Bosch TES50129RW VeroCafe Machine à café Expresso automatique Noir: инструкция
Раздел: Кухонная техника
Тип:
Инструкция к Bosch TES50129RW VeroCafe Machine à café Expresso automatique Noir

Register your new Bosch now:
www.bosch-home.com/welcome
TES 501..
en Instruction manual
fr Mode d’emploi
pl Instrukcja obsługi
nl Gebruiksaanwijzing
cs Návod k použití
ru Инструкция по эксплуатации
en English 2
fr Français 20
pl Polski 39
nl Nederlands 58
cs Čeština 76
ru Pycckий 94
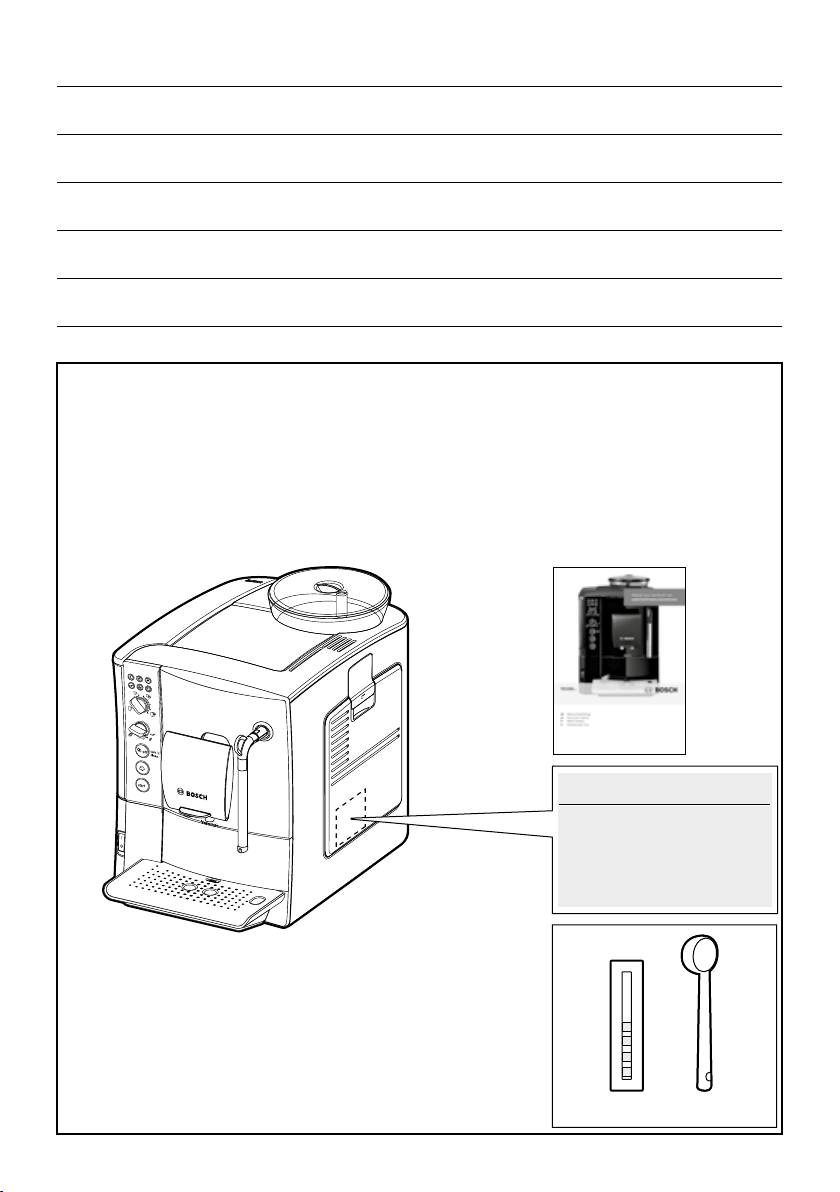
Included in delivery (see page 2)
Contenu de l’emballage (voir page 20)
Zakres dostawy (patrzstrona39)
Leveringsomvang (ziepagina58)
Součást dodávky (vizstrana76)
Объем поставки (voirpage94)
2
1
E-Nr. ……… FD… …
c d
A
4
1 2 3
17
16
15
14
5
13
12
6
11
10
9
8 7
B
18
1920
C D
8a 8b
6c
6a
6b
8e
6e
8c
8d
6d

B
18
1920
C D
8a 8b
6c
6a
6b
8e
6e
8c
8d
6d
E
2.
5e
5a
5b
5c
1.
5d
1.
2.

2
en
Contents
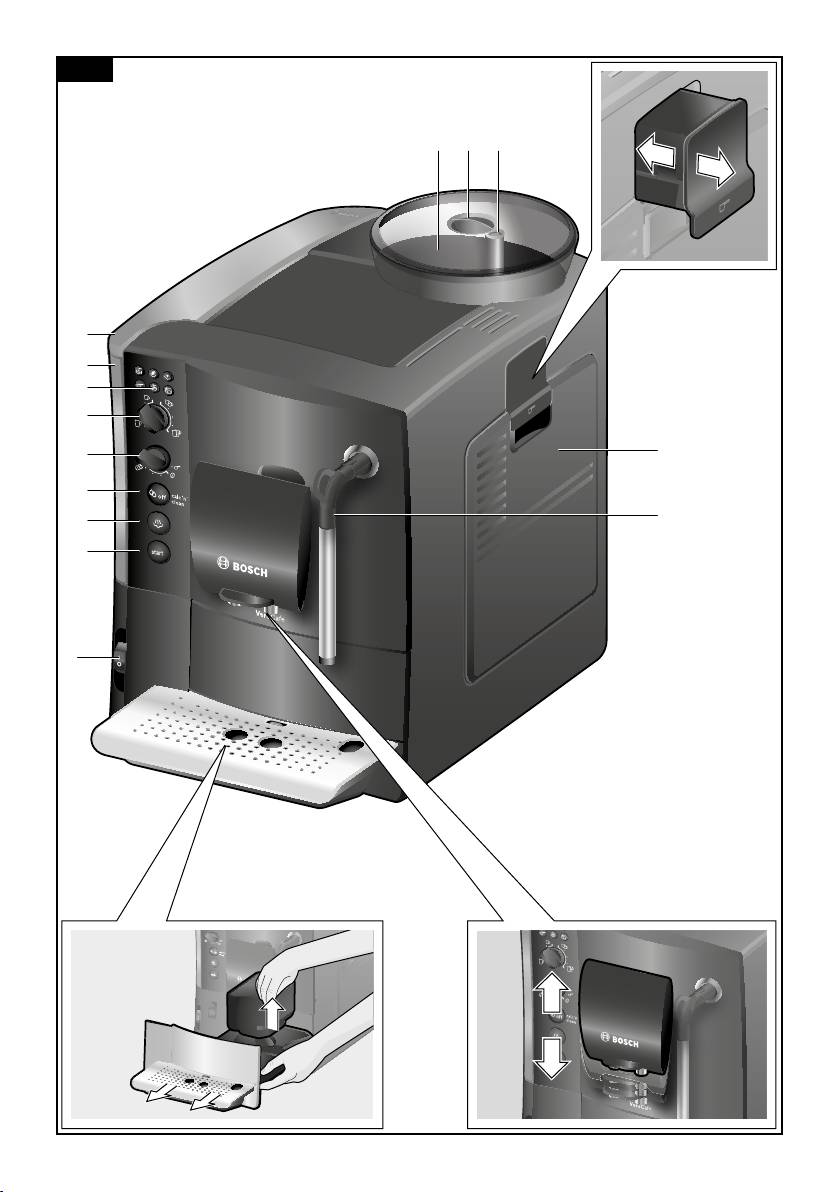
Overview
Includedindelivery ������������������������������������� 2
(see overview images A, B, C, D and E at
Overview�����������������������������������������������������2
thestartoftheoperatinginstructions)
Safetyinstructions ��������������������������������������3
Controls ������������������������������������������������������5
1 Beancontainer
Beforeusingforthersttime����������������������6
2 Aroma cover
Waterlter ��������������������������������������������������8
3 Selectorforgrindsetting
Settings�������������������������������������������������������9
4 Drawer(groundcoffee/cleaningtablet)
Preparationusingcoffeebeans ���������������� 11
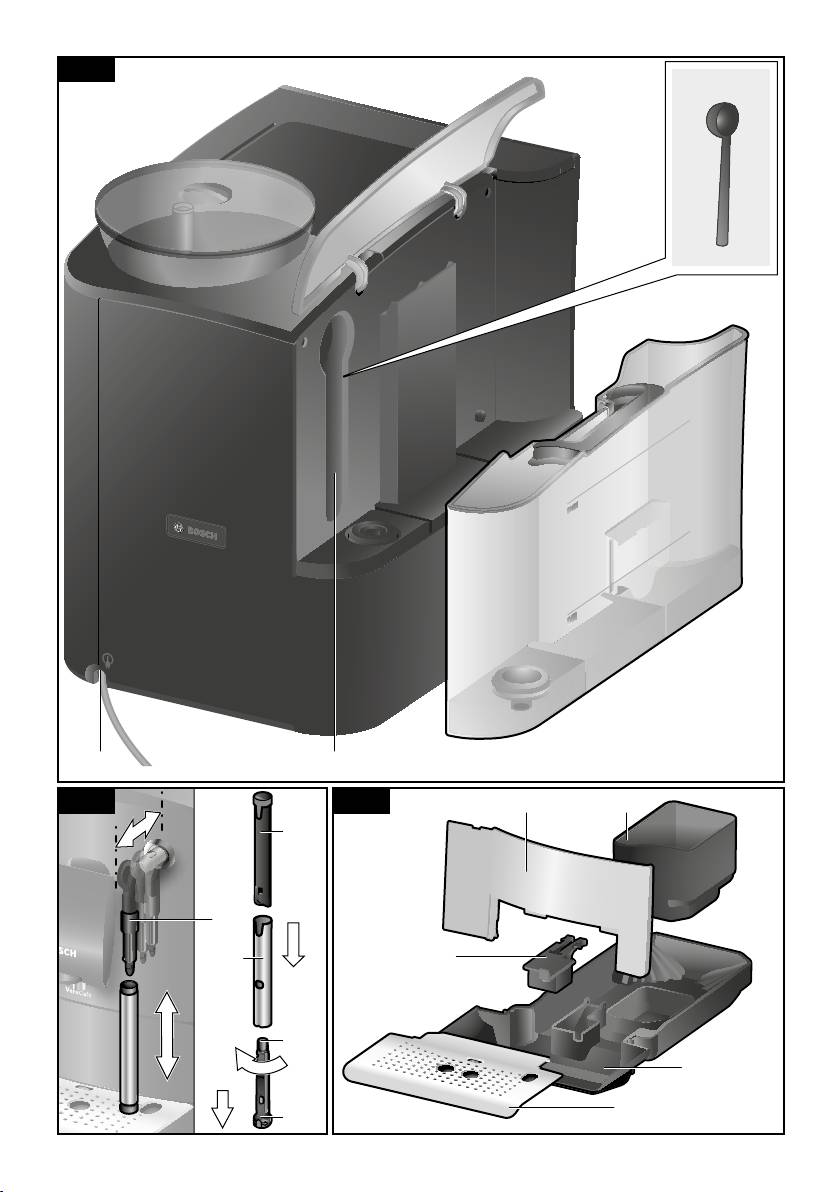
5 Brewingunit(Figure E)
Preparationusinggroundcoffee ������������� 11
a) Brewingunit
Dispensinghotwater �������������������������������� 11
b) Door
Preparingmilkfroth ����������������������������������12
c) Ejectleverforbrewingunit
Maintenanceanddailycleaning ���������������12
d) Lock
Tips on saving energy ������������������������������15
e) Cover
Service programme ����������������������������������15
6 Milkfrother(Figure C)removable
Frostprotection�����������������������������������������16
a) Steamvalve
Accessories ����������������������������������������������17
b) Metalsleeve
Disposal ��������������������������������������������������� 17
c) Frothingtube
Guarantee�������������������������������������������������17
d) Steamnozzle
Technicalspecications ����������������������������17
e) Air hole
Simpletroubleshooting �����������������������������18
7 Height-adjustablecoffeeoutlet
8 Driptray(Figure D)
a) Panel
b) Coffeegroundscontainer
c) Driptrayforcoffeeoutlet
DearCoffeeConnoisseur,
d) Grateforcoffeeoutlet
e) Float
Congratulationsonpurchasingthisfully
9 Poweron/offswitchO / I
automaticespressomachinefromBosch.
10 Startbutton
C
11 SteambuttonB
12 ServicebuttonA
13 “Coffeestrength”rotaryknob
Included in delivery
14 “Drinkselection”rotaryknob
(seeoverviewimageatthestartofthe
15 LED display
instructions)
16 Removablewatertank
17 Watertanklid
a TES501fullyautomatic
18 Measuringspoon
espresso machine
(insertionaidforwaterlter)
b Operatinginstructions
19 Storagecompartmentfor
c Waterhardnesstestingstrips
measuringspoon
d Measuringspoon
20 Powercablewithstoragecompartment
Robert Bosch Hausgeräte GmbH

en
3
Safety instructions
Please read and follow the operating instructions carefully and
keep them for later reference. Enclose these instructions when
you give this appliance to someone else. This appliance is
designed for the preparation of normal household quantities in
the home, or in household-like, non-commercial environments.
Household-like environments include staff kitchens in shops,
of ces, agricultural and other small businesses or for use by
guests at bed-and-breakfast establishments, small hotels and
similar residential facilities.
¡ Danger of electric shock!
Connectandoperatetheapplianceonlyaccordingtothetypeplate
specications.Toavoidpotentialhazards,repairssuchasreplacing
adamagedcablemustonlybecarriedoutbyourcustomerservice
personnel�
Thisappliancemaybeusedbychildrenaged8yearsandolderand
bypersonswithreducedphysical,sensoryormentalcapabilities
orwholackexperienceand/orknowledgeiftheyaresupervisedor
havebeengiveninstructioninthesafeuseoftheapplianceand
haveunderstoodthedangersinvolved.Keepchildrenunder8years
ofageawayfromtheapplianceandconnectingcableanddonot
allowthemtousetheappliance.Childrenshallnotplaywiththe
appliance� Cleaningandusermaintenanceshallnotbemadeby
childrenunlesstheyareolderthan8yearsandsupervised.
Neverimmersetheapplianceormainscableinwater.Useonlyif
powercordandapplianceshownosignsofdamage.Shouldafault
occur,pulltheplugordisconnectfromthemainsimmediately.
TES501.. | 02/2014

4
en
¡ Risk of suffocation!
Donotallowchildrentoplaywithpackagingmaterial.
¡ Risk of scalding!
Themilkfrotheroutlet(6a)getsveryhot.Afteruse,allowtocool
downrstbeforetouching.
Usethisapplianceonlyafterthemilkfrother(6)hasbeenfully
assembledandinstalled.
¡ Risk of injury!
Donotreachintothegrindingunit.
Robert Bosch Hausgeräte GmbH

en
5
LED display
Controls
ThevariousLEDslightupandashto
Power on/off switch O / I
indicatethefollowing:
Thepoweron/offswitchO / I(9)isusedto
switchtheapplianceonortoswitchitoff
Dlightsup Thewatertankisemptyand
completely(powersupplyoff).
needstoberelled.
Important: Toswitchoff,usetheservice
Dashes Thewaterlterisexhausted
button(12).
andneedstobereplaced.
Important: Whenyourst
Service button A
taketheapplianceintoopera-
Whentheservicebutton(12)ispressed
tionthisashinglightdoes
briey,theappliancerinsesandswitches
notsignify“Changelter”(see
off.Iftheservicebutton(12)ashes,the
“Settinguptheappliance”).
serviceprogrammeneedstoberun.Press
andholdtheservicebutton(12)tostart
theserviceprogramme.Theservicebutton
Elightsup Thebeancontainerisempty
(12)asheswhiletheserviceprogrammeis
andneedstoberelled.
runningandturnsoffwhentheprogramme
has ended�
Flightsup Thesteamvalveneedstobe
opened or closed�
Steam button B
Pressthesteambutton(11)togenerate
Fashes Dependingonthesetting,
steamforfrothingmilk.
steamorhotwateriscoming
outofthemilkfrother.
Start button C
Pressthestartbutton(10)tostartpreparing
Glightsup When Gisselectedusing
adrink.Pressagainduringdrinkprepara-
the“coffeestrength”rotary
tiontostopthedispensingprocessearly.
knob,thesymbollightsup
whilegroundcoffeeisbeing
dispensed�
Hlightsup Thedriptrayismissingorhas
notbeeninsertedcorrectly.
Insertthedripdray.
Hashes Thetraysarefull.Emptythe
traysandreinsertthem.
Ilightsup Thebrewingunitdoorisopen.
Closethedoor.
Iashes Removeandcleanthe
brewingunit.
TES501.. | 02/2014
6
en
“Coffee strength” rotary knob
Before using for
the rst time
Thisrotaryknob(13)isused
toadjustthecoffeestrength
General
orselectthesettingfor
Filltheappropriatecontainerusingonly
pre-groundcoffee.
pure,cold,uncarbonatedwaterandonly
roastedbeans(preferablyespressoorcof-
h
Very mild
feebeanblendsforfullyautomaticcoffee
Mild
machines)� Donotusecoffeebeansthat
to
Medium
havebeenglazed,caramelisedortreated
g
Strong
withotheradditivescontainingsugar,since
G
Groundcoffee
theywillblockthebrewingunit.
Thewaterhardnesssettingcanbeadjusted
onthisappliance.Thefactorysettingforthe
“Drink selection” rotary knob
waterhardnessis4.Checkthehardness
ofthewateryouusewiththeenclosed
Thisrotaryknob(14)is
teststrip.Ifthetestrevealsavalueother
usedtoselecttherequired
than4,changethesettingontheappli-
beverageandquantity.Itis
anceaccordinglyafterswitchingon(see
alsousedtochangeuser
“Settings”–“Waterhardness”).
settings.
Setting up the appliance
a
Small espresso
1� Removetheprotectivelm.
Espresso
2� Placethefullyautomaticespresso
to
Smallcafécrème
machineonaat,water-resistant
Cafécrème
surfacethatcantakeitsweight.The
c
Largecafécrème
ventilationslotsontheappliancemust
notbecovered.
2 small espresso
b
2 espresso
Important:Onlyusetheappliancein
2smallcafécrèmes
frost-freerooms.Iftheappliancehasbeen
to
2cafécrèmes
transportedorstoredattemperaturesbelow
2largecafécrèmes
0°C,waitatleast3hoursbeforeoperation.
d
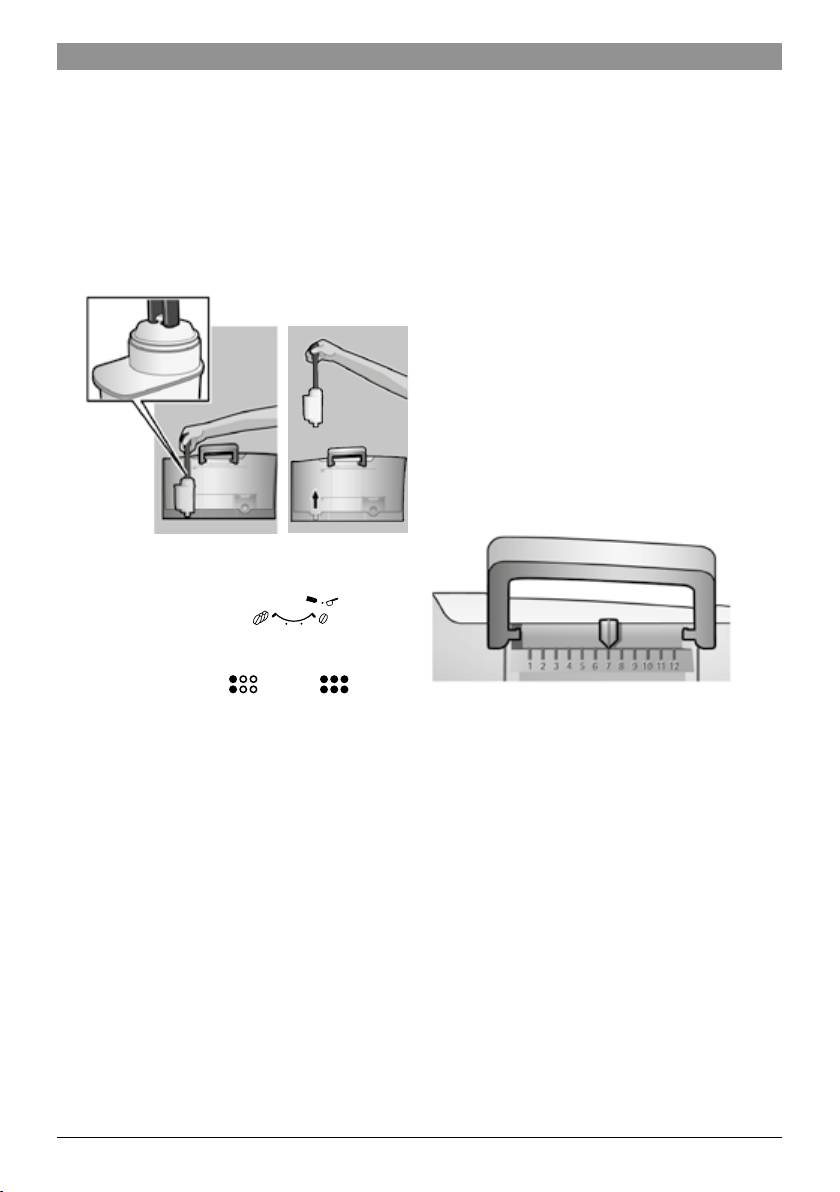
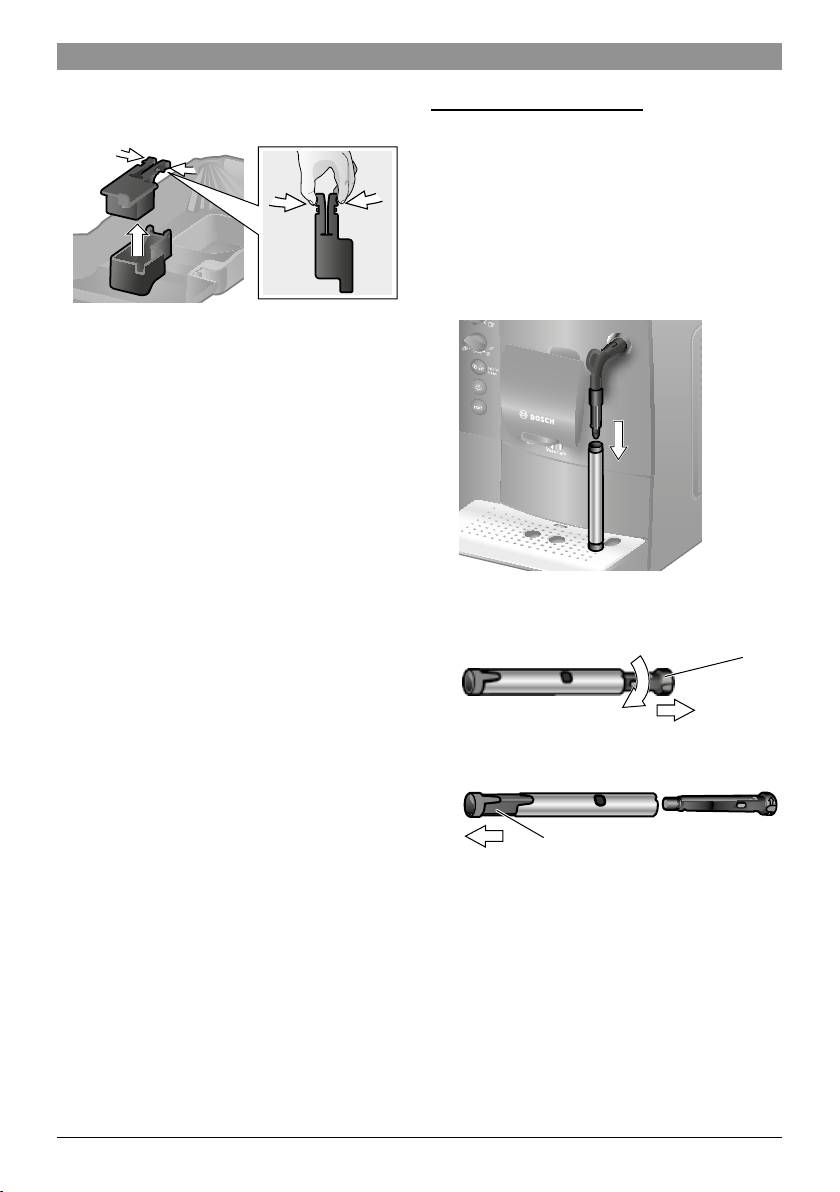
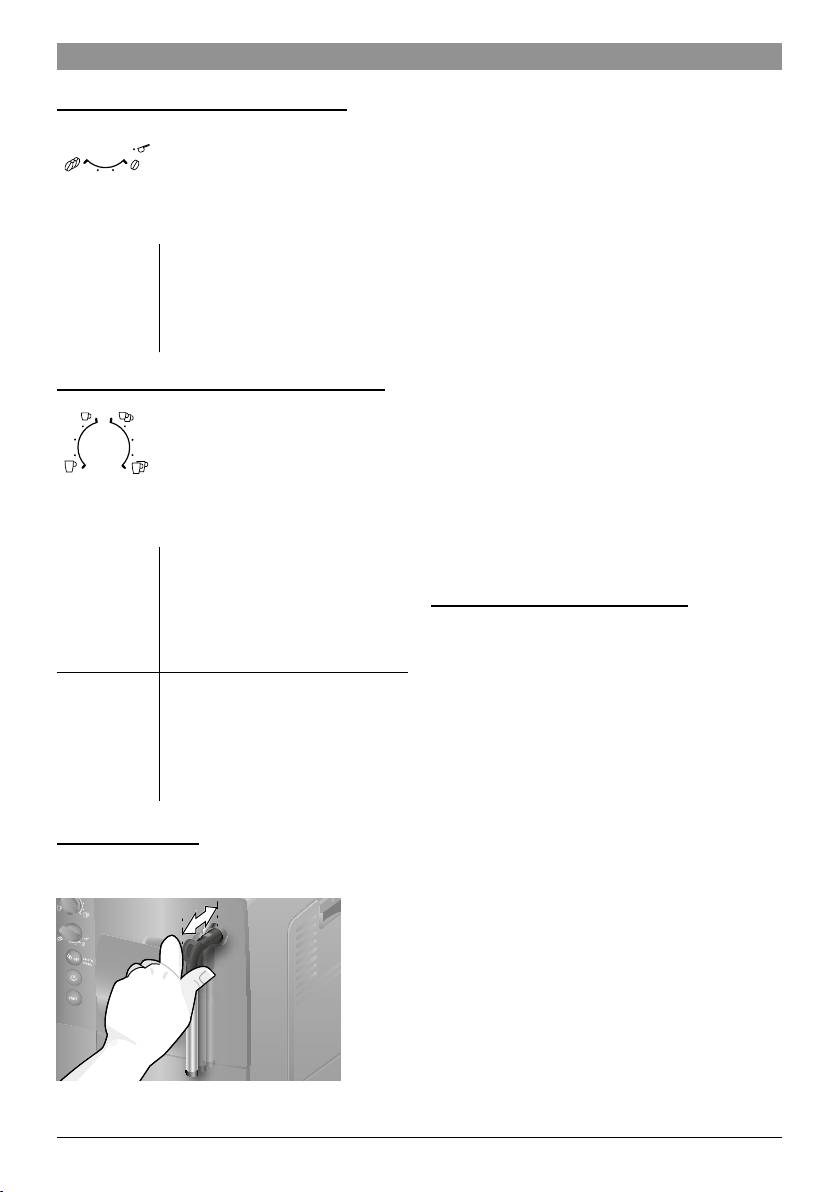
3� Pulloutthemainsplugfromthecable
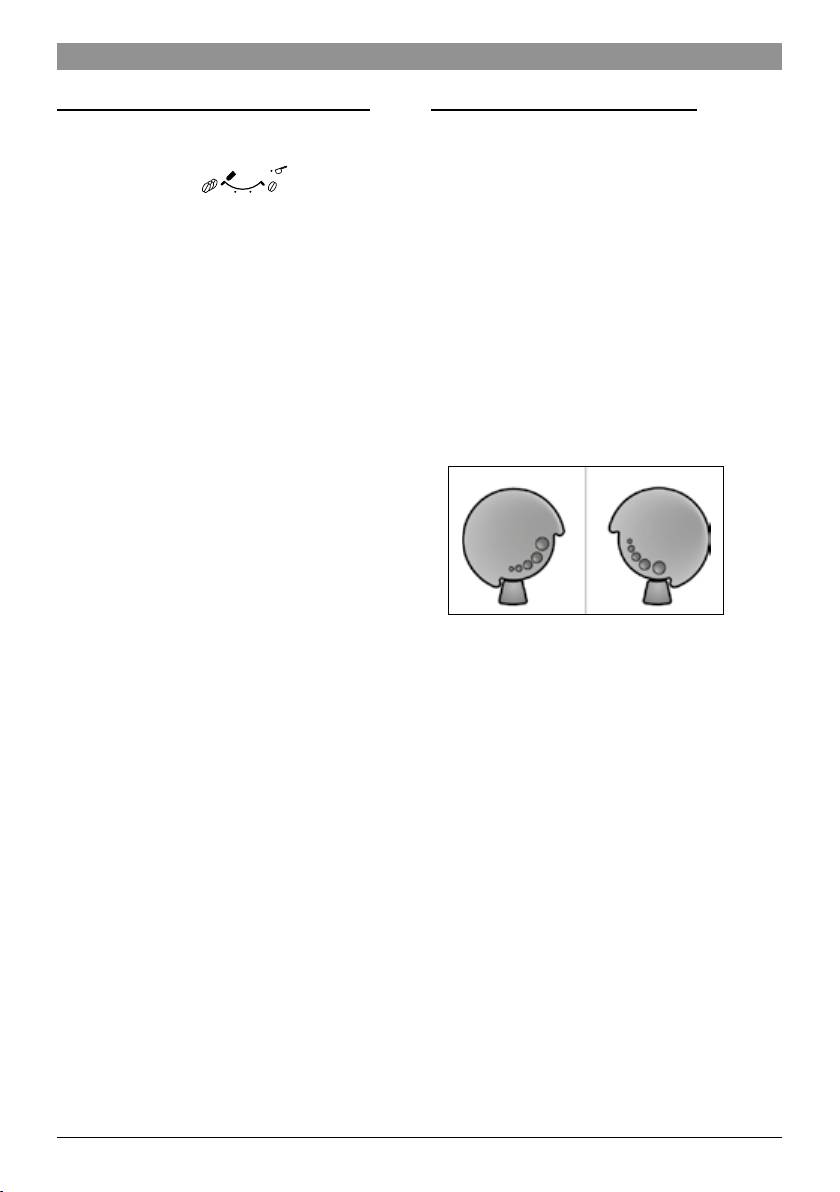
Milk frother
compartment(20)andplugitin.Adjust
Pullthemilkfrother(6)outtoopenitand
thelengthofthecablebypushingit
pushitbackintocloseit.
backinandpullingitout.Todothis,
placetheappliancewithitsbackush
withtheedgeoftheworksurfaceand
eitherpullthecabledownwards or
pushitupwards�
Robert Bosch Hausgeräte GmbH

en
7
4. Assemblethemilkfrother.Onlyusethe
Switching off the appliance
appliancewhenthemilkfrother(6)is
Thefactorysettingsofthefullyautomatic
completelyassembledandtted.
espressomachineareprogrammedfor
optimalperformance.Theappliance
switchesoffautomaticallyafteraspecic
time(thelengthoftimecanbeadjusted,
see“Settings”–“Automaticswitch-off”).
Exception:Theapplianceswitchesoff
withoutrinsingifonlyhotwaterorsteam
was dispensed�
Toswitchtheapplianceoffmanuallybefore
this,presstheservicebutton(12).
5� Liftthewatertanklid(17).
Theappliancerinsesandswitchesoff.
6. Removeandrinsethewatertank(16)
andllitwithfreshcoldwater.Donotll
Note:Iftheapplianceisbeingusedforthe
abovethemax mark�
rsttime,theserviceprogrammehasbeen
7. Replacethewatertank(16)andpushit
run,ortheappliancehasnotbeenoperated
rmlydownwardsintoplace.
foralongperiod,therstbeveragewill
8� Closethewatertanklid(17).
nothavethefullaromaandshouldnotbe
9� Fillthebeancontainer(1)with
consumed.
coffeebeans(forpreparationusing
Whenthefullyautomaticespressomachine
groundcoffeesee“Preparationusing
isrstused,youwillachieveasuitablythick
groundcoffee”).
andstable“crema”onlyaftertherstfew
10� Pressthepoweron/offswitchO / I (9)to
cupshavebeendispensed.
switchontheappliance.LED
Dashes
and LED Flightsup.
Iftheapplianceisinuseforalongperiod
11� Placeacontainerunderthemilkfrother
oftime,waterdropletswillformonthe
outlet(6).
ventilationslits.Thisisnormal.
12� Carefullypulloutthemilkfrother(6)
toopenit.Theappliancerinsesout
themilkfrother(6)withwater.LEDF
ashes.
13� When LED Flightsupconstantly,
pressinthemilkfrother(6)tocloseit.
Theapplianceheatsupandrinses.Some
waterwillrunoutofthecoffeeoutlet.When
buttonsA(12),B (11) and C(10)light
up,theapplianceisreadyforuse.
TES501.. | 02/2014
8
en
Information:Rinsingtheltersimultane-
Water lter
ouslyactivatesthesettingforthechange
Usingawaterltercanpreventabuild-up
lterdisplay(=LED
Dashes).
oflimescaledeposits.
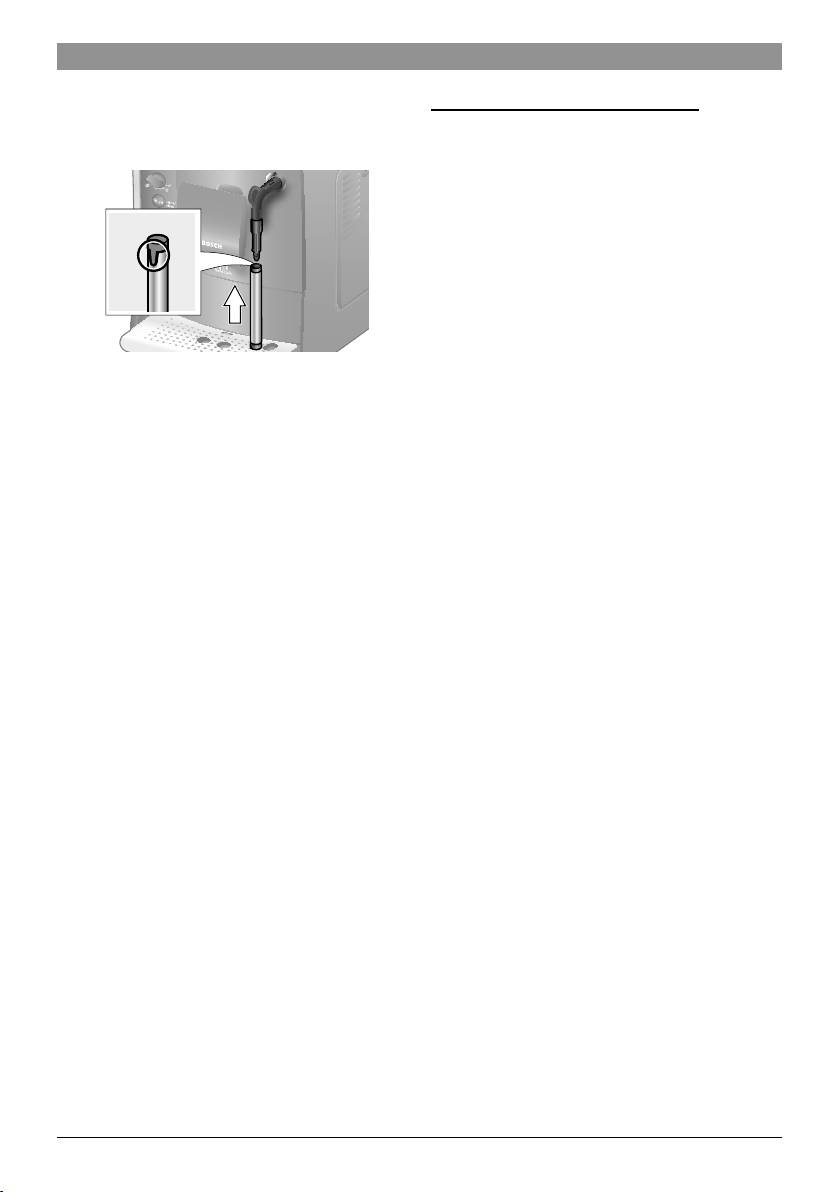
Anewwaterltermustberinsedbeforeit
Thelterisnolongereffectivewhenthe
canbeused.Todothis,proceedasfollows:
changelterdisplayappears,oratthe
1� Pressthewaterlterrmlyintotheempty
latestaftertwomonths.Itneedstobe
watertankwiththeaidofthemeasuring
replacedforreasonsofhygieneandso
spoon (18)�
thatthereisnobuild-upoflimescale(this
coulddamagetheappliance).Replacement
lterscanbeobtainedfromretailersorfrom
customerservice(see“Accessories”).Ifno
newlterisinserted,changethesettingfor
thelter(see“Waterhardness”).
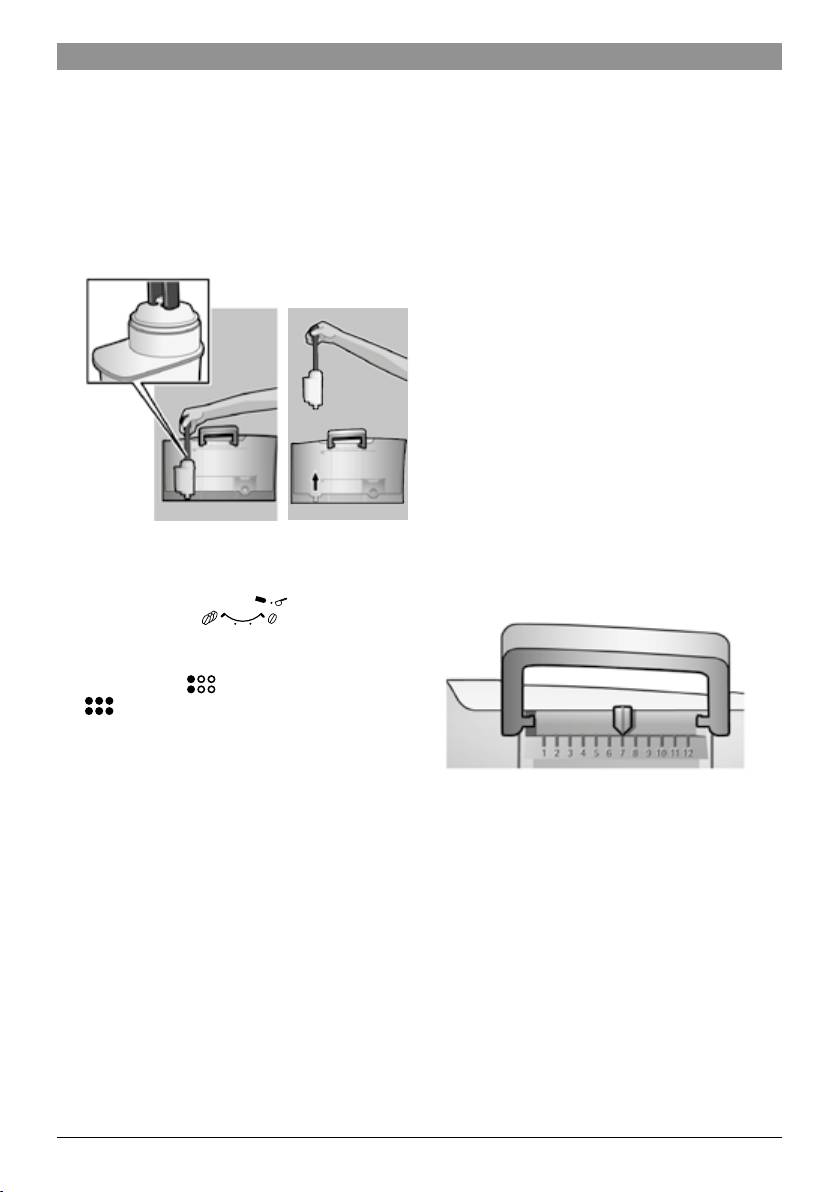
Information:Youcanusethelterindicator
tomarkthemonthinwhichyouinsertedthe
lter.Youcanalsomarkthemonthinwhich
youwillneedtoreplacethelternext
(atthelatestaftertwomonths).
2� Fillthewatertank(16)withwaterupto
themax mark�
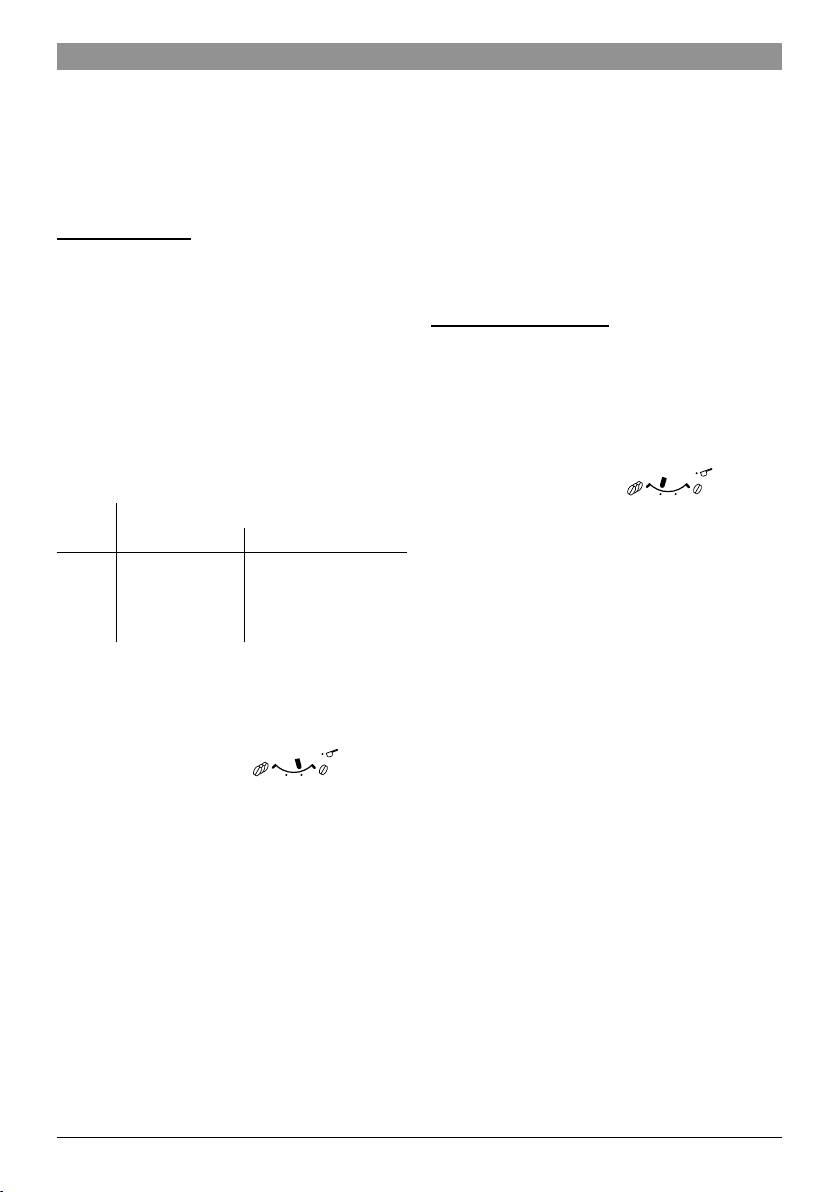
3� Turntherotary
knob(13)toposition
4. PressandholdbuttonsB (11) and
A(12)simultaneouslyforatleast
5seconds.Either “off”or “on”
lightsup.
Information:Iftheappliancehasnotbeen
5� Pressthestartbutton(10)toselect“on”.
usedforaprolongedperiod(forexample,
6. Pressandholdthestartbutton(10)for
whenyouareonvacation),theexistinglter
atleast5secondstoconrm.Allofthe
shouldberinsedbeforetheapplianceis
LEDslightupbriey.
usedagain.Todoso,dispenseacupofhot
7. LED DashesandLEDFlightsup.
waterandpouritaway.
8� Placeacontainerwithacapacityof0.5l
underthemilkfrotheroutlet(6).
9� Pulloutthemilkfrother(6)toopenit.
LED Fashes.
10� Waterwillnowowthroughthelterand
rinseit.
11� When LED Flightsupconstantly,
pressinthemilkfrother(6)tocloseit.
12� Emptythecontainer.
Theapplianceisreadytouseagain.
Robert Bosch Hausgeräte GmbH
en
9
Important:Ifawaterlterisused(see
Settings
“Accessories”),proceedasfollows,see
Youcancustomizethesettingsonthe
“Waterlter”.
appliance�
Youcanmakethefollowingadjustments:
Note:Ifnobuttonispressedwithin
90seconds,theapplianceswitchesto
Water hardness
stand-bymodewithoutsavingthenew
Thewaterhardnesssettingcanbeadjusted
settings.Inthiscase,thepreviouslysaved
onthisappliance.Itisimportanttosetthe
waterhardnesssettingisretained.
waterhardnesscorrectlysothattheappli-
ancecanaccuratelyindicatewhenitistime
Automatic switch-off
torunthedescaleprocess.Thefactory
Hereyoucansettheperiodoftimeafter
settingforthewaterhardnessis4.Youcan
whichtheapplianceshouldswitchoffauto-
establishthewaterhardnesseitherbyusing
maticallyfollowingthelastdrinkpreparation.
theteststripprovidedorbyaskingyour
Atimebetween15minutesand4hourscan
localwaterprovider.
beset.Tosavepoweryoucanspecifya
Diptheteststripinthewaterbriey,shakeit
shorterperiod.
gentlyandchecktheresultafteroneminute.
1� Turntherotary
knob(13)toposition
2� Pressandholdbuttons
B (11) and A
Level Waterhardness
(12)simultaneouslyforatleast5seconds.
German (°dH) French(°fH)
Thetimeafterwhichtheappliance
1
1-7
1-13
shouldswitchoffisindicatedbythe
2
8-14
14-25
numberofLEDsthatnowlightup.
3
15-21
26-38
3� Nowpressthestartbutton(10)repeat-
4
22-30
39-54
edlyuntiltherequirednumberofLEDs
lightuptoindicatetheswitch-offtime:
Ifyouwishtochangethedefaultdegree
D=15minutes
ofwaterhardness,orifyouhaveinserted
D and E=30minutes
awaterlter,proceedasfollows:
D,E and F=45minutes
1� Turntherotary
D,E,F and G=1hour
knob(13)toposition
D,E,F,G and H=2hours
2� PressandholdbuttonsB (11) and
D,E,F,G,H and I=4hours
A(12)simultaneouslyforatleast
4. Pressandholdthestartbutton(10)for
5seconds.Thesetwaterhardnessis
atleast5seconds.Thesetnumberof
indicatedbythenumberofLEDsthat
LEDswilllightuptoindicatethatthe
nowlightup.
selectedswitch-offtimehasbeensaved
3� Nowpressthestartbutton(10)repeat-
successfully.
edlyuntiltherequiredwaterhardness
isindicated,e.g.,forwaterhardness3,
Note:Ifnobuttonispressedwithin
LEDs D,E and Fwilllightup.
90seconds,theapplianceswitchesto
4. Pressandholdthestartbutton(10)
stand-bymodewithoutsavingthenew
foratleast5seconds.Thesetnumber
settings.Inthiscase,thepreviouslysaved
ofLEDswilllightuptoindicatethat
switch-offtimeisretained.
theselectedwaterhardnesshasbeen
savedsuccessfully.
TES501.. | 02/2014
10
en
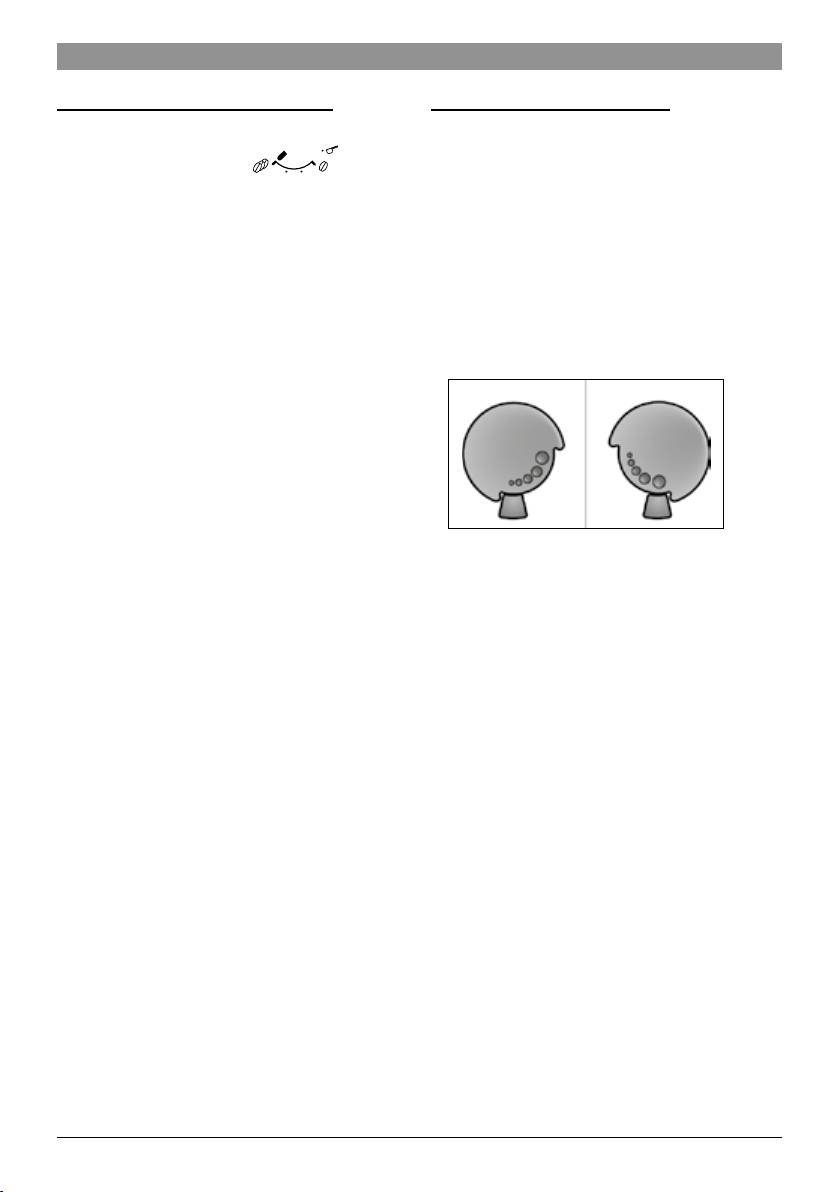
Setting the brewing temperature
Adjusting the grind settings
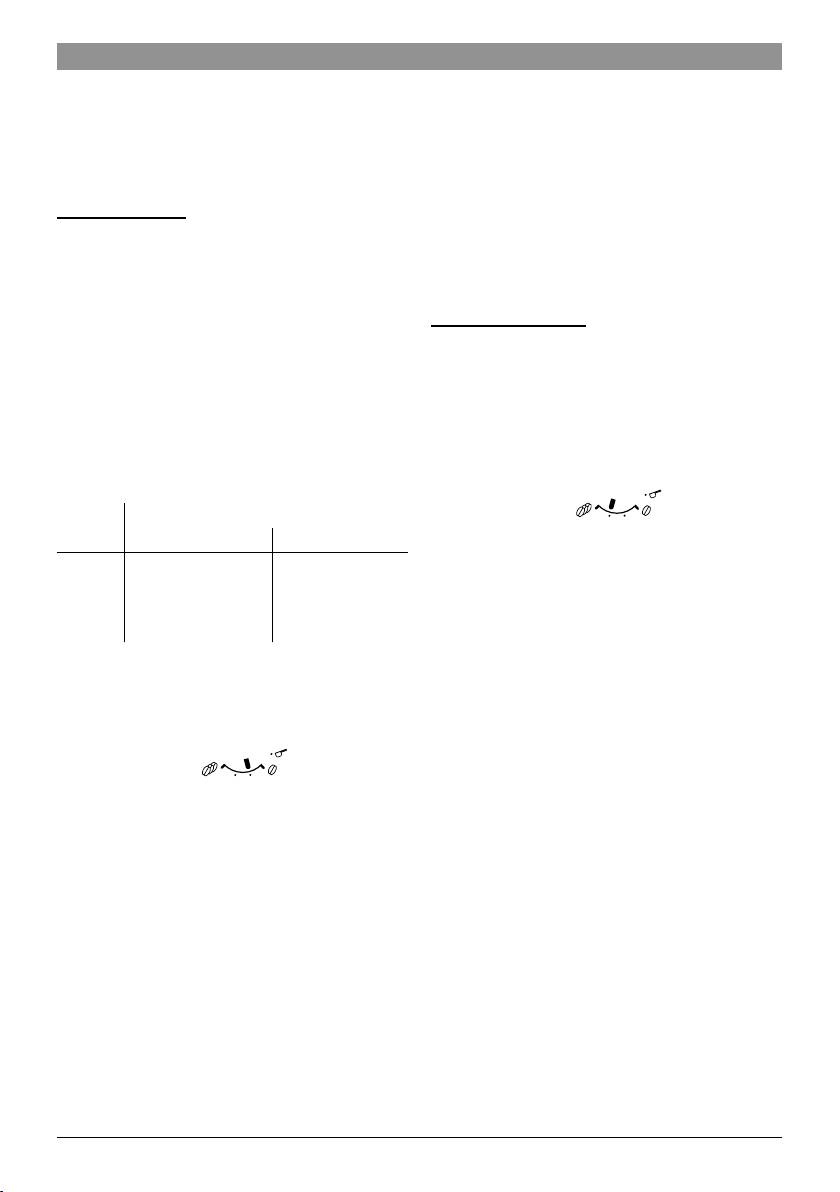
Thebrewingtemperaturecanalsobeset.
Theselector(3)forgrindsettingadjuststhe
1� Turntherotary
grindsettingsfromcoarsetone.
knob(13)toposition
2� Pressandholdbuttons
B (11) and
¡
Warning!
A(12)foratleast5seconds.Theset
Adjustthegrindingunitonlywhileitis
brewingtemperatureisindicatedbythe
running!Otherwisetheappliancemaybe
numberofLEDsthatnowlightup.
damaged.Donotreachintothegrinding
3� Nowpressthestartbutton(10)repeat-
unit.
edlyuntiltherequirednumberofLEDs
lightuptoindicatethetemperature:
● Withthegrindingunitrunning,adjustthe
LED D=low
selector(3)fromne(a:turnanticlock-
LED D and E=medium
wise)tocoarse(b:turnclockwise).
LED
D,E and F=high
a b
4. Pressandholdthestartbutton(10)for
atleast5seconds.Thesetnumberof
LEDswilllightuptoindicatethatthe
selectedtemperaturehasbeensaved
successfully.
Note:Ifnobuttonispressedwithin
90seconds,theapplianceswitchesto
Information: Theeffectsofthenewgrind
stand-bymodewithoutsavingthenew
settingwillnotbecomeapparentuntilafter
settings.Inthiscase,thepreviouslysaved
thesecondcupofcoffee.
brewingtemperaturesettingisretained.
Tip: Chooseanergrindfordarkroasted
beansandacoarsergrindforlighterbeans.
Robert Bosch Hausgeräte GmbH

en
11
Preparation using
Preparation using
coffee beans
ground coffee
Thisfullyautomaticespressomachine
Thisfullyautomaticespressomachinecan
grindsbeansfreshlyforeachbrew.
alsobeoperatedusinggroundcoffee(not
instantcoffeepowder).
Tip:Ifpossible,useonlybeansforfully
automaticcoffeeandespressomachines.
Important:Fillthewatertank(16)with
Foroptimalquality,deep-freezethebeans
freshwatereveryday.Thewatertank(16)
orstoreinacoolplaceinsealedcontainers.
shouldalwayscontainsufcientwaterfor
Coffeebeanscanbegroundwhilefrozen.
operatingtheappliance.
Important:Fillthewatertank(16)with
Preparation
freshwatereveryday.Thewatertank(16)
1� Openthedrawer(4).
shouldalwayscontainsufcientwaterfor
2� Putgroundcoffeeintothedrawer
operatingtheappliance.
(maximumtwolevelmeasuringspoons).
Caution:Donotusewholebeansor
Differentcoffeedrinkscanbeprepared
instantcoffee.
quitesimplyatthepressofabutton.
3� Closethedrawer(4).
4. Turnthebottomrotaryknob(13)tothe
Preparation
symbolG�
Theappliancemustbereadyforuse.
5� Pressthestartbutton(10).
1� Placethepre-warmedcup(s)underthe
Coffeeisbrewedandthenpouredinto
coffeeoutlet(7).
thecup.
Tip: Forasmallespresso,always
preheatthecup,e.g.usinghotwater.
2� Selecttherequiredcoffeeandthe
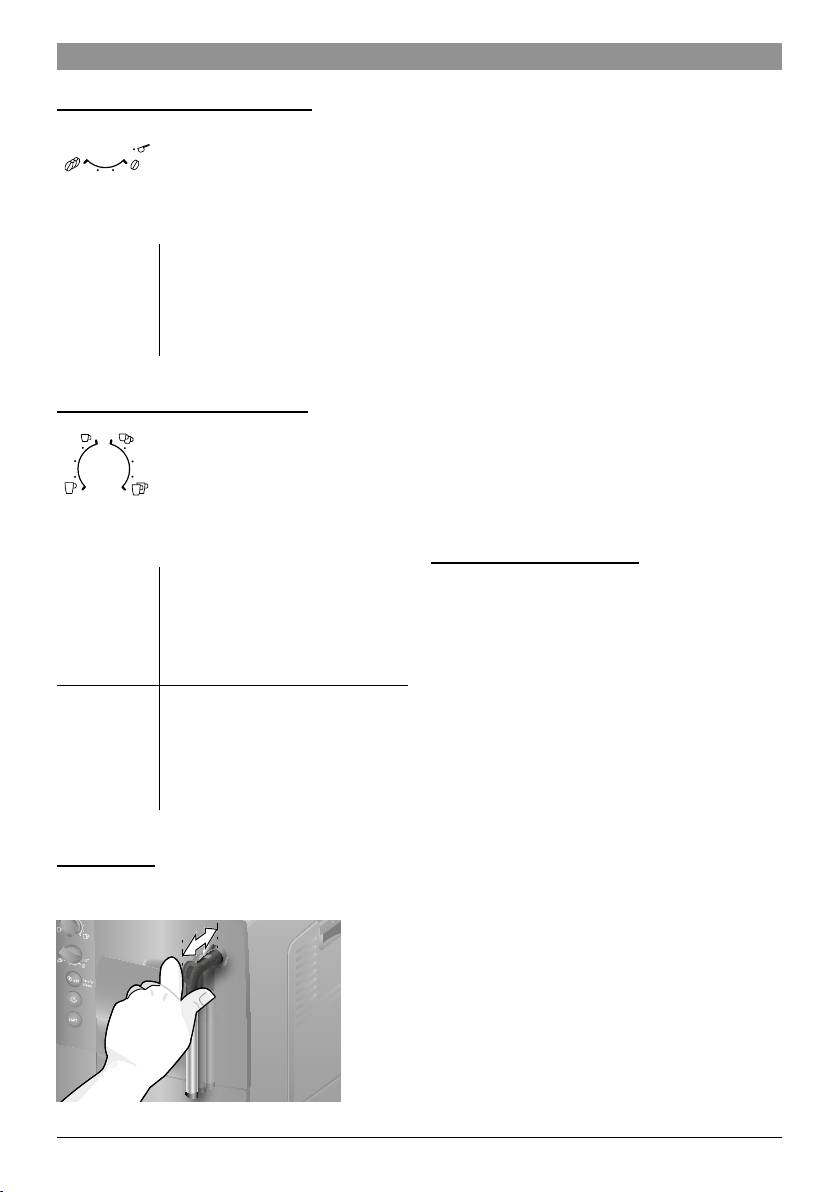
Dispensing hot water
requiredquantitybyturningtheupper
rotaryknob(14).
¡
Risk of burns!
3� Selecttherequiredcoffeestrengthby
Themilkfrother(6)getsveryhot.Holdthe
turningthelowerrotaryknob(13).
milkfrother(6)bytheplasticpartonly.
4. Pressthestartbutton(10).
Coffeeisbrewedandthenpouredintothe
Themilkfrothermustbecleanedbefore
cup(s).
drawinghotwater.
Theappliancemustbereadyforuse.
Pressthestartbutton (10)againtostopthe
1� Placeapre-heatedcuporglassunder
brewingprocessearly.
themilkfrotheroutlet(6).
2� Pulloutthemilkfrother(6)toopenit.
Theapplianceheatsup.Hotwaterruns
outofthemilkfrotheroutlet(6)forabout
40seconds.
3� Stoptheprocessbypushinginthemilk
frother(6).
TES501.. | 02/2014
12
en
Preparing milk froth
Maintenance and
daily cleaning
¡
Risk of burns!
Themilkfrother(6)getsveryhot.Holdthe
¡
Risk of electric shock
milkfrother(6)bytheplasticpartonly.
Unplugtheappliancebeforecleaningit.
Neverimmersetheapplianceinwater.
Tip:Youcanfroththemilkrstandthen
Donotuseasteamcleaner.
dispensecoffee,orfroththemilkseparately
andpouritontothecoffee.
● Wipethehousingwithasoft,dampcloth.
● Donotuseabrasiveclothsorcleaning
Theappliancemustbereadyforuse.
agents.
1� Pressbutton
B (11)�
ButtonBashesandtheappli-
ancenowheatsupforapproximately
20 seconds�
2� AssoonasbuttonandLEDFlights
up,immersethemilkfrothersothatit
reachesthebottomofacuporglass
● Alwaysremoveanytracesoflimescale,
thatisone-thirdlledwithmilk.
coffee,milkanddescalerimmediately.
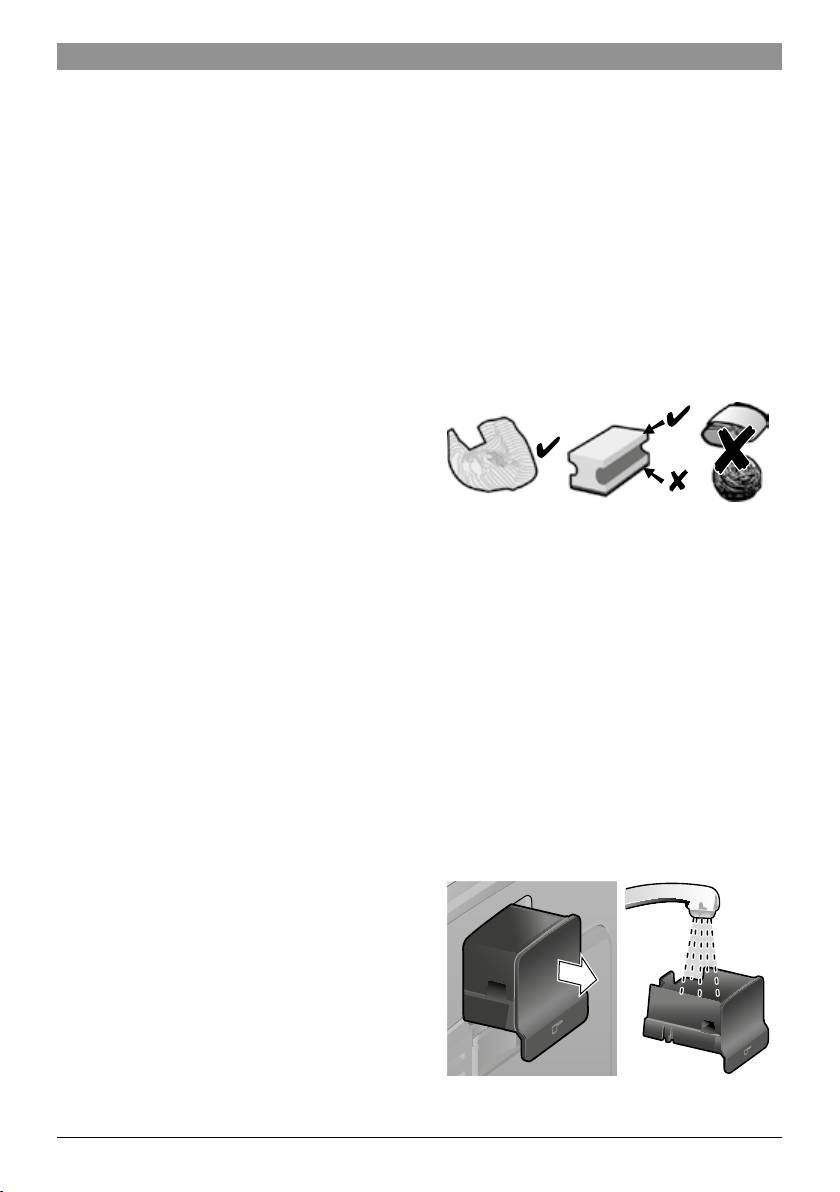
3� Pulloutthemilkfrother(6)toopenit.
Suchresiduecancausecorrosion.
● Newspongeclothsmaycontainsalts.
¡
Risk of burns!
Saltscancauserustlmonstainless
Escapingsteamisveryhotandmaycause
steelandmustthereforebewashedout
liquidstosputter.Donottouchthemetal
thoroughlybeforeuse.
sleeveoraimitatanyone.
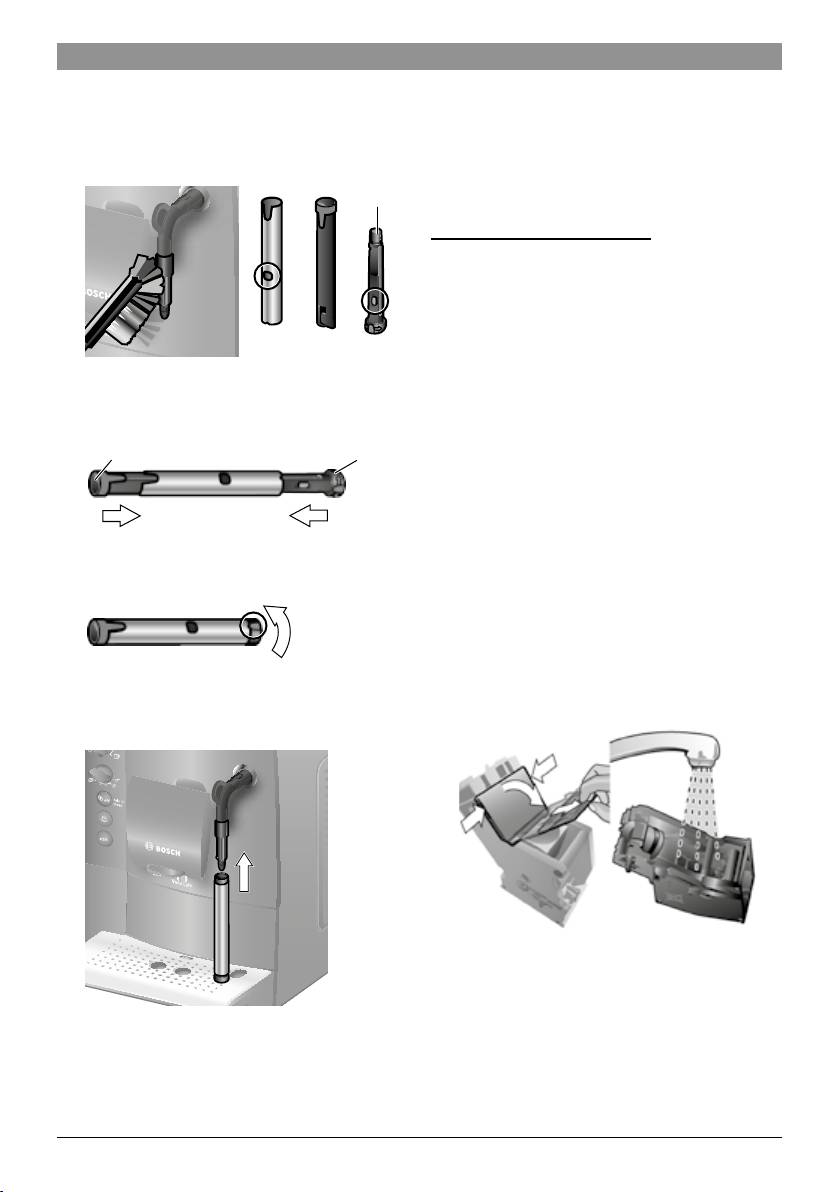
● Pullthedriptray(8c)withthecoffee
groundscontainer(8b)forwardsandout.
4. Froththemilk.
Removethepanel(8a)andgrate(8d).
5� Pushthemilkfrother(6)intocloseit.
Emptyandcleanthedriptrayandcoffee
groundscontainer.
Tip:Foroptimalmilkfroth,ifpossibleuse
● Removethedrawer(4)andclean.
coldmilkwithafatcontentofatleast1.5%.
Important:Driedmilkresidueisdifcult
toremove,sothemilkfrother(6)must be
cleanedwithlukewarmwaterimmediately
afteruse.
Robert Bosch Hausgeräte GmbH
en
13
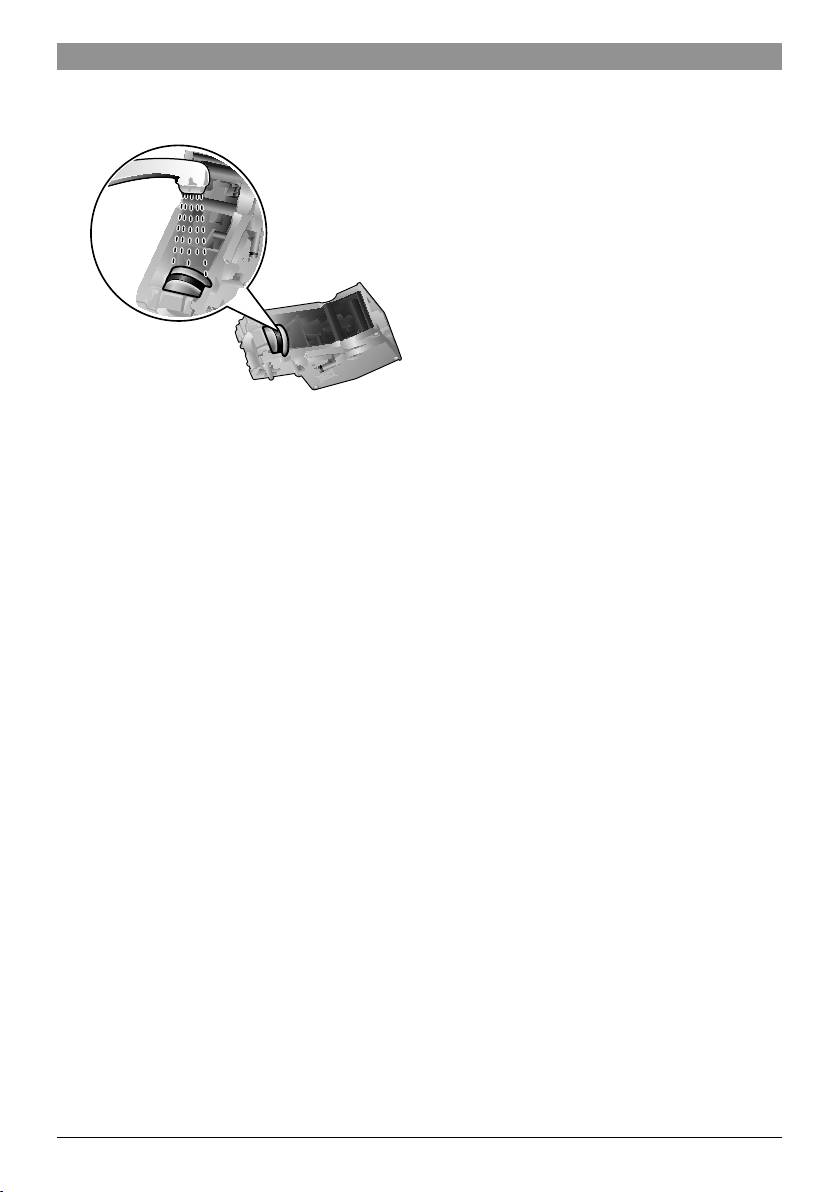
● Removeoat(8e)andcleanwitha
Cleaning the milk frother
dampcloth.
Themilkfrother(6)mustbecleanedafter
eachuseinordertoremoveresidues.
Important:Letthemilkfrothercooldown
beforeyouremoveit.
Dismantlethemilkfrotherforcleaning:
1� Toremove,takeholdofthemetalsleeve
andpullitdownwardsandoff.
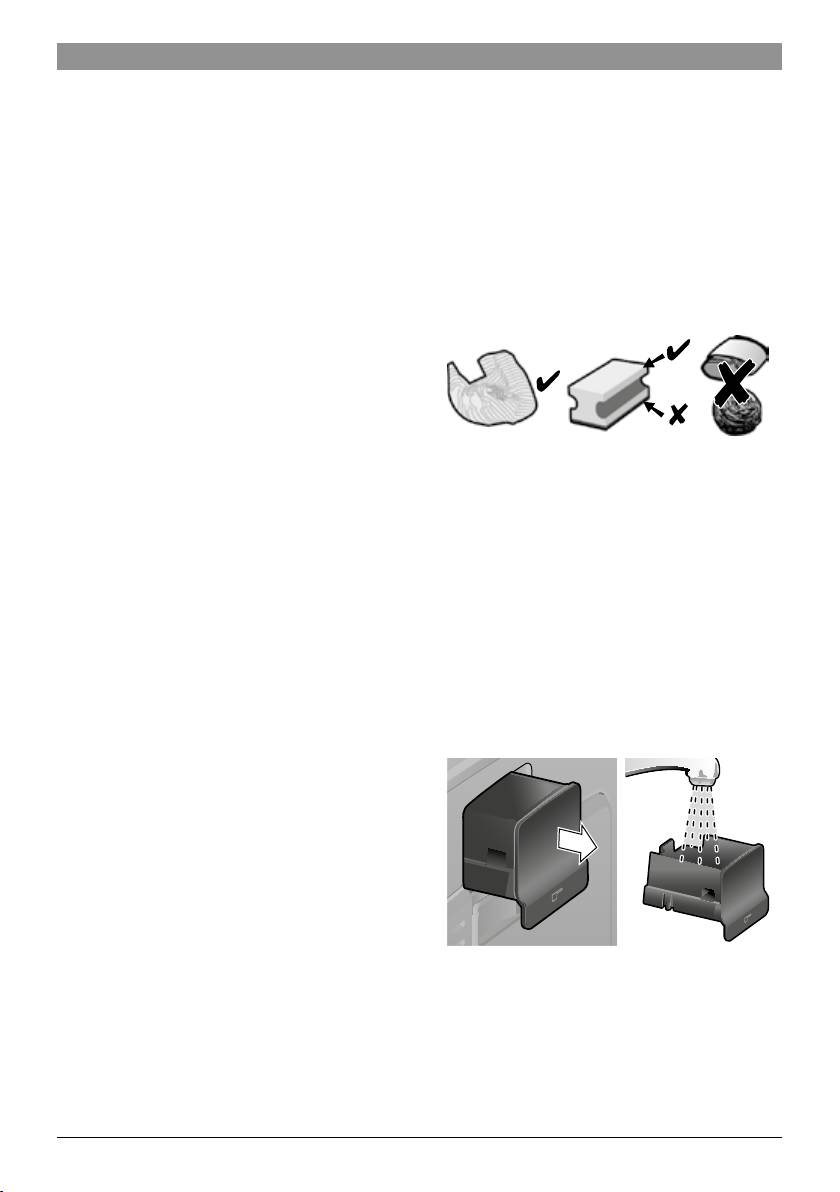
Do not put the following items in the
K
dishwasher: panel (8a),oat(8e),
drawer(4), brewingunit (5a)�
Thefollowingitemsaredishwasher-
J
safe:driptray(8c),coffeegrounds
container(8b),grate(8d),aromacover
(2)andmeasuringspoon(18).
● Wipeouttheinsideoftheappliance(tray
holders and drawer)�
Important:Thedriptray(8c)andcoffee
groundscontainer(8b)shouldbeemp-
tiedandcleaneddailytopreventmould
2� Twistthesteamnozzle(6d)anticlock-
developing�
wiseandremoveit.
Note:Iftheapplianceiscoldwhenswitched
onwiththepoweron/offswitchO / I(9)orif
itswitchesoffautomaticallyaftercoffeehas
beendispensed,theapplianceperformsan
automaticrinse.
Important:Iftheapplianceisnotusedfor
aprolongedperiod(forexample,whenyou
areonvacation),cleantheentireappliance
thoroughly,includingthemilksystemand
brewingunit.
TES501.. | 02/2014
1
6d
2
3� Removethefrothingtube(6c).
6c
14
en
4. Cleantheindividualpartswithadeter-
gentsolutionandasoftbrush.Ifneces-
sary,soakinawarmdetergentsolution.
Cleantheairhole(6e)thoroughly.
6e
5� Rinseallpartswithcleanwateranddry.
6. Fitthesteamnozzle(6d)andfrothing
tube
(6c)backintothemetalsleeve.
Robert Bosch Hausgeräte GmbH
1 2
¡
Risk of scalding!
Onlyusetheappliancewhenthemilk
frother(6)iscompletelyassembledand
tted.
Cleaning the brewing unit
Cleanthebrewingunitregularly.
Topre-cleanthebrewingunitautomatically:
Presstheservicebutton(12)briey.The
appliancewillrinseifcoffeewasdispensed
previously.Itthenswitchesoff.
Inadditiontotheautomaticcleaningpro-
gramme,thebrewingunit(5a)shouldbe
removedregularlyforcleaning(Figure E
atthebeginningoftheinstructions).
6d6c
1� Pressthepoweron/offswitchO / I(9)to
switchofftheappliance.Alllightsgooff.
2� Openthedoor(5b)tothebrewingunit.
3� Slidetheredlock(5d)onthebrewing
7. Twistthesteamnozzleclockwiseuntil
unit(5a)completelytotheleft.
themarksarealigned.
4. Presstheejectlever(5c)downfully.The
brewingunitisreleased.
5� Graspthebrewingunit(5a)bythe
recessedgripsandremovecarefully.
6. Removethecover(5e)ofthebrewing
8� Attachthemilkfrothertothesteam
unitandrinsethebrewingunit(5a)
valve.Checkthattheredmarkonthe
thoroughlyunderrunningwater.
steamvalveiscovered.
en
15
7. Thoroughlycleanthebrewingunitsieve
Service programme
undertherunningwater.
Duration:approx.35minutes
Dependingonuse,theservicebutton(12)
ashesatcertainintervals.
Theapplianceshouldbecleanedand
descaledimmediatelyusingtheservice
programme.Iftheserviceprogrammeis
notrunasinstructed,theappliancemay
bedamaged.
¡
Warning!
Followtheinstructionsforusingthe
descalingandcleaningagentsforeach
Important:Donotcleanwithdetergentor
serviceprogramme.Pleaseobservethe
othercleaningagentsanddonotputitin
safetyinstructionsonthepackagingof
thedishwasher.
thecleaningagent.
Neverinterrupttheserviceprogramme.
8� Wipeouttheinsideoftheappliance
Donotdrinktheliquids.
thoroughlywithadampclothand
Neverusevinegar,vinegar-basedproducts,
removeanycoffeeresidues.
citricacidorcitricacid-basedproducts.
9� Allowthebrewingunit(5a)andthe
Neverputdescalingtabletsorother
interioroftheappliancetodry.
descalingagentsinthedrawer(4).
10� Replacethecover(5e)onthebrewing
unitandreinsertthebrewingunit(5a)
Specially developed and suitable
fullyintotheappliance.
descaling and cleaning tablets are
11� Presstheejectlever(5c)upfully.
available from retailers or customer
12� Slidetheredlock(5d)fullytotheright
service (see “Accessories”).
andclosethedoor(5b).
Important:Ifthereisawaterlterinthe
watertank(16),itmustberemovedbefore
startingtheserviceprogramme.Cleanthe
Tips on saving energy
brewingunitbeforestartingtheservice
● Switchoffthefullyautomaticespresso
programme,seechapter“Cleaningthe
machinewhennotinuse.Todothis,
brewingunit”.
presstheservicebutton(12).Theappli-
ancerinsesandswitchesoff.
Tostarttheserviceprogramme,pressand
● Ifpossible,donotinterruptcoffeeormilk
holdtheservicebutton(12)foratleast
frothdispensing.Stoppingaprocess
5 seconds�
prematurelyresultsinhigherenergy
consumptionandthedriptrayllsup
Information:Theservicebutton(12)
morequickly.
asheswhiletheprogrammeisrunning.
● Descaletheapplianceregularlytoavoid
abuild-upoflimescale.Limescaleresidue
LED Hlightsup.
resultsinhigherenergyconsumption.
● Emptythedriptray(8)andreinsertit.
Theappliancerinsestwice.
TES501.. | 02/2014

16
en
LED Glightsup.
LED
Hlightsup.
● Openthedrawer(4).
● Emptythedriptray(8)andreinsertit.
● DropaBoschcleaningtabletintothe
drawer(4)andcloseit.
Ifyouareusingalter,reinsertitnow.
● Pressthestartbutton(10).
Theappliancehasbeencleaned,descaled
andisreadyforuseagain.
LED
Dlightsup.
● Pourlukewarmwaterintotheempty
Important:Wipedowntheapplianceusing
watertank(16)uptothe0.5 l mark and
asoft,dampclothtoimmediatelyremove
thendissolve1Boschdescalingtablet
anydescalerresidue.Suchresiduecan
TCZ8002init.WhenusingTCZ6002,
causecorrosion.Newspongeclothsmay
2tabletsmustbedissolved.
containsalts.Saltscancauserustlm
● Pressthestartbutton(10).
onstainlesssteelandmustthereforebe
washedoutthoroughlybeforeuse.
Theserviceprogrammewillnowrunfor
approximately10minutes.
Frost protection
LED Flightsup.
● Placeacontainerwithacapacityofat
¡
To avoid damage caused by frost
least0.5litresunderthemilkfrother
during transport and storage, the
outlet(6).
appliance must be completely
● Pulloutthemilkfrother(6) toopenit.
emptied rst.
Theserviceprogrammewillnowrunfor
Information: Theappliancemustbeready
approximately12minutes.
foruseandthewatertank (16)lled.
1� Placealargecontainerunderthemilk
LED Dlightsup.
frotheroutlet(6).
● Rinsethewatertank(16)andrellitwith
2� Pressthesteambutton(11).
freshwateruptothemax mark�
LED hashesandtheappliancenow
● Pressthestartbutton(10).
heatsupforapproximately20seconds.
3� IfLED
hlightsup,openthemilkfrother
Theserviceprogrammewillnowrunfor
(6)bypullingitoutandreleasesteam
approximately30secondsandrinsethe
forabout15seconds.
appliance�
4. Pressthepoweron/offswitchO / I(9)to
switchofftheappliance.
LED Flightsup.
5� Emptythewatertank(16)andthe
● Pushthemilkfrother(6)intocloseit.
driptray(8)�
Theserviceprogrammewillnowrunfor
approximately8minutes.
Robert Bosch Hausgeräte GmbH
en
17
Accessories
Guarantee
Thefollowingaccessoriesareavailable
Theguaranteeconditionsforthisappliance
fromretailersorfromcustomerservice:
areasdenedbyourrepresentativeinthe
countryinwhichitissold.Detailsregarding
Accessories Ordering number
theseconditionscanbeobtainedfromthe
Retail/
dealerfromwhomtheappliancewaspur-
Customerservice
chased.Thebillofsaleorreceiptmustbe
Cleaningtablets TCZ6001/00310575
producedwhenmakinganyclaimunderthe
Descalingtablets TCZ8002/00576694
termsofthisguarantee.
Waterlter TCZ7003/00575491
Careset TCZ8004/00576331
Changes reserved�
Disposal
A
Disposeofpackaginginanenvironmentally-
friendlymanner.Thisapplianceislabelled
inaccordancewithEuropeanDirective
2012/19/EGconcerningusedelectrical
andelectronicappliances(wasteelectrical
andelectronicequipment–WEEE).The
guidelinedeterminestheframeworkforthe
returnandrecyclingofusedappliances
asapplicablethroughouttheEU.Please
askyourspecialistretaileraboutcurrent
disposalfacilities.
Technical specications
Electricalconnection(voltage–frequency) 220-240V–50/60Hz
Heatingoutput 1600W
Maximumpumppressure,static 15bar
Maximumwatertankcapacity(withoutlter) 1.7l
Maximumbeancontainercapacity 300 g
Cablelength 100 cm
Dimensions (H x W x D) 385x280x479mm
Weight,unlled 9�3 kg
Typeofgrindingunit Ceramic
TES501.. | 02/2014

18
en
Simple troubleshooting
Problem Cause Remedy
Grindingunitdoesnot
Beansarenotfallinginto
Gentlytapthebeancontainer(1).
grindthebeans.
thegrindingunit(beanstoo
Changethetypeofcoffeeif
oily)�
necessary�
Whenthebeancontainer(1)is
empty,wipeitwithadrycloth.
Nohotwaterdispensed. Themilkfrother(6)is
Cleanthemilkfrother(6), see
soiled�
“Maintenanceanddailycleaning”.
Toolittleornomilkfroth. Themilkfrother(6) is
Cleanthemilkfrother(6), see
soiled�
“Maintenanceanddailycleaning”.
Milkunsuitableforfrothing. Usemilkwithafatcontentofat
least1.5%.
Themilkfrother(6)isnot
Wetthemilkfrotherparts and press
assembledcorrectly.
togetherrmly.
Build-upoflimescaleinthe
Descaletheapplianceasdescribed
appliance�
intheinstructions.
Coffeedispensingslows
Thegrindsettingistoone
Adjustthegrindingunittoacoarser
toatrickleorstops
orthepre-groundcoffeeis
settingorusecoarserpre-ground
completely.
toone.
coffee.
Build-upoflimescaleinthe
Descaletheapplianceasdescribed
appliance�
intheinstructions.
Coffeehasno“crema”. Unsuitabletypeofcoffee. Useatypeofcoffeewithahigher
proportionofrobustabeans.
Thebeansarenolonger
Usefreshbeans.
fresh.
Thegrindsettingisnot
Adjustthegrindsettingtone.
suitableforthebeans.
Coffeeistoo“acidic”. Thegrindsettingistoo
Adjustthegrindingunittoaner
coarseorthepre-ground
settingorusenerpre-ground
coffeeistoocoarse.
coffee.
Unsuitabletypeofcoffee. Useadarkerroast.
Coffeeistoo“bitter”. Thegrindsettingistoone
Adjustthegrindingunittoacoarser
orthepre-groundcoffeeis
settingorusecoarserpre-ground
toone.
coffee.
Unsuitabletypeofcoffee. Changethetypeofcoffee.
Thewaterlterdoesnot
Thewaterlterisnottted
Firmlypressthewaterlterstraight
stayinpositioninthe
correctly.
downintothetankconnection.
watertank(16).
If you are unable to solve the problem, please call the hotline.
You will nd the telephone numbers at the back of these instructions.
Robert Bosch Hausgeräte GmbH

en
19
Problem Cause Remedy
Thewatertankisnot
Correctlyinstallthewatertank.If
LED
Dashes.
correctlyinstalledorthe
theLEDcontinuestoash,install
lterisworn.
anewlterandrinse,seechapter
“Filter”.
Carbonatedwaterinthe
Fillthewatertankwithfreshtap
watertank.
water.
Thecoffeegroundsare
Thegrindsettingistoo
Adjustthegrindingunittoacoarser
notcompactandaretoo
neortoocoarse,ornot
ornersetting,oruse2level
wet.
enoughgroundcoffeehas
measuringspoonsofgroundcoffee.
beenused.
Brewingunit(5)issoiled. Cleaningthebrewingunit(5).
LED
Iashes.
Toomuchpre-ground
Cleanthebrewingunit(5).Putin
coffeeinthebrewing
nomorethan2levelmeasuring
unit(5).
spoonsofgroundcoffee.
Thebrewingunit
Removeandcleanthebrewing
mechanismisstiff.
unit,see“Maintenanceanddaily
cleaning”.
Brewingunit(5)ismissing
Switchofftheappliancewiththe
orhasnotbeendetected.
brewingunit(5)inplace,wait
threesecondsandswitchonthe
appliance again�
Coffeeormilkfroth
Build-upoflimescaleinthe
Descaletheapplianceasdescribed
qualityvarieswidely.
appliance�
intheinstructions.
Waterdrippedonto
Driptray(8)removedtoo
Waitafewsecondsafterthe
theinneroorofthe
soon�
lastdrinkwasdispensedbefore
appliancewhenthedrip
removingthedriptray(8).
tray(8)wasremoved.
Thedefaultsettingshave
Somesettingshavebeen
Pressthepoweron/offbuttonO / I
beenchangedandneed
madethatarenolonger
(9)toswitchofftheappliance.
tobereset.
required.
Pressandholdtheservicebutton
(12)andthesteambutton(11)
andpressthepoweron/offbutton
O / I(9)toswitchontheappliance.
Thenpressthestartbutton(10)to
conrm.Thedefaultsettingsare
reset.
LEDs
ash.
Theappliancehasafault. Pleasecontactthehotline.
LEDs
ash.
Incorrectvoltage. Operatetheapplianceat
220V-240Vonly.
LEDs
ash.
Theambienttemperature
Operatetheapplianceat
istoocold.
temperatures>5°C.
If you are unable to solve the problem, please call the hotline.
You will nd the telephone numbers at the back of these instructions.
TES501.. | 02/2014

20
fr
Table des matières
Présentation
Contenudel’emballage ����������������������������� 20
(voirlesillustrationsdevued’ensemble
Présentation ����������������������������������������������� 20
A,B,C,DetEaudébutdelanotice)
Consignesdesécurité ������������������������������� 21
Elémentsdecommande ���������������������������� 23
1 Réservoiràgrains
Avantlapremièreutilisation ����������������������� 24
2 Couvercled’arôme
Filtreeau ���������������������������������������������������� 26
3 Sélecteurdenessedemouture
Réglages ���������������������������������������������������� 27
4 Tiroiràcafé
Préparationavecducaféengrains ����������� 29
(caféenpoudre/pastilledenettoyage)
Préparationavecducafémoulu ��������������� 29
5 Unitédepercolation(gure E)
Préparerdel’eauchaude��������������������������� 29
a) Unitédepercolation
Préparerdelamoussedelait �������������������� 30
b) Volet
Entretienetnettoyagequotidiens �������������� 30
c) Levierd’éjectionpour
Conseilspouréconomiserl’énergie ���������� 33
l’unitédepercolation
Programme de Service ������������������������������ 34
d) Verrou
Protectioncontrelegel ������������������������������ 35
e) Couvercledeprotection
Accessoires ������������������������������������������������ 35
6 Mousseurdelaitamovible(gure C)
Miseaurebut �������������������������������������������� 35
a) Soupapeàvapeur
Garantie������������������������������������������������������ 35
b) Douillemétallique
Eliminersoi-mêmelesproblèmessimples 36
c) Tube
Caractéristiquestechniques ���������������������� 38
d) Cœur
e) Troud’aération
7 Becverseurducafé
(réglableenhauteur)
8 Baccollecteur(gure D)
Chèreamatricedecafé,
a) Cache
cheramateurdecafé.
b) Réservoiràmarcdecafé
c) Baccollecteurbecverseurducafé
Nousvousfélicitonspourl’achatdecette
d) Egouttoirbecverseurducafé
machineàespressoautomatiquede
e) Flotteur
marqueBosch.
9 InterrupteurélectriqueO / I
10 BoutonStart(Démarrage)
C
11 BoutonVapeurB
Contenu de l’emballage
12 BoutonServiceA
13 Boutonrotatif«Intensitéducafé»
(voirl’illustrationgurantaudébutdu
14 Boutonrotatif«Sélectiondeboisson»
présentModed’emploi)
15 AfchageparLED
16 Réservoird’eauamovible
a Machineàespressoautomatique
17 Couvercleduréservoird’eau
TES501
18 Cuillère-dose
b Moded’emploi
(outildemiseenplacedultreàeau)
c Bandelettededuretédel’eau
19 Casederangementdelacuillère-dose
d Cuillère-dose
20 Cordonsecteuraveclogement
Robert Bosch Hausgeräte GmbH

fr
21
Consignes de sécurité
Lire attentivement ce mode d’emploi, s’y conformer lors de
l’utilisation et le conserver ! Veuillez joindre ce mode d’emploi
si vous passez l’appareil à quelqu’un d’autre. Cet appareil est
conçu pour la préparation de quantités usuelles, dans le cadre
d’un foyer ou d’un usage non commercial de type domestique.
Citons p. ex. les cuisines du personnel dans les commerces,
bureaux, exploitations agricoles et établissements artisanaux
ainsi que les clients de pensions, petits hôtels et toute autre
résidence de type similaire.
¡ Risque de chocs électriques !
Nebrancheretn’utiliserl’appareilqueconformémentauxdonnées
indiquéessurlaplaquesignalétique.Lesréparationssurl’appareil
tellesqueleremplacementd’uncordonendommagénedoiventêtre
effectuéesqueparnotreSAVand’éliminertoutdanger.
Cetappareilpeutêtreutilisépardesenfantsàpartirde8anset
pardespersonnesayantdesfacultésphysiques,sensorielles
oumentalesréduitesoumanquantd’expérienceet/oude
connaissancesàconditiond’êtresurveillésoud’avoirétéinformés
quantàlabonneutilisationdel’appareiletd’avoircomprisles
dangersquiendécoulent.Lesenfantsdemoinsde8ansdoivent
êtretenuséloignésdel’appareiletducordond’alimentationetne
doiventpasutiliserl’appareil.Nepaslaisserlesenfantsjoueravec
l’appareil.Lenettoyageetl’entretienincombantàl’utilisateurne
doiventpasêtreeffectuéspardesenfantssaufs’ilsont8ansou
plusetsontsurveillés.
TES501.. | 02/2014

22
fr
Nejamaisplongerl’appareiloulecordonélectriquedansl’eau.
N’utiliserlamachinequelorsquelecordonélectriqueetl’appareil
neprésententaucundommage.Encasdedéfaut,débrancher
immédiatementlachesecteuroucouperlatensionduréseau.
¡ Risque d’étouffement !
Nepaslaisserlesenfantsjoueraveclesemballages.
¡ Risque de brûlure !
L’embout(6a)dumousseurdelaitdevientbrûlant.Aprèsutilisation,
bienlaisserrefroidirlabuseavantdelasaisir.
N’utilisezlamachinequelorsquelemousseurdelait(6)est
entièrementmontéetinstallé.
¡ Risque de blessure !
Nepasglisserlesdoigtsàl’intérieurdubroyeur.
Robert Bosch Hausgeräte GmbH

fr
23
Afchage par LED
Eléments de commande
Lasignicationdel’allumageetduclignote-
Interrupteur électrique O / I
mentdesLEDestlasuivante:
L’interrupteurélectriqueO / I(9)sertà
mettrel’appareilsoustensionouhorsten-
Destallumée Leréservoird’eauestvide
sion(l’alimentationélectriqueestcoupée).
etdoitêtrerempli.
Important : Pouréteindre,utiliserlebouton
Service (12)�
Dclignote Leltreàeauestuséet
doitêtreremplacé.
Bouton Service A
Important :lorsdelamise
Aprèsunebrèvepressionsurlebouton
enservice,leclignotement
Service(12),l’appareileffectueunrinçage
nesigniepas«change-
puissemethorstension.SileboutonSer-
mentdultre»(voirau
vice(12)clignote,exécuterleprogramme
chapitre«Miseenservice
deService.Unepressionlonguesurle
delamachine»).
boutonService(12)lanceleprogrammede
Service.Durantl’exécutionduprogramme
Eestallumée Leréservoiràgrainsest
deService,leboutonService(12)clignote;
videetdoitêtrerempli.
ils’éteintlorsqueleprogrammeestterminé.
Festallumée Lasoupapeàvapeurdoit
Bouton Vapeur B
êtreouverteoufermée.
UnepressionsurleboutonVapeur(11)
déclenchelaproductiondevapeurnéces-
Fclignote Selonleréglage,dela
saireàlapréparationdemoussedelait.
vapeuroudel’eauchaude
sortdumousseurdelait.
Bouton Start (Démarrage) C
UnepressionsurleboutonDémarrage(10)
Gestallumée Si Gestsélectionnée
déclenchelapréparationdelaboisson.Une
avecleboutonrotatif
nouvellepressiondurantlapréparationde
«Intensitéducafé»,le
laboissonpermetd’arrêterl’écoulement
symboleestallumépen-
avantterme.
danttouteladuréedepré-
parationdecaféenpoudre.
Hestallumée Lebaccollecteurest
absentoumalmisen
place;lemettreenplace.
Hclignote Lesbacssontpleins;vider
lesbacsetlesremettreen
place�
Iestallumée Levoletdel’unitédeper-
colationestouvert;fermer
levolet.
Iclignote Retireretnettoyerl’unité
depercolation.
TES501.. | 02/2014
24
fr
Bouton rotatif « Intensité du café »
Avant la
première utilisation
Ceboutonrotatif(13)permet
deréglerl’intensitéducafé
oudesélectionnerlecaféen
Généralités
poudre.
Utiliserexclusivementdel’eaupure,froide,
sansgazcarboniqueetexclusivement
h
Trèsdoux
ducaféengrainstorréé(depréférence
Doux
pourexpressooupercolateur)etremplir
à
Normal
lesconteneurscorrespondants. Ne pas
g
Corsé
employerdesgrainsdecaféavecglaçage,
G
Caféenpoudre
desgrainscaramélisésouenrobésd’une
substancesucréequelconque;ilsobturent
Bouton rotatif « Sélection de boisson »
l’unitédepercolation.
Ilestpossible,surcetappareil,deréglerla
Ceboutonrotatif(14)sert
duretédel’eau.Enusine,laduretédel’eau
àsélectionnerlaboisson
estrégléesur4.Testerladuretédel’eau
souhaitéeetlaquantité.
utiliséeàl’aidedelabandelettejointe.Sile
Ilpermetégalementde
résultatdutestestdifférentde4,program-
modierlesréglagesde
merl’appareilenconséquenceaprèsla
l’utilisateur.
miseenservice(voir«Duretédel’eau»au
chapitre«Réglages»).
a
Petitespresso
Espresso
Mise en service de la machine
à
Petitcafécrème
1� Retirerlelmdeprotectionexistant.
Cafécrème
2� Placerlamachineàespressoautoma-
c
Grandcafécrème
tiquesurunplanhorizontal,sufsam-
mentsolidepoursupportersonpoidset
b
2petitsespressos
résistantàl’eau.Lesfentesd’aération
2 espressos
del’appareildoiventêtredégagées.
à
2petitscaféscrème
2caféscrème
Important :Utiliserl’appareiluniquement
d
2grandscaféscrème
dansdeslocauxhorsgel.Danslecasoù
l’appareilaététransportéouentreposé
Mousseur de lait
àdestempératuresendessousde0°C,
Lemousseurdelait(6)peutêtreouvertet
attendreaumoins3heuresavantlamise
ferméenletirantetenl’enfonçant.
enservicedel’appareil.
3� Tirerlachesecteurhorsdulogement
(20)etlabrancher.Lalongueurpeut
êtrerégléeenpoussantouentirant.
Pourcefaire,placerledosdel’appareil
parex.aubordd’unetableettirerle
cordon vers le basoulepousservers
le haut�
Robert Bosch Hausgeräte GmbH
fr
25
4. Monterlemousseurdelait.N’utiliser
Mise hors tension de l’appareil
l’appareilquesilemousseurdelait(6)
Lamachineàexpressoautomatiqueest
estcomplètementassembléetmonté.
programméeenusinedefaçonàfoncti-
onnerdemanièreoptimale.Lamachine
s’arrêteautomatiquementaprèsunedurée
dénie.Laduréeestréglable,voir«Arrêt
automatique»auchapitre«Réglages».
Exception :Sil’appareiln’aétéutiliséque
pourpréparerdel’eauchaudeoudela
vapeur,ilsemethorstensionsansrinçage.
Pourmettrel’appareilhorstensionmanuel-
5� Remonterlecouvercleduréservoir
lementavantl’écoulementdeladurée,
d’eau(17).
appuyersurleBoutonService(12).L’ap-
6. Retirerleréservoird’eau(16),lerincer
pareileffectueunrinçageetsemethors
etlerempliravecdel’eaufroidefraîche.
tension.
Nepasdépasserlerepèremax�
7. Positionnerleréservoird’eau(16)bien
Remarque :Lorsdelapremièreutilisation,
verticaletl’enfoncerentièrement.
aprèsl’exécutionduprogrammedeService
8� Refermerlecouvercleduréservoir
ousil’appareiln’apasfonctionnépendant
d’eau(17).
uncertaintemps,l’arômedelapremière
9� Remplirleréservoiràgrains(1)avec
boissonn’estpascomplètementdéve-
ducaféengrains(pourlapréparation
loppé;nepasboirelapremièreboisson.
avecducaféenpoudre,voirlechapitre
«Préparationavecducafémoulu»).
Aprèslamiseenservicedelamachineà
10� Mettrel’appareilsoustensionavecl’in-
espressoautomatique,plusieurstasses
terrupteurélectriqueO / I (9)� La LED
D
doiventavoirétépréparéesavantd’avoir
clignoteetlaLEDFestallumée.
une«crème»neetconsistante.
11� Placerunrécipientsouslebecverseur
dumousseurdelait(6).
Laformationdegouttesd’eauauxfentes
12� Tirerprudemmentlemousseurde
d’aérationestnormaleencasd’utilisation
lait(6)pourl’ouvrir.L’appareilrincele
prolongée.
mousseurdelait(6)avecdel’eau.La
LED Fclignote.
13� LorsquelaLEDFs’allume,enfoncerle
mousseurdelait(6)pourlefermer.
L’appareilchauffeeteffectueunrinçage.
Del’eaus’écouledubecverseurducafé.
LorsquelesboutonsA(12),B(11)et
C(10)sontallumés,l’appareilestprêtà
fonctionner.
TES501.. | 02/2014
26
fr
Information :Lerinçagedultrea,parla
Filtre eau
mêmeoccasion,activéleréglagepourle
Unltreàeaupeutdiminuerl’entartrage.
signalementChangerltre(=laLED
D
Unltreàeauneufdoitêtrerincéavantde
clignote).
pouvoirêtreutilisé.Procédercommesuit:
1� Enfoncerfermementleltreàeaudans
AprèslesignalementChangerltreouau
leréservoird’eauvideàl’aidedela
plustardauboutdedeuxmois,leltre
cuillère-dose(18).
n’estplusefcace.Ilfautalorsleremplacer
pourdesraisonsd’hygièneetanque
l’appareilnes’entartrepas(celapourrait
l’endommager).Lesltresderechange
sontdisponiblesdanslecommerceou
auprèsduServiceClientèle(voirpoint
«Accessoires»).Siunltreneufn’estpas
misenplace,modierleréglagepourle
ltrecommeindiquéauchapitre«Duretéde
l’eau».
Information :L’indicateurdultrepermet
derepérerlemoisauquelleltreaété
misenplace.Ilestégalementpossiblede
2� Remplirleréservoird’eau(16)jusqu’au
repérerlemoisauquelleltredevraêtre
repèremaxavecdel’eau.
remplacélaprochainefois(auboutdedeux
3� Placerlebouton
moinsauplustard).
rotatif(13)sur
4. Enfoncersimultanémentlesboutons
B(11)etA(12)pendantaumoins
5 secondes� «arrêt»ou
«marche»s’allume.
5� Régler«marche»enappuyantsurle
boutonDémarrage(10).
6. MaintenirleboutonDémarrage(10)
enfoncépendantaumoins5secondes
Information :Sil’appareiln’apasétéutilisé
pourconrmer;touteslesLEDs’allu-
pendantuncertaintemps(parex.durant
mentbrièvement.
lesvacances),ilestrecommandéderincer
7. La LED DclignoteetlaLEDFs’allume.
leltreavantl’emploi.Pourcefaire,prépa-
8� Placerunrécipientd’unecapacitéde
rerunetassed’eauchaudeetlajeter.
0,5litresouslebecverseurdumous-
seurdelait(6).
9� Ouvrirlemousseurdelait(6)enle
tirant.LaLEDFclignote.
10� L’eaucouleàtraversleltreetlerince.
11� LorsquelaLEDFestallumée,fermer
lemousseurdelait(6)enl’enfonçant.
12� Viderleréservoir.
L’appareilestdenouveauprêtà
fonctionner.
Robert Bosch Hausgeräte GmbH
fr
27
Important :Encasd’utilisationdultreà
Réglages
eau(voirpoint«Accessoires»),procéder
Lesréglagespeuventêtrepersonnalisés.
commesuit,voirpoint«Filtreeau».
Lesréglagespossiblessontlessuivants:
Remarque :Siaucunboutonn’estactionné
Dureté de l’eau
dansles90secondes,l’appareilsemeten
Ilestpossible,surcetappareil,derégler
veillesanseffectuerd’enregistrement.La
laduretédel’eau.Leréglagecorrectdela
duretédel’eauprécédemmentenregistrée
duretédel’eauestimportantcarilpermet
estconservée.
àl’appareild’indiquerlemomentoùun
détartrageestnécessaire.Enusine,la
Arrêt automatique
duretédel’eauestrégléesur4.Ladureté
Laduréeauboutdelaquellel’appareilse
del’eaupeutêtredéterminéeàl’aidede
metautomatiquementhorstensionaprès
labandelettefournieouêtredemandéeau
ladernièrepréparationd’uneboissonpeut
ServicedesEauxlocal.
êtrerégléeici.Leréglagepossibleestde
Plongerbrièvementlabandelettedans
15minutesà4heures.Laduréeprogram-
l’eau,lasecouerlégèrementetattendre
méepeutêtreraccourciepouréconomiser
uneminutepourlirelerésultat.
l’énergie.
1� Placerlebouton
rotatif(13)sur
Niveau Duretédel’eau
2� Enfoncersimultanémentlesboutons
Allemagne (°dH) France(°fH)
B(11)etA(12)pendantaumoins
1
1-7
1-13
5secondes.LenombredeLEDalors
2
8-14
14-25
alluméessymboliseladuréeréglée
3
15-21
26-38
avantl’arrêt.
4
22-30
39-54
3� Appuyersuccessivementsurlebouton
Démarrage(10)jusqu’àcequeladurée
Pourentreruneautreduretédel’eauque
souhaitées’afche:
cellequiestprérégléeousiunltreàeau
D=15minutes
estutilisé,procédercommesuit:
DetE=30minutes
1� Placerlebouton
D,EetF=45minutes
rotatif(13)sur
D,E,FetG=1heure
2� Enfoncersimultanémentlesboutons
D,E,F,GetH=2heures
B(11)etA(12)pendantaumoins
D,E,F,G,HetI=4heures
5secondes.LenombredeLEDalors
4. EnfoncerleboutonDémarrage(10)
alluméessymboliseladuretédel’eau
pendantaumoins5secondes.LesLED
réglée.
régléesclignotent,laduréeavantl’arrêt
3� Appuyersuccessivementsurlebouton
sélectionnéeestenregistrée.
Démarrage(10)jusqu’àcequeladureté
del’eausouhaitéesoitindiquée;pour
Remarque :Siaucunboutonn’estactionné
uneduretédel’eaudeparex.3,les
dansles90secondes,l’appareilsemeten
LED D,EetFs’allument.
veillesanseffectuerd’enregistrement.La
4. EnfoncerleboutonDémarrage(10)
duréeavantl’arrêtprécédemmentréglée
pendantaumoins5secondes.LesLED
estconservée.
régléesclignotent,laduretédel’eau
sélectionnéeestenregistrée.
TES501.. | 02/2014
28
fr
Régler la température de percolation
Régler la nesse de la mouture
Latempératuredepercolationpeutelle
Lesélecteurderéglage(3)delamouture
aussiêtreréglée.
permetderéglerlanesseducaféen
1� Placerlebouton
poudre.
rotatif(13)sur
2� Enfoncersimultanémentlesboutons
¡
Attention !
B(11)etA(12)pendantaumoins
Nemodierleréglagequelorsquele
5secondes.LenombredeLEDalors
broyeurfonctionne!Sinon,l’appareilpeut
alluméessymboliseladuréedepercola-
êtreendommagé.Nepasglisserlesdoigts
tionréglée.
àl’intérieurdubroyeur.
3� Appuyersuccessivementsurlebouton
Démarrage(10)jusqu’àcequelatem-
● Lorsquelebroyeurestenmarche,régler
pératuresouhaitées’afche:
lesélecteur(3)entreunemouturene
LED
D=basse
(a :rotationdanslessensinversedes
LED
DetE=moyenne
aiguillesd’unemontre)etunemouture
LED D,EetF=élevée
grossière(b :rotationdanslesensdes
4. EnfoncerleboutonDémarrage(10)
aiguillesd’unemontre).
pendantaumoins5secondes.Les
a b
LEDrégléesclignotent,latempérature
sélectionnéeestenregistrée.
Remarque :Siaucunboutonn’estactionné
dansles90secondes,l’appareilsemeten
veillesanseffectuerd’enregistrement.La
températuredepercolationprécédemment
enregistréeestconservée.
Information : Lenouveauréglagen’est
perceptiblequ’àpartirdelasecondetasse
decafé.
Conseil pratique : Pourlesgrainstorréés
decouleurfoncée,choisirunemoutureplus
ne,pourlesgrainstorréésdecouleur
claire,réglerunemoutureplusgrossière.
Robert Bosch Hausgeräte GmbH

fr
29
Préparation avec du
Préparation avec du
café en grains
café moulu
Cettemachineàespressoautomatique
Cetappareilpeutégalementfonctionner
moutducaféfraispourchaquepréparation.
avecducafémoulu(pasavecducafé
soluble).
Conseil pratique :Utiliserdepréférenceun
mélangedecaféengrainspourespresso
Important :Remplirleréservoir(16)d’eau
oupercolateur.Pourassurerauxgrains
fraîchetouslesjours.Ildoittoujoursyavoir
unequalitéoptimale,lesconserveraufrais
sufsammentd’eaudansleréservoir(16)
dansunrécipientferméoulescongeler.
pourl’utilisationdel’appareil.
Lesgrainsdecafécongeléspeuventêtre
moulus.
Préparation
1� Ouvrirletiroiràcafé(4).
Important :Remplirleréservoir(16)d’eau
2� Verseraumaximum2cuillères-doses
fraîchetouslesjours.Ildoittoujoursyavoir
rasesdansletiroir.
sufsammentd’eaudansleréservoir(16)
Attention :Nepasverserdecafénon
pourl’utilisationdel’appareil.
mouluoudecafésoluble.
3� Fermerletiroiràcafé(4).
Différentscaféspeuventêtrepréparésen
4. Réglerleboutonrotatifinférieur(13)sur
appuyantsimplementsurunbouton.
lesymboleG�
5� AppuyersurleboutonDémarrage(10).
Préparation
Lecafésefaitets’écouleensuitedans
L’appareildoitêtreprêtàfonctionner.
latasse.
1� Placerune(des)tasse(s)préchauffée(s)
souslebecverseurducafé(7).
Conseil pratique :Pourunpetitespresso,
Préparer de l’eau chaude
préchauffertoujourslatasse,parex.
avecdel’eauchaude.
¡
Risque de brûlure !
2� Sélectionnerlecafésouhaitéetla
Lemousseurdelait(6)devienttrèsbrûlant.
quantitédésiréeentournantlebouton
Nesaisirlemousseurdelait(6)queparla
supérieur(14).
partieenplastique.
3� Sélectionnerl’intensitésouhaitéedu
caféentournantleboutoninférieur(13).
Avantdepréparerdel’eauchaude,le
4. AppuyersurleboutonDémarrage(10).
mousseurdelaitdoitêtrenettoyé.
Lecafésefaitets’écouleensuitedans
L’appareildoitêtreprêtàfonctionner.
la/lestasse(s).
1� Placerunetassepréchaufféeouun
verresouslebecverseurdumousseur
Lapercolationpeutêtrearrêtéeavantterme
delait(6).
enappuyantunenouvellefoissurlebouton
2� Ouvrirlemousseurdelait(6)enletirant.
Démarrage (10)�
L’appareilchauffe.Del’eauchaude
s’écoulependantenv.40secondesdu
becverseurdumousseurdelait(6).
3� Pourarrêterl’opération,enfoncerle
mousseurdelait(6).
TES501.. | 02/2014
30
fr
Préparer de la
Entretien et
mousse de lait
nettoyage quotidiens
¡
Risque de brûlure !
¡
Risque de choc électrique !
Lemousseurdelait(6)devienttrèsbrûlant.
Avanttoutnettoyage,débrancherlache
Nesaisirlemousseurdelait(6)queparla
électrique.
partieenplastique.
Nejamaisplongerl’appareildansl’eau.
Nepasutiliserdenettoyeuràvapeur.
Conseil pratique :Mousserd’abordlelait
puispréparerlecaféoumousserlelait
● Essuyerl’habillagedel’appareilavecun
séparémentetleversersurlecafé.
chiffondouxethumide.
● Nepasutiliserdechiffonsoudeproduits
L’appareildoitêtreprêtàfonctionner.
nettoyantsabrasifs.
1� AppuyersurleboutonB (11)�
LeboutonBclignote,l’appareilchauffe
pendantenv.20secondes.
2� LorsqueleboutonetlaLEDFs’allume,
plongerlemousseurdelaitjusqu’au
fondd’unetasseoud’unverreremplià
untiersdelait.
● Toujoursnettoyerimmédiatementles
3� Ouvrirlemousseurdelait(6)enletirant.
résidusdecalcaire,decafé,delaitoude
solutiondétartrante.Eneffet,delacorro-
¡
Risque de brûlure !
sionpeutseformersouscesrésidus.
Lavapeurquis’échappeestbrûlanteet
● Leschiffonsépongesneufspeuvent
peutprovoquerdeséclatsdeliquide.Ne
contenirdessels.Lesselspeuventêtre
pastoucherladouilleetnepasladiriger
responsablesderouillesuperciellesur
surdespersonnes.
l’acierspécial;unrinçagesoigneuxest
parconséquentindispensableavant
4. Mousserlelait.
l’emploi.
5� Fermerlemousseurdelait(6)en
● Retirerlebaccollecteur(8c)avecle
l’enfonçant.
réservoiràmarcdecafé(8b)versl’avant.
Retirerlecache(8a)etl’égouttoir(8d).
Conseil pratique :Pourréaliserune
Videretnettoyerlebaccollecteuretle
moussedelaitoptimale,employerde
réservoiràmarcdecafé.
préférencedulaitfroidavecuneteneur
● Retireretnettoyerletiroiràcafé(4).
enmatièresgrassesd’aumoins1,5%.
Important :Lesrestesdelaitséchés
sontdifcilesàéliminer.Parconséquent,
nettoyerimpérativement lemousseurde
lait(6)aprèschaqueutilisationàl’aide
d’eautiède.
Robert Bosch Hausgeräte GmbH
