Bosch GSA 1100 E Professional: инструкция
Раздел: Электроинструменты
Тип: Ножовка
Характеристики, спецификации
Инструкция к Ножовке Bosch GSA 1100 E Professional
Robert Bosch GmbH
Power Tools Division
70745 Leinfelden-Echterdingen
Germany
GSA 1100 E Professional
www.bosch-pt.com
1 619 929 L78 (2012.07) T / 145 UNI
de Originalbetriebsanleitung
el Ðñùôüôõðï ïäçãéþí ÷ñÞóçò
sr Originalno uputstvo za rad
en Original instructions
tr Orijinal işletme talimat
sl Izvirna navodila
fr Notice originale
pl Instrukcja oryginalna
hr Originalne upute za rad
es Manual original
cs Původní návod k používání
et Algupärane kasutusjuhend
pt Manual original
sk Pôvodný návod na použitie
lv Instrukcijas oriģinālvalodā
it Istruzioni originali
hu Eredeti használati utasítás
lt Originali instrukcija
nl Oorspronkelijke
ru Îðèãèíàëüíîå ðóêîâîäñòâî ïî
ar
gebruiksaanwijzing
ýêñïëóàòàöèè
fa
da Original brugsanvisning
uk Îðèã³íàëüíà ³íñòðóêö³ÿ ç
sv Bruksanvisning i original
åêñïëóàòàö³¿
no Original driftsinstruks
ro Instrucţiuni originale
fi Alkuperäiset ohjeet
bg Îðèãèíàëíà èíñòðóêöèÿ
ΕΎϤϴϠόΗϞϴϐθΘϟΔϴϠλϷ
Ϡλ έΎ ίήσ ΎϤϨϫέ
OBJ_BUCH-819-002.book Page 1 Tuesday, July 17, 2012 12:07 PM
OBJ_BUCH-819-002.book Page 2 Tuesday, July 17, 2012 12:08 PM
2 |
Deutsch. . . . . . . . . . . . . . . . . . . . . . . . . . . . . . . . . . . . . . . . . Seite 6
English . . . . . . . . . . . . . . . . . . . . . . . . . . . . . . . . . . . . . . . . . . Page 11
Français . . . . . . . . . . . . . . . . . . . . . . . . . . . . . . . . . . . . . . . . . Page 16
Español. . . . . . . . . . . . . . . . . . . . . . . . . . . . . . . . . . . . . . . . Página 21
Português . . . . . . . . . . . . . . . . . . . . . . . . . . . . . . . . . . . . . . Página 26
Italiano . . . . . . . . . . . . . . . . . . . . . . . . . . . . . . . . . . . . . . . . Pagina 31
Nederlands . . . . . . . . . . . . . . . . . . . . . . . . . . . . . . . . . . . . . Pagina 36
Dansk . . . . . . . . . . . . . . . . . . . . . . . . . . . . . . . . . . . . . . . . . . . Side 41
Svenska . . . . . . . . . . . . . . . . . . . . . . . . . . . . . . . . . . . . . . . . . Sida 45
Norsk. . . . . . . . . . . . . . . . . . . . . . . . . . . . . . . . . . . . . . . . . . . . Side 49
Suomi . . . . . . . . . . . . . . . . . . . . . . . . . . . . . . . . . . . . . . . . . . . Sivu 54
ÅëëçíéêÜ . . . . . . . . . . . . . . . . . . . . . . . . . . . . . . . . . . . . . . . Óåëßäá 58
Türkçe. . . . . . . . . . . . . . . . . . . . . . . . . . . . . . . . . . . . . . . . . . Sayfa 63
Polski . . . . . . . . . . . . . . . . . . . . . . . . . . . . . . . . . . . . . . . . . Strona 68
Česky . . . . . . . . . . . . . . . . . . . . . . . . . . . . . . . . . . . . . . . . . Strana 73
Slovensky . . . . . . . . . . . . . . . . . . . . . . . . . . . . . . . . . . . . . . Strana 77
Magyar . . . . . . . . . . . . . . . . . . . . . . . . . . . . . . . . . . . . . . . . . Oldal 82
Ðóññêèé . . . . . . . . . . . . . . . . . . . . . . . . . . . . . . . . . . . . . Ñòðàíèöà 87
Óêðà¿íñüêà . . . . . . . . . . . . . . . . . . . . . . . . . . . . . . . . . . . Ñòîð³íêà 93
Română. . . . . . . . . . . . . . . . . . . . . . . . . . . . . . . . . . . . . . . . Pagina 98
Áúëãàðñêè. . . . . . . . . . . . . . . . . . . . . . . . . . . . . . . . . . . . Ñòðàíèöà 102
Srpski . . . . . . . . . . . . . . . . . . . . . . . . . . . . . . . . . . . . . . . . . Strana 108
Slovensko . . . . . . . . . . . . . . . . . . . . . . . . . . . . . . . . . . . . . . . Stran 112
Hrvatski. . . . . . . . . . . . . . . . . . . . . . . . . . . . . . . . . . . . . . . Stranica 116
Eesti . . . . . . . . . . . . . . . . . . . . . . . . . . . . . . . . . . . . . . . . Lehekülg 121
Latviešu . . . . . . . . . . . . . . . . . . . . . . . . . . . . . . . . . . . . . . Lappuse 125
Lietuviškai . . . . . . . . . . . . . . . . . . . . . . . . . . . . . . . . . . . . Puslapis 130
vv
vv
cc
cc
. . . . . . . . . . . . . . . . . . . . . . . . . . . . . . . . . . . . . . . . . 135
ΔΤϔλ
vÝ—U
. . . . . . . . . . . . . . . . . . . . . . . . . . . . . . . . . . . . . . . 140
ϪΤϔλ
1 619 929 L78 | (17.7.12) Bosch Power Tools
OBJ_BUCH-819-002.book Page 3 Tuesday, July 17, 2012 12:08 PM
3 |
1 619 929 L78 | (17.7.12) Bosch Power Tools

OBJ_BUCH-819-002.book Page 4 Tuesday, July 17, 2012 12:08 PM
4 |
7
6
8
5
4
3
2
1
9
10
GSA 1100 E
11
A
12 51
1 619 929 L78 | (17.7.12) Bosch Power Tools
OBJ_BUCH-819-002.book Page 5 Tuesday, July 17, 2012 12:08 PM
5 |
CB
2
13
ED
6
GF
1 619 929 L78 | (17.7.12) Bosch Power Tools

OBJ_BUCH-819-002.book Page 6 Tuesday, July 17, 2012 12:08 PM
6 | Deutsch
f Wenn der Betrieb des Elektrowerkzeuges in feuchter
Deutsch
Umgebung nicht vermeidbar ist, verwenden Sie einen
Fehlerstromschutzschalter. Der Einsatz eines Fehler-
stromschutzschalters vermindert das Risiko eines elektri-
Sicherheitshinweise
schen Schlages.
Allgemeine Sicherheitshinweise für Elektro-
Sicherheit von Personen
werkzeuge
f Seien Sie aufmerksam, achten Sie darauf, was Sie tun,
WARNUNG
Lesen Sie alle Sicherheitshinweise
und gehen Sie mit Vernunft an die Arbeit mit einem
und Anweisungen. Versäumnisse bei
Elektrowerkzeug. Benutzen Sie kein Elektrowerkzeug,
der Einhaltung der Sicherheitshinweise und Anweisungen
wenn Sie müde sind oder unter dem Einfluss von Dro-
können elektrischen Schlag, Brand und/oder schwere Ver-
gen, Alkohol oder Medikamenten stehen. Ein Moment
letzungen verursachen.
der Unachtsamkeit beim Gebrauch des Elektrowerkzeuges
kann zu ernsthaften Verletzungen führen.
Bewahren Sie alle Sicherheitshinweise und Anweisungen
für die Zukunft auf.
f Tragen Sie persönliche Schutzausrüstung und immer
eine Schutzbrille. Das Tragen persönlicher Schutzausrüs-
Der in den Sicherheitshinweisen verwendete Begriff „Elektro-
tung, wie Staubmaske, rutschfeste Sicherheitsschuhe,
werkzeug“ bezieht sich auf netzbetriebene Elektrowerkzeuge
Schutzhelm oder Gehörschutz, je nach Art und Einsatz des
(mit Netzkabel) und auf akkubetriebene Elektrowerkzeuge
Elektrowerkzeuges, verringert das Risiko von Verletzungen.
(ohne Netzkabel).
f Vermeiden Sie eine unbeabsichtigte Inbetriebnahme.
Arbeitsplatzsicherheit
Vergewissern Sie sich, dass das Elektrowerkzeug aus-
f Halten Sie Ihren Arbeitsbereich sauber und gut be-
geschaltet ist, bevor Sie es an die Stromversorgung
leuchtet. Unordnung oder unbeleuchtete Arbeitsbereiche
und/oder den Akku anschließen, es aufnehmen oder
können zu Unfällen führen.
tragen. Wenn Sie beim Tragen des Elektrowerkzeuges den
f Arbeiten Sie mit dem Elektrowerkzeug nicht in explo-
Finger am Schalter haben oder das Gerät eingeschaltet an
sionsgefährdeter Umgebung, in der sich brennbare
die Stromversorgung anschließen, kann dies zu Unfällen
Flüssigkeiten, Gase oder Stäube befinden. Elektrowerk-
führen.
zeuge erzeugen Funken, die den Staub oder die Dämpfe
f Entfernen Sie Einstellwerkzeuge oder Schrauben-
entzünden können.
schlüssel, bevor Sie das Elektrowerkzeug einschalten.
f Halten Sie Kinder und andere Personen während der
Ein Werkzeug oder Schlüssel, der sich in einem drehenden
Benutzung des Elektrowerkzeugs fern. Bei Ablenkung
Geräteteil befindet, kann zu Verletzungen führen.
können Sie die Kontrolle über das Gerät verlieren.
f Vermeiden Sie eine abnormale Körperhaltung. Sorgen
Sie für einen sicheren Stand und halten Sie jederzeit
Elektrische Sicherheit
das Gleichgewicht. Dadurch können Sie das Elektrowerk-
f Der Anschlussstecker des Elektrowerkzeuges muss in
zeug in unerwarteten Situationen besser kontrollieren.
die Steckdose passen. Der Stecker darf in keiner Weise
verändert werden. Verwenden Sie keine Adapterste-
f Tragen Sie geeignete Kleidung. Tragen Sie keine weite
cker gemeinsam mit schutzgeerdeten Elektrowerkzeu-
Kleidung oder Schmuck. Halten Sie Haare, Kleidung
gen. Unveränderte Stecker und passende Steckdosen ver-
und Handschuhe fern von sich bewegenden Teilen.
ringern das Risiko eines elektrischen Schlages.
Lockere Kleidung, Schmuck oder lange Haare können von
sich bewegenden Teilen erfasst werden.
f Vermeiden Sie Körperkontakt mit geerdeten Oberflä-
chen wie von Rohren, Heizungen, Herden und Kühl-
f Wenn Staubabsaug- und -auffangeinrichtungen mon-
schränken. Es besteht ein erhöhtes Risiko durch elektri-
tiert werden können, vergewissern Sie sich, dass diese
schen Schlag, wenn Ihr Körper geerdet ist.
angeschlossen sind und richtig verwendet werden. Ver-
wendung einer Staubabsaugung kann Gefährdungen
f Halten Sie Elektrowerkzeuge von Regen oder Nässe
durch Staub verringern.
fern. Das Eindringen von Wasser in ein Elektrowerkzeug
erhöht das Risiko eines elektrischen Schlages.
Verwendung und Behandlung des Elektrowerkzeuges
f Zweckentfremden Sie das Kabel nicht, um das Elektro-
f Überlasten Sie das Gerät nicht. Verwenden Sie für Ihre
werkzeug zu tragen, aufzuhängen oder um den Stecker
Arbeit das dafür bestimmte Elektrowerkzeug. Mit dem
aus der Steckdose zu ziehen. Halten Sie das Kabel fern
passenden Elektrowerkzeug arbeiten Sie besser und
von Hitze, Öl, scharfen Kanten oder sich bewegenden
sicherer im angegebenen Leistungsbereich.
Geräteteilen. Beschädigte oder verwickelte Kabel erhö-
f Benutzen Sie kein Elektrowerkzeug, dessen Schalter de-
hen das Risiko eines elektrischen Schlages.
fekt ist. Ein Elektrowerkzeug, das sich nicht mehr ein- oder
f Wenn Sie mit einem Elektrowerkzeug im Freien arbei-
ausschalten lässt, ist gefährlich und muss repariert werden.
ten, verwenden Sie nur Verlängerungskabel, die auch
f Ziehen Sie den Stecker aus der Steckdose und/oder
für den Außenbereich geeignet sind. Die Anwendung
entfernen Sie den Akku, bevor Sie Geräteeinstellungen
eines für den Außenbereich geeigneten Verlängerungska-
vornehmen, Zubehörteile wechseln oder das Gerät
bels verringert das Risiko eines elektrischen Schlages.
weglegen. Diese Vorsichtsmaßnahme verhindert den
unbeabsichtigten Start des Elektrowerkzeuges.
1 619 929 L78 | (17.7.12) Bosch Power Tools
OBJ_BUCH-819-002.book Page 7 Tuesday, July 17, 2012 12:08 PM
Deutsch | 7
f Bewahren Sie unbenutzte Elektrowerkzeuge außer-
f Bremsen Sie das Sägeblatt nach dem Ausschalten nicht
halb der Reichweite von Kindern auf. Lassen Sie Perso-
durch seitliches Gegendrücken ab. Das Sägeblatt kann
nen das Gerät nicht benutzen, die mit diesem nicht ver-
beschädigt werden, brechen oder einen Rückschlag verur-
traut sind oder diese Anweisungen nicht gelesen
sachen.
haben. Elektrowerkzeuge sind gefährlich, wenn sie von
f Spannen Sie das Material gut fest. Stützen Sie das
unerfahrenen Personen benutzt werden.
Werkstück nicht mit der Hand oder dem Fuß ab. Berüh-
f Pflegen Sie Elektrowerkzeuge mit Sorgfalt. Kontrollie-
ren Sie keine Gegenstände oder den Erdboden mit der
ren Sie, ob bewegliche Teile einwandfrei funktionieren
laufenden Säge. Es besteht Rückschlaggefahr.
und nicht klemmen, ob Teile gebrochen oder so be-
f Verwenden Sie geeignete Suchgeräte, um verborgene
schädigt sind, dass die Funktion des Elektrowerkzeu-
Versorgungsleitungen aufzuspüren, oder ziehen Sie
ges beeinträchtigt ist. Lassen Sie beschädigte Teile vor
die örtliche Versorgungsgesellschaft hinzu. Kontakt mit
dem Einsatz des Gerätes reparieren. Viele Unfälle haben
Elektroleitungen kann zu Feuer und elektrischem Schlag
ihre Ursache in schlecht gewarteten Elektrowerkzeugen.
führen. Beschädigung einer Gasleitung kann zur Explosion
f Halten Sie Schneidwerkzeuge scharf und sauber.
führen. Eindringen in eine Wasserleitung verursacht Sach-
Sorgfältig gepflegte Schneidwerkzeuge mit scharfen
beschädigung oder kann einen elektrischen Schlag verur-
Schneidkanten verklemmen sich weniger und sind leichter
sachen.
zu führen.
f Halten Sie das Elektrowerkzeug beim Arbeiten fest mit
f Verwenden Sie Elektrowerkzeug, Zubehör, Einsatz-
beiden Händen und sorgen Sie für einen sicheren Stand.
werkzeuge usw. entsprechend diesen Anweisungen.
Das Elektrowerkzeug wird mit zwei Händen sicherer geführt.
Berücksichtigen Sie dabei die Arbeitsbedingungen und
f Sichern Sie das Werkstück. Ein mit Spannvorrichtungen
die auszuführende Tätigkeit. Der Gebrauch von Elektro-
oder Schraubstock festgehaltenes Werkstück ist sicherer
werkzeugen für andere als die vorgesehenen Anwendun-
gehalten als mit Ihrer Hand.
gen kann zu gefährlichen Situationen führen.
f Warten Sie, bis das Elektrowerkzeug zum Stillstand ge-
Service
kommen ist, bevor Sie es ablegen. Das Einsatzwerkzeug
f Lassen Sie Ihr Elektrowerkzeug nur von qualifiziertem
kann sich verhaken und zum Verlust der Kontrolle über das
Fachpersonal und nur mit Original-Ersatzteilen repa-
Elektrowerkzeug führen.
rieren. Damit wird sichergestellt, dass die Sicherheit des
Elektrowerkzeuges erhalten bleibt.
Produkt- und Leistungsbeschreibung
Sicherheitshinweise für Säbelsägen
Lesen Sie alle Sicherheitshinweise und An-
f Halten Sie das Gerät an den isolierten Griffflächen,
weisungen. Versäumnisse bei der Einhaltung
wenn Sie Arbeiten ausführen, bei denen das Einsatz-
der Sicherheitshinweise und Anweisungen
werkzeug verborgene Stromleitungen oder das eigene
können elektrischen Schlag, Brand und/oder
Netzkabel treffen kann. Der Kontakt mit einer spannungs-
schwere Verletzungen verursachen.
führenden Leitung kann auch metallene Geräteteile unter
Bitte klappen Sie die Aufklappseite mit der Darstellung des
Spannung setzen und zu einem elektrischen Schlag führen.
Elektrowerkzeugs auf, und lassen Sie diese Seite aufgeklappt,
f Halten Sie die Hände vom Sägebereich fern. Greifen
während Sie die Betriebsanleitung lesen.
Sie nicht unter das Werkstück. Bei Kontakt mit dem
Sägeblatt besteht Verletzungsgefahr.
Bestimmungsgemäßer Gebrauch
f Führen Sie das Elektrowerkzeug nur eingeschaltet
Das Elektrowerkzeug ist bestimmt, mit festem Anschlag Holz,
gegen das Werkstück. Es besteht sonst die Gefahr eines
Kunststoff, Metall und Baustoffe zu sägen. Es ist geeignet für
Rückschlages, wenn sich das Einsatzwerkzeug im Werk-
gerade und kurvige Schnitte. Bei Verwendung entsprechend
stück verhakt.
geeigneter Bi-Metall-Sägeblätter ist flächenbündiges Abtren-
nen möglich. Die Sägeblattempfehlungen sind zu beachten.
f Achten Sie darauf, dass die Fußplatte 2 beim Sägen
immer am Werkstück anliegt. Das Sägeblatt kann sich
Abgebildete Komponenten
verhaken und zum Verlust der Kontrolle über das Elektro-
werkzeug führen.
Die Nummerierung der abgebildeten Komponenten bezieht
f Schalten Sie nach Beendigung des Arbeitsvorgangs
sich auf die Darstellung des Elektrowerkzeuges auf der Gra-
das Elektrowerkzeug aus und ziehen Sie das Sägeblatt
fikseite.
erst dann aus dem Schnitt, wenn dieses zum Stillstand
1 Sägeblatt*
gekommen ist. So vermeiden Sie einen Rückschlag und
2 Verstellbare Fußplatte
können das Elektrowerkzeug sicher ablegen.
3 Sägeblatt-Aufnahme
f Verwenden Sie nur unbeschädigte, einwandfreie Säge-
4 Hubstange
blätter. Verbogene oder unscharfe Sägeblätter können
5 SDS-Hebel für Sägeblattentriegelung
brechen, den Schnitt negativ beeinflussen oder einen
6 Aufhängehaken
Rückschlag verursachen.
7 Einschaltsperre für Ein-/Ausschalter
Bosch Power Tools 1 619 929 L78 | (17.7.12)

OBJ_BUCH-819-002.book Page 8 Tuesday, July 17, 2012 12:08 PM
8 | Deutsch
8 Ein-/Ausschalter
Einsatz ist. Dies kann die Schwingungsbelastung über den ge-
9 Innensechskantschlüssel
samten Arbeitszeitraum deutlich reduzieren.
10 Lampe „PowerLight“
Legen Sie zusätzliche Sicherheitsmaßnahmen zum Schutz
des Bedieners vor der Wirkung von Schwingungen fest wie
11 Handgriff (isolierte Grifffläche)
zum Beispiel: Wartung von Elektrowerkzeug und Einsatzwerk-
12 Klemmplatte
zeugen, Warmhalten der Hände, Organisation der Arbeitsab-
13 Schrauben für Fußplattenverstellung
läufe.
*Abgebildetes oder beschriebenes Zubehör gehört nicht zum
Standard-Lieferumfang. Das vollständige Zubehör finden Sie in
Konformitätserklärung
unserem Zubehörprogramm.
Wir erklären in alleiniger Verantwortung, dass das unter
Technische Daten
„Technische Daten“ beschriebene Produkt mit den folgenden
Normen oder normativen Dokumenten übereinstimmt:
Säbelsäge GSA 1100 E
EN 60745 gemäß den Bestimmungen der Richtlinien
Sachnummer
3 601 F4C 8..
2011/65/EU, 2004/108/EG, 2006/42/EG.
Nennaufnahmeleistung
W1100
Technische Unterlagen (2006/42/EG) bei:
Leerlaufhubzahl n
0
min
-1
0–2700
Robert Bosch GmbH, PT/ETM9,
D-70745 Leinfelden-Echterdingen
Werkzeugaufnahme
SDS
Dr. Egbert Schneider
Helmut Heinzelmann
Hubzahlsteuerung
z
Senior Vice President
Head of Product Certification
Hub
mm 28
Engineering
PT/ETM9
max. Schnitttiefe
–in Holz
mm
230
– in Stahl, unlegiert
mm
20
– Rohrdurchmesser
mm
150
Robert Bosch GmbH, Power Tools Division
Gewicht entsprechend
D-70745 Leinfelden-Echterdingen
EPTA-Procedure 01/2003
kg 3,6
Leinfelden, 15.06.2012
Schutzklasse
/II
Die Angaben gelten für eine Nennspannung [U] von 230 V. Bei abwei-
Montage
chenden Spannungen und in länderspezifischen Ausführungen können
diese Angaben variieren.
Sägeblatt einsetzen/wechseln
f Ziehen Sie vor allen Arbeiten am Elektrowerkzeug den
Geräusch-/Vibrationsinformation
Netzstecker aus der Steckdose.
Messwerte für Geräusch ermittelt entsprechend EN 60745.
f Tragen Sie bei der Montage des Sägeblattes Schutz-
Der A-bewertete Geräuschpegel des Elektrowerkzeugs beträgt
handschuhe. Bei Berührung des Sägeblattes besteht Ver-
typischerweise: Schalldruckpegel 93 dB(A); Schallleistungs-
letzungsgefahr.
pegel 104 dB(A). Unsicherheit K=3 dB.
f Achten Sie beim Sägeblattwechsel darauf, dass die
Gehörschutz tragen!
Sägeblattaufnahme frei von Materialresten, z.B. Holz-
Schwingungsgesamtwerte a
h
(Vektorsumme dreier Richtun-
oder Metallspänen, ist.
gen) und Unsicherheit K ermittelt entsprechend EN 60745:
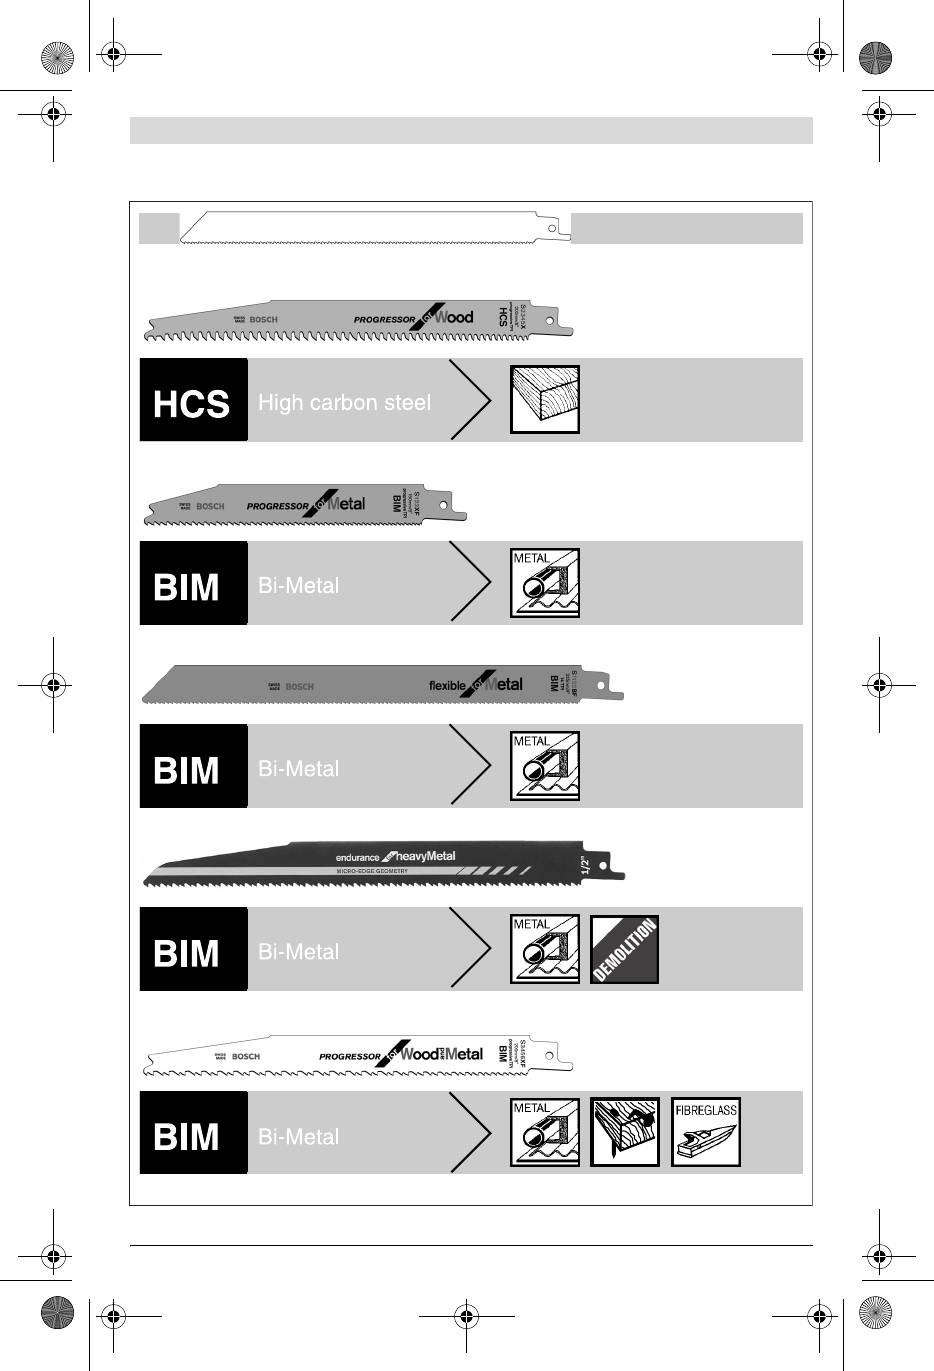
Sägeblatt auswählen
Sägen von Spanplatte: a
h
=18,5m/s
2
, K=1,5 m/s
2
,
2
Eine Übersicht empfohlener Sägeblätter finden Sie am Be-
Sägen von Holzbalken: a
h
=19,5m/s
2
, K=1,5 m/s
.
ginn dieser Anleitung. Setzen Sie nur Sägeblätter mit ½"-Uni-
Der in diesen Anweisungen angegebene Schwingungspegel
versalschaft ein. Das Sägeblatt sollte nicht länger sein als für
ist entsprechend einem in EN 60745 genormten Messverfah-
den vorgesehenen Schnitt notwendig.
ren gemessen worden und kann für den Vergleich von Elektro-
Verwenden Sie für das Sägen enger Kurven ein schmales
werkzeugen miteinander verwendet werden. Er eignet sich
Sägeblatt.
auch für eine vorläufige Einschätzung der Schwingungsbelas-
tung.
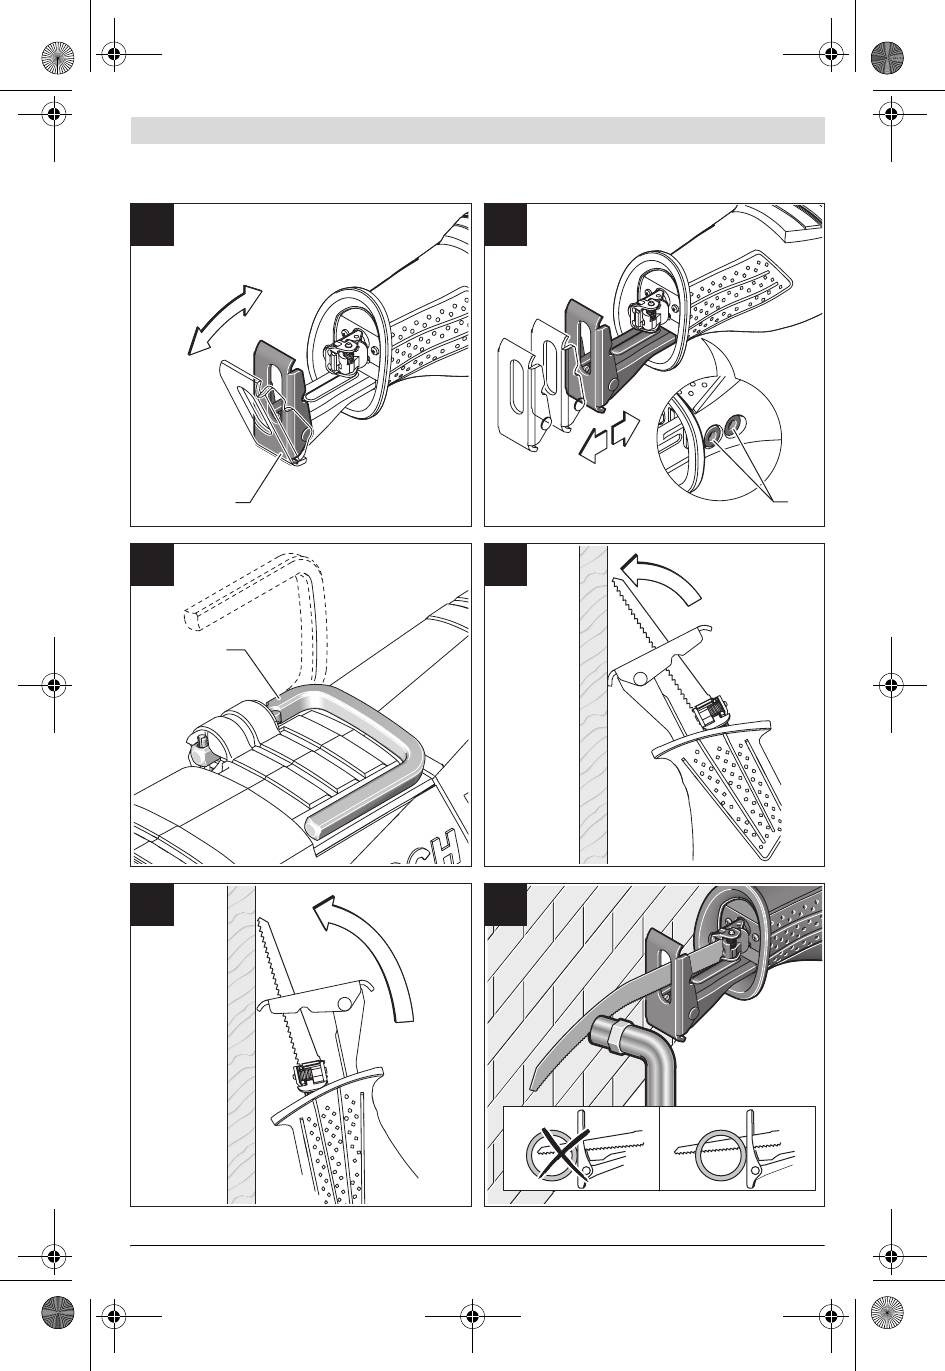
Sägeblatt einsetzen (siehe Bild A)
Der angegebene Schwingungspegel repräsentiert die haupt-
Drücken Sie den SDS-Hebel 5 nach vorn und führen Sie das
sächlichen Anwendungen des Elektrowerkzeugs. Wenn aller-
Sägeblatt 1 hinter der Klemmplatte 12 in die Sägeblatt-Auf-
dings das Elektrowerkzeug für andere Anwendungen, mit ab-
nahme 3 ein. Lassen Sie den SDS-Hebel 5 los.
weichenden Einsatzwerkzeugen oder ungenügender Wartung
eingesetzt wird, kann der Schwingungspegel abweichen. Dies
f Prüfen Sie den festen Sitz durch Ziehen am Säge-
kann die Schwingungsbelastung über den gesamten Arbeits-
blatt. Ein lockeres Sägeblatt kann herausfallen und Sie
zeitraum deutlich erhöhen.
verletzen.
Für eine genaue Abschätzung der Schwingungsbelastung soll-
Für bestimmte Arbeiten kann das Sägeblatt 1 auch um 180°
ten auch die Zeiten berücksichtigt werden, in denen das Ge-
gewendet (Zähne zeigen nach oben) und wieder eingesetzt
rät abgeschaltet ist oder zwar läuft, aber nicht tatsächlich im
werden.
1 619 929 L78 | (17.7.12) Bosch Power Tools

OBJ_BUCH-819-002.book Page 9 Tuesday, July 17, 2012 12:08 PM
Deutsch | 9
Sägeblatt entnehmen
Die Lampe 10 leuchtet bei eingestecktem Netzstecker und
f Lassen Sie das Sägeblatt vor dem Entnehmen abküh-
ermöglicht das Ausleuchten des Arbeitsbereiches bei un-
len. Bei Berührung des heißen Sägeblattes besteht Verlet-
günstigen Lichtverhältnissen.
zungsgefahr.
Ein-/Ausschalten
Drücken Sie den SDS-Hebel 5 nach vorn und ziehen Sie das
Sägeblatt 1 heraus. Lassen Sie den SDS-Hebel 5 los.
Zur Inbetriebnahme des Elektrowerkzeuges betätigen Sie
zuerst die Einschaltsperre 7 und drücken anschließend den
Staub-/Späneabsaugung
Ein-/Ausschalter 8 und halten ihn gedrückt.
f Stäube von Materialien wie bleihaltigem Anstrich, einigen
Um das Elektrowerkzeug auszuschalten, lassen Sie den Ein-/
Holzarten, Mineralien und Metall können gesundheitsschäd-
Ausschalter 8 los.
lich sein. Berühren oder Einatmen der Stäube können allergi-
Hinweis: Aus Sicherheitsgründen kann der Ein-/Ausschalter 8
sche Reaktionen und/oder Atemwegserkrankungen des Be-
nicht arretiert werden, sondern muss während des Betriebes
nutzers oder in der Nähe befindlicher Personen hervorrufen.
ständig gedrückt bleiben.
Bestimmte Stäube wie Eichen- oder Buchenstaub gelten als
Wenn Sie das Elektrowerkzeug nicht benutzen, schalten Sie es
krebserzeugend, besonders in Verbindung mit Zusatzstof-
aus, um Energie zu sparen.
fen zur Holzbehandlung (Chromat, Holzschutzmittel). As-
besthaltiges Material darf nur von Fachleuten bearbeitet
Hubzahl steuern
werden.
Sie können die Hubzahl des eingeschalteten Elektrowerk-
– Sorgen Sie für gute Belüftung des Arbeitsplatzes.
zeugs stufenlos regulieren, je nachdem, wie weit Sie den Ein-/
– Es wird empfohlen, eine Atemschutzmaske mit Filter-
Ausschalter 8 eindrücken.
klasse P2 zu tragen.
Leichter Druck auf den Ein-/Ausschalter 8 bewirkt eine nied-
Beachten Sie in Ihrem Land gültige Vorschriften für die zu
rige Hubzahl. Mit zunehmendem Druck erhöht sich die Hub-
bearbeitenden Materialien.
zahl.
f Vermeiden Sie Staubansammlungen am Arbeitsplatz.
Stäube können sich leicht entzünden.
Die erforderliche Hubzahl ist vom Werkstoff und den Arbeits-
bedingungen abhängig und kann durch praktischen Versuch
ermittelt werden.
Betrieb
Eine Verringerung der Hubzahl wird beim Aufsetzen des Säge-
Betriebsarten
blattes auf das Werkstück sowie beim Sägen von Kunststoff
f Ziehen Sie vor allen Arbeiten am Elektrowerkzeug den
und Aluminium empfohlen.
Netzstecker aus der Steckdose.
Bei längerem Arbeiten mit kleiner Hubzahl kann sich das
Elektrowerkzeug stark erwärmen. Lassen Sie das Elektro-
Schwenk- und herausziehbare Fußplatte
werkzeug zur Abkühlung ca. 3 min mit maximaler Hubzahl
(siehe Bilder B–C)
laufen.
Die Fußplatte 2 passt sich durch ihre Beweglichkeit der je-
weils erforderlichen Winkellage der Oberfläche an.
Arbeitshinweise
Die Fußplatte 2 kann je nach verwendetem Sägeblatt und
f Ziehen Sie vor allen Arbeiten am Elektrowerkzeug den
Anwendungsfall stufenlos in Längsrichtung verschoben wer-
Netzstecker aus der Steckdose.
den. Lösen Sie die Schrauben 13 mit dem Innensechskant-
schlüssel 9 und schieben Sie die Fußplatte 2 in die gewünsch-
Tipps
te Position. Ziehen Sie die Schrauben 13 wieder fest und
f Beachten Sie beim Sägen von Leichtbaustoffen die
überprüfen Sie, ob die Fußplatte 2 fest sitzt.
gesetzlichen Bestimmungen und Empfehlungen der
Aufhängehaken (siehe Bild D)
Materialhersteller.
Mit dem Aufhängehaken 6 können Sie das Elektrowerkzeug
Prüfen Sie vor dem Sägen in Holz, Spanplatten, Baustoffe etc.
z.B. an einer Leiter einhängen. Klappen Sie dazu den Aufhänge-
diese auf Fremdkörper wie Nägel, Schrauben o.Ä. und ver-
haken 6 in die gewünschte Position.
wenden Sie das geeignete Sägeblatt.
f Achten Sie bei eingehängtem Elektrowerkzeug darauf,
Schalten Sie das Elektrowerkzeug ein und führen Sie es an
dass das Sägeblatt vor unbeabsichtiger Berührung ge-
das zu bearbeitende Werkstück heran. Setzen Sie die Fuß-
schützt ist. Es besteht Verletzungsgefahr.
platte 2 auf die Werkstückoberfläche auf und sägen Sie mit
Klappen Sie den Aufhängehaken 6 wieder ein, wenn Sie mit
gleichmäßigem Auflagendruck bzw. Vorschub das Material
dem Elektrowerkzeug arbeiten wollen.
durch. Nach Beendigung des Arbeitsvorganges schalten Sie
das Elektrowerkzeug aus.
Inbetriebnahme
Falls sich das Sägeblatt verklemmt, schalten Sie das Elektro-
f Beachten Sie die Netzspannung! Die Spannung der
werkzeug sofort aus. Spreizen Sie den Sägespalt mit einem
Stromquelle muss mit den Angaben auf dem Typen-
geeigneten Werkzeug etwas und ziehen Sie das Elektrowerk-
schild des Elektrowerkzeuges übereinstimmen. Mit
zeug heraus.
230 V gekennzeichnete Elektrowerkzeuge können
auch an 220 V betrieben werden.
Bosch Power Tools 1 619 929 L78 | (17.7.12)
OBJ_BUCH-819-002.book Page 10 Tuesday, July 17, 2012 12:08 PM
10 | Deutsch
Tauchsägen (siehe Bilder E–F)
Geben Sie bei allen Rückfragen und Ersatzteilbestellungen
f Es dürfen nur weiche Werkstoffe wie Holz, Gipskarton
bitte unbedingt die 10-stellige Sachnummer laut Typenschild
o.Ä. im Tauchsägeverfahren bearbeitet werden! Bear-
des Elektrowerkzeuges an.
beiten Sie keine Metallwerkstoffe im Tauchsägever-
fahren!
Kundendienst und Kundenberatung
Verwenden Sie zum Tauchsägen nur kurze Sägeblätter.
Der Kundendienst beantwortet Ihre Fragen zu Reparatur und
Wartung Ihres Produkts sowie zu Ersatzteilen. Explosions-
Setzen Sie das Elektrowerkzeug mit der Kante der Fußplatte 2
zeichnungen und Informationen zu Ersatzteilen finden Sie
auf das Werkstück auf und schalten Sie es ein. Wählen Sie bei
auch unter:
Elektrowerkzeugen mit Hubzahlsteuerung die maximale Hub-
www.bosch-pt.com
zahl. Drücken Sie das Elektrowerkzeug fest gegen das Werk-
Das Bosch-Kundenberater-Team hilft Ihnen gerne bei Fragen
stück und lassen Sie das Sägeblatt langsam in das Werkstück
zu Kauf, Anwendung und Einstellung von Produkten und Zu-
eintauchen.
behören.
Sobald die Fußplatte 2 ganzflächig auf dem Werkstück auf-
liegt, sägen Sie entlang der gewünschten Schnittlinie weiter.
www.powertool-portal.de, das Internetportal für Hand-
werker und Heimwerker.
Für bestimmte Arbeiten kann das Sägeblatt 1 auch um 180°
www.ewbc.de, der Informations-Pool für Handwerk und
gedreht eingesetzt und die Säbelsäge entsprechend gewen-
Ausbildung.
det geführt werden.
Deutschland
Bündig sägen (siehe Bild G)
Robert Bosch GmbH
Mit elastischen Bi-Metall-Sägeblättern können z.B. hervor-
Servicezentrum Elektrowerkzeuge
stehende Bauelemente wie Wasserrohre etc. unmittelbar an
Zur Luhne 2
der Wand abgesägt werden.
37589 Kalefeld – Willershausen
f Achten Sie darauf, dass das Sägeblatt stets länger ist
Tel. Kundendienst: +49 (1805) 70 74 10*
als der Durchmesser des zu bearbeitenden Werk-
Fax: +49 (1805) 70 74 11*
stücks. Es besteht Rückschlaggefahr.
(*Festnetzpreis 14 ct/min, höchstens 42 ct/min aus Mobil-
Legen Sie das Sägeblatt direkt an der Wand an und biegen Sie
funknetzen)
es etwas durch seitlichen Druck auf das Elektrowerkzeug, bis
E-Mail: Servicezentrum.Elektrowerkzeuge@de.bosch.com
die Fußplatte an der Wand anliegt. Schalten Sie das Elektro-
Tel. Kundenberatung: +49 (1803) 33 57 99
werkzeug ein und sägen Sie mit konstantem seitlichem Druck
(Festnetzpreis 9 ct/min, höchstens 42 ct/min aus Mobil-
das Werkstück durch.
funknetzen)
Kühl-/Schmiermittel
Fax: +49 (711) 7 58 19 30
E-Mail: kundenberatung.ew@de.bosch.com
Beim Sägen von Metall sollten Sie wegen der Erwärmung des
Materials entlang der Schnittlinie Kühl- bzw. Schmiermittel
Österreich
auftragen.
Tel.: +43 (01) 7 97 22 20 10
Fax: +43 (01) 7 97 22 20 11
E-Mail: service.elektrowerkzeuge@at.bosch.com
Wartung und Service
Schweiz
Wartung und Reinigung
Tel.: +41 (044) 8 47 15 11
f Ziehen Sie vor allen Arbeiten am Elektrowerkzeug den
Fax: +41 (044) 8 47 15 51
Netzstecker aus der Steckdose.
Luxemburg
f Halten Sie das Elektrowerkzeug und die Lüftungsschlitze
Tel.: +32 2 588 0589
sauber, um gut und sicher zu arbeiten.
Fax: +32 2 588 0595
Reinigen Sie die Sägeblattaufnahme vorzugsweise mit Druck-
E-Mail: outillage.gereedschap@be.bosch.com
luft oder mit einem weichen Pinsel. Entnehmen Sie dazu das
Sägeblatt aus dem Elektrowerkzeug. Halten Sie die Sägeblatt-
Entsorgung
aufnahme durch Verwendung von geeigneten Schmiermitteln
Elektrowerkzeuge, Zubehör und Verpackungen sollen einer
funktionsfähig.
umweltgerechten Wiederverwertung zugeführt werden.
Eine starke Verschmutzung des Elektrowerkzeugs kann zu
Werfen Sie Elektrowerkzeuge nicht in den Hausmüll!
Funktionsstörungen führen. Sägen Sie deshalb stark staub-
erzeugende Materialien nicht von unten oder über Kopf.
Nur für EU-Länder:
Wenn ein Ersatz der Anschlussleitung erforderlich ist, dann
Gemäß der Europäischen Richtlinie
ist dies von Bosch oder einer autorisierten Kundendienst-
2002/96/EG über Elektro- und Elektronik-
stelle für Bosch-Elektrowerkzeuge auszuführen, um Sicher-
Altgeräte und ihrer Umsetzung in nationales
heitsgefährdungen zu vermeiden.
Recht müssen nicht mehr gebrauchsfähige
Elektrowerkzeuge getrennt gesammelt und
Sollte das Elektrowerkzeug trotz sorgfältiger Herstellungs-
einer umweltgerechten Wiederverwertung
und Prüfverfahren einmal ausfallen, ist die Reparatur von
zugeführt werden.
einer autorisierten Kundendienststelle für Bosch-Elektro-
werkzeuge ausführen zu lassen.
Änderungen vorbehalten.
1 619 929 L78 | (17.7.12) Bosch Power Tools
OBJ_BUCH-819-002.book Page 11 Tuesday, July 17, 2012 12:08 PM
English | 11
f Prevent unintentional starting. Ensure the switch is in
English
the off-position before connecting to power source
and/or battery pack, picking up or carrying the tool.
Carrying power tools with your finger on the switch or en-
Safety Notes
ergising power tools that have the switch on invites acci-
dents.
General Power Tool Safety Warnings
f Remove any adjusting key or wrench before turning
WARNING
Read all safety warnings and all in-
the power tool on. A wrench or a key left attached to a ro-
structions. Failure to follow the warnings
tating part of the power tool may result in personal injury.
and instructions may result in electric shock, fire and/or seri-
ous injury.
f Do not overreach. Keep proper footing and balance at
all times. This enables better control of the power tool in
Save all warnings and instructions for future reference.
unexpected situations.
The term “power tool” in the warnings refers to your mains-
f Dress properly. Do not wear loose clothing or jewel-
operated (corded) power tool or battery-operated (cordless)
lery. Keep your hair, clothing and gloves away from
power tool.
moving parts. Loose clothes, jewellery or long hair can be
Work area safety
caught in moving parts.
f Keep work area clean and well lit. Cluttered or dark areas
f If devices are provided for the connection of dust ex-
invite accidents.
traction and collection facilities, ensure these are con-
f Do not operate power tools in explosive atmospheres,
nected and properly used. Use of dust collection can re-
such as in the presence of flammable liquids, gases or
duce dust-related hazards.
dust. Power tools create sparks which may ignite the dust
Power tool use and care
or fumes.
f Do not force the power tool. Use the correct power tool
f Keep children and bystanders away while operating a
for your application. The correct power tool will do the
power tool. Distractions can cause you to lose control.
job better and safer at the rate for which it was designed.
Electrical safety
f Do not use the power tool if the switch does not turn it
f Power tool plugs must match the outlet. Never modify
on and off. Any power tool that cannot be controlled with
the plug in any way. Do not use any adapter plugs with
the switch is dangerous and must be repaired.
earthed (grounded) power tools. Unmodified plugs and
f Disconnect the plug from the power source and/or the
matching outlets will reduce risk of electric shock.
battery pack from the power tool before making any
f Avoid body contact with earthed or grounded surfaces,
adjustments, changing accessories, or storing power
such as pipes, radiators, ranges and refrigerators.
tools. Such preventive safety measures reduce the risk of
There is an increased risk of electric shock if your body is
starting the power tool accidentally.
earthed or grounded.
f Store idle power tools out of the reach of children and
f Do not expose power tools to rain or wet conditions.
do not allow persons unfamiliar with the power tool or
Water entering a power tool will increase the risk of electric
these instructions to operate the power tool. Power
shock.
tools are dangerous in the hands of untrained users.
f Do not abuse the cord. Never use the cord for carrying,
f Maintain power tools. Check for misalignment or bind-
pulling or unplugging the power tool. Keep cord away
ing of moving parts, breakage of parts and any other
from heat, oil, sharp edges and moving parts. Damaged
condition that may affect the power tool’s operation. If
or entangled cords increase the risk of electric shock.
damaged, have the power tool repaired before use.
f When operating a power tool outdoors, use an exten-
Many accidents are caused by poorly maintained power
sion cord suitable for outdoor use. Use of a cord suitable
tools.
for outdoor use reduces the risk of electric shock.
f Keep cutting tools sharp and clean. Properly maintained
f If operating a power tool in a damp location is unavoid-
cutting tools with sharp cutting edges are less likely to bind
able, use a residual current device (RCD) protected
and are easier to control.
supply. Use of an RCD reduces the risk of electric shock.
f Use the power tool, accessories and tool bits etc. in ac-
Personal safety
cordance with these instructions, taking into account
the working conditions and the work to be performed.
f Stay alert, watch what you are doing and use common
Use of the power tool for operations different from those
sense when operating a power tool. Do not use a power
intended could result in a hazardous situation.
tool while you are tired or under the influence of drugs,
alcohol or medication. A moment of inattention while op-
Service
erating power tools may result in serious personal injury.
f Have your power tool serviced by a qualified repair per-
f Use personal protective equipment. Always wear eye
son using only identical replacement parts. This will
protection. Protective equipment such as dust mask,
ensure that the safety of the power tool is maintained.
non-skid safety shoes, hard hat, or hearing protection used
for appropriate conditions will reduce personal injuries.
Bosch Power Tools 1 619 929 L78 | (17.7.12)

OBJ_BUCH-819-002.book Page 12 Tuesday, July 17, 2012 12:08 PM
12 | English
Safety Warnings for Sabre Saws
Product Description and
f Hold power tool by insulated gripping surfaces, when
Specifications
performing an operation where the cutting accessory
may contact hidden wiring or its own cord. Cutting ac-
Read all safety warnings and all instruc-
cessory contacting a “live” wire may make exposed metal
tions. Failure to follow the warnings and in-
parts of the power tool “live” and could give the operator an
structions may result in electric shock, fire
electric shock.
and/or serious injury.
f Keep hands away from the sawing range. Do not reach
While reading the operating instructions, unfold the graphics
under the workpiece. Contact with the saw blade can lead
page for the machine and leave it open.
to injuries.
f Apply the machine to the workpiece only when
Intended Use
switched on. Otherwise there is danger of kickback when
The machine is intended for sawing wood, plastic, metal and
the cutting tool jams in the workpiece.
building materials while resting firmly on the workpiece. It is
f When sawing, the adjustable footplate 2 must always
suitable for straight and curved cuts. When using the appro-
faces against the workpiece. The saw blade can become
priate bimetal saw blades, it is possible to cut flush to the
wedged and lead to loss of control over the machine.
workpiece surface. The saw blade recommendations must be
f When the cut is completed, switch off the machine and
observed.
then pull the saw blade out of the cut only after it has
Product Features
come to a standstill. In this manner you can avoid kick-
The numbering of the product features refers to the illustra-
back and can place down the machine securely.
tion of the machine on the graphics page.
f Use only undamaged saw blades that are in perfect con-
1 Saw blade*
dition. Bent or dull saw blades can break, negatively influ-
ence the cut, or lead to kickback.
2 Adjustable footplate
3 Saw blade holder
f Do not brake the saw blade to a stop by applying side
pressure after switching off. The saw blade can be dam-
4 Stroke rod
aged, break or cause kickback.
5 SDS clamping lever for saw blade release
f Clamp material well. Do not support the workpiece
6 Utility hook
with your hand or foot. Do not touch objects or the floor
7 Lock-off button for On/Off switch
with the the saw running. Danger of kickback.
8 On/Off switch
f Use suitable detectors to determine if utility lines are
9 Allen key
hidden in the work area or call the local utility company
10 “PowerLight”
for assistance. Contact with electric lines can lead to fire
11 Handle (insulated gripping surface)
and electric shock. Damaging a gas line can lead to explo-
12 Clamping plate
sion. Penetrating a water line causes property damage or
13 Screws for footplate adjustment
may cause an electric shock.
*Accessories shown or described are not part of the standard de-
f When working with the machine, always hold it firmly
livery scope of the product. A complete overview of accessories
with both hands and provide for a secure stance. The
can be found in our accessories program.
power tool is guided more secure with both hands.
Technical Data
f Secure the workpiece. A workpiece clamped with clamp-
ing devices or in a vice is held more secure than by hand.
Sabre saw GSA 1100 E
f Always wait until the machine has come to a complete
Article number
3 601 F4C 8..
stop before placing it down. The tool insert can jam and
Rated power input
W1100
lead to loss of control over the power tool.
Stroke rate at no load n
min
-1
0
0–2700
f Products sold in GB only: Your product is fitted with an
Tool holder
SDS
BS 1363/A approved electric plug with internal fuse
Stroke rate control
z
(ASTA approved to BS 1362).
If the plug is not suitable for your socket outlets, it should
Stroke
mm 28
be cut off and an appropriate plug fitted in its place by an
Cutting depth, max.
authorised customer service agent. The replacement plug
– in wood
mm
230
should have the same fuse rating as the original plug.
– in non-alloy steel
mm
20
The severed plug must be disposed of to avoid a possible
– Pipe diameter
mm
150
shock hazard and should never be inserted into a mains
Weight according to
socket elsewhere.
EPTA-Procedure 01/2003
kg 3.6
Products sold in AUS and NZ only: Use a residual current
Protection class
/II
device (RCD) with a rated residual current of 30 mA or less.
The values given are valid for a nominal voltage [U] of 230 V. For differ-
ent voltages and models for specific countries, these values can vary.
1 619 929 L78 | (17.7.12) Bosch Power Tools
OBJ_BUCH-819-002.book Page 13 Tuesday, July 17, 2012 1:55 PM
English | 13
Noise/Vibration Information
Selecting a Saw Blade
Measured sound values determined according to EN 60745.
An overview of recommended saw blades can be found at the
Typically the A-weighted noise levels of the product are:
beginning of these operating instructions. Use only saw
Sound pressure level 93 dB(A); Sound power level
blades with ½" universal shank. The saw blade should not be
104 dB(A). Uncertainty K =3 dB.
longer than required for the intended cut.
Wear hearing protection!
Use a thin saw blade for narrow curve cuts.
Vibration total values a
h
(triax vector sum) and uncertainty K
Inserting the Saw Blade (see figure A)
determined according to EN 60745:
Cutting board: a
2
, K=1.5 m/s
2
Press the SDS clamping lever 5 forward and guide the saw
h
=18.5m/s
,
Cutting wooden beam: a
=19.5m/s
2
2
blade 1 behind the clamping plate 12 into the saw blade hold-
h
, K=1.5 m/s
.
er 3. Release the SDS clamping lever 5.
The vibration emission level given in this information sheet has
f Check the tight seating by pulling on the saw blade.
been measured in accordance with a standardised test given in
A loose saw blade can fall out and cause injury.
EN 60745 and may be used to compare one tool with another.
It may be used for a preliminary assessment of exposure.
For certain work, the saw blade 1 can also be turned through
The declared vibration emission level represents the main ap-
180° (with the teeth pointed upwards) and re-inserted again.
plications of the tool. However if the tool is used for different
Removing the Saw Blade
applications, with different accessories or poorly maintained,
the vibration emission may differ. This may significantly in-
f Before removing, allow the saw blade to cool down.
crease the exposure level over the total working period.
Danger of injury when touching the hot saw blade.
An estimation of the level of exposure to vibration should also
Press the SDS clamping lever 5 forward and pull out the saw
take into account the times when the tool is switched off or
blade 1. Release the SDS clamping lever 5.
when it is running but not actually doing the job. This may signif-
icantly reduce the exposure level over the total working period.
Dust/Chip Extraction
Identify additional safety measures to protect the operator
f Dusts from materials such as lead-containing coatings,
from the effects of vibration such as: maintain the tool and the
some wood types, minerals and metal can be harmful to
accessories, keep hands warm, organise work patterns.
one’s health. Touching or breathing-in the dusts can
cause allergic reactions and/or lead to respiratory infec-
Declaration of Conformity
tions of the user or bystanders.
We declare under our sole responsibility that the product de-
Certain dusts, such as oak or beech dust, are considered
scribed under “Technical Data” is in conformity with the fol-
as carcinogenic, especially in connection with wood-
lowing standards or standardization documents: EN 60745
treatment additives (chromate, wood preservative).
according to the provisions of the directives 2011/65/EU,
Materials containing asbestos may only be worked by
2004/108/EC, 2006/42/EC.
specialists.
Technical file (2006/42/EC) at:
– Provide for good ventilation of the working place.
Robert Bosch GmbH, PT/ETM9,
– It is recommended to wear a P2 filter-class respirator.
D-70745 Leinfelden-Echterdingen
Observe the relevant regulations in your country for the
Dr. Egbert Schneider
Helmut Heinzelmann
materials to be worked.
Senior Vice President
Head of Product Certification
f Prevent dust accumulation at the workplace. Dusts can
Engineering
PT/ETM9
easily ignite.
Operation
Robert Bosch GmbH, Power Tools Division
Operating Modes
D-70745 Leinfelden-Echterdingen
Leinfelden, 15.06.2012
f Before any work on the machine itself, pull the mains
plug.
Assembly
Pivoting and Retractable Footplate
Replacing/Inserting the Saw Blade
(see figure B–C)
Due to its movability, the adjustable footplate 2 adapts to the
f Before any work on the machine itself, pull the mains
required angular position of the surface.
plug.
Depending on the application and the saw blade being used,
f When mounting the saw blade, wear protective gloves.
the footplate 2 can be moved variably in length direction.
Danger of injury when touching the saw blade.
Loosen the screws 13 with Allen key 9 and move the footplate
f When changing the saw blade, take care that the saw
2 to the requested position. Tighten the screws 13 again and
blade holder is free of material residue, e.g. wood or
check if the footplate 2 is tightly seated.
metal shavings.
Bosch Power Tools 1 619 929 L78 | (17.7.12)
OBJ_BUCH-819-002.book Page 14 Tuesday, July 17, 2012 1:55 PM
14 | English
Utility Hook (see figure D)
feed. After completing the working procedure, switch the
Your tool is equipped with a utility hook 6 for hanging it, e.g.,
machine off.
to a ladder, etc. Simply fold out the utility hook 6 to the re-
If the saw blade should jam, switch the machine off immedi-
quired position.
ately. Widen the gap somewhat with a suitable tool and pull
f When the tool is hanging by the utility hook, ensure
out the machine.
that the saw blade is protected against unintended
Plunge Cutting (see figures E–F)
contact. Danger of injury.
f The plunge cutting procedure is only suitable for treat-
Fold the utility hook 6 back in again when you are ready to
ing soft materials such as wood, plaster board or simi-
continue working.
lar! Do not work metal materials with the plunge cut-
ting procedure!
Starting Operation
Use only short saw blades for plunge cutting.
f Observe correct mains voltage! The voltage of the pow-
Place the machine with the edge of the footplate 2 onto the
er source must agree with the voltage specified on the
workpiece and switch on. For power tools with stroke speed
nameplate of the machine. Power tools marked with
control, set the maximum stroke speed. Press the power tool
230 V can also be operated with 220 V.
firmly against the workpiece and allow the saw blade to slowly
The “Power Light” 10 is lit when the mains plug is inserted,
plunge into the workpiece.
and allows for illumination of the working range under unfa-
As soon as the footplate 2 fully lays on the surface of the work-
vourable light conditions.
piece, continue sawing alongside the desired cutting line.
Switching On and Off
For certain work, the saw blade 1 can also be inserted turned
To start the machine, first push the lock-off button for the
through by 180° and the sabre saw can be guided accordingly
On/Off switch 7 and then press the On/Off switch 8 and keep
in a reversed manner.
it pressed.
Flush Cuts (see figure G)
To switch off the machine, release the On/Off switch 8.
Using elastic bimetal saw blades, items still attached to a wall
Note: For safety reasons, the On/Off switch 8 cannot be
(e.g. projecting building elements such as water pipes, etc.)
locked; it must remain pressed during the entire operation.
can be sawn off flush at the wall.
When not using the power tool, switch it off in order to save
f Pay attention that the saw blade always extends be-
energy.
yond the diameter of the material being worked. There
is danger of kickback.
Controlling the Stroke Rate
Position the saw blade directly against the wall and apply
Increasing or reducing the pressure on the On/Off switch 8
some lateral pressure via the tool until the footplate faces
enables stepless stroke-rate control of the switched-on ma-
against the wall. Switch the power tool on and saw through
chine.
the workpiece, applying constant lateral pressure.
Light pressure on the On/Off switch 8 results in a low stroke
rate. Increasing the pressure also increases the stroke rate.
Coolant/Lubricant
When sawing metal, coolant/lubricant should be applied
The required stroke rate is dependent on the material and the
alongside cutting line because of the material heating up.
working conditions and can be determined by a practical trial.
Reducing the stroke rate is recommended when the saw
blade engages in the material as well as when sawing plastic
Maintenance and Service
and aluminium.
Maintenance and Cleaning
After longer periods of work at low stroke rate, the machine
f Before any work on the machine itself, pull the mains
can heat up considerably. Allow the machine to cool down by
plug.
running it for approx. 3 minutes at maximum stroke rate.
f For safe and proper working, always keep the machine
Working Advice
and ventilation slots clean.
Clean the saw blade holder preferably with compressed air or
f Before any work on the machine itself, pull the mains
a soft brush. Remove the saw blade from the power tool for
plug.
this. Ensure proper operation of the saw blade holder by ap-
Tips
plying a suitable lubricant.
f When sawing light building materials, observe the stat-
Heavy contamination of the machine can lead to malfunc-
utory provisions and the recommendations of the ma-
tions. Therefore, do not saw materials that produce a lot of
terial suppliers.
dust from below or overhead.
Check wood, press boards, building materials, etc. for foreign
If the replacement of the supply cord is necessary, this has to
objects such as nails, screws or similar, and always use the
be done by Bosch or an authorized Bosch service agent in or-
correct sawblade.
der to avoid a safety hazard.
Switch the machine on and guide it toward the workpiece.
If the machine should fail despite the care taken in manufac-
Position the footplate 2 onto the surface of the work and saw
turing and testing procedures, repair should be carried out by
through the material applying uniform contact pressure and
an after-sales service centre for Bosch power tools.
1 619 929 L78 | (17.7.12) Bosch Power Tools

OBJ_BUCH-819-002.book Page 15 Tuesday, July 17, 2012 12:08 PM
English | 15
In all correspondence and spare parts order, please always in-
KZN – BSC Service Centre
clude the 10-digit article number given on the type plate of
Unit E, Almar Centre
the machine.
143 Crompton Street
Pinetown
After-sales Service and Customer Assistance
Tel.: +27 (031) 7 01 21 20
Our after-sales service responds to your questions concern-
Fax: +27 (031) 7 01 24 46
ing maintenance and repair of your product as well as spare
E-Mail: bsc.dur@za.bosch.com
parts. Exploded views and information on spare parts can al-
Western Cape – BSC Service Centre
so be found under:
Democracy Way, Prosperity Park
www.bosch-pt.com
Milnerton
Our customer service representatives can answer your ques-
Tel.: +27 (021) 5 51 25 77
tions concerning possible applications and adjustment of
Fax: +27 (021) 5 51 32 23
products and accessories.
E-Mail: bsc@zsd.co.za
Great Britain
Bosch Headquarters
Robert Bosch Ltd. (B.S.C.)
Midrand, Gauteng
P.O. Box 98
Tel.: +27 (011) 6 51 96 00
Broadwater Park
Fax: +27 (011) 6 51 98 80
North Orbital Road
E-Mail: rbsa-hq.pts@za.bosch.com
Denham
People’s Republic of China
Uxbridge
UB 9 5HJ
China Mainland
Tel. Service: +44 (0844) 736 0109
Bosch Power Tools (China) Co., Ltd.
Fax: +44 (0844) 736 0146
567, Bin Kang Road
E-Mail: boschservicecentre@bosch.com
Bin Jiang District 310052
Hangzhou, P.R.China
Ireland
Service Hotline: 400 826 8484
Origo Ltd.
Fax: +86 571 8777 4502
Unit 23 Magna Drive
E-Mail: contact.ptcn@cn.bosch.com
Magna Business Park
www.bosch-pt.com.cn
City West
HK and Macau Special Administrative Regions
Dublin 24
Robert Bosch Hong Kong Co. Ltd.
Tel. Service: +353 (01) 4 66 67 00
21st Floor, 625 King’s Road
Fax: +353 (01) 4 66 68 88
North Point, Hong Kong
Australia, New Zealand and Pacific Islands
Customer Service Hotline: +852 2101 0235
Robert Bosch Australia Pty. Ltd.
Fax: +852 2590 9762
Power Tools
E-Mail: info@hk.bosch.com
Locked Bag 66
www.bosch-pt.com.hk
Clayton South VIC 3169
Indonesia
Customer Contact Center
PT. Multi Mayaka
Inside Australia:
Kawasan Industri Pulogadung
Phone: +61 (01300) 307 044
Jalan Rawa Gelam III No. 2
Fax: +61 (01300) 307 045
Jakarta 13930
Inside New Zealand:
Indonesia
Phone: +64 (0800) 543 353
Tel.: +62 (21) 46 83 25 22
Fax: +64 (0800) 428 570
Fax: +62 (21) 46 82 86 45/68 23
Outside AU and NZ:
E-Mail: sales@multimayaka.co.id
Phone: +61 (03) 9541 5555
www.bosch-pt.co.id
www.bosch.com.au
Philippines
Republic of South Africa
Robert Bosch, Inc.
Customer service
28th Floor Fort Legend Towers,
Hotline: +27 (011) 6 51 96 00
3rd Avenue corner 31st Street,
Gauteng – BSC Service Centre
Fort Bonifacio Global City,
35 Roper Street, New Centre
1634 Taguig City, Philippines
Johannesburg
Tel.: +63 (2) 870 3871
Tel.: +27 (011) 4 93 93 75
Fax: +63 (2) 870 3870
Fax: +27 (011) 4 93 01 26
matheus.contiero@ph.bosch.com
E-Mail: bsctools@icon.co.za
www.bosch-pt.com.ph
Bosch Power Tools 1 619 929 L78 | (17.7.12)
OBJ_BUCH-819-002.book Page 16 Tuesday, July 17, 2012 12:08 PM
16 | Français
Bosch Service Center:
Disposal
9725-27 Kamagong Street
The machine, accessories and packaging should be sorted for
San Antonio Village
environmental-friendly recycling.
Makati City, Philippines
Tel.: +63 (2) 899 9091
Do not dispose of power tools into household waste!
Fax: +63 (2) 897 6432
Only for EC countries:
rosalie.dagdagan@ph.bosch.com
According to the European Guideline
Malaysia
2002/96/EC for Waste Electrical and Elec-
tronic Equipment and its implementation
Robert Bosch (S.E.A.) Sdn. Bhd.
into national right, power tools that are no
No. 8A, Jalan 13/6
longer usable must be collected separately
G.P.O. Box 10818
and disposed of in an environmentally cor-
46200 Petaling Jaya
rect manner.
Selangor, Malaysia
Tel.: +60 (3) 7966 3194
Subject to change without notice.
Fax: +60 (3) 7958 3838
cheehoe.on@my.bosch.com
Toll-Free: 1800 880 188
www.bosch-pt.com.my
Français
Thailand
Robert Bosch Ltd.
Avertissements de sécurité
Liberty Square Building
Avertissements de sécurité généraux pour l’outil
No. 287, 11 Floor
Silom Road, Bangrak
AVERTISSEMENT
Lire tous les avertissements
Bangkok 10500
de sécurité et toutes les ins-
Tel.: +66 (2) 6 31 18 79 – 18 88 (10 lines)
tructions. Ne pas suivre les avertissements et instructions
Fax: +66 (2) 2 38 47 83
peut donner lieu à un choc électrique, un incendie et/ou une
Robert Bosch Ltd., P. O. Box 2054
blessure sérieuse.
Bangkok 10501, Thailand
Conserver tous les avertissements et toutes les instruc-
tions pour pouvoir s’y reporter ultérieurement.
Bosch Service – Training Centre
2869-2869/1 Soi Ban Kluay
Le terme « outil » dans les avertissements fait référence à vo-
Rama IV Road (near old Paknam Railway)
tre outil électrique alimenté par le secteur (avec cordon d’ali-
Prakanong District
mentation) ou votre outil fonctionnant sur batterie (sans cor-
10110 Bangkok
don d’alimentation).
Thailand
Sécurité de la zone de travail
Tel.: +66 (2) 6 71 78 00 – 4
f Conserver la zone de travail propre et bien éclairée. Les
Fax: +66 (2) 2 49 42 96
zones en désordre ou sombres sont propices aux accidents.
Fax: +66 (2) 2 49 52 99
f Ne pas faire fonctionner les outils électriques en at-
Singapore
mosphère explosive, par exemple en présence de liqui-
Robert Bosch (SEA) Pte. Ltd.
des inflammables, de gaz ou de poussières. Les outils
11 Bishan Street 21
électriques produisent des étincelles qui peuvent enflam-
Singapore 573943
mer les poussières ou les fumées.
Tel.: +65 6571 2772
f Maintenir les enfants et les personnes présentes à
Fax: +65 6350 5315
l’écart pendant l’utilisation de l’outil. Les distractions
leongheng.leow@sg.bosch.com
peuvent vous faire perdre le contrôle de l’outil.
Toll-Free: 1800 333 8333
Sécurité électrique
www.bosch-pt.com.sg
f Il faut que les fiches de l’outil électrique soient adaptées
Vietnam
au socle. Ne jamais modifier la fiche de quelque façon
Robert Bosch Vietnam Co. Ltd
que ce soit. Ne pas utiliser d’adaptateurs avec des outils
10/F, 194 Golden Building
à branchement de terre. Des fiches non modifiées et des
473 Dien Bien Phu Street
socles adaptés réduiront le risque de choc électrique.
Ward 25, Binh Thanh District
f Eviter tout contact du corps avec des surfaces reliées à
84 Ho Chi Minh City
la terre telles que les tuyaux, les radiateurs, les cuisi-
Vietnam
nières et les réfrigérateurs. Il existe un risque accru de
Tel.: +84 (8) 6258 3690 ext. 413
choc électrique si votre corps est relié à la terre.
Fax: +84 (8) 6258 3692
f Ne pas exposer les outils à la pluie ou à des conditions
hieu.lagia@vn.bosch.com
humides. La pénétration d’eau à l’intérieur d’un outil aug-
www.bosch-pt.com
mentera le risque de choc électrique.
1 619 929 L78 | (17.7.12) Bosch Power Tools

OBJ_BUCH-819-002.book Page 17 Tuesday, July 17, 2012 12:08 PM
Français | 17
f Ne pas maltraiter le cordon. Ne jamais utiliser le cordon
f Débrancher la fiche de la source d’alimentation en cou-
pour porter, tirer ou débrancher l’outil. Maintenir le
rant et/ou le bloc de batteries de l’outil avant tout ré-
cordon à l’écart de la chaleur, du lubrifiant, des arêtes
glage, changement d’accessoires ou avant de ranger
ou des parties en mouvement. Les cordons endommagés
l’outil. De telles mesures de sécurité préventives rédui-
ou emmêlés augmentent le risque de choc électrique.
sent le risque de démarrage accidentel de l’outil.
f Lorsqu’on utilise un outil à l’extérieur, utiliser un pro-
f Conserver les outils à l’arrêt hors de la portée des en-
longateur adapté à l’utilisation extérieure. L’utilisation
fants et ne pas permettre à des personnes ne connais-
d’un cordon adapté à l’utilisation extérieure réduit le risque
sant pas l’outil ou les présentes instructions de le faire
de choc électrique.
fonctionner. Les outils sont dangereux entre les mains
f Si l’usage d’un outil dans un emplacement humide est
d’utilisateurs novices.
inévitable, utiliser une alimentation protégée par un
f Observer la maintenance de l’outil. Vérifier qu’il n’y a
dispositif à courant différentiel résiduel (RCD). L’usage
pas de mauvais alignement ou de blocage des parties
d’un RCD réduit le risque de choc électrique.
mobiles, des pièces cassées ou toute autre condition
Sécurité des personnes
pouvant affecter le fonctionnement de l’outil. En cas de
dommages, faire réparer l’outil avant de l’utiliser. De
f Rester vigilant, regarder ce que vous êtes en train de fai-
nombreux accidents sont dus à des outils mal entretenus.
re et faire preuve de bon sens dans l’utilisation de l’outil.
Ne pas utiliser un outil lorsque vous êtes fatigué ou sous
f Garder affûtés et propres les outils permettant de cou-
l’emprise de drogues, d’alcool ou de médicaments. Un
per. Des outils destinés à couper correctement entretenus
moment d’inattention en cours d’utilisation d’un outil peut
avec des pièces coupantes tranchantes sont moins sus-
entraîner des blessures graves des personnes.
ceptibles de bloquer et sont plus faciles à contrôler.
f Utiliser un équipement de sécurité. Toujours porter
f Utiliser l’outil, les accessoires et les lames etc., confor-
une protection pour les yeux. Les équipements de sécu-
mément à ces instructions, en tenant compte des con-
rité tels que les masques contre les poussières, les chaus-
ditions de travail et du travail à réaliser. L’utilisation de
sures de sécurité antidérapantes, les casques ou les pro-
l’outil pour des opérations différentes de celles prévues
tections acoustiques utilisés pour les conditions
pourrait donner lieu à des situations dangereuses.
appropriées réduiront les blessures des personnes.
Maintenance et entretien
f Eviter tout démarrage intempestif. S’assurer que l’in-
f Faire entretenir l’outil par un réparateur qualifié utili-
terrupteur est en position arrêt avant de brancher
sant uniquement des pièces de rechange identiques.
l’outil au secteur et/ou au bloc de batteries, de le ra-
Cela assurera que la sécurité de l’outil est maintenue.
masser ou de le porter. Porter les outils en ayant le doigt
sur l’interrupteur ou brancher des outils dont l’interrupteur
Instructions de sécurité pour scies sabre
est en position marche est source d’accidents.
f Tenir l’outil par les surfaces de préhension isolantes,
f Retirer toute clé de réglage avant de mettre l’outil en
pendant les opérations au cours desquelles l’accessoi-
marche. Une clé laissée fixée sur une partie tournante de
re coupant peut être en contact avec des conducteurs
l’outil peut donner lieu à des blessures de personnes.
cachés ou avec son propre câble. Le contact avec un fil
f Ne pas se précipiter. Garder une position et un équili-
« sous tension » peut également mettre « sous tension » les
bre adaptés à tout moment. Cela permet un meilleur con-
parties métalliques exposées de l’outil électrique et provo-
trôle de l’outil dans des situations inattendues.
quer un choc électrique sur l’opérateur.
f S’habiller de manière adaptée. Ne pas porter de vête-
f Garder les mains à distance de la zone de sciage. Ne pas
ments amples ou de bijoux. Garder les cheveux, les vê-
passer les mains sous la pièce à travailler. Lors d’un con-
tements et les gants à distance des parties en mouve-
tact avec la lame de scie, il y a risque de blessures.
ment. Des vêtements amples, des bijoux ou les cheveux
f N’approchez l’outil électroportatif de la pièce à travailler
longs peuvent être pris dans des parties en mouvement.
que quand l’appareil est en marche. Sinon, il y a risque
f Si des dispositifs sont fournis pour le raccordement
d’un contrecoup, au cas où l’outil se coincerait dans la pièce.
d’équipements pour l’extraction et la récupération des
f Veiller à ce que la plaque de base 2 repose bien sur la
poussières, s’assurer qu’ils sont connectés et correcte-
pièce à travailler lors du sciage. La lame de scie risque de
ment utilisés. Utiliser des collecteurs de poussière peut
se coincer, ce qui entraîne une perte de contrôle de l’outil
réduire les risques dus aux poussières.
électroportatif.
Utilisation et entretien de l’outil
f Une fois l’opération terminée, arrêter l’outil électro-
portatif et ne retirer la lame de scie de sa ligne de coupe
f Ne pas forcer l’outil. Utiliser l’outil adapté à votre appli-
que lorsque celle-ci est complètement à l’arrêt. Ainsi,
cation. L’outil adapté réalisera mieux le travail et de maniè-
un contrecoup est évité et l’outil électroportatif peut être
re plus sûre au régime pour lequel il a été construit.
retiré en toute sécurité.
f Ne pas utiliser l’outil si l’interrupteur ne permet pas de
f N’utiliser que des lames de scie en parfait état. Les la-
passer de l’état de marche à arrêt et vice versa. Tout
mes de scie déformées ou émoussées peuvent se casser,
outil qui ne peut pas être commandé par l’interrupteur est
avoir des effets négatifs sur la qualité de la coupe ou causer
dangereux et il faut le faire réparer.
un contrecoup.
Bosch Power Tools 1 619 929 L78 | (17.7.12)
OBJ_BUCH-819-002.book Page 18 Tuesday, July 17, 2012 12:08 PM
18 | Français
f Une fois l’appareil arrêté, ne pas stopper la lame de
6 Crochet de suspension
scie en exerçant une pression latérale sur celle-ci. La la-
7 Déverrouillage de mise en fonctionnement de
me de scie peut être endommagée, se casser ou causer un
l’interrupteur Marche/Arrêt
contrecoup.
8 Interrupteur Marche/Arrêt
f Bien serrer le matériau dans l’étau. Ne pas soutenir la
9 Clé mâle coudée pour vis à six pans creux
pièce à travailler avec la main ou le pied. Ne pas tou-
10 Lampe « Power Light »
cher d’objets ou le sol avec la scie en fonctionnement. Il
y a risque de contre-coup.
11 Poignée (surface de préhension isolante)
f Utiliser des détecteurs appropriés afin de déceler des
12 Plaque de serrage
conduites cachées ou consulter les entreprises d’ap-
13 Vis de réglage de la plaque de base
provisionnement locales. Un contact avec des lignes
*Les accessoires décrits ou illustrés ne sont pas tous compris dans
électriques peut provoquer un incendie ou un choc électri-
la fourniture. Vous trouverez les accessoires complets dans notre
que. Un endommagement d’une conduite de gaz peut pro-
programme d’accessoires.
voquer une explosion. La perforation d’une conduite d’eau
Caractéristiques techniques
provoque des dégâts matériels et peut provoquer un choc
électrique.
Scie sabre GSA 1100 E
f Toujours bien tenir l’outil électroportatif des deux
N° d’article
3 601 F4C 8..
mains et veiller à toujours garder une position de tra-
Puissance nominale absorbée
W1100
vail stable. Avec les deux mains, l’outil électroportatif est
guidé de manière plus sûre.
Nombre de courses à vide n
0
tr/min 0–2700
f Bloquer la pièce à travailler. Une pièce à travailler serrée
Porte-outil
SDS
par des dispositifs de serrage appropriés ou dans un étau
Variateur de vitesse
z
est fixée de manière plus sûre que tenue dans les mains.
Amplitude de course
mm 28
f Avant de déposer l’outil électroportatif, attendre que
Profondeur de coupe max.
celui-ci soit complètement à l’arrêt. L’outil risque de se
– dans le bois
mm
230
coincer, ce qui entraînerait une perte de contrôle de l’outil
– dans l’acier, non-allié
mm
20
électroportatif.
– diamètre de tuyau
mm
150
Poids suivant
Description et performances du
EPTA-Procedure 01/2003
kg 3,6
produit
Classe de protection
/II
Ces indications sont valables pour une tension nominale de [U] 230 V.
Il est impératif de lire toutes les consignes
Ces indications peuvent varier pour des tensions plus basses ainsi que
de sécurité et toutes les instructions. Le
pour des versions spécifiques à certains pays.
non-respect des avertissements et instruc-
tions indiqués ci-après peut conduire à une
Niveau sonore et vibrations
électrocution, un incendie et/ou de graves
blessures.
Valeurs de mesure du niveau sonore relevées conformément
à la norme EN 60745.
Dépliez le volet sur lequel l’appareil est représenté de manière
graphique. Laissez le volet déplié pendant la lecture de la pré-
Les mesures réelles (A) des niveaux sonores de l’appareil
sente notice d’utilisation.
sont : niveau de pression acoustique 93 dB(A) ; niveau d’in-
tensité acoustique 104 dB(A). Incertitude K=3 dB.
Utilisation conforme
Porter une protection acoustique !
L’appareil muni d’une plaque de base rigide est conçu pour le
Valeurs totales des vibrations a
h
(somme vectorielle des trois
sciage du bois, des matières plastiques, du métal et des maté-
axes directionnels) et incertitude K relevées conformément à
riaux de construction. Il est approprié pour des coupes droi-
la norme EN 60745 :
2
2
tes et curvilignes. L’utilisation des lames de scie bimétal sou-
Sciage de panneau aggloméré : a
h
=18,5m/s
, K=1,5 m/s
,
2
ples permet des découpes au ras des murs. Respectez les
Sciage de poutre en bois : a
h
=19,5m/s
, K=1,5 m/s
2
.
recommandations d’utilisation des lames de scie.
Le niveau d’oscillation indiqué dans ces instructions d’utilisa-
tion a été mesuré conformément à la norme EN 60745 et peut
Eléments de l’appareil
être utilisé pour une comparaison d’outils électroportatifs. Il
La numérotation des éléments de l’appareil se réfère à la re-
est également approprié pour une estimation préliminaire de
présentation de l’outil électroportatif sur la page graphique.
la charge vibratoire.
1 Lame de scie*
Le niveau d’oscillation correspond aux utilisations principales
2 Plaque de base réglable
de l’outil électroportatif. Si l’outil électrique est cependant
utilisé pour d’autres applications, avec d’autres outils de tra-
3 Porte-lame
vail ou avec un entretien non approprié, le niveau d’oscillation
4 Porte-outil
peut être différent. Ceci peut augmenter considérablement la
5 Levier SDS pour déverrouillage de la lame de scie
charge vibratoire pendant toute la durée de travail.
1 619 929 L78 | (17.7.12) Bosch Power Tools
OBJ_BUCH-819-002.book Page 19 Tuesday, July 17, 2012 12:08 PM
Français | 19
Pour une estimation précise de la charge vibratoire, il est re-
Pour certains travaux, il est possible de monter la lame de
commandé de prendre aussi en considération les périodes
scie 1 tournée de 180° (de façon à ce que les dents soient
pendant lesquelles l’appareil est éteint ou en fonctionnement,
dirigées vers le haut).
mais pas vraiment utilisé. Ceci peut réduire considérable-
ment la charge vibratoire pendant toute la durée de travail.
Ejection de la lame de scie
Déterminez des mesures de protection supplémentaires pour
f Laissez refroidir la lame de scie avant de la retirer. Lors
protéger l’utilisateur des effets de vibrations, telles que par
d’un contact avec la lame de scie chaude, il y a un risque de
exemple : entretien de l’outil électrique et des outils de travail,
blessures.
maintenir les mains chaudes, organisation judicieuse des
Poussez le levier SDS 5 vers l’avant et retirez la lame de
opérations de travail.
scie 1. Relâchez le levier SDS 5.
Déclaration de conformité
Aspiration de poussières/de copeaux
Nous déclarons sous notre propre responsabilité que le pro-
f Les poussières de matériaux tels que peintures contenant
duit décrit sous « Caractéristiques techniques » est en confor-
du plomb, certains bois, minéraux ou métaux, peuvent être
mité avec les normes ou documents normatifs suivants :
nuisibles à la santé. Entrer en contact ou aspirer les pous-
EN 60745 conformément aux termes des réglementations en
sières peut entraîner des réactions allergiques et/ou des
vigueur 2011/65/UE, 2004/108/CE, 2006/42/CE.
maladies respiratoires auprès de l’utilisateur ou de person-
Dossier technique (2006/42/CE) auprès de :
nes se trouvant à proximité.
Robert Bosch GmbH, PT/ETM9,
Certaines poussières telles que les poussières de chêne ou
D-70745 Leinfelden-Echterdingen
de hêtre sont considérées comme cancérigènes, surtout
Dr. Egbert Schneider
Helmut Heinzelmann
en association avec des additifs pour le traitement du bois
Senior Vice President
Head of Product Certification
(chromate, lazure). Les matériaux contenant de l’amiante
Engineering
PT/ETM9
ne doivent être travaillés que par des personnes qualifiées.
– Veillez à bien aérer la zone de travail.
– Il est recommandé de porter un masque respiratoire
avec un niveau de filtration de classe P2.
Robert Bosch GmbH, Power Tools Division
Respectez les règlements spécifiques aux matériaux à trai-
D-70745 Leinfelden-Echterdingen
ter en vigueur dans votre pays.
Leinfelden, 15.06.2012
f Evitez toute accumulation de poussières à l’emplace-
ment de travail. Les poussières peuvent facilement s’en-
Montage
flammer.
Montage/changement de la lame de scie
f Avant d’effectuer des travaux sur l’outil électroporta-
Mise en marche
tif, retirez la fiche de la prise de courant.
Modes opératoires
f Portez toujours des gants de protection pour monter la
f Avant d’effectuer des travaux sur l’outil électroporta-
lame de scie. Lors d’un contact avec la lame de scie, il y a
tif, retirez la fiche de la prise de courant.
risque de blessures.
f Lors du changement de la lame de scie, veillez à ce que
Plaque de base orientable et réglable (voi figures B–C)
le système de fixation de la lame de scie soit exempt de
Grâce à sa mobilité, la plaque de base 2 s’adapte à la position
tout résidu de matériau, par ex. copeaux de bois ou de
angulaire requise de la surface en question.
métal.
Il est possible de déplacer la plaque de base 2 en continu dans
Choix de la lame de scie
le sens de la longueur suivant l’utilisation et la lame de scie.
Vous trouverez un tableau des lames de scie recommandées au
Desserrez les vis 13 à l’aide de la clé pour vis à six pans creux
début de ces instructions d’utilisation. Ne montez que des la-
9 et poussez la plaque de base 2 dans la position souhaitée.
mes de scie à queue universelle ½". La lame de scie ne devrait
Resserrez les vis 13 et contrôlez si la plaque de base 2 est
pas être plus longue que nécessaire pour la coupe prévue.
bien fixée.
Pour le sciage de courbes serrées, utilisez des lames de scie
Crochet de suspension (voir figure D)
fines à chantourner.
Le crochet de suspension 6 permet d’accrocher l’outil électri-
Montage de la lame de scie (voir figure A)
que à une échelle par ex. Pour ce faire, rabattez le crochet de
Poussez le levier SDS 5 vers l’avant et introduisez la lame de
suspension 6 dans la position souhaitée.
scie 1 derrière la plaque de serrage 12 dans le porte-lame 3.
f Lorsque l’outil électrique est accroché, veillez à ce que
Relâchez le levier SDS 5.
la lame de scie soit à l’abri d’un contact non intention-
f Contrôlez que la lame de scie soit bien fixée en tirant
nel. Il y a un risque de blessures.
dessus. Une lame de scie qui n’est pas bien serrée peut
Relevez le crochet de suspension 6 si vous voulez travailler
tomber et risque de vous blesser.
avec l’outil électrique.
Bosch Power Tools 1 619 929 L78 | (17.7.12)

OBJ_BUCH-819-002.book Page 20 Tuesday, July 17, 2012 12:08 PM
20 | Français
Mise en service
Arrêtez immédiatement l’outil électroportatif lorsque la lame
f Tenez compte de la tension du réseau ! La tension de la
de scie se coince. A l’aide d’un outil approprié, écartez légère-
source de courant doit correspondre aux indications se
ment la fente de scie et retirez l’outil électroportatif.
trouvant sur la plaque signalétique de l’outil électro-
Coupes en plongée (voir figures E– F)
portatif. Les outils électroportatifs marqués 230 V
peuvent également fonctionner sur 220 V.
f Le procédé de coupes en plongée ne peut être appliqué
que dans des matériaux tendres tels que le bois, les pla-
La lampe 10 s’allume lorsque la fiche de secteur est branchée
ques de plâtre, etc. ! N’effectuez pas de coupes en plon-
et permet d’éclairer la zone de travail lorsque l’éclairage est
gée dans des matériaux métalliques !
mauvais.
Pour les coupes en plongée n’utilisez que des lames de scie
Mise en Marche/Arrêt
courtes.
Pour la mise en service de l’outil électroportatif, poussez
Positionnez l’outil électroportatif avec le bord de la plaque de
d’abord le dispositif de déverrouillage de mise en marche 7
base 2 sur la pièce à travailler et mettez-le en fonctionnement.
vers l’arrière ; appuyez ensuite sur l’interrupteur Marche/
Si l’outil électroportatif dispose d’un variateur de vitesse, sé-
Arrêt 8 et maintenez-le appuyé.
lectionnez la vitesse maximale. Avec l’outil électroportatif
Pour arrêter l’outil électroportatif, relâchez l’interrupteur
exercez une pression contre la pièce à travailler et plongez
Marche/Arrêt 8.
lentement la lame de scie dans la pièce.
Note : Pour des raisons de sécurité, il n’est pas possible de
Dès que la plaque de base 2 repose de toute sa surface sur la
verrouiller l’interrupteur Marche/Arrêt 8, mais celui-ci doit
pièce à travailler, continuez à scier le long du tracé souhaité.
rester constamment appuyé pendant le travail de sciage.
Pour certains travaux, il est possible de monter la lame de scie
Pour des économies d’énergie, éteignez l’outil électroportatif
1 tournée de 180° et d’utiliser la scie sabre tournée en consé-
quand vous ne l’utilisez pas.
quence.
Réglage du variateur de vitesse
Sciage à bord franc (voir figure G)
La pression plus ou moins importante exercée sur l’interrup-
teur Marche/Arrêt 8 permet de régler en continu le nombre de
Les lames de scie bimétals souples permettent par exemple
courses de l’outil électroportatif en marche.
de scier au ras des murs des éléments de construction en
saillie tels que les conduites d’eau, etc.
Une légère pression sur l’interrupteur Marche/Arrêt 8 entraî-
ne un nombre de course réduit. Plus la pression sur l’interrup-
f Veillez à ce que la lame de scie soit toujours plus longue
teur augmente, plus le nombre de courses est élevé.
que le diamètre de la pièce à travailler. Il y a un risque
Le nombre de courses dépend du matériau à travailler et des
de contre-coup.
conditions de travail et peut être déterminé par des essais
Placez la lame de scie directement sur le mur et pliez-la un peu
pratiques.
pour la presser sur l’outil électroportatif en appliquant une
Il est recommandé de réduire la vitesse quand la lame de scie
pression latérale jusqu’à ce que la plaque de base repose sur
est placée au contact de la pièce à travailler ainsi que pour dé-
le mur. Mettez l’outil électroportatif en marche et sciez com-
couper des matières plastiques ou de l’aluminium.
plètement la pièce en appliquant une pression latérale cons-
tante.
En cas de travaux assez longs avec un petit nombre de cour-
ses, l’outil électroportatif risque de chauffer fortement. Faites
Liquides de refroidissement/lubrifiant
travailler l’outil électroportatif au nombre de courses maximal
Lors du sciage de métal, appliquez un lubrifiant ou un liquide
pendant une durée de 3 minutes environ afin de le laisser re-
de refroidissement le long du tracé de coupe.
froidir.
Instructions d’utilisation
Entretien et Service Après-Vente
f Avant d’effectuer des travaux sur l’outil électroportatif,
retirez la fiche de la prise de courant.
Nettoyage et entretien
Conseil
f Avant d’effectuer des travaux sur l’outil électroporta-
f Lors du sciage de matériaux de construction légers,
tif, retirez la fiche de la prise de courant.
respectez les dispositions légales ainsi que les recom-
f Veillez à ce que l’outil électroportatif ainsi que les ouïes
mandations du fabricant du matériau.
de ventilation soient toujours propres afin d’obtenir un
Avant de scier dans le bois, les panneaux d’agglomérés, les
travail impeccable et sûr.
matériaux de construction etc., vérifiez si ceux-ci contiennent
Nettoyez le porte-lame de préférence à l’aide de l’air compri-
des corps étrangers tels que clous ou vis etc., et utilisez la la-
mé ou d’un pinceau souple. Pour ce faire, enlevez la lame de
me de scie appropriée.
scie de l’outil électroportatif. Maintenez la fonctionnalité du
Mettez l’outil électroportatif en marche et approchez-le de la
porte-lame en utilisant des lubrifiants appropriés.
pièce à travailler. Placez la plaque de base 2 sur la surface de
Un fort encrassement de l’outil électroportatif risque d’entra-
la pièce et sciez complètement le matériau en appliquant une
ver le bon fonctionnement de celui-ci. Pour cette raison, ne
pression et/ou avance régulière. Une fois l’opération de tra-
sciez pas les matériaux produisant beaucoup de poussières
vail terminée, arrêtez l’outil électroportatif.
par dessous ou dans une position en hauteur.
1 619 929 L78 | (17.7.12) Bosch Power Tools


