Bosch BSA 2885: инструкция
Раздел: Бытовая, кухонная техника, электроника и оборудование
Тип: Пылесос
Характеристики, спецификации
Инструкция к Пылесосу Bosch BSA 2885

BSA28..
a
de Gebrauchsanweisung
en Instructions for use
fr Mode d´emploi
it Instruzioni per l´uso
nl Gebruiksaanwijzing
da Brugsanvisning
no Bruksanvisning
A
sv Bruksanvisning
fi Käyttöohje
pt Instruções de serviço
es Instrucciones para el
uso
el Oδηγες χρσεως
tr Kullanma talimatı
hu Használati utasitás
pl Sposób użycia
bg 燘ËÌ Ì‡ ÛÔÓÚpe·a
ru àÌÒÚÛ͈Ëfl ÔÓ
ÔÓθÁo‚aÌ˲
ro Instrucţioni de folosire
uk ßÌÒÚÛ͈¥fl Á
ÂÍÒÔÎÛ‡Ú‡ˆ¥ª
ar
Internet:
http://www.
bosch-hausgeraete.de

7* 89*
10*
11*
6*
12*
5*
13*
4*
14*
15
16
3*
17
18
2*
19
1*
24
23
22
21 20
ABCD
Typ G
EFG
5* b
1*
2 ba
CLICK!
3* a 3* b 4*
a
b
5* 6*
a
7 8
9
10 ab 11* a
11* b
cde f
12*
13
14 15
16
17
1918
20
20

21
22
23
CLICK!
CLICK!
24
24
27
31*
CLICK!
CLICK!
25
CLICK!
CLICK!
25
26
2928
30*

Gerätebeschreibung
1 umschaltbare Bodendüse*
17 Parkhilfe
2 Saugrohr
*
18 Staubbehälter oder alternativ
3 Kombidüse
*
19 Filterbeutel
4 Zubehörträger für Kombidüse
*
20 Motorschutzfilter
5 Teleskoprohr
*
21 Abstellhilfe (an der Geräteunterseite)
6 Verriegelungsknopf / Schiebemuffe
*
22 Gerätedeckel
7 Schlauchhandgriff
*
23 Tragegriff
8 Saugschlauch
24 Ausblasgitter
9 Möbelpinsel*
10 Polsterdüse
*
11 Fugendüse
*
12 Matratzendüse
*
13 Bohrdüse*
14 Hartbodendüse
*
15 Netzanschlusskabel
16 Ein-/Austaste mit elektronischem
*
je nach Ausstattung
Saugkraftregler
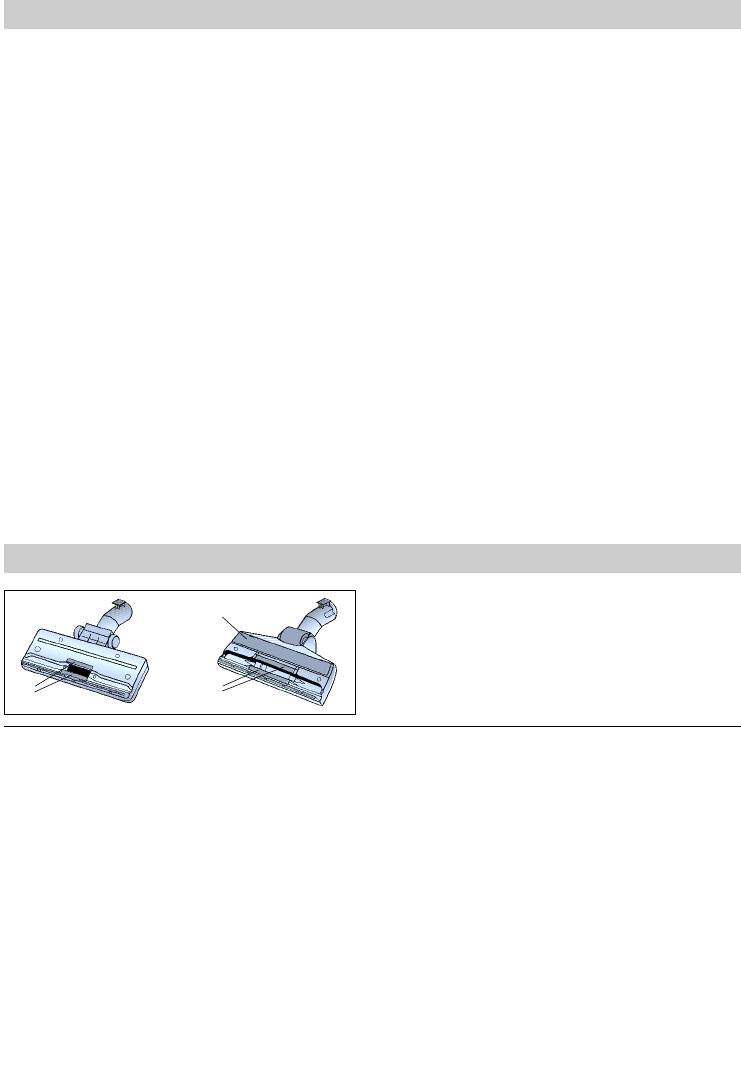
Ersatzteile und Sonderzubehör
Fadenheber (1) und Polierstreifen (2) können
bei Bedarf über den Kundendienst bezogen
werden.
2
1
1
®
A Ersatzfilterpackung BBZ52AFG1
E TURBO-UNIVERSAL
-Bürste
Inhalt: 5 Filterbeutel mit Verschluss
für Böden BBZ102TBB
1 Micro-Hygienefilter
Bürsten und Saugen in einem Arbeitsgang
von kurzflorigen Teppichen undTeppichböden
B Textilfilter (Dauerfilter) BBZ10TFG
bzw. für alle Beläge. Besonders geeignet zum
Wiederverwendbarer Filter mit Klettverschluss.
Aufsaugen von Tierhaaren. Antrieb der
C HEPA-Filter BBZ8SF1
Bürstenwalze erfolgt über Saugstrom des
Zusatzlicher Filter für reinere Ausblasluft.
Staubsaugers.
Empfohlen für Allergiker. Jährlich auswechseln.
Kein Elektroanschluss erforderlich.
®
®
D TURBO-UNIVERSAL
-Bürste
F ACCUMATIC
-Bürste BBZ37AB
für Polster BBZ42TB
Bürsten und Saugen in einem Arbeitsgang von
Bürsten und Saugen in einem Arbeitsgang
kurzflorigen Teppichen und Teppichböden
von Polstermöbeln, Matratzen, Autositzen,
bzw. für alle Beläge. Richtet Teppichflor auf
usw. Besonders geeignet zum Aufsaugen von
und pflegt ihn. Besonders geeignet zum
Tierhaaren. Antrieb der Bürstenwalze erfolgt
Aufsaugen von Tierhaaren.
über Saugstrom des Staubsaugers.
Kein Elektroanschluss erforderlich.
Kein Elektroanschluss erforderlich.
G Hartboden-Düse BBZ122HD
Zum Saugen glatter Böden (Parkett, Fliesen,
Terracotta, usw.)

de
Die Gebrauchsanweisung bitte aufbewahren.
Das Netzanschlusskabel nicht zumTragen/
Bei Weitergabe des Staubsaugers an Dritte bitte
Transportieren des Staubsaugers benutzen.
Gebrauchsanweisung mitgeben.
Bei mehrstündigem Dauerbetrieb Netzan-
schlusskabel vollständig ausziehen.
Bestimmungsgemäße Verwendung
Nicht am Anschlusskabel, sondern am
Dieser Staubsauger ist für den Gebrauch im
Stecker ziehen, um das Gerät vom Netz zu
Haushalt und nicht für gewerbliche Zwecke
trennen.
bestimmt.
Das Netzanschlusskabel nicht über scharfe
Den Staubsauger ausschließlich gemäß den
Kanten ziehen und nicht einquetschen.
Angaben in dieser Gebrauchsanweisung
Vor allen Arbeiten am Staubsauger
verwenden.
Netzstecker ziehen.
Der Hersteller haftet nicht für eventuelle
Beschädigten Staubsauger nicht in Betrieb
Schäden, die durch nicht bestimmungsgemäßen
nehmen. Beim Vorliegen einer Störung
Gebrauch oder falsche Bedienung verursacht
Netzstecker ziehen.
werden.
Um Gefährdungen zu vermeiden, dürfen
Deshalb beachten Sie bitte unbedingt die
Reparaturen und Ersatzteileaustausch am
nachfolgenden Hinweise!
Staubsauger nur vom autorisierten
Der Staubsauger darf nur bedient werden mit:
Kundendienst durchgeführt werden.
Original-Filterbeuteln.
Staubsauger vor externer Witterung,
Original-Ersatzteilen, -Zubehör oder
Feuchtigkeit und Hitzequellen schützen.
-Sonderzubehör
Gerät ausschalten, wenn nicht gesaugt wird.
Der Staubsauger ist nicht geeignet für:
Ausgediente Geräte sofort unbrauchbar
das Absaugen von Menschen oder Tieren
machen, danach das Gerät einer ordnungs-
das Aufsaugen von:
gemäßen Entsorgung zuführen.
– Kleinlebewesen ( z.B. Fliegen, Spinnen, ...).
Aus Sicherheitsgründen sind Staubsauger,
– gesundheitsschädlichen, scharfkantigen,
die eine Leistung von 2000 W und mehr
heißen oder glühenden Substanzen.
haben, mit einem Überhitzungsschutz
– feuchten oder flüssigen Substanzen.
ausgestattet.
– leicht entflammbaren oder explosiven
Sollte eine Blockierung auftreten und das
Stoffen und Gasen.
Gerät zu heiß werden, schaltet es sich auto-
– Asche, Ruß aus Kachelöfen und Zentral-
matisch ab. Ziehen Sie den Netzstecker und
Heizungsanlagen
stellen Sie sicher, dass Düse, Saugrohr oder
Schlauch nicht verstopft sind, bzw. der Filter
Sicherheitshinweise
gewechselt werden muß.
Dieser Staubsauger entspricht den anerkannten
Nach Beseitigung der Störung lassen Sie das
Regeln der Technik und den einschlägigen
Gerät mindestens 1 Stunde abkühlen.
Sicherheitsbestimmungen. Wir bestätigen die
Danach ist das Gerät wieder einsatzbereit.
Übereinstimmung mit den folgenden euro-
päischen Richtlinien: 89/336/EWG (geändert
durch RL 91/263/EWG, 92/31/EWG und
93/68/EWG). 73/23/EWG (geändert durch RL
93/68/EWG).
Staubsauger nur gemäß Typenschild
anschließen und in Betrieb nehmen.
Niemals ohne Staubbehälter oder Filterbeutel
saugen => Gerät kann beschädigt werden!
Kindern die Benutzung des Staubsaugers nur
unter Aufsicht gestatten.
Vermeiden Sie das Saugen mit Handgriff,
Düsen und Rohr in Kopfnähe.
=> Es besteht Verletzungsgefahr!
de
Hinweise zur Entsorgung
Bitte Bildseiten ausklappen!
Verpackung
Die Verpackung schützt den Staubsauger vor
Beschädigung auf dem Transport.
Sie besteht aus umweltfreundlichen
Materialien und ist deshalb recycelbar.
Entsorgen Sie nicht mehr benötigte
Verpackungsmaterialien an den
Sammelstellen für das Verwertungssystem
»Grüner Punkt«.
Vor dem ersten Gebrauch
Altgerät
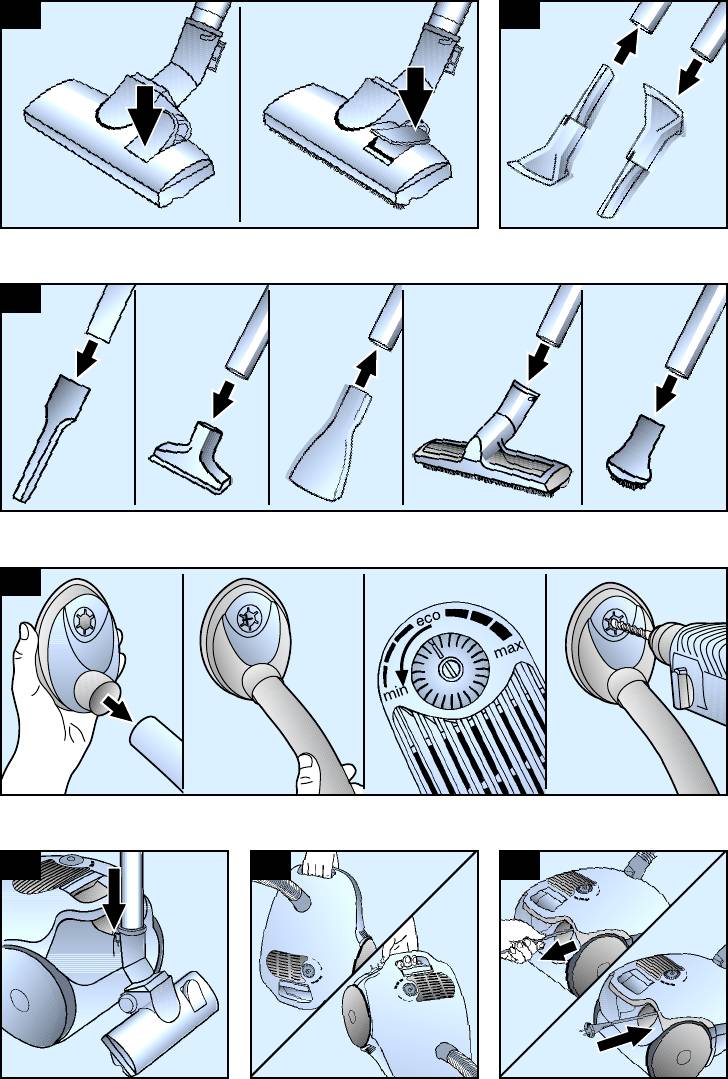
1*
Altgeräte enthalten vielfach noch wertvolle
Bild
Materialien.
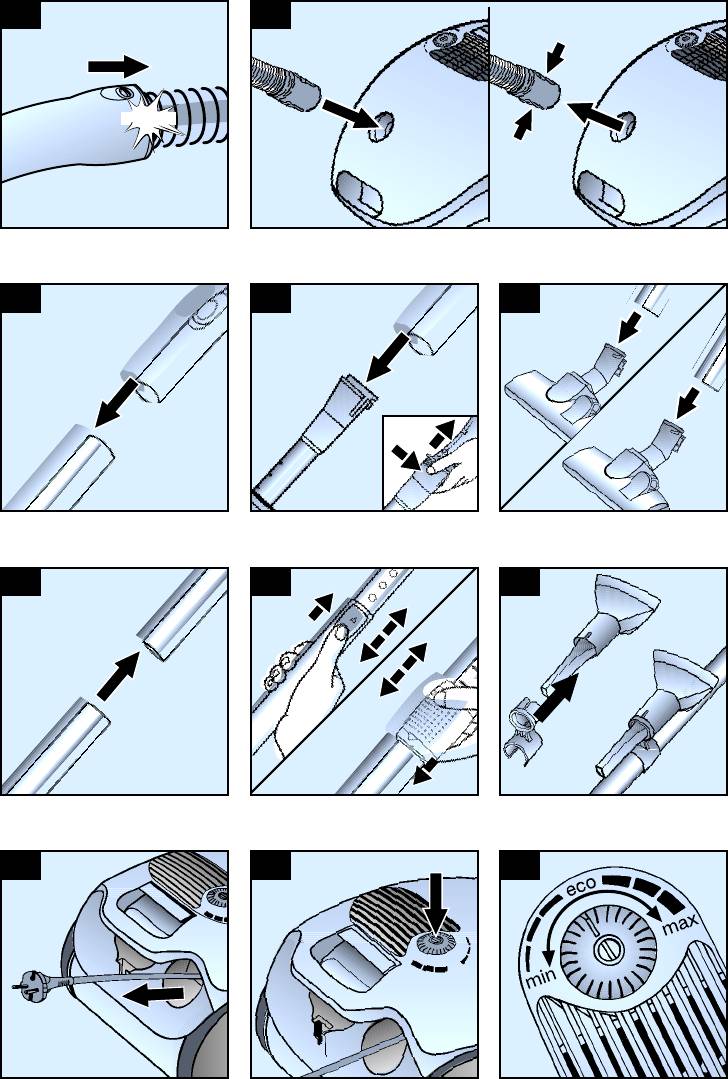
Handgriff auf Saugschlauch stecken und
Geben Sie deshalb Ihr ausgedientes Gerät bei
verrasten.
Ihrem Händler bzw. einem Recyclingcenter
zur Wiederverwertung ab.
Aktuelle Entsorgungswege erfragen Sie bitte bei
Inbetriebnahme
Ihrem Händler oder Ihrer Gemeindeverwaltung.
Bild
2
a) Saugschlauchstutzen in die Saugöffnung
Bitte beachten
einrasten.
!
Die Netzsteckdose muß über eine Sicherung
b)Beim Entfernen des Saugschlauches beide
16 A abgesichert sein.
Rastnasen zusammendrücken und Schlauch
Sollte die Sicherung beim Einschalten des
herausziehen.
Gerätes einmal ausgelöst werden, so kann
dies daran liegen, daß gleichzeitig andere
Bild
3*
Elektrogeräte mit hohem Anschlusswert am
a) Handgriff und Saugrohr zusammenstecken.
gleichen Stromkreis angeschlossen sind.
b)Handgriff bis zum Einrasten in das
Das Auslösen der Sicherung ist vermeidbar,
Teleskoprohr schieben. Zum Lösen der
in dem Sie vor dem Einschalten des Gerätes
Verbindung Entriegelungstaste drücken und
die niedrigste Leistungsstufe einstellen
Handgriff herausziehen.
und erst danach eine höhere
Leistungsstufe wählen.
Bild
4*
a) Bodendüse und Saugrohr zusammenstecken.
b)Teleskoprohr in den Stutzen der Bodendüse
stecken.
Bild
5*
a) Saugrohre zusammenstecken.
b)Durch Verschieben des Verstellknopfes /
Schiebemuffe in Pfeilrichtung Teleskoprohr
entriegeln und gewünschte Länge einstellen.
Bild
6*
Zubehörträger auf Kombidüse schieben und
auf Saug-/ Teleskoprohr clipsen.
Bild
7
Netzanschlusskabel am Stecker greifen,
auf die gewünschte Länge herausziehen und
Netzstecker einstecken.

de
der Bohrdüse sicherzustellen.
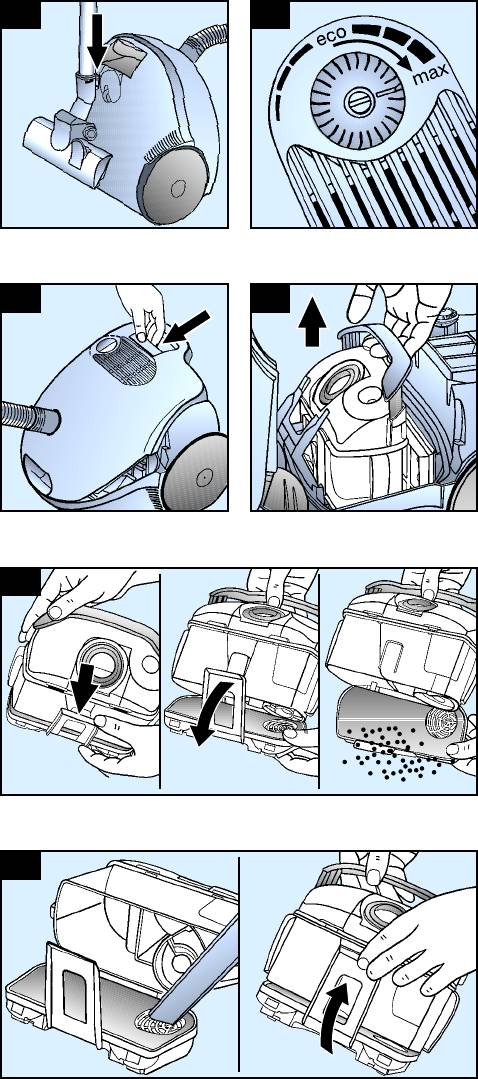
Bild
8
Beim Bohren wird der Feinstaub automatisch
Staubsauger durch Betätigen der Ein- /
aufgesaugt.
Austaste in Pfeilrichtung ein-/ ausschalten.
Achtung: Die Bohrdüse sollte nur in
Bild
9
!
Verbindung mit dem Stabbehälter
Saugkrafteinstellung durch Drehen der
eingesetzt werden, da feiner Bohrstaub die
Ein-/ Austaste in Pfeilrichtung.
Funktion des Filterbeutels beeinträchtigen
kann.
Saugen
Bild
13
Bei kurzen Saugpausen können Sie die
Bild
10
Parkhilfe an der Geräterückseite benutzen.
Bodendüse einstellen:
Haken an der Bodendüse in die Aussparung
a) Teppiche und Teppichboden
an der Geräterückseite schieben.
b)glatte Böden
Bild
14
Bild
11*
Beim Saugen, z. B. auf Treppen, kann das
Saugen mit Zubehör
Gerät auch an beiden Griffen transportiert
( je nach Bedarf auf Handgriff bzw. Saugrohr
werden.
stecken ).
a) Kombidüse
Zum Reinigen von Fugen und Ecken bzw.
Nach der Arbeit
Polstermöbeln, Vorhängen, usw.
b)Fugendüse
Bild
15
Zum Reinigen von Fugen und Ecken.
Netzstecker ziehen.
c) Polsterdüse
Kurz am Netzanschlusskabel ziehen und
Zum Reinigen von Polstermöbeln, Vor-
loslassen (Kabel rollt sich automatisch auf).
hängen usw.
d)Matratzendüse
Bild
16
Zum Reinigen von Matratzen, Polstern usw.
Zum Abstellen /Transportieren des Gerätes
e) Hartbodendüse
können Sie die Abstellhilfe an der
Zum Reinigen von harten Bodenbelägen
Geräteunterseite benutzen.
(Fliesen, Parkett usw.)
Gerät aufrecht hinstellen. Haken an der
f) Möbelpinsel
Bodendüse in die Aussparung an der
Zum Reinigen von Fensterrahmen,
Geräteunterseite schieben.
Schränken, Profilen, usw.
Sie haben einen Bodenstaubsauger erworben,
Bild
12*
mit dem Sie jegliche Art von Trockenschmutz
Bohrdüse am Handgriff befestigen und so
sowohl mit dem Staubbehälter als auch mit dem
an der Wand platzieren, dass die Bohrloch-
Filterbeutel aufsaugen können.
öffnung der Düse direkt über dem zu
bohrenden Loch sitzt.
Wir empfehlen den Einsatz
Gerät auf niedrigem Leistungsniveau ein-
- des Staubbehälters besonders im Hobby-
stellen und dann einschalten.
bereich, z.B. zum Entfernen von Sägespänen,
Bohrdüse wird durch die Saugkraft in der
usw.
gewünschten Position gehalten. Eventuell
- des Filterbeutels vor allem für herkömmliche
empfiehlt es sich die Leistung höher nachzu-
Reinigungsarbeiten im Haushalt.
regulieren, je nach Oberflächenbeschaffenheit
der zu bohrenden Wand, um das Festsaugen

de
Arbeiten mit dem Staubbehälter
Dauer- und Microfilter reinigen
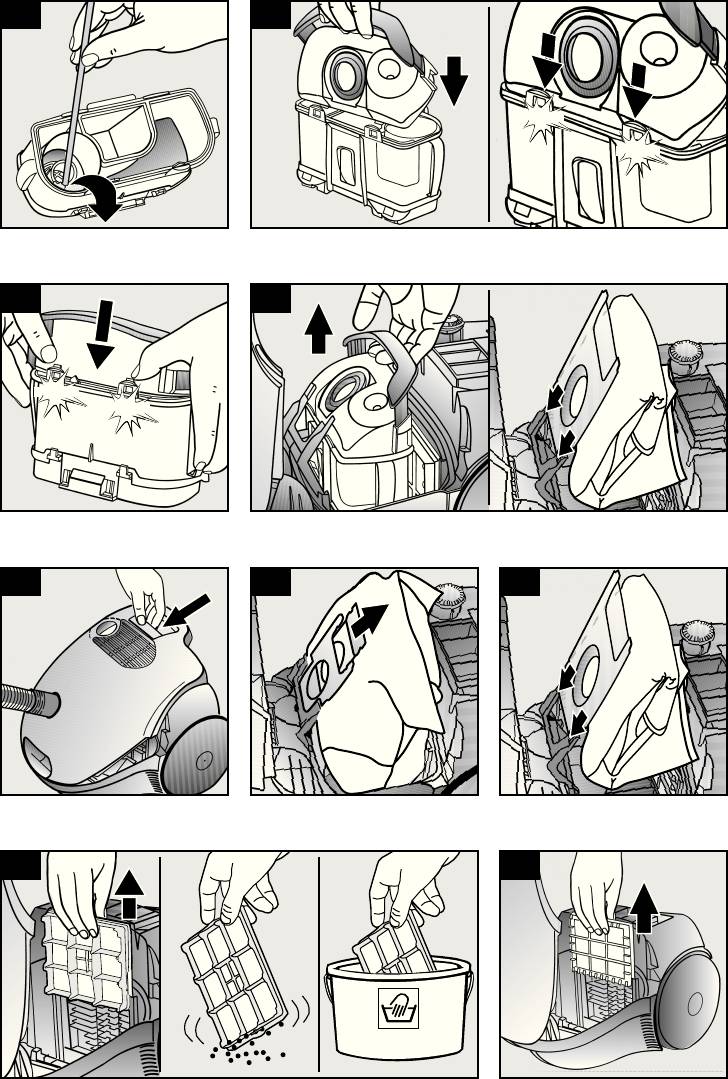
Bild
17
Wann muss ich reinigen:
Für optimale Saugergebnisse den Leistungs-
Nach jedem Störbetrieb, d.h. nach jeder
steller auf Maximalstellung bringen.
Beseitigung einer Verstopfung.
Nur bei sehr empfindlichen Materialien
Spätestens halbjährlich.
empfehlen wir, die Leistung zurückzuregeln.
Bild
22
Durch Drücken der beiden Rastnasen in Pfeil-
Leeren des Staubbehälters
richtung Filterhalterung lösen und aufklappen.
Um ein optimales Saugergebnis zu erzielen,
sollte der Staubbehälter nach jedem
Bild
23
Saugvorgang entleert werden.
Micro- und Dauerfilter entnehmen und
handwaschen.
Bild
18
Achtung: Sowohl der Dauerfilter als auch
Gerätedeckel durch Betätigung des
!
der weiße Vliesfilter dürfen nach der
Verschlusshebels in Pfeilrichtung öffnen.
Handwäsche erst nach einer Trocknungs-
zeit von ca. 24 Stunden wieder eingesetzt
Bild
19
werden.
Tragegriff des Staubbehälters in Pfeilrichtng
ausziehen.
Staubbehälter am Tragegriff aus dem Gerät
Störbetrieb
nehmen.
Beseitigen einer Verstopfung im Staubbehälter.
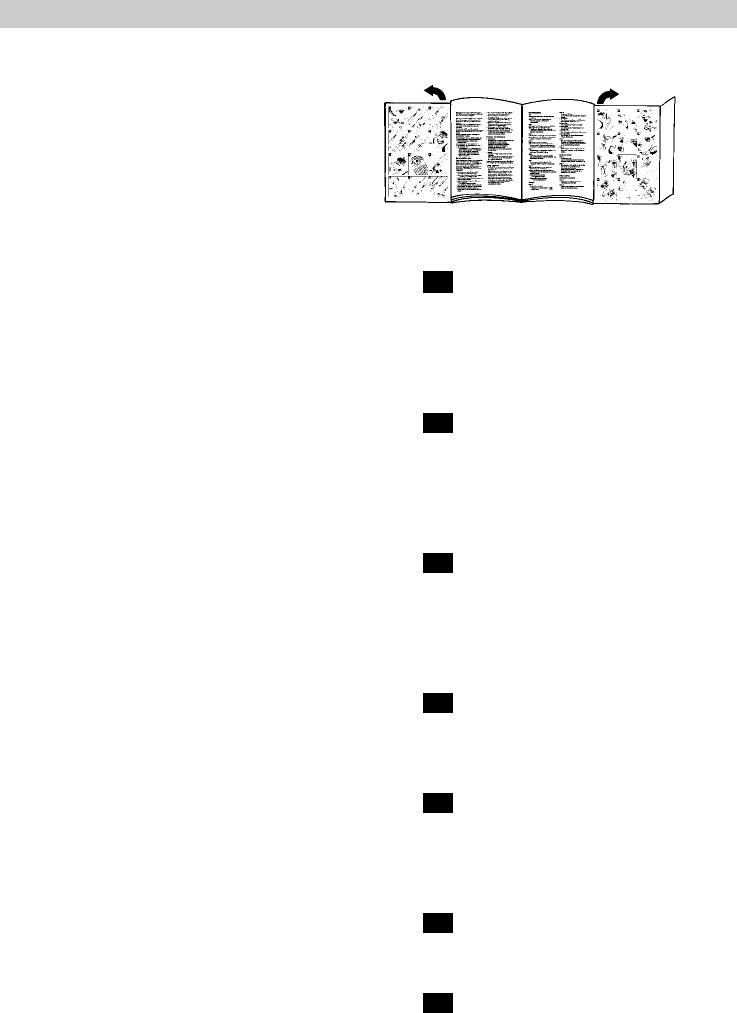
Bild
20
Durch Betätigung der Klappenverriegelung in
Bild
24
Pfeilrichtung Bodenklappe öffnen und Staub-
Die 4 Schnappverriegelungen durch Drücken
behälter entleeren.
in Pfeilrichtung lösen und Deckel des Staub-
Bei starker Verschutzung der Bodenklappe
behälters abnehmen. Verstopfung lösen,
(grober Schmutz), diese zunächst reinigen,
z. B. mit Hilfe eines Schraubendrehers, und
z. B. durch Absaugen mit der Fugendüse.
durch Ausklopfen oder Aussaugen beseitigen.
(Dazu unbedingt Filterbeutel in das
(Zum Aussaugen unbedingt Filterbeutel in
Gerät einlegen - siehe Bild 29)
das Gerät einlegen - siehe Bild 29)
Bodenklappe schließen.
Bild
25
Bild
21
Deckel des Staubbehälters aufsetzen und in
Staubbehälter wieder in den Staubsauger
Pfeilrichtung drücken, bis die 4 Schnappver-
einsetzen, Tragegriff einschieben und
riegelungen hörbar einrasten.
Gerätedeckel schließen.
Achtung: Nach jedem Störbetrieb müssen
Achtung: Nach mehrmaligem Saugen
!
Micro- und Dauerfilter gereinigt werden
!
kann der Staubbehälter innen zerkratzt
(s. Bilder 22 u. 23).
werden und milchig anlaufen. Dies hat
jedoch keinerlei Einwirkung auf die
Funktion des Staubsaugers, d.h. er ist
weiterhin voll funktionsfähig.
Arbeiten mit Filterbeutel
Bei Bedarf kann auch an Stelle des Staub-
behälters ein Filterbeutel verwendet werden.

de
Motorschutzfilter reinigen
Bild
26
Der Motorschutzfilter sollte in regelmäßigen
Gerätedeckel öffnen (s. Bild 18)
Abständen durch Ausklopfen bzw. Auswaschen
Staubbehälter entnehmen und Filterbeutel
gereinigt werden!
einsetzen.
Gerätedeckel schließen.
Bild
30*
Staubraumdeckel öffnen (siehe Bild 18).
Sie haben ein sehr leistungs- und saugstarkes
Motorschutzfilter in Pfeilrichtung heraus-
Gerät erworben.
ziehen.
Die max. Leistungsstellung empfielt sich
Motorschutzfilter durch Ausklopfen reinigen.
deshalb nur bei stark verschmutzten Niedrigflor-
Bei starker Verschmutzung sollte der Motor-
Teppichböden oder Hartböden.
schutzfilter ausgewaschen werden.
Den Filter anschließend mindestens
Durch Betätigen des Saugkraftreglers (s. Bild 9)
24 Stunden trocknen lassen.
kann die gewünschte Saugkraft stufenlos ein-
Nach der Reinigung, Motorschutzfilter in das
gestellt werden.
Gerät einschieben und Staubraumdeckel
Niedriger Leistungsbereich:
schließen.
Für das Absaugen empfindlicher Stoffe,
z. B. Gardinen.
Hepa-Filter austauschen
Mittlerer Leistungsbereich:
Für die tägliche Reinigung bei geringer
Ist Ihr Gerät mit einem Hepa-Filter ausgestattet,
Verschmutzung.
muss dieser jährlich ausgewechselt werden.
Hoher Leistungsbereich:
Zur Reinigung robuster Bodenbeläge,
Bild
31*
Hartböden und bei starker Verschmutzung.
Gerätedeckel öffnen (Siehe Bild 18)
Hepa-Filter aus der Führung nehmen.
Neuen Hepafilter in Gerät einschieben und
Filterbeutel austauschen
Gerätedeckel schließen.
Bild
27
Ist die Saugkraft des Gerätes merklich
Pflege
vermindert, muss der Filterbeutel gewechselt
werden, auch wenn er noch nicht voll sein
Vor jeder Reinigung des Staubsaugers, muss
sollte. In diesem Fall macht die Art des
dieser ausgeschaltet und der Netzstecker gezogen
Füllgutes den Wechsel erforderlich.
werden.
Gerätedeckel durch Betätigung des
Staubsauger und Zubehörteile aus Kunststoff
Verschlusshebels in Pfeilrichtung öffnen.
können mit einem handelsüblichen
Kunststoffreiniger gepflegt werden.
Bild
28
Filterbeutel durch Ziehen an der Verschluss-
Keine Scheuermittel, Glas oder Allzweck-
lasche verschließen und herausnehmen.
!
reiniger verwenden.
Staubsauger niemals in Wasser tauchen.
Bild
29
Neuen Filterbeutel in die Halterung einlegen
Der Staubraum kann bei Bedarf mit einem zweiten
und Gerätedeckel schließen.
Staubsauger ausgesaugt, oder einfach mit einem
trockenen Staubtuch / Staubpinsel gereinigt
Achtung: Staubraumdeckel schließt nur mit
werden.
!
eingelegtem Filterbeutel bzw. Textilfilter
oder Staubbehälter.
Technische Änderungen vorbehalten.
Your vacuum cleaner
1 Adjustable floor tool*
17 Parking aid
2 Suction pipe
*
18 Dust collector or alternative
3 Multi-purpose nozzle
*
19 Dust bag
4 Accessories holder for multi-purpose
20 Motor protection filter
nozzle
*
21 Storage aid (on underside of unit)
5 Telescopic tube
*
22 Vacuum cleaner lid
6 Locking button / sliding sleeve
*
23 Carrying handle
7 Handle
*
24 Exhaust grille
8 Flexible hose
9 Hard furnishings brush*
10 Upholstery nozzle
*
11 Crevice nozzle
*
12 Mattress nozzle
*
13 Drill dust nozzle*
14 Hard-floor brush
*
15 Power cord
16 On/off button with electronic suction
*
Depending on equipment
regulator
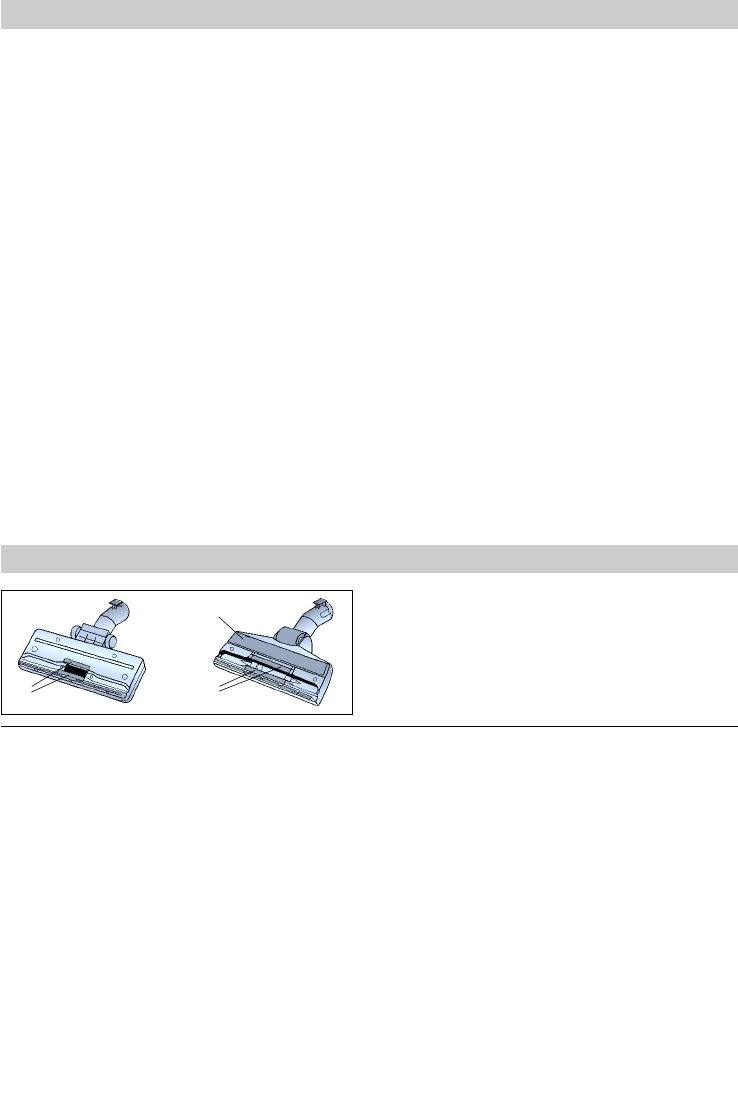
Replacement parts and accessories
Thread lifter (1) and polishing strips (2) can be
ordered through the after-sales department.
®
A Replacement filter pack BBZ52AFG1
E TURBO UNIVERSAL
brush for floors
Contains: 5 self-sealing dust bags
BBZ102TBB
1 micro-hygiene filter
All in one brushing and vacuuming of short-
pile rugs and carpets and all hard floor cover-
B Textile filters (permanent filters) BBZ10TFG
ings. Especially suitable for picking up pet hair.
Reusable filter with Velcro fastener.
The brush roller is driven by the suction of the
C HEPA filter BBZ8SF1
air flow.
Additional filter for cleaner exhaust air.
No separate electrical connection is needed.
Recommended for allergy sufferers. Replace
®
F ACCUMATIC
brush BBZ37AB
once a year.
All in one brushing and vacuuming of short-
®
D TURBO UNIVERSAL
brush for upholstery
pile pile rugs and carpets and all hard floor
BBZ42TB
coverings. Plumps and cares for carpet pile.
All in one brushing and vacuuming of uphol-
Especially suitable for picking up pet hair.
stered furniture, mattresses, car seats, etc.
No separate electrical connection is needed.
Especially suitable for picking up pet hair. The
G Hard-floor brush BBZ122HD
brush roller is driven by the cleaner’s suction air
For vacuuming hard floors (parquet flooring,
flow.
tiles, terracotta, etc.)
No separate electrical connection is needed.

en
Please keep this instruction manual
Never carry the vacuum cleaner by the power
When passing the vacuum cleaner on to a third
cord.
party, please also pass on this instruction
Fully extend the power cord when using the
manual.
vacuum cleaner continuously for several
hours.
Intended use
When disconnecting the appliance from the
This vacuum cleaner is intended for domestic
mains, pull the plug, not the power cord.
use and not for commercial use.
Do not pull the power cord around sharp
This vacuum cleaner should only be used in
corners or allow it to become trapped.
accordance with these instructions for use.
Unplug the vacuum cleaner from the mains
The manufacturer will not accept any
before carrying out any work on it.
responsibility for damage caused by improper
Do not use the vacuum cleaner if it is
use or incorrect operation.
damaged. Unplug the power cord from the
Therefore, please note the following points.
mains if a fault is detected.
The vacuum cleaner must only be operated
To prevent you from being exposed to risks,
with:
vacuum cleaner repairs and the fitting of
Manufacturer’s original dust bags.
replacement parts must only be carried out
Manufacturer’s original replacement parts,
by the authorised after-sales service.
accessories and optional accessories
The vacuum cleaner should be protected from
The vacuum cleaner is not to be used for:
the weather, moisture and sources of heat.
Vacuuming persons or animals
Switch off the vacuum cleaner when it is not
Vacuuming up:
in use.
– Insects or spiders.
At the end of its life, the vacuum cleaner
– Hazardous, sharp-edged, hot or burning
should be disposed of in an appropriate
substances.
manner.
– Damp or liquid substances.
For safety reasons, vacuum cleaners with a
– Highly flammable or explosive substances
power rating of more than 2000 W are fitted
and gases.
with a temperature safety switch
– Ash, soot from tiled stoves and central
which automatically switches the vacuum
heating systems
cleaner off if it is blocked and overheating.
Unplug the vacuum cleaner from the mains
Safety information
and make sure that the nozzles, suction pipe
This vacuum cleaner complies with the
and hose are not blocked and check whether
recognised rules of technology and the relevant
the filter needs replacing.
safety regulations. We confirm compliance with
Having cleared the blockage, leave the vacuum
the following European directives: 89/336/EEC
cleaner to cool down for at least one hour.
(amended by Directives 91/263/EEC, 92/31/EEC
It can then be switched back on again.
and 93/68/EEC). 73/23/EEC (amended by
Directive 93/68/EEC).
Always observe the information on the rating
plate when using the vacuum cleaner and
connecting to the power supply.
Do not use the vacuum cleaner without the
dust collector or dust bag fitted => The
appliance could be damaged.
Only allow children to use the vacuum cleaner
under supervision.
Keep suction away from your face when using
the handle, nozzles or pipe.
=> Risk of injury.
en
Disposal information
Fold out picture pages.
Packaging
The packaging is designed to protect the
vacuum cleaner from being damaged during
transportation.
It is made of environment-friendly materials
and therefore can be recycled.
Dispose of packaging which is no longer
required at recycling points.
Used vacuum cleaners
Before using for the first time
Used vacuum cleaners still contain many
1*
recyclable materials.
Figure
Therefore, please take used vacuum cleaners
Push the handle onto the flexible tube and
to your retailer or recycling centre so that they
until it engages.
can be recycled.
Please enquire about current disposal
methods at your retailer or local council.
Setting up
Figure
2
Please note
a) Push the hose connector into the opening on
!
The mains socket must be protected by a
the vacuum cleaner until it engages.
16 amp fuse.
b)To remove the flexible hose, press the two
If a fuse is be tripped when you switch on the
lugs together and pull the hose out.
vacuum cleaner, this may be because other
electrical appliances which have a high
Figure
3*
current draw are connected to the same
a) Connect the handle and the suction pipe
power circuit.
together.
To prevent the fuse from tripping, select the
b)Push the handle into the telescopic tube until
lowest power setting before switching the
it engages. To release the connection, press
vacuum cleaner on, and increase the power
the release button and pull the handle out.
only once it is running.
Figure
4*
a) Connect the floor tool and the suction pipe
together.
b)Insert the telescopic tube into the floor tool
connector.
Figure
5*
a) Connect the suction pipes together.
b)Disconnect the telescopic tube and adjust its
length by moving the adjusting button/sliding
sleeve in the direction of the arrow.
Figure
6*
Attach the accessories holder to the multi-
purpose nozzle and clip it onto the suction
pipe/telescopic tube.

en
Suction holds the drill dust nozzle in the
Figure
7
required position. Depending on the surface
Holding the power cord by the plug, pull out
of the wall to be drilled it may be necessary to
the required length and plug it into the mains
readjust the power to a higher setting to
socket.
ensure the drill dust nozzle is firmly attached.
Any fine particles are automatically vacuumed
Figure
8
up.
Press the on/off button in the direction of the
arrow to switch your vacuum cleaner on/off.
Caution: The drill dust nozzle should only
Figure
9
!
be used in conjunction with the dust
Adjust the suction by turning the on/off button
collector since fine drill dust can impair the
in the direction of the arrow.
function of the dust bag.
Figure
13
Vacuuming
You can use the parking aid on the back of
the vacuum cleaner if you wish to stop
Figure
10
vacuuming for a short time.
Adjusting the floor tool:
Slide the catch on the floor tool into the
a) Rugs and carpets
groove at the rear of the appliance.
b)Hard floors
Figure
14
Figure
11*
The appliance can also be carried using the
Vacuuming using the accessories
two handles when vacuuming steps, for
(if required, connect them to the handle or the
example.
suction pipe).
a) Multi-purpose nozzle
For cleaning corners and crevices, as well as
When the work is done
upholstered furniture, curtains, etc.
b)Crevice nozzle
Figure
15
For cleaning crevices and corners.
Unplug the vacuum cleaner.
c) Upholstery nozzle
Tug the power cord briefly and let go. The
For cleaning upholstered furniture, curtains,
cable then rewinds automatically.
etc.
d)Matress nozzle
Figure
16
For cleaning mattresses, upholstery, etc.
To store or transport the vacuum cleaner, use
e) Hard-floor brush
the storage aid on the underside of the
For cleaning hard floor coverings (tiles,
vacuum cleaner.
parquet flooring, etc.)
Stand the vacuum cleaner up on its end. Slide
f) Hard furnishings brush
the catch on the floor tool into the groove on
For cleaning window frames, cabinets,
the underside of the appliance.
mouldings, etc.
You have purchased a floor vacuum cleaner
Figure
12*
which can vacuum up any type of dry dirt using
Secure the drill dust nozzle to the handle and
the dust collector or dust bag.
then place against the wall, so that the nozzle
drill hole opening sits directly over the hole to
We recommend that you use:
be drilled.
- the dust collector, in particular for your
Select the lowest power setting and then
hobbies, e.g. to remove wood shavings, etc.
switch on the vacuum cleaner.
- the dust bag principally for everyday
household cleaning.

en
Using the dust collector
Cleaning the permanent filters and
microfilters
Figure
17
Set the power setting to maximum for the
The filters must be cleaned:
best results when vacuuming.
After any operating malfunctions, i.e. after a
We recommend that you reduce the setting
blockage is cleared.
only when vacuuming very delicate materials.
At least every six months.
Figure
22
Emptying the dust collector
Unlock the filter holder by pressing the two
To achieve an optimal result when vacuuming,
lugs in the direction of the arrow and open it.
the dust collector should be emptied each time
the vacuum cleaner is used.
Figure
23
Remove the microfilter and permanent filter
Figure
18
and wash them by hand.
Open the vacuum cleaner lid by moving the
Caution: After they have been washed by
locking lever in the direction of the arrow.
!
hand, the permanent filter and the white
fleece filter should be allowed to dry for
Figure
19
approximately 24 hours before being used
Pull out the dust collector carrying handle in
again.
the direction of the arrow.
Remove the dust collector from the vacuum
cleaner using the carrying handle.
Blockages
Figure
20
Removing a blockage in the dust collector.
Open the base and empty the dust collector
by pressing the lid lock in the direction of the
Figure
24
arrow.
Unfasten the 4 snaplocks by pushing them in
If the base is very dirty (thick dirt), clean this
the direction of the arrow and remove the
first, e.g. by vacuuming it with the crevice
dust collector lid. Loosen the blockage, e.g.
nozzle.
with a screwdriver, and tap or vacuum it out.
(You must fit the dust bag in the vacuum
(You must fit a dust bag in the vacuum
cleaner when you do this - see Figure 29)
cleaner before vacuuming it out - see
Close the base.
Figure 29)
Figure
21
Figure
25
Refit the dust collector to the vacuum cleaner,
Replace the dust collector lid and push in the
push in the carrying handle and close the lid.
direction of the arrow until you hear the
4 snaplocks lock into place.
Caution: The inside of the dirt collector
!
may become scratched with use and start
Caution: The micro- and permanent filters
to look opaque. This does not, however,
!
must be cleaned following any operating
affect the performance of the vacuum
problem (see Figure 22 and 23).
cleaner in any way, i.e. it will continue to
function as normal.

en
Using dust bags
Cleaning the motor protection filter
The motor protection filter should be cleaned
If necessary, a dust bag may be used instead of
regularly by knocking out the dirt and rinsing.
the dust collector.
Figure
30*
Figure
26
Open the dust bag compartment lid (see
Open the vacuum cleaner lid (see Figure 18)
Figure 18).
Remove the dust collector and insert a dust
Pull out the motor protection filter in the
bag.
direction of the arrow.
Close the vacuum cleaner lid.
Clean the motor protection filter by tapping it.
If it is very dirty, the motor protection filter
You have bought an extremely powerful device.
should be rinsed.
The highest suction setting is therefore only
The filter must then be left to dry for at least
recommended for heavily soiled, short-pile
24 hours.
carpets and hard floors.
After cleaning, slide the motor protection filter
into the vacuum cleaner and close the dust
The required suction power can be selected by
bag compartment lid.
adjusting the suction regulator (see Figure 9).
Low suction range:
Replacing the Hepa filter
For vacuuming delicate fabrics, e.g. curtains.
Middle suction range:
If your vacuum cleaner is equipped with a Hepa
For daily vacuuming of lightly soiled floors.
filter, this should be replaced once a year.
High suction range:
31*
For vacuuming durable floor coverings, hard
Figure
floors and for heavily soiled surfaces.
Open the dust compartment lid
(see Figure 18)
Remove the Hepa filter from the guide.
Replacing the dust bag
Insert the new Hepa filter into the vacuum
cleaner and close the lid.
Figure
27
If suction diminishes considerably, the dust
bag must be replaced, even if it is not yet full.
Care
In this case it is essential to change the dust
bag due to the type of material it contains.
Always switch off the vacuum cleaner and
Turn the dust compartment locking lever in
disconnect the power cord from the mains before
the direction of the arrow to open the vacuum
cleaning the appliance.
cleaner lid.
The vacuum cleaner and plastic accessories can
be cleaned with a commercial plastic cleaner.
Figure
28
Seal the dust bag by pulling the locking tab
Do not use a scourer, glass-cleaning agent or
and then remove it.
!
multipurpose cleaning product.
Never immerse the vacuum cleaner in water.
Figure
29
Place a new dust bag in the holder and close
If necessary, the dust compartment can be
the vacuum cleaner lid.
cleaned with a second vacuum cleaner or simply
wiped with a dry cloth or dusting brush.
Caution: The dust bag compartment lid will
!
only close when the dust bag, textile filter
or dust collector are inserted.
Subject to technical modifications.
Description de l’appareil
1 Brosse commutable pour sols*
17 Position parking
2 Tube d’aspiration
*
18 Collecteur de poussières ou comme
3 Buse combinée
*
alternative
4 Porte-accessoires pour buse combinée
*
19 Sac aspirateur
5 Tube télescopique
*
20 Filtre de protection du moteur
6 Bouton de verrouillage / manchon
21 Dispositif de rangement (sur le dessous de
coulissant
*
l’appareil)
7 Poignée de flexible
*
22 Couvercle de l’appareil
8 Flexible d’aspiration
23 Poignée de transport
9 Pinceau pour meubles*
24 Grille de sortie d’air
10 Tête pour coussins
*
11 Suceur de joints
*
12 Suceur pour matelas
*
13 Suceur pour trous de perçage*
14 Brosse pour sols durs
*
15 Cordon électrique
16 Bouton marche/arrêt avec régulateur
*
selon l’équipement
électronique de la puissance d’aspiration
Pièces de rechange et accessoires en option
Ramasse-fils (1) et Bande de polissage (2),
disponibles au service après-vente en cas de
besoin.
®
A Paquet de sacs et de filtre de
E Brosse TURBO-UNIVERSAL
pour sols
rechange BBZ52AFG1
BBZ102TBB
Contenu: 5 Sacs aspirateur avec fermeture
Brossage et aspiration en une seule opération
1 Micro-filtre hygiénique
sur des tapis à voile ras et des moquettes,
voire appropriée à tous les revêtements. Idéale
B Sac textile (filtre permanent) BBZ10TFG
pour aspirer des poils. Entraînement de la
Sac réutilisable avec fermeture à scratch.
brosse rotative par le débit aspiré de l’aspira-
C Filtre HEPA BBZ8SF1
teur.
Filtre supplémentaire pour un air sortant plus pur.
Pas besoin de raccordement électrique.
®
Recommandé pour personnes allergiques. A
F Brosse ACCUMATIC
BBZ37AB
remplacer tous les ans.
Brossage et aspiration en une seule opération
®
D Brosse TURBO-UNIVERSAL
pour
sur des tapis à voile ras et des moquettes,
voire appropriée à tous les revêtements.
capitonnages BBZ42TB
Redresse le voile de tapis et l’entretient. Idéale
Brossage et aspiration, en une seule opération
pour aspirer des poils.
de travail, sur des meubles capitonnés, mate-
Pas besoin de raccordement électrique.
las, sièges auto etc. Idéale pour aspirer des
poils. Entraînement de la brosse rotative par le
G Brosse pour sols durs BBZ122HD
débit aspiré de l’aspirateur.
Pour aspirer sur des sols lisses (parquet, car-
Pas besoin de raccordement électrique.
relages, dalles de terre cuite, etc.)


