Sony CDX-M670: Additional Information
Additional Information: Sony CDX-M670
Notes
• For safety, turn off the ignition before cleaning the
connectors, and remove the key from the ignition
Additional Information
switch.
• Never touch the connectors directly with your fingers
or with any metal device.
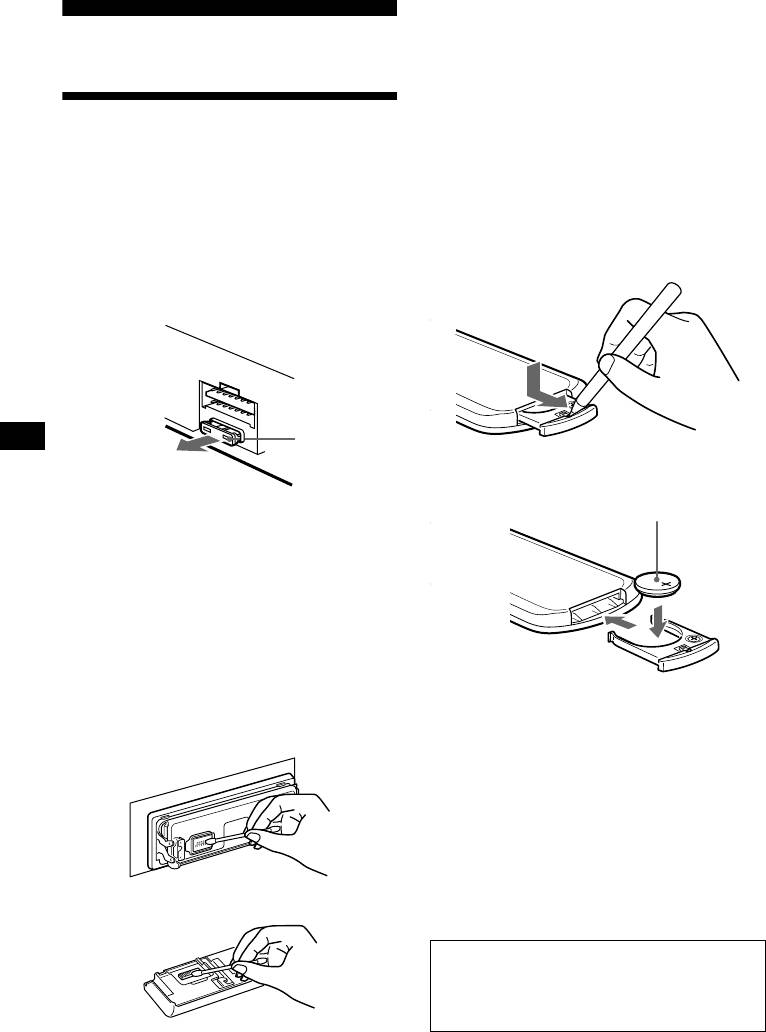
Maintenance
Replacing the lithium battery
Under normal conditions, batteries will last
approximately 1 year. (The service life may be
Fuse replacement
shorter, depending on the conditions of use.)
When replacing the fuse, be sure to use one
When the battery becomes weak, the range of the
matching the amperage rating stated on the
card remote commander becomes shorter.
original fuse. If the fuse blows, check the power
Replace the battery with a new CR2025 lithium
connection and replace the fuse. If the fuse blows
battery.
again after replacement, there may be an internal
malfunction. In such a case, consult your nearest
Sony dealer.
Fuse (10 A)
x
+ side up
Warning
Never use a fuse with an amperage rating
exceeding the one supplied with the unit as this
could damage the unit.
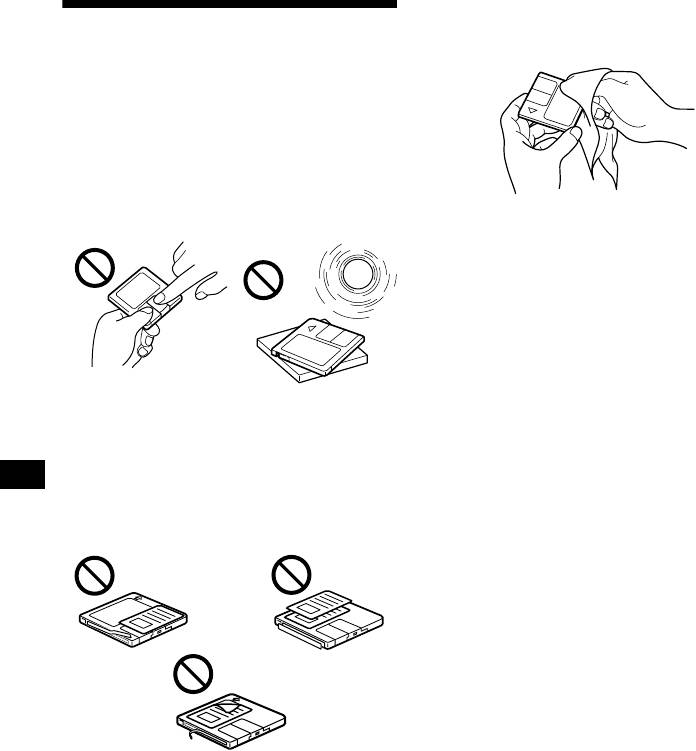
Cleaning the connectors
The unit may not function properly if the
connectors between the unit and the front panel
are not clean. In order to prevent this, detach the
front panel (page 9) and clean the connectors
with a cotton swab dipped in alcohol. Do not
apply too much force. Otherwise, the connectors
may be damaged.
Notes on lithium battery
• Keep the lithium battery out of the reach of
children. Should the battery be swallowed,
immediately consult a doctor.
• Wipe the battery with a dry cloth to assure a
good contact.
• Be sure to observe the correct polarity when
installing the battery.
• Do not hold the battery with metallic tweezers,
Main unit
otherwise a short-circuit may occur.
WARNING
Battery may explode if mistreated.
Do not recharge, disassemble, or dispose of
in fire.
Back of the front panel
36
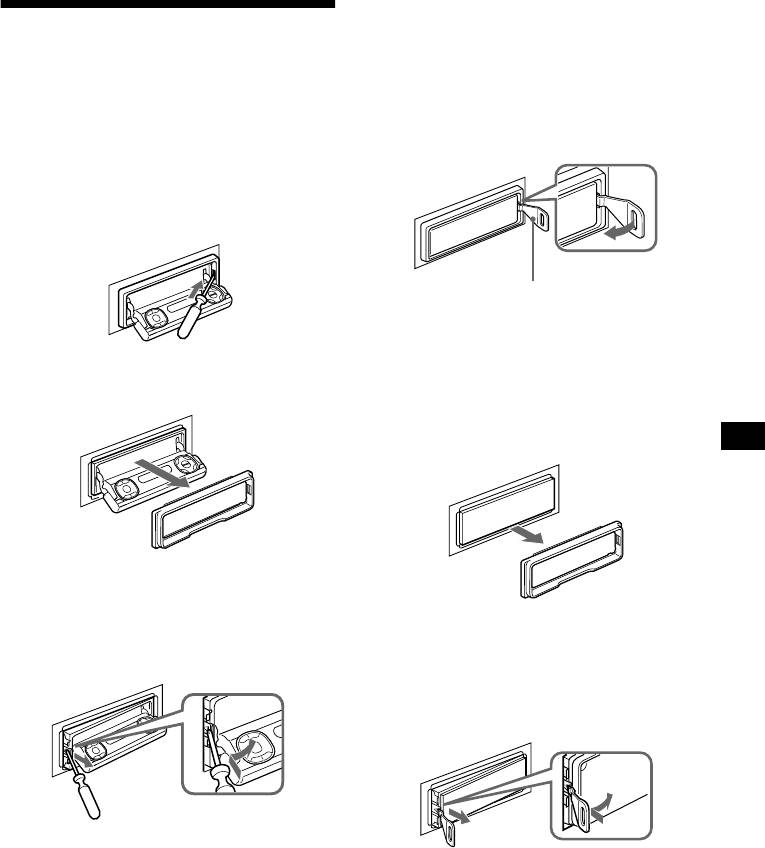
If the front panel does not open
Removing the unit
because of a blown fuse
1 Remove the front cover
With the front panel open
1 Press the clip inside the front cover
with a release key (supplied), and
1 Remove the front cover
pry the front cover free.
1 Press (OPEN/CLOSE) or (OPEN) of
the unit, then press the clip inside
the front cover with a thin
screwdriver, and gently pry the front
cover free.
Release key (supplied)
Note
To protect the surface of the unit, put thin cloth
between release key and the unit by inserting the
2 Repeat step 1 on the left side.
release key.
The front cover is removed.
2 Repeat step 1 on the left side.
The front cover is removed.
2 Remove the unit
1 Use a thin screwdriver to push in
the clip on the left side of the unit,
2 Remove the unit
then pull out the left side of the unit
until the catch clears the mounting.
1 Use a release key to push in the clip
on the left side of the unit, then pull
out the left side of the unit until the
catch clears the mounting.
2 Repeat step 1 on the right side.
3 Slide the unit out of the mounting.
2 Repeat step 1 on the right side.
3 Slide the unit out of the mounting.
37

Specifications
Tone controls (CDX-M670, MDX-M690 only)
CD/MD Player section
Bass ±8 dB at 100 Hz
Signal-to-noise ratio 90 dB
Treble ±8 dB at 10 kHz
Frequency response 10 – 20,000 Hz
Loudness (CDX-M670, MDX-M690 only)
Wow and flutter Below measurable limit
+8 dB at 100 Hz
+2 dB at 10 kHz
Tuner section
Power requirements 12 V DC car battery
(negative earth)
FM
Dimensions Approx. 178 × 50 × 182
Tuning range 87.5 – 108.0 MHz
mm (w/h/d)
Aerial terminal External aerial connector
Mounting dimensions Approx. 182 × 53 × 160
Intermediate frequency 10.7 MHz/450 kHz
mm (w/h/d)
Usable sensitivity 8 dBf
Mass Approx. 1.5 kg
Selectivity 75 dB at 400 kHz
Supplied accessories Parts for installation and
Signal-to-noise ratio 66 dB (stereo),
connections (1 set)
72 dB (mono)
Front panel case (1)
Harmonic distortion at 1 kHz
Card remote commander
0.6 % (stereo),
RM-X111
0.3 % (mono)
Rotary commander
Separation 35 dB at 1 kHz
RM-X5S (CDX-M770)
Frequency response 30 – 15,000 Hz
Optional accessories Rotary commander
RM-X5S (CDX-M670,
MW/LW
MDX-M690)
Tuning range MW: 531 – 1,602 kHz
RM-X4S
LW: 153 – 279 kHz
BUS cable (supplied with
Aerial terminal External aerial connector
an RCA pin cord)
Intermediate frequency 10.7 MHz/450 kHz
RC-61 (1 m), RC-62 (2 m)
Sensitivity MW: 30 µV
Optional equipment CD changer (10 discs)
LW: 40 µV
CDX-848X, CDX-646
CD changer (6 discs)
Power amplifier section
CDX-T68X, CDX-T67
Outputs Speaker outputs
MD changer (6 discs)
(sure seal connectors)
MDX-65
Speaker impedance 4 – 8 ohms
Source selector
Maximum power output 52 W × 4 (at 4 ohms)
XA-C30
DAB tuner unit
XT-100DAB
General
Outputs Audio outputs (front/rear)
Subwoofer output (mono)
Note
Power aerial relay control
This unit cannot be connected to a digital preamplifier
lead
or an equalizer.
Power amplifier control lead
US and foreign patents licensed from Dolby
Inputs Telephone ATT control lead
Laboratories.
Illumination control lead
BUS control input
Design and specifications are subject to change
connector
without notice.
BUS audio input connector
Remote controller input
connector (CDX-M670,
MDX-690)
Aerial input connector
AUX IN connector (CDX-
M770 only)
38
The rotary commander RM-X5S cannot be
Troubleshooting
operated.
Rotate the dial at the bottom of the rotary
The following checklist will help you remedy
commander until it can be operated.
problems you may encounter with your unit.
Before going through the checklist below, check
CD/MD playback
the connection and operating procedures.
A disc cannot be loaded.
• Another CD/MD is already loaded.
General
• The CD/MD is forcibly inserted upside down
No sound.
or in the wrong way.
• Press the (+) side of (VOL) to adjust the
Playback does not begin.
volume.
• Dirty or defective disc.
• Cancel the ATT function.
• CD-R that is not finalized, or a CD-RW.
• Set the fader control to the centre position for
• You tried to playback a CD-R not designed
a 2-speaker system.
for audio use.
The message “LP” appears in the display.
• Some CD-Rs may not play due to its
MDLP tracks cannot be played back. (MDX-
recording equipment or the disc condition.
M690 only)
A disc is automatically ejected.
An optional MD unit does not conform to
The ambient temperature exceeds 50°C.
MDLP play back.
t Use this unit to playback the MDLP tracks.
CD will not be ejected.
The operation buttons do not function.
The contents of the memory have been
Press the reset button.
erased.
• The reset button has been pressed.
The sound skips from vibration.
• Store again into the memory.
• (CDX-M770, CDX-M670)
• The power cord or battery has been
The unit is installed at an angle of more than
disconnected.
60°.
• The power connecting cord is not connected
(MDX-M690)
properly.
The unit is installed at an angle of more than
20°.
No beep sound.
• The unit is not installed in a sturdy part of
The beep sound is cancelled (page 34).
the car.
Indications disappear from/do not appear in
The sound skips.
the display.
Dirty or defective disc.
• The clock display disappears if you press
(OFF) for 2 seconds.
Cannot turn off the “--------” indication.
t Press (OFF) again for 2 seconds to
You entered the name edit mode.
display the clock.
t Press (LIST) for 2 seconds.
• Remove the front panel and clean the
connectors. See “Cleaning the connectors”
Radio reception
(page 36) for details.
Preset tuning is not possible.
Stored stations and correct time are erased.
• Store the correct frequency in the memory.
The fuse has blown.
• The broadcast signal is too weak.
Makes noise when the ignition key is in the
ON, ACC, or OFF position.
continue to next page t
The leads are not matched correctly with the
car’s accessory power connector.
No power is being supplied to the unit.
• Check the connection. If everything is in
order, check the fuse.
• The car does not have an ACC position.
t Press (SOURCE) (or insert a disc) to turn
on the unit.
The power is continuously supplied to the
unit.
The car does not have an ACC position.
The power aerial does not extend.
The power aerial does not have a relay box.
39

The stations cannot be received.
DSP functions (CDX-M770 only)
The sound is hampered by noises.
No sound, or sound is too low.
• Connect a power aerial control lead (blue) or
The volume of the speakers may have been
accessory power supply lead (red) to the
automatically lowered in order to maximize
power supply lead of a car’s aerial booster.
the effect of the listening position adjustment.
(Only when your car has built-in FM/MW/
t Press < or , to adjust the balance. The
LW aerial in the rear/side glass.)
speaker balance can be set separately for
• Check the connection of the car aerial.
DSP on mode and DSP off mode (page 29).
• The auto aerial will not go up.
t Check the connection of the power aerial
control lead.
• Check the frequency.
• When the DSO mode is on, the sound is
sometimes hampered by noises.
t Set the DSO mode to off (page 27)
(CDX-M770), (page 27) (CDX-M670,
MDX-M690).
Automatic tuning is not possible.
• The local seek mode is set to “on.”
t Set the local seek mode to “off” (page
34).
• The broadcast signal is too weak.
t Perform manual tuning.
The “ST” indication flashes.
• Tune in the frequency accurately.
• The broadcast signal is too weak.
t Set to the monaural reception mode (page
34).
A programme broadcast in stereo is heard
in monaural.
• The unit is in monaural reception mode.
t Cancel monaural reception mode (page
34).
RDS
The Seek starts after a few seconds of
listening.
The station is non-TP or has weak signal.
t Press (AF) or (TA) repeatedly until “AF
off” or “TA off” appears.
No traffic announcements.
• Activate “TA.”
• The station does not broadcast any traffic
announcements despite being TP.
t Tune in another station.
PTY displays “--------.”
• The current station is not an RDS station.
• RDS data has not been received.
• The station does not specify the programme
type.
40
If these solutions do not help improve the
situation, consult your nearest Sony dealer.
Error displays/Messages
Messages
Error displays
LCL Seek +/–
(For this unit and optional CD/MD changers)
The Local Seek mode is on during automatic
The following indications will flash for about 5
tuning (page 16).
seconds, and an alarm sound will be heard.
NO AF
1
Blank*
There is no alternative frequency for the
2
No tracks have been recorded on an MD*
.
current station.
t Play an MD with recorded tracks on it.
“” or “”
1
Error*
You have reached the beginning or the end of
2
• A CD is dirty or inserted upside down*
.
the disc and you cannot go any further.
t Clean or insert the CD correctly.
• A CD/MD cannot play because of some
2
problem*
.
t Insert another CD/MD.
High Temp
The ambient temperature is more than 50°C.
t Wait until the temperature goes down
below 50°C.
NO Disc
No disc is inserted in the CD/MD unit.
t Insert discs in the CD/MD unit.
NO Mag
The disc magazine is not inserted in the CD/
MD unit.
t Insert the magazine in the CD/MD unit.
Not Ready
The lid of the MD unit is open or the MDs are
not inserted properly.
t Close the lid or insert the MDs properly.
Push Reset
The CD/MD unit cannot be operated because
of some problem.
t Press the reset button on the unit.
*1 When the CD/MD changer is connected to the unit,
the disc number of the CD or MD appears in the
display.
*2 The disc number of the disc causing the error
appears in the display.
41

¡Bienvenido!
Gracias por adquirir este reproductor de discos
compactos/minidiscos Sony. Disfrutará incluso
más de sus distintas funciones con:
1
• Selección del idioma de las indicaciones*
entre inglés, alemán, francés, italiano,
holandés, español, portugués, sueco, polaco,
checo o turco.
• Unidades opcionales de CD/MD (cambiadores
2
y reproductores)*
.
• Reproducción MDLP (Reproducción de larga
duración de minidiscos). (sólo MDX-M690)
• Sintonizador DAB opcional.
• Información CD TEXT (mostrada al reproducir
3
discos CD TEXT*
).
• Accesorio de controlador suministrado
Mando a distancia de tarjeta RM-X111
Mando rotativo inalámbrico RM-X5S (CDX-
M770)
• Accesorios de controlador opcionales
Mando rotativo inalámbrico RM-X5S (CDX-
M670, MDX-M690)
Mando rotativo alámbrico RM-X4S (CDX-
M670, MDX-M690)
*1 Algunas indicaciones del visor no aparecen en el
idioma que seleccione.
*2 Esta unidad funciona solamente con productos
Sony.
*3 Un disco CD TEXT es un CD de audio que incluye
información, como el nombre del disco, el nombre
del artista y los nombres de las pistas. Esta
información está grabada en el disco.
Esta etiqueta está situada en la parte inferior del
chasis.
CAUTION INVISIBLE
LASER RADIATION WHEN OPEN
DO NOT STARE INTO BEAM OR
VIEW DIRECTLY WITH OPTICAL INSTRUMENTS
Esta etiqueta está situada en el chasis interno de
la unidad de activación.
2

Índice
Ubicación de los controles. . . . . . . . . . . . . . . 4
DAB (opcional)
Precauciones . . . . . . . . . . . . . . . . . . . . . . . . . 6
Descripción general de DAB . . . . . . . . . . . 20
Notas sobre los discos compactos . . . . . . . . . 7
Operaciones básicas de DAB . . . . . . . . . . . 20
Notas sobre minidiscos . . . . . . . . . . . . . . . . . 8
Memorización automática de servicios DAB
— BTM . . . . . . . . . . . . . . . . . . . . . . . . . 21
Procedimientos iniciales
Memorización manual de servicios DAB
Restauración de la unidad . . . . . . . . . . . . . . . 9
— Edición de programación . . . . . . . . . 22
Extracción del visor principal . . . . . . . . . . . . 9
Sintonización de programas DAB mediante
Ajuste del reloj . . . . . . . . . . . . . . . . . . . . . . 10
una lista . . . . . . . . . . . . . . . . . . . . . . . . . 22
Cambio de audio multicanal y DRC. . . . . . 23
CD/MD
Localización de servicios DAB mediante el
Reproducción de discos. . . . . . . . . . . . . . . . 11
tipo de programa (PTY). . . . . . . . . . . . . 23
Elementos del visor . . . . . . . . . . . . . . . . . . . 12
Reproducción repetida de pistas
Ajuste del mejor sonido
— Reproducción repetida. . . . . . . . . . . . 12
Ajuste del ecualizador (EQ7) . . . . . . . . . . . 24
Reproducción de pistas en orden aleatorio
Ajuste del menú de sonido de baja frecuencia
— Reproducción aleatoria . . . . . . . . . . . 12
— Organizador de sonido de baja frecuencia
Etiquetado de CD
dinámico (DSO) . . . . . . . . . . . . . . . . . . . 25
— Memorando de discos* . . . . . . . . . . . 13
Audición de cada fuente de programa con su
Localización de discos por nombre
DSO registrado
— Listado* . . . . . . . . . . . . . . . . . . . . . . . 14
— Memoria de sonido fuente (SSM). . . 26
Selección de pistas específicas para su
Ajuste de las características de sonido . . . . 26
reproducción
Selección de la posición de audición
— Banco* . . . . . . . . . . . . . . . . . . . . . . . . 14
(sólo CDX-M770) . . . . . . . . . . . . . . . . . 27
* Funciones disponibles con una unidad opcional de
Ajuste del balance (BAL). . . . . . . . . . . . . . 27
CD/MD
Ajuste de los graves
Radio
(sólo CDX-M670, MDX-M690) . . . . . . 27
Almacenamiento automático de emisoras
Ajuste de los agudos
— Memoria de la mejor sintonía
(sólo CDX-M670, MDX-M690) . . . . . . 28
(BTM). . . . . . . . . . . . . . . . . . . . . . . . . . . 15
Ajuste del balance (FAD)
Recepción de las emisoras almacenadas . . . 15
(sólo CDX-M670, MDX-M690) . . . . . . 28
Almacenamiento de las emisoras
Ajuste del volumen frontal y posterior
deseadas . . . . . . . . . . . . . . . . . . . . . . . . . 16
(sólo CDX-M770) . . . . . . . . . . . . . . . . . 28
Sintonización de emisoras mediante lista
Ajuste del volumen de los altavoces
— Listado . . . . . . . . . . . . . . . . . . . . . . . . 16
potenciadores de graves . . . . . . . . . . . . . 29
Otros elementos ajustables
RDS
(sólo CDX-M670, MDX-M690) . . . . . . 30
Descripción general de RDS . . . . . . . . . . . . 16
Otras funciones
Resintonización automática para mejorar la
recepción
Uso del mando rotativo. . . . . . . . . . . . . . . . 30
— Función AF . . . . . . . . . . . . . . . . . . . . 17
Atenuación rápida del sonido . . . . . . . . . . . 32
Recepción de anuncios de tráfico
Selección del analizador de espectros. . . . . 32
— TA/TP . . . . . . . . . . . . . . . . . . . . . . . . 18
Cambio de los ajustes de sonido y
Memorización de emisoras RDS con los
visualización
ajustes AF y TA . . . . . . . . . . . . . . . . . . . 18
— Menú . . . . . . . . . . . . . . . . . . . . . . . . . 33
Sintonización de emisoras mediante tipo de
Asignación de nombre a una indicación del
programa
visor . . . . . . . . . . . . . . . . . . . . . . . . . . . . 34
— PTY . . . . . . . . . . . . . . . . . . . . . . . . . . 19
Conexión de equipos auxiliares de audio
Ajuste automático del reloj
(sólo CDX-M770) . . . . . . . . . . . . . . . . . 34
— CT . . . . . . . . . . . . . . . . . . . . . . . . . . . 19
Información complementaria
Mantenimiento . . . . . . . . . . . . . . . . . . . . . . 35
Extracción de la unidad. . . . . . . . . . . . . . . . 36
Especificaciones . . . . . . . . . . . . . . . . . . . . . 37
Solución de problemas . . . . . . . . . . . . . . . . 38
3
Mensajes/Indicaciones de error . . . . . . . . . 40
Ubicación de los controles
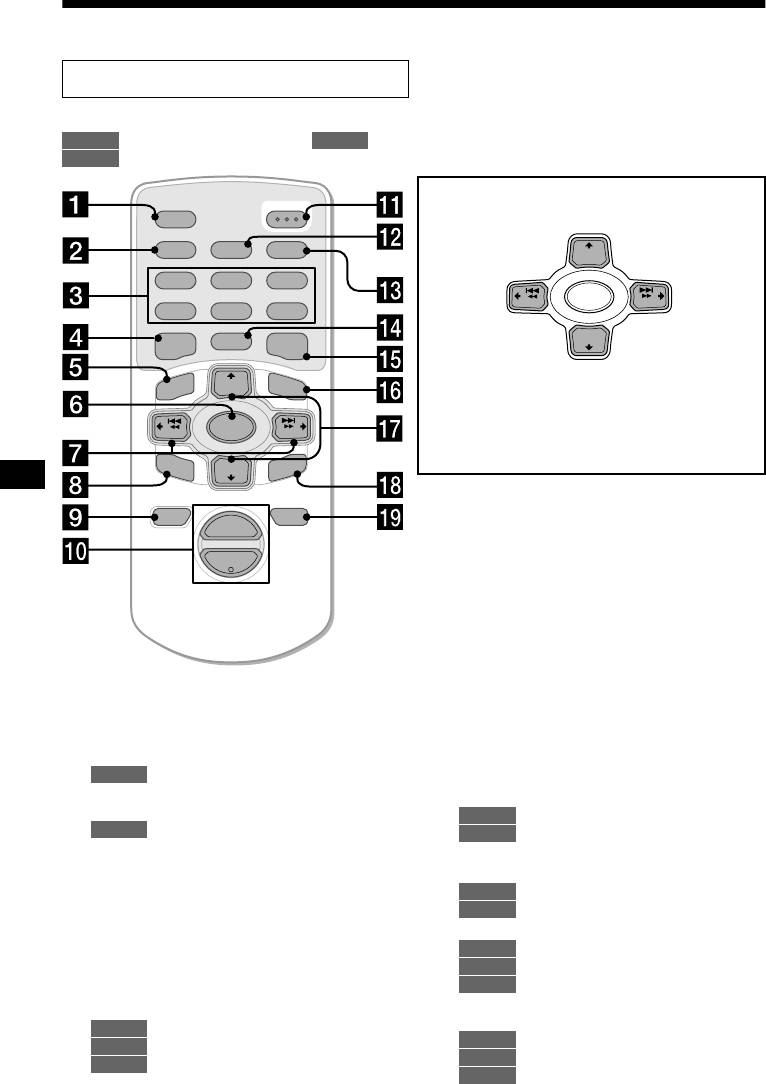
Mando a distancia de tarjeta RM-X111
Consulte las páginas indicadas para obtener información detallada.
CD/MD
: Durante la reproducción : Durante la recepción de la radio
RADIO
MENU
: Durante el modo de menú
M (DISC)
OPEN/CLOSE
(+): para seleccionar hacia arriba
SCRL
PTY
< (SEEK)
DSPL
AF
TA
(–): para seleccionar
DISC
+
REP SHUF
hacia la
1
2
3
izquierda/
.
SOURCE
SEEK
–
SEEK
+
4
5
6
, (SEEK)
DISC
–
EQ7 DSO
MODE
(+): para seleccionar
hacia la
derecha/>
DISC
+
LIST
m (DISC)
MENU
(–): para seleccionar hacia abajo
SOURCE
En el modo de menú, el botón o botones que pueden
SEEK
–
SEEK
+
seleccionarse actualmente de estos cuatro se
SOUND
indican con “ v” en el visor.
DISC
–
ENTER
Nota
Si la unidad se apaga pulsando (OFF) durante 2
ATTOFF
+
segundos, no podrá utilizarse con el mando a
VOL
distancia de tarjeta a menos que se pulse (SOURCE)
en la unidad, o que se inserte un disco para que
–
dicha unidad se active primero.
Sugerencia
Consulte “Sustitución de la pila de litio” para obtener
información detallada sobre cómo sustituir las pilas
(página 35).
a Botón SCRL (desplazamiento) 12
i Botón OFF (Parada/Desactivación de
b Botón DSPL/PTY (cambio del modo
la alimentación) 11, 34
de indicación/tipo de programa) 12,
j Botones VOL +/– 18
13, 16, 19, 23, 34
k Botón OPEN/CLOSE 11, 36
c Botones numéricos
l Botón AF 17, 18
CD/MD
m Botón TA 18
(1) REP 12
n Botón MODE
(2) SHUF 12
CD/MD
11, 13
RADIO
15, 16, 17, 18, 21, 22
RADIO
15, 16, 18, 20, 21
d Botón EQ7 24
o Botón DSO 25
e Botón MENU 10, 13, 14, 15, 18, 19, 21,
p Botón LIST
22, 23, 24, 25, 26, 28, 29, 30, 32, 33, 34
CD/MD
13, 14
f Botón SOURCE (Activación de la
RADIO
16, 22
alimentación/Radio/CD/MD) 10, 11,
q Botones M/m DISC +/–
13, 15, 16, 18, 20, 21, 24, 25, 27, 28, 29,
CD/MD
11, 14
32, 34
RADIO
15, 16, 19, 20, 21, 22, 23
MENU
13, 14, 15, 18, 19, 21, 22, 23,
g </, Botones SEEK +/– 10, 26, 27,
24, 25, 26, 28, 29, 30, 32, 33, 34
28, 29
r Botón ENTER
CD/MD
11
CD/MD
14
RADIO
15, 16, 17, 20
RADIO
16, 19, 21, 22, 23
MENU
10, 13, 14, 19, 22, 23, 24, 25,
MENU
10, 13, 14, 15, 18, 19, 21, 22,
26, 28, 29, 30, 32, 33, 34
23, 24, 25, 26, 28, 29, 30, 32, 33, 34
4
h Botón SOUND 26, 27, 28, 29
s Botón ATT 32
Panel de visualización principal
Cara de operaciones
RESET
C
L
D
S
P
P
S
R
L
T
Y
DISC
LIST
MENU
DSO
SOURCE
EQ7
REP SHUF
SOUND
CLOSE
O
F
F
O
D
E
M
AF TA
123456
DISC
ENTER
CDX-M770/CDX-M670
/MDX-M690
Los botones correspondientes de la
j Botones DISC +/– (cursor arriba/abajo)
unidad controlan las mismas funciones
Botones SEEK –/+ (cursor izquierda/
que los del mando a distancia de tarjeta.
derecha)
a Botón OPEN 9, 11, 36
k Botón MENU
b Visor principal
m Botón LIST
c qf Receptor para el mando a
o Botón CLOSE (cierre del panel
distancia de tarjeta
frontal) 9, 11
d qs Botón de restauración 9
p Botón OFF (Parada/Desactivación de
e Botones de ajuste de volumen
la alimentación)*
f Botón SCRL (desplazamiento)
q Botón MODE
g Botón SOURCE
r Botones Numéricos
h Botón DSPL/PTY (cambio del modo
s Botón SOUND
de indicación/tipo de programa)
t Botón EQ7
i Visor secundario
u Botón ENTER
v Botón DSO
w Botón Z (expulsión) 11
5
* Advertencia sobre la instalación en un
automóvil que no disponga de posición
Precauciones
ACC (auxiliar) en el interruptor de
encendido
Después de apagar el encendido, asegúrese de
• Si aparca el automóvil bajo la luz solar directa,
pulsar el botón de activación/desactivación de la
permita que la unidad se enfríe antes de
alimentación de la unidad durante 2 segundos para
utilizarla.
desactivar la indicación del reloj.
• Las antenas motorizadas se extenderán
En caso contrario, la indicación del reloj no se
automáticamente mientras la unidad se
desactivará y causará el desgaste de la batería.
encuentra en funcionamiento.
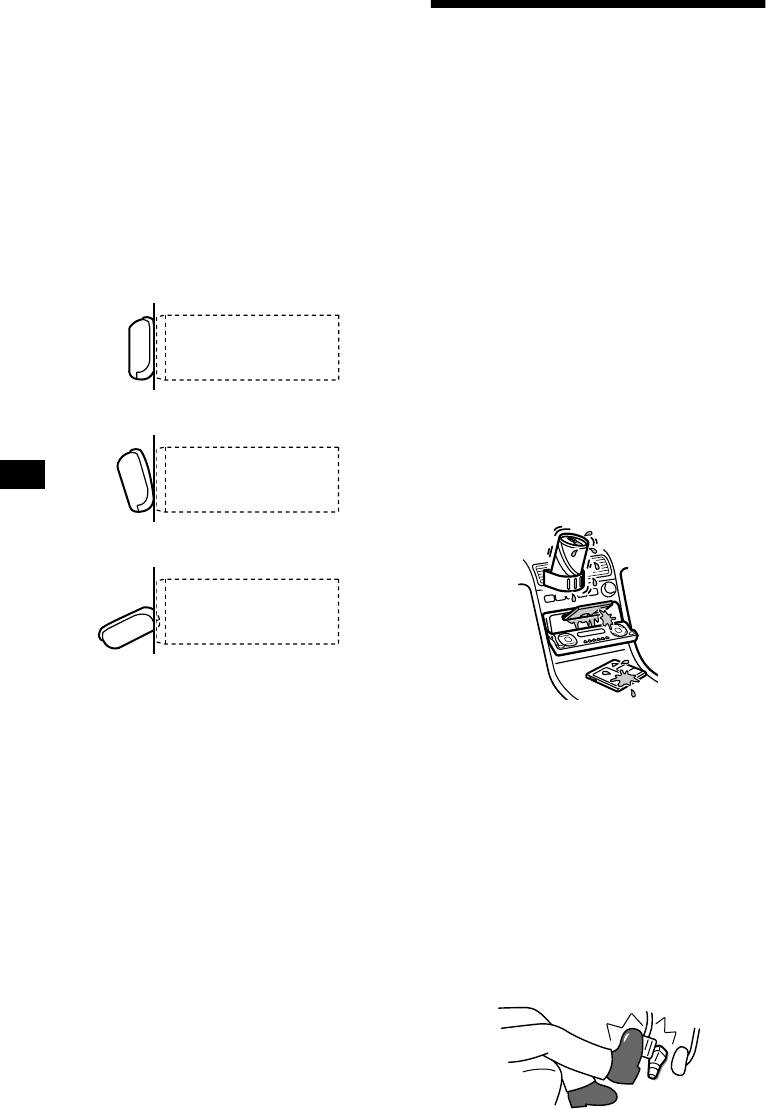
Acerca de las posiciones del panel
Si desea realizar alguna consulta o solucionar
algún problema relativo a la unidad que este
frontal
manual no trate, consulte con el proveedor Sony
Esta unidad dispone de 3 modos de apertura del
más próximo.
panel frontal.
• Posición de visualización principal
Condensación de humedad
En días lluviosos o en zonas muy húmedas, es
posible que se condense humedad dentro de las
unidad
lentes y visor de la unidad. Si esto ocurre, ésta no
funcionará correctamente. En este caso, extraiga
el disco y espere una hora aproximadamente
hasta que se haya evaporado la humedad.
• Posición de extracción
Para mantener una alta calidad de
sonido
unidad
Asegúrese de no derramar zumos ni demás
bebidas suaves sobre la unidad o los discos.
• Posición de visualización secundaria
unidad
Para evitar que el mando rotativo
inalámbrico RM-X5S se caiga
(suministrado con CDX-M770 solamente)
Si el mando inalámbrico se cae, podría causar un
accidente.
• Asegúrese de adherir la correa suministrada
cuando instale el mando rotativo cerca del
volante.
• Cerciórese de que la correa no queda atrapada
en los controles del automóvil (mecanismos,
palanca de cambios, etc.).
• Asegúrese de apretar el tope de la correa
después de colgar ésta en el interruptor
indicador, etc.
6
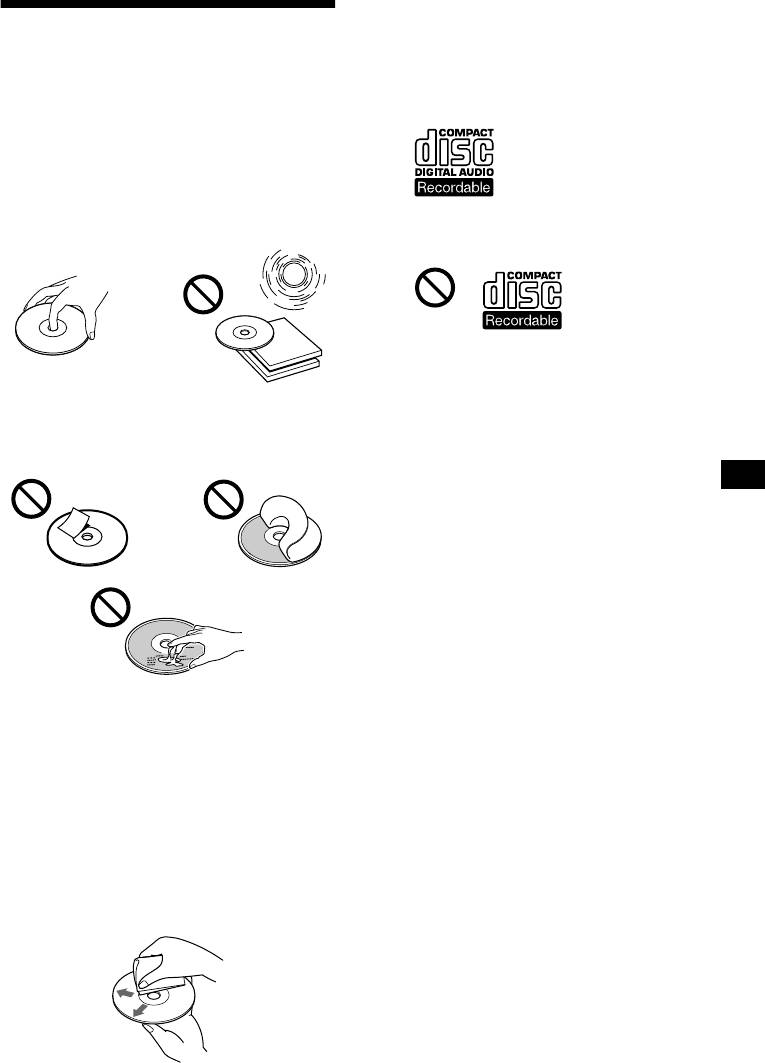
Notas sobre discos CD-R/CD-RW
Notas sobre los discos
• Puede reproducir discos CD-R (discos
compactos grabables) diseñados para uso de
compactos
audio en esta unidad
Busque esta marca con el fin de distinguir los
• Para mantener los discos limpios, no toque la
discos CD-R para uso de audio.
superficie. Agarre los discos por los bordes.
• Guarde los discos en sus cajas o en los
cargadores de discos cuando no los utilice.
No someta los discos al calor ni a altas
temperaturas. Evite dejarlos en automóviles
aparcados o en salpicaderos o bandejas
Esta marca indica que el disco no es para uso de
traseras.
audio.
• Determinados discos CD-Rs (dependiendo del
equipo utilizado para su grabación o la
condición del disco) pueden no reproducirse en
• No adhiera etiquetas, ni utilice discos con
esta unidad.
residuos/tinta pegajosos. Tales discos pueden
• No es posible reproducir discos CD-R que no
dejar de girar durante el uso, causando fallos de
estén finalizados*.
funcionamiento, o pueden dañarse.
* Proceso necesario para reproducir en el
reproductor de CD de audio discos CD-R
grabados.
• No es posible reproducir discos CD-RW
(discos compactos reescribibles) en esta
unidad.
• Los discos con formas no estándar (p.ej.,
corazón, cuadrado, estrella) no pueden
reproducirse en esta unidad. Si lo intenta,
puede dañar la unidad. No utilice tales discos.
• No es posible reproducir discos compactos de
8 cm.
• Antes de realizar la reproducción, limpie los
discos con un paño de limpieza disponible en el
mercado. Hágalo desde el centro hacia los
bordes. No utilice disolventes como bencina,
diluyente, limpiadores disponibles en el
mercado ni aerosoles antiestáticos para discos
analógicos.
7
Limpieza
Notas sobre minidiscos
Limpie regularmente la superficie del cartucho
con un paño seco y suave.
• No abra el obturador del cartucho de
forma que el MD quede expuesto. Cierre
inmediatamente el obturador si se abre.
• No toque nunca la superficie del disco del
interior.
• No someta los discos al calor ni a altas
temperaturas. Evite dejarlos en automóviles
aparcados o en salpicaderos o bandejas
traseras.
Notas sobre la adhesión de etiquetas
Para evitar que los minidiscos se atasquen en la
unidad:
– Adhiera la etiqueta en una posición adecuada.
– Retire las etiquetas antiguas antes de adherir
nuevas.
– Sustituya las etiquetas que estén despegándose.
8
Оглавление
- CDX-M770 CDX-M670
- Getting Started
- CD/MD
- *
- Radio
- RDS
- DAB (optional)
- Tuning up for your best
- Other Functions
- Additional Information
- Procedimientos iniciales
- CD/MD
- *
- Radio
- RDS
- DAB (opcional)
- Ajuste del mejor sonido
- Otras funciones
- Información
- Komma igång
- CD/MD
- *
- Radio
- RDS
- DAB (tillval)
- Finjustera för bästa ljud
- Andra funktioner
- Ytterligare information
- Preparativos
- CD/MD
- *
- Rádio
- RDS
- DAB (opcional)
- Sintonização para o
- Outras funções
- Informações adicionais
- Ξεκινώντας
- CD/MD
- *
- Ραδιφωνο
- RDS
- Λειτουργία DAB
- Συντονισµς του µς του
- Λοιπές Λειτουργίες
- Πρσθετες
- Начало работы
- CD/MD
- Радиоприемник
- RDS
- DAB (как
- Настройка
- Другие функции
- Дополнительная


