Sony KV-25FX20R: инструкция
Раздел: Бытовая, кухонная техника, электроника и оборудование
Тип: Телевизор
Инструкция к Телевизору Sony KV-25FX20R

4-204-788-91(2)
R
FD Trinitron
Colour Television
GB
Instruction Manual
RU
Сборник инструкций
BG
Инструкции за експлоатация
KV-25FX20R
KV-29FX20R
©1999 by Sony Corporation Printed in Spain

2

GB
Instruction Manual
Thank you for choosing this Sony TV.
Before operating the TV, please read this manual thoroughly and retain it for
future reference.
Keys to read this Instruction Manual:
• Use Getting Started if you wish to install the TV set and to get familiar with the
basic functions.
• Use Advanced Operation if you wish to know more about the additional features
of the TV set.
• Symbols used in the manual:
• Informs you of possible hazards
• Important information
• Information on a feature
• 1, 2 ... Sequence of instructions
MENU
• Shaded buttons on the remote control show the buttons you have to
K
press to follow the sequence of instructions.
• Informs you of the result of the instructions.
• The process continues on the next page to get final result.
3
For Your Safety
WARNING
Safety Information
All TVs operate on extremely high voltages. To prevent fire or electric shock, please follow the safety
procedures indicated below.
For General Safety
• Do not expose the TV set to rain or moisture.
• Do not remove the rear cover.
• For your protection, refer all servicing to qualified personnel only.
For Safe Installation
• Do not install the TV in hot, humid or excessively dusty places.
• Do not block or cover the ventilation openings. For ventilation, leave
a space of at least 10 cm all around the set.
• Do not install the TV where it may be exposed to mechanical vibrations.
• Place the TV set only on a stable stand designed for the weight and
dimensions of the TV.
For Safe Operation
• Do not operate the TV set on anything other than a 220-240V AC, 50Hz
supply.
• Do not operate the TV if any liquid or solid objects fall in through the
ventilation slots. Have it checked immediately.
• For environmental and safety reasons, it is recommended that the TV set
is not left in standby mode when not in use. Switch off at the mains.
• Do not disconnect the TV by pulling on the power cable. Disconnect by
removing the mains plug.
• In case of a thunderstorm, disconnect the TV set from the main supply and
the aerial. Otherwise the set may be damaged by a stroke of lightning.
For Maintenance
• Clean the TV screen with a soft dampened cloth. Do not use any abrasive
cleaners.
• Dust and nicotine deposits may cause heat accumulation inside the TV set.
In the long term this could be a safety risk and may shorten the lifetime of
your TV set. Therefore have your set serviced about every five years.
4
For Your Safety

Table of Contents
Table of Contents
Keys to read this Instruction Manual .................................................................................................. 3
For your Safety ........................................................................................................................................ 4
Getting Started
Overview
Checking the Accessories Supplied ......................................................................................... 6
Overview of TV Buttons ........................................................................................................... 6
Overview of Remote Control Buttons ..................................................................................... 7
First Time Operation
Step 1 - Installation
Inserting Batteries into the Remote Control ........................................................................... 8
Connecting the Aerial ................................................................................................................ 8
Switching on the TV .................................................................................................................. 8
Step 2 - Basic Presetting
GB
Selecting Language .................................................................................................................... 9
Automatically Tuning the TV using the Remote Control .................................................. 10
Changing the Programme Order of the TV channels ......................................................... 11
Advanced Operation
Advanced Presetting
Automatically Tuning the TV using the TV buttons ........................................................... 12
Manually Tuning the TV ......................................................................................................... 13
Fine Tuning Channels .............................................................................................................. 14
Adjusting the Picture Rotation ............................................................................................... 15
Skipping Programme positions ............................................................................................. 16
Advanced TV Operation
Adjusting the Picture ............................................................................................................... 17
Adjusting the Sound ................................................................................................................ 18
Using the Sleep Timer ............................................................................................................. 19
Teletext
Viewing Teletext ....................................................................................................................... 20
Optional Connections
Using Optional equipment ..................................................................................................... 21
Smartlink ................................................................................................................................... 22
Additional Information
Menu Guide .............................................................................................................................. 23
Troubleshooting........................................................................................................................ 24
Specifications ............................................................................................................................ 25
Table of Contents
5
Getting Started - Overview
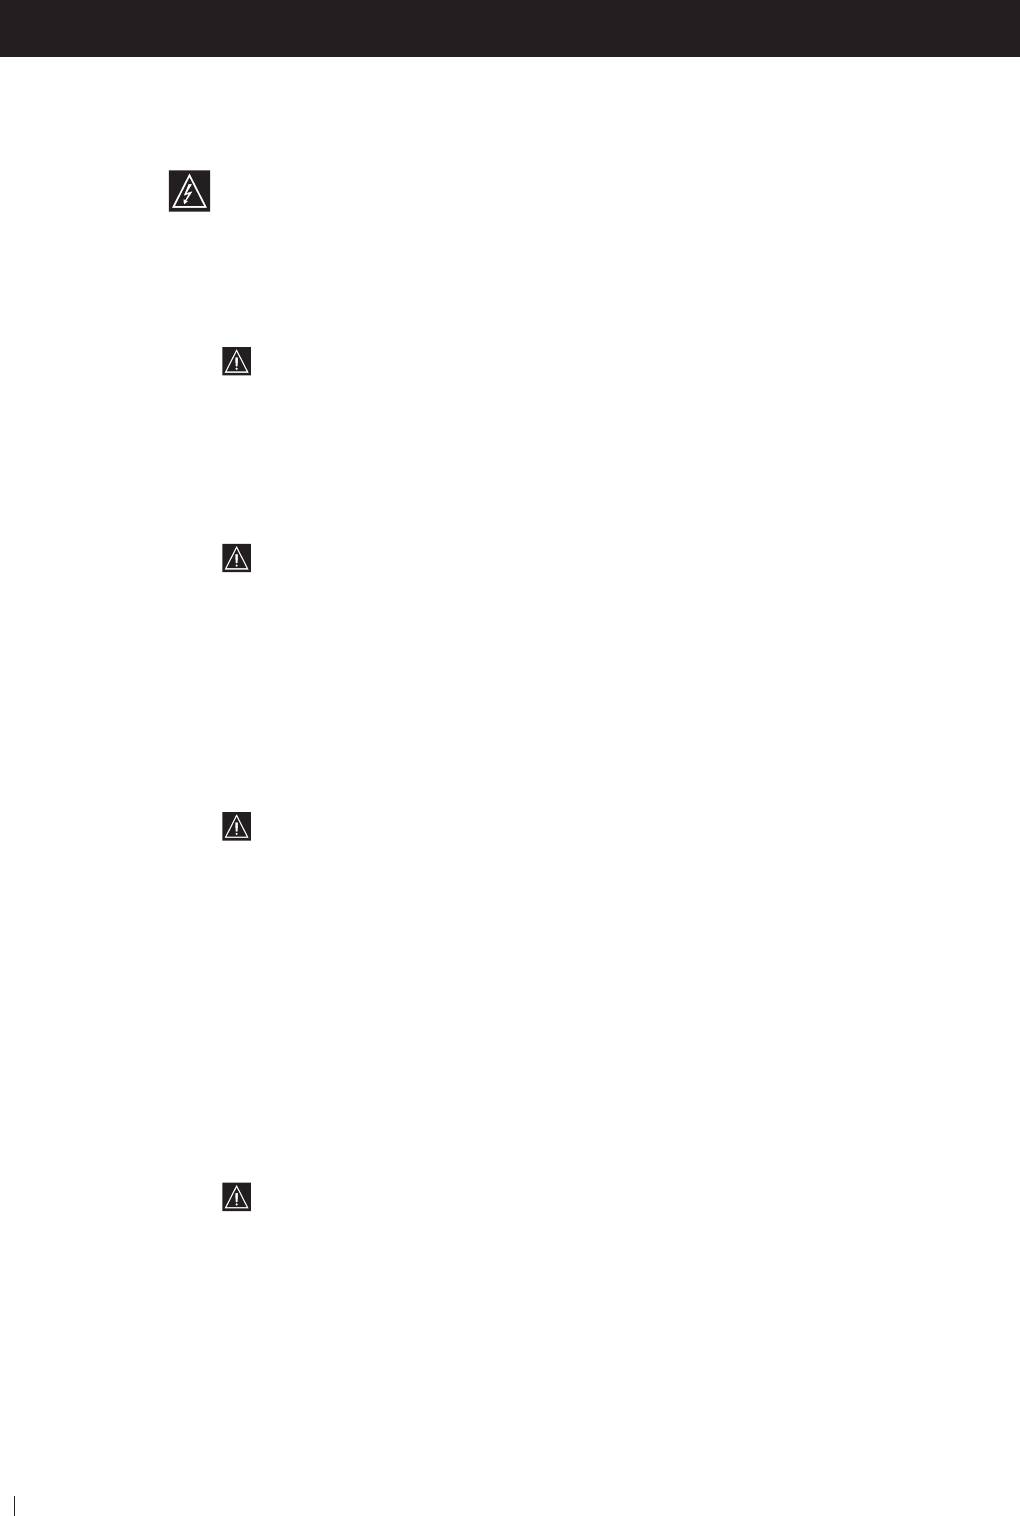
Checking the Accessories Supplied
1
2
3
4
5
6
7
8
9
0
MENU
K
PROGR
Two batteries (R6 type)
RM
887
S
One Remote Control
(RM-887)
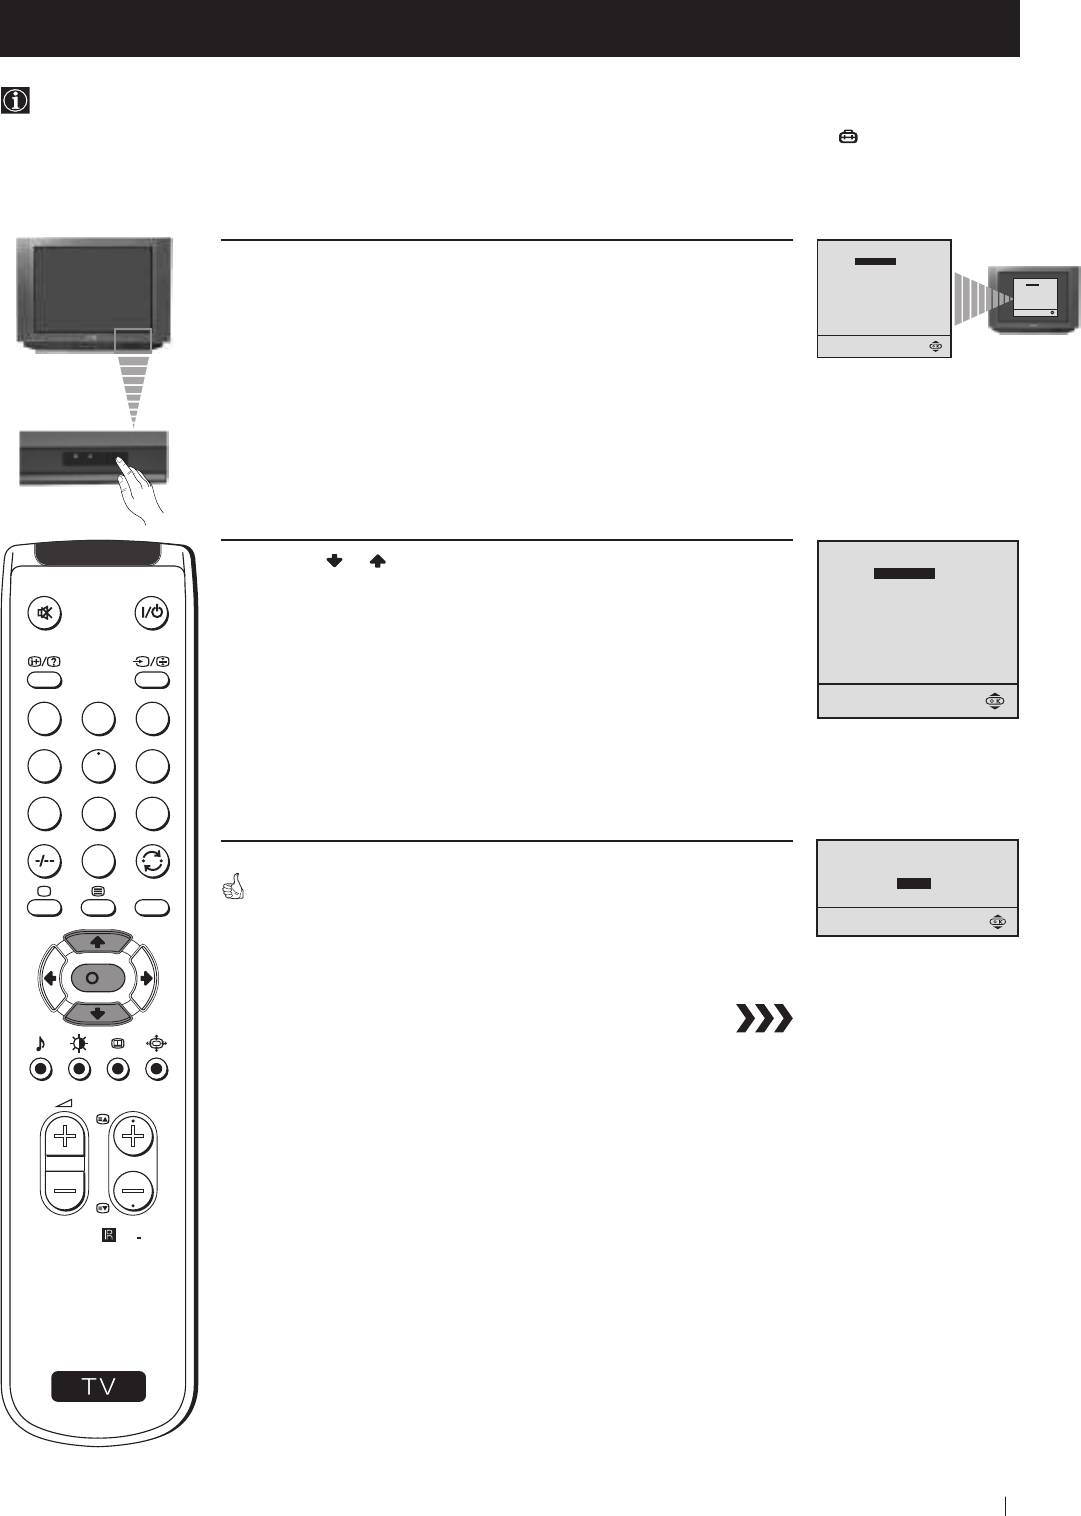
Overview of TV Buttons
On/Off Switch
Standby
indicator
Headphone jack
Auto Tune button
S Video
Phono
Audio
Selecting
Volume
Programme Up or
Input
Video
Inputs
Input
control
Down buttons
Press the flap on the front of the TV
jack
Input
jacks
source
buttons
(Selects TV channels)
to reveal the front control panel
jack
(press on the mark )
6
Getting Started - Overview
Getting Started - Overview
Overview of Remote Control Buttons
Muting the Sound
To Temporarily Switch Off TV
Press to mute TV sound.
Press to temporarily switch off TV (the
Press again to restore the sound.
standby indicator
on TV lights up). Press
again to switch on TV from standby mode.
Displaying On Screen Information
To save energy we recommend switching off
Press to display all on-screen indications.
completely when TV is not in use.
Press again to cancel. +.--+++++-++++
After 15-30 minutes without a TV
1
2
3
signal and without any button being
Selecting channels
pressed, the TV switches automatically
Press to select channels.
4
5
6
into standby mode.
For double-digit programme numbers, e.g. 23,
7
8
9
Selecting Input source
press -/-- first, then the buttons 2 and 3.
Press repeatedly until the desired input
If you enter an incorrect first digit, this should
symbol of the source appears on the TV
0
be corrected by entering another digit (0-9)
screen.
MENU
and then selecting -/-- button again to enter
the programme number of your choice.
Back to the channel last watched
+++++++++++++++...
Press to watch the last channel selected
Selecting TV mode
(watched for at least 5 seconds).
Press to switch off Teletext or video input.
K
+++++++++++++++++...
Displaying the menu system
Selecting Teletext
Press to display the menu on the TV screen.
Press to switch on Teletext.
Press again to remove the menu display
from the TV screen.
Selecting Sound mode
PROGR
Press to change the sound mode.
Menu selection
+++++++++++++++++...
Scroll Up
Selecting Picture mode
Scroll Down
Press to change the picture mode.
Previous menu or selection
+++++++++++++++++...
Next menu or selection
Adjusting TV Volume
OK Confirms your selection
RM
887
Press to adjust the volume of the TV.
Selecting Screen format
Press to view programmes in 16:9 mode.
Press again to return to 4:3 mode.
S
This button only works in Teletext mode.
Function
associated to this button does
not work with this TV.
Selecting channels
Press to select the next or previous channel.
Besides TV functions, all coloured buttons as well as green symbols are also used for Teletext operation. For more details,
please refer to the "Teletext" section of this instruction manual.
Getting Started - Overview
7
First Time Operation - Installation
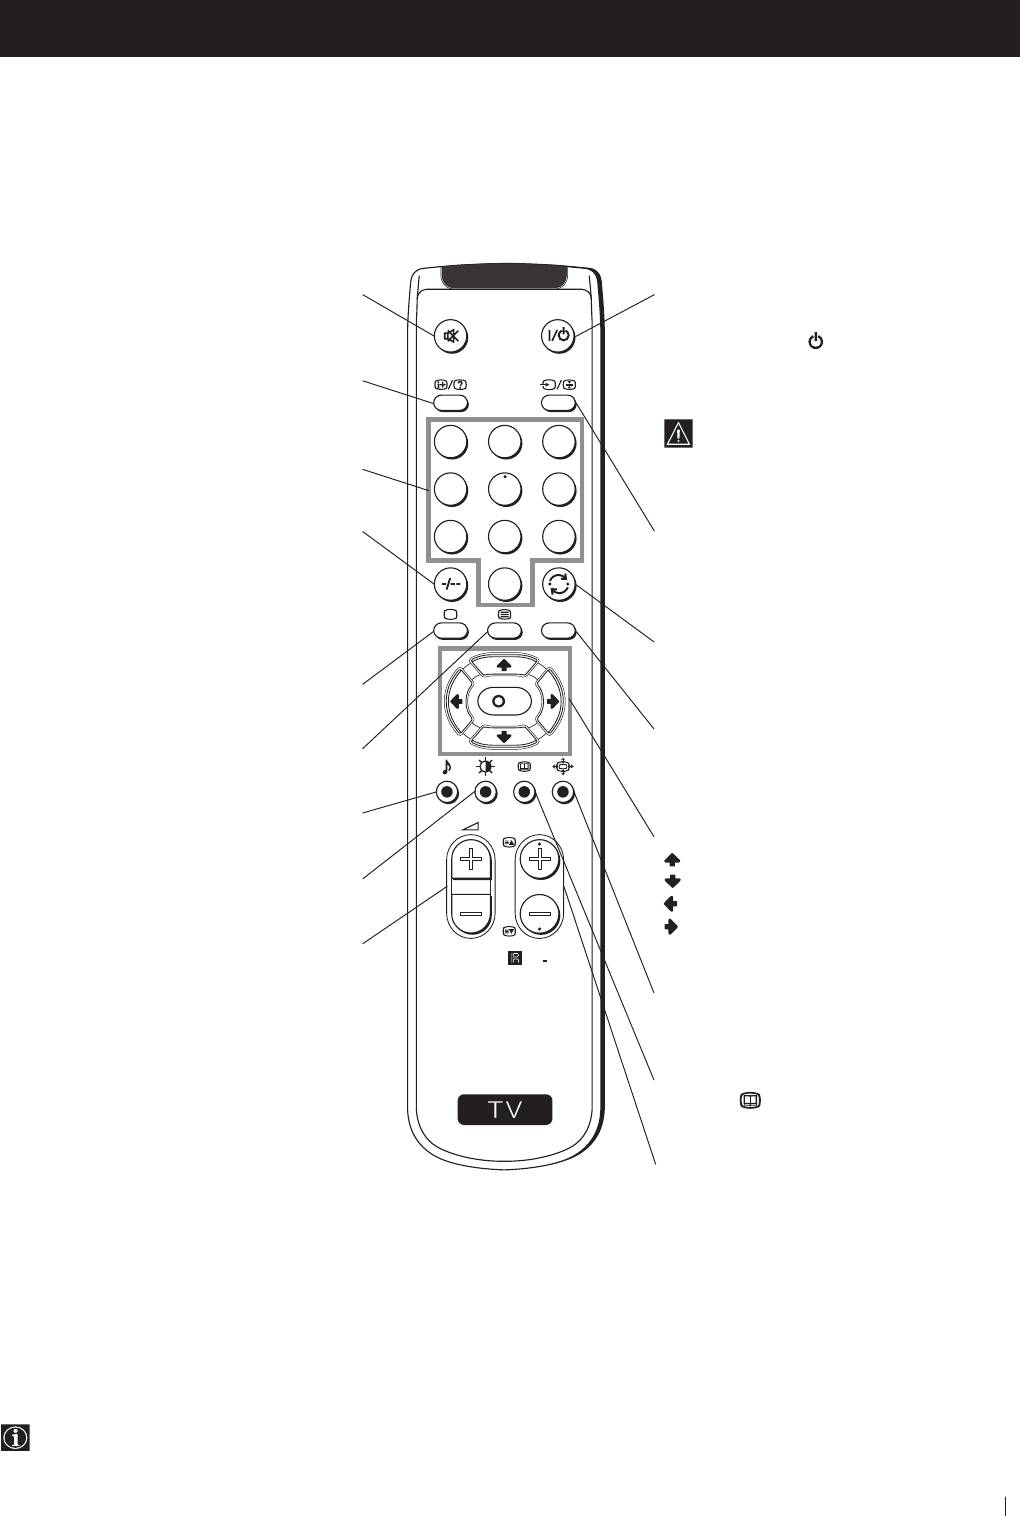
Inserting Batteries into the Remote Control
Make sure to insert the batteries using the correct polarities.
Always remember to dispose of used batteries in an environmental friendly way.
Connecting the Aerial
Connect a conventional aerial to the socket
marked on the rear of the TV.
Switching on the TV
Connect the TV plug to the mains socket (220-240V AC, 50Hz).
Push in the On/Off switch on the front of the TV.
8
First Time Operation - Installation
First Time Operation - Basic Presetting
Selecting Language
Use this function to change the language of the menu screens.
The first time that you switch on your TV, the Language menu appears automatically.
However, if you need to change the language menu afterwards, select the menu LANGUAGE in the
(SET UP) menu
and proceed in the same way as described below.
LANGUAGE
1 Press the on/off button on your TV set to switch on your TV. The
ENGLISH
PУCCKИЙ
БЬЛГAPCKИ
LANGUAGE
first time you press the on/off button on your TV set, the language
БЬЛГAPCKИ
ENGLISH
PУCCKИЙ
menu displays automatically on the TV screen.
Select language:
Select language:
LANGUAGE
2 Press the or button on the remote control to select the
ENGLISH
language, then press the OK button to confirm your selection.
PУCCKИЙ
БЬЛГAPCKИ
Select language:
1
2
3
4
5
6
7
8
9
Do you want to start
0
automatic tuning?
YES
MENU
The Auto Tuning menu appears on the TV screen in the selected language.
NO
K
PROGR
RM
887
S
First Time Operation - Basic Presetting
9
First Time Operation - Basic Presetting
Automatically Tuning the TV using the Remote Control
You need to tune the TV to receive channels (TV Broadcast). By following the instructions below, this TV automatically
searches and stores all available channels for you.
After having selected the language, a new menu appears automatically on the TV screen asking you to automatically tune
the TV. However, if you need to change or repeat the tuning afterwards (e.g. when you move house), select the menu
AUTO PROGRAMME in the
(SET UP) menu and proceed in the same way as described below in step 1 or, please refer
to the section "Automatically Tuning the TV using the TV buttons" of this instruction manual.
Do you want to start
automatic tuning?
1 Press the OK button on the remote control to select YES.
Do you want to start
automatic tuning?
YES
NO
NO
YES
A new menu appears automatically on the screen asking you to
check that the antenna is connected.
1
2
3
Please confirm that
2 Confirm that the antenna is connected and then press the OK
antenna is connected
button.
CONFIRM
4
5
6
7
8
9
AUTO PROGRAMME
0
The automatic tuning starts and the message "Searching..." flashes
PROGRAMME:
01
SYSTEM:
B/G
MENU
on the screen.
CHANNEL:
C 21
Searching...
This procedure could take some minutes.
K
PROGRAMME SORTING
PROGRAMME:
01
03
CONFIRM
When the automatic tuning is finished, the Programme Sorting menu
appears on the TV screen.
Select Channel:
PROGR
Select new position:
PROGR
Confirm:
Exit:
MENU
Notes: • To stop the automatic tuning, press the MENU button.
• If you stop the automatic tuning by pressing the MENU
button, the Programme Sorting menu does not appear
RM
887
automatically on the TV screen.
S
10
First Time Operation - Basic Presetting
First Time Operation - Basic Presetting
Changing the Programme Order of the TV channels
After all available channels (TV Broadcast) are captioned and stored, a new menu appears automatically on the screen to
change the order in which the channels appear on the screen.
However, if you wish to rearrange the order of the channels afterwards, select the menu PROGRAMME SORTING in the
(SET UP) menu and proceed in the same way as described in the b) section of this chapter.
a) If you do not wish to change the channel order:
PROGRAMME SORTING
1 Press the MENU button to exit and return to the normal TV screen.
PROGRAMME:
01
03
CONFIRM
PROGRAMME SORTING
PROGRAMME:
CONFIRM
01
03
Select Channel:
Select new position:
PROGR
Select Channel:
PROGR
Confirm:
Exit:
MENU
Select new position:
Confirm:
Exit:
MENU
1
2
3
Your TV is now ready for use.
4
5
6
7
8
9
b) If you wish to change the channel order:
0
PROGRAMME SORTING
MENU
1 Press the PROGR or button until the channel (TV Broadcast) you
PROGRAMME:
01
03
CONFIRM
PROGRAMME SORTING
CONFIRM
PROGRAMME:
01
03
wish to rearrange appears on the screen.
Select Channel:
PROGR
Select Channel:
PROGR
Select new position:
Confirm:
Select new position:
Exit:
MENU
Confirm:
Exit:
MENU
K
PROGRAMME SORTING
2 Press the or button to select the new programme number
PROGRAMME:
02
04
position for your selected channel (TV Broadcast), then press the
CONFIRM
OK button.
Select Channel:
PROGR
Select new position:
Confirm:
The word CONFIRM is highlighted for a few seconds to
Exit:
MENU
PROGR
confirm that the new programme position is stored.
3 Repeat steps 1 and 2 if you wish to change the order of the other
channels on your TV.
RM
887
4 Press the MENU button to exit and return to the normal TV screen.
S
Your TV is now ready for use.
First Time Operation - Basic Presetting
11
Advanced Operation - Advanced Presetting
Automatically Tuning the TV using the TV buttons
Besides the explanation in the section “Automatically Tuning the TV using the Remote Control“, by following the
instructions below, this TV also searches and stores automatically all available channels using just one button of the TV set.
1 Press the flap on the front of the TV by pressing on the mark to
reveal the front control panel.
Please confirm that
antenna is connected
2 Press and hold in the button on the TV set for some seconds,
Please confirm that
CONFIRM
antenna is connected
CONFIRM
until a menu appears automatically on the screen asking you to
check that antenna is connected.
Please confirm that
3 Confirm that the antenna is connected and then press the OK
antenna is connected
button.
CONFIRM
1
2
3
AUTO PROGRAMME
The automatic tuning starts and the message "Searching..." flashes
PROGRAMME:
01
4
5
6
on the screen.
SYSTEM:
B/G
CHANNEL:
C 21
7
8
9
Searching...
This procedure could take some minutes.
0
MENU
K
When the automatic tuning procedure is complete, the menu disappears
from the TV screen and your TV is now ready for use.
PROGR
Note: To stop the automatic tuning, press the MENU button on the
remote control.
RM
887
S
12
Advanced Operation - Advanced Presetting
Advanced Operation - Advanced Presetting
Manually Tuning the TV
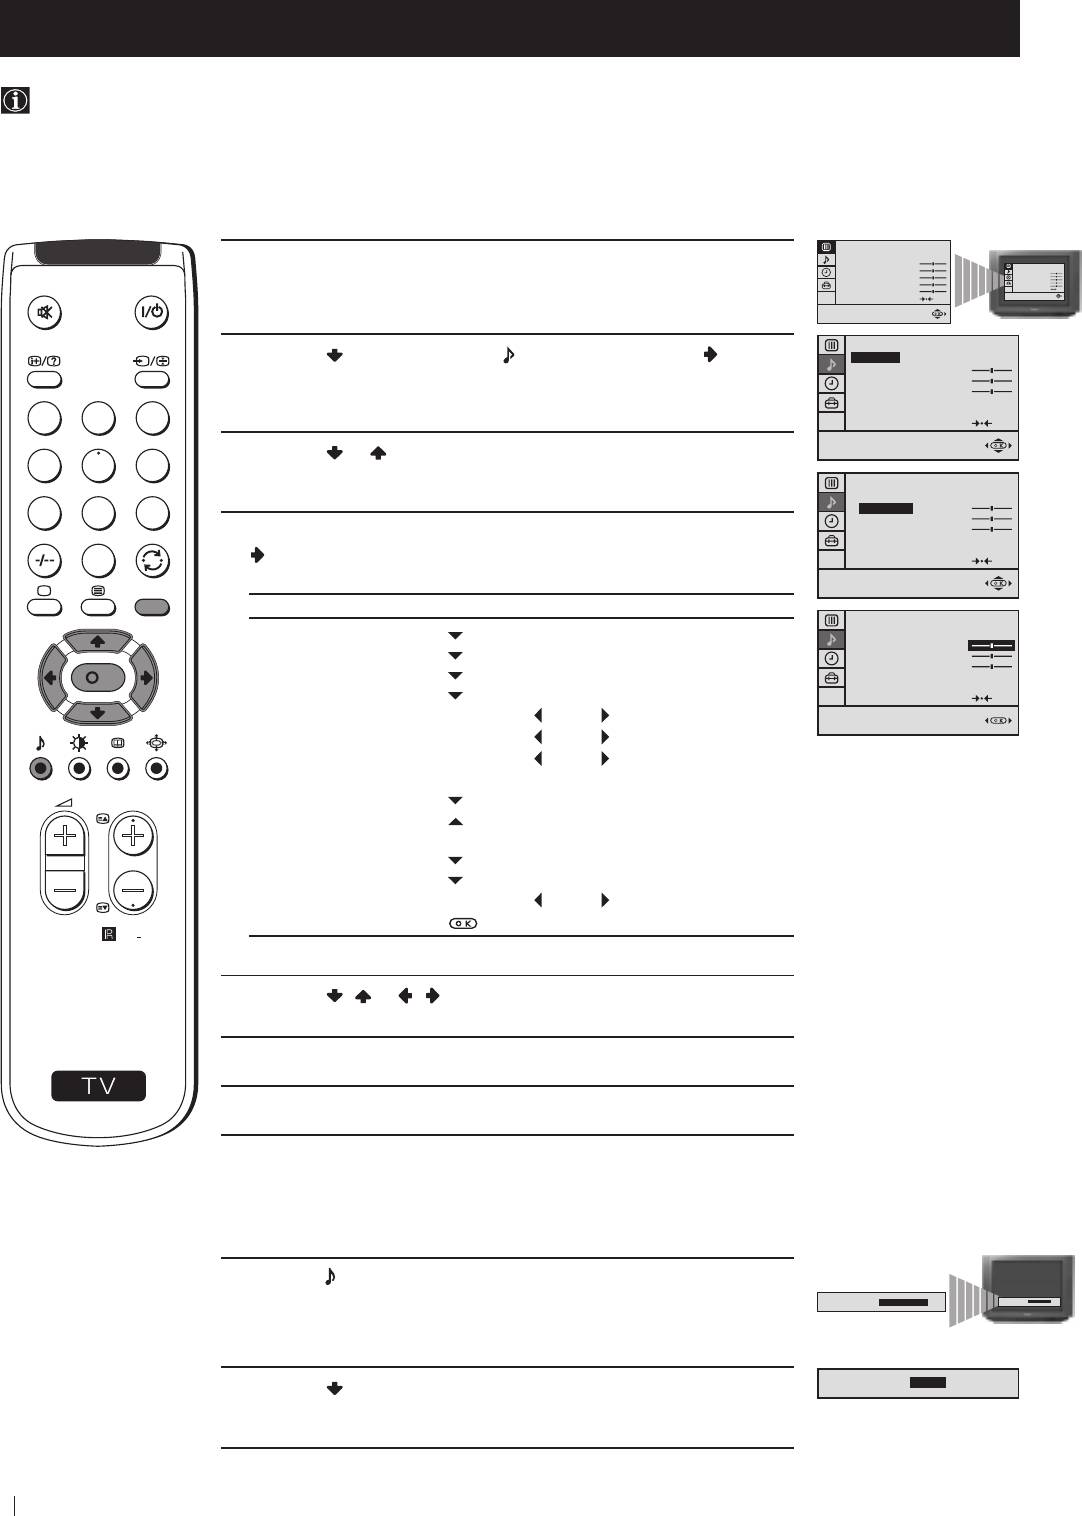
Use this function to preset channels or a video input source one by one to the programme order of your choice.
PICTURE CONTROL
MODE: PERSONAL
1 Press the MENU button on the remote control to display the
CONTRAST
PICTURE CONTROL
BRIGHTNESS
MODE: PERSONAL
COLOUR
BRIGHTNESS
CONTRAST
COLOUR
SHARPNESS
SHARPNESS
menu on the TV screen.
HUE
HUE
RESET
RESET
SET UP
2 Press the button to select the symbol, then press the
PICTURE ROTATION:
0
LANGUAGE: ENGLISH
button to enter to the SET UP menu.
AUTO PROGRAMME
PROGRAMME SORTING
MANUAL PROGRAMME
1
2
3
4
5
6
SET UP
3 Press the button to select MANUAL PROGRAMME, then
PICTURE ROTATION:
0
LANGUAGE: ENGLISH
7
8
9
press the
button.
AUTO PROGRAMME
PROGRAMME SORTING
MANUAL PROGRAMME
0
MENU
SET UP:
MANUAL PROGRAMME
4 With the cursor highlighting PROGRAMME, press the button
PROGRAMME:
01
SYSTEM:
B/G
and then, press the
or button to select on which programme
CHANNEL:
C 21
AFT:
ON
number you want to preset a channel. Press the button.
SKIP:
NO
K
CONFIRM
SET UP:
5 Press the button to select SYSTEM, then press the button.
MANUAL PROGRAMME
PROGRAMME:
01
SYSTEM:
B/G
Press
or button to select the TV broadcast system (B/G for
CHANNEL:
C 21
PROGR
AFT:
ON
western European countries, D/K for eastern European
SKIP:
NO
CONFIRM
countries). Press the button.
SET UP:
6 Press the button to select CHANNEL, then press the button.
MANUAL PROGRAMME
PROGRAMME:
01
SYSTEM:
B/G
Press
or button to select the channel tuning, "C" for
CHANNEL:
C 21
RM
887
AFT:
ON
terrestrial channels or "S" for cable channels. Press the
button.
SKIP:
NO
CONFIRM
SET UP:
S
7 Press the number buttons to enter the channel number of the TV
MANUAL PROGRAMME
PROGRAMME:
01
SYSTEM:
B/G
Broadcast or press the
or button to search for the next
CHANNEL:
C 21
AFT:
ON
available channel.
SKIP:
NO
CONFIRM
If you do not wish to store this channel, press the
or button
to continue searching for the desired channel.
SET UP:
MANUAL PROGRAMME
8 If this is the desired channel you wish to store, press the OK
PROGRAMME:
01
SYSTEM:
B/G
button and then, with the cursor highlighting CONFIRM, press
CHANNEL:
C 21
AFT:
ON
the OK button again.
SKIP:
NO
CONFIRM
9 Repeat steps 4 to 8 if you wish to store more channels.
10 Press the MENU button to exit and return to the normal TV
screen.
Your TV is now ready for use.
Advanced Operation - Advanced Presetting
13
Advanced Operation - Advanced Presetting
Fine Tuning Channels
Normally, the automatic fine tuning (AFT) function is operating. If the picture is distorted, however, you can manually fine
tune the TV to obtain a better picture reception.
PICTURE CONTROL
MODE: PERSONAL
1 Select the channel (TV Broadcast) you wish to fine tune, then press
CONTRAST
PICTURE CONTROL
BRIGHTNESS
MODE: PERSONAL
COLOUR
COLOUR
BRIGHTNESS
CONTRAST
SHARPNESS
HUE
SHARPNESS
the MENU button on the remote control to display the menu on the
HUE
RESET
RESET
TV screen.
SET UP
2 Press the button to select the symbol, then press the button
PICTURE ROTATION:
0
LANGUAGE: ENGLISH
to enter to the SET UP menu.
AUTO PROGRAMME
PROGRAMME SORTING
MANUAL PROGRAMME
1
2
3
4
5
6
SET UP
3 Press the button to select MANUAL PROGRAMME, then press
7
8
9
PICTURE ROTATION:
0
LANGUAGE: ENGLISH
the
button.
AUTO PROGRAMME
PROGRAMME SORTING
MANUAL PROGRAMME
0
MENU
SET UP:
MANUAL PROGRAMME
4 Press the button to select AFT, then press the button.
PROGRAMME:
01
SYSTEM:
B/G
K
CHANNEL:
C 21
AFT:
ON
SKIP:
NO
CONFIRM
SET UP:
MANUAL PROGRAMME
5 Press the or button to adjust the fine tuning (-15 to +15), then
PROGR
PROGRAMME:
01
SYSTEM:
B/G
press the OK button.
CHANNEL:
C 21
AFT:
+2
SKIP:
NO
CONFIRM
SET UP:
RM
887
6 With the cursor highlighting CONFIRM, press the OK button to
MANUAL PROGRAMME
PROGRAMME:
01
SYSTEM:
B/G
store.
CHANNEL:
C 21
AFT:
+2
SKIP:
NO
CONFIRM
S
7 Press the MENU button to exit and return to the normal TV screen.
8 Repeat steps 1 to 7 to fine tune other channels.
Your TV is now ready for use.
14
Advanced Operation - Advanced Presetting
Advanced Operation - Advanced Presetting
Adjusting the Picture Rotation
Because of the earth's magnetism, the picture might slant. In this case, you can correct the picture slanting.
PICTURE CONTROL
MODE: PERSONAL
1 Press the MENU button on the remote control to display the menu
CONTRAST
BRIGHTNESS
MODE: PERSONAL
PICTURE CONTROL
CONTRAST
COLOUR
BRIGHTNESS
SHARPNESS
SHARPNESS
COLOUR
on the TV screen.
HUE
HUE
RESET
RESET
1
2
3
SET UP
2 Press the button to select the symbol, then press the button
PICTURE ROTATION:
0
LANGUAGE: ENGLISH
4
5
6
to enter to the SET UP menu.
AUTO PROGRAMME
PROGRAMME SORTING
MANUAL PROGRAMME
7
8
9
0
MENU
SET UP
3 With the cursor highlighting PICTURE ROTATION, press the
PICTURE ROTATION:
0
LANGUAGE: ENGLISH
button.
AUTO PROGRAMME
PROGRAMME SORTING
K
MANUAL PROGRAMME
PROGR
SET UP
4 Press the or button to adjust the picture rotation (adjusting
PICTURE ROTATION:
+2
LANGUAGE: ENGLISH
range is -5 to +5), then press the OK button.
AUTO PROGRAMME
PROGRAMME SORTING
MANUAL PROGRAMME
RM
887
5 Press the MENU button to exit and return to the normal TV screen.
S
Your TV is now ready for use.
Advanced Operation - Advanced Presetting
15
Advanced Operation - Advanced Presetting
Skipping Programme positions
You can programme this TV to skip any unwanted programme numbers when they are selected with the PROGR +/-
buttons. To cancel this function afterwards, proceed in the same way as described below by selecting NO instead of YES in
step 6.
PICTURE CONTROL
MODE: PERSONAL
1 Press the MENU button on the remote control to display the menu
CONTRAST
PICTURE CONTROL
BRIGHTNESS
MODE: PERSONAL
SHARPNESS
COLOUR
BRIGHTNESS
CONTRAST
COLOUR
on the TV screen.
SHARPNESS
HUE
HUE
RESET
RESET
SET UP
2 Press the button to select the symbol, then press the button
PICTURE ROTATION:
0
LANGUAGE: ENGLISH
to enter to the SET UP menu.
AUTO PROGRAMME
PROGRAMME SORTING
MANUAL PROGRAMME
1
2
3
4
5
6
SET UP
3 Press the button to select MANUAL PROGRAMME, then press
PICTURE ROTATION:
0
7
8
9
LANGUAGE: ENGLISH
AUTO PROGRAMME
the
button.
PROGRAMME SORTING
MANUAL PROGRAMME
0
MENU
SET UP:
MANUAL PROGRAMME
4 With the cursor highlighting PROGRAMME, press the PROGR
PROGRAMME:
01
SYSTEM:
B/G
K
or button until the programme you want to skip appears on the
CHANNEL:
C 21
AFT:
ON
screen.
SKIP:
NO
CONFIRM
SET UP:
MANUAL PROGRAMME
PROGR
5 Press the button to select SKIP, then press the button.
PROGRAMME:
05
SYSTEM:
B/G
CHANNEL:
C 21
AFT:
ON
SKIP:
NO
CONFIRM
SET UP:
RM
887
MANUAL PROGRAMME
6 Press the button to select YES, then press the OK button.
PROGRAMME:
05
SYSTEM:
B/G
CHANNEL:
C 21
AFT:
ON
SKIP:
YES
CONFIRM
S
SET UP:
7 With the cursor highlighting CONFIRM, press the OK button.
MANUAL PROGRAMME
PROGRAMME:
05
SYSTEM:
B/G
CHANNEL:
C 21
AFT:
ON
SKIP:
YES
CONFIRM
8 Repeat steps 4 to 7 to skip other unused programme positions.
9 Press the MENU button to exit and return to the normal TV screen.
When changing channels (TV Broadcasts) with the PROGR +/- buttons,
the skipped programme positions do not appear. You can, however, still
select them using the number buttons.
16
Advanced Operation - Advanced Presetting

Advanced Operation - Advanced TV Operation
Adjusting the Picture
Although the picture is adjusted at the factory, you can modify it to suit your own taste.
PICTURE CONTROL
MODE: PERSONAL
1 Press the MENU button on the remote control to display the menu
CONTRAST
PICTURE CONTROL
BRIGHTNESS
MODE: PERSONAL
COLOUR
BRIGHTNESS
CONTRAST
COLOUR
on the TV screen.
SHARPNESS
RESET
HUE
SHARPNESS
HUE
RESET
PICTURE CONTROL
2 Press the button to enter to the PICTURE CONTROL menu.
MODE: PERSONAL
CONTRAST
BRIGHTNESS
COLOUR
SHARPNESS
HUE
1
2
3
RESET
4
5
6
PICTURE CONTROL
3 Press the or button to select the item you wish to change.
MODE: PERSONAL
CONTRAST
7
8
9
BRIGHTNESS
COLOUR
SHARPNESS
HUE
0
RESET
MENU
PICTURE CONTROL
4 With the cursor highlighting the item you wish to change, press the
MODE: PERSONAL
CONTRAST
button.
BRIGHTNESS
K
COLOUR
(Refer to the table below for the effect of each control).
SHARPNESS
HUE
RESET
PICTURE CONTROL OPERATION / EFFECT
MODE PERSONAL (for individual settings)
LIVE (for live broadcast programmes)
MOVIE (for films)
PROGR
CONTRAST Less More
BRIGHTNESS* Darker Brighter
COLOUR* Less More
SHARPNESS* Softer Sharper
HUE** Greenish Reddish
RESET Resets picture to the factory preset levels.
RM
887
* Can be only altered if PERSONAL MODE is selected.
** Only avalaible for NTSC colour signal (e.g: US video tapes).
5 Press the / or / button to alter the selected item, then press
S
the OK button to store the new adjustment.
6 Repeat steps 3 to 5 to alter the other items.
7 Press the MENU button to exit and return to the normal TV screen.
Changing Picture Mode Quickly
1 Press the button on the remote control to directly access the
PICTURE MODE.
PICTURE MODE:
PERSONAL
PICTURE MODE:
PERSONAL
PICTURE MODE:
PICTURE MODE:
LIVE
2 Press the button to select your desired picture mode
(PERSONAL, LIVE or MOVIE).
Advanced Operation - Advanced TV Operation
17
Advanced Operation - Advanced TV Operation
Adjusting the Sound
Although the sound is adjusted at the factory, you can modify it to suit your own taste.
PICTURE CONTROL
MODE: PERSONAL
1 Press the MENU button on the remote control to display the menu
CONTRAST
PICTURE CONTROL
BRIGHTNESS
MODE: PERSONAL
CONTRAST
COLOUR
SHARPNESS
COLOUR
BRIGHTNESS
on the TV screen.
SHARPNESS
RESET
HUE
HUE
RESET
SOUND CONTROL
2 Press the button to select the symbol, then press the button
MODE: PERSONAL
TREBLE
to enter to the SOUND CONTROL menu.
BASS
BALANCE
DUAL SOUND:
STEREO
DSP:
ON
1
2
3
RESET
3 Press the or button to select the item you wish to change.
4
5
6
SOUND CONTROL
MODE: PERSONAL
TREBLE
7
8
9
BASS
BALANCE
4 With the cursor highlighting the item you wish to change, press the
DUAL SOUND:
STEREO
DSP:
ON
button.
0
RESET
(Refer to the table below for the effect of each control).
MENU
SOUND CONTROL OPERATION / EFFECT
SOUND CONTROL
MODE
PERSONAL (for individual settings)
MODE: PERSONAL
TREBLE
JAZZ
BASS
BALANCE
POP
K
DUAL SOUND:
STEREO
DSP:
ON
ROCK
RESET
TREBLE* Less More
BASS* Less More
BALANCE Left Right
DUAL SOUND • For a stereo broadcast:
PROGR
MONO
STEREO
• For a bilingual broadcast:
A (for channel 1)
B (for channel 2)
DSP (Digital sound Processor) ON OFF
RESET Resets sound to the factory preset levels.
RM
887
Can be only altered if PERSONAL MODE is selected.
*
5 Press the / or / button to alter the selected item, then press
the OK button to store the new adjustment.
S
6 Repeat steps 3 to 5 to alter the other items.
7 Press the MENU button to exit and return to the normal TV screen.
Changing Sound Mode Quickly
1 Press the button on the remote control to access directly to the
SOUND MODE.
SOUND MODE:
PERSONAL
SOUND MODE:
PERSONAL
SOUND MODE:
POP
2 Press the button to select your desired sound mode
(PERSONAL, JAZZ, POP or ROCK).
18
Advanced Operation - Advanced TV Operation
Advanced Operation - Advanced TV Operation
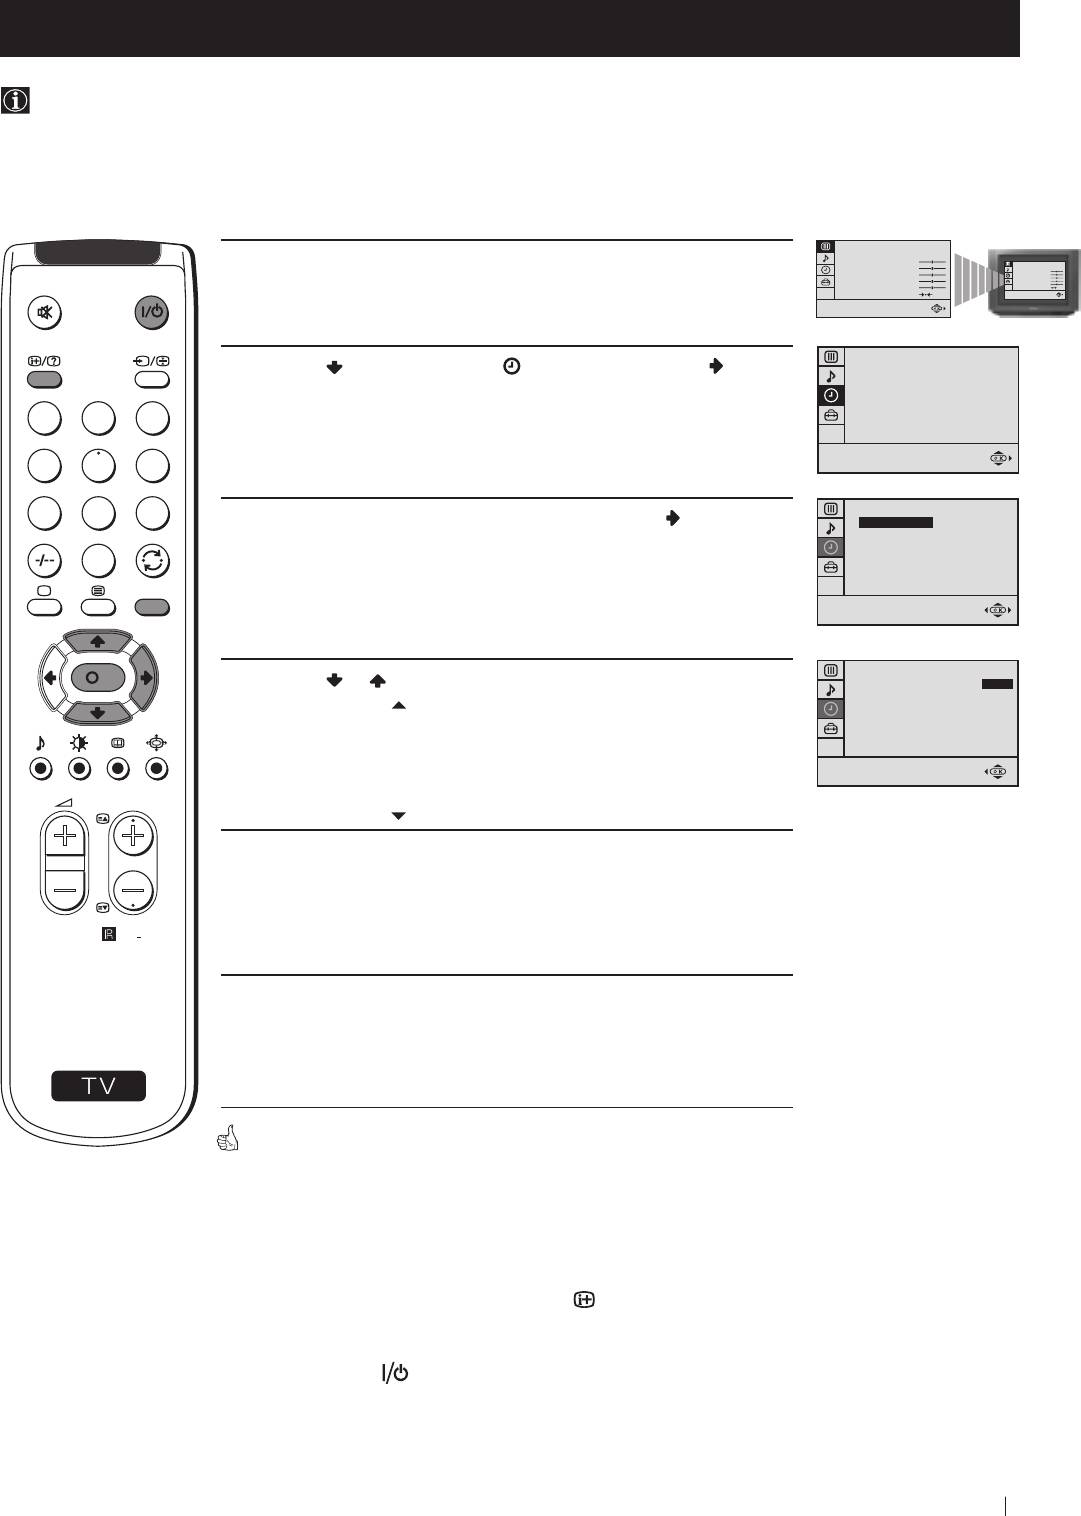
Using the Sleep Timer
You can select a time period for the TV to switch itself automatically into the standby mode.
PICTURE CONTROL
MODE: PERSONAL
1 Press the MENU button on the remote control to display the menu
CONTRAST
PICTURE CONTROL
BRIGHTNESS
MODE: PERSONAL
COLOUR
BRIGHTNESS
CONTRAST
SHARPNESS
COLOUR
SHARPNESS
on the TV screen.
HUE
RESET
HUE
RESET
TIMER
2 Press the button to select the symbol, then press the button
OFF TIMER:
OFF
to enter to the TIMER menu.
1
2
3
4
5
6
7
8
9
TIMER
3 With the cursor highlighting OFF TIMER, press the button.
OFF TIMER:
OFF
0
MENU
K
TIMER
4 Press the or button to set the time period delay
OFF TIMER:
0:15
OFF
0:15 min.
0:30 min.
...
...
PROGR
4:00 hours
5 Press the OK button.
RM
887
6 Press the MENU button to exit and return to the normal TV screen.
S
One minute before the TV switches into standby mode, the time remaining
is displayed on the TV screen automatically.
Notes: • When watching the TV, press the
button to display the
time remaining.
• To return to normal operation from standby mode,
press the
button.
Advanced Operation - Advanced TV Operation
19
Teletext
Viewing Teletext
Teletext is an information service transmitted by most TV stations.
Make sure to use a TV channel with a strong signal, otherwise teletext errors may occur.
Selecting Teletext
1 Select the TV channel which carries the teletext service you wish to
view.
2 Press the button on the remote control to switch on the teletext.
1
2
3
TELETEXT
Index
TELETEXT
Index
Programme
25
Programme
News
25
Sport
101
153
News
153
Weather
98
4
5
6
Sport
101
Weather
98
7
8
9
3 Input three digits for the page number, using the numbered buttons
0
on the remote control. (if you have made a mistake, type in any
MENU
three digits and then, re-enter the correct page number).
4 Press the button to switch off teletext.
K
Using other Teletext functions
PROGR
TO PRESS THE BUTTON
Access the next or preceding page
for next page or
for the preceding page
TELETEXT
Index
RM
887
Programme
25
Superimpose teletext on to the TV
News
153
Sport
101
Weather
98
Press again to cancel teletext
mode.
TELETEXT
Index
Programme
25
News
153
S
Sport
101
Freeze a teletext page
Weather
98
Press again to cancel the
freeze.
Reveal concealed information
(e.g: answer to a quiz) Press again to cancel.
Using Fastext
Fastext lets you access pages with one button stroke.
When Fastext is broadcast, a colour coded menu appears at the
bottom of the teletext page. Press the colour button (red, green,
yellow or blue) on the remote control to access the corresponding
page.
20
Teletext
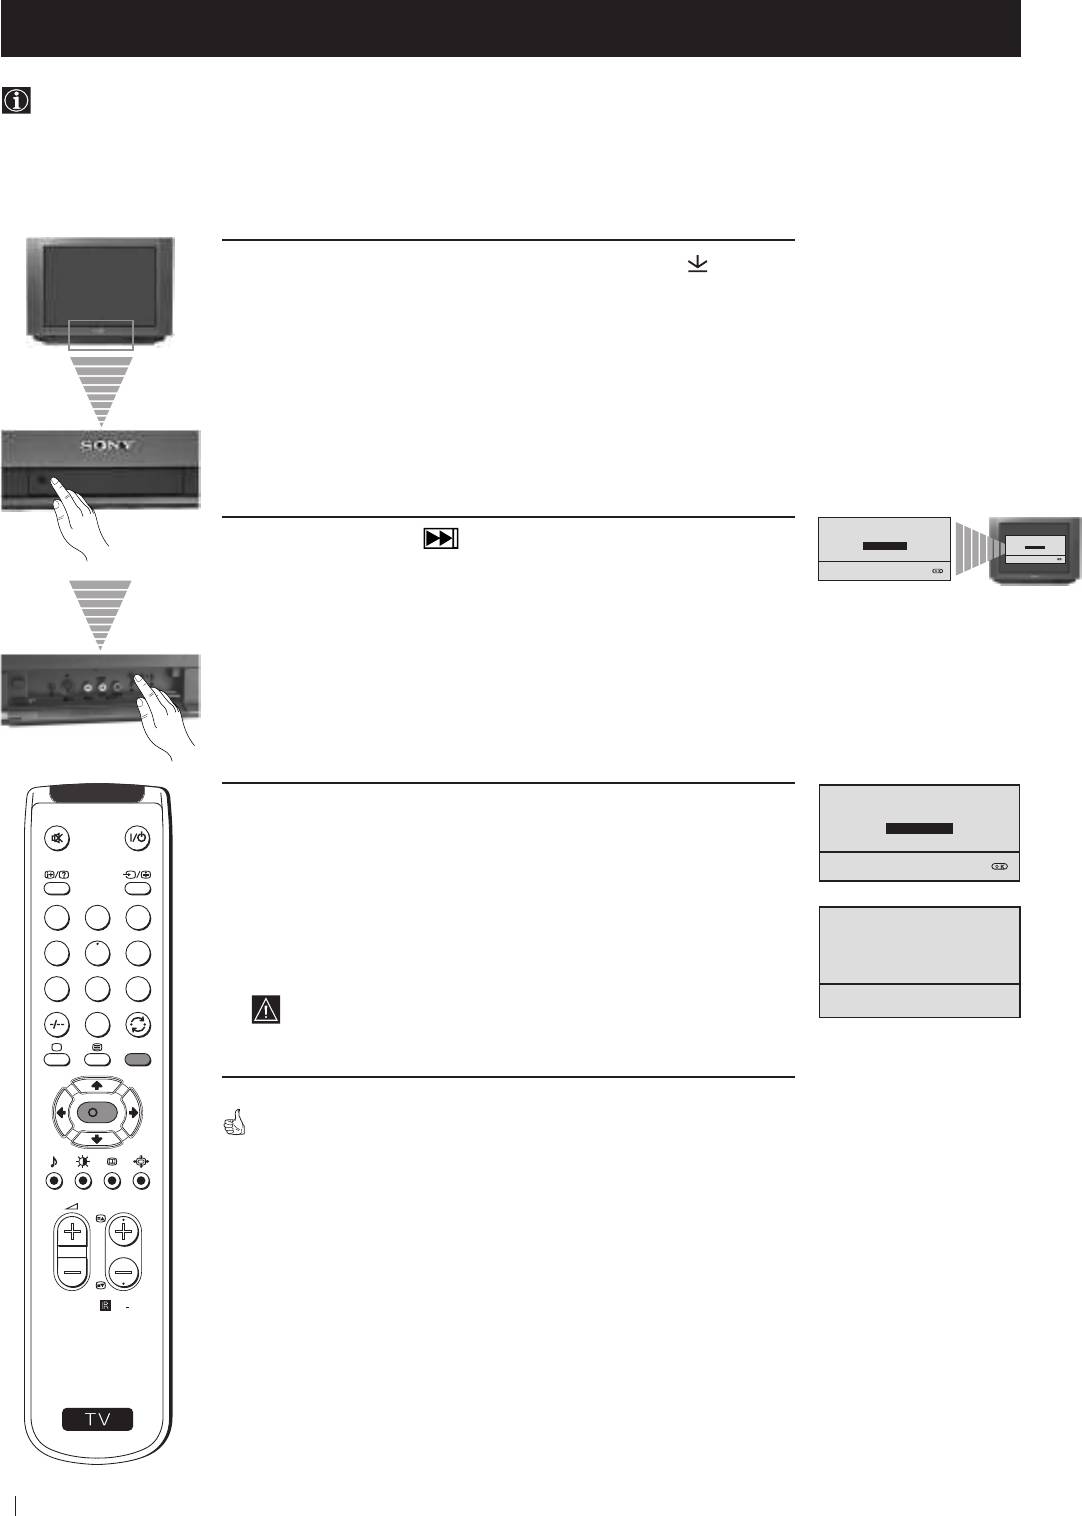
Optional Connections
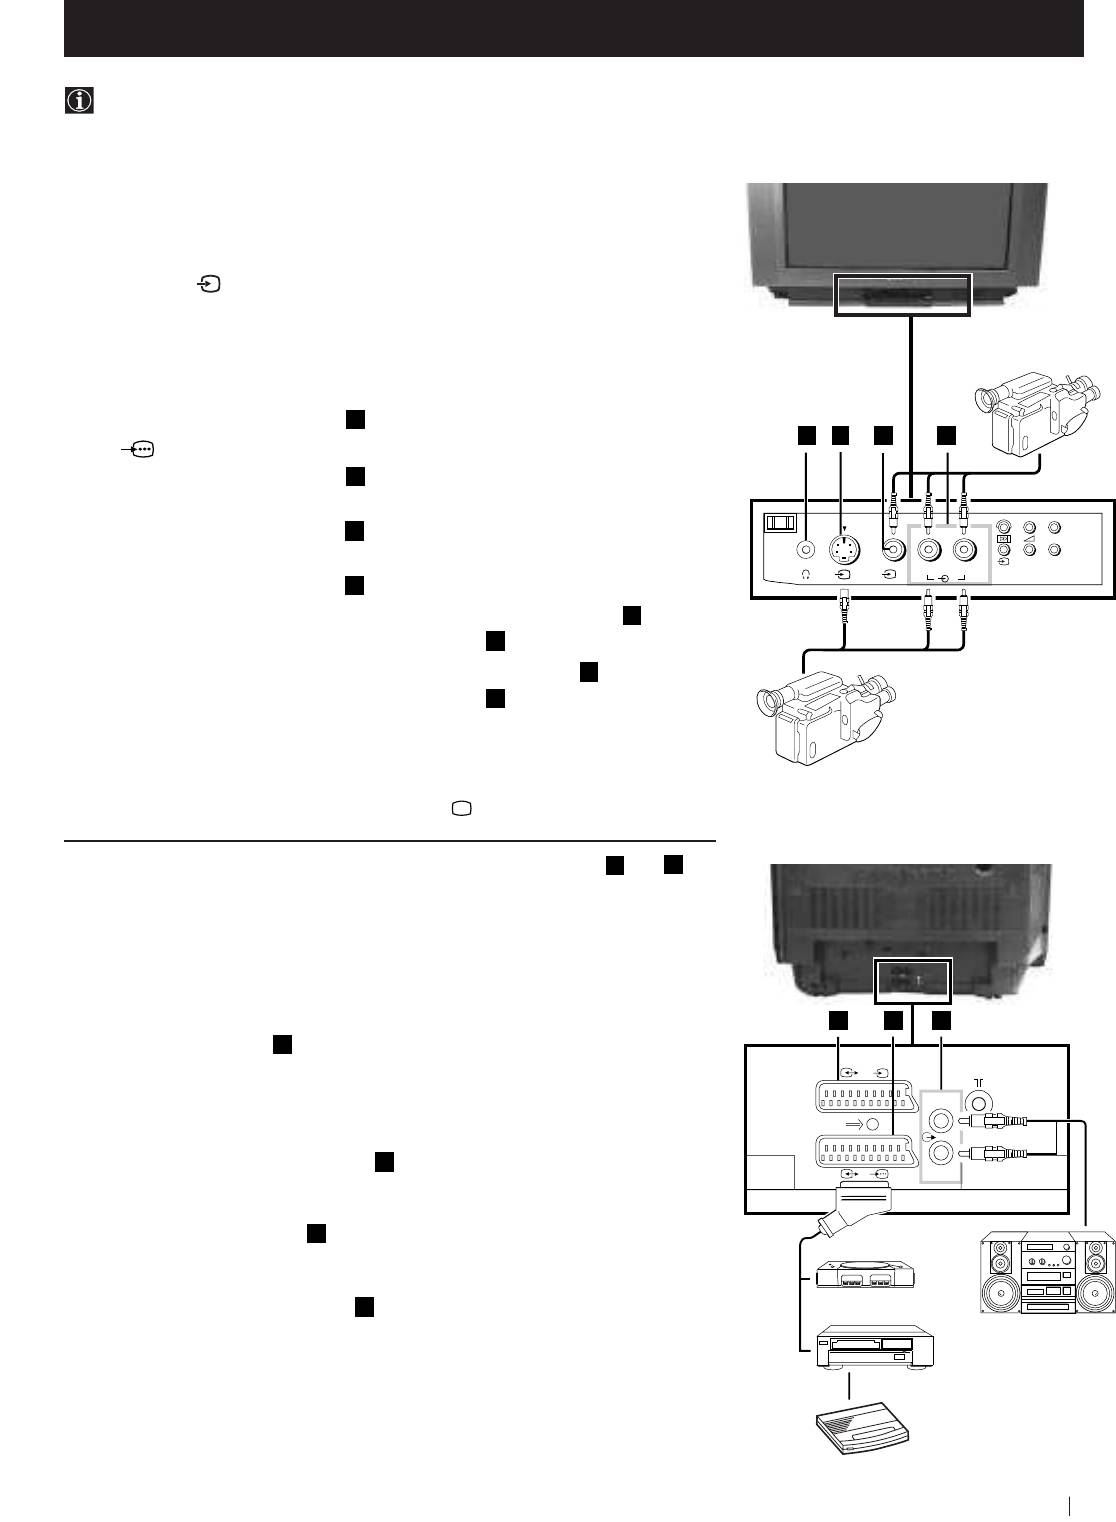
Using Optional Equipment
You can connect optional audio or video equipment to your TV, such as a VCR, a camcorder or a video game as shown
below.
Front of TV
8mm/Hi8
camcorder
S-VHS/Hi8
camcorder
Rear of TV
E
F
G
2 /
s
L/G/S/I
1/
R/D/D/D
1
2
“PlayStation”
*
Hi-Fi
VCR
Decoder
21
+
MONO
P
_
s
3
L/G/S/I R/D/D/D
L/G/S/I R/D/D/D
L/G/S/I R/D/D/D
3
3
Select and View the Input Signal
1
Connect your equipment to the designated TV socket.
2 Press
the
button repeatedly on your remote control until the correct
input symbol appears on the TV screen.
Symbol Input signals
k • Audio/video input signal through the Euro AV
connector
F
A
B
C
D
• RGB input signal through the Euro AV
connector
F
K
• Audio/video input signal through the Euro AV
connector
E
q
2
• S video input signal through the Euro AV
connector
E
K
3
• Video input signal through the phono socket
C
and
Audio input signal through
D
q
3
• S video input signal through the socket
B
and
Audio input signal through
D
.
3 Switch on the connected equipment.
4 To return to normal TV picture, press the
button on the remote control.
Note: To avoid picture distortion, do not connect equipment to the
B
and
E
connectors
at the same time.
Additional Information
Connecting a VCR
Plug in VCR to the socket
F
on the rear of the TV set.
We recommend you tune in the VCR signal to TV programme number ‘0’ using
the section “Manually Tuning the TV“ of this instruction manual.
Connecting Headphones
Plug in your headphones to the socket
A
on the front of the TV set.
Connecting Decoders
Plug in decoders to the socket
F
on the rear of the TV.
Connecting to External Audio Equipment
Plug in your Hi-Fi equipment to the
G
sockets on the rear of the TV if you wish
to amplify the audio output from the TV.
* “PlayStation” is a product of Sony Computer Entertainment, Inc.
* “PlayStation” is a trademark of Sony Computer Entertainment, Inc.
Optional Connections
Optional Connections
Smartlink
Smartlink is a direct link between your TV set and a VCR.
For Smartlink you need:
• A VCR which supports Smartlink, NextView Link, Easy Link or
Megalogic.
Megalogic is a trademark of Grundig Corporation.
EasyLink is a trademark of Philips Corporation.
• A fully-wired 21 pin SCART cable to connect your VCR to Scart
:1/
connector.
The features of Smartlink are:
• Tuning information such as the channel overview are downloaded
from the TV set to the VCR.
• Direct TV recording: While watching TV you need to press just one
button on the VCR to record this programme.
• TV in standby mode: Press the "Play z" button on your VCR to
switch the TV automatically on.
For more information on Smartlink, please refer to the Instruction
Manual of your VCR.
22
Optional Connections

Additional Information
Menu Guide
Set Up Menus (for first time operation)
LANGUAGE
ENGLISH
PУCCKИЙ
PROGRAMME SORTING
БЬЛГAPCKИ
Do you want to start
Please confirm that
AUTO PROGRAMME
PROGRAMME:
01
03
automatic tuning?
antenna is connected
PROGRAMME:
01
CONFIRM
YES
CONFIRM
SYSTEM:
B/G
NO
CHANNEL:
C 21
Select Channel:
PROGR
Select new position:
Searching...
Confirm:
Exit:
MENU
Select language:
(For more details, please refer to the chapter "Selecting Language")
On Screen display Menus Guide
PICTURE CONTROL
PICTURE CONTROL
MODE: PERSONAL
MODE: PERSONAL
CONTRAST
CONTRAST
BRIGHTNESS
BRIGHTNESS
(For different adjustments,
COLOUR
COLOUR
SHARPNESS
SHARPNESS
HUE
HUE
please refer to the section
RESET
RESET
"Adjusting the Picture")
SOUND CONTROL
SOUND CONTROL
MODE: PERSONAL
MODE: PERSONAL
TREBLE
TREBLE
(For different adjustments,
BASS
BASS
BALANCE
BALANCE
DUAL SOUND:
STEREO
DUAL SOUND:
STEREO
please refer to the section
DSP:
ON
DSP:
ON
RESET
RESET
"Adjusting the Sound" )
TIMER
OFF TIMER:
OFF
TIMER
TIMER
(For more details,
OFF TIMER:
OFF
OFF TIMER:
OFF
please refer to the section
"Using the Sleep Timer")
SET UP
SET UP
SET UP
PICTURE ROTATION:
0
PICTURE ROTATION:
0
PICTURE ROTATION:
0
(For more details,
LANGUAGE: ENGLISH
LANGUAGE: ENGLISH
LANGUAGE: ENGLISH
AUTO PROGRAMME
AUTO PROGRAMME
AUTO PROGRAMME
PROGRAMME SORTING
PROGRAMME SORTING
PROGRAMME SORTING
MANUAL PROGRAMME
MANUAL PROGRAMME
MANUAL PROGRAMME
please refer to the section
"Picture Rotation")
SET UP
SET UP
PICTURE ROTATION:
0
PICTURE ROTATION:
0
(For more details,
LANGUAGE: ENGLISH
LANGUAGE:
ENGLISH
AUTO PROGRAMME
AUTO PROGRAMME
PROGRAMME SORTING
PROGRAMME SORTING
MANUAL PROGRAMME
MANUAL PROGRAMME
please refer to the section
"Selecting Language")
SET UP
PICTURE ROTATION:
0
LANGUAGE: ENGLISH
Do you want to start
AUTO PROGRAMME
automatic tuning?
(For more details, please
PROGRAMME SORTING
MANUAL PROGRAMME
YES
NO
refer to the section
"Automatically Tuning the TV
using the Remote Control")
SET UP
SET UP:
PICTURE ROTATION:
0
PROGRAMME SORTING
(For more details, please
LANGUAGE: ENGLISH
AUTO PROGRAMME
PROGRAMME:
01
03
PROGRAMME SORTING
CONFIRM
refer to the section
MANUAL PROGRAMME
"Changing the Programme
Select channel:
PROGR
Select new position:
Order of the TV channels")
SET UP
SET UP:
PICTURE ROTATION:
0
MANUAL PROGRAMME
LANGUAGE: ENGLISH
PROGRAMME:
01
(For more details,
AUTO PROGRAMME
SYSTEM:
B/G
PROGRAMME SORTING
CHANNEL:
C 21
MANUAL PROGRAMME
AFT:
ON
please refer to the section
SKIP:
NO
CONFIRM
"Manually Tuning the TV")
Additional Information
23
Additional Information
Troubleshooting
Here are some simple solutions to the problems which may affect the picture and sound.
Problem Solution
No picture (screen is dark), no sound • Plug the TV in.
• Press the
button on the front of TV.
• If the
indicator
is on, press
button or a
programme number
button on the remote control.
• Check the aerial connection.
• Check that the selected video source is on.
• Turn the TV off for 3 or 4 seconds and then turn it
on again using the
button on the front of the TV.
Poor or no picture (screen is dark), • Using the MENU system, select the Picture Adjustment
but good sound display.
Adjust the brightness, picture and colour balance levels.
• From the Picture Adjustment display select RESET to return
to the factory settings.
Poor picture quality when watching a • Press the button repeatedly on the remote control until
RGB video source. the RGB symbol
is displayed on the screen.
Good picture, no sound • Press the +/– button on the remote control.
• If
is displayed on the screen, press the button on the
remote control.
No colour on colour programmes • Using the MENU system, select the Picture Adjustment
display. Adjust the colour balance.
• From the Picture Adjustment display select RESET to return
to the factory settings.
Distorted picture when changing • Turn off any equipment connected to the 21 pin Euro
programmes or selecting teletext connector on the rear of the TV.
Noisy picture when viewing TV • Adjust Fine Tuning to obtain better picture reception.
channel
Remote control does not function • Replace the batteries.
The standby indicator on the TV • Contact to your nearest Sony service centre.
flashes.
• If you continue to have these problems, have your TV serviced by qualified personnel.
• NEVER open the casing yourself.
24
Additional Information
Additional Information
Specifications
TV system
Sound output
B/G/H, D/K
2x7 W + 1x15 W (RMS)
Colour system
Power consumption
PAL, SECAM
KV-25FX20R: 100 W
NTSC 3.58, 4.43 (only Video In)
KV-29FX20R: 120 W
Channel coverage
Standby Power consumption
VHF: E2-E12
0.5 W
UHF: E21-E69
Dimensions (w x h x d)
CATV: S1-S20
KV-25FX20R: Approx. 655 x 509 x 476 mm
HYPER: S21-S41
KV-29FX20R: Approx. 746 x 569 x 516 mm
D/K: R1-R12, R21-R69
Weight
Picture tube
KV-25FX20R: Approx. 37 kg
KV-25FX20R:
KV-29FX20R: Approx. 47.5 kg
Flat Display Trinitron
Accessories supplied
Approx. 63 cm (25 inches) (Approx. 59 cm picture
measured diagonally), 104° deflection
1 Remote Control (RM-887)
KV-29FX20R:
2 Batteries (IEC designated)
Flat Display Trinitron
Other features
Approx. 72 cm (29 inches) (Approx. 68 cm picture
TELETEXT, Fastext
measured diagonally), 104° deflection
Sleep Timer
Rear Terminals
Smartlink
:1/
21-pin Euro connector (CENELEC
standard) including audio/video input,
RGB input, TV audio/video output
:2/
s
21-pin Euro connector (CENELEC
standard) including audio/video input,
S-video input, monitor audio/video
output
Audio outputs - phono jacks
Front Terminals
2
3
video input - phono jack
2
3
audio inputs - phono jacks
s
3
S video input - 4 pin DIN
Headphones jack - minijack stereo
Design and specifications are subject to change without notice.
Ecological Paper - Totally Chlorine Free
Additional Information
25

26
Оглавление
- FD Trinitron Colour Television
- FD Trinitron Цветной телевизор
- FD Trinitron Цветен телевизор


