Sony ST-SB920: инструкция
Раздел: Бытовая, кухонная техника, электроника и оборудование
Тип: Ресивер/Усилитель
Инструкция к Ресиверу/Усилителю Sony ST-SB920

3-865-569-41(1)
FM Stereo
FM-AM Tuner
GB
Operating Instructions
PL
Instrukcja obsługi
RU
Инструкция по эксплуатации
ST-SE520
1998 by Sony Corporation

WARNING
Precautions
To prevent fire or shock
On safety
Should any liquid or solid object fall
hazard, do not expose the unit
into the unit, unplug the unit and have
to rain or moisture.
the unit checked by qualified personnel
before operating it any further.
To avoid electrical shock, do
not open the cabinet. Refer
On power sources
servicing to qualified
• Before operating the unit, be sure that
the operating voltage of your unit is
personnel only.
identical with that of your local
power supply.
• Unplug the unit from the wall outlet
if it is not to be used for an extended
period of time. To disconnect the
cord, pull it out by grasping the plug.
Never pull the cord itself.
• AC power cord must be changed only
at the qualified service shop.
On placement
• Place the unit in a location with
adequate ventilation to prevent heat
buildup and prolong the life of its
components.
• Do not place the unit near heat
sources, or in a place subject to direct
sunlight, excessive dust or
mechanical shock.
• Do not place anything on top of the
cabinet which might block the
ventilation holes and cause
malfunctions.
• Do not install the appliance in a
confined space, such as a bookcase or
built-in cabinet.
On cleaning the cabinet
Clean the cabinet, panels and controls
with a soft cloth lightly moistened with
a mild detergent solution. Do not use
any type of abrasive pad, scouring
powder or solvent such as alcohol or
benzine.
On repacking
Do not throw away the carton and the
packing material. This makes an ideal
container when transporting the unit.
When shipping the unit, repack it as it
was packed at the factory.
If you have any question or problem
concerning your unit that is not covered
in this manual, please consult your
nearest Sony dealer.
GB
2

TABLE OF CONTENTS
Welcome!
Thank you for purchasing the Sony FM
Stereo FM-AM Tuner. Before operating
Getting Started
the unit, please read this manual
thoroughly and retain it for future
Unpacking 4
reference.
Hooking Up the System 4
Selecting the German Display 6
Changing the FM Reception Mode 6
About This Manual
Basic Operations
The instructions in this manual describe
Receiving Preset Stations 7
the operation of the Sony ST-SE520.
Advanced Tuner Operations
Convention
The following icon is used in this
About the Menu Entry System 8
manual:
Customizing the Display 8
Receiving Broadcasts 9
Indicates hints and tips for
Tips for Better FM Reception 10
z
making the task easier.
Presetting Radio Stations 10
GB
Naming the Preset Stations 11
Organizing the Preset Stations 12
Additional Information
Troubleshooting 13
Specifications 13
Index 14
GB
3
Getting StartedGetting Started
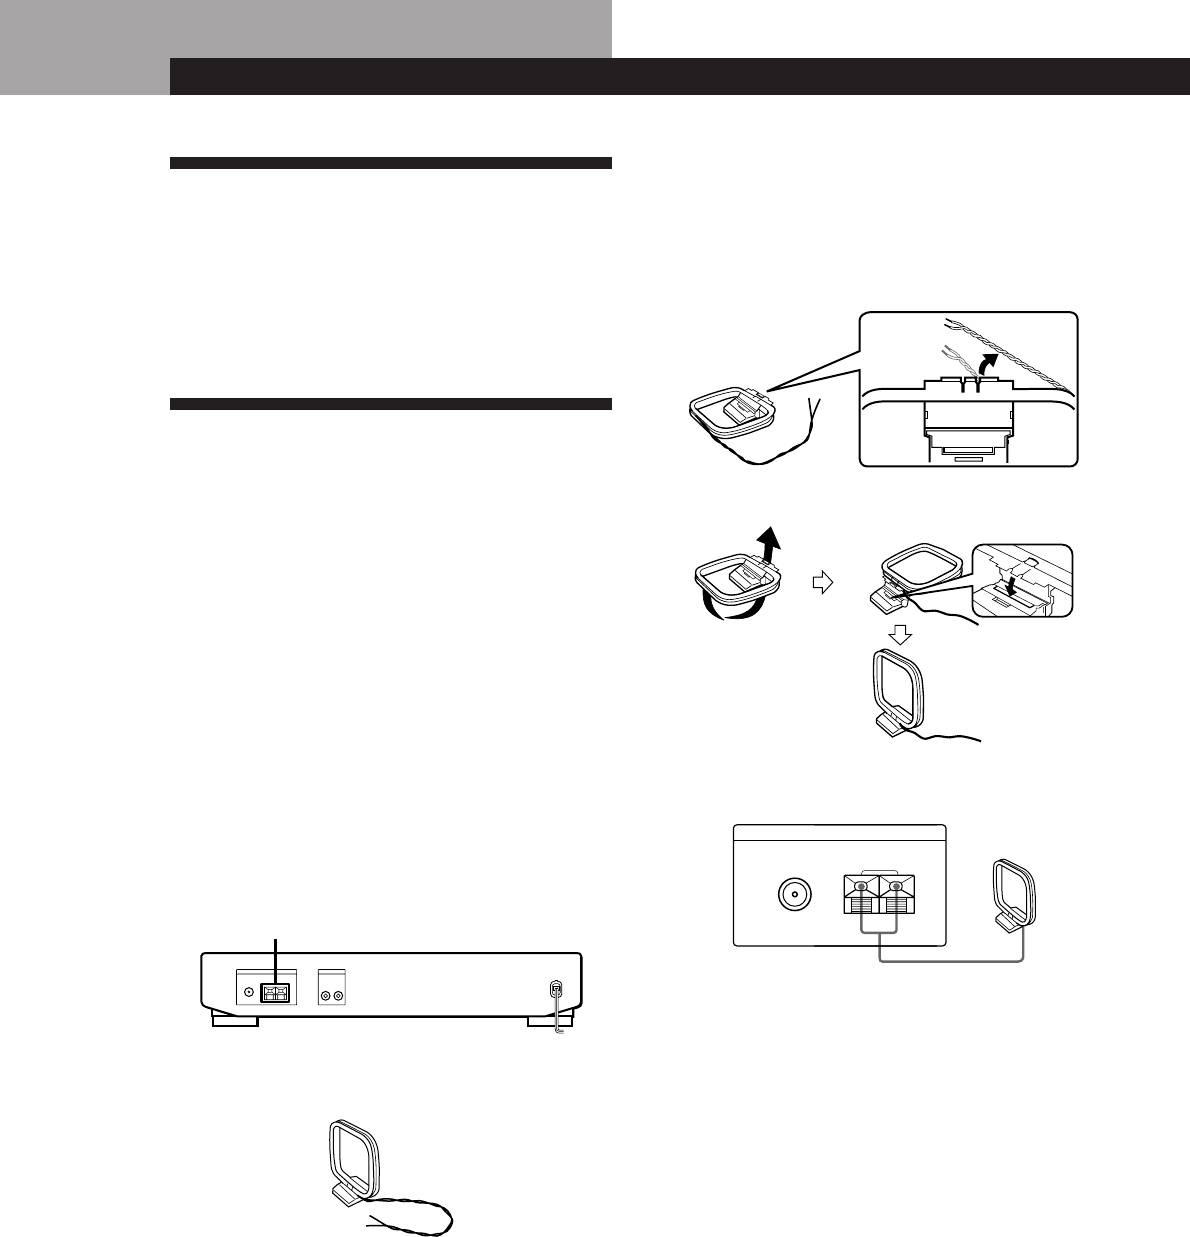
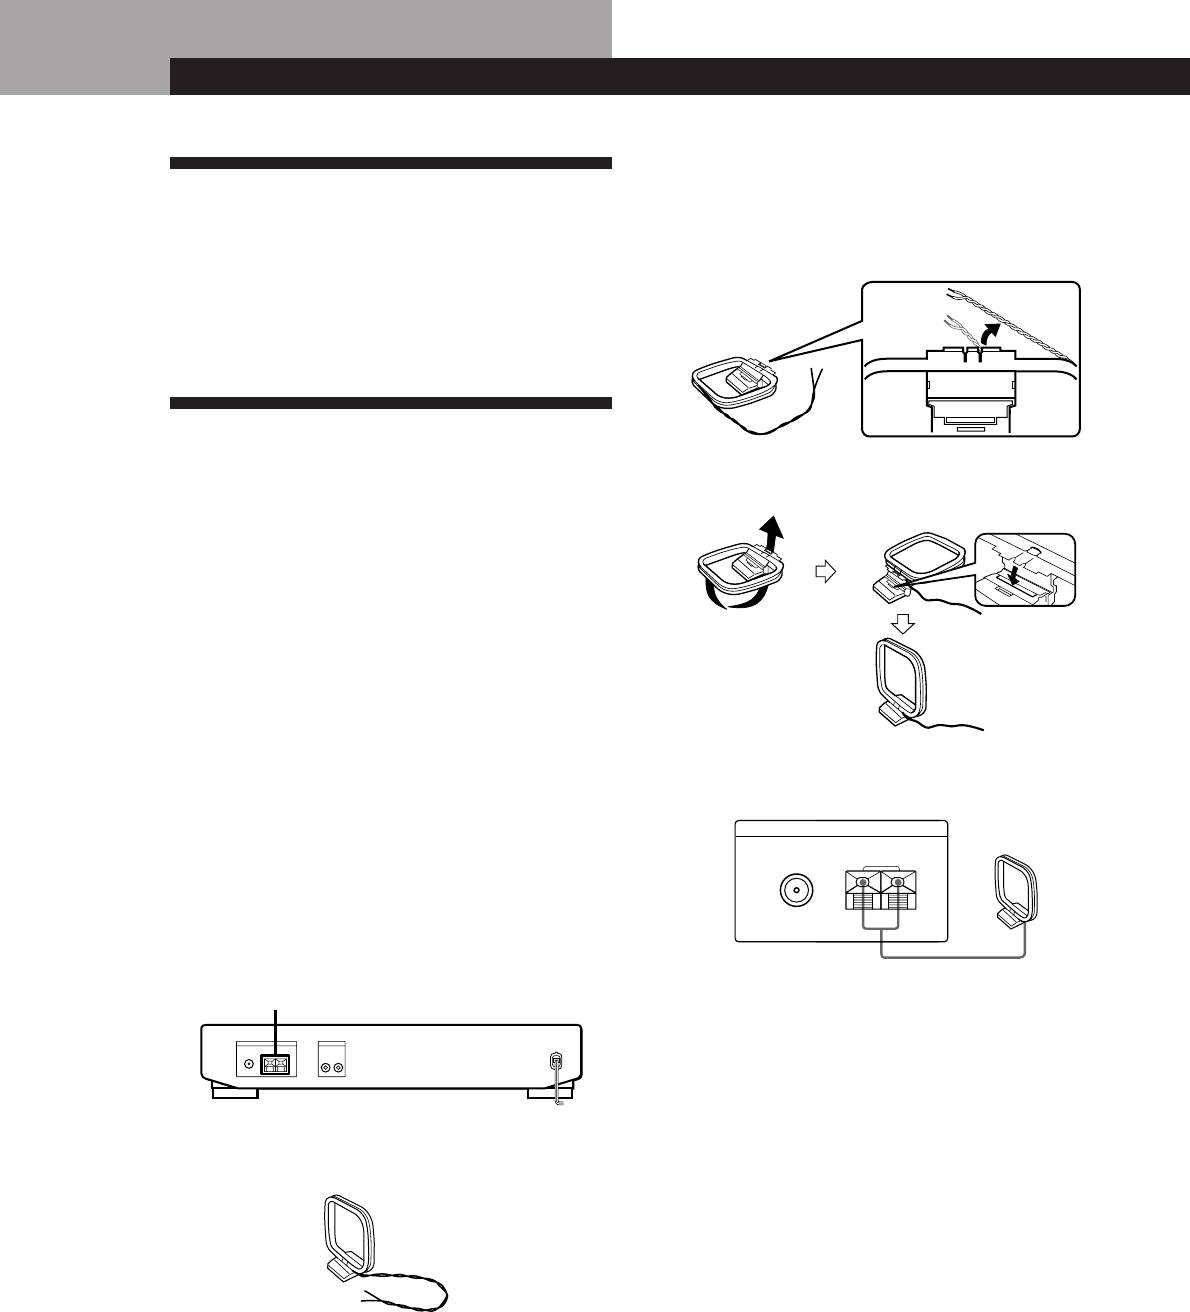
2 Unwrap 3 lengths of the braided lead wire from
Unpacking
around the frame of the aerial. Be careful to
unwrap only the braided section of the lead wire.
Check that you received the following items with the
Do not unwrap more than 3 lengths of the lead
tuner:
wire. Also, be careful not to unbraid the lead
• Audio cord (1)
wire.
• AM loop aerial (1)
• FM wire aerial (1)
Hooking Up the System
Before you get started
3 Assemble the supplied aerial as shown below.
• Turn off the power to all components before making
any connections.
• Do not connect the mains lead until all of the
connections are completed.
• Be sure to make connections firmly to avoid hum
and noise.
• When connecting an audio cord, be sure to match the
colour-coded pins to the appropriate jacks: White
(left) to White; and Red (right) to Red.
4 Connect the AM loop aerial to the AM terminals
AM aerial hookups
on the back of this unit.
This section describes how to connect the supplied AM
ANTENNA
AM loop aerial
loop aerial. For the specific location of the AM
FM
AM
ANTENNA terminals, see the illustration below.
75Ω COAXIAL
AM ANTENNA
y
5 Adjust the aerial direction for the best reception.
The AM loop aerial has a directivity which detects
the signal from some angles more strongly than
others. Set the aerial to the orientation which
What will I need?
• AM loop aerial (supplied) (1)
provides the best receiving condition.
If a high pitched noise (beat noise) occurs when
recording AM broadcasts, adjust the position of
the AM loop aerial so that the noise disappears.
If you live in a building constructed of reinforced
concrete, or with a steel frame, you may not be
able to achieve good reception since the radio
waves become weaker indoors. In this case, we
1 Before assembling the supplied aerial, pull the
recommend connecting an optional aerial.
lead wire out from the slot in the aerial frame.
z For stations that are difficult to receive
Try repositioning the loop aerial while tuning. Placing
the supplied AM loop aerial near a window will help
improve reception quality.
GB
4
Getting Started
Getting Started
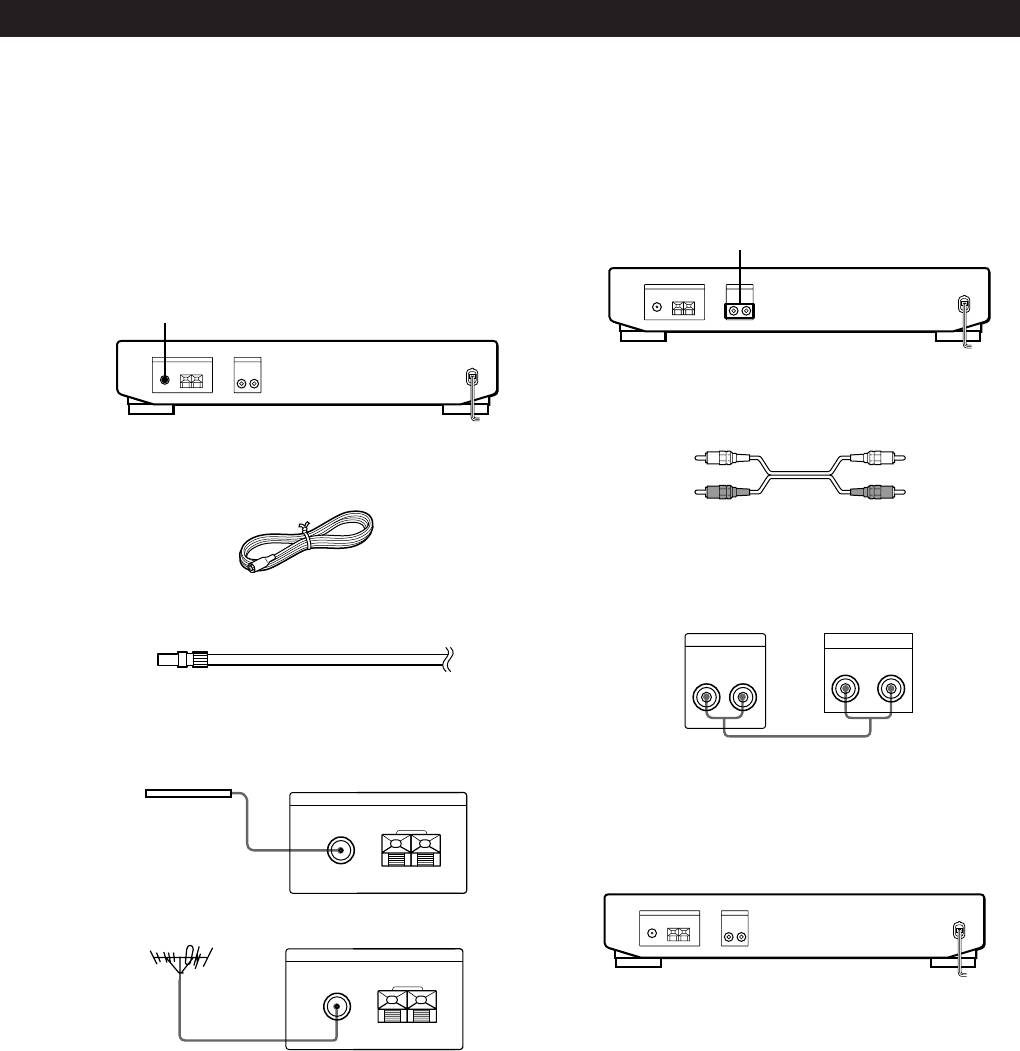
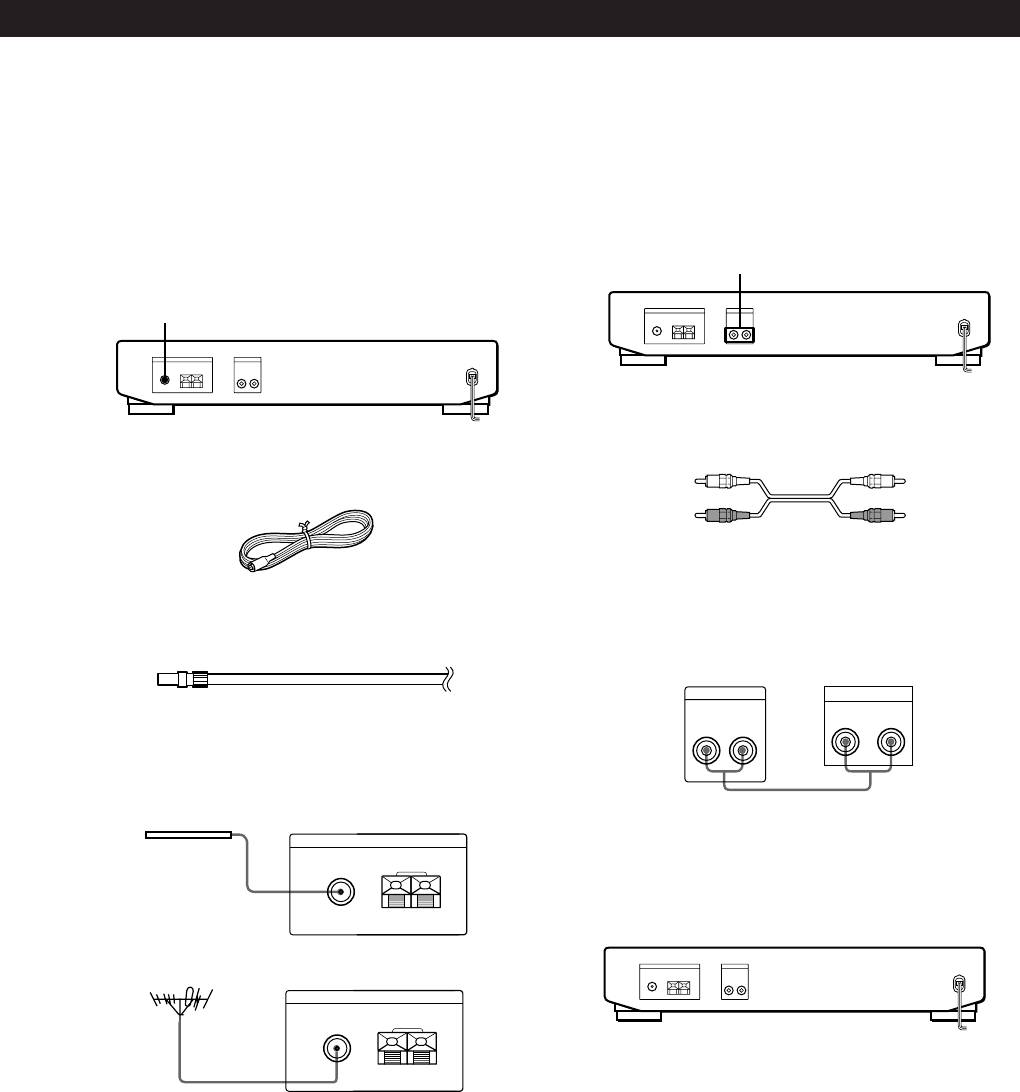
FM aerial hookups
Amplifier hookups
With an FM outdoor aerial, you can obtain a higher FM
Connect the tuner to an amplifier. Be sure to turn off
broadcast sound quality. We recommend that you use
both components before connection. For the specific
the supplied FM wire aerial only temporarily until you
location of the terminals, see the illustration below.
install an FM outdoor aerial. For the specific location
of the FM ANTENNA terminal, see the illustration
LINE OUT
below.
FM ANTENNA
What cables will I need?
• Audio cord (supplied) (1)
White (L)White (L)
What will I need?
• FM wire aerial (supplied) (1)
Red (R)
Red (R)
Connect the white plugs to the white (L) jacks and the red
plugs to the red (R) jacks. Insert the plugs completely into
the jacks; incomplete connections may cause noise.
• FM outdoor aerial (not supplied) (1) and 75-ohm coaxial
AmplifierTuner
cable with IEC female type connector (not supplied) (1)
LINE OUT
TUNER IN
R L
RL
IEC female type connector
Connect the supplied FM wire aerial or an FM outdoor aerial
ç
(not supplied) to the FM terminal on the back of this unit.
FM wire aerial
ANTENNA
Mains lead hookup
FM
AM
Connect the mains lead to a wall outlet after
completing all of the previous connections.
75Ω COAXIAL
y
FM outdoor aerial
ANTENNA
FM
AM
/
to a wall
outlet
75Ω COAXIAL
y
IEC female type
connector
Connecting a ground wire
If you connect an outdoor aerial, be sure to connect a
earth lead (not supplied) to the AM ANTENNA y
terminal (in addition to the AM loop aerial) for
lightning protection.
GB
5
Getting Started
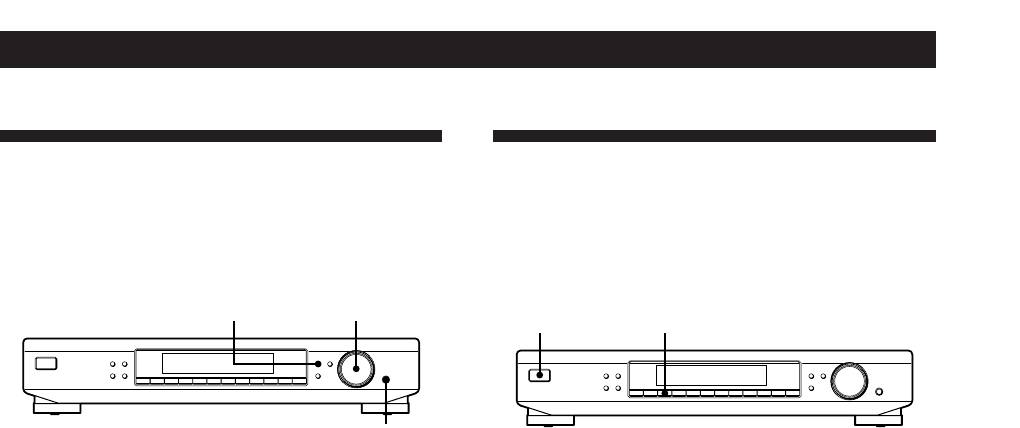
Selecting the German Display
Changing the FM Reception
Mode
You can select either an English or a German language
display. The factory preset language is English. To
Do the procedure below to receive FM broadcasts in
change the display to German, follow the steps below.
PILOT TONE mode.
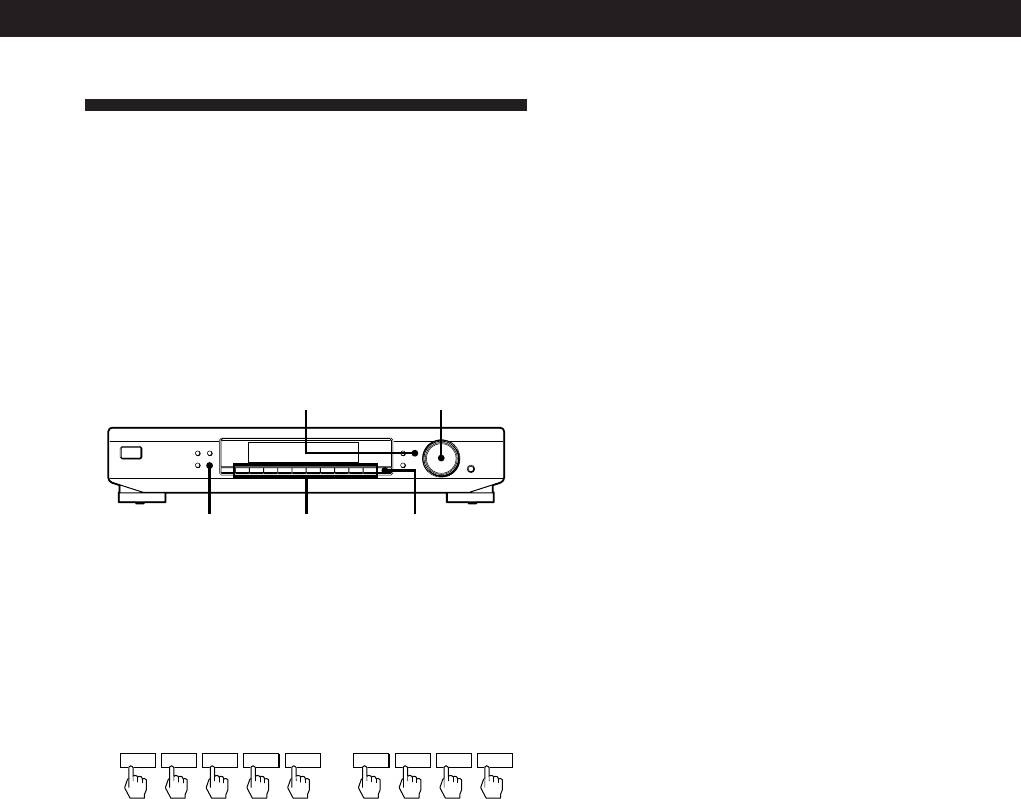
MENU
TUNING / SELECT
2U
MEMORY
DISPLAY
MENU
TUNE MODE
TUNING / SELECT
FM MODE BAND
RETURN
ENTER
MEMORY
DISPLAY
MENU
TUNE MODE
TUNING / SELECT
SHIFT DIRECT
0987654321
FM MODE BAND
RETURN
ENTER
SHIFT DIRECT
0987654321
ENTER
1 Press U to turn off the tuner.
1 Press MENU.
2 While pressing down the numeric button 2, press
2 Turn TUNING/SELECT until “LANGUAGE”
U to turn on the tuner.
appears and then press ENTER.
“PILOT” appears in the display for about 2
“SELECT” appears in the display.
seconds.
3 Turn TUNING/SELECT until “GERMAN”
To return to POLAR mode (Stereo Plus)
appears and then press ENTER.
Repeat the procedure above to select “POLAR”
The display returns to the frequency indication.
instead. In POLAR mode (Stereo Plus), the tuner
receives FM broadcasts that are only within a
To return to the English display
frequency range of 65 MHz to 74 MHz.
Repeat the procedure above to select “ENGLISH”
instead.
GB
6

Basic Operations
Basic Operations
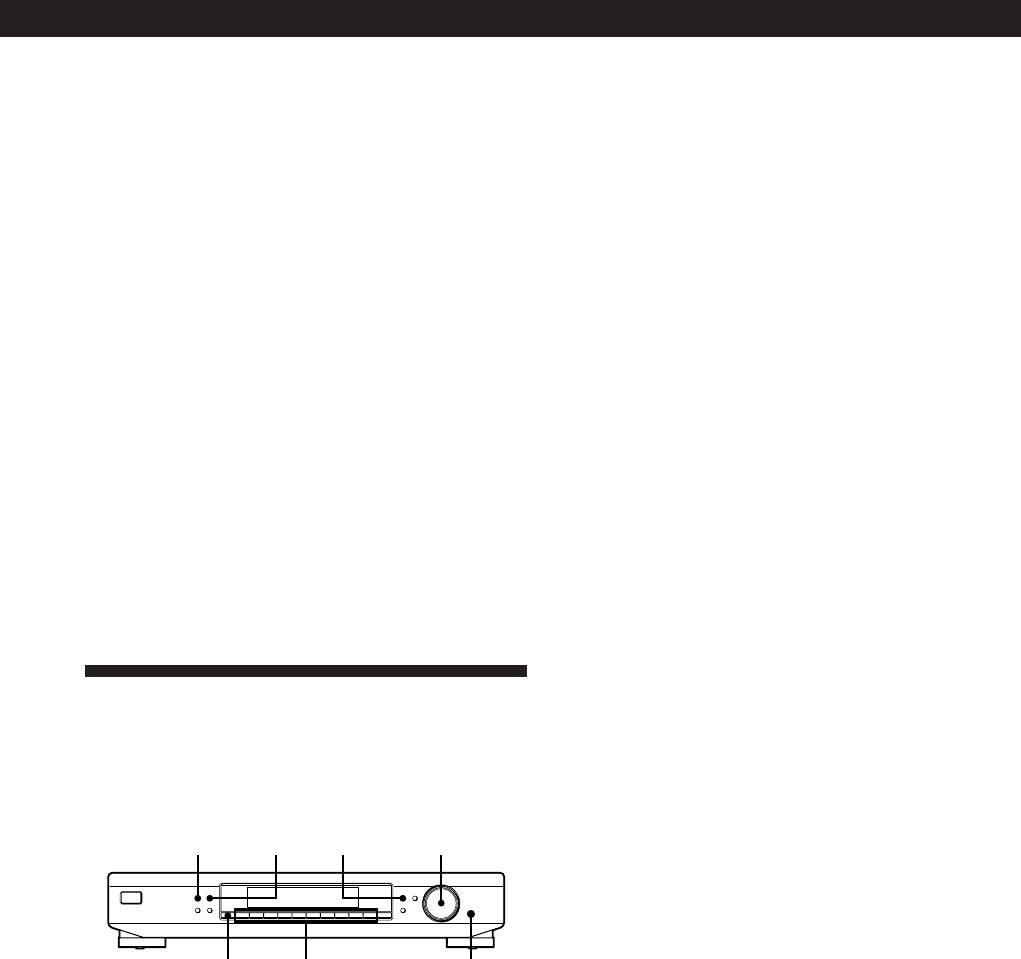
Receiving Preset Stations
This section shows you how to receive preset stations.
3
MEMORY DISPLAY
MENU
TUNE MODE
TUNING / SELECT
FM MODE BAND
RETURN
ENTER
SHIFT DIRECT
0987654321
4
5
• To tune in a non-preset station,
Make sure you’ve hooked up the tuner and preset stations.
see “Receiving Broadcasts” on
1
page 9.
(See pages 4 and 5 for hookups and pages 10 and 11 for
presetting.)
Basic Operations
Turn on the amplifier and select the TUNER mode.
2
Press U to turn on the tuner.
3
Press SHIFT repeatedly to select A, B, C, or D.
4
Press the preset number you want (1 - 0).
5
To check broadcasts by scanning the preset stations
MENU
TUNE MODE
TUNING / SELECT
RETURN
ENTER
0
DIRECT
TUNE MODE TUNING / SELECT
1 Press TUNE MODE repeatedly so that “PRESET” appears in the display.
2 Turn TUNING/SELECT.
Each time you turn TUNING/SELECT, a preset station is received and
the settings (preset code, frequency, and station name, etc.) appear in the
display. The signal meter indicates the strength of the broadcast signal.
GB
7
Advanced Tuner OperationsAdvanced Tuner Operations
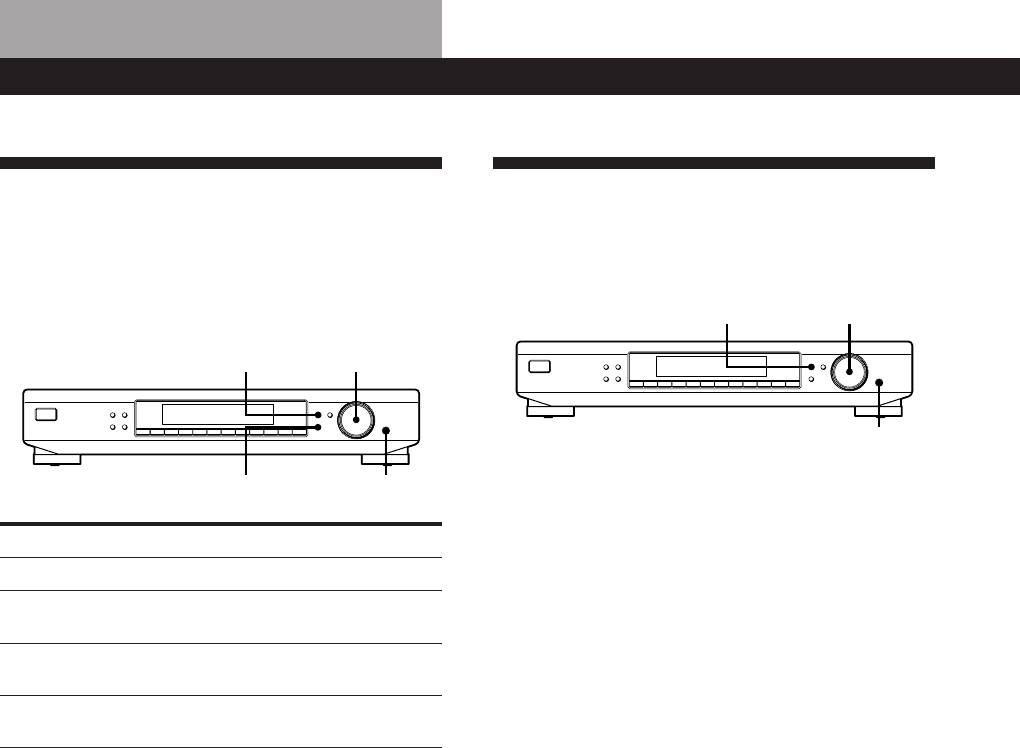
About the Menu Entry System
Customizing the Display
This tuner uses a menu entry system which allows you
You can select the appearance of the display from one
to operate various functions by following messages on
of the following four display modes.
the display. Use the following controls for menu
operation.
MENU
TUNING / SELECT
MENU
TUNING / SELECT
MEMORY
DISPLAY
MENU
TUNE MODE
TUNING / SELECT
FM MODE BAND
RETURN
ENTER
SHIFT DIRECT
0987654321
MEMORY
DISPLAY
MENU
TUNE MODE
TUNING / SELECT
FM MODE BAND
RETURN
ENTER
SHIFT DIRECT
0987654321
ENTER
RETURN
ENTER
1 Press MENU, then turn TUNING/SELECT until
“DISPMODE” appears in the display.
Use the To
2 Press ENTER.
MENU button enter the menu mode.
“SELECT” appears in the display.
TUNING/SELECT control display different items or
settings.
3 Turn TUNING/SELECT to select a display mode.
ENTER button select the currently displayed
item or setting.
Full Display/Full Brightness
RETURN button return to a previous stage in the
.
menu mode.
Full Display/Dimmed
.
Minimal Display/Full Brightness
.
Minimal Display/Dimmed
4 Press ENTER.
The setting remains in effect until you change it
again.
If you press one of the buttons on this unit, the
minimal display changes to the full display with
the selected brightness. After about 4 seconds, the
display returns to the display mode you selected.
GB
8
Advanced Tuner Operations
z If you enter a frequency not covered by the tuning
interval
Receiving Broadcasts
The entered value is automatically rounded up or down
to the closest covered value.
This tuner lets you enter a station’s frequency directly
Tuning intervals for direct tuning are:
by using the numeric buttons (Direct Tuning). If you
FM: 50 kHz intervals
don’t know the frequency of the station you want, see
AM: 9 kHz intervals
“Receiving broadcasts by scanning stations (Automatic
Tuning)” on this page.
Before you begin, make sure you have:
Receiving broadcasts by scanning stations
• Connected an FM/AM aerial to the tuner as
(Automatic Tuning)
indicated on pages 4 and 5.
With automatic tuning you can quickly tune in a
station without having to know its frequency.
TUNE MODE
TUNING / SELECT
MEMORY
DISPLAY
MENU
TUNE MODE
TUNING / SELECT
1 Press BAND repeatedly to select FM (FM 1 or FM
FM MODE BAND
RETURN
ENTER
SHIFT DIRECT
0987654321
2) or AM.
2 Press TUNE MODE so that “AUTO” appears in
BAND
Numeric
DIRECT
the display.
buttons
3 Turn TUNING/SELECT slightly and release it
1 Press BAND repeatedly to select FM* (FM 1 or
when the frequency numbers start changing.
FM 2) or AM (MW).
Turn the control to the right for a higher
frequency; turn it to the left for a lower frequency.
2 Press DIRECT.
When the tuner locates a station, it stops
automatically, “TUNED” appears in the display.
3 Press the numeric buttons to enter the frequency.
Example 1: FM 102.50 MHz Example 2: AM 1350 kHz
4 Repeat step 3 until you tune in the appropriate
1 0250
1 350
station.
To store the station, see “Presetting Radio
Stations” on page 10.
To receive other stations
Repeat steps 1 to 3.
z If you cannot tune in the station you want
* FM 1 is received in POLAR mode (Stereo Plus) and FM 2
(Manual Tuning)
is received in PILOT TONE mode (see page 6).
With manual tuning you can search through all stations
broadcasting on each band, and tune in stations with
extremely weak signals that you might not be able to
z When you tune in AM stations
receive with automatic tuning.
Adjust the direction of the AM loop aerial for optimum
1 Press BAND repeatedly to select FM (FM 1 or FM 2)
reception.
or AM.
2 Press TUNE MODE repeatedly until “AUTO” and
“PRESET” go off.
z If the STEREO indicator remains off
3 Turn TUNING/SELECT until you tune in the station
Press FM MODE when an FM stereo broadcast is
you want.
received.
Turn the control to the right for a higher frequency;
turn it to the left for a lower frequency.
z If an FM stereo programme is distorted
The STEREO indicator flashes. Press FM MODE to
Note
change to monaural (MONO). You will not have the
When you reach the highest or lowest frequency of any
stereo effect but the distortion will be reduced. To
band, tuning stops.
return to stereo mode, press this button again.
z If you cannot tune in a station and the entered
numbers are flashing
Make sure you’ve entered the right frequency. If not,
press DIRECT and reenter the frequency you want.
If the entered numbers are still flashing, the frequency is
not used in your area.
GB
9

Advanced Tuner Operations
Tips for Better FM Reception
Presetting Radio Stations
This tuner has various functions designed for better
reception. First, try to receive stations with the
MEMORY MENU
TUNING / SELECT
standard settings. If the reception is not good, try
altering the reception quality to obtain a clear signal.
MEMORY
DISPLAY
MENU
TUNE MODE
TUNING / SELECT
FM MODE BAND
RETURN
ENTER
The tuner stores the FM mode, together with the
SHIFT DIRECT
0987654321
frequency when you make a station preset either
manually or automatically (see this page and page 11).
SHIFT
Numeric
ENTER
buttons
DISPLAYFM MODE
Storing stations manually
MEMORY
DISPLAY
MENU
TUNE MODE
TUNING / SELECT
FM MODE BAND
RETURN
ENTER
This section shows you how to store up to 40 of your
SHIFT DIRECT
0987654321
favorite FM or AM stations manually onto preset codes
made up of characters (A, B, C, or D) and numbers
(1-0), such as A7. You can store up to 10 stations on
each of the 4 different letters. You can use these letters
Setting the FM mode
to classify stations according to music category or
Press FM MODE a few times to choose the reception
station band.
mode, select either Auto stereo (no indication) or
MONO.
1 Tune in the FM or AM station you want to store.
• Auto stereo mode receives stereo broadcasts with
strong signals. Press FM MODE a few times so that
2 Press MEMORY.
“MONO” disappears.
“MEMORY” appears along with the lowest vacant
• “MONO” receives stations with weak signals.
code to indicate that the tuner is ready to store the
Stations will be received in monaural but with even
station.
less noise.
3 Press SHIFT repeatedly to select A, B, C, or D.
The letter you selected appears in the display.
Checking the signal strength
You can use the digital signal meter to check the signal
4 Press a numeric button (1 - 0).
strength of FM frequencies. The display range is from
The tuner stores the station at the preset code you
16 to 70 dB (1µV of radio frequency voltage = 0dB). To
specified.
obtain a signal to noise ratio sufficient for receiving a
stereo broadcast, we recommend a reading greater
5 Repeat steps 1 through 4 to store other stations.
than 50 dB. (You can also change the FM MODE while
using the signal meter to determine the best reception.)
z If you want to label the stations
Follow the procedure described in “Naming the Preset
1 Tune in an FM station.
Stations” on page 11.
2 Press DISPLAY repeatedly to display the digital
signal meter.
3 Rotate the FM aerial to obtain the strongest signal.
GB
10
Advanced Tuner Operations
Storing stations automatically (Auto
5 Repeat steps 3 and 4 until the station name you
Memory)
want appears in the display.
This section explains how to prestore all FM stations in
6 Press ENTER.
your broadcasting area in one operation.
The station name is memorized and the station’s
preset code flashes.
1 Press MENU.
7 Press ENTER again.
2 Turn TUNING/SELECT until “AUTO-MEM”
appears and then press ENTER.
Note
3 Turn TUNING/SELECT until “Y/N YES”
The display returns to normal display mode if you stop
assigning names for more than 8 seconds. If this happens,
appears and then press ENTER.
start again from the beginning.
The tuner scans for FM stations starting with the
lowest frequency. When a station is detected, it is
stored automatically into the tuner’s memory.
z To see the frequency of the displayed station name
Stored stations are assigned a two-character code
Press DISPLAY repeatedly.
starting with A1.
z You can label the station before presetting it
To cancel storing the stations
1 Tune in the station.
Press ENTER while the tuner is scanning for the
2 Do steps 1 to 5 above.
stations in step 3.
3 Press ENTER.
4 Press SHIFT and a numeric button to assign a preset
code to the station and then press ENTER.
Naming the Preset Stations
You can assign a name up to 5 characters long to each
preset station. When the station is tuned in, the station
name will appear instead of the frequency.
MEMORY DISPLAY MENU
TUNING / SELECT
MEMORY DISPLAY
MENU
TUNE MODE
TUNING / SELECT
FM MODE BAND
RETURN
ENTER
SHIFT DIRECT
0987654321
SHIFT
Numeric
ENTER
buttons
1 Press MENU.
2 Turn TUNING/SELECT until “CHAR” appears
and then press ENTER.
3 Turn TUNING/SELECT to select a character.
4 When the character you want appears, press
MEMORY to move the cursor into position for the
next character.
If you make a mistake
Press MEMORY repeatedly until the character you
want to change flashes (every time you press
MEMORY, the next character flashes). Then turn
TUNING/SELECT to select a new character.
GB
11

Advanced Tuner Operations
Erasing preset stations
Organizing the Preset Stations
You can erase preset stations one by one.
This tuner makes it easy to arrange preset stations in
1 Press MENU.
the order you prefer. You can arrange all the preset
stations automatically, according to alphabetical order,
2 Turn TUNING/SELECT until “CLEAR” appears
signal strength, or tuner band. You can even erase
and then press ENTER.
specific preset stations.
3 Turn TUNING/SELECT so that the preset code
MENUU
TUNING / SELECT
you want to erase appears in the display and
press ENTER.
MEMORY
DISPLAY
MENU
TUNE MODE
TUNING / SELECT
FM MODE BAND
RETURN
ENTER
The preset station you selected is erased from the
SHIFT DIRECT
0987654321
preset memory.
5
ENTER
Note
If you try to select an erased preset station using the SHIFT
1 Press MENU.
button and a numeric button, “65 MHz” (factory-set
frequency) will appear in the display.
2 Turn TUNING/SELECT until “SORT” appears in
the display and press ENTER.
z If you want to erase all the preset stations
“SELECT” appears in the display.
1 Turn off the tuner.
2 While pressing down the numeric button 5 and
3 Turn TUNING/SELECT to select one of the
MENU, press U to turn on the tuner.
following sorting methods:
Select To
ALPHABET sort preset stations in alphabetical order
according to their preset names.
Stations without preset names are arranged
by frequency, from low to high.
STRENGTH sort preset stations in order of their signal
strength (FM stations only).
AM stations are arranged by frequency.
BAND sort preset stations in order of their
frequency band (FM - AM).
4 Press ENTER.
The tuner sorts the stations, then returns to normal
tuning mode and receives preset station A1.
GB
12

Additional Information
Additional Information
General
Power requirements 220 - 230 V,
Troubleshooting
Specifications
AC 50/60 Hz
If you experience any of the
Power consumption 10 W
FM tuner section
following difficulties while using
Frequency range 65.0 - 74.0 MHz
Input impedance 75Ω
the tuner, use this troubleshooting
(FM 1)
guide to help you remedy the
87.5 - 108.0 MHz
Input connector IEC-male
(FM 2)
problem. Should any problem
persist, consult your nearest Sony
Dimensions 430 × 82 × 295 mm
Aerial terminals 75Ω, unbalanced
(w/h/d)
dealer.
Intermediate frequency
Weight 2.6 kg
10.7 MHz
There’s no sound.
Supplied accessories See page 4.
/Connect the aerials.
Sensitivity at 26 dB quieting
(mono) 10.3 dBf,
/Set the source setting on the
0.9 µV/75Ω
amplifier to TUNER.
Design and specifications are
at 46 dB quieting
subject to change without notice.
(stereo) 38.5 dBf,
23 µV/75Ω
You cannot tune in a frequency.
/Adjust the position of the aerial.
Usable sensitivity (IHF) 10.3 dBf, 0.9 µV/75Ω
/Connect an external aerial for FM
broadcasts.
S/N at 40 kHz deviation
/Preset the stations again if you've
74 dB (mono),
moved.
69 dB (stereo)
Harmonic distortion 0.1% (mono),
There is severe hum and/or
0.2% (stereo)
background noise.
Frequency response 30 Hz - 15 kHz
/Adjust the position or direction of
(+0.5/–2.0 dB)
the aerial.
/Tune to a correct frequency.
Separation 45 dB at 1 kHz
/Connect an external aerial for FM
broadcasts.
Selectivity at 400 kHz
/Move the tuner away from the
80 dB
source of the noise.
at 300 kHz
60 dB
All preset staions have been erased
Output at 40 kHz deviation
from the preset memory.
600 mV
/If the mains lead is disconnected
from the wall outlet for more than
AM tuner section
one month, the memory is erased.
Frequency range 531 - 1,611 kHz
Preset stations again.
(9 kHz step)
Intermediate frequency
The appropriate display or
450 kHz
information does not appear.
Usable Sensitivity (with AM loop
/Turn off the tuner. Press down
aerial)
MENU and the numeric button 5
300 µV/m
and press U to turn the tuner back
on. This empties any frequencies
Signal-to-noise ratio 54 dB
stored in the preset memory and
(50 mV/m,
returns the display to the default
999 kHz)
language (English).
Harmonic distortion 0.5%
/Contact the radio station and find
out whether or not they actually
Selectivity 32 dB
provide the service in question. If
so, the service may be temporarily
out of order.
GB
13

Additional Information
S
Index
Scanning preset stations 7
Signal meter 10
Storing radio stations. See
A, B
Presetting stations
Aerial hookups
AM 4
T
FM 5
Troubleshooting 13
Amplifier hookups 5
Tuning
Auto memory 11
automatic 9
Automatic tuning 9
direct 9
manual 9
C
preset 7
Changing the FM reception
mode 6
U, V, W, X, Y, Z
Connecting. See Hookups
Unpacking 4
D, E
Direct tuning 9
Display
language 6
mode 8
F, G
FM
mode 10
reception mode 6
H, I, J, K, L
Hookups
AM aerial 4
amplifier 5
FM aerial 5
mains lead 5
M
Manual tuning 9
Memory 10, 11
N
Naming stations 11
O
Organizing preset stations 12
P, Q
Preset stations
erasing 12
organizing 12
receiving 7
scanning 7
Presetting stations
automatically. See Auto
memory
manually 10
Preset tuning
AM stations 7
FM stations 7
R
Receiving broadcasts. See
Tuning
GB
14

Ostrzeżenie
Środki ostrożności
Aby uniknąć pożaru lub
O bezpieczeństwie
Jeżeli jakikolwiek płyn lub przedmiot stały
porażenia prądem
dostanie się do wnętrza urządzenia, wyłącz
elektrycznym nie wystawiaj
urządzenie z sieci i przed ponownym
urządzenia na działanie
użytkowaniem zleć sprawdzenie
deszczu lub wilgoci.
wykfalifikowanemu personelowi.
O źródłach mocy
Aby uniknąć porażenia
• Przed rozpoczęciem użytkowania
prądem elektrycznym nie
sprawdź, czy napięcie operacyjne
otwieraj obudowy. Naprawy
Twojego urządzenia jest zgodne z
napięciem w sieci lokalnej.
zlecaj wyłącznie
• Odłącz urządzenie od gniazdka ściennego
wykfalifikowanemu
jeżeli nie będzie ono użytkowane przez
personelowi.
dłuższy okres czasu. Aby odłączyć
przewód pociągnij ujmując za wtyczkę.
Nigdy nie ciągnij za sam przewód.
• Przewód zasilania prądem zmiennym
może być wymieniany jedynie w
wykfalifikowanym punkcie usługowym.
O lokalizacji
• Ustaw urządzenie w miejscu
zapewniającym wystarczającą wentylację
aby zabezpieczyć je przed przegrzaniem i
w ten sposób przedłużyć żywotność jego
komponentów.
• Nie umieszczaj urządzenia w pobliżu
źródeł ciepła, w miejscu wystawionym na
bezpośrednie nasłonecznienie, nadmierne
zapylenie lub wstrząsy mechaniczne.
• Nie umieszczaj na obudowie nic, co
mogłoby blokować otwory wentylacyjne i
powodować wadliwe funkcjonowanie.
• Nie umieszczaj urządzenia w przestrzeni
zamkniętej jak półka na książki lub
wbudowana szafka.
O czyszczeniu obudowy
Czyść obudowę, panele i regulatory miękką
ściereczką lekko zwilżoną łagodnym
detergentem. Nie używaj szorstkich tkanin,
proszków czyszczących lub środków takich
jak alkohol czy benzyna.
O rozpakowywaniu
Nie wyrzucaj kartonu i opakowania. Będą
one przydatne do opakowania podczas
przewozu urządzenia. W przypadku wysyłki
urządzenia zapakuj je ponownie tak jak było
zapakowane fabrycznie.
W przypadku jakichkolwiek pytań lub
problemów dotyczących urzadzenia,
których nie wyjaśnia niniejsza instrukcja,
prosimy skonsultować się z najbliższym
punktem sprzedaży sprzętu Sony.
PL
2

Witaj!
Spis treści
Dziękujemy za zakup tunera
stereofonicznego FM-AM produkcji
firmy Sony. Przed rozpoczęciem
Czynności wstępne
użytkowania prosimy zapoznać się
Rozpakowywanie 4
wnikliwie z niniejszą instrukcją obsługi i
Podłączanie zestawu 4
zachować ją w celu odwoływania się do
niej w przyszłości.
Wybór niemieckojezycznego wyświetlenia 6
Zmiany rodzaju odbioru FM 6
Podstawowe funkcje
O niniejszej instrukcji
Odbiór zaprogramowanych stacji 7
Wyjaśnienia w niniejszej instrukcji opisują
działanie Sony ST-SE520.
Zaawansowane funkcje tunera
O systemie korzystania z menu 8
Zasada
Wybór wyświetlenia 8
Następujące oznaczenie używane jest
Odbiór audycji 9
w niniejszej instrukcji:
Wskazówki dla lepszego odbioru FM 10
Wskazuje naprowadzenia i
Programowanie stacji radiowych 10
z
wskazówki ułatwiające zadanie.
Nadawanie nazw zaprogramowanym stacjom 11
PL
Porządkowanie zaprogramowanych stacji 12
Dodatkowe informacje
W razie trudności 13
Dane techniczne 13
Indeks 14
PL
3
Czynności wstępne
Czynności wstępne
2 Odwiń 3 długości splecionego przewodu z ramki
Rozpakowywanie
anteny. Uważaj aby odwinąć tylko spleciony
odcinek. Nie odwijaj więcej niż 3 długości
Sprzwdź, czy wraz z tunerem dostarczono Ci
przewodu. Uważaj także aby nie rozpleść
następujące rzeczy:
przewodu.
• Przewód audio (1)
• Antenę ramową AM (1)
• Antenę przewodową FM (1)
Podłączanie zestawu
3 Zamontuj znajdującą się w wyposażeniu antenę
jak pokazano poniżej.
Przed rozpoczęciem użytkowania
• Wyłącz zasilanie wszystkich komponentów przed
przystąpieniem do wykonywania jakichkolwiek
podłączeń.
• Nie podłączaj zasilania dopóki wszystkie
podłączenia nie są gotowe.
• Upewnij się, że wszystkie podłączenia są solidnie
wykonane aby uniknąć przydźwięku i zakłóceń.
• Podczas podłączania przewodu audio upewnij się,
że oznaczone kolorami wtyczki pasują do
odpowiednich gniazdek: białe (lewe) do białych, a
4 Podłącz antenę ramową AM do łączy z tyłu
czerwone (prawe) do czerwonych.
obudowy.
ANTENNA
Antena
ramowa AM
Podłączanie anteny AM
FM
AM
Niniejszy rozdział opisuje, jak podłączyć znajdującą się
w wyposażeniu antenę ramową AM. Lokalizację
75Ω COAXIAL
specjalnych łączy AM ANTENNA sprawdź na poniższej
y
ilustracji.
AM ANTENNA
5 Wyreguluj kierunek anteny dla uzyskania lepszego
odbioru. Antena ramowa AM posiada
kierunkowość, która umożliwia wykrywanie sygnału
pod pewnym kątem silniej niż pod innym. Ustaw
antenę pod katem, który zapewni najlepsze warunki
odbioru. Jeżeli pojawią się zakłócenia strojenia
(dudnienie) podczas nagrywania audycji AM,
Co będzie mi potrzebne ?
• Antena ramowa AM (w wyposażeniu) (1)
wyreguluj położenie anteny tak aby zakłćcenia
zanikły. Jeżeli mieszkasz w budynku ze zbrojonego
betonu lub o stalowym szkielecie uzyskanie
dobrego odbioru może być niemożliwe, ponieważ
fale radiowe będą słabsze wewnątrz budynku. W
takim przypadku polecamy zainstalowanie
dodatkowej anteny.
1 Przed zamontowaniem znajdującej się w
W przypadku stacji trudnych w odbiorze
wyposażeniu anteny wyciągnij przewód ze szczeliny
z
Próbuj zmieniać kierunek anteny ramowej podczas
w ramce anteny.
strojenia. Ustawienie znajdującej się w wyposażeniu
anteny ramowej AM w pobliżu okna pomoże poprawić
jakość odbioru.
PL
4
Czynności wstępne
Getting Started
Podłączenie anteny FM
Podłączanie wzmacniacza
Dzięki zewnętrznej antenie FM można uzyskać lepszą
Podłącz tuner do wzmacniacza. Przed rozpoczęciem
jakość dźwięku audycji FM. Zalecamy korzystanie ze
podłączania upewnij się, że wyłączyłeś zasila oba
znajdującej się w wyposażeniu anteny przewodowej
urządzenia. Lokalizację specjalnych łączy sprawdź na
FM tylko tymczasowo do chwili zamontowania anteny
poniższej ilustracji.
zewnętrznej FM. Lokalizację specjalnych łączy FM
ANTENNA sprawdź na poniższej ilustracji.
LINE OUT
FM ANTENNA
Jakie przewody będą mi potrzebne ?
• Przewód audio (w wyposażeniu) (1)
Co będzie mi potrzebne ?
biały (L-lewy)biały (L-lewy)
• Antena przewodowa FM (w wyposażeniu) (1)
czerwony
czerwony
(R-prawy)
(R-prawy)
Podłącz białe wtyczki do białych gniazdek (L), a czerwone
wtyczki do czerwonych gniazdek (R). Włóż wtyczki
• Antena zewnętrzna FM (brak w wyposażeniu) (1) i osiowy kabel
całkowicie do gniazdek; niepełne połączenie może
75 omowy z łącznikiem obejmującym MKE (brak w
powodować zakłócenia.
wyposażeniu) (1)
wzmacniacztuner
LINE OUT
TUNER IN
Łącznik obejmujący MKE
R L
RL
Podłącz znajdującą się w wyposażeniu antenę przewodową
FM lub antenę zewnętrzną FM (brak w wyposażeniu) do
ç
łączników FM z tyłu urządzenia.
antena przewodowa FM
ANTENNA
Podłączenie zasilania
FM
AM
Po wykonaniu wszelkich uprzednich podłączeń
75Ω COAXIAL
podłącz przewód zasilania do gniazdka ściennego.
y
antena zewnętrzna FM
ANTENNA
FM
AM
/
do gniazdka
75Ω COAXIAL
ściennego
y
łącznik
obejmujący MKE
Podłączanie uziemienia
Jeżeli podłączysz antenę zewnetrzną , koniecznie
podłącz przewód uziemienia (brak w wyposażeniu) do
łącza AM ANTENNA y (razem z anteną ramową AM)
aby zabezpieczyć się przed wyładowaniami
atmosferycznymi.
PL
5
Czynności wstępne
Wybór niemieckojezycznego
Zmiany rodzaju odbioru FM
wyświetlenia
Wykonaj poniższe czynności aby odbierać audycjesm
z funkcją odbioru PILOT TONE.
Możesz wybrać angielsko lub niemieckojęzyczne
wyświetlenie. Wyświetlenie jest fabrycznie nastawione
2U
na wyświetlenie angielskojęzyczne. Aby przełączyć na
niemieckojęzyczne wyświetlenie wykonaj poniższe
MEMORY
DISPLAY
MENU
TUNE MODE
TUNING / SELECT
czynności.
FM MODE BAND
RETURN
ENTER
SHIFT DIRECT
0987654321
MENU
TUNING / SELECT
1 Naciśnij U aby wyłączyć tuner.
MEMORY
DISPLAY
MENU
TUNE MODE
TUNING / SELECT
FM MODE BAND
RETURN
ENTER
SHIFT DIRECT
0987654321
2 Trzymając wciśnięty przycisk numeryczny 2
naciśnij U aby włączyć tuner.
ENTER
Po około 2 sekundach na wyświetlaczu pojawi się
“PILOT”.
1 Naciśnij MENU.
Aby powrócić do funkcji POLAR (Stereo plus)
2 Przekręć TUNING/SELECT aż do pojawienia się
Powtórz powyższe czynności wybierając “POLAR”.
“LANGUAGE”, a następnie naciśnij ENTER.
Podczas funkcji POLAR (Stereo plus) tuner odbiera
Na wyświetlaczu pojawi się “SELECT”.
stacje FM tylko z zasiegu częstotliwości 65 MHz do 74
MHz.
3 Przekręć TUNING/SELECT aż do pojawienia się
“GERMAN”, a następnie naciśnij ENTER.
Wyświetlenie powróci do wskazania
częstotliwości.
Aby powrócić do angielskojęzycznego
wyświetlenia
Powtórz powyższe czynności wybierając “ENGLISH”.
PL
6
Оглавление
- Receiving Preset Stations
- Odbiór zaprogramowanych stacji
- Прием Предварительно Установленных Станций
