Sony KDL-40 Z4500: инструкция
Раздел: Бытовая, кухонная техника, электроника и оборудование
Тип: Телевизор
Характеристики, спецификации
Инструкция к Телевизору Sony KDL-40 Z4500

LCD Digital Colour TV
Instructions on “Installing the Wall-Mount Bracket” are not supplied in the
form of a separate leaflet with this TV. These installation instructions are
included within this TV’s instructions manual.
„Instalacja uchwytu ściennego” nie została opisana w oddzielnej ulotce.
Ulotka taka nie jest dołączona do tego odbiornika TV. Wskazówki
dotyczące instalacji uchwytu ściennego znajdują się w instrukcji obsługi
tego odbiornika TV.
Инструкции “Порядок установки настенного монтажного
кронштейна” не прилагаются в виде отдельной брошюры к
этому телевизору. Эти инструкции по установке содержаться
в данной инструкции по эксплуатации телевизора.
For useful information about Sony products
Szczegółowe informacje o produktach Sony
Для получения полезной информации о продукции Сони
4-116-578-51(1)
Printed in Spain
4-116-578-51(1)
LCD Digital Colour TV
Operating Instructions
GB
Instrukcja obsługi
PL
Инструкция по эксплуатации
RU
KDL-52Z4500
KDL-46Z4500
KDL-40Z4500
© 2008 Sony Corporation 4-116-578-51(1)
Introduction
Thank you for choosing this Sony product.
Before operating the TV, please read this manual thoroughly and
retain it for future reference.
The manufacturer of this product is Sony Corporation, 1-7-1
Konan Minato-ku Tokyo, 108-0075 Japan. The Authorized
Representative for EMC and product safety is Sony
Deutschland GmbH, Hedelfinger Strasse 61, 70327 Stuttgart,
Germany. For any service or guarantee matters please refer to
the addresses given in separate service or guarantee
documents.
Notice for Digital TV function
s Any functions related to Digital TV ( ) will only work in
countries or areas where DVB-T (MPEG2 and MPEG4 AVC)
digital terrestrial signals are broadcast or where you have access
to a compatible DVB-C (MPEG2 and MPEG4 AVC) cable
service. Please confirm with your local dealer if you can receive
a DVB-T signal where you live or ask your cable provider if
their DVB-C cable service is suitable for integrated operation
with this TV.
s The cable provider may charge an additional fee for such a
service and you may be required to agree to their terms and
conditions of business.
s Although this TV set follows DVB-T and DVB-C
specifications, compatibility with future DVB-T digital
terrestrial and DVB-C digital cable broadcasts cannot be
guaranteed.
s Some Digital TV functions may not be available in some
countries/regions and DVB-C cable may not operate correctly
with all providers.
s For more information about DVB-C functionality please see
our cable support site:
http://support.sony-europe.com/TV/DVBC/
Trademark information
s is a registered trademark of the DVB Project
s DLNA and DLNA CERTIFIED are trademarks and/or service
marks of Digital Living Network Alliance.
s GUIDE Plus+ is (1) a registered trademark or trademark of, (2)
manufactured under license from and (3) subject of various
international patents and patent applications owned by, or
licensed to, Gemstar-TV Guide International, Inc. and/or its
related affiliates.
s GEMSTAR-TV GUIDE INTERNATIONAL, INC. AND/OR
ITS RELATED AFFILIATES ARE NOT IN ANY WAY
LIABLE FOR THE ACCURACY OF THE PROGRAM
SCHEDULE INFORMATION PROVIDED BY THE GUIDE
PLUS+ SYSTEM. IN NO EVENT SHALL GEMSTAR-TV
GUIDE INTERNATIONAL, INC. AND /OR ITS RELATED
AFFILIATES BE LIABLE FOR ANY AMOUNTS
REPRESENTING LOSS OF PROFITS, LOSS OF BUSINESS,
OR INDIRECT, SPECIAL, OR CONSEQUENTIAL
DAMAGES IN CONNECTION WITH THE PROVISION OR
USE OF ANY INFORMATION, EQUIPMENT, OR
SERVICES RELATING TO THE GUIDE PLUS+ SYSTEM.
s Manufactured under license from Dolby Laboratories. Dolby
and the double-D symbol are trademarks of Dolby Laboratories.
s HDMI, the HDMI logo and High-Definition Multimedia
Interface are trademarks or registered trademarks of HDMI
Licensing LLC.
s “BRAVIA” and are trademarks of Sony
Corporation.
s “XMB” and “xross media bar” are the trademarks of Sony
Corporation and Sony Computer Entertainment Inc.
2
GB
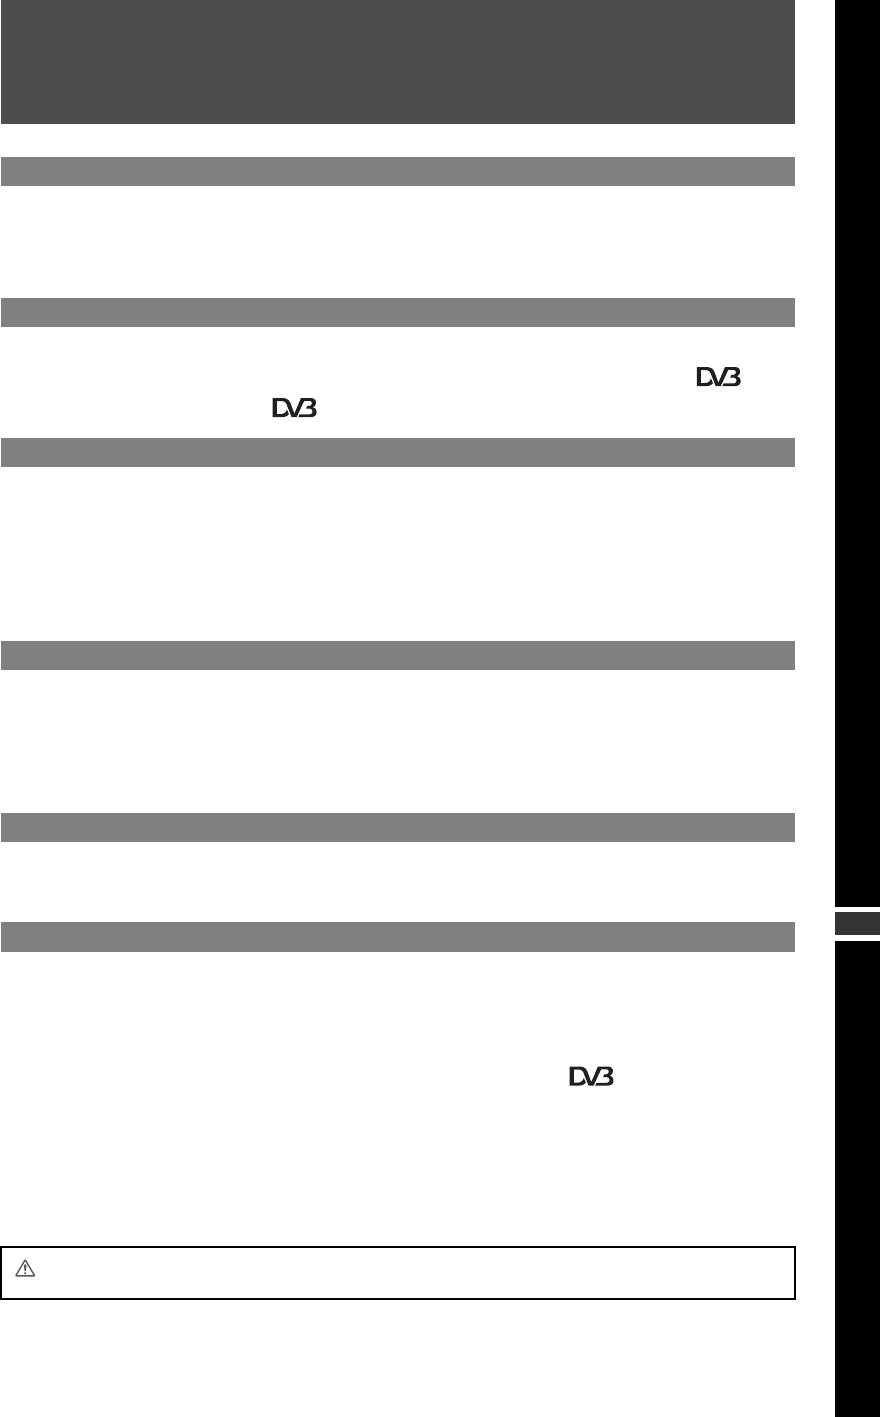
Table of Contents
Start-up Guide 4
Safety information ............................................................................................................................ 9
Precautions..................................................................................................................................... 11
Remote and TV Controls/Indicators ............................................................................................. 12
Watching TV
Watching TV.................................................................................................................................... 16
Using GUIDE Plus+™ System and the Digital Electronic Programme Guide (EPG) ..... 18
Using the Digital Favourite List .......................................................................................... 22
Using Optional Equipment
Connecting Chart ........................................................................................................................... 23
Viewing Pictures from Connected Equipment............................................................................. 26
Playing Back Photo/Music via USB .............................................................................................. 27
Using BRAVIA Sync with Control for HDMI ................................................................................. 30
Operating Optional Equipment using the TV Remote................................................................. 31
Using Network Features
Connecting the TV to the Network................................................................................................34
Enjoying Photo/Music Files via the Network ............................................................................... 34
Checking the Network Connection............................................................................................... 36
Adjusting the Server Display Settings ......................................................................................... 36
Using MENU Functions
Navigating through TV Home Menu (XMB™)............................................................................... 38
Settings ........................................................................................................................................... 39
GB
Additional Information
Installing the Accessories (Wall-Mount Bracket) ........................................................................ 52
Specifications ................................................................................................................................. 54
Troubleshooting ............................................................................................................................. 56
: for digital channels only
Before operating the TV, please read the “Safety information” section of this manual.
Retain this manual for future reference.
3
GB
Start-up Guide
Before Use
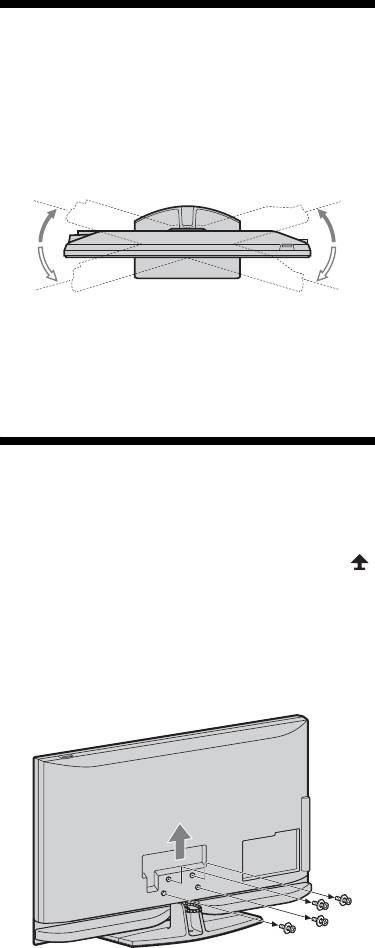
1: Attaching the stand
(for KDL-46Z4500/
To check the accessories
KDL-40Z4500)
Mains lead (1)
1 Open the carton box and take out the stand
and the screws.
Remote RM-ED012 (1)
2 Place the TV set on the stand. Take care
Size AA batteries (R6 type) (2)
not to interfere with cables.
Stand (1) and screws for stand (4)
(KDL-46Z4500/KDL-40Z4500 only)
To insert batteries into the remote
Push and lift the cover to open.
3 Fix the TV to the stand according to the
~
• Observe the correct polarity when inserting
arrow marks that guide the screw holes
batteries.
using the supplied screws.
• Do not use different types of batteries together or
mix old and new batteries.
• Dispose of batteries in an environmentally
friendly way. Certain regions may regulate the
disposal of batteries. Please consult your local
authority.
• Handle the remote with care. Do not drop or step
on it, or spill liquid of any kind onto it.
• Do not place the remote in a location near a heat
source, a place subject to direct sunlight, or a
damp room.
~
To replace the speaker grille
• If using an electric screwdriver, set the tightening
The speaker grille unit can be replaced with
torque at approximately 1.5 N·m {15 kgf·cm}.
others that are sold separately. However, do
not remove the unit except to replace it. For
details, see the instructions supplied with
speaker grille units.
4
GB
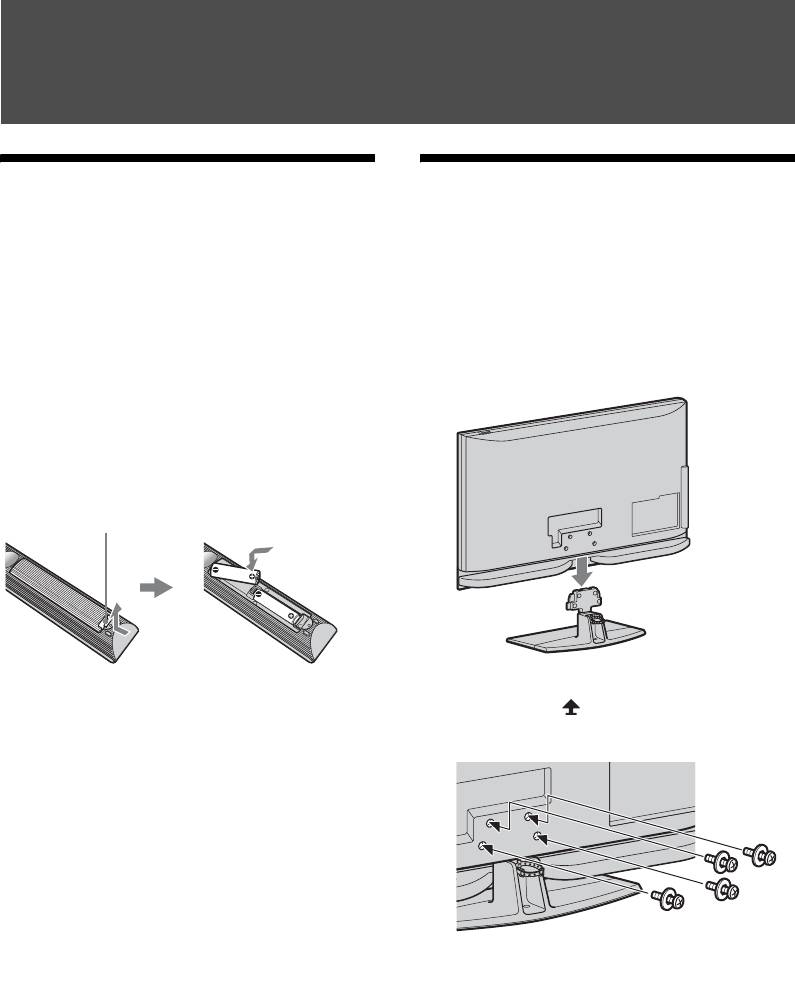
2: Connecting an aerial/Set
3: Preventing the TV from
Top Box/recorder (e.g. DVD
toppling over
recorder)
Start-up Guide
Connecting a Set Top Box/recorder (e.g.
DVD recorder) with SCART
A V
2
( SMARTLINK )
Scart lead
Set Top Box/recorder (e.g. DVD recorder)
1 Install a wood screw (4 mm in diameter,
Connecting a Set Top Box/recorder (e.g.
not supplied) in the TV stand.
DVD recorder) with HDMI
2 Install a machine screw (M6 x 12-15, not
supplied) into the screw hole of the TV.
3 Tie the wood screw and the machine
screw with a strong cord.
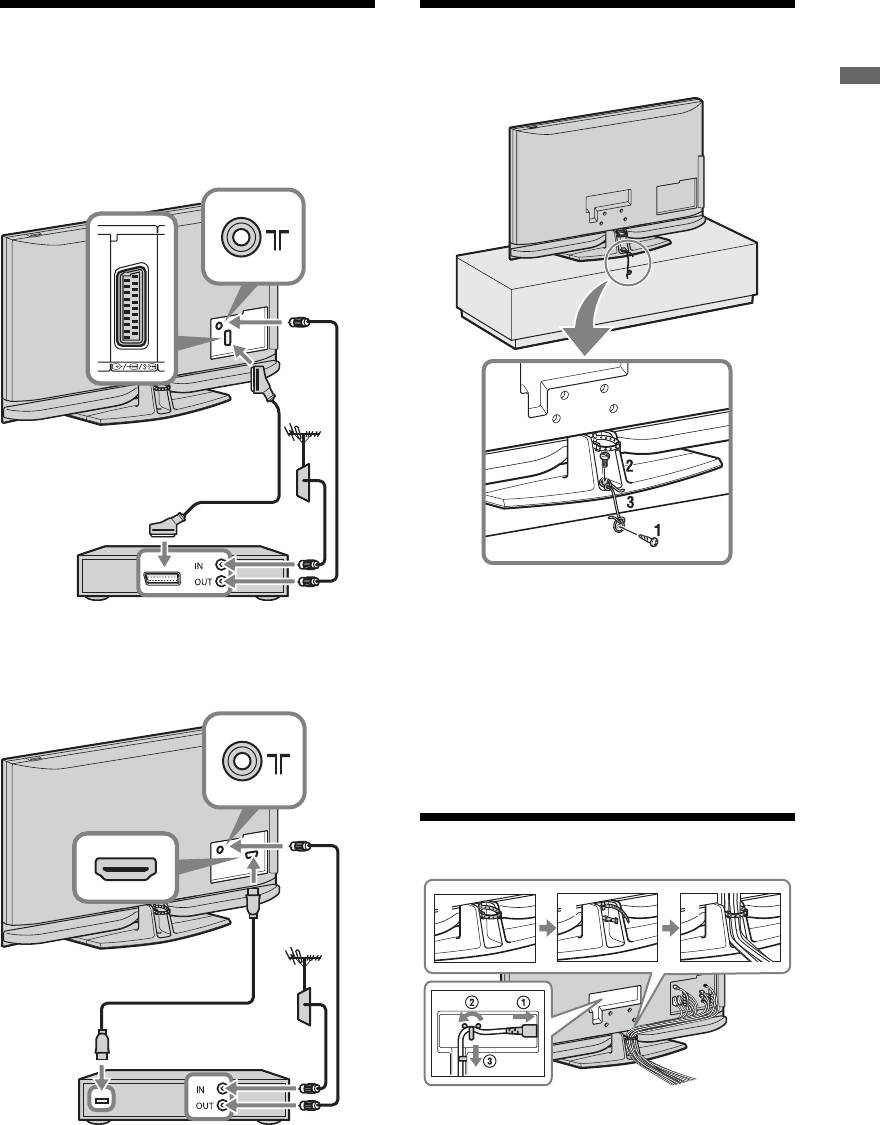
4: Bundling the cables
2
3 4
HDMI cable
1
~
Set Top Box/recorder (e.g. DVD recorder)
• Do not bundle the mains lead together with other
cables.
5
GB
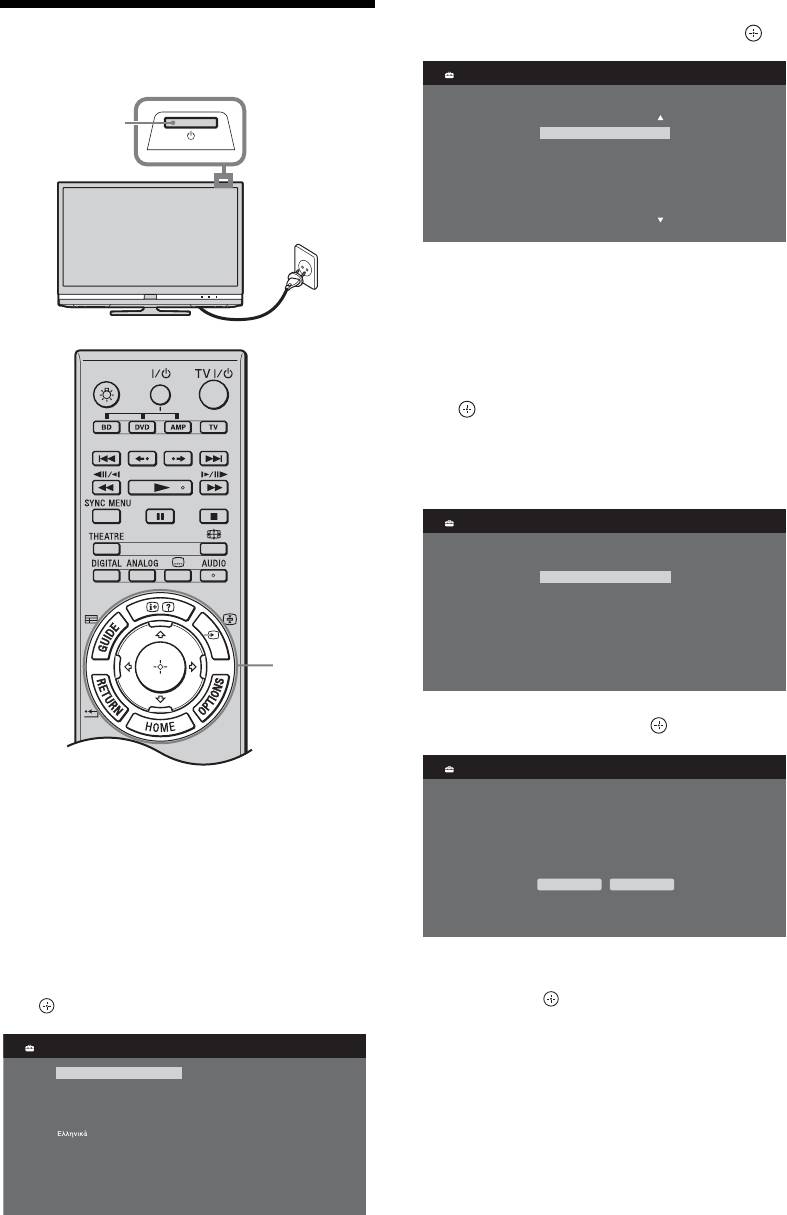
4 Press F/f to select the country in which
5: Performing the initial set-
you will operate the TV, then press .
up
Country
Select country.
2
-
United Kingdom
Ireland
Nederland
België/Belgique
Luxembourg
France
Italia
1
If the country in which you want to use
the TV does not appear in the list, select
“-” instead of a country.
5 Press F/f to select the location type in
which you will operate the TV, then press
.
~
• Select “Home” for the best TV settings to use the
TV in the home.
Location
Select location.
Home
Shop
3-11
6 Select “Yes” then press .
Auto Tuning
1 Connect the TV to your mains socket
(220-240V AC, 50Hz).
Do you want to start Auto Tuning?
2 Press 1 on the TV.
When you switch on the TV for the first
Yes No
time, the Language menu appears on the
screen.
3 Press F/f/G/g to select the language
displayed on the menu screens, then press
7 Press F/f to select “Antenna” or “Cable”,
.
then press .
If you select “Cable”, the screen for
Language
selecting the scan type appears. See “To
English
Česky
Nederlands
Magyar
tune the TV for Cable connection”
Français
Русский
Italiano
ББлгар
ски
(page 7).
Deutsch
Suomi
Dansk
The TV starts searching for all available
Türkçe
Svenska
Español
Norsk
digital channels, followed by all available
Català
Slovenčina
Português
Română
analogue channels. This may take some
Polski
time, so do not press any buttons on the
TV or remote while proceeding.
6
GB

If a message appears for you to confirm
To tune the TV for Cable connection
the aerial connection
1 Press .
No digital or analogue channels were
found. Check all the aerial/cable
2 Press F/f to select “Quick Scan” or “Full
connection and then press to start auto-
Scan”, then press .
Start-up Guide
tuning again.
“Quick Scan” : channels are tuned
8 When the Programme Sorting menu
according to the cable operator
appears on the screen, follow the steps of
information within the broadcast signal.
“Programme Sorting” (page 46).
Recommended setting for “Frequency”,
“Network ID” and “Symbol Rate” is
If you do not change the order in which
“Auto.”
the analogue channels are stored on the
This option is recommended for fast
TV, press RETURN to go to step 9.
tuning when supported by your cable
9
operator.
Quick Start
If the “Quick Scan” does not tune, please
use the “Full Scan” method below.
“Full Scan” : All available channels are
Do you want to enable Quick Start?
TV turns on more quickly but stand by power
tuned and stored. This procedure may take
consumption is increased.
some time.
Yes No
This option is recommended when “Quick
Scan” is not supported by your cable
provider.
For further information about supported
For details, see page 41.
cable providers, refer to support web site:
10
http://support.sony-europe.com/TV/
Control for HDMI
DVBC/
3 Press f to select “Start”, then press .
Do you want to enable control for compatible
HDMI devices?
The TV starts searching for channels. Do
Choosing "Yes" will increase
standby power consumption.
not press any buttons on the TV or
Yes No
remote.
~
• Some cable providers do not support “Quick
Scan.” If no channels are detected using “Quick
For details, see page 30.
Scan”, perform “Full Scan.”
Following this step, GUIDE Plus+ setting
screen appears only when GUIDE Plus+
To setup GUIDE Plus+ system (only
is available.
when GUIDE Plus+ system is
11 Press .
available)*
* Condition you can setup this feature:
The TV has now tuned in all the available
– in UK, Italy, Germany or Spain.
channels.
– you can receive digital broadcasting.
~
– when “Antenna” is selected in step 7 of “ 5:
• When a digital broadcast channel cannot be
Performing the initial set-up.”
received, or when selecting a country in which
1 Enter Postal Code of region you live using
there are no digital broadcasts in step 4, the time
F/f/G/g/+.
must be set after performing step 8.
~
• Enter from the left, when the postal code is
fewer than seven digits.
(Continu ed)
7
GB
2 Select language for GUIDE Plus+.
This step will be skipped if any one of the
Adjusting the Viewing
following languages is selected in “5:
Angle of the TV
Performing the initial set-up” step 3:
This TV can be adjusted within the angles
“English”, “Deutsch”, “Español”,
shown below.
“Italiano”, “Français” or “Nederlands.”
Adjust the angle left and right (swivel)
3 GUIDE Plus+ Data Download.
Top view
The initial download may take some time,
so do not press any buttons on the TV or
20°
20°
remote while proceeding. Once you have
received the first download of TV listings
20°
20°
data, all future downloads will be done
Front
automatically.
~
• When adjusting the angle, hold the Table-Top
Stand with one hand to avoid slipping or tipping
the TV.
Detaching the Table-Top
Stand from the TV
~
• Remove the screws guided by the arrow marks
of the TV.
• Do not remove the Table-Top Stand for any
reason other than listed below.
– To wall-mount the TV.
– To put the TV in the carton at time of purchase
(KDL-46Z4500/KDL-40Z4500 only).
8
GB
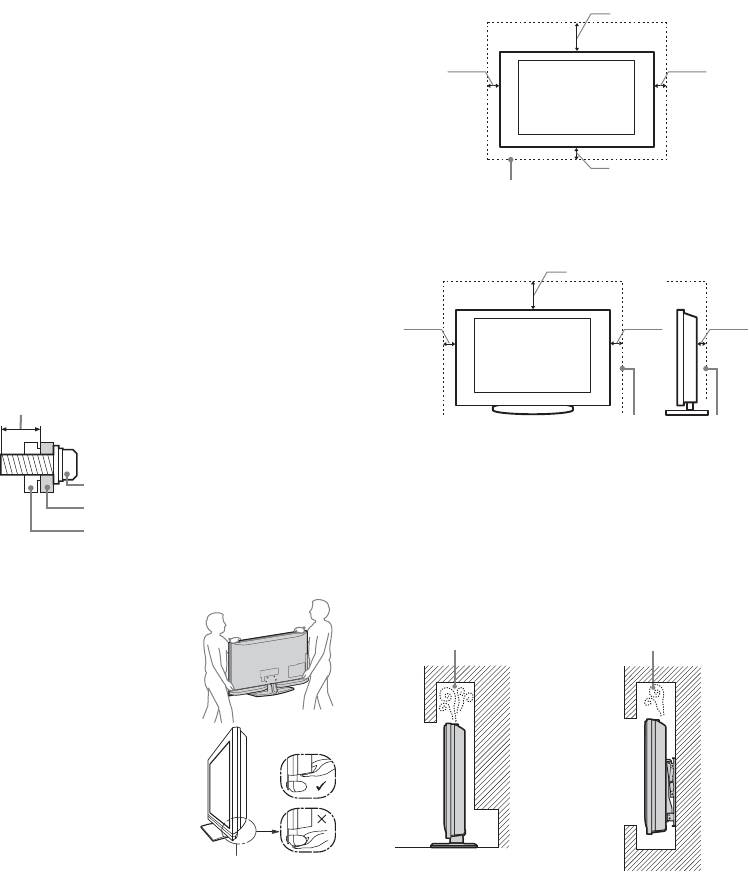
Ventilation
Safety
s Never cover the ventilation holes or insert anything in the
cabinet.
s Leave space around the TV set as shown below.
s It is strongly recommended that you use a Sony wall-mount
information
bracket in order to provide adequate air-circulation.
Installed on the wall
Installation/Set-up
30 cm
Install and use the TV set in accordance with the instructions below
in order to avoid any risk of fire, electrical shock or damage and/or
injuries.
10 cm
10 cm
Installation
s The TV set should be installed near an easily accessible mains
socket.
s Place the TV set on a stable, level surface.
s Only qualified service personnel should carry out wall
installations.
10 cm
s For safety reasons, it is strongly recommended that you use
Leave at least this space around the set.
Sony accessories, including:
– Wall-mount bracket SU-WL500
s Be sure to use the screws supplied with the Wall-mount bracket
Installed with stand
when attaching the mounting hooks to the TV set.
The supplied screws are designed so that they are 8 mm to 12
30 cm
mm in length when measured from the attaching surface of the
mounting hook.
The diameter and length of the screws differ depending on the
10 cm10 cm
6 cm
Wall-mount bracket model.
Use of screws other than those supplied may result in internal
damage to the TV set or cause it to fall, etc.
8mm – 12mm
Leave at least this space around the set.
Screw (supplied with the Wall-
s To ensure proper ventilation and prevent the collection of dirt
mount bracket)
or dust:
Mounting Hook
– Do not lay the TV set flat, install upside down, backwards,
Hook attachment on rear
or sideways.
of TV set
– Do not place the TV set on a shelf, rug, bed or in a closet.
– Do not cover the TV set with a cloth, such as curtains, or
items such as newspapers, etc.
Transporting
– Do not install the TV set as shown below.
s Before transporting the TV set,
disconnect all cables.
Air circulation is
Air circulation is
s Two or three people are needed to
blocked.
blocked.
transport a large TV set.
s When transporting the TV set by
hand, hold it as shown on the right.
Do not put stress on the LCD panel
and the frame around the screen.
s When lifting or moving the TV set,
hold it firmly from the bottom.
Wall
Wall
s When transporting the TV set, do not
subject it to jolts or excessive
vibration.
s When transporting the TV set for
repairs or when moving, pack it
using the original carton and packing
material.
Be sure to hold the
bottom of the panel,
and not the
transparent part,
speaker, or speaker
grille area. Do not
compress the
panel’s speaker
grille area.
(Continu ed)
9
GB
Mains lead
If the following problems occur...
Handle the mains lead and socket as follows in order to avoid any
Turn off the TV set and unplug the mains lead immediately if any
risk of fire, electrical shock or damage and/or injuries:
of the following problems occur.
– Use only mains leads supplied by Sony, not other suppliers.
Ask your dealer or Sony service centre to have it checked by
– Insert the plug fully into the mains socket.
qualified service personnel.
– Operate the TV set on a 220-240 V AC supply only.
When:
– When wiring cables, be sure to unplug the mains lead for your
safety and take care not to catch your feet on the cables.
– Mains lead is damaged.
– Disconnect the mains lead from the mains socket before
– Poor fitting of mains socket.
working on or moving the TV set.
– TV set is damaged by being dropped, hit or having something
– Keep the mains lead away from heat sources.
thrown at it.
– Unplug the mains plug and clean it regularly. If the plug is
– Any liquid or solid object falls through openings in the cabinet.
covered with dust and it picks up moisture, its insulation may
deteriorate, which could result in a fire.
Notes
s Do not use the supplied mains lead on any other equipment.
s Do not pinch, bend, or twist the mains lead excessively. The
core conductors may be exposed or broken.
s Do not modify the mains lead.
s Do not put anything heavy on the mains lead.
s Do not pull on the mains lead itself when disconnecting the
mains lead.
s Do not connect too many appliances to the same mains socket.
s Do not use a poor fitting mains socket.
Prohibited Usage
Do not install/use the TV set in locations, environments or
situations such as those listed below, or the TV set may malfunction
and cause a fire, electrical shock, damage and/or injuries.
Location:
Outdoors (in direct sunlight), at the seashore, on a ship or other
vessel, inside a vehicle, in medical institutions, unstable locations,
near water, rain, moisture or smoke.
Environment:
Places that are hot, humid, or excessively dusty; where insects may
enter; where it might be exposed to mechanical vibration, near
flammable objects (candles, etc).
The TV set shall not be exposed to dripping or splashing and no
objects filled with liquids, such as vases, shall be placed on the TV.
Situation:
Do not use when your hands are wet, with the cabinet removed, or
with attachments not recommended by the manufacturer.
Disconnect the TV set from mains socket and aerial during
lightning storms.
Broken pieces:
s Do not throw anything at the TV set. The screen glass may
break by the impact and cause serious injury.
s If the surface of the TV set cracks, do not touch it until you have
unplugged the mains lead. Otherwise electric shock may result.
When not in use
s If you will not be using the TV set for several days, the TV set
should be disconnected from the mains for environmental and
safety reasons.
s As the TV set is not disconnected from the mains when the TV
set is just turned off, pull the plug from the mains to disconnect
the TV set completely.
s However, some TV sets may have features that require the TV
set to be left in standby to work correctly.
For children
s Do not allow children to climb on the TV set.
s Keep small accessories out of the reach of children, so that they
are not mistakenly swallowed.
10
GB

