Sony XR-CA440X: инструкция
Раздел: Авто, мото оборудование и транспорт
Тип: Автомагнитола
Инструкция к Автомагнитоле Sony XR-CA440X
3-238-898-11 (2)
FM/AM
Cassette Car Stereo
GB
Operating Instructions
RU
Инструкция по эксплуатации
For installation and connections, see the supplied installation/connections manual.
Перед установкой и подсоединениями прочитайте прилагаемую инструкцию по
установке и подсоединению.
XR-CA440X
© 2002 Sony Corporation

Welcome !
Thank you for purchasing this Sony Cassette
Player. You can enjoy its various features even
more with:
• Optional CD/MD units (both changers and
1
players)*
.
• CD TEXT information (displayed when a CD
2
TEXT disc*
is played on a connected optional
CD unit with the CD TEXT function).
*1 This unit works with Sony products only.
*2 A CD TEXT disc is an audio CD that includes
information such as the disc name, artist name,
and track names. This information is recorded on
the disc.
2

Table of Contents
Location of controls . . . . . . . . . . . . . . . . . . . 4
CD/MD Unit (optional)
Precautions . . . . . . . . . . . . . . . . . . . . . . . . . . 5
Playing a CD or MD. . . . . . . . . . . . . . . . . . 13
Notes on Cassettes. . . . . . . . . . . . . . . . . . . . . 5
Display items . . . . . . . . . . . . . . . . . . . . . . . 13
Playing tracks repeatedly
Getting Started
— Repeat Play . . . . . . . . . . . . . . . . . . . . 14
Resetting the unit. . . . . . . . . . . . . . . . . . . . . . 6
Playing tracks in random order
Detaching the front panel . . . . . . . . . . . . . . . 6
— Shuffle Play. . . . . . . . . . . . . . . . . . . . 14
Setting the clock . . . . . . . . . . . . . . . . . . . . . . 7
MP3 playable CD Unit (optional)
Cassette Player
Listening to an MP3 file . . . . . . . . . . . . . . . 15
Listening to a tape . . . . . . . . . . . . . . . . . . . . . 8
Display items . . . . . . . . . . . . . . . . . . . . . . . 15
Playing a tape in various functions . . . . . . . . 9
Playing tracks repeatedly
— Repeat Play . . . . . . . . . . . . . . . . . . . . 16
Radio
Playing tracks in random order
Storing stations automatically
— Shuffle Play. . . . . . . . . . . . . . . . . . . . 16
— Best Tuning Memory (BTM). . . . . . . . 9
Storing only the desired stations . . . . . . . . . 10
Additional Information
Receiving the stored stations. . . . . . . . . . . . 10
Maintenance . . . . . . . . . . . . . . . . . . . . . . . . 17
Removing the unit. . . . . . . . . . . . . . . . . . . . 17
Other Functions
Specifications . . . . . . . . . . . . . . . . . . . . . . . 18
Adjusting the sound characteristics. . . . . . . 11
Troubleshooting . . . . . . . . . . . . . . . . . . . . . 19
Quickly attenuating the sound. . . . . . . . . . . 11
Error displays . . . . . . . . . . . . . . . . . . . . . . . 20
Changing the sound and display settings
— Menu . . . . . . . . . . . . . . . . . . . . . . . . . 11
Selecting the sound position
— My Best sound Position (MBP). . . . . 12
Boosting the bass sound
— D-bass . . . . . . . . . . . . . . . . . . . . . . . . 12
3

Location of controls
Refer to the pages listed for details.
ATT
SEEK
SOURCE
VOL
D-BASS
AMS
MODE
MBP
RELEASE
DISC
REP
SHUF BL
SKIP/ ALBM
-
+
/ATA
MTL
SEL
SENS
123456
BTM
OFFDSPL
XR-CA440X
a SOURCE (Power on/Tape/Radio/CD/
n Number buttons
MD) select button
Tape:
b MODE (o) button
(3): REP (Repeat)
Selecting the source.
(5): BL SKIP (Blank Skip)
c VOL +/– button
(6): ATA (Automatic Tuner Activation)
d ATT (attenuate) button
Radio:
e Display window
Storing the desired station on each number
f Z (eject) button 8
button.
g SEEK/AMS button
CD (MP3 files)/MD:
Tape:
(1): DISC –
Fast-forwarding, reversing a tape.
(2): DISC +
Radio:
(3): REP (Repeat)
Tuning in stations automatically.
(4): SHUF (Shuffle)
Finding a station manually.
MP3 files:
CD (MP3 files)/MD:
(5): ALBM –
Skipping tracks.
(6): ALBM +
h MBP (My Best sound Position) button
o BTM/MTL (Best Tuning Memory/Metal)
12
button 9
i D-BASS button 12
p DSPL (display mode change) button
j RELEASE (front panel release) button
q OFF (Stop/Power off) button*
k SEL (select) button
Selecting items.
* Warning when installing in a car without
an ACC (accessory) position on the
l RESET button (located on the front side of
ignition switch
the unit, behind the front panel) 6
After turning off the ignition, be sure to press
m SENS button
(OFF) on the unit for 2 seconds to turn off
Storing the stations with the strongest
the clock display.
signals.
Otherwise, the clock display does not turn off
and this causes battery drain.
4
Precautions
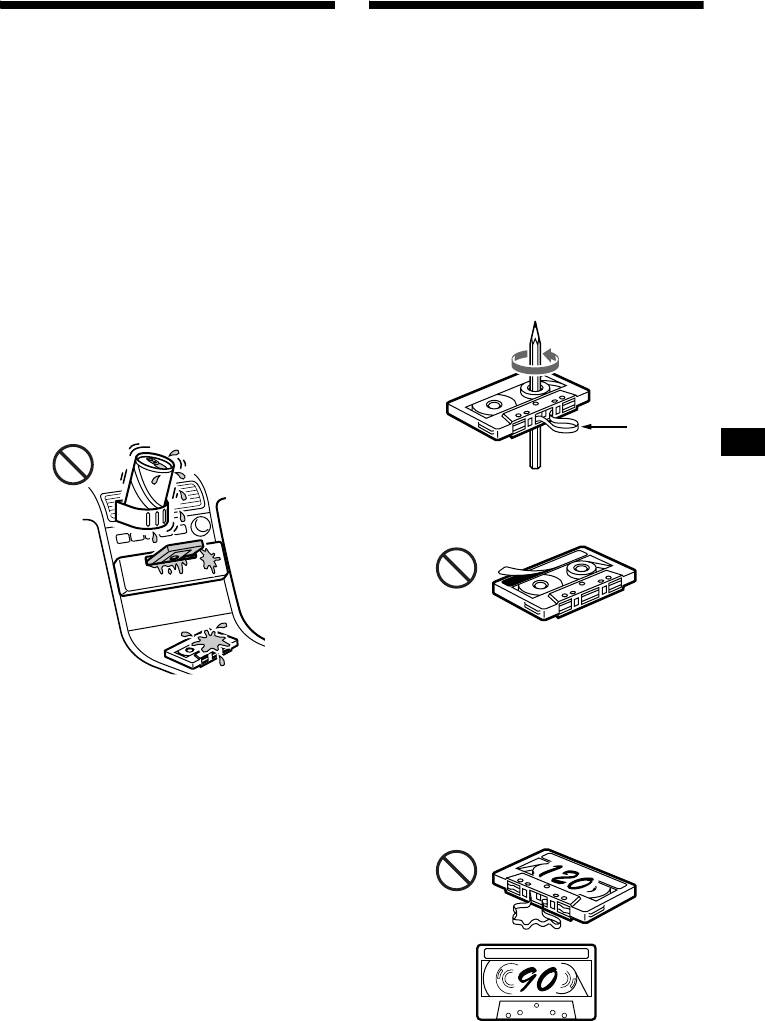
Notes on Cassettes
• If your car was parked in direct sunlight, allow
Cassette care
the unit to cool off before operating it.
• Do not touch the tape surface of a cassette, as
• If no power is being supplied to the unit, check
any dirt or dust will contaminate the heads.
the connections first. If everything is in order,
• Keep cassettes away from equipment with
check the fuse.
built-in magnets such as speakers and
• If no sound comes from the speakers of a two-
amplifiers, as erasure or distortion on the
speaker system, set the fader control to the
recorded tape could occur.
centre position.
• Do not expose cassettes to direct sunlight,
• When a tape is played back for a long period,
extremely cold temperatures, or moisture.
the cassette may become warm because of the
• Slack in the tape may cause the tape to be
built-in power amplifier. However, this is not a
caught in the machine. Before you insert the
sign of malfunction.
tape, use a pencil or similar object to turn the
reel and take up any slack.
If you have any questions or problems
concerning your unit that are not covered in this
manual, please consult your nearest Sony dealer.
To maintain high quality sound
Be careful not to splash juice or other soft drinks
onto the unit or tapes.
Slack
• Distorted cassettes and loose labels can cause
problems when inserting or ejecting tapes.
Remove or replace loose labels.
• The sound may become distorted while playing
the cassette. The cassette player head should be
cleaned after each 50 hours of use.
The use of cassettes longer than 90 minutes
is not recommended except for long
continuous play
The tape used for these cassettes is very thin and
tends to stretch easily.
Frequent playing and stopping of these tapes
may cause them to become entangled in the
cassette deck mechanism.
5
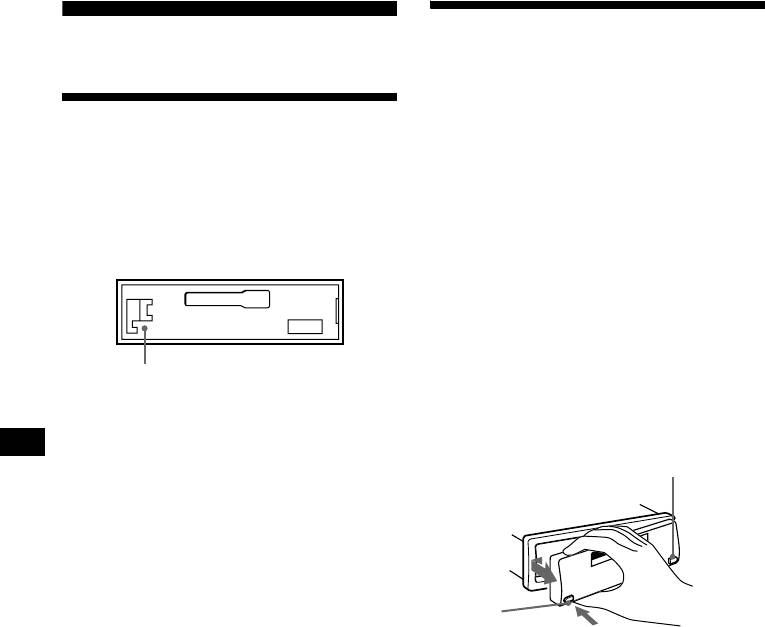
Detaching the front panel
Getting Started
You can detach the front panel of this unit to
protect the unit from being stolen.
Resetting the unit
Caution alarm
If you turn the ignition switch to the OFF
Before operating the unit for the first time or
position without removing the front panel, the
after replacing the car battery, you must reset the
caution alarm will beep for a few seconds.
unit.
If you connect an optional amplifier and do not
Remove the front panel and press the RESET
use the built-in amplifier, the beep sound will be
button with a pointed object, such as a ballpoint
deactivated.
pen.
1 Press (OFF)*.
Tape playback or radio reception stops (the
key illumination and display remain on).
* If your car has no ACC position on the ignition
switch, be sure to turn the unit off by pressing
(OFF) for 2 seconds to avoid car battery drain.
RESET button
2 Press (RELEASE), then slide the front
Note
panel a little to the left, and pull it off
Pressing the RESET button will erase the clock setting
towards you.
and some stored contents.
(OFF)
(RELEASE)
Notes
• Be sure not to drop the panel when detaching it from
the unit.
• If you detach the panel while the unit is still turned
on, the power will turn off automatically to prevent
the speakers from being damaged.
• When carrying the front panel with you, use the
supplied front panel case.
6
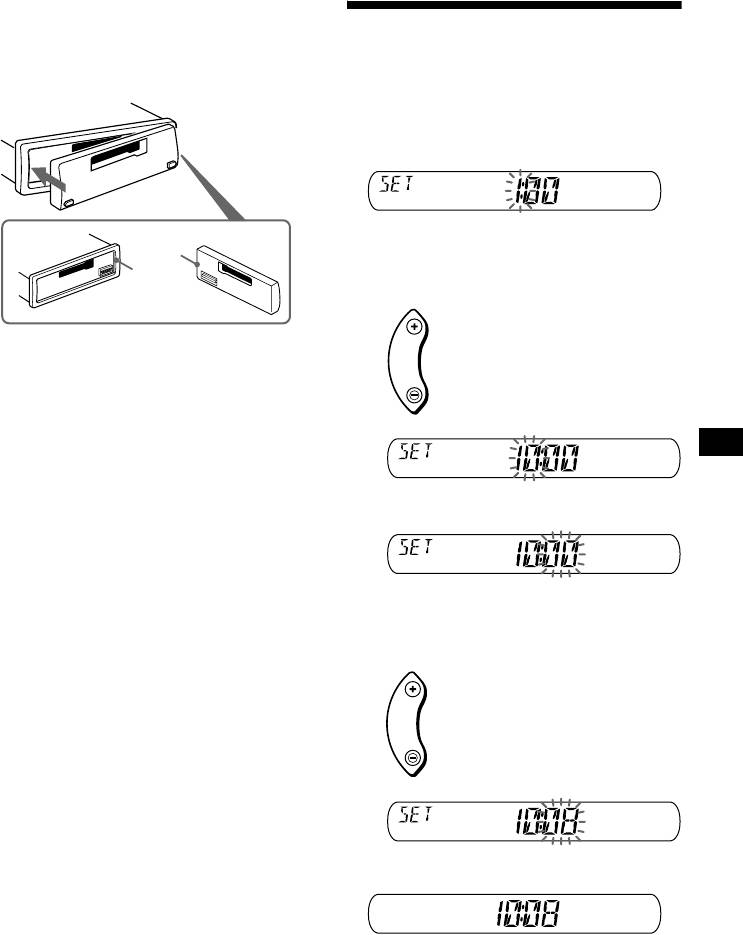
Attaching the front panel
Attach part A of the front panel to part B of the
Setting the clock
unit as illustrated and push the left side into
position until it clicks.
The clock uses a 12-hour digital indication.
Example: To set the clock to 10:08
1 Press (DSPL) for 2 seconds.
The hour indication flashes.
A
1 Press either side of (VOL) to set the
B
hour.
to go forward
VOL
Notes
• Be sure not to attach the front panel upside down.
to go back
• Do not press the front panel too hard against the unit
when attaching it.
• Do not press too hard or put excessive pressure on
the display window of the front panel.
• Do not expose the front panel to direct sunlight or
heat sources such as hot air ducts, and do not leave
it in a humid place. Never leave it on the dashboard
of a car parked in direct sunlight or where there may
2 Press (SEL).
be a considerable rise in temperature.
The minute indication flashes.
3 Press either side of (VOL) to set the
minute.
to go forward
VOL
to go back
2 Press (DSPL).
The clock starts.
After the clock setting is completed, the
display returns to normal play mode.
7

