Sony XR-CA440X: Additional Information
Additional Information: Sony XR-CA440X

Notes
• For safety, turn off the ignition before cleaning the
connectors, and remove the key from the ignition
Additional Information
switch.
• Never touch the connectors directly with your fingers
or with any metal device.
Maintenance
Removing the unit
Fuse replacement
When replacing the fuse, be sure to use one
1 Remove the front cover
matching the amperage rating stated on the
original fuse. If the fuse blows, check the power
1 Detach the front panel (page 6).
connection and replace the fuse. If the fuse blows
2 Press the clip inside the front cover
again after replacement, there may be an internal
with a thin screwdriver.
malfunction. In such a case, consult your nearest
Sony dealer.
Fuse (10 A)
3 Repeat step 2 for the other side.
Warning
2 Remove the unit
Never use a fuse with an amperage rating
1 Use a thin screwdriver to push in
exceeding the one supplied with the unit as this
the clip on the left side of the unit,
could damage the unit.
then pull out the left side of the unit
until the catch clears the mounting.
Cleaning the connectors
The unit may not function properly if the
connectors between the unit and the front panel
are not clean. In order to prevent this, detach the
front panel (page 6) and clean the connectors
with a cotton swab dipped in alcohol. Do not
apply too much force. Otherwise, the connectors
may be damaged.
4 mm
2 Repeat step 1 for the right side.
3 Slide the unit out of its mounting.
Main unit
Back of the front panel
17
Specifications
General
Cassette Player section
Outputs Audio outputs
Tape track 4-track 2-channel stereo
Power aerial relay control
Wow and flutter 0.08 % (WRMS)
lead
Frequency response 30 – 18,000 Hz
Power amplifier control lead
Signal-to-noise ratio
Inputs BUS control input terminal
Cassette type
BUS audio input terminal
TYPE II, IV 61 dB
Aerial input terminal
Tone controls Bass ±9 dB at 100 Hz
TYPE I 58 dB
Treble ±9 dB at 10 kHz
Power requirements 12 V DC car battery
Tuner section
(negative earth)
Dimensions Approx. 178 × 50 × 178
mm (w/h/d)
FM
Mounting dimensions Approx. 182 × 53 × 161
Tuning range FM tuning interval:
mm (w/h/d)
87.5 – 108.0 MHz
Mass Approx. 1.2 kg
Aerial terminal External aerial connector
Supplied accessories Parts for installation and
Intermediate frequency 10.7 MHz
connections (1 set)
Usable sensitivity 11 dBf
Front panel case (1)
Selectivity 75 dB at 400 kHz
Optional accessories BUS cable (supplied with
Signal-to-noise ratio 65 dB (stereo),
an RCA pin cord)
68 dB (mono)
RC-61 (1 m), RC-62 (2 m)
Harmonic distortion at 1 kHz
Optional equipment CD changer (6 discs)
0.7 % (stereo),
CDX-T70MX, CDX-T69
0.5 % (mono)
MD changer (6 discs)
Separation 33 dB at 1 kHz
MDX-66XLP
Frequency response 30 – 15,000 Hz
MG Memory Stick
System-up Player
AM
MGS-X1
Source selector
Tuning range AM tuning interval:
XA-C30
531 – 1,602 kHz
Sensitivity 30 µV
Note
This unit cannot be connected to a digital preamplifier
Aerial terminal External aerial connector
or an equalizer.
Intermediate frequency 10.7 MHz/450 kHz
Design and specifications are subject to change
Power amplifier section
without notice.
Outputs Speaker outputs
(sure seal connectors)
Speaker impedance 4 – 8 ohms
Maximum power output 50 W × 4 (at 4 ohms)
18
Tape playback
Troubleshooting
The sound is distorted.
The tape head is contaminated.
The following checklist will help you remedy
t Clean the head with a commercially
problems you may encounter with your unit.
available dry-tape cleaning cassette.
Before going through the checklist below, check
The AMS does not operate correctly.
the connection and operating procedures.
• There is noise in the space between tracks.
• A blank space is too short (less than 4
General
seconds).
No sound.
• A long pause, or a passage of low
• Adjust the volume with (+).
frequencies or very low sound level is treated
• Cancel the ATT function.
as a blank space.
• Set the fader control to the centre position for
a 2-speaker system.
Radio reception
The contents of the memory have been
Preset tuning is not possible.
erased.
• Store the correct frequency in the memory.
• The RESET button has been pressed.
• The broadcast signal is too weak.
t Store again into the memory.
• The power cord or battery has been
The stations cannot be received.
disconnected.
The sound is hampered by noises.
• The power connecting cord is not connected
• Connect a power aerial control lead (blue) or
properly.
accessory power supply lead (red) to the
power supply lead of a car’s aerial booster.
No beep sound.
(Only when your car has built-in FM/AM
The beep sound is cancelled (page 11).
aerial in the rear/side glass.)
Indications disappear from/do not appear in
• Check the connection of the car aerial.
the display.
• The auto aerial will not go up.
• The clock display disappears if you press
t Check the connection of the power aerial
(OFF) for 2 seconds.
control lead.
t Press (OFF) again for 2 seconds to
• Check the frequency.
display the clock.
Automatic tuning is not possible.
• Remove the front panel and clean the
• The local seek mode is set to “ON.”
connectors. See “Cleaning the connectors”
t Set the local seek mode to “OFF” (page
(page 17) for details.
10).
Stored stations and correct time are erased.
• The broadcast signal is too weak.
The fuse has blown.
t Perform manual tuning.
Makes noise when the ignition key is in the
The “ST” indication flashes.
ON, ACC, or OFF position.
• Tune in the frequency accurately.
The leads are not matched correctly with the
• The broadcast signal is too weak.
car’s accessory power connector.
t Set to the monaural reception mode (page
No power is being supplied to the unit.
10).
• Check the connection. If everything is in
A programme broadcast in stereo is heard
order, check the fuse.
in monaural.
• The car does not have an ACC position.
The unit is in monaural reception mode.
t Press (SOURCE) (or insert a cassette) to
t Cancel monaural reception mode (page
turn on the unit.
10).
The power is continuously supplied to the
unit.
The car does not have an ACC position.
CD/MD playback
The power aerial does not extend.
The sound skips.
The power aerial does not have a relay box.
Dirty or defective disc.
19

Error displays
(when an optional CD/MD unit is connected)
Error displays
The following indications will flash for about 5
seconds, and an alarm sound will be heard.
NO MAG
The disc magazine is not inserted in the CD/
MD unit.
t Insert the magazine in the CD/MD unit.
NO DISC
No disc is inserted in the CD/MD unit.
t Insert discs in the CD/MD unit.
NO MUSIC
A CD which is not a music file is inserted in
the MP3 playable CD unit.
t Insert a music CD in the MP3 playable CD
unit.
1
ERROR*
2
• A CD is dirty or inserted upside down.*
t Clean or insert the CD correctly.
• An MD does not playback because of some
2
problem.*
t Insert another MD.
• A CD/MD cannot play because of some
problem.
t Insert another CD/MD.
1
BLANK*
2
No tracks have been recorded on an MD.*
t Play an MD with recorded tracks on it.
RESET
The CD/MD unit cannot be operated because
of some problem.
t Press the RESET button on the unit.
NOT READY
The lid of the MD unit is open or the MDs are
not inserted properly.
t Close the lid or insert the MDs properly.
HI TEMP
The ambient temperature is more than 50°C.
t Wait until the temperature goes down
below 50°C.
*1 When an error occurs during playback of a CD or
MD, the disc number of the CD or MD does not
appear in the display.
*2 The disc number of the disc causing the error
appears in the display.
If these solutions do not help improve the
situation, consult your nearest Sony dealer.
20

Поздравляем с покупкой!
Благодарим Вас за то, что Вы остановили
свой выбор на этом кассетном
проигрывателе Sony. Данный
проигрыватель имеет ряд новых
характеристик:
• Возможность подключения
дополнительных проигрывателей компакт-
/мини-дисков (как обычных, так и с
1
возможностью смены дисков)*
.
• Информация CD TEXT (отображаемая,
2
когда диск с CD TEXT*
воспроизводится
на подключенном дополнительном
проигрывателе компакт-дисков с функцией
CD TEXT).
*1 Данное устройство работает только в
комплекте с изделиями фирмы Sony.
*2 Диск с CD TEXT - это звуковой компакт-диск,
содержащий такую информацию, как название
диска, имя исполнителя и названия
композиций. Эта информация записана на
диске.
Кacceтнaя cтepeофоничecкaя
aвтомaгнитолa c диaпaзоном
FM/AM
Cдeлaно в Taилaндe
2

Содержание
Расположение органов управления . . . 4
Устройство для компакт-/мини-
Меры предосторожности . . . . . . . . . . . . 5
дисков (дополнительное)
Кассеты . . . . . . . . . . . . . . . . . . . . . . . . . . . . 5
Воспроизведение компакт- или мини-
Начало работы
диска . . . . . . . . . . . . . . . . . . . . . . . . . . . 13
Надписи на дисплее . . . . . . . . . . . . . . . . 14
Переустановка параметров
Повторное воспроизведение
устройства . . . . . . . . . . . . . . . . . . . . . . . 6
композиций
Снятие передней панели . . . . . . . . . . . . . 6
— Повтор воспроизведения. . . . . . . 15
Установка часов . . . . . . . . . . . . . . . . . . . . 7
Воспроизведение композиций в
Кассетный проигрыватель
случайной последовательности
Прослушивание кассеты . . . . . . . . . . . . . 8
— Перетасованное
Воспроизведение ленты при работе
воспроизведение. . . . . . . . . . . . . . . . . 15
различных функций . . . . . . . . . . . . . . . 9
Устройство для компакт-дисков,
Радиоприемник
на котором можно
Автоматическое сохранение
воспроизводить файлы MP3
радиостанций в памяти
(дополнительное)
— Память оптимальной настройки
Прослушивание файла MP3. . . . . . . . . 16
(BTM) . . . . . . . . . . . . . . . . . . . . . . . . . . . 9
Надписи на дисплее . . . . . . . . . . . . . . . . 16
Сохранение в памяти только
Повторное воспроизведение
необходимых радиостанций . . . . . . . 10
композиций
Прием радиостанций, сохраненных в
— Повтор воспроизведения. . . . . . . 17
памяти . . . . . . . . . . . . . . . . . . . . . . . . . . 10
Воспроизведение композиций в
Другие функции
случайной последовательности
— Перетасованное
Подстройка характеристик звука . . . . 11
воспроизведение. . . . . . . . . . . . . . . . . 18
Резкое уменьшение громкости . . . . . . 11
Изменение параметров звука и дисплея
Дополнительная информация
— Меню . . . . . . . . . . . . . . . . . . . . . . . . 11
Уход за аппаратом . . . . . . . . . . . . . . . . . 18
Выбор положения для прослушивания
Извлечение устройства . . . . . . . . . . . . . 19
— Любимое положение для
Технические характеристики . . . . . . . 20
прослушивания (MBP). . . . . . . . . . . . 12
Устранение неполадок . . . . . . . . . . . . . 21
Усиление басовых частот
Индикация об ошибках . . . . . . . . . . . . . 22
— Функция D-bass . . . . . . . . . . . . . . . 12
3
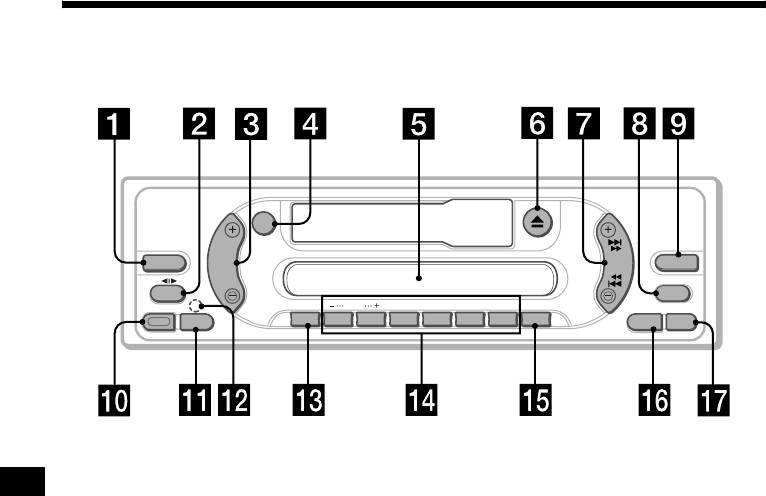
Расположение органов управления
Подробнее см. на указанных страницах.
ATT
SEEK
SOURCE
VOL
D-BASS
AMS
MODE
MBP
RELEASE
DISC
REP
SHUF BL
SKIP/ ALBM
-
+
/ATA
MTL
SEL
SENS
123456
BTM
OFFDSPL
XR-CA440X
a Кнопка выбора SOURCE (Питание
n Номерные кнопки
вкл/кассета/радио/компакт-диск/
Кассета:
мини-диск)
(3): REP (повтор)
b Кнопка MODE (o)
(5): BL SKIP (пропуск
Выбор источника.
незаписанных участков)
c Кнопка VOL +/–
(6): ATA (автоматическое
d Кнопка ATT (приглушение звука)
включение тюнера)
e Окно дисплея
Радиоприемник:
f Кнопка Z (извлечение диска) 8
Сохранение нужной радиостанции с
g Кнопка SEEK/AMS
назначением ей соответствующей
Кассета:
номерной кнопки.
Быстрая перемотка ленты вперед или
Компакт- (с файлами MP3)/мини-диск:
назад.
(1): DISC –
Радиоприемник:
(2): DISC +
Автоматическая настройка на
(3): REP (повтор)
станции.
(4): SHUF (перетасованное
Поиск станции вручную.
воспроизведение)
Компакт- (с файлами MP3)/мини-диск:
Файлы MP3:
Пропуск композиций.
(5): ALBM –
h Кнопка MBP (Любимое положение
(6): ALBM +
для прослушивания) 12
o Кнопка BTM/MTL (память
i Кнопка D-BASS 12
оптимальной настройки/металл) 9
j Кнопка RELEASE (для снятия
p Кнопка DSPL (изменение режима
передней панели)
дисплея)
k Кнопка SEL (выбор)
q Кнопка OFF (Стоп/Питание выкл)*
Выбор элементов.
l Кнопка RESET (расположена под
передней панелью) 6
m Кнопка SENS
Сохранение станций с наиболее
сильным сигналом.
4

* Соблюдайте осторожность, выполняя
установку в автомобиле, в котором
Кассеты
нет положения ACC (принадлежности)
в замке зажигания
Обязательно нажмите кнопку (OFF) на
Уход за кассетами
аппарате на 2 секунды, чтобы
• Не прикасайтесь к ленте в кассете,
отключить индикацию времени после
поскольку пыль или грязь затем попадет на
выключения зажигания.
головки.
Если этого не сделать, индикация
• Не храните кассеты рядом с
оборудованием, в котором имеются
времени не отключается, что может
сильные магниты (например,
привести к разрядке аккумулятора.
громкоговорители или усилители),
поскольку это может привести к
ухудшению качества записи на кассете или
к ее стиранию.
Меры предосторожности
• Не подвергайте кассеты воздействию
прямых солнечных лучей, слишком
высокой или низкой температуры или
• Если автомобиль был припаркован в
влажности.
солнечном месте, не включайте устройство
• Слабое натяжение ленты может привести к
до тех пор, пока оно не охладится.
ее застреванию в лентопротяжном
• Если на аппарат не подается питание,
механизме. Перед вставкой кассеты
сначала проверьте соединения. Если все
подтяните ленту, повернув колесико
соединения выполнены правильно,
кассеты с помощью карандаша или
проверьте предохранитель.
аналогичного предмета.
• Если не слышен звук, когда используется
система с двумя громкоговорителями,
установите регулятор фейдера в
центральное положение.
• Кассета может нагреваться после
длительного воспроизведения из-за
встроенного усилителя мощности. Однако
это не является признаком неисправности.
Слабое
натяжени
В случае возникновения вопросов или
проблем, касающихся данного устройства,
которые не описаны в данном
• Деформированные кассеты и
отклеившиеся наклейки могут затруднить
руководстве, обратитесь к ближайшему
установку или извлечение кассет. Удалите
дилеру Sony.
или замените отклеившиеся наклейки.
Для поддержания высокого
качества звучания
Будьте осторожны и не проливайте сок
или другие напитки на аппарат или
кассеты.
• Во время воспроизведения кассеты звук
может искажаться. Головку кассетного
проигрывателя следует чистить через
каждые 50 часов эксплуатации.
продолжение на следующей странице t
5
е
ленты

