Sony 2(sl).St.Pin: инструкция
Раздел: Компьютерная техника, комплектующие, аксессуары
Тип: Sony Playstation
Характеристики, спецификации
Инструкция к Sony Playstation Sony 2(sl).St.Pin
Оглавление
- ПPEДУПPEЖДEHИE
- Содержание
- Меры предосторожности Здоровье Безопасность Использование и управление
- Примечания по технике безопасности при использовании аналогового контроллера Использование адаптера AC (переменного тока) и шнура питания AC (переменного тока) Подключение с помощью сетевого кабеля
- При подключении консоли к плазменному или проекционному* телевизору. Обращение с дисками Конденсация влаги Очистка Запрещается разбирать консоль и прилагаемые дополнительные устройства Защита от внешних повреждений
- Установка консоли Начало работы Проверка содержимого упаковки
- Крышка диска
- Подсоединение к телевизору Перед подключением Подсоединение к телевизору используя прилагаемый Кабель AV (интегрированный аудио/видео)
- Предупреждение Подсоединение к телевизору с разъемом Euro-AV (аудио/видео) с помощью Соединительного разъема Euro-AV (аудио/ видео)
- Шкала качества изображения Использование кабелей, продаваемых отдельно
- Подсоединение цифрового аудиооборудования
- Подсоединение адаптера AC (переменного тока) и шнура питания AC (переменного тока)
- Передняя панель консоли
- Кнопка =/1/RESET Передняя панель консоли Индикатор =/1
- Игры Перед началом игры Запуск игры
- Завершение игры
- Использование Аналогового контроллера (DUALSHOCK®2)
- Использование Аналогового контроллера (DUALSHOCK®) (SCPH-110 E)
- Передняя панель консоли
- Сохранение или загрузка игровых данных Копирование или удаление игровых данных
- Управление проигрывателем CD во время воспроизведения Воспроизведение аудио CD Воспроизведение аудио CD
- Завершение воспроизведения аудио CD Воспроизведение в различных режимах
- Использование Панели управления Воспроизведение DVD-видео
- Значок Функция Значок Функция
- Значок Функция Завершение воспроизведения DVD x Воспроизведение с места, где диск был остановлен ранее (Возобновление воспроизведения) Воспроизведение диска DVD
- Выбор определенной сцены для Поиск определенного места на диске (Поиск) воспроизведения
- Отображение информации о Выбор Original или Play List при воспроизведении воспроизведении DVD-RW
- Использование режимов воспроизведения Произвольное воспроизведение Программа
- Повтор A-В Повторное воспроизведение Отключение режимов воспроизведения
- Нaстройкa установок DVD проигрывателя Установка параметров языка
- DNR Установка режима изображения телевизора Тип ТВ экрана Резкость контура
- Индикация Прогрессивный режим
- Установка параметров просмотра Режим паузы Родительский контроль Список региональных кодов
- Воспроизведение диска, защищенного функцией Родительского контроля Чтобы изменить пароль
- Установка параметров звука Цифровой выход звука
- Режим автоматического выбора звуковой дорожки Громкость DVD
- Использование экрана браузера Вызов главного меню 3 Вставьте диск или MEMORY CARD (карту памяти).
- 4 Выберите значок, затем нажмите кнопку . Использование меню Конфигурация системы 1 Отображать главное меню ( стр. 90).
- 4 Выберите желаемое значение, затем нажмите кнопку Размер экрана Настройка часов
- DIGITAL OUT (OPTICAL) (цифровой оптический выход) Пульт дистанционного управления Компонентный видео выход
- Использование экрана Информация о версии Язык Дополнительные параметры 1 Используя кнопки направлений, выберите элемент, затем нажмите кнопку .
- 2 Выберите элемент, затем нажмите кнопку . Драйвер PlayStation® 3 Выберите желаемое значение, затем нажмите кнопку Консоль
- Проигрыватель DVD Сбросить прогрессивный режим
- Подключение с помощью сетевого кабеля Подключение к сети
- Подсоединение консоли
- Сетевые настройки Необходимое оборудование
- Совместимое программное обеспечение
- Аксессуары Аксессуары, не совместимые с этой моделью консоли PlayStation®2
- Примечания относительно пульта ГАРАНТИЯ дистанционного управления DVD (для PlayStation®2) Multitap (разветвители)
- Технические характеристики
- Экспортный контроль Защита от копирования Управление доступом
- Устранение неисправностей На изображении имеются помехи. Прежде всего убедитесь, что: Изображение Изображение отсутствует. На экране появляется сообщение “Ошибка чтения диска”.
- При воспроизведении DVD изображение отсутствует или на нем Размер видеоизображения не соответствует экрану телевизора. имеются помехи. Звук Звук отсутствует. Форматное соотношение экрана не меняется даже при воспроизведении DVD с настроенными параметрами формата экрана и (или) воспроизведении изображений формата 16:9 с DVD.
- Низкое качество звука. При воспроизведении диска DVD-видео, содержащего звуковую дорожку в формате Dolby Digital, эффект объемного звучания отсутствует. Звук отсутствует или качество звука цифрового Работа аудиооборудования низкое. Контроллер не работает. Консоль не распознает MEMORY CARD (карту памяти). Данные не удается сохранить или копировать на MEMORY CARD (карту памяти).
- Диск DVD не воспроизводится. Забыли пароль. Сохраненные на MEMORY CARD (карте памяти) данные повреждены. Консоль не работает должным образом. Не выполняются некоторые функции. Индикатор @/1 мигает красным, и консоль не работает. Консоль гудит или вибрирует.
- Некоторые установки DVD невозможно изменить. Работа в сети Подключение к сети не выполняется.

GB
RU
Instruction Manual
Руководство по эксплуатации
SCPH-75008
Before using this product, carefully read this manual and retain it for future reference.
Перед началом эксплуатации внимательно прочитайте данное руководство и сохраните его для дальнейшего использования.
2-650-066-52(1)
watching TV or playing video games, including DVD videos or games played on the
PlayStation®2 console. Players who have not had any seizures may nonetheless have
WARNING
an undetected epileptic condition. Consult your physician before operating the
PlayStation®2 console if you have an epileptic condition or experience any of the
following symptoms while watching TV programmes or playing video games:
altered vision, muscle twitching, other involuntary movements, loss of awareness of
To reduce the risk of fire or electric shock, do not expose this
your surroundings, mental confusion, and/or convulsions.
apparatus to rain or moisture.
Some PlayStation® or PlayStation®2 format software titles may perform differently
on this console than they do on previous PlayStation®2 or PlayStation® consoles, or
To prevent fire or shock hazard, do not place a container filled
may not perform properly on this console. For more information, visit our Web site
with liquids on top of the console.
at www.playstation.com
To avoid electrical shock, do not open the cabinet. Refer
servicing to qualified personnel only.
Caution
Use of controls or adjustments or performance of procedures
other than those specified herein may result in hazardous
radiation exposure.
The use of optical instruments with this product will increase
eye hazard.
CLASS 1 LASER PRODUCT
LUOKAN 1 LASERLAITE
KLASS 1 LASERAPPARAT
This appliance is classified as a CLASS 1 LASER product under IEC60825-1: 2001.
Read carefully before operating your
PlayStation®2 console
A few people may experience epileptic seizures when viewing flashing lights or
patterns in our daily environment. These persons may experience seizures while
2
WARNING
Main menu
Table of contents
Displaying the main menu............................................................35
Using the Browser screen.............................................................35
Using the System Configuration menu.........................................36
WARNING .................................................................................... 2
Using the Version Information screen..........................................39
Precautions ..................................................................................... 4
Networking
Preparation
GB
Connecting to a network...............................................................42
Getting started................................................................................ 7
Creating network settings .............................................................44
Part names ...................................................................................... 8
Connecting to a TV........................................................................ 9
Additional information
Connecting digital audio equipment ............................................ 12
Compatible software.....................................................................45
Connecting the controller............................................................. 12
Connecting the AC adaptor and AC power cord ......................... 13
Accessories ...................................................................................46
Turning the console on and off .................................................... 14
GUARANTEE..............................................................................47
Specifications ...............................................................................47
Games
Troubleshooting............................................................................49
Playing a game ............................................................................. 15
Using Memory Cards ................................................................... 18
Audio CDs
Playing an audio CD .................................................................... 20
DVDs
Watching a DVD.......................................................................... 22
Using the playback modes ........................................................... 26
Adjusting DVD player settings.................................................... 28
Table of contents
3

Health
• Stop using the console immediately if you experience any of the following
Precautions
symptoms. If the condition persists, consult a doctor.
– Lightheadedness, nausea, or a sensation similar to motion sickness
– Tired, uncomfortable or aching hands or arms
This product has been designed with the highest concern for safety. However, any
– Tired, dry or aching eyes
electrical device, if used improperly, has the potential for causing fire, electrical
• When operating the unit, play in a well-lit room and keep a safe distance from the
shock or personal injury. To help ensure accident-free operation, follow these
TV screen.
guidelines:
• Avoid prolonged use of the console. Take a break of about 15 minutes during every
• Observe all warnings, precautions and instructions.
hour of play.
• Stop use and unplug the AC power cord from the electrical outlet immediately if
• Do not use the console when you are tired or short of sleep.
the device functions in an abnormal manner or produces unusual sounds or smells.
• Listening to sound continuously for a long time with a high volume may adversely
• Contact the appropriate PlayStation® customer service helpline which can be
affect the ears. Be careful especially when using headphones. Adjust the volume
found within every PlayStation® and PlayStation®2 format software manual if the
so that surrounding sounds can be heard.
device does not operate properly.
Safety
• Do not remove the console exterior or disassemble the console. The laser beam
emitted from the lens of this unit may be harmful to the eyes.
• Do not use the console near water.
• Keep the console and all connecting cords and cables out of the reach of children.
• Do not touch the plug of the AC power cord with wet hands.
• Do not touch the console or connected accessories during an electrical storm.
• Do not touch the console or AC adaptor for extended periods of time while the
console is turned on as extended contact may cause low-temperature burns.
• Do not place the console and connected accessories on the floor or in a place where
they may cause persons walking by to trip or stumble.
• Adjust the settings of the DVD player according to the instructions provided before
playing a DVD. If the settings are not correct, a loud sound may be emitted,
possibly injuring your ears or damaging the speakers.
• Do not touch a disc while it is spinning as personal injury or damage to the disc
may result.
• Do not close the disc cover in a way that could pinch your hand or fingers as
personal injury or damage to the console may result.
4
Precautions

Use and handling
AC adaptor and AC power cord use
• Do not throw or drop the console or accessories, or expose them to strong physical
• To help ensure safe operation, regularly inspect the AC adaptor and AC power
shock.
cord. If damaged, stop use immediately and contact the appropriate PlayStation®
• Do not place the console or accessories on surfaces that are unstable, tilted or
customer service helpline which can be found within every PlayStation® and
subject to vibration.
PlayStation®2 format software manual.
• Do not expose the console or accessories to high temperatures, high humidity or
• Do not use a power cord other than the supplied AC adaptor and AC power cord.
direct sunlight (use in an environment where temperatures range from 5 °C to
• Check that there is no dust or lint on the power plug before inserting into an
35 °C).
electrical outlet. If the plug becomes dirty, wipe it off with a dry cloth before
• Do not place the console or accessories in locations subject to sudden temperature
connecting.
GB
change (for example, changes of 10 °C per hour or more).
• Unplug the AC power cord from the electrical outlet before cleaning or moving the
• Do not leave the console or accessories in a car with its windows closed
console, or when you do not intend to use the console for an extended period of
(particularly in summer).
time.
• Do not place the console in locations of poor ventilation such as small, enclosed
When disconnecting, grasp the power cord by the plug and pull straight out of the
areas, directly against a wall or on a thick carpet or bedding.
electrical socket. Never pull by the cord and do not pull out at an angle.
• Do not expose the console to dust, smoke or steam. This can cause the console to
• Do not connect the AC adaptor and/or AC power cord to a voltage transformer or
malfunction.
inverter.
• Do not allow liquid or small particles to get into the console.
• Do not put any objects on the console.
Notes on safety when using the Analog Controller
• Do not touch, or insert foreign objects into the connectors of the console or
(DUALSHOCK®2)*
accessories.
• Stop using the console immediately if you begin to feel tired or if you experience
• Do not place the console close to magnetic fields produced by magnets or
discomfort or pain in your hands or arms while operating the Analog Controller
loudspeakers.
(DUALSHOCK®2). If the condition persists, consult a doctor.
• Do not set the console other than in the vertical or horizontal position. When
• The Analog Controller (DUALSHOCK®2) is intended for use with the hands only.
placing in the vertical position, use the Vertical Stand (for PlayStation®2) (sold
Do not bring it into contact with your head, face or the bones of any other part of
separately) that is compatible with this console. Also, do not change the position
the body.
while the console is turned on.
• The vibration function of the Analog Controller (DUALSHOCK®2) can aggravate
injuries. Do not use the vibration function if you have any ailment or injury to the
bones, joints or muscles of your hands or arms. Note that some PlayStation®2 and
PlayStation® format software titles set the vibration function to "On" by default. In
most cases, the vibration function can be set to "Off" in the options menu of the
software. Do not play such titles using the Analog Controller (DUALSHOCK®2)
unless you have set the vibration function to "Off".
• Avoid prolonged use of the Analog Controller (DUALSHOCK®2). Take a break
at about 30-minute intervals.
* These notes also apply to other controllers.
Precautions
5
Connecting with a network cable
Moisture condensation
Do not connect network cables or telephone cords of the following types to the
If the console or disc is brought directly from a cold location to a warm one, moisture
network connector:
may condense on the lens inside the console or on the disc. Should this occur, the
• Standard residential telephone lines
console may not operate properly. In this case, remove the disc and turn off and
• Network cables not appropriate for use with a 10Base-T/100Base-TX network
unplug the console. Do not put the disc back in until the moisture evaporates (this
• Any ISDN (digital) compatible phone or data line
may take several hours). If the console still does not operate properly, contact the
• PBX phone lines
appropriate PlayStation® customer service helpline which can be found within every
• Other "unknown" types of telephone lines
PlayStation® and PlayStation®2 format software manual.
Disc handling
Cleaning
• Do not touch the disc surface when handling a disc; hold it by the edges.
• For safety reasons, before cleaning the console or connected accessories, 1) turn
• Do not stick paper or tape onto discs and do not write on discs.
off the console, 2) disconnect the power plug for the console from the electrical
• Fingerprints, dust, dirt or scratches on the disc can distort the picture or reduce
outlet, and 3) remove the network cable from the network connector.
sound quality. Always handle carefully and make sure discs are clean before use.
• When cleaning the console, use a soft, dry cloth. Do not use paint thinner, solvents,
• Do not leave discs near a heat source, in direct sunlight or in high humidity.
other chemicals or a chemically-treated dust cloth to clean the product.
• Store discs in their cases when not in use.
• When dust accumulates in the console vents, remove the dust with a low-powered
• Clean discs using a soft cloth, lightly wiping from the centre outwards.
vacuum cleaner.
Do not use solvents such as benzine, commercially available cleaners not intended
• Do not touch the lens located inside the disc cover. To help protect the lens from
for CDs or anti-static spray intended for vinyl LPs.
dust, keep the disc cover closed except when inserting or removing discs.
• Do not leave a disc in the console when moving or changing the position of the
console.
Exterior protection
• Do not use irregularly shaped discs (for example, heart- or star-shaped discs) or
To help prevent damage to the painted parts, follow the precautions below:
damaged, re-shaped or repaired discs.
• Do not spill liquids such as alcohol, benzine, paint thinner or other chemicals on
the product.
Never disassemble the console or supplied accessories
• Do not place any rubber, vinyl or plastic items on the painted surfaces for an
Use the PlayStation®2 console and accessories according to the instructions in this
extended period of time.
manual. No authorisation for the analysis or modification of the console, or the
analysis and use of its circuit configurations, is provided. There are no user-
serviceable components inside the PlayStation®2 console. Disassembling the
console will void the guarantee. Additionally, there is a risk of exposure to laser
radiation as well as to electrical shock hazards.
When connecting the console to a plasma or projection* TV
Do not leave a still image on the TV screen for an extended period of time, as this
may leave a faint image permanently on the screen.
* Except LCD screen types.
6
Precautions
Preparation
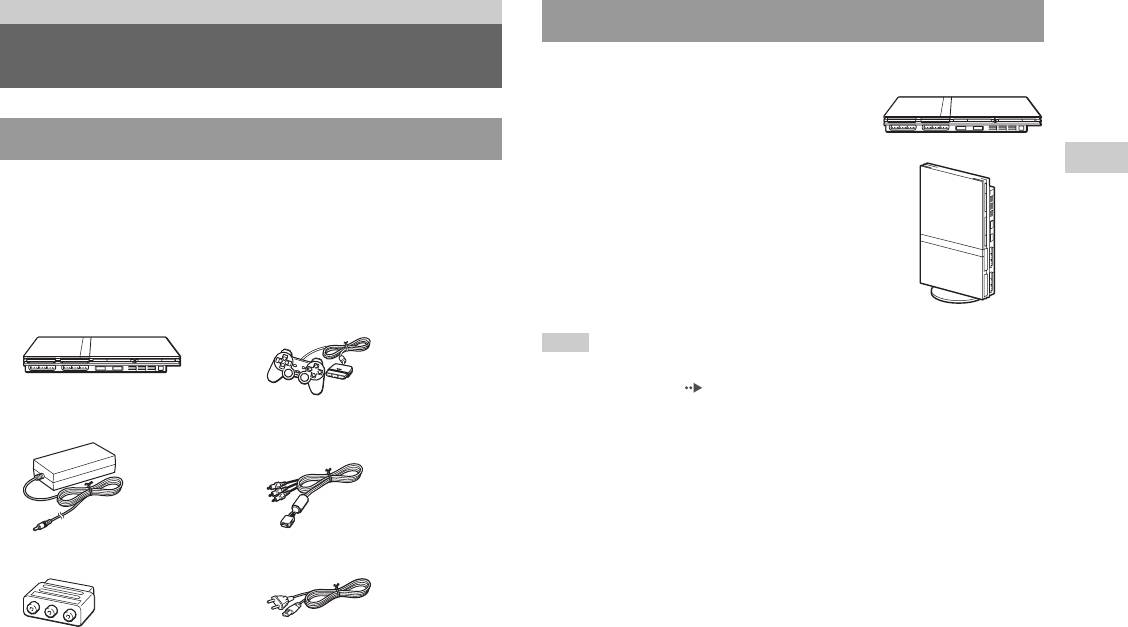
Positioning the console
Getting started
You can place the console in either the horizontal or vertical position.
Horizontal position
Set the console horizontally.
Checking the package contents
GB
Vertical position
Check that you have all of the following items. If any items are missing,
Preparation
Preparation
contact the appropriate PlayStation® customer service helpline which can
When setting the console in the vertical
be found within every PlayStation® and PlayStation®2 format software
position, use the SCPH-70110 E Vertical
manual.
Stand (for PlayStation®2) (sold separately).
s PlayStation®2 console...1 s Analog Controller
(DUALSHOCK®2)...1
Note
Some Vertical Stands (for PlayStation®2) cannot be used with this model of the
PlayStation®2 console ( page 46). Choose the SCPH-70110 E when purchasing a
Vertical Stand.
s AC adaptor...1
s AV Cable (integrated
audio/video)...1
s AC power cord...1s Euro-AV connector plug...1
s Instruction Manual...1
Getting started
7
Caution
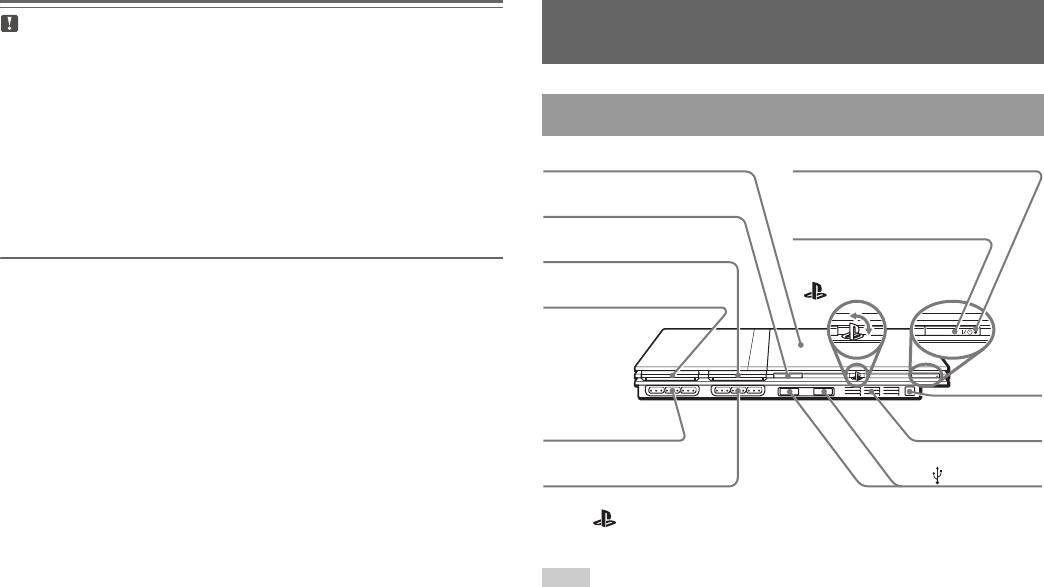
Part names
Do not place the console in locations where it may be exposed to the following
conditions:
• Places subject to excessive cigarette smoke or dust. Cigarette smoke residue
or dust build-up on the internal components, such as the lens, may cause the
console to malfunction.
PlayStation®2 console front
• Places subject to extreme temperatures, in direct sunlight, near a heat source,
or in a car with its windows closed (particularly in summer). These conditions
may warp the exterior of the console or cause the console to malfunction.
• Places close to magnetic fields, such as those produced by magnets or
loudspeakers.
• Places subject to vibration.
* The " " product family logo can be rotated to match the horizontal or vertical
positioning of the console.
Note
You can connect USB devices that are compatible with the PlayStation®2 console.
Note, however, that not all USB-compatible products work with the PlayStation®2
console. Refer to the instructions supplied with the device to be connected for more
information.
8
Part names
RESET
Disc cover
]/1 (on/standby) indicator
A (open) button
]/1 (on/standby)/RESET button
MEMORY CARD slot 2
" " product family logo*
MEMORY CARD slot 1
IR receiver
Controller port 1
Front vent
Controller port 2
USB connector
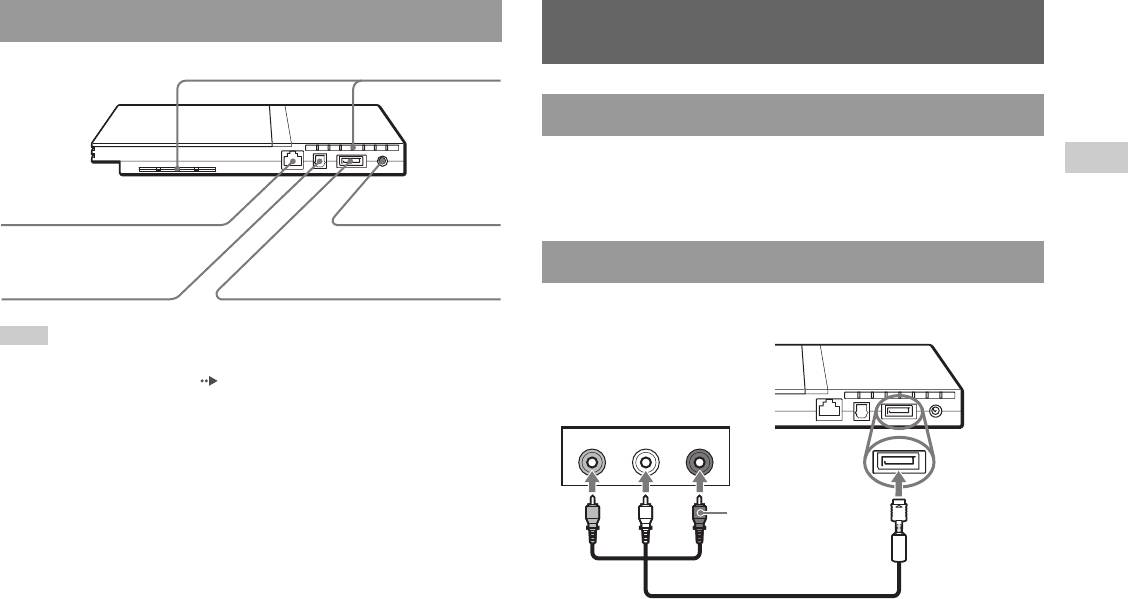
PlayStation®2 console rear
Connecting to a TV
Rear vent
Before connecting
• Do not plug the AC power cord for the console into the electrical outlet
GB
until you have made all other connections.
Preparation
Preparation
! DC IN 8.5V
• Check that the TV is turned off.
NETWORK connector
connector
DIGITAL OUT
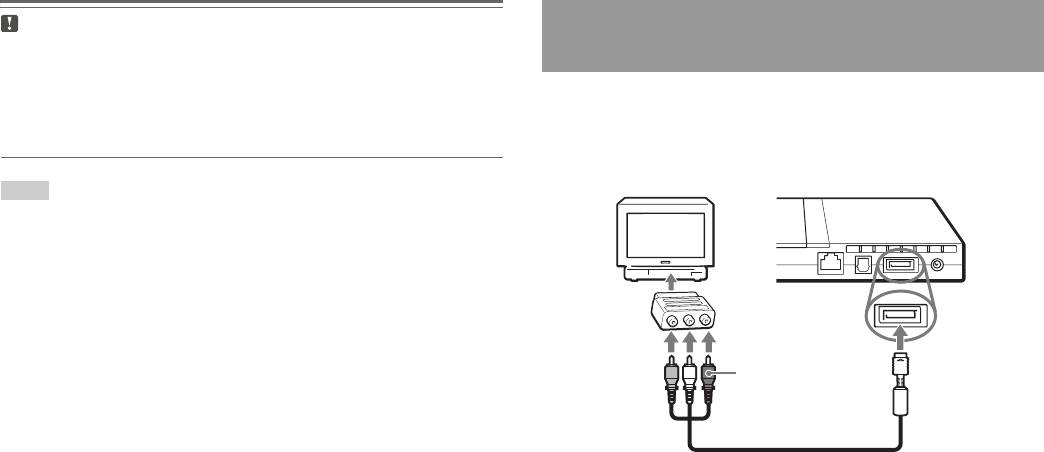
Connecting to a TV using the supplied AV Cable
(OPTICAL) connector
AV MULTI OUT connector
Connect the console to the TV as shown below.
Console rear
Note
For part names of the Analog Controller (DUALSHOCK®2), see "Using the Analog
Controller (DUALSHOCK®2)" ( page 17).
Audio and video inputs of the TV
VIDEO L-AUDIO-R
White RedYellow
Do not use when
connecting to a
To the AV MULTI
monaural TV.
OUT connector
AV Cable (integrated audio/video)
Connecting to a TV
9
Caution
Connecting to a TV with a Euro-AV connector
If you display a still image on a plasma or projection* TV screen for an extended
using the Euro-AV connector plug
period of time, "ghosting" may occur. This is a characteristic of these types of
TVs. Static, non-moving images, such as console setting menus, DVD menus or
Connect your PlayStation®2 console to the Euro-AV connector (SCART)
paused images, may leave a faint image permanently on the TV screen if left on
on the TV using the Euro-AV connector plug and AV Cable (integrated
for an extended time. Refer to the instructions supplied with your TV for details.
audio/video), making sure you match the colour-coded plugs of the AV
* except those of LCD screen types
Cable to the matching jacks of the connector plug.
Console rear
Note
The console can be connected to a VCR or an integrated TV/VCR. Note, however,
that if you play a DVD with copy-protection encryption, picture quality may be
reduced.
Euro-AV
connector plug
To AV MULTI
OUT connector
To Euro-AV
connector
AV Cable (integrated audio/video)
After connecting
Set your TV to the appropriate video input mode. Refer to the Instruction
Manual of your TV.
10
Connecting to a TV
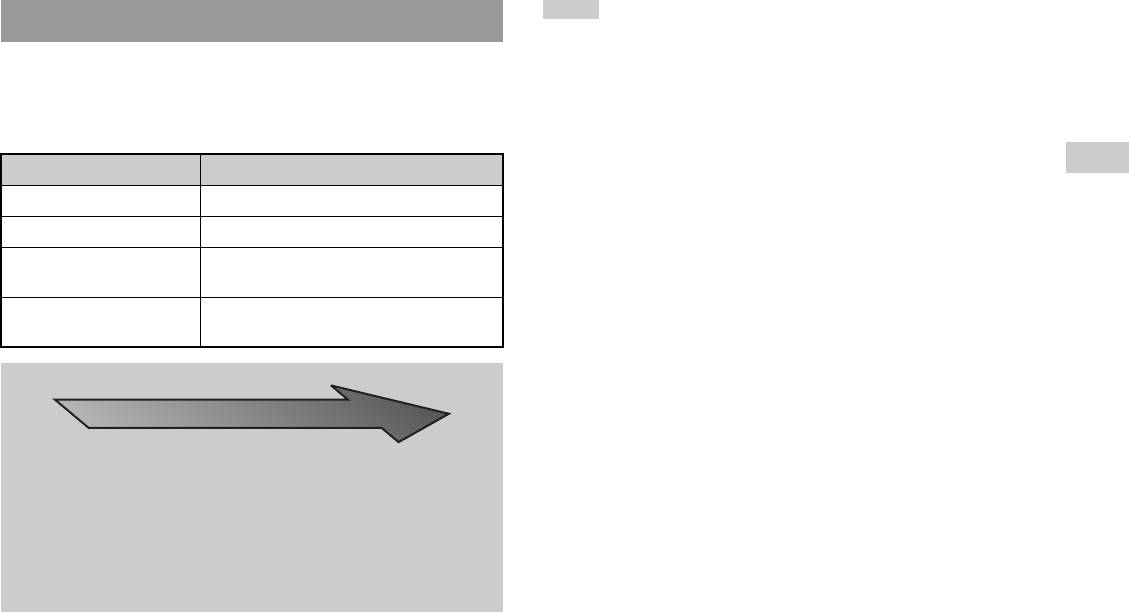
Notes
When using cables sold separately
• The DVD player's progressive scan mode is only available when playing a disc
recorded in NTSC format, and viewed on a TV that supports progressive scan
Picture quality differs depending on the type of cable used. Use the
(480p).
information below to determine the best connection method.
• You cannot connect the console to a TV with component video inputs that are
If you use a cable sold separately, refer to the instructions supplied with the
exclusively for HDTV use (Y PB PR). Refer to the instructions supplied with your
cable.
TV for details.
GB
TV Cable type
Preparation
Preparation
A TV with S VIDEO inputs S VIDEO Cable (SCPH-10060 E)
A TV without video inputs RFU Adaptor (SCPH-10072 C)
A TV with Euro-AV (SCART)
Euro-AV Cable (SCPH-10142)
connector
A TV with component video
Component AV Cable (for PlayStation®2)
input connectors
(SCPH-10100 E)
Picture quality scale
High quality
x AV Cable (supplied) x S VIDEO Cable x Component AV Cable
x RFU Adaptor
This scale is intended only as a reference. Depending on the product or
condition of your TV, the picture quality may be different.
When using the Euro-AV Cable, picture quality may vary depending on your
TV's AV connection.
For optimum picture quality, connect your Euro-AV cable to an RGB-
compatible socket on your TV. Refer to the instructions supplied with your TV
for details.
Connecting to a TV
11
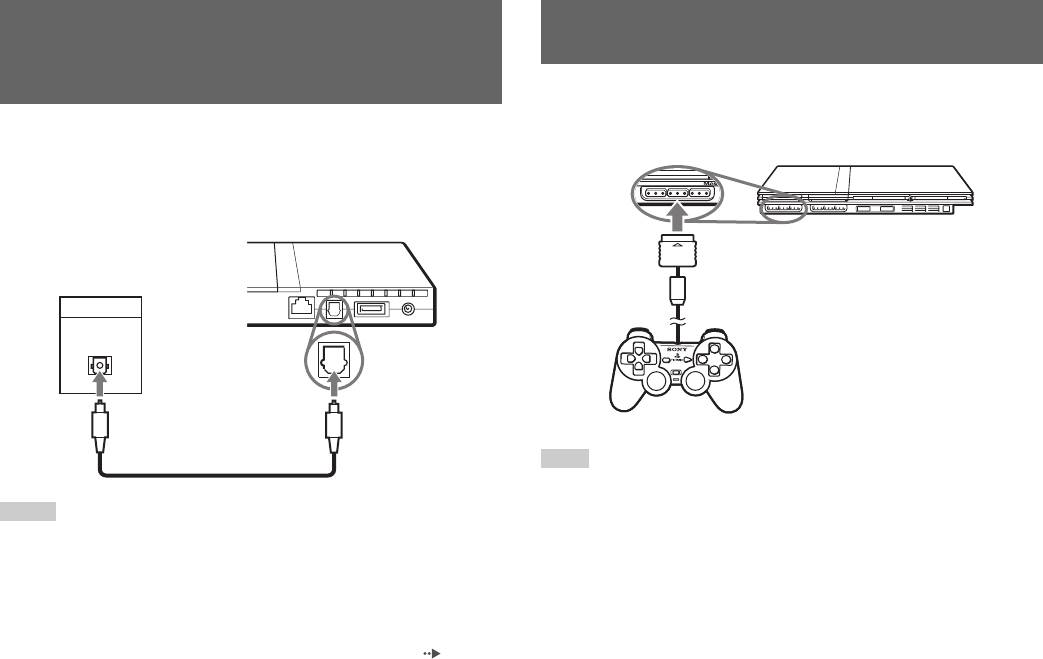
Connecting digital audio
Connecting the controller
equipment
1 Insert the Analog Controller (DUALSHOCK®2) into a controller
port of the console.
By using a commercially available optical digital cable, you can enjoy
surround sound with the effect of being in a movie theatre or a concert hall.
When connecting the console to audio equipment with digital connectors,
refer to the instructions supplied with the device to be connected.
Console rear
Connected device
DIGITAL IN
OPTICAL
Commercially available optical
digital cable
Note
Some software titles designate a specific controller port to be used. Refer to the
instructions supplied with the software for details.
Notes
• If you connect the console to audio equipment using an optical digital cable, it may
affect the audio output of some PlayStation®2 format software with the result that
no sound is produced. If this happens, use a cable such as the supplied AV Cable
(integrated audio/video) and connect it to the console's AV MULTI OUT
connector. Do not use an optical digital cable.
• After connecting digital audio equipment, set "Digital Out (Optical)" to "On" in the
System Configuration menu. For details, see "Digital Out (Optical)" ( page 37).
12
Connecting digital audio equipment
MEMORY CARD
Console front
Analog Controller
(DUALSHOCK®2)
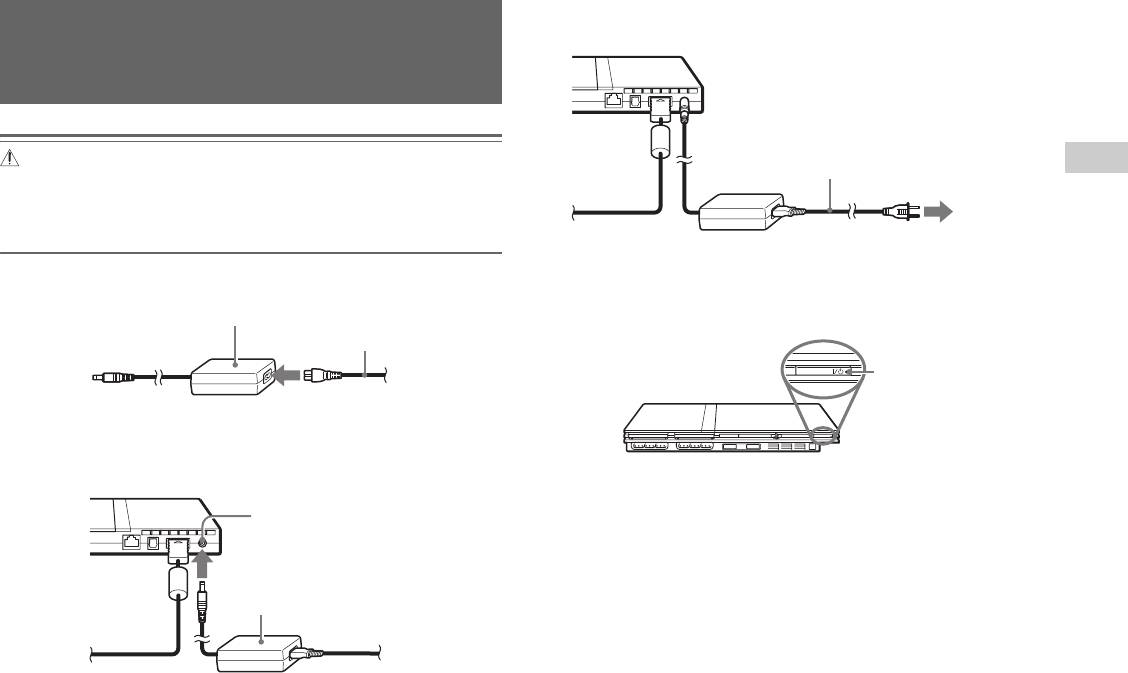
3 Plug the AC power cord into the electrical outlet.
Connecting the AC adaptor and
Console rear
AC power cord
Warnings
GB
AC power cord
• The socket-outlet shall be installed near the equipment and shall be easily
Preparation
Preparation
To the electrical outlet
accessible.
• Do not plug the AC power cord for the console into the electrical outlet until you
Some regions and countries may
have made all other connections.
use a different electrical outlet
plug from the one illustrated.
1 Connect the AC power cord to the AC adaptor.
The =/1 (on/standby) indicator on the console front will light up in red
AC adaptor
to indicate that the console is in standby mode.
AC power cord
2 Plug the connector of the AC adaptor into the ! DC IN 8.5V
connector on the console rear.
Console rear
! DC IN 8.5V connector
AC adaptor
Connecting the AC adaptor and AC power cord
13
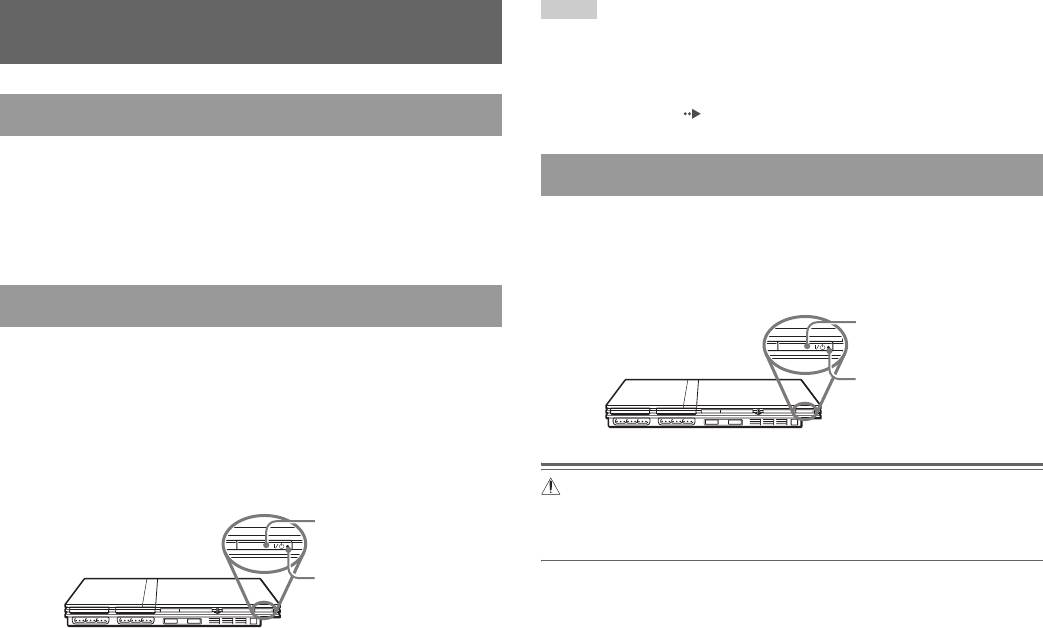
RESET
]/1 indicator
Console front
Notes
Turning the console on and off
• The first time you turn on the console after purchase, screens for setting
"Language", "Time Zone" and "Daylight Savings Time (Summer Time)" will be
displayed. Follow the on-screen instructions to complete the settings.
• If you connect the console to a wide-screen TV, set "Screen Size" in the System
Configuration menu ( page 37).
Before turning on the console
Do not turn on the console until you have finished these steps. Refer to the
instructions supplied with your TV for details.
• Turn on the TV.
• Change your TV setting to display output from the line to which the
1 Press and hold the =/1/RESET button on the console front for
console is connected.
more than a second.
The =/1 indicator will turn red to indicate that the console has entered
standby mode.
Turning on the console
1 Check that the =/1 (on/standby) indicator on the console
front is lit up in red.
2 Press the =/1 (on/standby)/RESET button on the console
front.
The =/1 indicator on the console front will turn green and output from
the console will be displayed on the TV.
Warning
The power is not completely turned off when the console is in standby mode. If
you do not plan to use the console for an extended period of time, unplug the
AC power cord from the electrical outlet.
14
Turning the console on and off
RESET
Turning off the console
=/1/RESET button
Console front
=/1 indicator
RESET
=/1/RESET button
Console front
=/1 indicator
Games
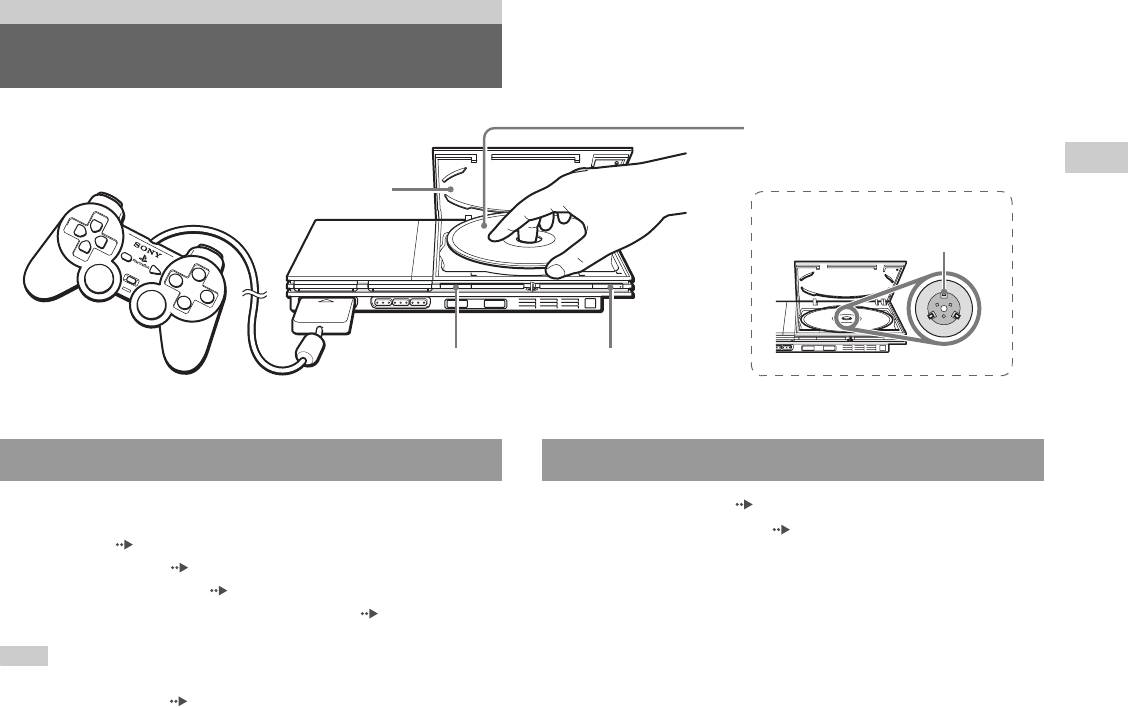
Playing a game
Place the disc in the console with the label
side facing up.
GB
Games
Disc cover
Place the disc so that all three tabs
are above the disc's surface.
=/1/RESET buttonA (open) button
Before playing a game Starting a game
Check that the connections to the TV and audio equipment are correct and
1 Turn on the console ( page 14).
that the precautions have been met.
The main menu is displayed ( page 35).
• "Precautions" ( page 4)
• "Connecting to a TV" ( page 9)
2 Press the A (open) button on the console front.
• "Connecting the controller" ( page 12)
The disc cover opens.
• "Connecting the AC adaptor and AC power cord" ( page 13)
3 Place the disc in the console.
Note
Set the disc in the disc holder with the label side facing up.
To play online games, you first need to connect to and set up a network. See
"Connecting to a network" ( page 42) for details.
Playing a game
15
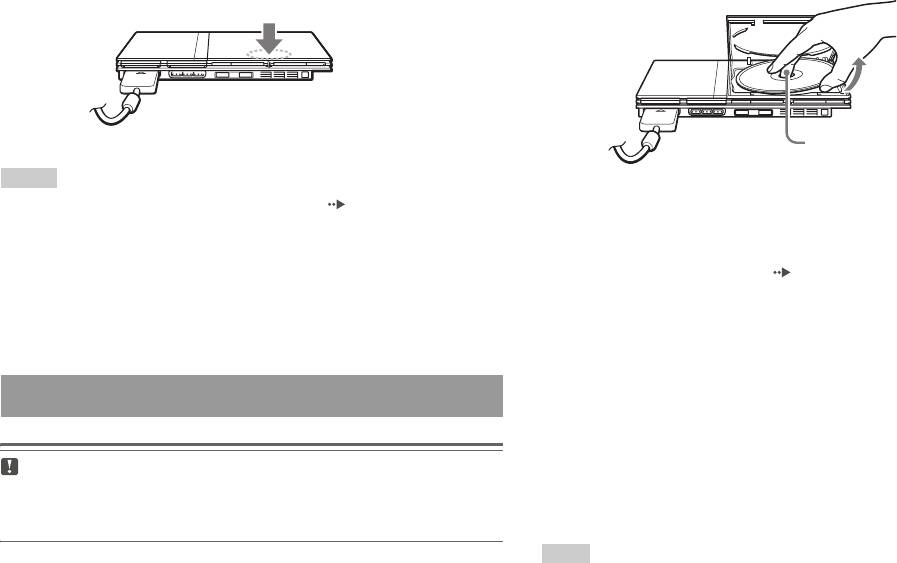
4 Close the disc cover.
2 Remove the disc.
Push the middle of the disc cover. After the disc cover is closed, the
Hold down the black centre part of the console, and then lift the disc
game will start.
by the edges.
Push the middle of the disc cover.
Press the black centre part
of the disc holder.
Notes
• You can also start a game from the Browser screen ( page 35).
3 Close the disc cover.
• If you turn on the console after inserting a disc, the game will start automatically.
4 Press the =/1/RESET button.
To reset a game
The main menu is displayed ( page 35).
Press the \/1 (on/standby)/RESET button on the console front. Do not
accidentally press the @/1/RESET button while playing a game, as doing
Changing game discs
so will cause the game to reset.
1 Open the disc cover and remove the disc.
When removing a disc from the console, hold down the black centre
Ending a game
part of the disc holder and then lift the disc by the edges.
2 Insert a disc.
Caution
When removing a disc, check that the disc has stopped completely. Do not touch
3 Close the disc cover and reset the console.
the disc if it is spinning, as doing so may cause injury, damage to the disc or
The new game will start.
console malfunction.
Note
1 Press the A button on the console front.
You do not need to turn off the console when changing games.
16
Playing a game
About mode switching
Using the Analog Controller (DUALSHOCK®2)
The ANALOG mode button can be used to switch between two modes.
Switch to the appropriate mode for use. Note, however, that some software
The Analog Controller (DUALSHOCK®2) is equipped with a pressure-
titles make this adjustment automatically.
sensitive button function. It also has a vibration function.
Digital mode
Analog mode
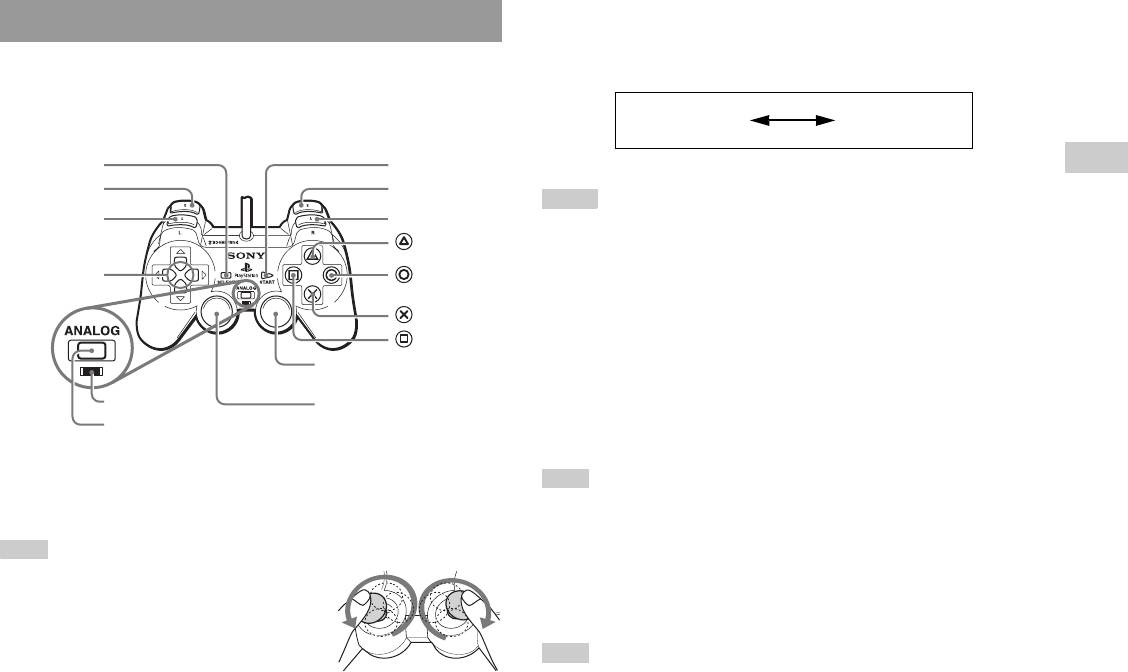
Part names
(indicator: off)
(indicator: red)
SELECT button
START button
GB
Games
L2 button
R2 button
Notes
L1 button
R1 button
• When using the Analog Controller in digital mode, the left and right analog sticks
button
do not function. Also, the pressure-sensitive button function is turned off.
• Depending on the software, you may not be able to switch modes even if you press
Directional
button
buttons
the ANALOG mode button.
button
About analog controls
button
• When playing a PlayStation®2 format software title, you can use all
Right analog stick/ R3 button*
buttons in analog mode except for the START, SELECT, L3 and R3
buttons.
Mode indicator
Left analog stick/ L3 button*
• When playing a PlayStation® format software title, only the left and right
ANALOG mode button
analog sticks can be used in analog mode.
* The left and right analog sticks, or the L3 and R3 buttons, function only in analog
Note
mode (indicator: red).
* The L3 and R3 buttons function when the analog sticks are pressed.
Depending on the software, the buttons for use in analog mode may be limited. Refer
to the instructions supplied with the software for details.
Note
About the vibration function
Before using the Analog Controller
(DUALSHOCK®2), with the console turned on,
The vibration function can be set to ON or OFF in the software options
rotate the left and right analog sticks once with your
menu.
thumbs before starting a game. Do not twist the
analog sticks, but rotate as if drawing a circle as
Note
shown in the diagram.
Depending on the software, the vibration function may be set to "On" automatically.
Playing a game
17
About using the Analog Controller (DUALSHOCK®)
Using Memory Cards
(SCPH-110 E)
You can use the Analog Controller (DUALSHOCK®) (SCPH-110 E) with
You can save and load game data using a Memory Card. You can also
the PlayStation®2 console, but the functions of the buttons in analog mode
delete game data or copy game data from one Memory Card to another.
may be different from those of the Analog Controller (DUALSHOCK®2).
Only the left and right analog sticks can be used in analog mode.
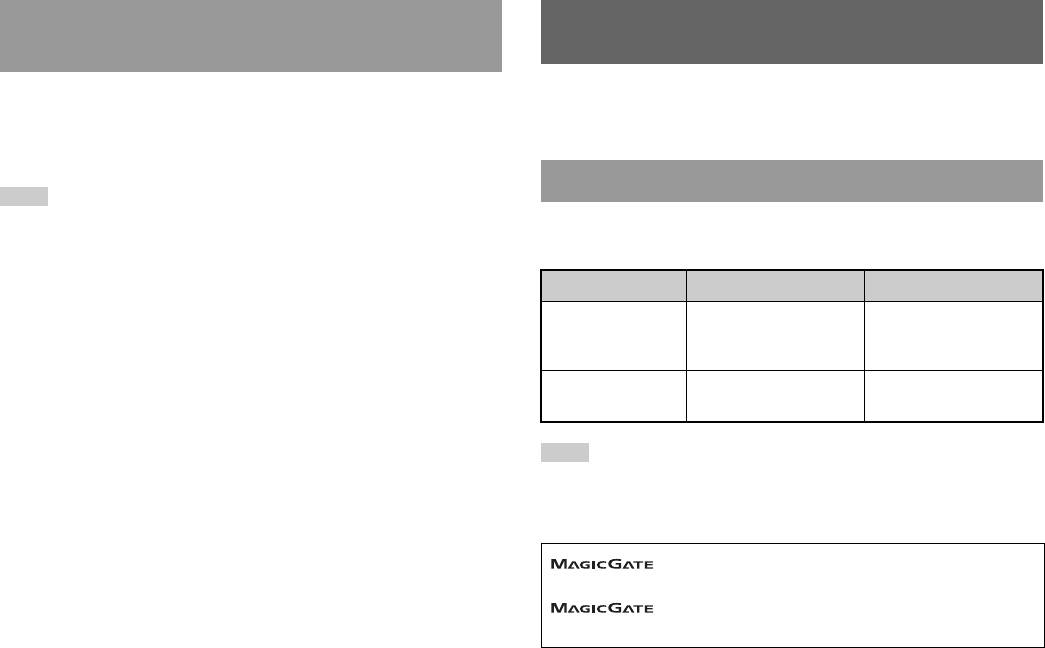
About Memory Card types
Note
Not all PlayStation®2 format software titles support the use of the Analog Controller
There are two types of Memory Cards. Select a Memory Card suitable for
(DUALSHOCK®) (SCPH-110 E). The Analog Controller (DUALSHOCK®2)
the software in use.
should be used in such cases.
Memory Card type Compatible software Amount of memory
Memory Card (8MB)
PlayStation®2 format
Approx. 8 MB
(for PlayStation®2)
software
(SCPH-10020 E)
Memory Card
PlayStation® format
15 memory blocks
(SCPH-1020 E)
software
(approx. 120 KB)
Note
The Memory Card (8MB) (for PlayStation®2) uses "MagicGate", a technology that
helps protect copyrighted content through data encryption and hardware
authentication.
is a term of copyright protection technology developed
by Sony Group.
does not guarantee compatibility with other products
bearing the "MagicGate" trademark.
18
Using Memory Cards
3 Select "Copy" or "Delete", and then press the button.
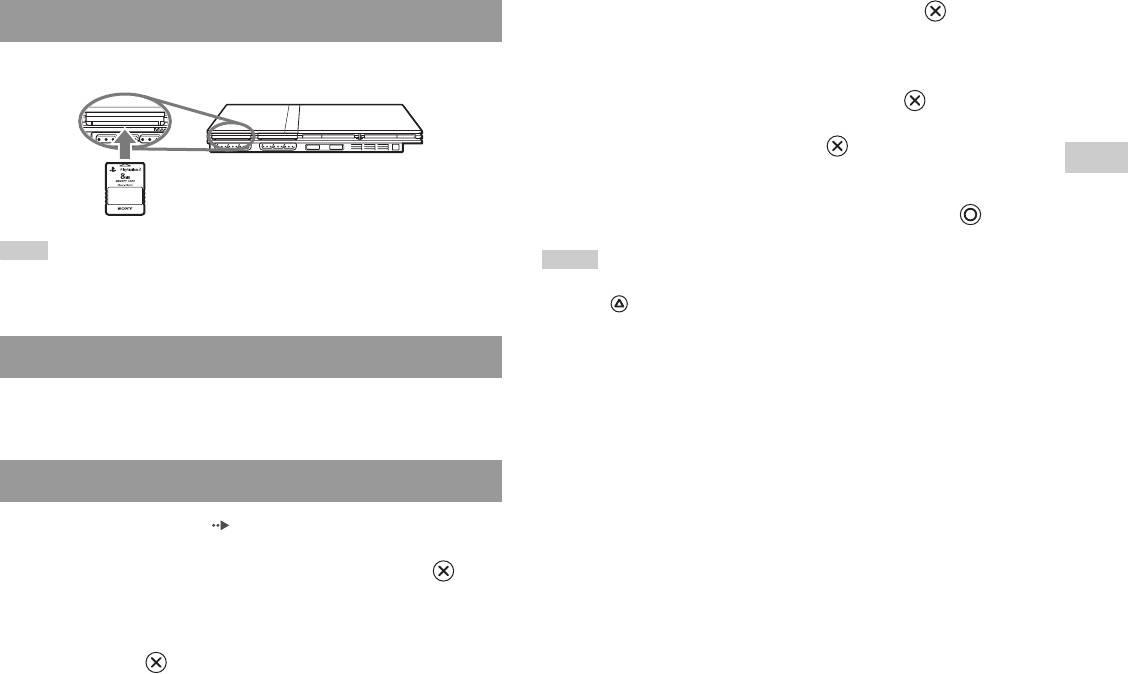
Inserting a Memory Card
When copying game data, check that two Memory Cards are inserted
Insert the Memory Card into a MEMORY CARD slot on the console front.
in the console. If you have selected "Delete", skip to step 5.
4 Select the destination, and then press the button.
5 Select "Yes", and then press the button.
GB
While copying or deleting data, do not remove the Memory Cards.
Games
6 When copying or deleting is completed, press the button.
Note
Notes
Some software titles designate a specific MEMORY CARD slot to use. Refer to the
• To view information about a game data item, select the icon for the data and then
instructions supplied with the software for details.
press the button to check the details.
• Compatibility between software and Memory Cards:
– You cannot save or copy PlayStation®2 format software to a Memory Card
Saving or loading game data
(SCPH-1020 E).
– You cannot save PlayStation® format game data to a Memory Card (8MB) (for
Depending on the software, the procedure for saving or loading may vary.
PlayStation®2). You can, however, copy PlayStation® format game data from a
Refer to the instructions supplied with the software for details.
Memory Card (SCPH-1020 E) to a Memory Card (8MB) (for PlayStation®2) for
storage purposes. Note that such game data cannot be loaded directly from a
Memory Card (8MB) (for PlayStation®2).
Copying or deleting game data
1 At the Browser screen ( page 35), use the directional
buttons to select the icon for the Memory Card you want to
use for copying or deleting data and then press the
button.
2 Select the icon for the data you want to copy or delete, and
then press the button.
Using Memory Cards
19
MEMORY CARD
Console front
Audio CDs
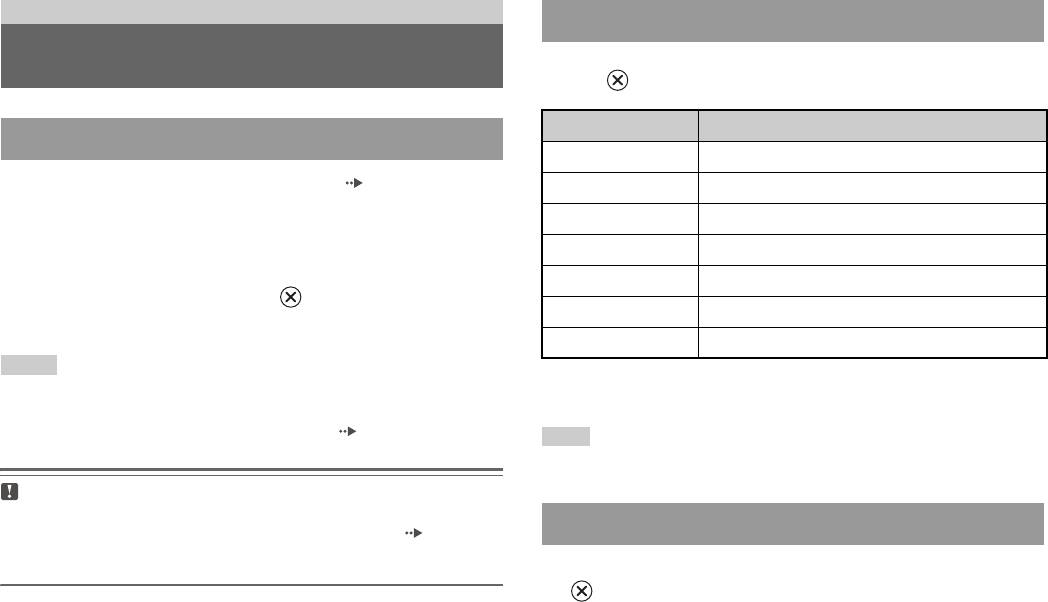
Operating the CD player during playback
Playing an audio CD
Using the directional buttons, select the icon for the desired track and then
press the button.
Icon (button*) Function
Playing a CD
. (L1 button) Go to the beginning of the current or previous track
1 Turn on the console and insert the disc ( page 15).
m (L2 button) Fast reverse
Follow steps 1 to 4 of "Starting a game".
M (R2 button) Fast forward
The track numbers are displayed.
> (R1 button) Go to the beginning of the next track
2 Using the directional buttons, select the track number you
N (START button) Start playback
want to play and then press the button.
X (START button) Pause playback
Playback begins.
x (SELECT button) Stop playback
Notes
* You can operate directly by pressing the buttons of the Analog Controller
• If you turn on the console after inserting a disc, the track numbers are displayed
(DUALSHOCK®2).
automatically.
• You can also start playback from the Browser screen ( page 35).
Note
You can also use the DVD Remote Control (for PlayStation®2) (sold separately).
Caution
To play an audio CD recorded in DTS format, you must connect a device with
a DTS decoder to the DIGITAL OUT (OPTICAL) connector ( page 12).
Ending audio CD playback
Note that an extremely loud noise may be emitted if the device does not have a
DTS decoder or if it is connected to the AV MULTI OUT connector.
1 Using the directional buttons, select x and then press the
button.
Playback stops. Press the A (open) button on the console front to
remove the disc.
20
Playing an audio CD


