Sony CDX-A250EE: инструкция
Раздел: Авто, мото оборудование и транспорт
Тип: Автомагнитола
Характеристики, спецификации
Инструкция к Автомагнитоле Sony CDX-A250EE
Оглавление
2-650-614-22 (1)
FM
/
AM
Compact Disc Player
GB
Operating Instructions
RU
Инструкция по эксплуатации
To cancel the demonstration (DEMO) display, see page 9.
Для отмены демонстрации на дисплее (режим DEMO) см. стр. 11.
CDX-A250EE
© 2005 Sony Corporation
Welcome !
Warning if your car’s ignition has no
ACC position
Thank you for purchasing this Sony Compact
After turning the ignition off, be sure to press
Disc Player. You can enjoy your drive with the
and hold (OFF) on the unit until the display
following functions.
disappears.
• CD playback
Otherwise, the display does not turn off and
You can play CD-DA (also containing CD
this causes battery drain.
TEXT*), CD-R/CD-RW (MP3/WMA files also
containing Multi Session (page 11)), and
ATRAC CD (ATRAC3 and ATRAC3plus
format (page 11)).
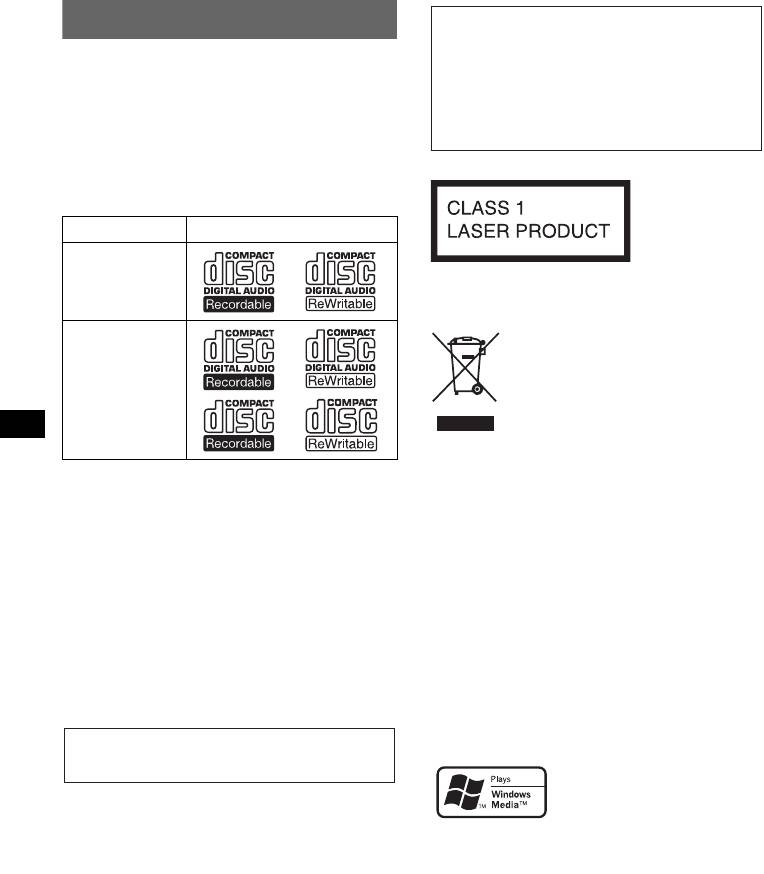
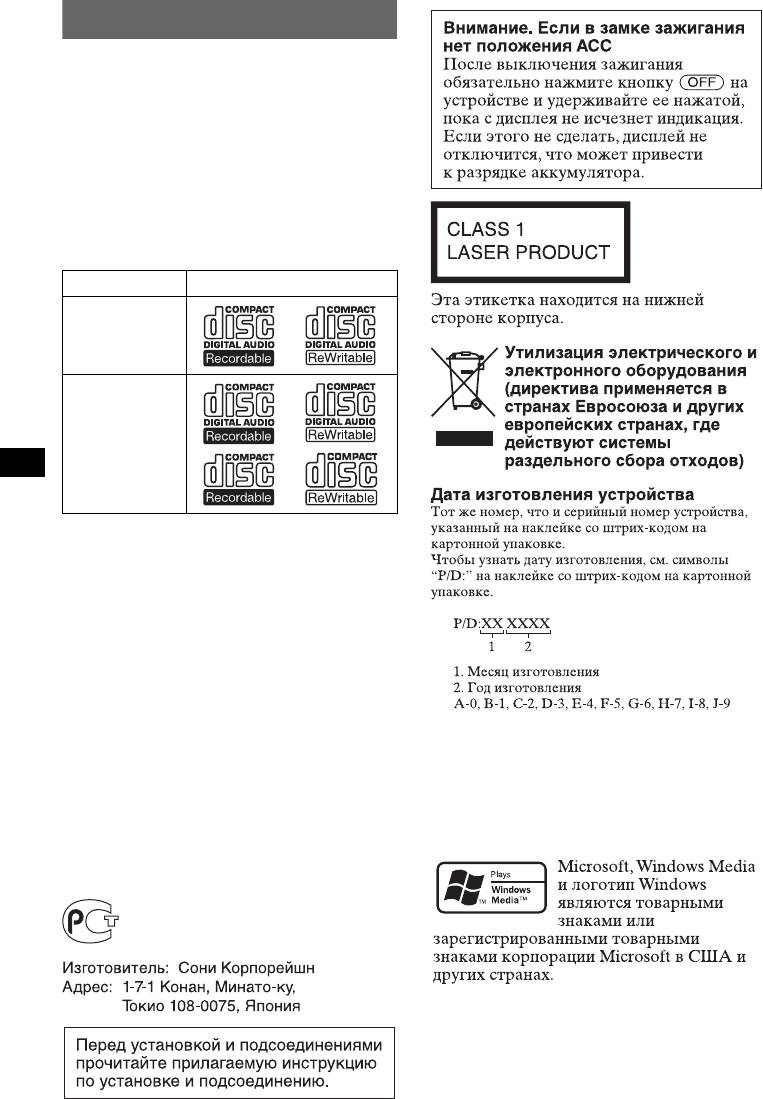
Type of discs Label on the disc
CD-DA
This label is located on the bottom of the
chassis.
Disposal of Old Electrical &
Electronic Equipment (Applicable in
MP3
the European Union and other
WMA
European countries with separate
ATRAC CD
collection systems)
This symbol on the product or on its
packaging indicates that this product shall not be treated
as household waste. Instead it shall be handed over to the
• Radio reception
applicable collection point for the recycling of electrical
– You can store up to 6 stations per band (FM1,
and electronic equipment. By ensuring this product is
FM2, FM3, AM1 and AM2).
disposed of correctly, you will help prevent potential
– BTM (Best Tuning Memory): the unit selects
negative consequences for the environment and human
health, which could otherwise be caused by inappropriate
strong signal stations and stores them.
waste handling of this product. The recycling of materials
• Sound adjustment
will help to conserve natural resources. For more detailed
– EQ3: You can select an equalizer curve for 7
information about recycling of this product, please contact
music types.
your local Civic Office, your household waste disposal
• Auxiliary equipment connection
service or the shop where you purchased the product.
– An AUX input jack on the front of the unit
Applicable accessory: Remote commander
allows connection of a portable audio device.
* A CD TEXT disc is a CD-DA that includes
SonicStage and its logo are trademarks of Sony
information such as disc, artist and track name.
Corporation.
ATRAC, ATRAC3, ATRAC3plus and their logos
are trademarks of Sony Corporation.
For installation and connections, see the
supplied installation/connections manual.
Microsoft, Windows Media,
and the Windows logo are
trademarks or registered
trademarks of Microsoft
Corporation in the United States and/or other
countries.
2

Table of Contents
Getting Started
Other functions
Resetting the unit. . . . . . . . . . . . . . . . . . . . . . . . 4
Changing the sound settings . . . . . . . . . . . . . . . 9
Setting the clock . . . . . . . . . . . . . . . . . . . . . . . . 4
Adjusting the sound characteristics
Detaching the front panel . . . . . . . . . . . . . . . . . 4
— BAL/FAD/SUB . . . . . . . . . . . . . . . . . . . 9
Attaching the front panel . . . . . . . . . . . . . . . 5
Customizing the equalizer curve
— EQ3 . . . . . . . . . . . . . . . . . . . . . . . . . . . . 9
Adjusting setup items — SET . . . . . . . . . . . . . 9
Location of controls and basic
Using optional equipment. . . . . . . . . . . . . . . . 10
operations
Auxiliary audio equipment . . . . . . . . . . . . 10
Main unit . . . . . . . . . . . . . . . . . . . . . . . . . . . 6
Card remote commander RM-X151 . . . . . . 6
Additional Information
Precautions . . . . . . . . . . . . . . . . . . . . . . . . . . . 10
CD
Notes on discs . . . . . . . . . . . . . . . . . . . . . . 10
About MP3/WMA files . . . . . . . . . . . . . . . 11
Display items . . . . . . . . . . . . . . . . . . . . . . . . 8
About ATRAC CD . . . . . . . . . . . . . . . . . . 11
Repeat and shuffle play . . . . . . . . . . . . . . . . 8
Maintenance . . . . . . . . . . . . . . . . . . . . . . . . . . 12
Removing the unit. . . . . . . . . . . . . . . . . . . . . . 12
Radio
Specifications . . . . . . . . . . . . . . . . . . . . . . . . . 13
Troubleshooting . . . . . . . . . . . . . . . . . . . . . . . 14
Storing and receiving stations . . . . . . . . . . . . . . 8
Error displays/Messages . . . . . . . . . . . . . . 15
Storing automatically — BTM . . . . . . . . . . 8
Storing manually . . . . . . . . . . . . . . . . . . . . . 8
Receiving the stored stations . . . . . . . . . . . . 8
Tuning automatically . . . . . . . . . . . . . . . . . . 8
3
Getting Started
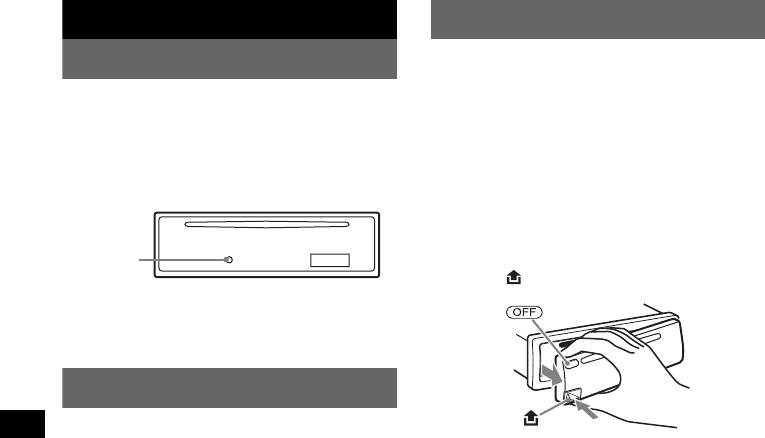
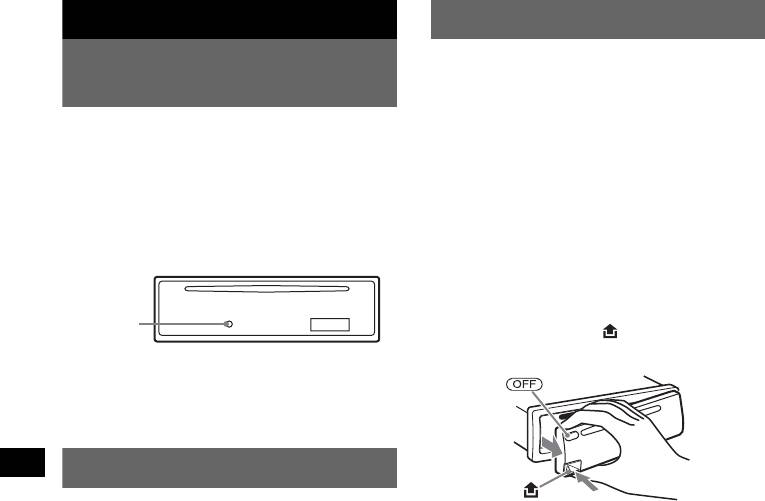
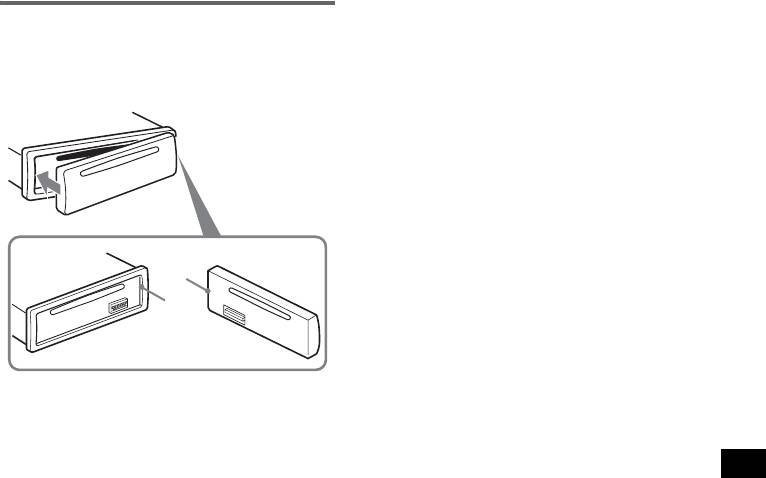
Detaching the front panel
You can detach the front panel of this unit to
Resetting the unit
prevent theft.
Before operating the unit for the first time, or
after replacing the car battery or changing the
Caution alarm
connections, you must reset the unit.
If you turn the ignition switch to the OFF
Detach the front panel and press the RESET
position without detaching the front panel, the
button with a pointed object, such as a ballpoint
caution alarm will sound for a few seconds.
pen.
The alarm will only sound if the built-in
amplifier is used.
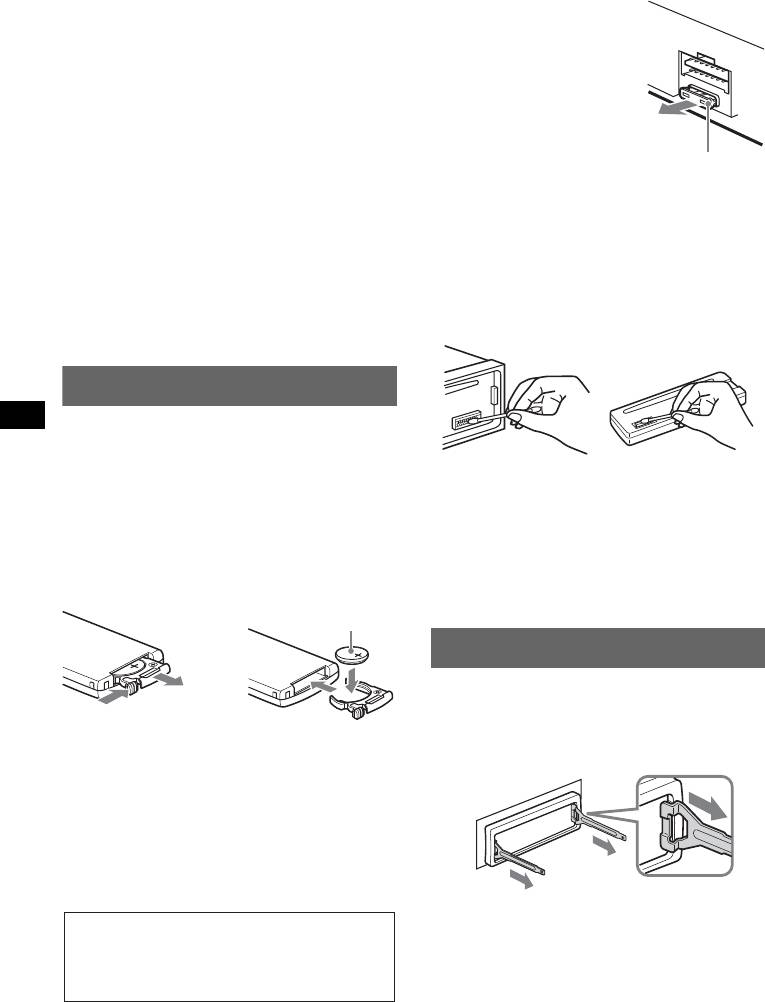
1 Press (OFF).
RESET
The unit is turned off.
button
2 Press , then pull it off towards you.
Note
Pressing the RESET button will erase the clock setting
and some stored contents.
Setting the clock
The clock uses a 24-hour digital indication.
1 Press and hold the select button.
Notes
The setup display appears.
• Do not drop or put excessive pressure on the front
panel and display window.
2 Press the select button repeatedly
• Do not subject the front panel to heat/high
until “CLOCK-ADJ” appears.
temperature or moisture. Avoid leaving it in a parked
car or on a dashboard/rear tray.
3 Press (DSPL ) .
The hour indication flashes.
4 Rotate the volume control dial to set
the hour and minute.
To move the digital indication, press (DSPL).
5 Press the select button.
The setup is complete and the clock starts.
To display the clock, press (DSPL). Press
(DSPL) again to return to the previous display.
With the card remote commander
In step 4, to set the hour and minute, press M or m.
4
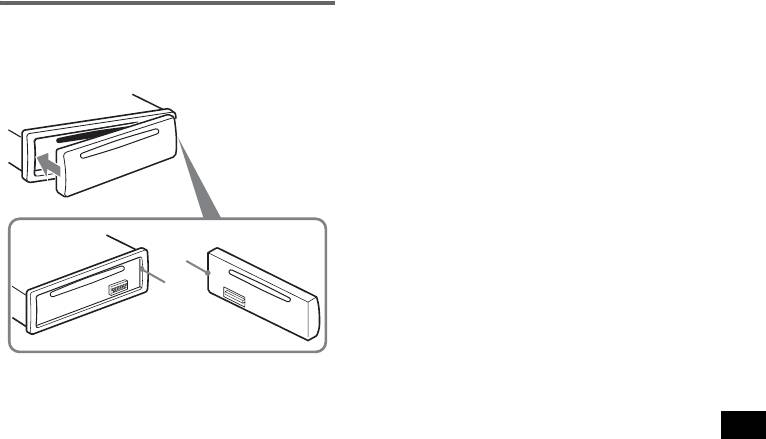
Attaching the front panel
Engage part A of the front panel with part B of
the unit, as illustrated, and push the left side into
position until it clicks.
A
B
Note
Do not put anything on the inner surface of the front
panel.
5

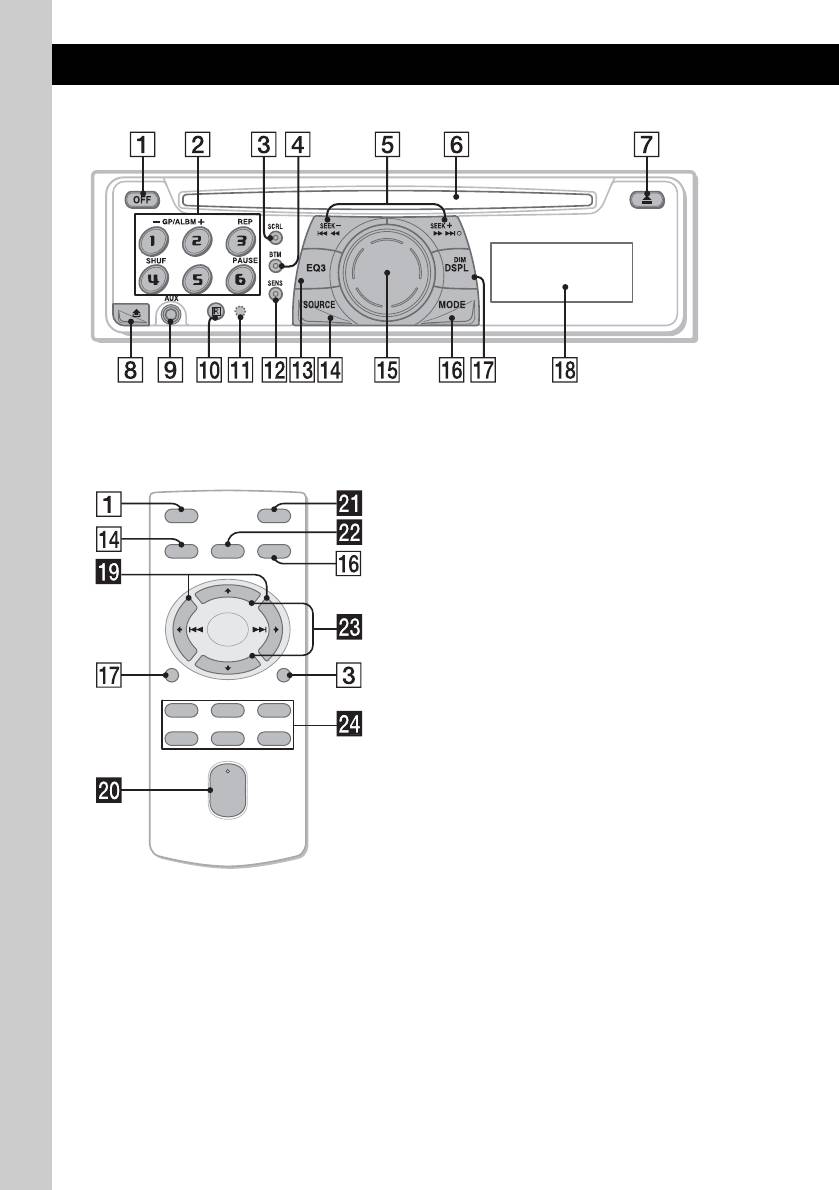
Location of controls and basic operations
Main unit
CDX-A250EE
Card remote commander
Refer to the pages listed for details. The
corresponding buttons on the card remote
RM-X151
commander control the same functions as those
on the unit.
OFF
ATT
A OFF button
To power off; stop the source.
SOURCE
SEL
MODE
B Number buttons
CD:
1
2
(1)/(2): GP*
/ALBM*
–/+
+
To skip groups/albums (press); skip
groups/albums continuously (press and
–
hold).
(3): REP 8
DSPL
SCRL
(4): SHUF 8
132
(6): PAUSE
To pause playback. To cancel, press
465
again.
Radio:
+
To receive stored stations (press); store
VOL
stations (press and hold).
–
C SCRL (scroll) button 8
To scroll the display item.
D BTM button 8
To start the BTM function (press and hold).
6

E SEEK –/+ buttons
The following buttons on the card remote
CD:
commander have also different buttons/functions
To skip tracks (press); skip tracks
from the unit.
continuously (press, then press again within
about 1 second and hold); reverse/fast-
ql < (.)/, (>) buttons
forward a track (press and hold).
To control CD/Radio, the same as (SEEK)
Radio:
–/+ on the unit.
To tune in stations automatically (press); find
a station manually (press and hold).
w; VOL (volume) +/– button
To adjust volume.
F Disc slot
To insert the disc (label side up), playback
wa ATT (attenuate) button
starts.
To attenuate the sound. To cancel, press
again.
G Z (eject) button
To eject the disc.
ws SEL (select) button
To select items.
H (front panel release) button 4
wd M (+)/m (–) buttons
I AUX input jack 10
To control CD, the same as (1)/(2) –/+ on
To connect a portable audio device.
the unit.
J Receptor for the card remote
wf Number buttons
commander
To receive stored stations (press); store
K RESET button (located behind the front
stations (press and hold).
panel) 4
*1 When an ATRAC CD is played.
L SENS button
*2 When an MP3/WMA is played.
To improve weak reception: LOCAL/
Note
MONO.
If the unit is turned off and the display disappears, it
cannot be operated with the card remote commander
M EQ3 (equalizer) button 9
unless (SOURCE) on the unit is pressed, or a disc is
To select an equalizer type (XPLOD,
inserted to activate the unit first.
VOCAL, CLUB, JAZZ, NEW AGE, ROCK,
Tip
CUSTOM or OFF).
For details on how to replace the battery, see
“Replacing the lithium battery of the card remote
N SOURCE button
commander” on page 12.
To power on; change the source (Radio/CD/
AUX).
O Volume control dial/select button 9
To adjust volume (rotate); select setup items
(press and rotate).
P MODE button 8
To select the radio band (FM/AM).
Q DSPL (display)/DIM (dimmer) button
4, 8
To change display items (press); change the
display brightness (press and hold).
R Display window
7
CD
Radio
Storing and receiving stations
Display items
Caution
When tuning in stations while driving, use Best
Tuning Memory (BTM) to prevent an accident.
Storing automatically — BTM
1 Press (SOURCE) repeatedly until
“TUNER” appears.
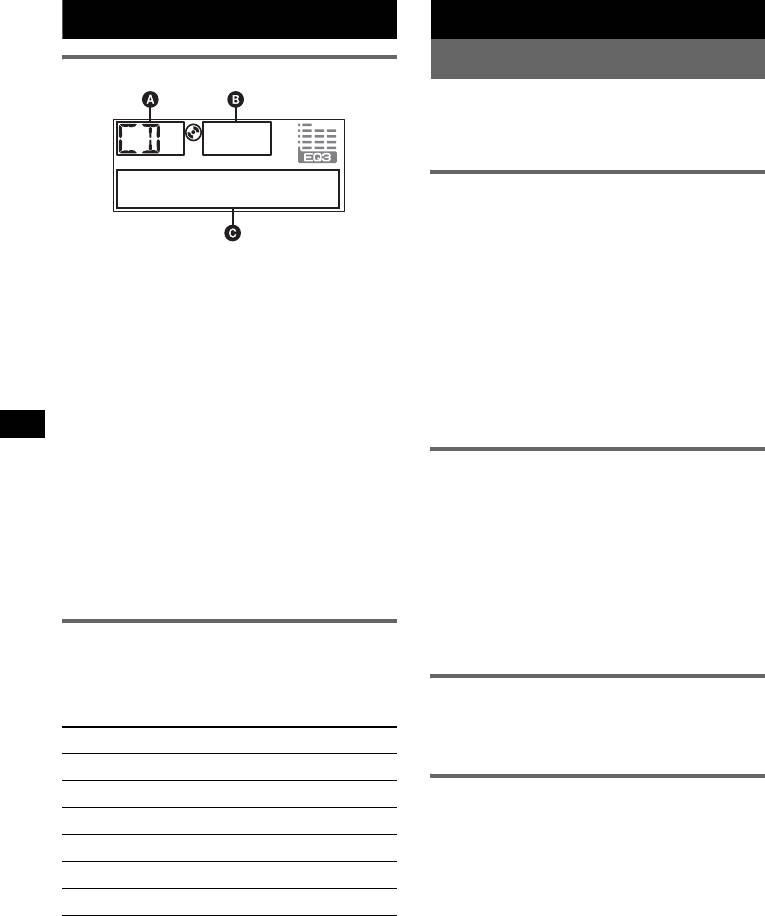
A Source
To change the band, press (MODE)
B WMA/MP3/ATRAC CD indication
repeatedly. You can select from FM1, FM2,
C Track number/Elapsed playing time, Disc/
FM3*, AM1 or AM2.
1
artist name, Album/group number*
, Album/
2 Press and hold (BTM) until “BTM”
2
group name, Track name, Text information*
,
flashes.
Clock
The unit stores stations in order of frequency
*1 Album/group number is displayed only when the
on the number buttons.
album/group is changed.
A beep sounds when the setting is stored.
*2 When playing an MP3, ID3 tag is displayed, when
* FM3 tuning range is 65 to 74 MHz (at 30KHz step).
playing ATRAC CD, text information written by
SonicStage, etc., is displayed, and when playing
WMA, WMA tag is displayed.
Storing manually
To change display items C, press (DSPL);
scroll display items C, press (SCRL) or set
1 While receiving the station that you
“A.SCRL-ON” (page 9).
want to store, press and hold a
number button ((1) to (6)) until
Tip
“MEM” appears.
Displayed items will differ, depending on the disc type,
recorded format and settings. For details on MP3/
The number button indication appears in the
WMA, see page 11; ATRAC CD, see page 11.
display.
Note
If you try to store another station on the same number
Repeat and shuffle play
button, the previous stored station will be replaced.
1 During playback, press (3) (REP) or
(4) (SHUF) repeatedly until the
Receiving the stored stations
desired setting appears.
1 Select the band, then press a number
Select To play
button ((1) to (6)).
REP-TRACK track repeatedly.
1
REP-ALBM*
album repeatedly.
Tuning automatically
2
REP-GP*
group repeatedly.
1 Select the band, then press (SEEK) –/+
1
to search for the station.
SHUF-ALBM*
album in random order.
Scanning stops when the unit receives a
2
SHUF-GP*
group in random order.
station. Repeat this procedure until the
desired station is received.
SHUF-DISC disc in random order.
Tip
*1 When an MP3/WMA is played.
If you know the frequency of the station you want to
*2 When an ATRAC CD is played.
listen to, press and hold (SEEK) –/+ to locate the
approximate frequency, then press (SEEK) –/+
To return to normal play mode, select “REP-
repeatedly to fine adjust to the desired frequency
OFF” or “SHUF-OFF.”
(manual tuning).
8
Tip
Other functions
Other equalizer types are also adjustable.
With the card remote commander
Changing the sound settings
In step 3, to adjust the selected item, press <, M, ,
or m.
Adjusting the sound
Adjusting setup items — SET
characteristics — BAL/FAD/SUB
You can adjust the balance, fader, subwoofer
1 Press and hold the select button.
volume.
The setup display appears.
1 Press the select button repeatedly
2 Press the select button repeatedly
until “BAL,” “FAD” or “SUB” appears.
until the desired item appears.
The item changes as follows:
3 Rotate the volume control dial to
1
1
1
LOW*
t MID*
t HI*
t
select the setting (example “ON” or
BAL (left-right) t FAD (front-rear) t
“OFF”).
2
3
SUB (subwoofer volume)*
t AUX*
4 Press and hold the select button.
*1 When EQ3 is activated (page 9).
The setup is complete and the display returns
*2 When the audio output is set to “SUB” (page 9).
to normal play/reception mode.
“ATT” is displayed at the lowest setting, and can
be adjusted up to 20 steps.
Note
*3 When AUX source is activated (page 10).
Displayed items will differ, depending on the source
and setting.
2 Rotate the volume control dial to
With the card remote commander
adjust the selected item.
In step 3, to select the setting, press < or ,.
After 3 seconds, the setting is complete and
the display returns to normal play/reception
The following items can be set (follow the page
mode.
reference for details):
“
z” indicates the default settings.
With the card remote commander
In step 2, to adjust the selected item, press <, M, ,
or m.
CLOCK-ADJ (Clock Adjust) (page 4)
BEEP
To set “BEEP-ON” (z) or “BEEP-OFF.”
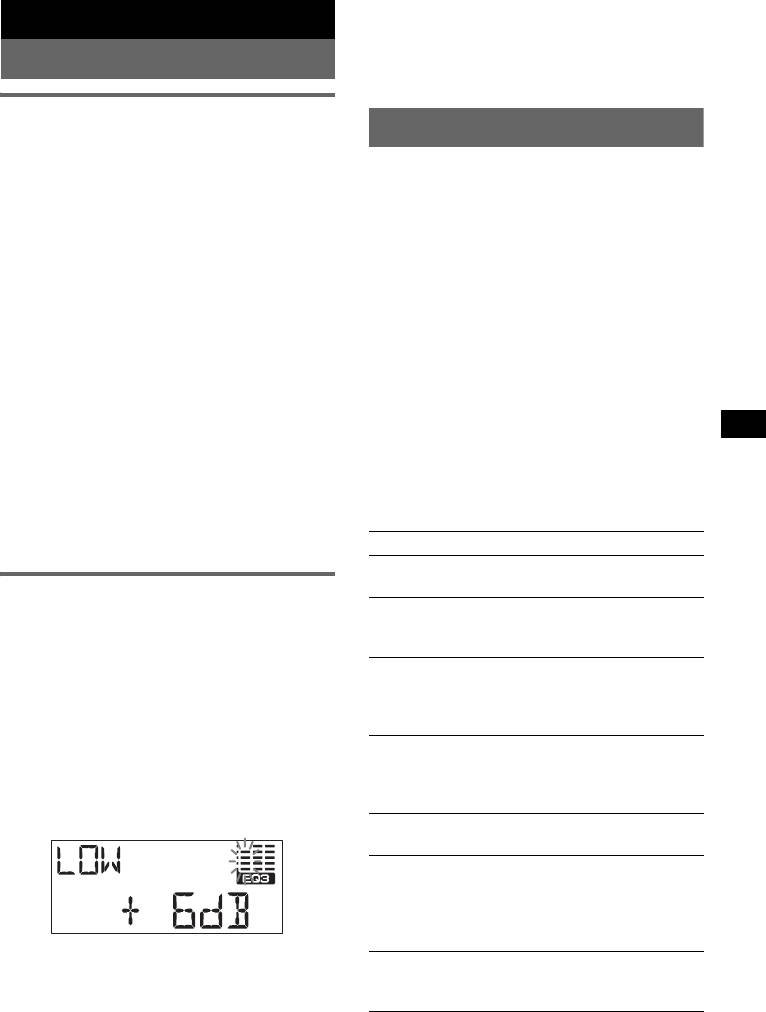
Customizing the equalizer curve
1
AUX-A*
(AUX Audio)
— EQ3
To turn the AUX source display “AUX-A-ON”
“CUSTOM” of EQ3 allows you to make your
(
z) or “AUX-A-OFF” (page 10).
own equalizer settings.
1
SUB/REAR*
1 Select a source, then press (EQ3)
To switch the audio output.
repeatedly to select “CUSTOM.”
– “SUB-OUT” (
z): to output to a subwoofer.
2 Press the select button repeatedly
– “REAR-OUT”: to output to a power amplifier.
until “LOW,” “MID” or “HI” appears.
DIM (Dimmer)
To change the brightness of the display.
3 Rotate the volume control dial to
– “DIM-ON”: to dim the display.
adjust the selected item.
– “DIM-OFF” (
z): to deactivate the dimmer.
The volume level is adjustable in 1 dB steps,
from –10 dB to +10 dB.
1
DEMO*
(Demonstration)
To set “DEMO-ON” (z) or “DEMO-OFF”.
A.SCRL (Auto Scroll)
To scroll long displayed item automatically
when the disc/group/track/album is changed.
– “A.SCRL-ON”: to scroll.
– “A.SCRL-OFF” (
z): to not scroll.
Repeat steps 2 and 3 to adjust the equalizer
2
LPF*
(Low Pass Filter)
curve.
To select the subwoofer cut-off frequency: “LPF
To restore the factory-set equalizer curve,
OFF” (
z), “LPF125Hz” or “LPF 78Hz.”
press and hold the select button before the
setting is complete.
*1 When the unit is turned off.
After 3 seconds, the setting is complete and
*2 When the audio output is set to “SUB.”
the display returns to normal play/reception
mode.
9
Using optional equipment
Additional Information
Precautions
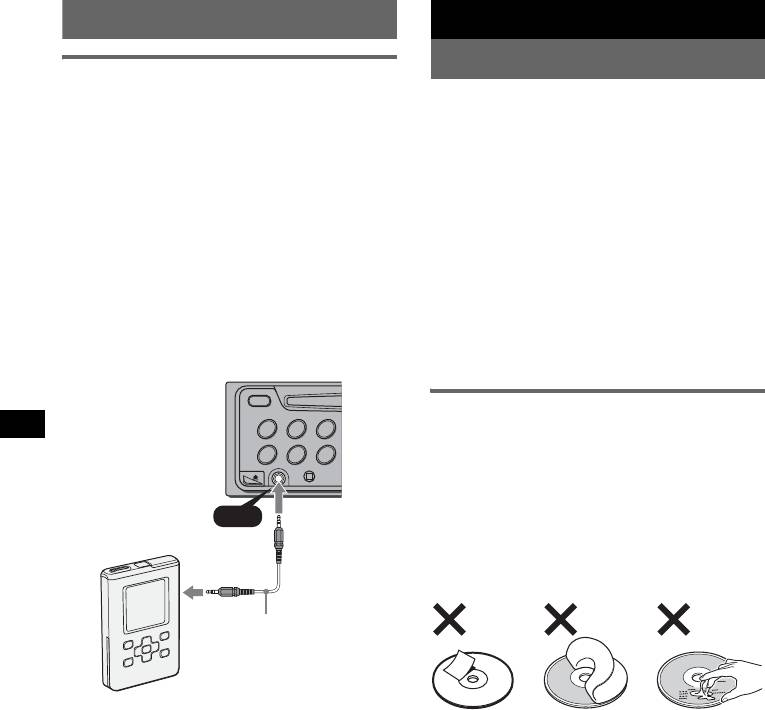
Auxiliary audio equipment
By connecting an optional portable audio device
• If your car has been parked in direct sunlight,
to the AUX input jack (stereo mini jack) on the
allow the unit to cool off before operating it.
unit and then simply selecting the source, you
• Power aerial will extend automatically while the
can listen on your car speakers. The volume level
unit is operating.
is adjustable for any difference between the unit
and the portable audio device. Follow the
Moisture condensation
procedure below:
On a rainy day or in a very damp area, moisture
condensation may occur inside the lenses and
display of the unit. Should this occur, the unit will
Connecting the portable audio
not operate properly. In such a case, remove the disc
device
and wait for about an hour until the moisture has
1 Turn off the portable audio device.
evaporated.
2 Turn down the volume on the unit.
To maintain high sound quality
3 Connect to the unit.
Be careful not to splash juice or other soft drinks
onto the unit or discs.
Notes on discs
• To keep a disc clean, do not touch its surface.
Handle the disc by its edge.
• Keep your discs in their cases or disc magazines
when not in use.
• Do not subject discs to heat/high temperature.
Avoid leaving them in a parked car or on a
AUX
dashboard/rear tray.
• Do not attach labels, or use discs with sticky ink/
residue. Such discs may stop spinning when used,
causing a malfunction, or may ruin the disc.
Connecting cord*
(not supplied)
* Be sure to use a straight type plug.
• Do not use any discs with labels or stickers
attached.
Adjust the volume level
The following malfunctions may result from using
Be sure to adjust the volume for each connected
such discs:
audio device before playback.
– Inability to eject a disc (due to a label or sticker
peeling off and jamming the eject mechanism).
1 Turn down the volume on the unit.
– Inability to read audio data correctly (e.g.,
2 Press (SOURCE) repeatedly until “AUX
playback skipping, or no playback) due to heat
FRONT IN” appears.
shrinking of a sticker or label causing a disc to
warp.
3 Start playback of the portable audio device at a
• Discs with non-standard shapes (e.g., heart,
moderate volume.
square, star) cannot be played on this unit.
4 Set your usual listening volume on the unit.
Attempting to do so may damage the unit. Do not
use such discs.
5 Press the select button repeatedly until “AUX”
• You cannot play 8 cm CDs.
appears, and rotate the volume control dial to
adjust the volume level.
10
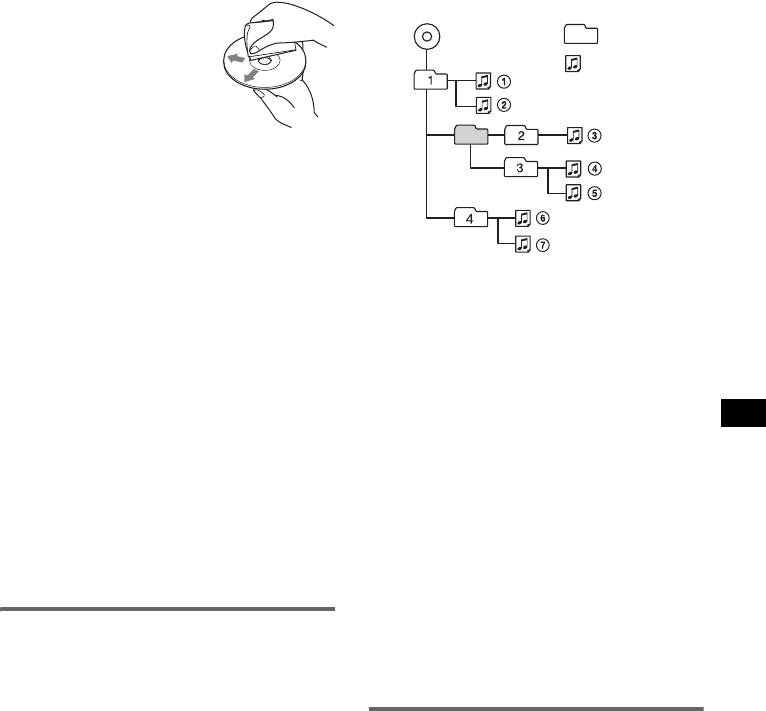
• Before playing, clean the discs
Playback order of MP3/WMA files
with a commercially available
Folder
cleaning cloth. Wipe each disc
MP3/WMA
(album)
from the centre out. Do not use
solvents such as benzine,
MP3/WMA
thinner, commercially available
file (track)
cleaners, or antistatic spray
intended for analogue discs.
Notes on CD-R/CD-RW discs
• Some CD-Rs/CD-RWs (depending on the
equipment used for its recording or the condition
of the disc) may not play on this unit.
• You cannot play a CD-R/a CD-RW that is not
finalized.
Music discs encoded with copyright
Notes
protection technologies
• When naming an MP3/WMA file, be sure to add the
This product is designed to play back discs that
file expansion “.mp3” / “.wma” to the file name.
conform to the Compact Disc (CD) standard.
• During playback of a VBR (variable bit rate) MP3/
WMA file or fast-forward/reverse, elapsed playing
Recently, various music discs encoded with
time may not display accurately.
copyright protection technologies are marketed by
• When the disc is recorded in Multi Session, only the
some record companies. Please be aware that among
first track of the first session format is recognized
those discs, there are some that do not conform to
and played (any other format is skipped). The
the CD standard and may not be playable by this
priority of the format is CD-DA, ATRAC CD and
product.
MP3/WMA.
– When the first track is a CD-DA, only CD-DA of the
Note on DualDiscs
first session is played.
A DualDisc is a two sided disc product which
– When the first track is not a CD-DA, an ATRAC CD
or MP3/WMA session is played. If the disc has no
mates DVD recorded material on one side with
data in any of these formats, “NO MUSIC” is
digital audio material on the other side. However,
displayed.
since the audio material side does not conform to
the Compact Disc (CD) standard, playback on this
Notes on MP3
product is not guaranteed.
• Be sure to finalize the disc before using on the unit.
• If you play a high-bit-rate MP3, such as 320 kbps,
sound may be intermittent.
About MP3/WMA files
Notes on WMA
MP3, which stands for MPEG-1 Audio Layer-3, is a
• Files made with lossless compression are not
music file compression format standard. It
playable.
compresses audio CD data to approximately 1/10 of
• Files protected by copyright are not playable.
its original size.
WMA, which stands for Windows Media Audio, is
About ATRAC CD
another music file compression format standard. It
compresses audio CD data to approximately 1/22*
ATRAC3plus format
of its original size.
ATRAC3, which stands for Adaptive Transform
* only for 64 kbps
Acoustic Coding3, is audio compression
technology. It compresses audio CD data to
• The unit is compatible with the ISO 9660 level 1/
approximately 1/10 of its original size.
level 2 format, Joliet/Romeo in the expansion
ATRAC3plus, which is an extended format of
format and Multi Session.
ATRAC3, compresses the audio CD data to
• The maximum number of:
approximately 1/20 of its original size. The unit
– folders (albums): 150 (including root and empty
accepts both ATRAC3 and ATRAC3plus format.
folders).
– MP3/WMA files (tracks) and folders contained
continue to next page t
in a disc: 300 (if a folder/file names contain
many characters, this number may become less
than 300).
– displayable characters for a folder/file name is
32 (Joliet), or 64 (Romeo).
• ID3 tag versions 1.0, 1.1, 2.2, 2.3 and 2.4 apply to
MP3 only. ID tag is 15/30 characters (1.0 and 1.1),
or 63/126 characters (2.2, 2.3 and 2.4). WMA tag
is 63 characters.
11
ATRAC CD
Fuse replacement
ATRAC CD is recorded audio CD data which is
When replacing the fuse, be
compressed to ATRAC3 or ATRAC3plus format
sure to use one matching the
using authorized software, such as SonicStage 2.0 or
amperage rating stated on the
later, or SonicStage Simple Burner.
original fuse. If the fuse blows,
• The maximum number of:
check the power connection and
– folders (groups): 255
replace the fuse. If the fuse
– files (tracks): 999
blows again after replacement,
• The characters for a folder/file name and text
there may be an internal
information written by SonicStage is displayed.
malfunction. In such a case,
consult your nearest Sony
For details on ATRAC CD, see the SonicStage or
dealer.
SonicStage Simple Burner manual.
Note
Cleaning the connectors
Be sure to create the ATRAC CD using authorized
The unit may not function properly if the connectors
software, such as SonicStage 2.0 or later, or
between the unit and the front panel are not clean. In
SonicStage Simple Burner 1.0 or 1.1.
order to prevent this, detach the front panel (page 4)
and clean the connectors with a cotton swab dipped
If you have any questions or problems concerning
in alcohol. Do not apply too much force. Otherwise,
your unit that are not covered in this manual, consult
the connectors may be damaged.
your nearest Sony dealer.
Maintenance
Replacing the lithium battery of the
card remote commander
Under normal conditions, the battery will last
approximately 1 year. (The service life may be
shorter, depending on the conditions of use.)
When the battery becomes weak, the range of the
Notes
card remote commander becomes shorter. Replace
• For safety, turn off the ignition before cleaning the
the battery with a new CR2025 lithium battery. Use
connectors, and remove the key from the ignition
switch.
of any other battery may present a risk of fire or
• Never touch the connectors directly with your fingers
explosion.
or with any metal device.
Removing the unit
1 Remove the protection collar.
1Detach the front panel (page 4).
2Engage the release keys together with the
Notes on the lithium battery
protection collar.
• Keep the lithium battery out of the reach of children.
Should the battery be swallowed, immediately
consult a doctor.
• Wipe the battery with a dry cloth to assure a good
contact.
• Be sure to observe the correct polarity when
installing the battery.
• Do not hold the battery with metallic tweezers,
otherwise a short-circuit may occur.
12
1
Fuse (10A)
Main unit Back of the front
panel
+ side up
2
c
Orient the release
keys as shown.
WARNING
Battery may explode if mistreated.
Do not recharge, disassemble, or dispose of
in fire.
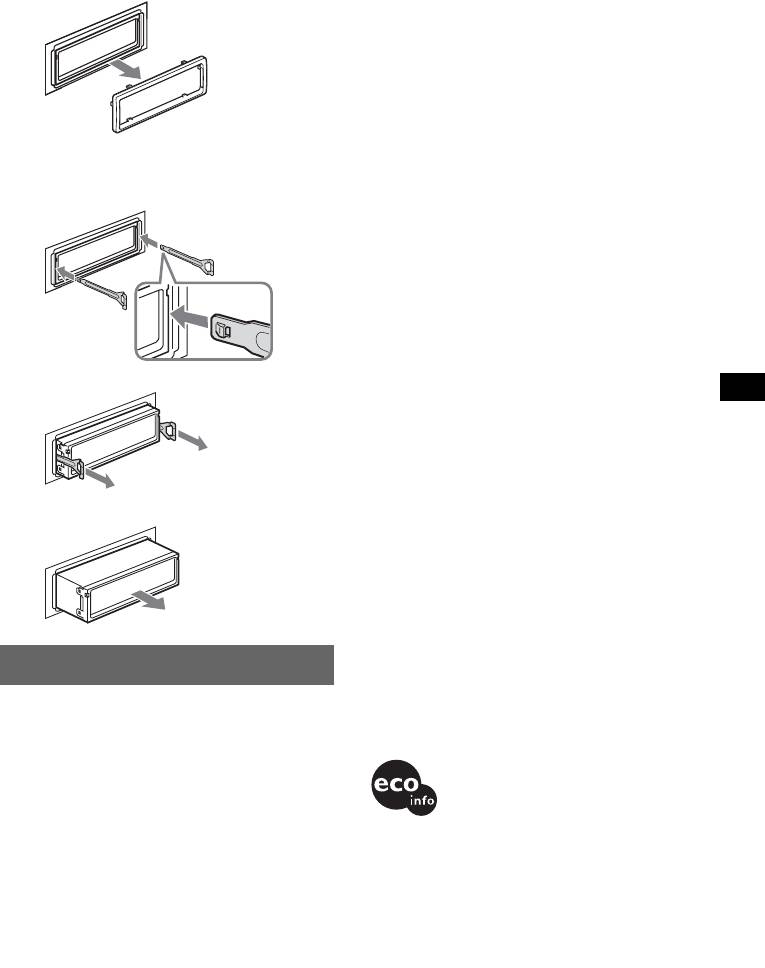
3 Pull out the release keys to remove the
AM
protection collar.
Tuning range:
531 – 1,602 kHz
Aerial terminal: External aerial connector
Intermediate frequency: 10.7 MHz/450 kHz
Sensitivity: 30 µV
Power amplifier section
Outputs: Speaker outputs (sure seal connectors)
Speaker impedance: 4 – 8 ohms
Maximum power output: 50 W × 4 (at 4 ohms)
2 Remove the unit.
General
1 Insert both release keys simultaneously
Outputs:
until they click.
Audio outputs terminal (sub/rear switchable)
Power aerial relay control terminal
Power amplifier control terminal
Hook facing
Inputs:
inwards.
Aerial input terminal
AUX input jack (stereo mini jack)
Tone controls:
Low: ±10 dB at 60 Hz (XPLOD)
Mid: ±10 dB at 1 kHz (XPLOD)
High: ±10 dB at 10 kHz (XPLOD)
Power requirements: 12 V DC car battery
2 Pull the release keys to unseat the unit.
(negative earth)
Dimensions: Approx. 178 × 50 × 178 mm (w/h/d)
Mounting dimensions: Approx. 182 × 53 × 162 mm
(w/h/d)
Mass: Approx. 1.2 kg
Supplied accessories:
Card remote commander: RM-X151
Parts for installation and connections (1 set)
3 Slide the unit out of the mounting.
Your dealer may not handle some of the above
listed accessories. Please ask the dealer for
detailed information.
US and foreign patents licensed from Dolby
Laboratories.
MPEG Layer-3 audio coding technology and
Specifications
patents licensed from Fraunhofer IIS and
Thomson.
CD Player section
Signal-to-noise ratio: 120 dB
Design and specifications are subject to change
Frequency response: 10 – 20,000 Hz
without notice.
Wow and flutter: Below measurable limit
Tuner section
FM
• Lead-free solder is used for soldering certain parts.
Tuning range:
(more than 80 %)
FM1/FM2: 87.5 – 108.0 MHz (at 50 kHz step)
• Halogenated flame retardants are not used in the
FM3: 65 – 74 MHz (at 30 kHz step)
certain printed wiring boards.
Aerial terminal: External aerial connector
• Halogenated flame retardants are not used in
Intermediate frequency: 10.7 MHz/450 kHz
cabinets.
Usable sensitivity: 9 dBf
• VOC (Volatile Organic Compound)-free vegetable
Selectivity: 75 dB at 400 kHz
oil based ink is used for printing the carton.
Signal-to-noise ratio: 67 dB (stereo), 69 dB (mono)
• Packaging cushions do not use polystyrene foam.
Harmonic distortion at 1 kHz: 0.5 % (stereo),
0.3 % (mono)
Separation: 35 dB at 1 kHz
Frequency response: 30 – 15,000 Hz
13

MP3/WMA files take longer to play back than
Troubleshooting
others.
The following discs take a longer time to start
The following checklist will help you remedy
playback.
problems you may encounter with your unit.
– a disc recorded with a complicated tree structure.
Before going through the checklist below, check the
– a disc recorded in Multi Session.
connection and operating procedures.
– a disc to which data can be added.
The ATRAC CD cannot play.
General
• The disc is not created by authorized software, such
No power is being supplied to the unit.
as SonicStage or SonicStage Simple Burner.
• Check the connection. If everything is in order, check
• Tracks that are not included in the group cannot be
the fuse.
played.
• If the unit is turned off and the display disappears, it
The display items do not scroll.
cannot be operated with the remote commander.
• For discs with very many characters, those may not
tTurn on the unit.
scroll.
The power aerial does not extend.
• “A.SCRL” is set to “OFF”.
The power aerial does not have a relay box.
t Set “A.SCRL-ON” (page 9) or press (SCRL).
No sound.
The sound skips.
• The volume is too low.
• Installation is not correct.
• The ATT function is activated (page 7).
t Install the unit at an angle of less than 45° in a
• The position of the fader control “FAD” is not set for
sturdy part of the car.
a 2-speaker system.
• Defective or dirty disc.
No beep sound.
The operation buttons do not function.
• The beep sound is cancelled (page 9).
The disc will not eject.
• An optional power amplifier is connected and you are
Press the RESET button (page 4).
not using the built-in amplifier.
The contents of the memory have been erased.
Radio reception
• The RESET button has been pressed.
The stations cannot be received.
tStore again into the memory.
The sound is hampered by noises.
• The power connecting lead or battery has been
• Connect a power aerial control lead (blue) or
disconnected.
accessory power supply lead (red) to the power
• The power connecting lead is not connected properly.
supply lead of a car’s aerial booster (only when your
Stored stations and correct time are erased.
car has built-in FM/AM aerial in the rear/side glass).
The fuse has blown.
• Check the connection of the car aerial.
Makes noise when the position of the ignition
• The auto aerial will not go up.
key is switched.
t Check the connection of the power aerial control
The leads are not matched correctly with the car’s
lead.
accessory power connector.
• Check the frequency.
The display disappears from/does not appear
Preset tuning is not possible.
in the display window.
• Store the correct frequency in the memory.
• The dimmer is set “DIM-ON” (page 9).
• The broadcast signal is too weak.
• The display disappears if you press and hold (OFF).
Automatic tuning is not possible.
tPress and hold (OFF) on the unit until the
• Setting of the local seek mode is not correct.
display appears.
t Tuning stops too frequently:
• The connectors are dirty (page 12).
Press (SENS) until “LOCAL-ON” appears.
t Tuning does not stop at a station:
CD playback
Press (SENS) repeatedly until “MONO-ON” or
“MONO-OFF” (FM), or “LOCAL-OFF” (AM)
The disc cannot be loaded.
appears.
• Another disc is already loaded.
• The broadcast signal is too weak.
• The disc has been forcibly inserted upside down or in
t Perform manual tuning.
the wrong way.
During FM reception, the “ST” indication
The disc does not playback.
flashes.
• Defective or dirty disc.
• Tune in the frequency accurately.
• The CD-Rs/CD-RWs are not for audio use (page 11).
• The broadcast signal is too weak.
MP3/WMA files cannot be played back.
t Press (SENS) to set the monaural reception
The disc is incompatible with the MP3/WMA format
mode to “MONO-ON.”
and version (page 11).
An FM programme broadcast in stereo is heard
in monaural.
The unit is in monaural reception mode.
14
t Press (SENS) until “MONO-OFF” appears.

Error displays/Messages
ERROR
• The disc is dirty or inserted upside down.
t Clean or insert the disc correctly.
• A blank disc has been inserted.
• The disc cannot play because of some problem.
t Insert another disc.
FAILURE
The connection of speaker/amplifier is incorrect.
tSee the supplied installation/connections manual to
check the connection.
L.SEEK +/–
The local seek mode is on during automatic tuning.
NO ID3
ID3 tag information is not written in the MP3 file.
NO INFO
Text information is not written in the ATRAC3/
ATRAC3plus or WMA file.
NO MUSIC
The disc is not a music file.
tInsert a music CD.
NO NAME
A track/album/group/disk name is not written in the
track.
OFFSET
There may be an internal malfunction.
tCheck the connection. If the error indication
remains on in the display, consult your nearest
Sony dealer.
READ
The unit is reading all track and group information on
the disc.
tWait until reading is complete and playback starts
automatically. Depending on the disc structure, it
may take more than a minute.
RESET
The unit cannot be operated because of some problem.
tPress the RESET button (page 4).
“” or “”
During reverse or fast-forward, you have reached the
beginning or the end of the disc and you cannot go any
further.
“”
The character cannot be displayed with the unit.
If these solutions do not help improve the situation,
consult your nearest Sony dealer.
If you take the unit to be repaired because of CD
playback trouble, bring the disc that was used at the
time the problem began.
15
Поздравляем с покупкой!
Благодарим Вас за то, что Вы остановили
свой выбор на проигрывателе компакт-
дисков Sony. В поездке Вы сможете
использовать следующие функции
проигрывателя.
• Воспроизведение компакт-дисков
Можно воспроизводить диски CD-DA
(содержащие также CD TEXT*), CD-R/
CD-RW (с файлами MP3/WMA и диски в
формате Multi Session (стр. 13)), а также
диски ATRAC CD (форматы ATRAC3 и
ATRAC3plus (стр. 14)).
Тип диска Метка на диске
CD-DA
MP3
WMA
ATRAC CD
• Прием радиостанций
– Можно хранить в памяти до 6 станций в
каждом диапазоне (FM1, FM2, FM3,
AM1 и AM2).
– BTM (Память оптимальной настройки):
устройство выбирает радиостанции с
наиболее сильным сигналом и
сохраняет их в памяти.
• Настройка звучания
– EQ3: кривую эквалайзера можно
выбрать для 7 музыкальных типов.
• Подключение дополнительной
аппаратуры
SonicStage и ее логотип являются
– Входное гнездо AUX на передней
товарными знаками корпорации Sony.
панели проигрывателя позволяет
ATRAC, ATRAC3, ATRAC3plus и их
подсоединять переносное
логотипы являются товарными знаками
аудиоустройство.
корпорации Sony.
* Диск с CD TEXT - это компакт-диск CD-DA,
содержащий такую информацию, как название
диска, имя исполнителя и названия композиций.
Проигрыватель компакт-
дисков с диапазоном FM/AM
Сдепано в Таиланде
2

Содержание
Начало работы
Другие функции
Сброс параметров устройства . . . . . . . . . . 4
Изменение настроек звука . . . . . . . . . . . . 10
Установка часов . . . . . . . . . . . . . . . . . . . . . . 4
Настройка характеристик звука
Снятие передней панели . . . . . . . . . . . . . . . 4
— BAL/FAD/SUB . . . . . . . . . . . . . . . . . 10
Установка передней панели . . . . . . . . . 5
Настройка кривой эквалайзера
— EQ3 . . . . . . . . . . . . . . . . . . . . . . . . . . . 10
Настройка параметров установки
Расположение органов
— SET . . . . . . . . . . . . . . . . . . . . . . . . . . . . . . 10
управления и основные
Использование дополнительного
операции
оборудования. . . . . . . . . . . . . . . . . . . . . . . . 11
Вспомогательное
Основное устройство . . . . . . . . . . . . . . . 6
аудиооборудование . . . . . . . . . . . . . . . . 11
Пульт дистанционного управления
RM-X151 . . . . . . . . . . . . . . . . . . . . . . . . . . 6
Дополнительная информация
Компакт-диск
Меры предосторожности . . . . . . . . . . . . . 12
Примечания относительно
Индикация на дисплее . . . . . . . . . . . . . . 8
дисков . . . . . . . . . . . . . . . . . . . . . . . . . . . 12
Повторное и перетасованное
О файлах MP3/WMA . . . . . . . . . . . . . . 13
воспроизведение . . . . . . . . . . . . . . . . . . . 8
О компакт-дисках ATRAC CD . . . . . 14
Уход за устройством . . . . . . . . . . . . . . . . . 15
Радиоприемник
Извлечение устройства . . . . . . . . . . . . . . . 16
Технические характеристики. . . . . . . . . . 16
Сохранение и прием радиостанций . . . . . . 9
Поиск и устранение неисправностей . . . 17
Автоматическое сохранение — BTM
Индикация/сообщения об
(Память оптимальной настройки) . . . . 9
ошибках . . . . . . . . . . . . . . . . . . . . . . . . . . 18
Сохранение вручную . . . . . . . . . . . . . . . 9
Прием радиостанций, сохраненных в
памяти . . . . . . . . . . . . . . . . . . . . . . . . . . . . 9
Автоматическая настройка . . . . . . . . . . 9
3
Начало работы
Снятие передней панели
Во избежание кражи устройства можно
Сброс параметров
снять с него переднюю панель.
устройства
Предупреждающий сигнал
Перед первым включением устройства
Если до поворота ключа зажигания в
или после замены автомобильного
положение OFF с устройства не была
аккумулятора, а также после изменения
снята передняя панель, то в течение
схемы подключения следует сбросить
нескольких секунд будет слышен
параметры устройства.
предупредительный звуковой сигнал.
Снимите переднюю панель и нажмите
Звуковой сигнал будет слышен только в
кнопку RESET с помощью заостренного
том случае, если используется встроенный
предмета, например шариковой ручки.
усилитель.
1 Нажмите кнопку (OFF).
Устройство выключится.
Кнопка
RESET
2 Нажмите кнопку , затем снимите
панель, потянув на себя.
Примечание
При нажатии кнопки RESET выполняется
стирание установок времени и некоторых других
занесенных в память параметров.
Установка часов
Часы данного устройства имеют 24-
часовую индикацию.
Примечания
• Старайтесь не ронять переднюю панель. Не
1 Нажмите и удерживайте кнопку
надавливайте слишком сильно на переднюю
выбора.
панель и окошко дисплея.
Отобразится дисплей установок.
• Не подвергайте переднюю панель воздействию
тепла/высокой температуры или влажности.
2 Нажимайте кнопку выбора, пока не
Старайтесь не оставлять его в припаркованной
появится индикация “CLOCK-ADJ” .
машине или на приборной доске/полочке за
задним сиденьем.
3 Нажмите кнопку (DSPL).
Замигает индикация часа.
4 Поверните регулятор громкости
для установки значения часов и
минут.
Чтобы переместить индикацию,
нажмите кнопку (DSPL).
5 Нажмите кнопку выбора.
Установка завершена, и часы начинают
отсчет времени.
Чтобы отобразить часы, нажмите кнопку
(DSPL). Нажмите кнопку (DSPL) еще раз,
чтобы вернуться к предыдущей индикации
дисплея.
При использовании пульта дистанционного
управления
Чтобы установить значения часов и минут в шаге
4, нажмите кнопку M или m.
4
Установка передней панели
Прикрепите часть A передней панели к
части B устройства, как показано на
рисунке, и установите левую сторону на
место до щелчка.
A
B
Примечание
Не ставьте ничего на внутреннюю поверхность
передней панели.
5
Расположение органов управления и основные операции
Основное устройство
CDX-A250EE
Пульт дистанционного
Подробную информацию см. на
указанных страницах. Кнопки на пульте
управления RM-X151
дистанционного управления с такими же
обозначениями, что и на устройстве,
выполняют те же функции.
OFF
ATT
A Кнопка OFF
SOURCE
SEL
MODE
Выключение питания/остановка
источника.
B Номерные кнопки
+
Компакт-диск:
1
2
(1)/(2): GP*
/ALBM*
–/+
–
Пропуска групп/альбомов
(нажмите); непрерывный пропуск
DSPL
SCRL
групп/альбомов (нажмите и
132
удерживайте).
(3): REP 8
465
(4): SHUF 8
(6): PAUSE
+
Для приостановки
VOL
–
воспроизведения. Чтобы
отменить приглушение звука,
нажмите кнопку еще раз.
Радиоприемник:
Прием хранящихся в памяти
радиостанций (нажмите); сохранение
радиостанций в памяти (нажмите и
удерживайте).
C Кнопка SCRL (прокрутка) 8
Прокрутка элементов дисплея.
D Кнопка BTM 9
Включение функции BTM (нажмите и
удерживайте).
6
- 1
- 2
