Sony CDP-XE520: инструкция
Раздел: Видео Аудио Фото Оборудование
Тип: CD Плеер
Инструкция к CD Плееру Sony CDP-XE520
Оглавление

3-865-491-41 (1)
Compact Disc
Player
GB
Operating Instructions
PL
Instrukcja obslugi
RU
ИнcтpyкЗио пo ТкcплyaтaЗии
CDP-XE520
CDP-XE320
CDP-XE220
1999 by Sony Corporation
On adjusting volume
WARNING
• Do not turn up the volume while
Precautions
listening to a portion with very low
To prevent fire or shock
level inputs or no audio signals. If you
On safety
do, the speakers may be damaged
hazard, do not expose the unit
• Caution — The use of optical
when a peak level portion is played.
to rain or moisture.
instruments with this product will
To avoid electrical shock, do
increase eye hazard.
On cleaning
• Should any solid object or liquid fall
not open the cabinet. Refer
• Clean the cabinet, panel and controls
into the cabinet, unplug the player and
servicing to qualified
with a soft cloth slightly moistened
have it checked by qualified personnel
personnel only.
with a mild detergent solution. Do not
before operating it any further.
use any type of abrasive pad, scouring
The laser component in this product
powder or solvent such as alcohol or
On power sources
is capable of emitting radiation
benzine.
• Before operating the player, check that
exceeding the limit for Class 1.
the operating voltage of the player is
If you have any questions or
identical with your local power
problems concerning your player,
supply. The operating voltage is
please consult your nearest Sony
indicated on the nameplate at the rear
dealer.
of the player.
• The player is not disconnected from
the AC power source (mains) as long
as it is connected to the wall outlet,
even if the player itself has been
This appliance is classified as a CLASS 1
turned off.
LASER product. The CLASS 1 LASER
• If you are not going to use the player
PRODUCT MARKING is located on the
for a long time, be sure to disconnect
rear exterior.
the player from the wall outlet. To
disconnect the AC power cord (mains
lead), grasp the plug itself; never pull
the cord.
• AC power cord must be changed only
at the qualified service shop.
On placement
• Place the player in a location with
adequate ventilation to prevent heat
build-up in the player.
• Do not place the player on a soft
surface such as a rug that might block
the ventilation holes on the bottom.
• Do not place the player in a location
near heat sources, or in a place subject
to direct sunlight, excessive dust or
mechanical shock.
On operation
• If the player is brought directly from a
cold to a warm location, or is placed in
a very damp room, moisture may
condense on the lenses inside the
player. Should this occur, the player
may not operate properly. In this case,
remove the disc and leave the player
turned on for about an hour until the
moisture evaporates.
GB
2

Getting Started
TABLE OF CONTENTS
Welcome!
Thank you for purchasing the Sony
Compact Disc Player. Before operating
the unit, please read this manual
Getting Started
thoroughly and retain it for future
Unpacking........................................................................................................ 4
reference.
Hooking Up the System ................................................................................. 4
About This Manual
Playing a CD ........................................................................................................ 6
The instructions in this manual are for
models CDP-XE520, CDP-XE320 and
CDP-XE220. The CDP-XE520 is the
Playing CDs
model used for illustration purposes.
Any difference in operation is clearly
Using the Display ........................................................................................... 7
indicated in the text, for example, “CDP-
Locating a Specific Track or a Particular Point in a Track ........................ 9
XE520 only.”
Playing Tracks Repeatedly ..........................................................................10
Playing in Random Order (Shuffle Play) ..................................................11
Conventions
• Instructions in this manual describe
Creating Your Own Programme (Programme Play) ...............................12
the controls on the player.
GB
You can also use the controls on the
remote if they have the same or
similar names as those on the player.
Recording From CDs
• The following icons are used in this
Recording Your Own Programme .............................................................14
manual:
Recording a CD by Specifying Tape Length (Time Edit)
Indicates that you can do the
(CDP-XE520 only) .........................................................................................14
task using the remote.
Fading In or Out............................................................................................15
(Note that the CDP-XE220
Adjusting the Recording Level (Peak Search) .......................................... 17
cannot do the tasks marked
with this icon.)
Additional Information
Indicates hints and tips for
making the task easier.
Notes on CDs ................................................................................................. 17
Troubleshooting ............................................................................................18
Specifications ................................................................................................. 18
Index
Index ............................................................................................................... 19
GB
3
Getting Started
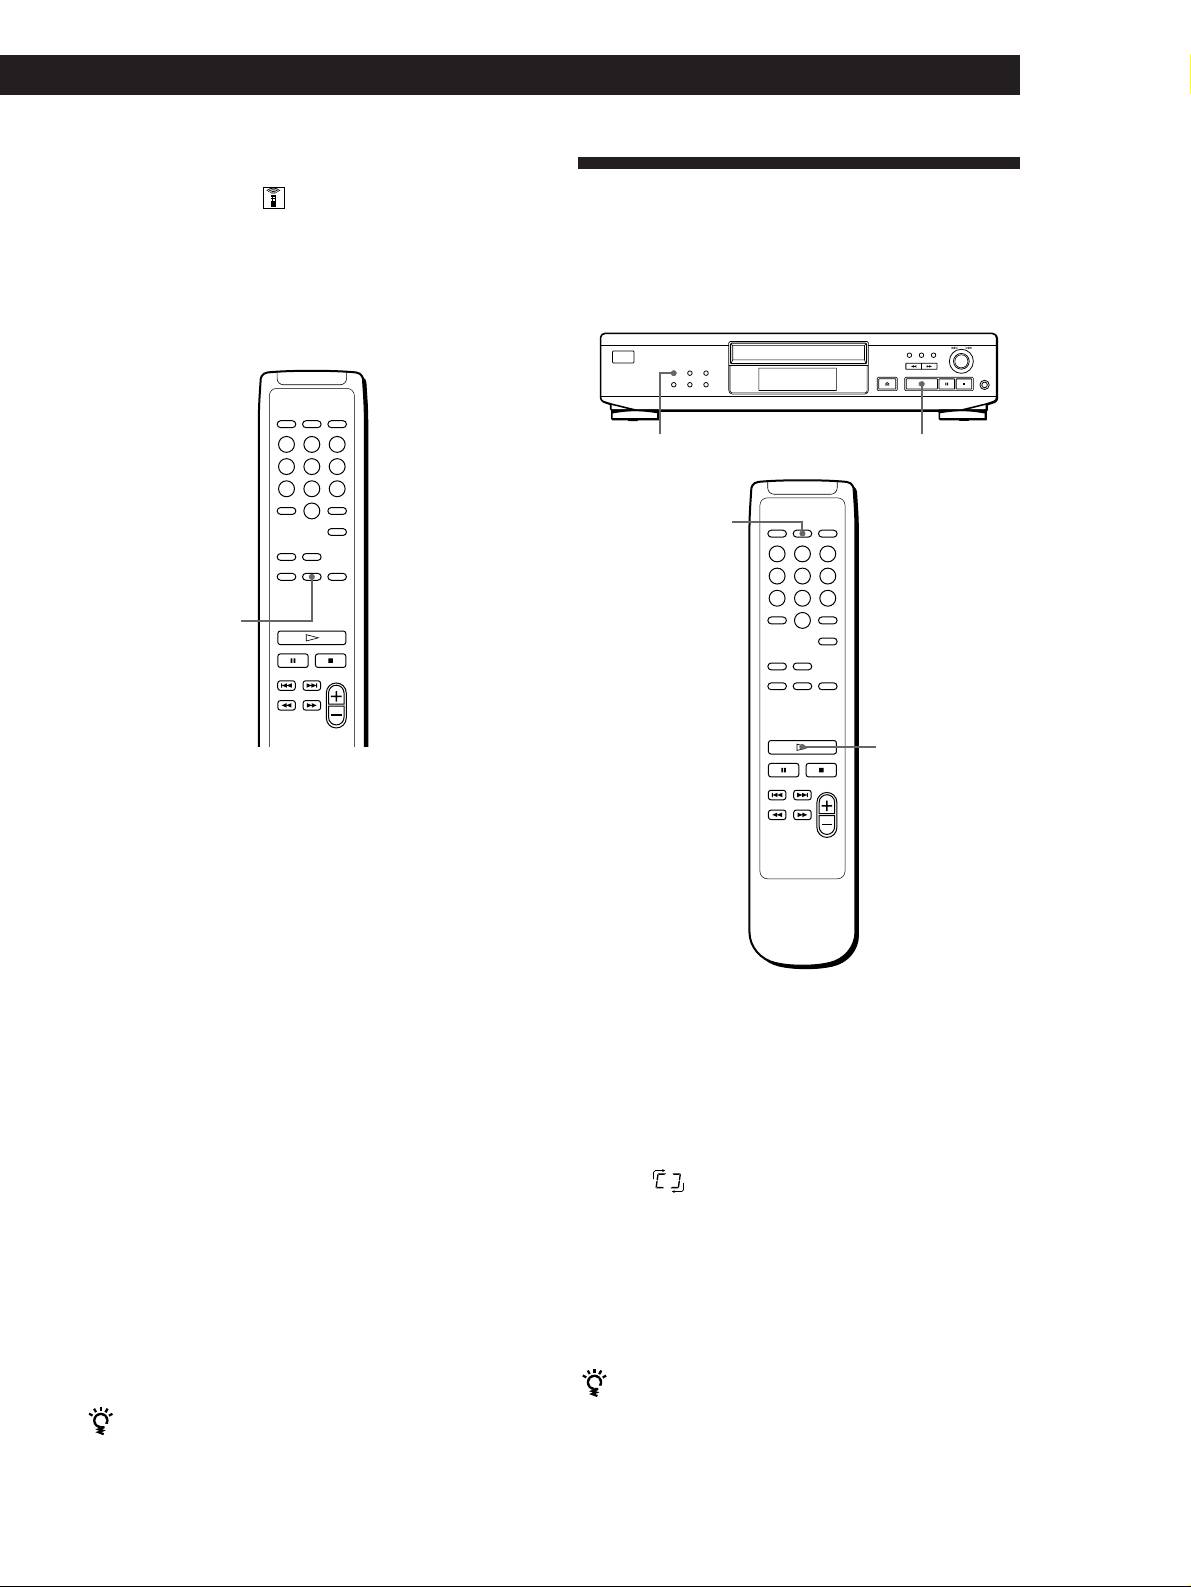
Unpacking
Hooking Up the System
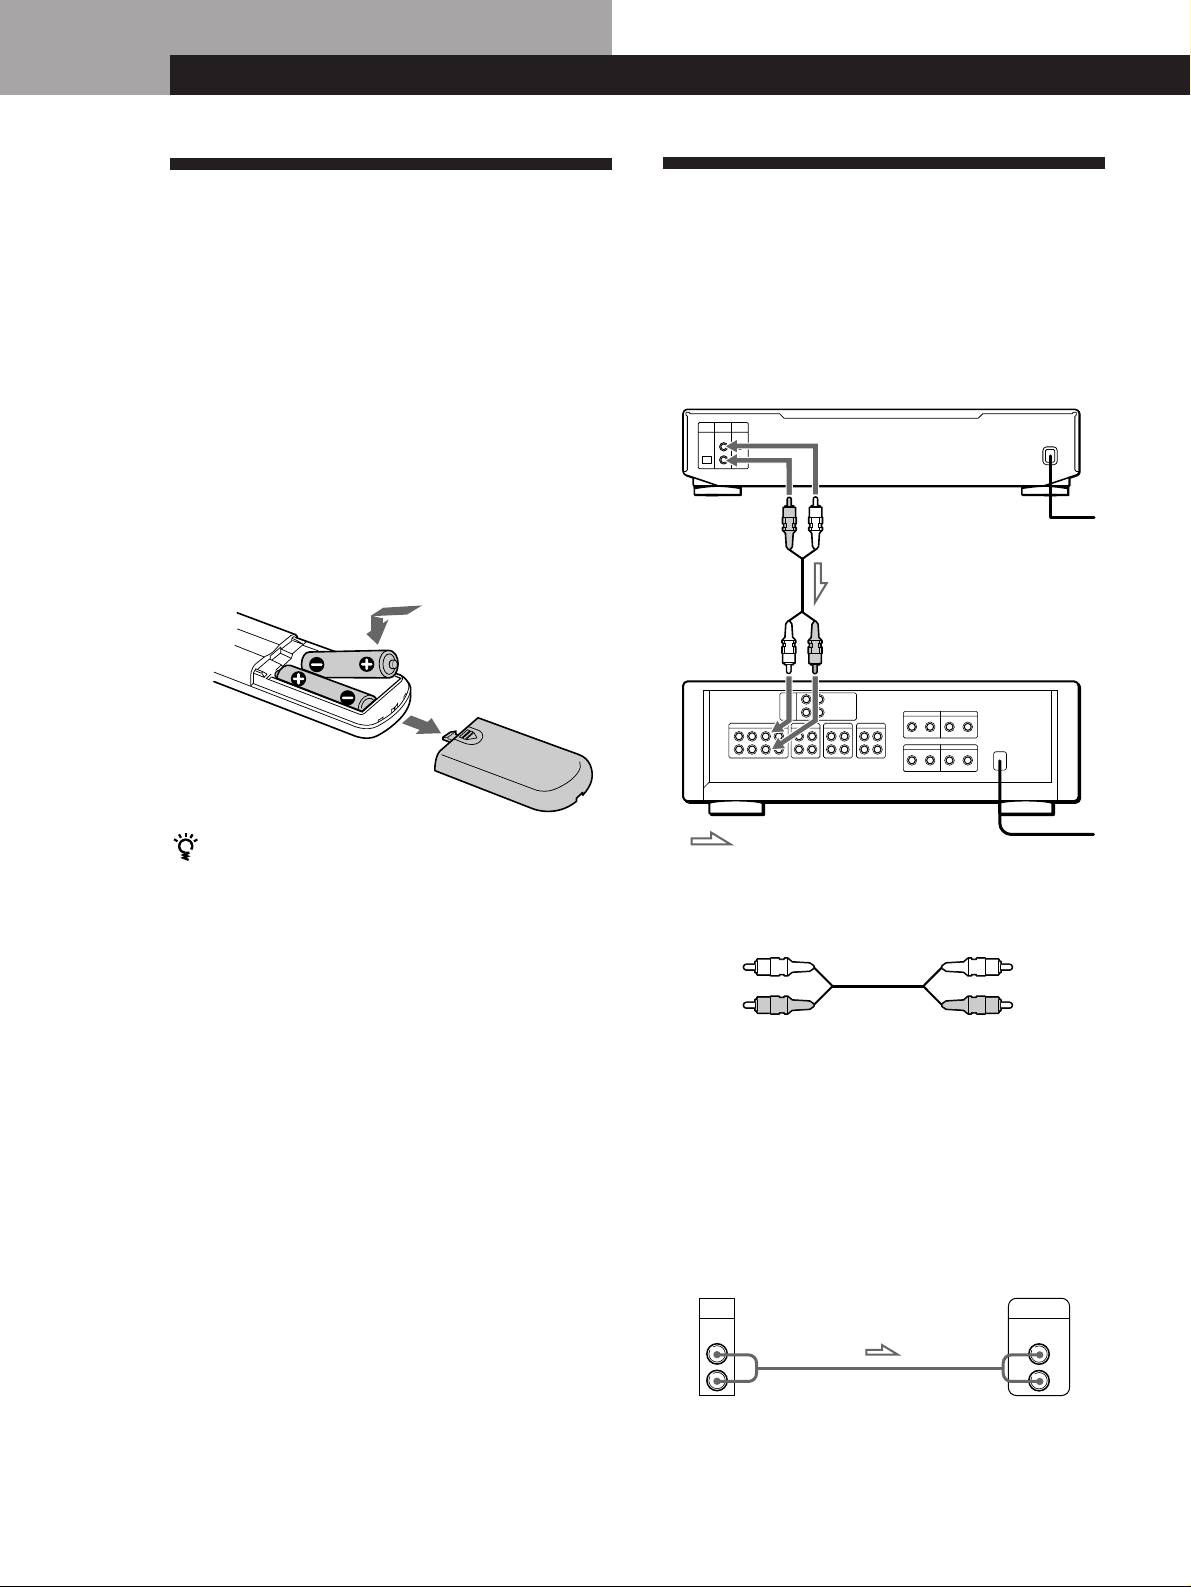
Check that you received the following items:
• Audio connecting cord (1)
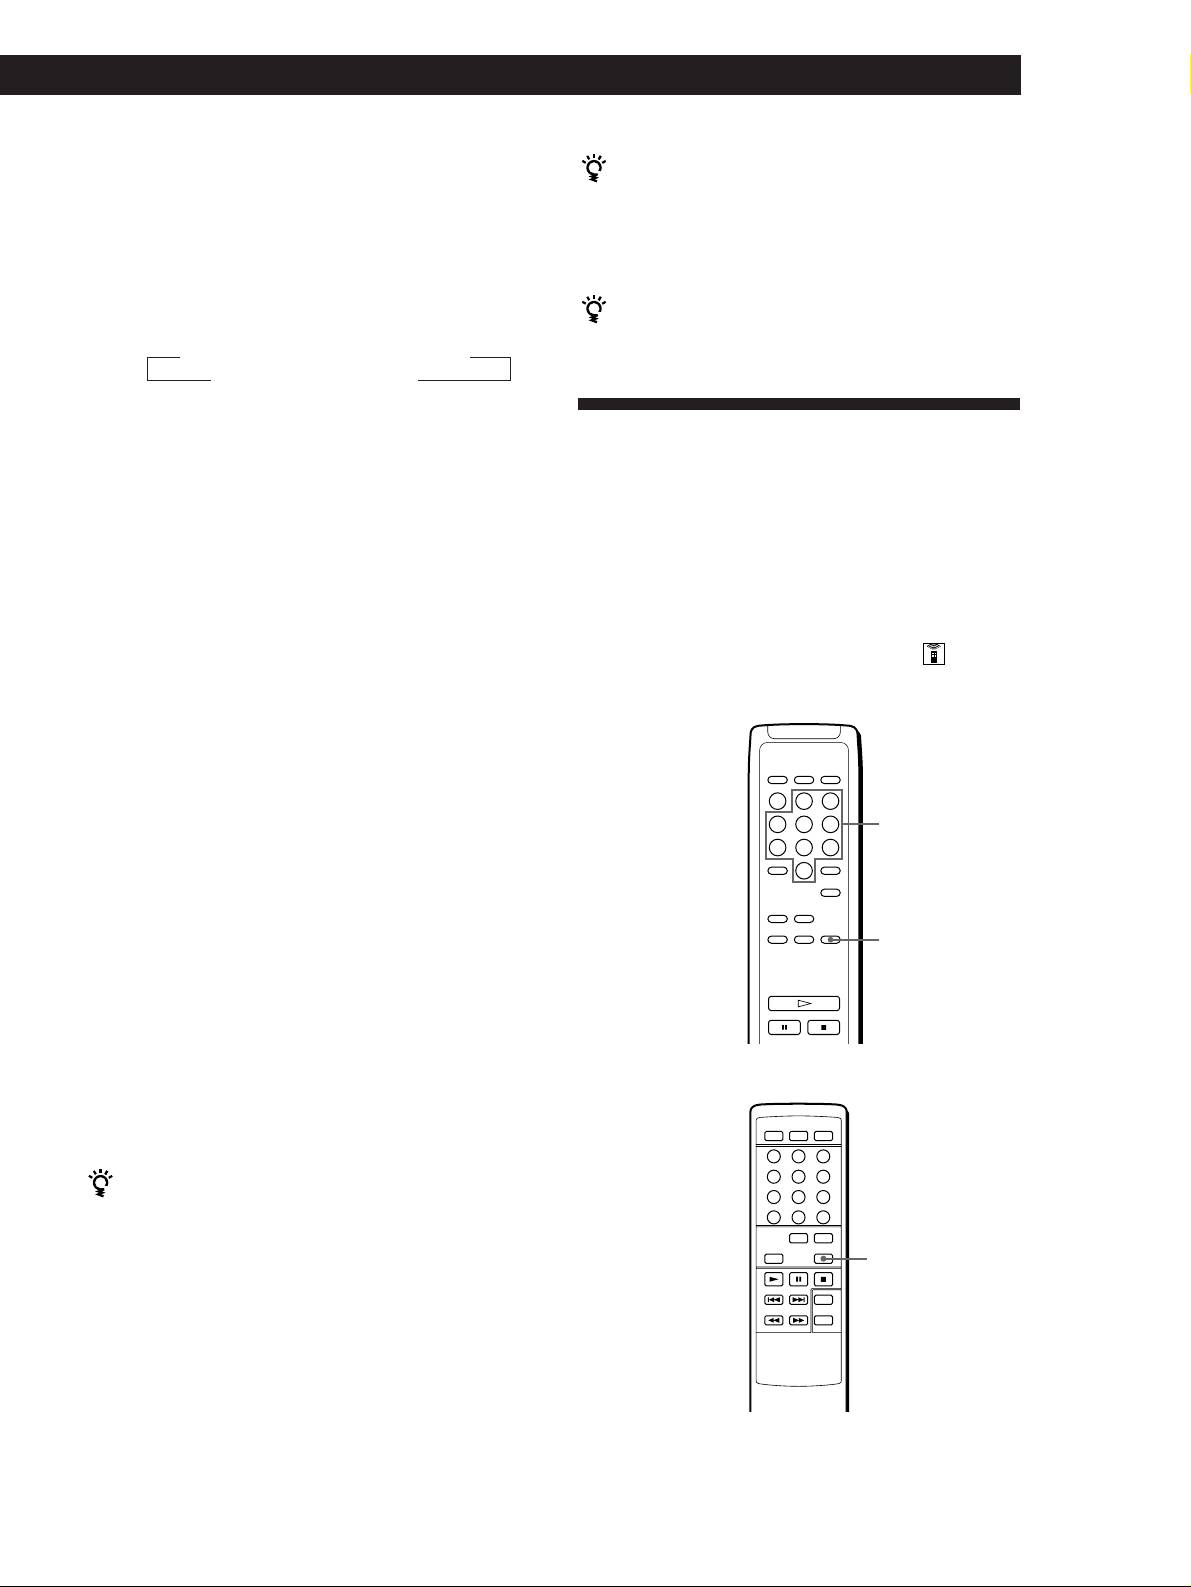
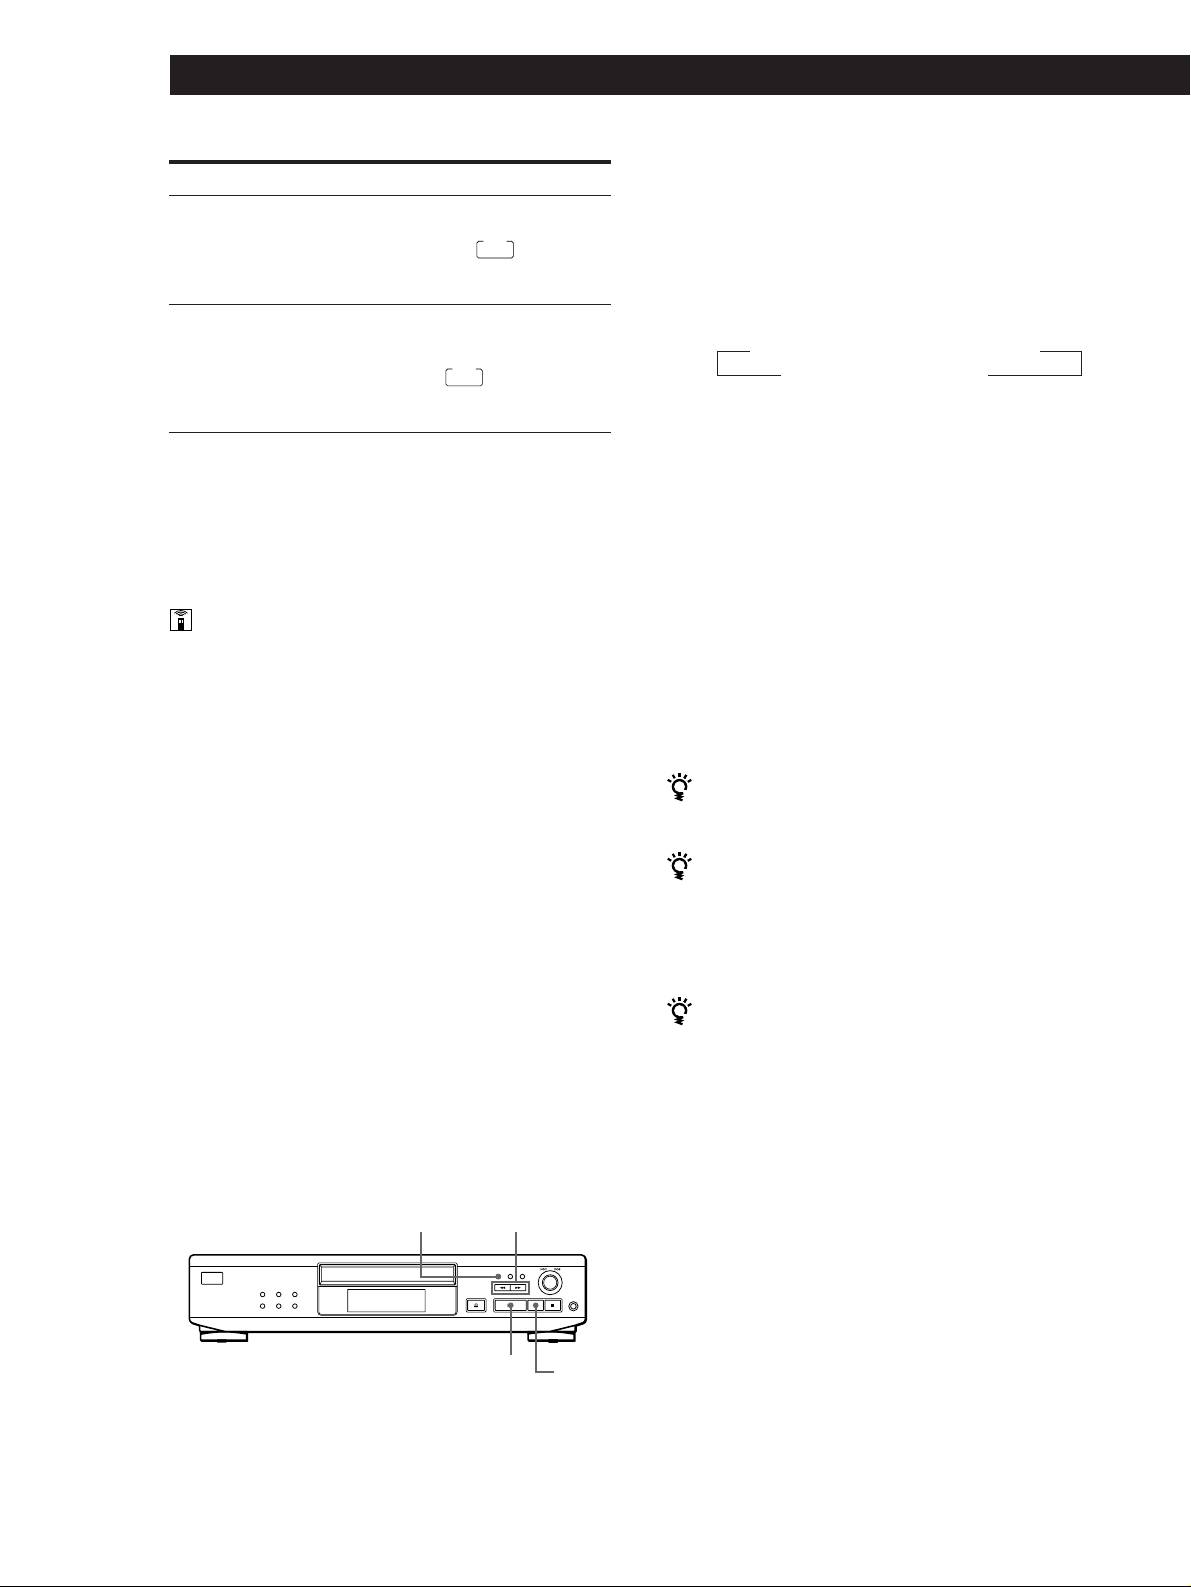
Overview
• Remote commander (remote) (CDP-XE520 and
This section describes how to hook up the CD player to
CDP-XE320 only) (1)
an amplifier. Be sure to turn off the power of each
• Sony SUM-3 (NS) batteries (CDP-XE520 and
component before making the connections.
CDP-XE320 only) (2)
CD player
Inserting batteries into the remote
(CDP-XE520 and CDP-XE320 only)
You can control the player using the supplied remote.
Insert two size AA (R6) batteries by matching the +
LINE OUT
LINE OUT
(R)
(L)
To mains
and – on the batteries. When using the remote, point it
at the remote sensor g on the player.
Audio input
Audio input
(L)
(R)
Amplifier
: Signal flow
When to replace batteries
To mains
With normal use, the batteries should last for about six
months. When the remote no longer operates the player,
What cords will I need?
replace all the batteries with new ones.
Audio cord (supplied) (1)
White
Notes
White
(L)
• Do not leave the remote near an extremely hot or humid
(L)
Red
place.
Red
(R)
(R)
• Do not drop any foreign object into the remote casing,
particularly when replacing the batteries.
• Do not expose the remote sensor to direct sunlight or
lighting apparatuses. Doing so may cause a malfunction.
Hookups
• If you don’t use the remote for an extended period of time,
When connecting an audio cord, be sure to match the
remove the batteries to avoid possible damage from battery
leakage and corrosion.
colour-coded cord to the appropriate jacks on the
components: Red (right) to Red and White (left) to
White. Be sure to make connections firmly to avoid
hum and noise.
AmplifierCD player
LINE
OUT
INPUT
CD
L
L
R
R
GB
4
Getting Started
Getting Started
You can adjust the output level to the amplifier
Connecting the mains lead
(CDP-XE520 and CDP-XE320 only)
Press LINE OUT LEVEL +/– on the remote. You can
Connect the mains lead to a wall outlet.
reduce the output level up to –20␣ dB.
FADE
When you reduce the output level, “FADE” (or
for
the CDP-XE320) appears in the display.
Where do I go next?
When you turn off the player, the output level
automatically returns to the maximum level.
Now you’re ready to use your player.
If you aren’t familiar with how to play CDs, go to the section
“Playing a CD” on page 6.
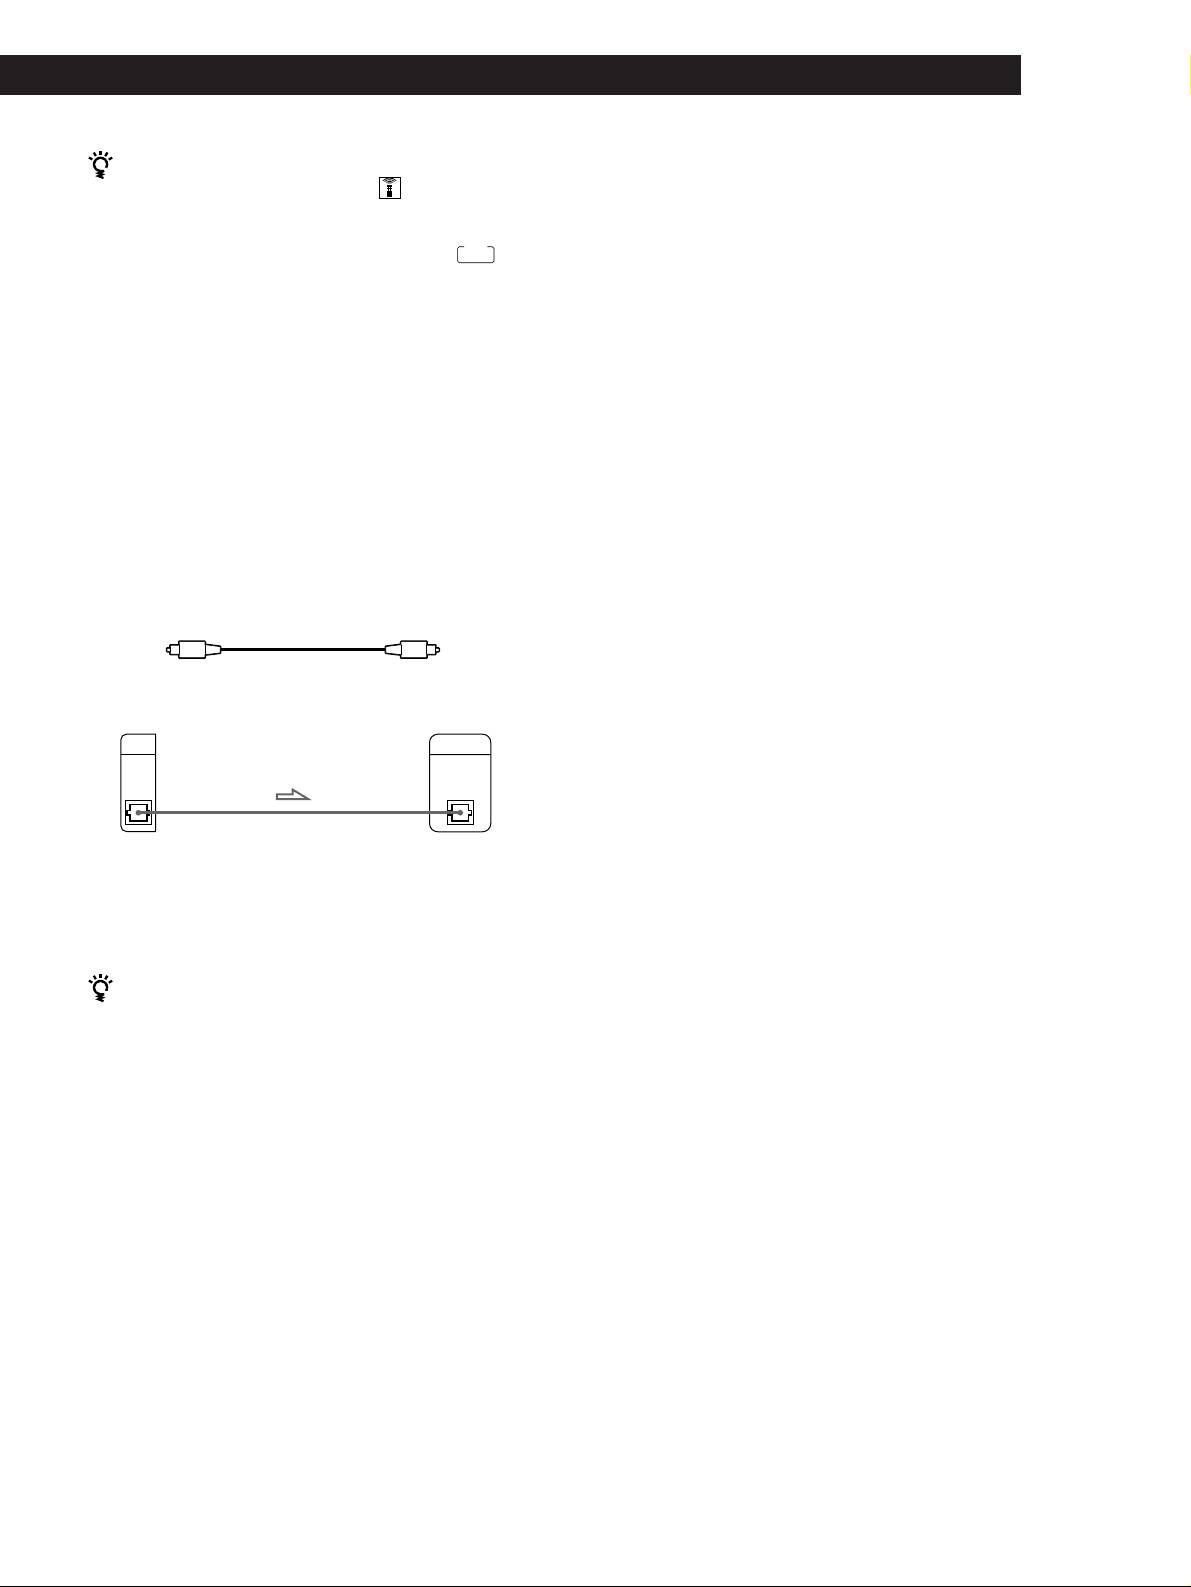
• If you have a digital component such as a digital
Then, go to the following sections for other operations.
amplifier, D/A converter, DAT or MD
Connect the component via the DIGITAL OUT (OPTICAL)
connector using the optical cable (not supplied). Take off
the cap and plug in the optical cable.
Note that you cannot use the following functions when
making this connection:
• Fading In or Out (see page 15)
• Time Fade (see page 16)
• Adjusting the output level using the LINE OUT
LEVEL +/– buttons on the remote (see above)
POC-15
Optical cable (not supplied)
CD player
Digital component
DIGITAL
DIGITAL
OUT
INPUT
OPTICAL
OPTICAL
Note
When you connect via the DIGITAL OUT (OPTICAL)
connector, noise may occur when you play CD software other
than music, such as a CD-ROM.
If you have a Sony component with the CONTROL A1
jack (CDP-XE520 only)
Connect the component via the CONTROL A1 jack. You
can simplify the operation of audio systems composed of
separate Sony components. For details, refer to the
supplementary “S-Link
TM
/CONTROL-A1 Control
System” instructions.
GB
5
Basic Operations
Playing a CD
Connect the
2
3
4
headphones.*
AMS
EDIT/TIME FADE
CHECK CLEAR
I / u
REPEATPLAY MODE
TIME/TEXT
OPEN/CLOSE
PHONES
PEAK SEARCH
MUSIC SCAN
LANGUAGE
*CDP-XE520 only
• See pages 4 – 5 for the hookup
Turn on the amplifier and select the CD player position so that
information.
1
you can listen to the sound from this player.
If you turn on the player with
a CD in the tray
Press I/u to turn on the player.
You can start playing
2
automatically from the
beginning of the CD. If you
Press §␣ OPEN/CLOSE,
connect a commercially
available timer, you can start
3
and place a disc on the
playing the CD at any time
disc tray.
you want.
With the label side up
You can adjust the output
level with the LINE OUT
Press ·.
LEVEL +/– on the remote
4
The disc tray closes and the player plays all the tracks once
(CDP-XE520 and CDP-XE320
only) Z
(Continuous Play).
Adjust the volume on the amplifier.
You can adjust the
headphones volume on the
To stop playback
remote (CDP-XE520 only) Z
Connect the headphones to
Press p.
the PHONES jack and adjust
the volume with the LINE
OUT LEVEL +/– on the
To
You need to
remote.
Pause
Press P
Resume play after pause
Press P or ·
Go to the next track
Turn ≠ AMS ± clockwise
Go back to the preceding track
Turn ≠ AMS ±
counterclockwise
Stop play and remove the CD
Press §␣ OPEN/CLOSE
GB
6
Playing CDs
Playing CDs
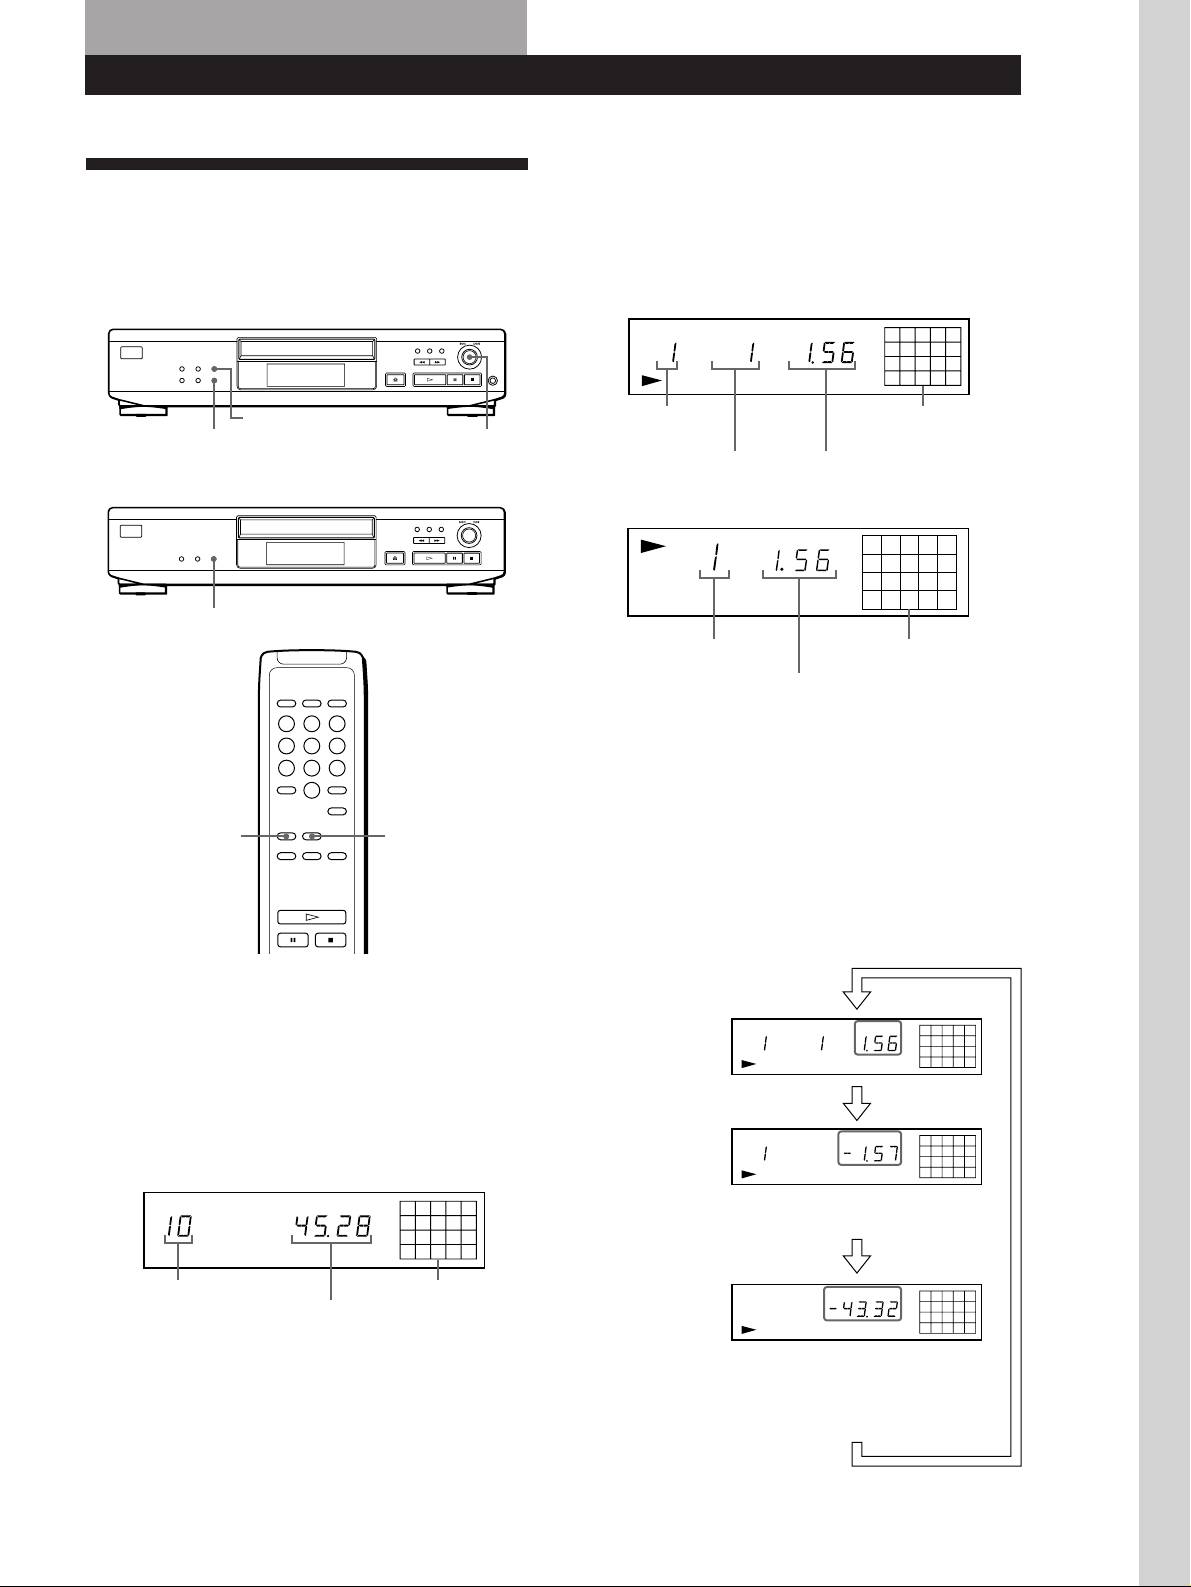
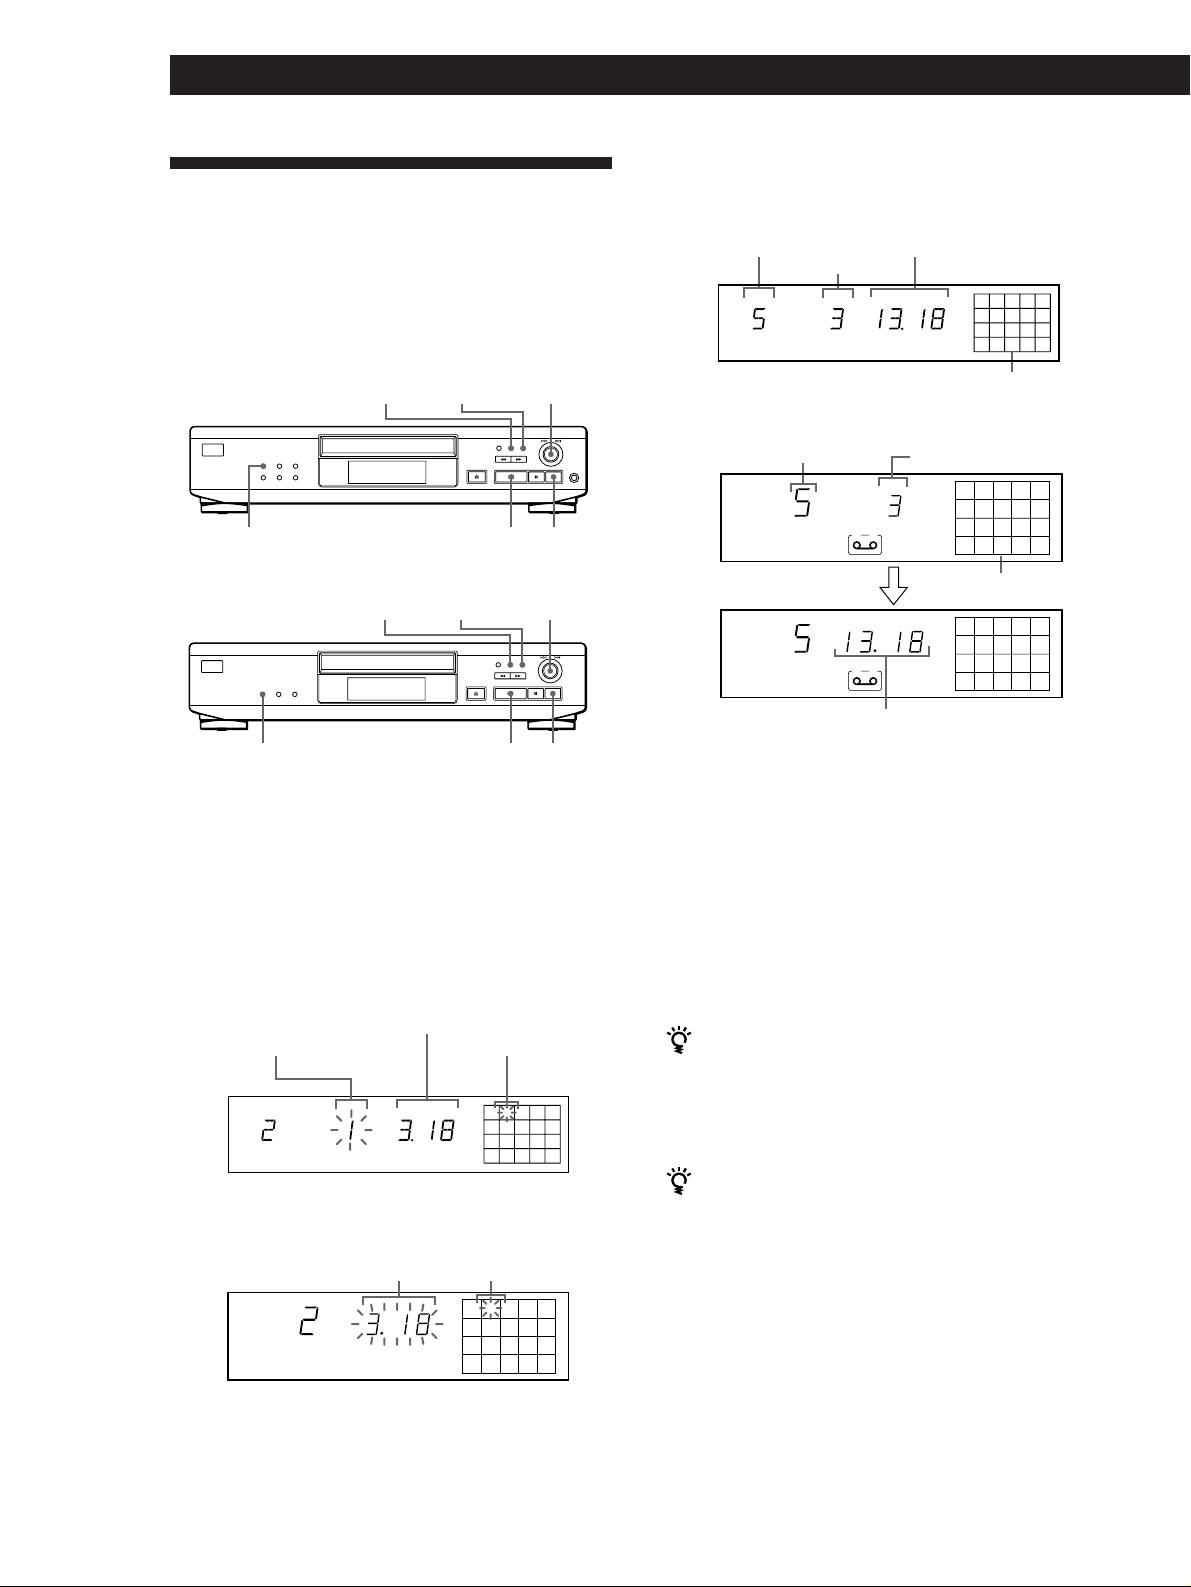
Display information while playing a disc
Using the Display
While playing a disc, the display shows the current
track number, index number (CDP-XE520 only),
You can check information about the disc using the
playing time and the music calendar.
display.
• CDP-XE520
• CDP-XE520
TRACK INDEX
MIN SEC
12345
678910
TIME/TEXT
Current track
Music calendar
LANGUAGE ≠ AMS ±
number
Index number
Playing time
• CDP-XE320 and CDP-XE220
• CDP-XE320 and CDP-XE220
MIN SEC
12345
678910
TIME
Current track number
Music calendar
Playing time
Basic Operations
The track numbers in the music calendar disappear
after they are played.
Checking the remaining time
TIME
DISPLAY ON/OFF
Each time you press TIME/TEXT (or TIME on the
remote and for the CDP-XE320 and CDP-XE220) while
playing a disc, the display changes as shown in the
chart below.
Checking the total number and playing
Playing time of the
TRACK INDEX
MIN SEC
12345
678910
time of the tracks
current track
Press TIME/TEXT (or TIME on the remote and for the
CDP-XE320 and CDP-XE220) before you start playing.
Press
The display shows the total number of tracks, total
Remaining time on
TRACK INDEX
MIN SEC
12345
678910
playing time and music calendar.
the current track
TRACK INDEX
MIN SEC
12345
If the track number exceeds 24 (or 68 for the CDP-XE320 and
678910
CDP-XE220), “–␣ –␣ .␣ –␣ –” appears instead of the remaining time.
Press
Total number of
Music calendar
MIN SEC
Remaining time on
12345
678910
tracks
Total playing time
the disc
While in Shuffle Play mode (“SHUFFLE” appears in
If the remaining time exceeds 100 minutes in Programme
the display; see page 11), a one-second access time
Play mode or when the disc has more than 24 (or 68 for the
blank is added between each track. This increase is
CDP-XE320 and CDP-XE220) tracks, “–␣ –␣ .␣ –␣ –” appears
automatically added to the total playing time in the
instead of the remaining time.
display.
Press
The information also appears when you press
§␣ OPEN/CLOSE to close the disc tray.
GB
7
Playing CDs
Checking the information of CD TEXT discs
• While playing a disc
(CDP-XE520 only)
CD TEXT discs have information, such as the disc titles
or artist names, memorised in a blank space on the
Track title
TRACK
12345
678910
discs where, on normal discs, there is no information.
TEXTCD
The display shows the CD TEXT information of the
disc so that you can check the current disc title, artist
This information also appears
name and track title. When the player detects CD TEXT
when the player locates the track.
discs, the “CD TEXT” indication appears in the
Press
display. If your CD TEXT disc has multi language
capacity, “CD TEXT” and “MULTI” indications appear
Playing time of the
TRACK INDEX
MIN SEC
12345
678910
in the display. If you want to check the information in
current disc
TEXTCD
another language, refer to “Checking the information
of CD TEXT discs in other languages” on page 8.
Press
Each time you press TIME/TEXT (or TIME on the
Remaining time on
TRACK INDEX
MIN SEC
12345
remote), the display changes as shown in the chart
678910
the current track
below.
TEXTCD
• Before you start playing
If the track number exceeds 24,
“–␣ –␣ .␣ –␣ –” appears instead of the
remaining time.
DISC
Press
Disc title
12345
678910
TEXTCD
Remaining time on
MIN SEC
12345
678910
the disc
TEXTCD
Press
If the remaining time exceeds 100 minutes in
Artist name
ART.
12345
678910
Programme Play mode or when the disc has more
TEXTCD
than 24 tracks, “–␣ –␣ .␣ –␣ –” appears instead of the
remaining time.
Press
Press
Total number of
TRACK INDEX
MIN SEC
12345
678910
tracks and total
If a title or name has more than 12 characters, the first
TEXTCD
playing time
12 characters will light up after the title or name scrolls
Press
by in the display.
Notes
• The display may not show all the characters depending on
the disc.
• This player can only display the disc titles, track titles and
artist names from CD TEXT discs. Other information cannot
be displayed.
Checking the information of CD TEXT discs
in other languages (CDP-XE520 only)
You can change the displayed language if your CD
TEXT disc has multi language capacity. When the
player detects such a CD TEXT disc, the display shows
the current operating language after “CD TEXT” and
“MULTI” appear in the display.
If the player cannot read the language memorised in a
CD TEXT disc, the display shows “<OTHER LANG>”
after the player detects the disc.
GB
8
Playing CDs
1 Before playing a CD TEXT disc, press
LANGUAGE.
Locating a Specific Track or a
“SELECT LANG” and the current operating
Particular Point in a Track
language appear in the display.
You can quickly locate any track while playing a disc
2 Turn ≠ AMS ± until the language you want
using the AMS (Automatic Music Sensor) on the player
to select appears in the display.
or number buttons (for the CDP-XE520 and
CDP-XE320) on the remote.
3 Push ≠ AMS ± to select the language.
You can also locate a particular point in a track while
“READING TEXT” appears momentarily, then the
playing a disc.
display shows the new selected language.
4 Press TIME/TEXT (or TIME on the remote)
repeatedly until the information you want to check
appears (see page 8).
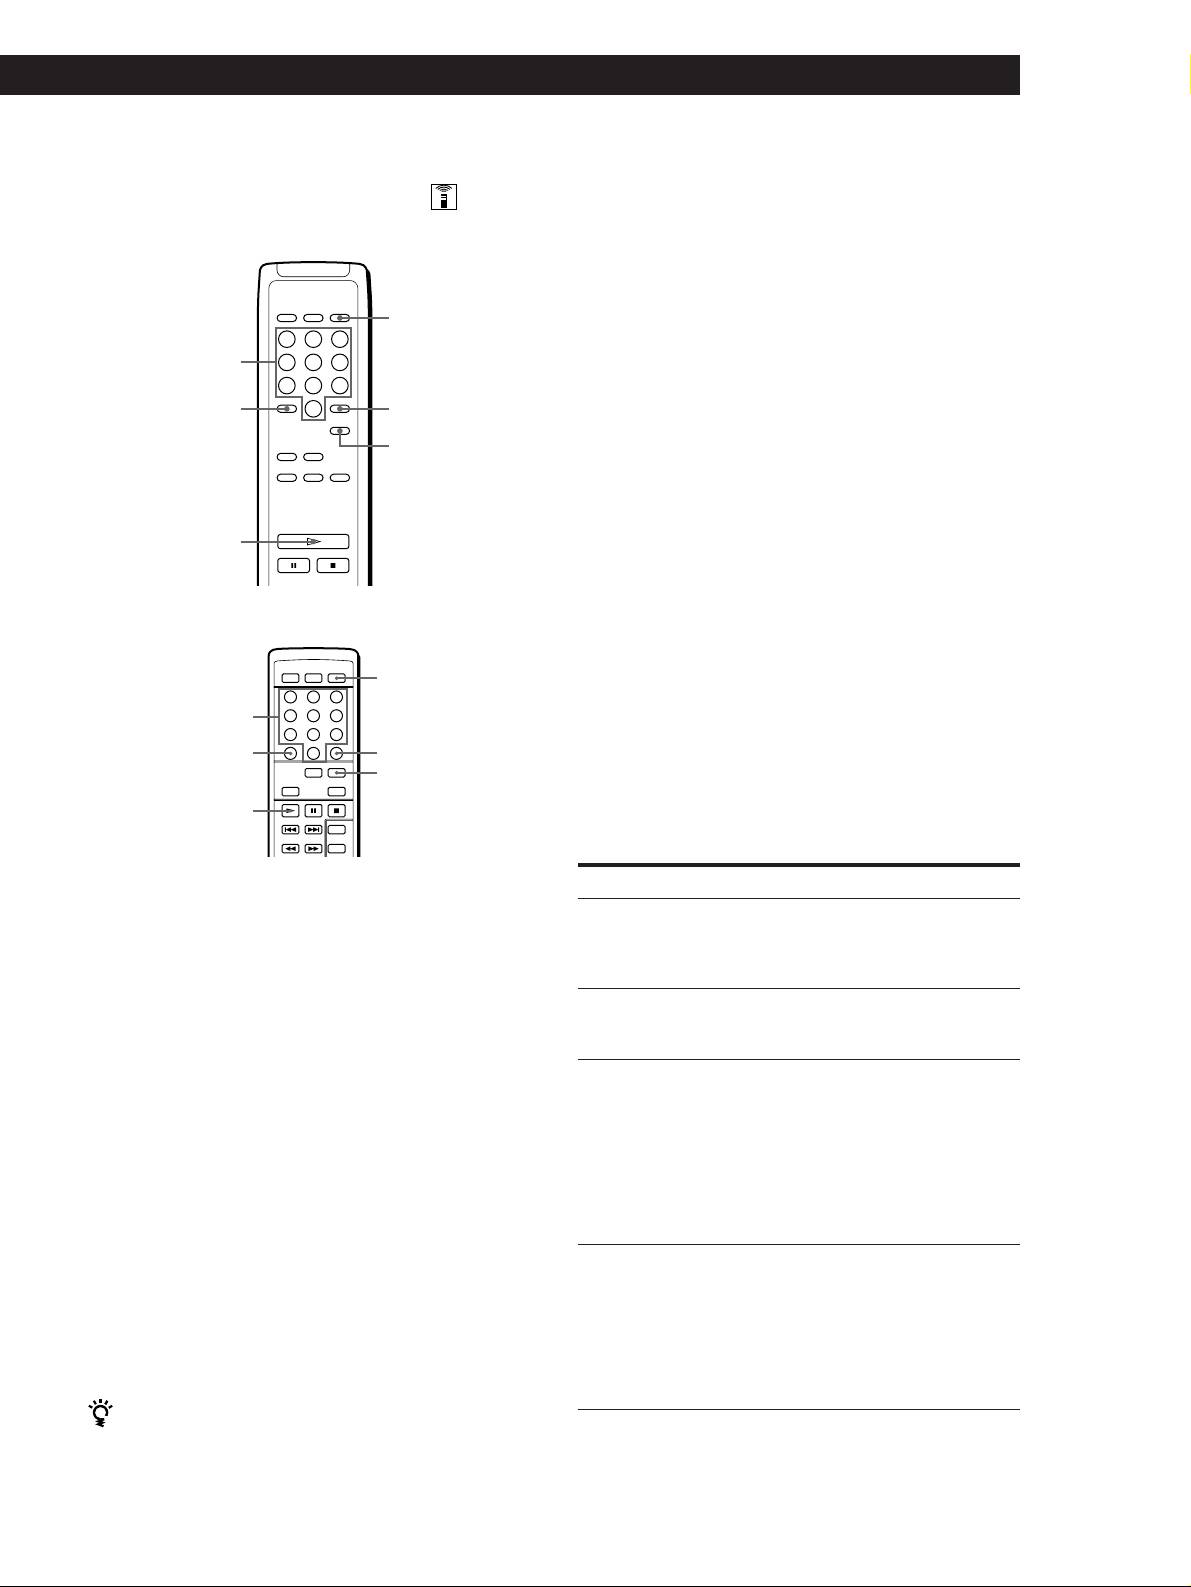
MUSIC SCAN
0/)
·
Notes
(CDP-XE520 only)
≠ AMS ±
• If your CD TEXT disc is not equipped with other languages,
“CAN'T SELECT” appears in the display when you press
• CDP-XE520
the LANGUAGE button.
• If you press LANGUAGE while playing a CD TEXT disc,
the current operating language appears momentarily.
• The operating language you have selected remains until
you turn off the power.
Number
buttons
>10
Turning off indications in the display
(CDP-XE520 only)
Each time you press DISPLAY ON/OFF on the remote
while playing a disc, the display turns off and on
alternately.
Even when the display is turned off, the display turns
on if you pause or stop play. When you resume play,
the display turns off again.
=/+
0/)
Before you start playing, when you press DISPLAY
ON/OFF to turn off the display, “DISPLAY OFF”
appears, and when you press the button to turn on the
display, “DISPLAY ON” appears.
• CDP-XE320
Number
buttons
>10
=/+
0/)
(Continued)
GB
9
Playing CDs
To locate
You need to
Playing Tracks Repeatedly
The next or
Turn ≠ AMS ± clockwise until
succeeding tracks
you find the track. When using the
You can play tracks repeatedly in any play mode.
remote, press + repeatedly until
you find the track (CDP-XE520 and
CDP-XE320 only).
• CDP-XE520
The current or
REPEAT
Turn ≠ AMS ± counterclockwise
preceding tracks
until you find the track. When using
the remote, press = repeatedly until
you find the track (CDP-XE520 and
CDP-XE320 only).
A specific track
Turn ≠ AMS ± until you find the
directly
track number you want. When using
the remote, press the number button of
• CDP-XE320 and CDP-XE220
the track (CDP-XE520 and CDP-XE320
only).
REPEAT
By scanning each
Press MUSIC SCAN. When you find
track for 10 seconds
the track you want, press · to start
(Music Scan)
playing the track.
(CDP-XE520 only)
A point while
Press ) (forward) or 0 (backward)
monitoring the sound
and hold down until you find the
Press REPEAT while playing a disc.
point.
“REPEAT” appears in the display. The player repeats
A point quickly by
Press ) (forward) or 0 (backward)
the tracks as follows:
observing the display
and hold down until you find the
during pause
point. You will not hear the sound
during the operation.
When the disc is played in
The player repeats
Continuous Play (page 6)
All the tracks
When you directly locate a track numbered over 10
Shuffle Play (page 11)
All the tracks in random order
(CDP-XE520 and CDP-XE320 only)
Press >10 first, then the corresponding number buttons.
Programme Play (page 12)
The same programme
To enter “0,” use button 10.
Example: To play track number 30
To cancel Repeat Play
Press >10 first, then 3 and 10.
Press REPEAT twice.
You can extend the playing time during Music Scan
(CDP-XE520 only)
Repeating the current track (Repeat 1)
Press MUSIC SCAN repeatedly until the playing time
You can repeat only the current track in any play
you want (10, 20 or 30) appears in the display. Each time
you press the button, the playing time changes cyclically.
mode.
While the track you want is being played, press
Note
REPEAT repeatedly until “REPEAT 1” appears in the
If “- OVER -” (or “ ” for the CDP-XE320 and CDP-XE220)
display.
appears in the display, the disc has reached the end while you
were pressing ). Press 0 or turn ≠ AMS ±
counterclockwise to go back.
To cancel Repeat 1
Press REPEAT.
GB
10
Playing CDs
Repeating a Specific Portion (A˜B Repeat)
(CDP-XE520 only)
Playing in Random Order
You can play a specific portion in a track repeatedly.
(Shuffle Play)
This might be useful when you want to memorize
You can have the player “shuffle” tracks and play in a
lyrics.
random order.
Note that you cannot repeat a portion extending to two
tracks.
·PLAY MODE
SHUFFLE
A – B
·
1 While playing a disc, press A – B on the remote
when you find the starting point (point A) to be
played repeatedly.
“A-” of “REPEAT A-” flashes in the display.
2 When you reach the ending point (point B), press
A – B again.
“REPEAT A-B” appears. The player plays this
specific portion repeatedly.
1 Press PLAY MODE repeatedly until “SHUFFLE”
To cancel A˜B Repeat
appears in the display.
Press REPEAT.
When using the remote, press SHUFFLE
(CDP-XE520 and CDP-XE320 only).
Setting a new starting point
You can move the repeating portion ahead by
2 Press · to start Shuffle Play.
changing the starting point.
The
indication appears while the player is
1 Press A – B while the player is repeating the
“shuffling” the tracks.
specific portion.
The ending point B becomes the new starting point
A. “A-” of “REPEAT A-” flashes in the display.
To cancel Shuffle Play
Press PLAY MODE twice.
2 When you reach the ending point (point B), press
When using the remote, press CONTINUE (CDP-XE520 and
A – B again.
CDP-XE320 only).
“REPEAT A-B” appears. The player repeats
between the new starting and ending points.
You can start Shuffle Play while playing
Press PLAY MODE repeatedly until “SHUFFLE” appears
When you want to restart from the starting point A
in the display. When using the remote, press SHUFFLE
Press · during A˜B Repeat.
(CDP-XE520 and CDP-XE320 only). Shuffle Play starts
from the current track.
GB
11
Playing CDs
3 Push ≠ AMS ± to select the track.
Creating Your Own Programme
• CDP-XE520
(Programme Play)
Last programmed track
Total playing time
Playing order
You can arrange the order of the tracks on a disc and
TRACK STEP
MIN SEC
create your own programme. The programme can
25
8
contain up to 24 tracks.
PROGRAM
TAPE A
• CDP-XE520
Programmed tracks
CHECK
CLEAR
≠ AMS ±
• CDP-XE320 and CDP-XE220
Last programmed track
Playing order
STEP
25
8
PLAY MODE
·
p
A
PROGRAM
• CDP-XE320 and CDP-XE220
After one second
Programmed tracks
CHECK
CLEAR
≠ AMS ±
MIN SEC
25
8
A
PROGRAM
Total playing time
PLAY MODE
·
p
If you’ve made a mistake
Press CLEAR, then repeat Steps 2 and 3.
Creating a programme on the player
4 Repeat Steps 2 and 3 to programme the tracks in
1 Press PLAY MODE repeatedly until “PROGRAM”
the order you want.
appears in the display before you start playing.
5 Press · to start Programme Play.
2 Turn ≠ AMS ± until the track number you
want appears in the display.
To cancel Programme Play
Press PLAY MODE.
• CDP-XE520
Total playing time
Track number being
Playing order
programmed
When tracks, which aren’t numerically consecutive on
the disc, are programmed consecutively (i.e. 1, 3, 5
etc.)
TRACK STEP
MIN SEC
A one-second access time blank is added between the
2
tracks.
PROGRAM
The programme remains until erased (see page 13) or
until you press §OPEN/CLOSE
• CDP-XE320 and CDP-XE220
The programme you have created remains even after the
Track number being
Programme Play mode ends or you select another play
Total playing time
programmed
mode.
MIN SEC
2
Notes
• The total playing time doesn’t appear in the display when it
PROGRAM
exceeds 100 minutes.
• If you programme a track numbered over 24 (or 68 for the
CDP-XE320 and CDP-XE220), “–␣ –␣ .␣ –␣ –” appears instead of
the total playing time.
• “PROGRAM FULL” (or “FULL” for the CDP-XE320 and
CDP-XE220) appears in the display when you try to add a
track to a programme which already contains 24 tracks.
GB
12
Playing CDs
Creating a programme using the remote
Notes
• The total playing time doesn’t appear in the display when it
(CDP-XE520 and CDP-XE320 only)
exceeds 100 minutes.
• If you programme a track numbered over 24 (or 68 for the
• CDP-XE520
CDP-XE320), “–␣ –␣ .␣ –␣ –” appears instead of the total playing
time.
• “PROGRAM FULL” (or “FULL” for the CDP-XE320)
PROGRAM
appears in the display when you try to add a track to a
programme which already contains 24 tracks.
Number buttons
>10
CLEAR
Checking the track order
CHECK
You can check your programme before or after you
start playing.
Press CHECK.
·
Each time you press this button, the display shows the
track number in the programmed order. After the last
track in the programme, the display shows “- END -”
• CDP-XE320
(or “End” for the CDP-XE320 and CDP-XE220) and
returns to the original display. If you check the order
after you start playing, the display shows only the
PROGRAM
remaining track numbers.
Number buttons
>10
CLEAR
Changing the track order
CHECK
You can change your programme before you start
(
playing.
To
You need to
1 Press PROGRAM before you start playing.
“PROGRAM” appears in the display.
Erase a track
Press CHECK until the track
you don’t want appears in
the display, then press
2 Press the number buttons of the tracks you want to
CLEAR
programme in the order you want.
Erase the last track in the
Press CLEAR. Each time you
Example: To programme the tracks 2, 8 and 5.
programme
press the button, the last
Press the number buttons in the order
track will be cleared.
2, 8 and 5.
Add tracks to the end of the
Turn ≠ AMS ± until
programme
the track number you want
to add appears, then push
To select a track with a number over 10
≠ AMS ±.
Use >10 button (see page 10).
When using the remote,
If you’ve made a mistake
press the number buttons of
the tracks to be added
Press CLEAR, then press the correct track number.
(CDP-XE520 and CDP-XE320
only).
3 Press · ( or ( for the CDP-XE320) to start
Change the whole
Hold down CLEAR until
Programme Play.
programme completely
“CLEAR” (for the CDP-
XE520) or “CLEAr” (for the
CDP-XE320 and CDP-XE220)
To cancel Programme Play
appears in the display.
Press CONTINUE.
Create a new programme
following the programming
procedure.
You can check the total playing time while
programming using the remote (Programme Edit)
To select a track, press = or + and check the total
playing time. Then press PROGRAM to confirm your
selection.
GB
13
Recording From CDs
4 Start recording on the deck and then press · on
Recording Your Own
the player.
When you record on both sides of the tape, the player
Programme
pauses at the end of the programme for side A.
You can record the programme you’ve created on a
5 When you record on side B, reverse the tape and
tape, DAT or MD. The programme can contain up to 24
press · or P on the player to resume playing.
tracks.
By inserting a pause during programming, you can
divide the programme into two for recording on both
To check and change your programme
sides of a tape.
See page 13.
The “TAPE A” (or
• CDP-XE520
≠ AMS ±
PLAY MODE
·
P
• CDP-XE320 and CDP-XE220
≠ AMS ±
Recording a CD by Specifying
Tape Length (Time Edit)
PLAY MODE
·
P
(CDP-XE520 only)
1 Create your programme (for side A when
You can have the player create a programme that will
recording on a tape) while checking the total
match the length of the tape. In this feature, the player
playing time indicated in the display.
creates a programme basically keeping the original
Follow Steps 1 to 4 in “Creating a programme on
order of the disc. However, the player may change the
the player” on page 12 or Steps 1 and 2 in
last track of each side to match the recording time to
“Creating a programme using the remote” on page
the tape length.
13.
i.e. Side A: track number 1n2n3n4n8
A
The “TAPE A” (or
indication for the
Side B: track number 5n6n7n9n10
CDP-XE320 and CDP-XE220) appears in the
The programme may contain up to 24 tracks (a pause
display.
inserted between tracks is counted as one track).
Note that tracks numbered over 24 cannot be
2 When you record on both sides of the tape, press
programmed in this feature.
P to insert a pause.
A B
The “P” and “TAPE B” (or
indication for the
EDIT/TIME FADE
0/)
CDP-XE320 and CDP-XE220) appear in the display
and the playing time is reset to “0.00.”
When you record on one side of the tape or on a
DAT or MD, skip this step and go to Step 4.
A pause is counted as one track
You can programme up to 23 tracks when you insert a
pause.
3 Repeat Step 1 to create the programme for side B.
GB
14
A
indication for the CDP-XE320
and CDP-XE220) appears while checking the
B
programme for side A and “TAPE B” (or
indication
for the CDP-XE320 and CDP-XE220) appears while
checking the programme for side B.
When tracks, which aren’t numerically consecutive on
the disc, are programmed consecutively (i.e. 1, 3, 5
etc.)
A one-second access time blank is added between the
tracks.
·
P
Recording From CDs
Recording From CDs
1 Press EDIT/TIME FADE before you start playing
When tracks, which aren’t numerically consecutive on
until “EDIT” appears and “TAPE A” flashes in the
the disc, are programmed consecutively (i.e. 1, 3, 5
display.
etc.)
A one-second access time blank is added between the
tracks.
2 Press 0 or ) to specify the tape length.
Each time you press these buttons, the display
changes as shown below with the tape length of
To check and change your programme
one side .
See page 13.
n HALF ˜ C-46 23.00 ˜ C-54 27.00 ˜ C-60 30.00 N
n - -. - - ˜ C-90 45.00 ˜ C-74 37.00 N
When you select “HALF”
The player divides the total playing time of the disc in
Fading In or Out
half, keeping the original order.
Note that you cannot select “HALF” when the disc has
You can manually fade in or out to prevent tracks from
more than 24 tracks.
starting or ending abruptly.
Note that you cannot use this effect when you use the
3 Press EDIT/TIME FADE to have the player create
DIGITAL OUT (OPTICAL) connector.
the programme.
The display shows the tracks to be recorded.
“TAPE B” flashes in the display.
Fading in or out at the point you want
(CDP-XE520 and CDP-XE320 only)
4 When you record on both sides of the tape, press
EDIT/TIME FADE again.
• CDP-XE520
The player inserts a pause, then creates the
programme for side B. The display shows the
programmed tracks.
When you record on one side of the tape or on a
DAT or MD, skip this step.
Number buttons
5 Start recording on the deck and then press · on
the player.
When you record on both sides of the tape, the
player pauses at the end of the programme for side
FADER
A.
6 When you record on side B, reverse the tape and
press · or P on the player to resume playing.
To cancel Time Edit
• CDP-XE320
Press PLAY MODE.
When using the remote, press CONTINUE.
You can specify the tape length freely
You can set the tape length using ≠ AMS ±.
Example: When the tape length of one side is 30 minutes
and 15 seconds
FADER
1 To set the minutes, turn ≠ AMS ± until
“30” appears in the display, then push
≠ AMS ±.
2 To set the seconds, turn ≠ AMS ± until
“15” appears in the display, then push
≠ AMS ±.
(Continued)
GB
15
Recording From CDs
1 Press EDIT/TIME FADE repeatedly before you
To
Press FADER
start playing until “T.FADE” and “TAPE A”
Start play fading in
During pause. For the CDP-XE520,
appear in the display.
“FADE” flashes. For the CDP-XE320
FADE
and CDP-XE220,
lights up
and the Q indication flashes. Then
2 Press 0 or ) to specify the playing time. Each
play fades in.
time you press these buttons, the display changes
as shown below with the tape length of one side.
End play fading out
When you want to start fading out.
For the CDP-XE520, “FADE”
n HALF ˜ C-46 23.00 ˜ C-54 27.00 ˜ C-60 30.00 N
flashes. For the CDP-XE320 and
FADE
CDP-XE220,
lights up and the
n - -. - - ˜ C-90 45.00 ˜ C-74 37.00 N
q indication flashes. Then play
fades out and the player pauses.
When you select “HALF”
The player sets the playing time to a half of the total
playing time.
Fading time lasts for 5 seconds. If you press FADER
during Music Scan (page 10), fading time changes to 2
3 Press · to start playing.
seconds (CDP-XE520 only).
At the specified time the play fades out and the
player pauses. “TAPE B” appears in the display.
Changing the fading time (CDP-XE520 only)
4 To record on side B, reverse the tape and press ·
or P on the player to resume playing.
You can change the fading time from 2 to 10 seconds
Again, the play fades out at the specified time.
before fading in or out. If you don’t change it, fading
lasts for 5 seconds.
To cancel Time Fade
Press EDIT/TIME FADE.
1 Before you start playing, press FADER.
You can freely specify the playing time
2 Press the number buttons to specify the fading
See “You can specify the tape length freely” on page 15.
time.
You can change discs during Time Fade
Notes
If the play ends before the specified fade-out time, (for
• The fading time is reset to 5 seconds when you turn off the
example, when you record CD-singles on a tape) you can
player.
change the disc. The specified fade-out time is counted
• If you press FADER during Music Scan (page 10), fading
only during playing.
time changes to 2 seconds.
You can fade in to resume playing in Step 4
After you reverse the tape, press FADER on the remote.
Fading out at the specified time
(Time Fade) (CDP-XE520 only)
Notes
You can have the player fade out automatically by
• Time Fade will be cancelled if you press 0 or ) during
specifying the playing time. Once you set the time fade,
the operation.
it works twice, that is, the play fades out at the end of
• “HALF” does not appear when the disc has more than 24
both sides of a tape.
tracks.
EDIT/TIME FADE
0/)
·
P
GB
16

Recording From CDs
Additional Information
Recording From CDs
Recording From CDs
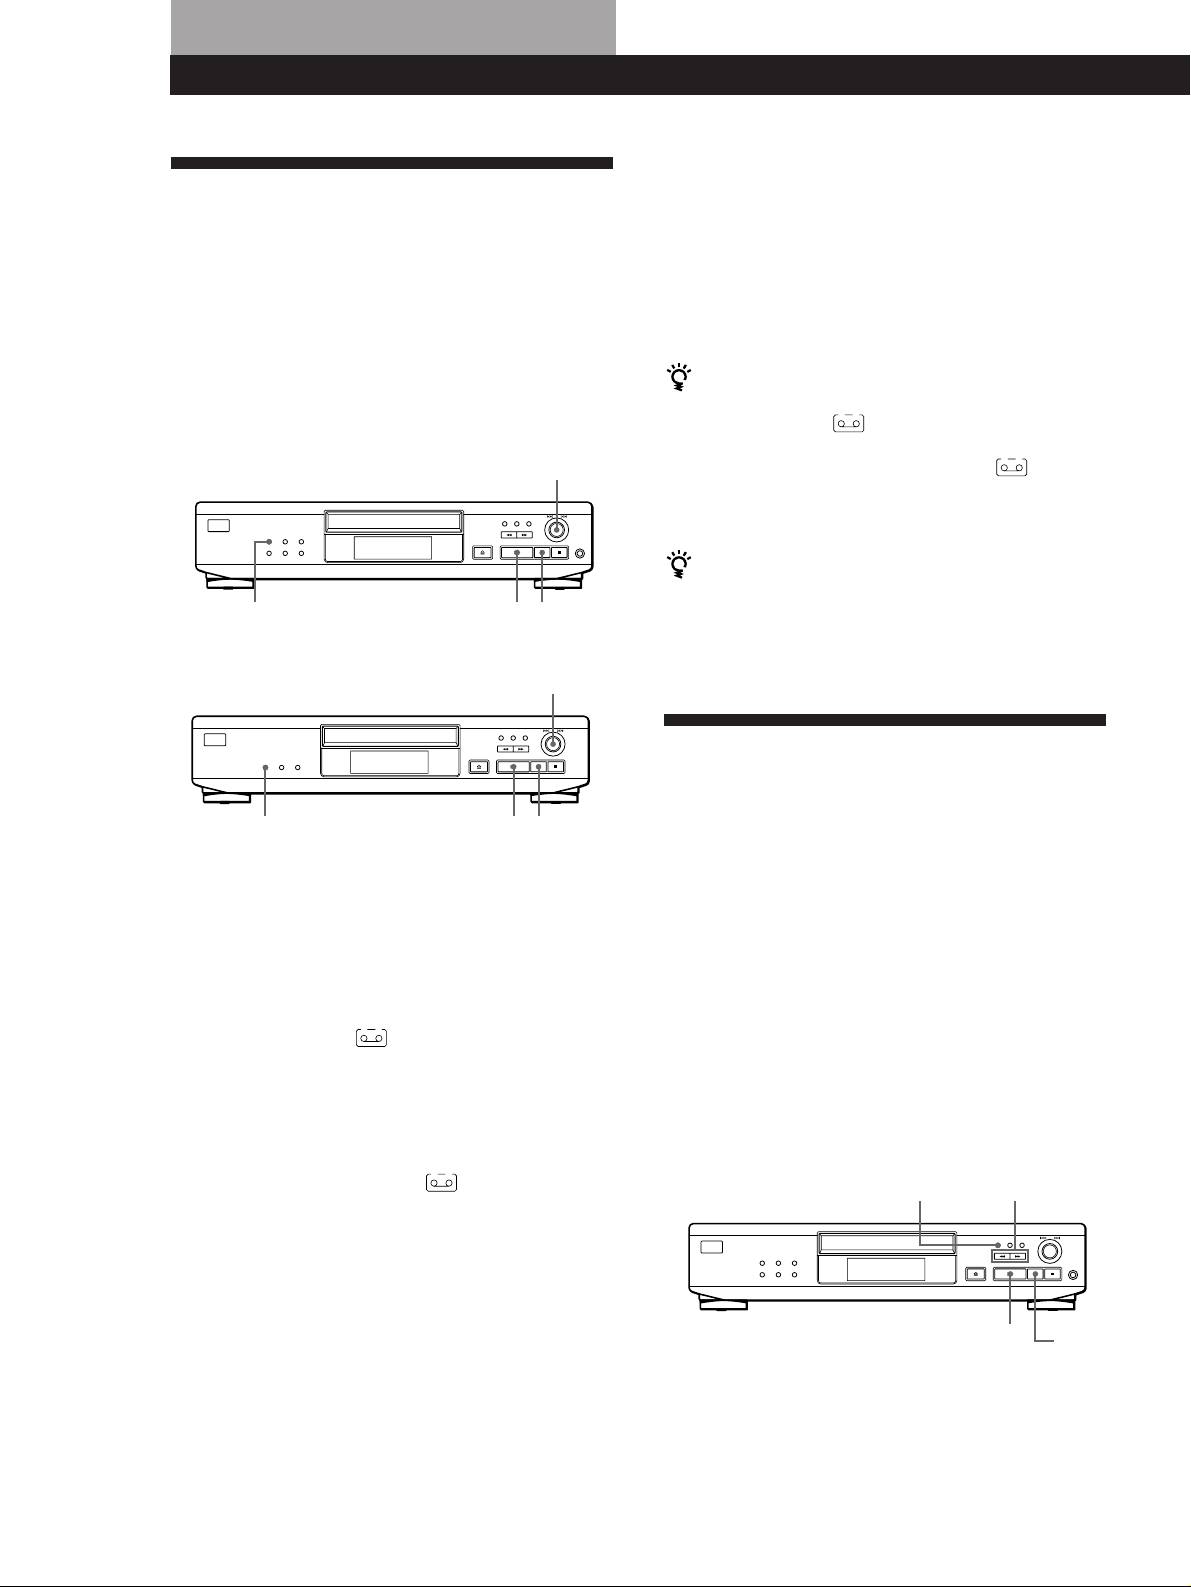
Adjusting the Recording Level
Notes on CDs
(Peak Search)
On handling CDs
• To keep the disc clean, handle the disc by its edge. Do not
The player locates the highest level among the tracks to
touch the surface.
be recorded to let you adjust the recording level before
• Do not stick paper or tape on the disc.
you start recording.
• CDP-XE520
Not this way
PEAK SEARCH
p
• Do not expose the disc to direct sunlight or heat sources
such as hot air ducts, nor leave it in a car parked in direct
• CDP-XE320 and CDP-XE220
sunlight as there can be considerable rise in temperature
inside the car.
• Do not use any commercially available stabilizer. If you do,
the disc and the player may be damaged.
• After playing, store the disc in its case.
PEAK SEARCH
p
On cleaning
1 Before you start playing, press PEAK SEARCH.
• Before playing, clean the disc with a cleaning cloth. Wipe
“PEAK” flashes in the display and the player starts
the disc from the centre out.
scanning the disc searching for the highest peak
level.
After scanning all the tracks, the player repeats the
portion with the highest peak level.
2 Adjust the recording level on the deck.
3 Press p on the player to stop Peak Search.
“PEAK” disappears from the display.
• Do not use solvents such as benzine, thinner,
commercially available cleaners or anti-static spray
intended for vinyl LPs.
Note
The portion with the highest level may differ every time you
try the adjustment on the same disc. The difference is,
however, so slight that you won’t find any problem in
adjusting the recording level precisely.
GB
17

Additional Information
Troubleshooting
Specifications
If you experience any of the following difficulties while
Compact disc player
using the player, use this troubleshooting guide to help
Laser Semiconductor laser (λ = 780 nm)
you remedy the problem. Should any problem persist,
Emission duration: continuous
consult your nearest Sony dealer.
Laser output Max 44.6 µW*
There’s no sound.
* This output is the value measured at
/ Check that the player is connected securely.
a distance of 200 mm from the
/ Make sure you operate the amplifier correctly.
objective lens surface on the Optical
/ Adjust the output level with LINE OUT LEVEL +/–
Pick-up block with 7 mm aperture.
on the remote (CDP-XE520 and CDP-XE320 only).
Frequency response 2 Hz to 20 kHz ± 0.5 dB
The CD does not play.
Signal-to-noise ratio More than 100 dB
/ There’s no CD inside the player. “- NO DISC -” (or
Dynamic range CDP-XE520: More than 98 dB
“no dISC” for the CDP-XE320 and CDP-XE220)
CDP-XE320 and CDP-XE220:
appears. Insert a CD.
More than 92 dB
/ Place the CD with the label side up on the disc tray
Harmonic distortion CDP-XE520: Less than 0.0045%
correctly.
CDP-XE320 and CDP-XE220:
/ Clean the CD (see page 17).
Less than 0.005%
/ Moisture has condensed inside the player. Remove
Channel separation More than 95 dB
the disc and leave the player turned on for about an
hour (see page 2).
Outputs
The recording level has changed (CDP-XE520 and
Jack
Maximum
Load
CDP-XE320 only).
type
output
impedance
/ The recording level changes if you adjust the output
level
level with LINE OUT LEVEL +/– on the remote
LINE OUT
Phono
2 V
Over 10 kilohms
during recording.
jacks
(at 50 kilohms)
The remote does not function (CDP-XE520 and CDP-XE320
DIGITAL
Optical
–18 dBm
Wave length: 660 nm
only).
OUT
output
/ Remove the obstacles in the path of the remote and
(OPTICAL)
connector
the player.
PHONES
Stereo
10 mW
32 ohms
/ Point the remote at the remote sensor g on the player.
(CDP-XE520
phone
/ Replace all the batteries in the remote with new ones
only)
jack
if they are weak.
General
Power requirements 220 V – 230 V AC, 50/60 Hz
Power consumption CDP-XE520: 11 W
CDP-XE320/XE220: 10 W
Dimensions (approx.) 430 × 95 × 290 mm
(w/h/d) (17 × 3 3/4 × 11 1/2 in.) incl. projecting
parts
Mass (approx.) CDP-XE520: 3.2 kg (7 lbs 1 oz)
CDP-XE320/XE220: 3.0 kg (6 lbs 10 oz)
Supplied accessories
Audio cord (2 phono plugs – 2 phono plugs) (1)
Remote commander (remote) (CDP-XE520 and
CDP-XE320 only) (1)
Sony SUM-3 (NS) batteries (CDP-XE520 and CDP-XE320
only) (2)
Design and specifications are subject to change without notice.
GB
18

Index
Additional Information
R
Names of controls
Index
Recording 14
a programme 14
Buttons
using Time Edit 14
A – B 11
A, B
Remaining time 7
Remote control 4
CHECK 13
A˜B Repeat 11
Repeating
CLEAR 13
AMS 9
all 10
CONTINUE 11
Automatic Music Sensor. See
a specific portion 11
EDIT/TIME FADE 15, 16
AMS
the current track 10
FADER 16
LANGUAGE 9
C, D
LINE OUT LEVEL +/– 5
S
CD TEXT 8
MUSIC SCAN 10
Scanning. See Music Scan
Connecting 4
Number 10
Searching. See Locating
Continuous Play 6
§ OPEN/CLOSE 6
Selecting the language 8
CONTROL A1 5
PEAK SEARCH 17
Shuffle Play 11
PLAY MODE 11, 12
PROGRAM 13
E
T
REPEAT 10
Editing. See Recording
Time Edit 14
SHUFFLE 11
Time Fade 16
TIME 7
F, G
Total playing time 7
TIME/TEXT 7
Fading 15
Troubleshooting 18
· 6
Time Fade 16
P 6
p 6
U, V, W, X, Y, Z
H, I, J, K
0/) 10
Unpacking 4
=/+ 10
Half disc (HALF) 15
>10 10
Handling CDs 17
Hookups 4
overview 4
Switch
I/u 6
L
Locating
Connector
by monitoring 10
DIGITAL OUT (OPTICAL) 5
by observing the display 10
by scanning 10
Jacks
directly 10
LINE OUT 4
using AMS 10
PHONES 6
M, N, O
Others
Music Scan 10
Disc tray 6
Display 7
P, Q
≠ AMS ± 6
Peak Search 17
g 4
Playback
Continuous Play 6
Programme Play 12
Repeat Play 10
Shuffle Play 11
Programme 12
changing 13
checking 13
for recording 14
Programme Edit 13
GB
19
Dotyczące działania sprzętu
OSTRZEŻENIE
• Przeniesienie sprzętu bezpośrednio z
Środki ostrożności
zimnego do ciepłego pomieszczenia, lub
ustawienie go w wilgotnym
W celu uniknięcia
Dotyczące bezpieczeństwa
pomieszczeniu, może spowodować
niebezpieczeństwa pożaru lub
• Ostrzeżenie — Manipulowanie przy
kondensację wilgoci na powierzchni
sprzęcie instrumentami optycznymi,
porażenia prądem, nie należy
soczewki, umieszczonej wewnątrz
może być niebezpieczne dla wzroku.
poddawać urządzenia
odtwarzacza. W takim wypadku,
• Jeżeli do wnętrza obudowy dostanie się
funkcjonowanie sprzętu może być
działaniu wilgoci lub deszczu.
stałe lub płynne ciało obce, należy sprzęt
nieprawidłowe. Należy wówczas usunąć
W celu uniknięcia
odłączyć od źródła zasilania i przed
dysk CD z odtwarzacza i włączony
podjęciem dalszej eksploatacji, oddać
niebezpieczeństwa porażenia
sprzęt pozostawić na około godzinę, aby
do przeglądu przez odpowiednio
wilgoć mogła wyparować.
prądem nie należy otwierać
wykwalifikowany personel.
obudowy. Jedynie
Dotyczące regulacji poziomu głośności
wykwalifikowany personel jest
Dotyczące źródeł zasilania
• Słuchając odcinka o niskim poziomie
• Przed rozpoczęciem eksploatacji, należy
uprawniony do naprawy i
dźwiękowych sygnałów wejściowych lub
upewnić się, że potrzebne napięcie
odcinka bez zapisu sygnałów
serwisu.
robocze sprzętu jest identyczne z
wejściowych, nie należy zwiększać
miejscowym napięciem sieci
poziomu głośności. W przeciwnym
Laser będący komponentem tego
elektrycznej. Niezbędne napięcie
wypadku można spowodować
robocze podano na tabliczce
urządzenia jest w stanie emitować
uszkodzenie głośników w momencie
znamiennej, umieszczonej na tylnej
promienie przekraczające normy
odtworzenia odcinka o szczytowym
ściance odtwarzacza.
Klasy 1.
poziomie dźwięku.
• Wyłączony sprzęt, nie jest odłączony od
źródła zasilania (sieć elektryczna) dopóki
Dotyczące czyszczenia
przewód zasilania jest podłączony do
• Obudowę, panel oraz kontrolki proszę
gniazdka ściennego prądu AC.
czyścić przy pomocy miękkiej ściereczki,
lekko zwilżonej w rozczynie łagodnego
• Przed dłuższą przerwą w eksplotacji
detergentu. Nie należy używać gąbek
sprzętu, należy pamiętać o odłączeniu
szorujących, proszków do czyszczenia,
odtwarzacza od sieci elektrycznej.
lub rozpuszczalników zawierających
Przewód zasilania prądem AC (sieć
alkohol lub benzynę.
Niniejsze urządzenie jest
elektryczna) odłącza się przez
zaklasyfikowane jako produkt z CLASS 1
wyciągnięcie wtyczki; nigdy nie ciągnąć
W przypadku ewentualnych pytań lub
LASER (z laserem klasy 1). Oznakowanie
za sam kabel.
CLASS 1 LASER PRODUCT znajduje się
• Wymianę przewodu zasilania prądem AC
niejasności dotyczących nabytego
na zewnętrznej, tylnej stronie obudowy.
zlecać wyłącznie fachowcom punktów
odtwarzacza, prosimy o
serwisowych.
skontaktowanie się z najbliższym
punktem obsługi lub sprzedaży
Dotyczące umiejscowienia sprzętu
sprzętu Sony.
• Sprzęt należy ustawić w miejscu
zapewniającym odpowiednią wentylację,
zapobiegającą narastaniu ciepła
wewnątrz urządzenia.
• Nie ustawiać sprzętu na miękkich
powierzchniach, takich jak np. dywan,
powodujących zablokowanie otworów
wentylacyjnych dolnej powierzchni
sprzętu.
• Nie ustawiać sprzętu w pobliżu źródeł
ciepła, lub w miejscach narażonych na
bezpośrednie działanie promieni
słonecznych, nadmiernych ilości kurzu
lub wstrząsy mechaniczne.
PL
2
