Sony DAV-SB200: инструкция
Раздел: Бытовая, кухонная техника, электроника и оборудование
Тип: Музыкальный Центр
Инструкция к Музыкальному Центру Sony DAV-SB200

2-179-837-81
DVD
Home Theatre System
GB
Operating Instructions
RU
àÌÒÚÛ͈Ëfl ÔÓ ˝ÍÒÔÎÛ‡Ú‡ˆËË
DAV-SB200
©2004 Sony Corporation
Safety Precautions
On power sources
WARNING: TO PREVENT FIRE OR ELECTRIC SHOCK
•AC power cord must be changed only at the qualified service
HAZARD, DO NOT EXPOSE THIS PRODUCT TO RAIN OR
shop.
MOISTURE.
On placement
WARNING: Do not install this equipment in a confined space
• Place the receiver in a location with adequate ventilation to
such as a book case or similar unit.
prevent heat build-up in the system.
To prevent fire, do not cover the ventilation of the apparatus
• At high volume, over long periods of time, the cabinet
with news papers, table-cloths, curtains, etc. And don’t place
becomes hot to the touch.This is not a malfunction.
lighted candles on the apparatus.
However, touching the cabinet should be avoided. Do not
Don’t throw away the battery with general
place the unit in a confined space where ventilation is poor
house waste, dispose of it correctly as chemical
as this may cause overheating.
waste.
• Do not block the ventilation slots by putting anything on the
system.The receiver is equipped with a high power amplifier.
If the ventilation slots on the top surface are blocked, the unit
This appliance is classified as a CLASS 1
can overheat and malfunction.
LASER product.The label is located on the
• Do not place the system on a soft surface such as a rug
rear exterior.
that might block the ventilation holes on the bottom.
• Do not place the system in a location near heat sources, or
CAUTION:
in a place subject to direct sunlight, excessive dust, or
This DVD Receiver employs a Laser System.
mechanical shock.
To ensure proper use of this product, please read this owner’s
On operation
manual carefully and retain it for future reference. Should the
• If the system is brought directly from a cold to a warm loca-
unit require maintenance, contact an authorized service loca-
tion, or is placed in a very damp room, moisture may con-
tion (see service procedure).
dense on the lenses inside the system. Should this occur,
Performing controls, adjustments, or carrying out procedures
the system may not operate properly. In this case, remove
other than those specified herein may result in hazardous radi-
the disc and leave the system turned on for about half an
ation exposure.
hour until the moisture evaporates.
To prevent direct exposure to laser beam, do not try to open
• When you move the system, take out any discs. If you don’t,
the enclosure.Visible laser radiation when open. DO NOT
the disc may be damaged.
STARE INTO BEAM.
The nameplate is located on the rear of the unit.
CAUTION: The apparatus should not be exposed to water
(dripping or splashing) and no objects filled with liquids, such
IMPORTANT NOTICE
as vases, should be placed on the apparatus.
Caution:This system is capable of holding a still video
Precautions
image or on-screen display image on your television screen
Safety
indefinitely. If you leave the still video image or on-screen
• If anything falls into the cabinet, unplug the unit and have it
display image displayed on your TV for an extended period
checked by qualified personnel before operating it any
of time you risk permanent damage to your television
further.
screen. Projection televisions are especially susceptible to
• The unit is not disconnected from the AC power source
this.
(mains) as long as it is connected to the mains outlet, even if
the unit itself has been turned off.
• Unplug the unit from the wall outlet if you do not intend to
use it for an extended period of time.To disconnect the cord,
pull it out by the plug, never by the cord.
Installing
• Allow adequate air circulation to prevent internal heat
buildup.
• Do not place the unit on surfaces (rugs, blankets, etc.) or
near materials (curtains, draperies) that may block the venti-
lation slots.
• Do not install the unit near heat sources such as radiators, or
air ducts, or in a place subject to direct sunlight, excessive
dust, mechanical vibration, or shock.
• Do not install the unit in an inclined position. It is designed to
be operated in a horizontal position only.
•Keep the unit and discs away from equipment with strong
magnets, such as microwave ovens, or large loudspeakers.
• Do not place heavy objects on the unit.
• If the unit is brought directly from a cold to a warm location,
moisture may condense inside the DVD Home Theatre
System and cause damage to the lenses.When you first
install the unit, or when you move it from a cold to a warm
location, wait for about 30 minutes before operating the unit.
2

Safety Precautions (Continued)
NOTES ON COPYRIGHTS:
It is forbidden by law to copy, broadcast, show, broadcast
via cable, play in public, or rent copyrighted material without
permission.
This product features the copy protection function developed by
Macrovision. Copy protection signals are recorded on some
discs.When recording and playing the pictures of these discs
on a VCR, picture noise will appear.
This product incorporates copyright protection technology that
is protected by method claims of certain U.S. patents and other
intellectual property rights owned by Macrovision Corporation
and other rights owners. Use of this copyright protection tech-
nology must be authorized by Macrovision Corporation, and is
INTRODUCTION
intended for home and other limited viewing uses only unless
otherwise authorized by Macrovision Corporation. Reverse
engineering or disassembly is prohibited.
About the symbols for instruction
Indicates hazards likely to cause harm to the unit
itself or other material damage.
Note Indicates special operating features of this unit.
Tip Indicates tips and hints for making the task easier.
3

Table of Contents
Introduction
Audio CD and MP3 Disc Operation . . . . . . . . . 25-26
Playing an Audio CD and MP3 Disc . . . . . . . . . . 25
Safety Precautions. . . . . . . . . . . . . . . . . . . . . . . . 2-3
Notes on MP3 Files . . . . . . . . . . . . . . . . . . . . . . 25
Table of Contents . . . . . . . . . . . . . . . . . . . . . . . . . . 4
Pause . . . . . . . . . . . . . . . . . . . . . . . . . . . . . 26
Before Use . . . . . . . . . . . . . . . . . . . . . . . . . . . . . . 5-6
Selecting Another Track . . . . . . . . . . . . . . . . 26
Playable Discs. . . . . . . . . . . . . . . . . . . . . . . . . . . 5
Search. . . . . . . . . . . . . . . . . . . . . . . . . . . . . 26
Precautions . . . . . . . . . . . . . . . . . . . . . . . . . . . . . 6
Repeat . . . . . . . . . . . . . . . . . . . . . . . . . . . . 26
Notes on Discs . . . . . . . . . . . . . . . . . . . . . . . . . . 6
Changing the Audio Channel . . . . . . . . . . . . 26
About Symbols . . . . . . . . . . . . . . . . . . . . . . . . . . 6
JPEG File Operation . . . . . . . . . . . . . . . . . . . . . . . 27
Front Panel Controls . . . . . . . . . . . . . . . . . . . . . . . . 7
Viewing JPEG Files on a Disc . . . . . . . . . . . . . . 27
Display Window Indicators . . . . . . . . . . . . . . . . . . . 8
Selecting Another Files . . . . . . . . . . . . . . . . 27
Remote Control . . . . . . . . . . . . . . . . . . . . . . . . . . . . 9
Still Picture . . . . . . . . . . . . . . . . . . . . . . . . . 27
Rear Panel Connections . . . . . . . . . . . . . . . . . . . . 10
To flip the picture . . . . . . . . . . . . . . . . . . . . . 27
To rotate picture. . . . . . . . . . . . . . . . . . . . . . 27
Preparation
Notes on JPEG Files . . . . . . . . . . . . . . . . . . 27
Connections . . . . . . . . . . . . . . . . . . . . . . . . . . . 11-15
Programmed Playback . . . . . . . . . . . . . . . . . . . . . 28
Connecting to a TV . . . . . . . . . . . . . . . . . . . . . . 11
Programmed Playback with Audio CD
Connecting to External Equipment . . . . . . . . . . . 12
and MP3 Disc . . . . . . . . . . . . . . . . . . . . . . . . . . 28
Antenna Connections. . . . . . . . . . . . . . . . . . . . . 13
Programmed Playback with Video CD . . . . . . . . 28
Speaker System Connection . . . . . . . . . . . . . . . 14
Speaker Setup . . . . . . . . . . . . . . . . . . . . . . . . . . . . 29
Speaker Positioning . . . . . . . . . . . . . . . . . . . . . . 15
Additional Information. . . . . . . . . . . . . . . . . . . . . . 30
Selecting the Output/Input Source . . . . . . . . . . . . 16
Sleep Timer Setting . . . . . . . . . . . . . . . . . . . . . . 30
Before Operation . . . . . . . . . . . . . . . . . . . . . . . 17-21
Viewing the Playing Time and Remaining
Mini Glossary for Audio Stream & Surround
Time in the Front Panel Display . . . . . . . . . . . . . 30
Mode. . . . . . . . . . . . . . . . . . . . . . . . . . . . . . . . . 17
Dimmer . . . . . . . . . . . . . . . . . . . . . . . . . . . . . . . 30
Sound Mode . . . . . . . . . . . . . . . . . . . . . . . . . . . 17
Muting . . . . . . . . . . . . . . . . . . . . . . . . . . . . . . . . 30
General Explanation. . . . . . . . . . . . . . . . . . . . . . 18
Using Headphone Jack . . . . . . . . . . . . . . . . . . . 30
On-Screen Display. . . . . . . . . . . . . . . . . . . . . . . 18
Volume Control . . . . . . . . . . . . . . . . . . . . . . . . . 30
Initial Settings . . . . . . . . . . . . . . . . . . . . . . . . 19-21
Using the Sound Effect . . . . . . . . . . . . . . . . . . . 30
General Operation. . . . . . . . . . . . . . . . . . . . 19
Radio Operation . . . . . . . . . . . . . . . . . . . . . . . . . . 31
Language . . . . . . . . . . . . . . . . . . . . . . . . . . 19
Presetting the Radio Stations. . . . . . . . . . . . . . . 31
TV Aspect . . . . . . . . . . . . . . . . . . . . . . . . . . 19
Listening to the Radio . . . . . . . . . . . . . . . . . . . . 31
Speaker Setup. . . . . . . . . . . . . . . . . . . . . . . 20
Controlling the TV with the Supplied Remote . . . 32
Others. . . . . . . . . . . . . . . . . . . . . . . . . . . . . 20
Controlling the TV . . . . . . . . . . . . . . . . . . . . . . . 32
Parental Control. . . . . . . . . . . . . . . . . . . . . . 21
Using the SONY TV DIRECT Function . . . . . . . . . 33
Area code . . . . . . . . . . . . . . . . . . . . . . . . . . 21
Preparation . . . . . . . . . . . . . . . . . . . . . . . . . . . . 33
Operation. . . . . . . . . . . . . . . . . . . . . . . . . . . . . . 33
Operation
DVD and Video CD Operation. . . . . . . . . . . . . . 22-24
Reference
Playing a DVD and Video CD. . . . . . . . . . . . . . . 22
Language Code List . . . . . . . . . . . . . . . . . . . . . . . 34
General Features. . . . . . . . . . . . . . . . . . . . . . . . 22
Area Code List. . . . . . . . . . . . . . . . . . . . . . . . . . . . 35
Resume Function . . . . . . . . . . . . . . . . . . . . 22
Troubleshooting . . . . . . . . . . . . . . . . . . . . . . . . 36-37
Selecting Another TITLE . . . . . . . . . . . . . . . 22
Specification . . . . . . . . . . . . . . . . . . . . . . . . . . . . . 38
Selecting Another CHAPTER/TRACK . . . . . 22
Search. . . . . . . . . . . . . . . . . . . . . . . . . . . . . 22
Still Picture . . . . . . . . . . . . . . . . . . . . . . . . . 22
Slow Motion. . . . . . . . . . . . . . . . . . . . . . . . . 23
Repeat . . . . . . . . . . . . . . . . . . . . . . . . . . . . 23
Time Search . . . . . . . . . . . . . . . . . . . . . . . . 23
Special DVD Features . . . . . . . . . . . . . . . . . . . . 24
Manufactured under license from Dolby Laboratories.“Dolby”,
Checking the contents of DVD Video disc:
“Pro Logic”, and the double-D symbol are trademarks of Dolby
Menus . . . . . . . . . . . . . . . . . . . . . . . . . . . . . 24
Laboratories. Confidential Unpublished works. Copyright 1992-
Camera Angle . . . . . . . . . . . . . . . . . . . . . . . 24
1997 Dolby Laboratories. All rights reserved.
Changing the Audio Language. . . . . . . . . . . 24
Manufactured under license from Digital Theater Systems, Inc.
Changing the Audio Channel . . . . . . . . . . . . 24
US Pat. No. 5,451,942 5,956,674, 5,974,380, 5,978,762 and
Subtitle . . . . . . . . . . . . . . . . . . . . . . . . . . . . 24
other world-wide patents issued and pending. “DTS” and “DTS
Digital Surround” are registered trademarks of Digital Theater
Systems, Inc. Copyright 1996, 2000 Digital Theater Systems,
Inc. All rights reserved.
4
Before Use
Playable Discs
Disc-related terms
Title (DVD video discs only)
DVD video discs
The main film content or accompanying feature content
(8 cm / 12 cm disc)
or additional feature content, or music album.
Each title is assigned a title reference number enabling
Video CD (VCD)
you to locate it easily.
(8 cm / 12 cm disc)
Chapter (DVD video discs only)
Audio CD
Sections of a picture or a musical piece that are smaller
(8 cm / 12 cm disc)
than titles. A title is composed of one or several chap-
In addition, this unit can play a DVD-R/-RW, SVCD and
ters. Each chapter is assigned a chapter number,
CD-R or CD-RW that contains audio titles, MP3, or
enabling you to locate the chapter you want. Depending
INTRODUCTION
JPEG files.
on the disc, chapters may not be recorded.
Notes
Track (Video CD and audio CD only)
Depending on the conditions of the recording equip-
Sections of a picture or a musical piece on a video CD
ment or the CD-R/RW (or DVD-R/-RW) disc itself,
or an audio CD. Each track is assigned a track number,
some CD-R/RW (or DVD-R/-RW) discs cannot be
enabling you to locate the track you want.
played on the unit.
DVD-RWs in VR (Video Recording) mode discs
Index (Video CD)
cannot be played on the unit.
A number that divides a track into sections to easily
Do not attach any seal or label to either side (the
locate the point you want on a VIDEO CD. Depending
labeled side or the recorded side) of a disc.
on the disc, no indexes may be recorded.
Do not use irregularly shaped CDs (e.g., heart-
shaped or octagonal). It may result in malfunctions.
Scene
A disc recorded in packet write format cannot be
On a video CD with PBC (Playback control) functions,
played.
moving pictures and still pictures are divided into
Notes on DVDs and Video CDs
sections called “Scenes”. Each scene is displayed in the
Some playback operations of DVDs and Video CDs may
menu screen and assigned a scene number, enabling
be intentionally fixed by software manufacturers. As this
you to locate the scene you want.
unit plays DVDs and Video CDs according to disc con-
A scene is composed of one or several tracks.
tent designed by the software manufacturer, some play-
back features of the unit may not be available or other
File
functions may be added.
Sections of a picture on a data CD containing JPEG
Make sure to also refer to the instructions supplied with
image files.
the DVDs and Video CDs. Some DVDs made for busi-
ness purposes may not be able to be played on the unit.
Types of video CDs
There are two types of video CDs:
Regional code of the DVD Receiver and DVDs
This DVD Receiver is designed and manufactured for
Video CDs equipped with PBC (Version 2.0)
playback of region “5” encoded DVD software.
PBC (Playback control) functions allow you to interact
The region code on the labels of some DVDs
with the system via menus, search functions, or other
indicates which type of player can play those
typical computer-like operations. Moreover, still pictures
discs.This unit can only play DVDs labeled “5”
of high resolution can be played if they are included in
or “ALL”. If you try to play any other discs, the message
the disc.
“Check Regional Code” will appear on the TV screen.
Video CDs not equipped with PBC (Version 1.1)
Some DVDs that have no region code label may still be
Operated in the same way as audio CDs, these discs
subject to area restrictions and therefore not playable.
allow playback of video pictures as well as sound, but
they are not equipped with PBC.
5
5
IMPORTANT NOTE:
SPENT OR DISCHARGED BATTERIES MUST BE
RECYCLED OR DISPOSED OF IN A SAFE MANNER IN
COMPLIANCE WITH ALL APPLICABLE LAWS.
FOR DETAILED INFORMATION, CONTACT YOUR LOCAL
COUNTY SOLID WASTE AUTHORITY.
Before Use (Continued)
Precautions
Storing discs
After playing, store the disc in its case.
Handling the unit
Do not expose the disc to direct sunlight or sources of
heat, or leave it in a parked car exposed to direct sun-
When shipping the unit
light, as there may be a considerable temperature
The original shipping carton and packing materials may
increase inside the car.
come in handy. For maximum protection, re-pack the
unit as it was originally packed at the factory.
Cleaning discs
When setting up the unit
Fingerprints and dust on the disc can distort the picture
The picture and sound of a nearby TV, VCR, or radio
or reduce sound quality. Before playing, clean the disc
may be disturbed during playback. In this case, position
with a clean cloth.Wipe the disc from the centre out-
the unit away from the TV, VCR, or radio, or turn off the
wards.
unit after removing the disc.
To keep the exterior surfaces clean
Do not use volatile liquids, such as insecticide spray,
near the unit. Do not leave rubber or plastic products in
contact with the unit for a long period of time.They will
leave marks on the surface.
Cleaning the unit
Do not use strong solvents such as alcohol, benzine,
To clean the cabinet
thinner, commercially available cleaners, or anti-static
Use a soft, dry cloth. If the surfaces are extremely dirty,
spray intended for vinyl records.
use a soft cloth lightly moistened with a mild detergent
solution. Do not use strong solvents such as alcohol,
This system can only play back a standard circular disc.
benzine, or thinner, as these might damage the surface
Using neither standard nor circular discs (e.g., card,
of the unit.
heart, or star shape) may cause a malfunction.
To obtain a clear picture
Do not use a disc that has a commercially available
The
DVD Receiver
is a high-tech, precision device. If the
accessory attached, such as a label or ring.
optical pick-up lens and disc drive parts are dirty or
worn, the picture quality will be poor.
Regular inspection and maintenance are recommended
About Symbols
after every 1,000 hours of use. (This depends on the
operating environment.)
About the symbol display
For details, please contact your nearest dealer.
“ ” may appear on the TV screen during operation.
Notes on Discs
This icon means the function explained in this owner’s
manual is not available on that specific DVD video disc.
Disc Handling
About the disc symbols for instructions
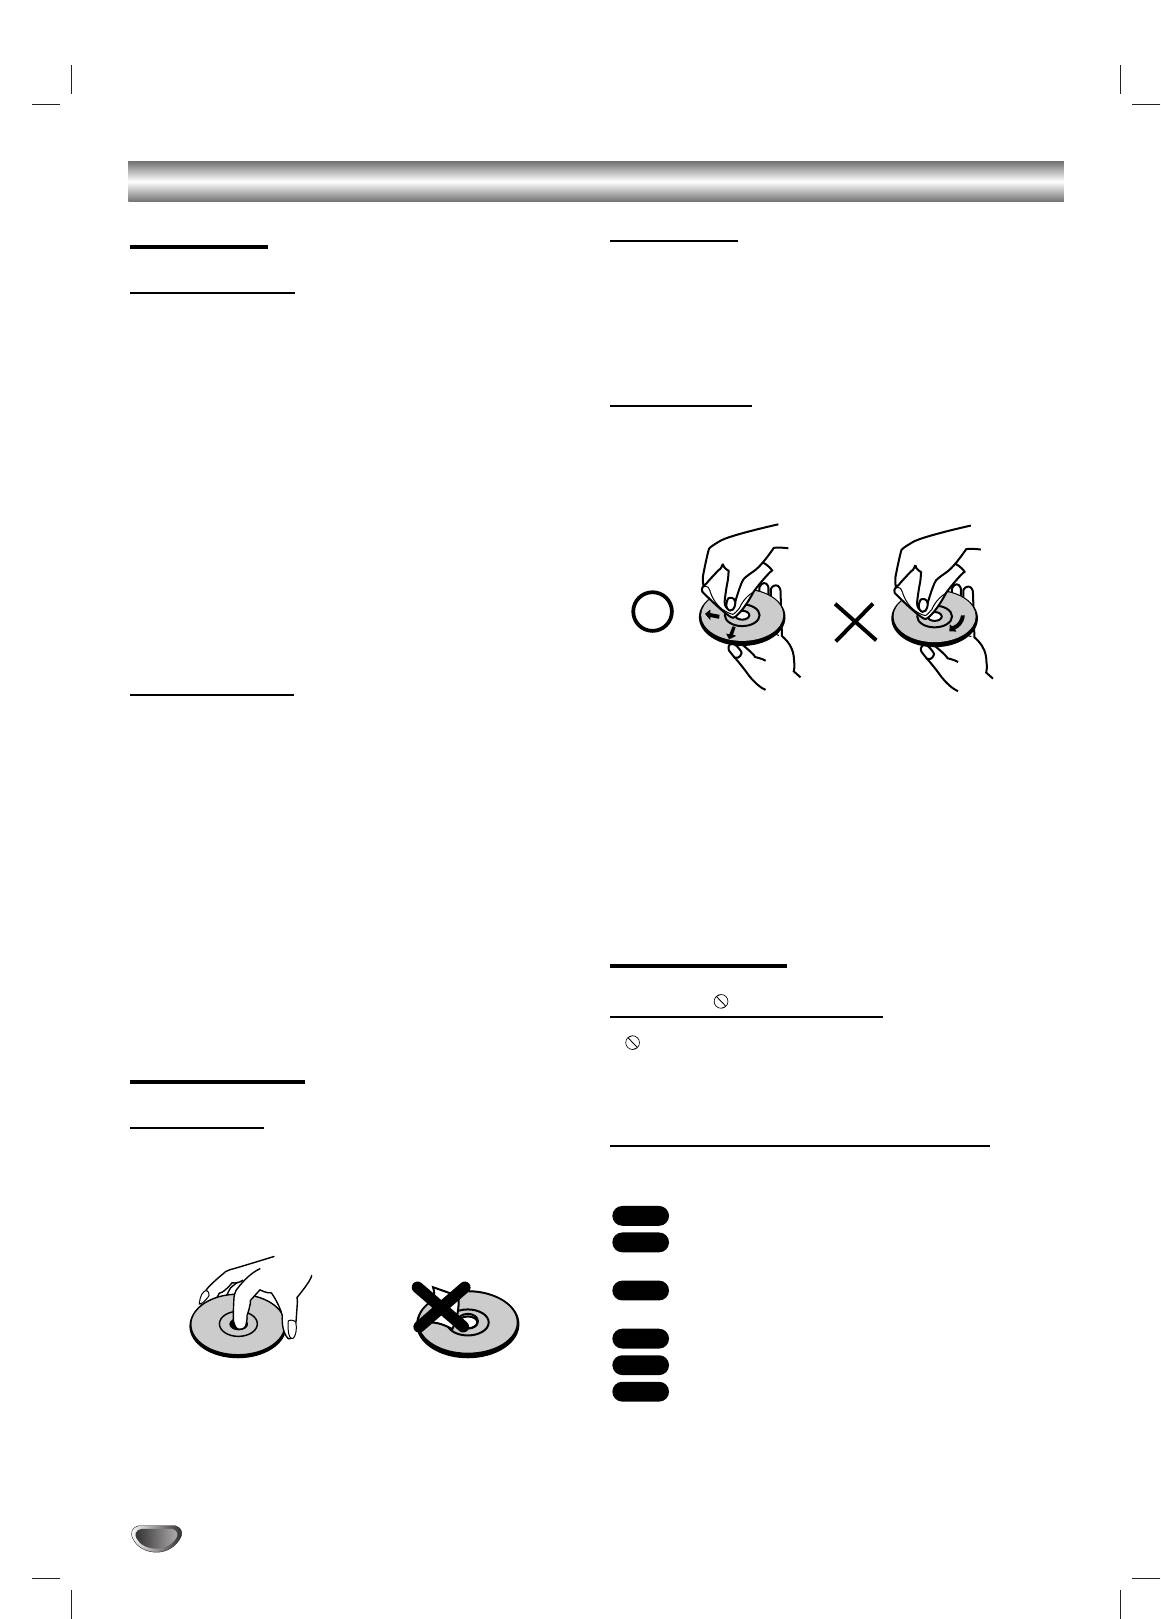
Do not touch the playback side of the disc.
Hold the disc by the edges so that fingerprints will not
A section whose title has one of the following symbol is
get on the surface.
applicable only to the disc represented by the symbol.
Do not stick paper or tape on the disc.
DVD
DVD Video discs
VCD2.0
Video CDs with the PBC (playback control)
function.
VCD1.1
Video CDs without the PBC (playback control)
function.
CD
Audio CDs.
MP3
MP3 disc.
JPEG
JPEG disc.
6
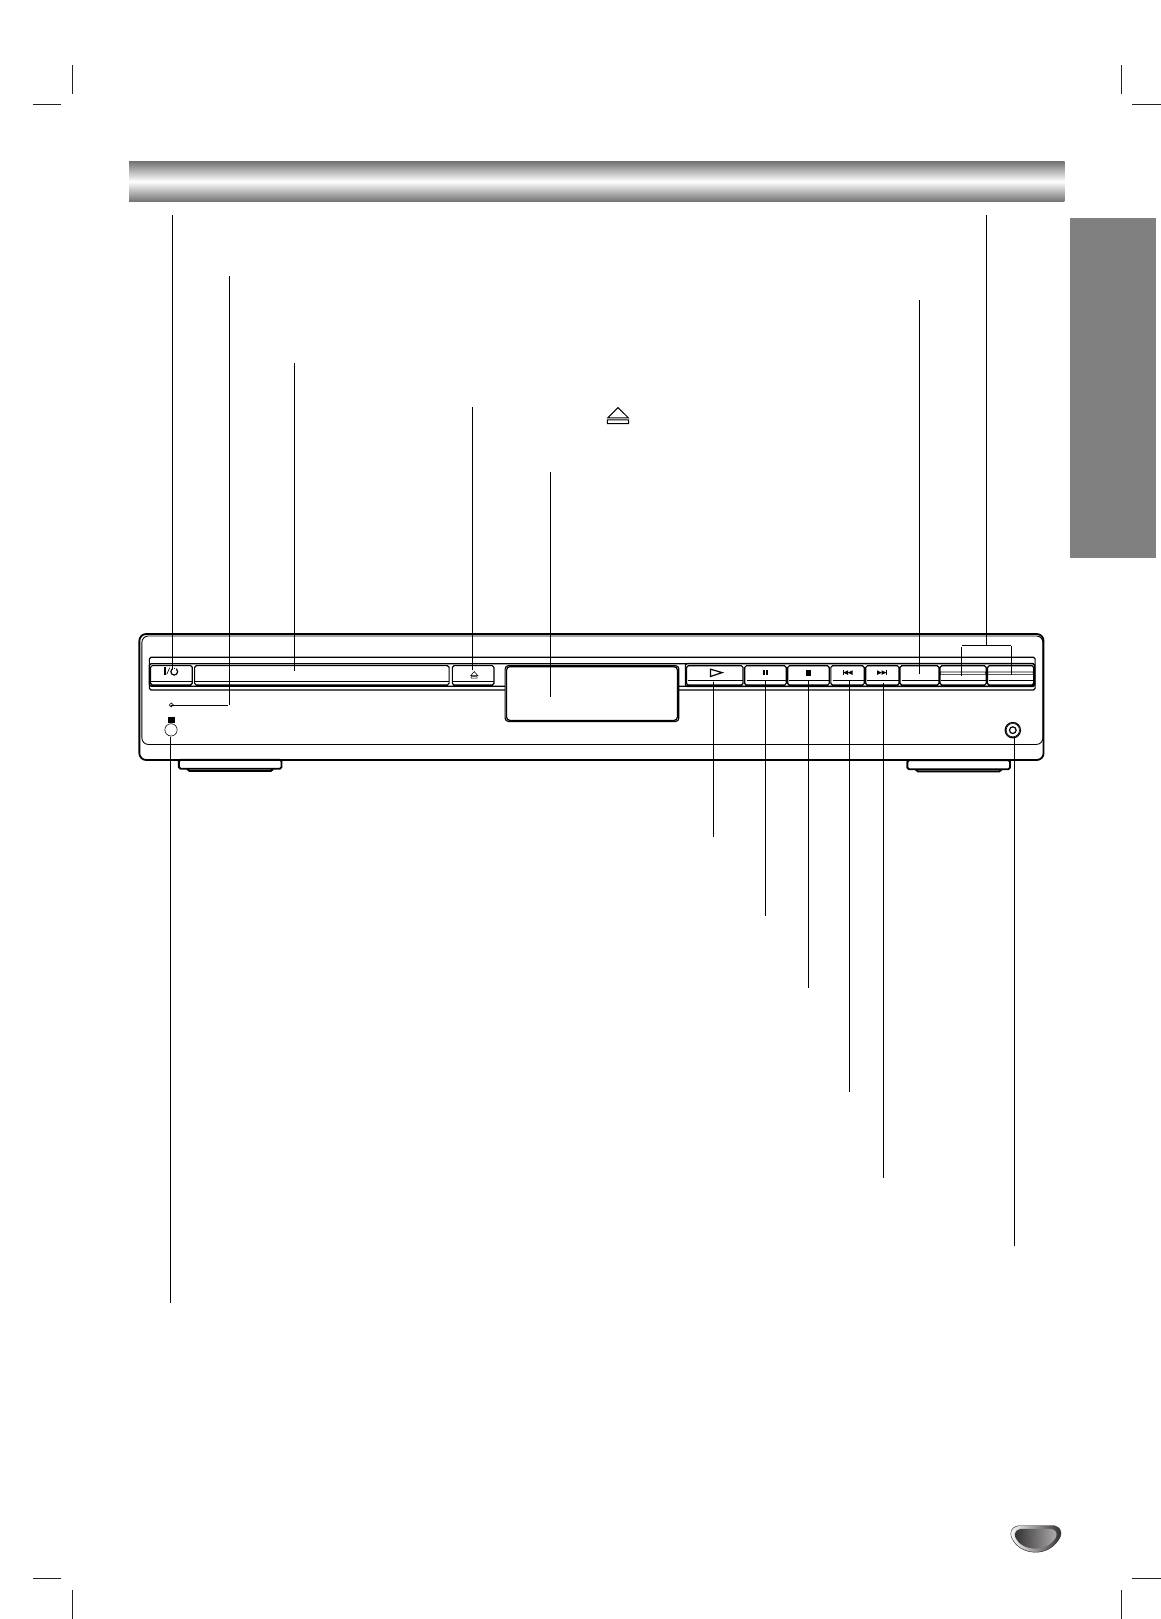
Front Panel Controls
INTRODUCTION
7
- PRESET +
-
VOLUME +
FUNCTION
STANDBY
IR
PHONES
@ / 1 (POWER) indicator
VOLUME Control
Switches the DVD Receiver ON and OFF.
Press “+” to increase volume or press “-” to
decrease the volume.
STANDBY indicator
Lights red when the receiver
FUNCTION
is in Standby mode (off).
To select the Receiver’s source.
(FM, AM, VIDEO, TV or
Disc Tray
CD/DVD)
Insert a disc here.
OPEN/CLOSE ( )
Opens or closes the disc tray.
Display window
PLAY (
H)
To play back a disc.
PAUSE (
XX
)
Pause playback of a disc temporarily.
STOP (
xx
)
Stops playback of a disc.
Reverse SKIP (
SS
)
DVD: Go to beginning of current chapter/track or to previous
chapter/track.
RADIO:
To select preset station you want.
Forward SKIP (
TT
)
DVD: Go to NEXT chapter/track.
RADIO:
To select preset station you want.
PHONES
To connect headphones.
Remote Sensor
Point the DVD receiver remote control here.
DISC
FM
MP3 CD ST
DSGX
D
D
REP 1ALBM
MONO
D
D
D
PL II
AM
CHAP TITLE
TRK
TUNED PBC SLEEP
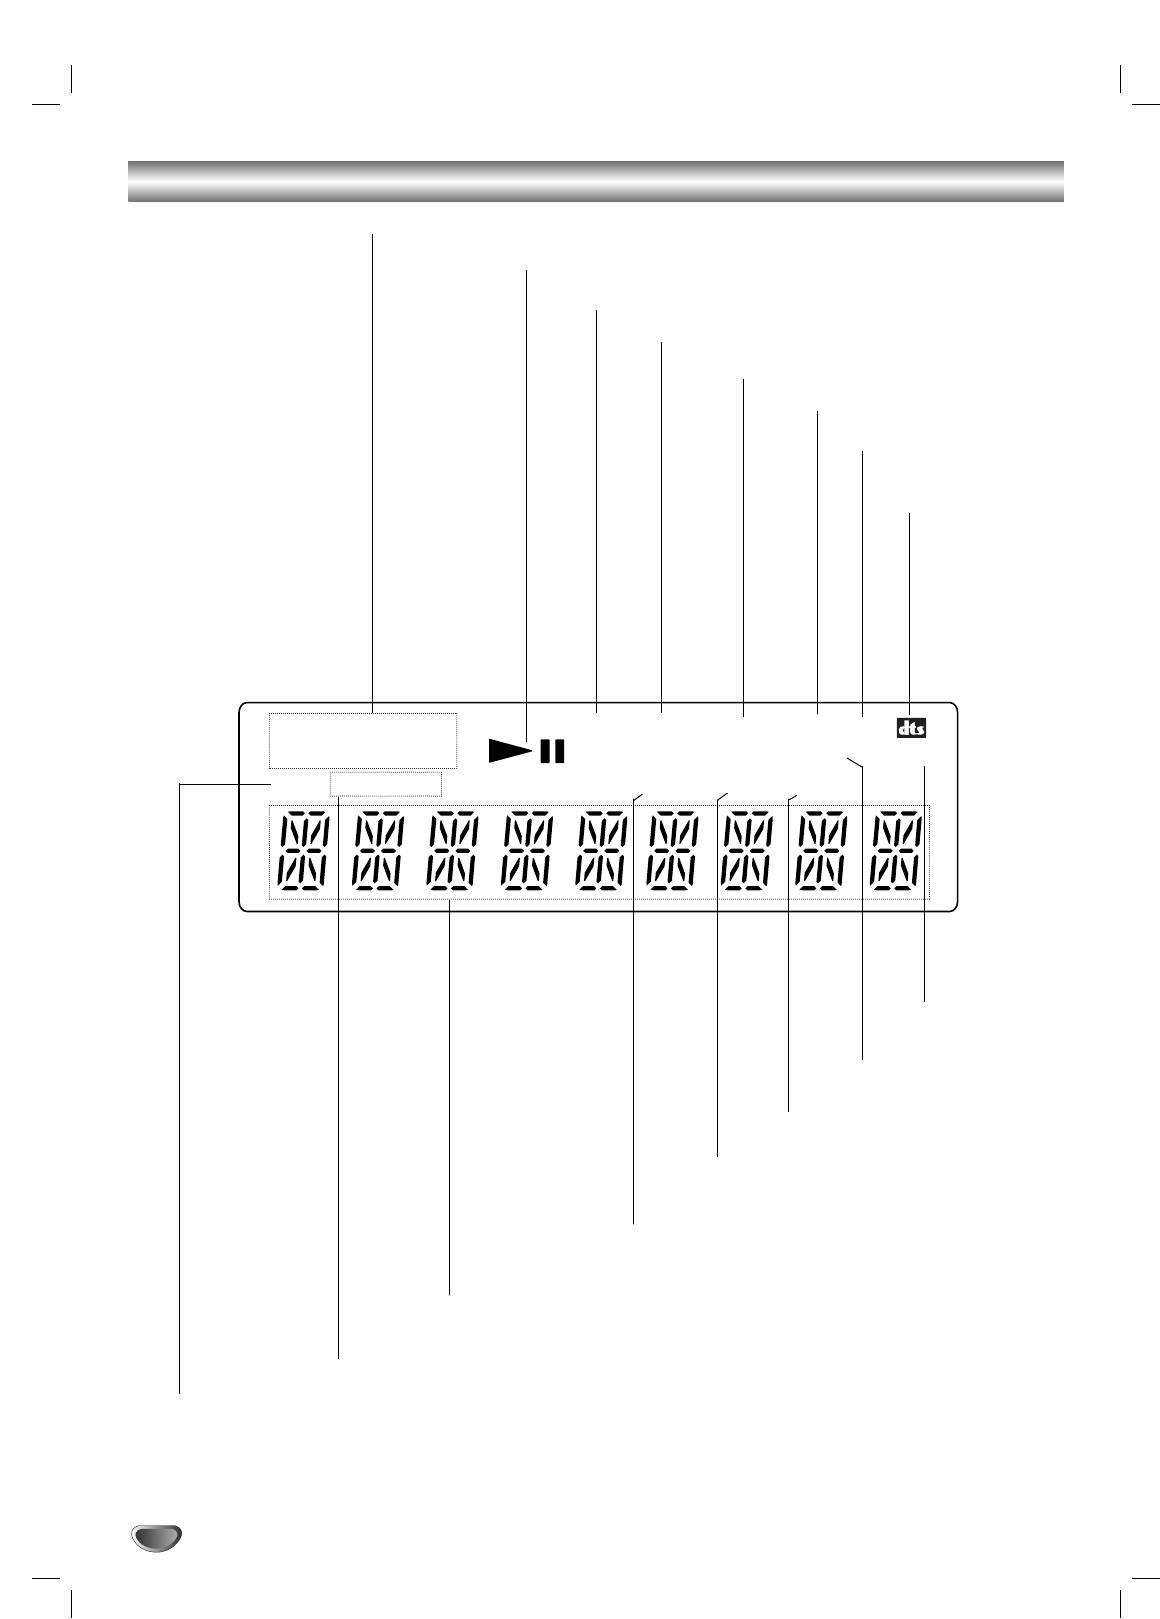
Display Window Indicators
Repeat playback mode indicators.
Playing status.
Indicates the unit is radio mode.
Indicates the unit is stereo mode.
CD disc inserted.
MP3 disc inserted.
Lights up when the unit
is DSGX ON mode.
Indicate current
surround format.
Indicates sound
format is DOLBY
PROLOGIC II.
Indicate current
surround format.
SLEEP timer indication
VCD2.0 disc inserted.
Lights up when the DVD Receiver
tunes in a station.
Total playing time/Elapsed time/Frequency/remaining time/ Current status/
Title number/Surround mode/Volume etc. indicators.
Indicates current chapter or
track number.
Title indication
8

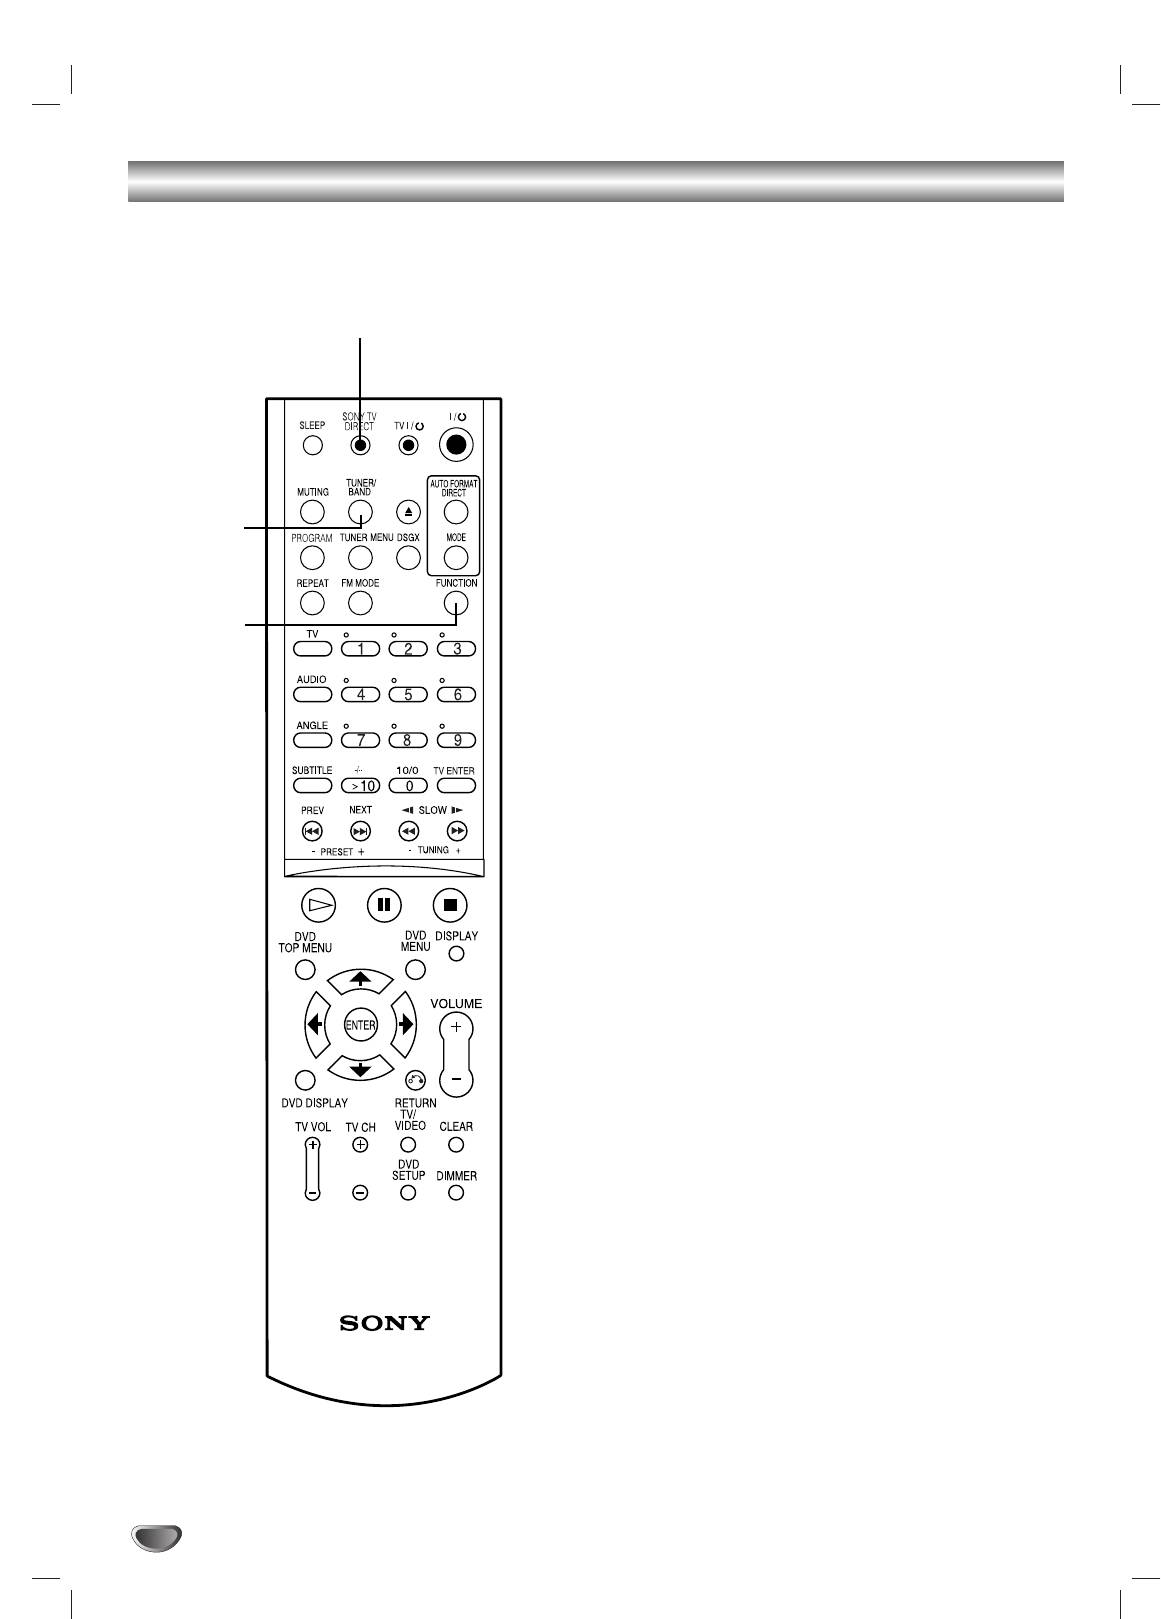
Remote Control
SLEEP
SONY TV DIRECT
To place the unit in the Sleep mode.
Select the output source to DVD directly.
TUNER/BAND
TV @ / 1
Selects the DVD Receiver’s tuner as the
Switches TV ON and OFF.
listening choice. (FM and AM bands)
@ / 1
MUTING
Switches DVD Receiver ON and OFF.
Momentarily silence the speaker of the
AUTO FORMAT DIRECT
DVD Receiver.
Selects sound mode between A.F.D.
TUNER MENU
AUTO, PRO LOGIC, PLII MOVIE and
Memorize a radio station frequency
PLII MUSIC.
into the tuner.
MODE
Press to clear preset stations from the
Selects sound mode between FLAT,
tuner memory.
INTRODUCTION
ROCK, POP, JAZZ, CLASSIC and
PROGRAM
NEWS.
Enters to the programme edit mode or
FUNCTION
exits from that.
To select the Receiver’s source.
REPEAT
(FM, AM, VIDEO, TV or CD/DVD)
Repeat chapter, track, title, all.
ZZ
FM MODE
Opens and closes the disc tray.
To change between MONO and STEREO
DSGX
modes.
Switches DSGX ON and OFF.
TV
0-9 numerical buttons
To control TVs with the Remote.
Selects numbered options in a menu.
AUDIO
>10/ TV ENTER
Selects an audio language (DVD) or an
Used to control TV.
audio channel (CD).
SLOW t/
TUNING-
ANGLE
For picture search or slow playback back-
Selects a DVD camera angle if available.
ward.
SUBTITLE
To tune in the desired station.
Selects a subtitle language.
SLOW T/TUNING+
PREV/PRESET-
For picture search or slow playback
Go to beginning of current chapter or
forward.
track or go to previous chapter or track.
To tune in the desired station.
Select programme of Tuner.
Playback Control Buttons
NEXT/PRESET+
• H (PLAY)
Starts playback.
Go to next chapter or track.
Select programme of Tuner.
• X (PAUSE)
Pause playback or recording temporarily.
DVD TOP MENU
• x (STOP)
Displays the disc’s Title menu, if available.
Stops playback.
B/b/V/v (left/right/up/down)
DVD MENU
Selects an option in the menu.
Accesses menu on a DVD disc.
ENTER
DISPLAY
Acknowledges menu selection.
To display remaining time between
Chapter and title.
DVD DISPLAY
VOLUME (+/-)
Accesses On-Screen display.
Adjusts speaker volume.
TV VOL +/–
CLEAR
Adjusts TV’s volume.
Removes a track number on the program
TV CH +/–
menu.
Selects TV’s channel.
RETURN
Returns the setup menu.
DVD SETUP
DIMMER
Accesses or removes DVD setup menu.
To change the brightness of the display
window.
TV/VIDEO
Selects the TV’s source.
9
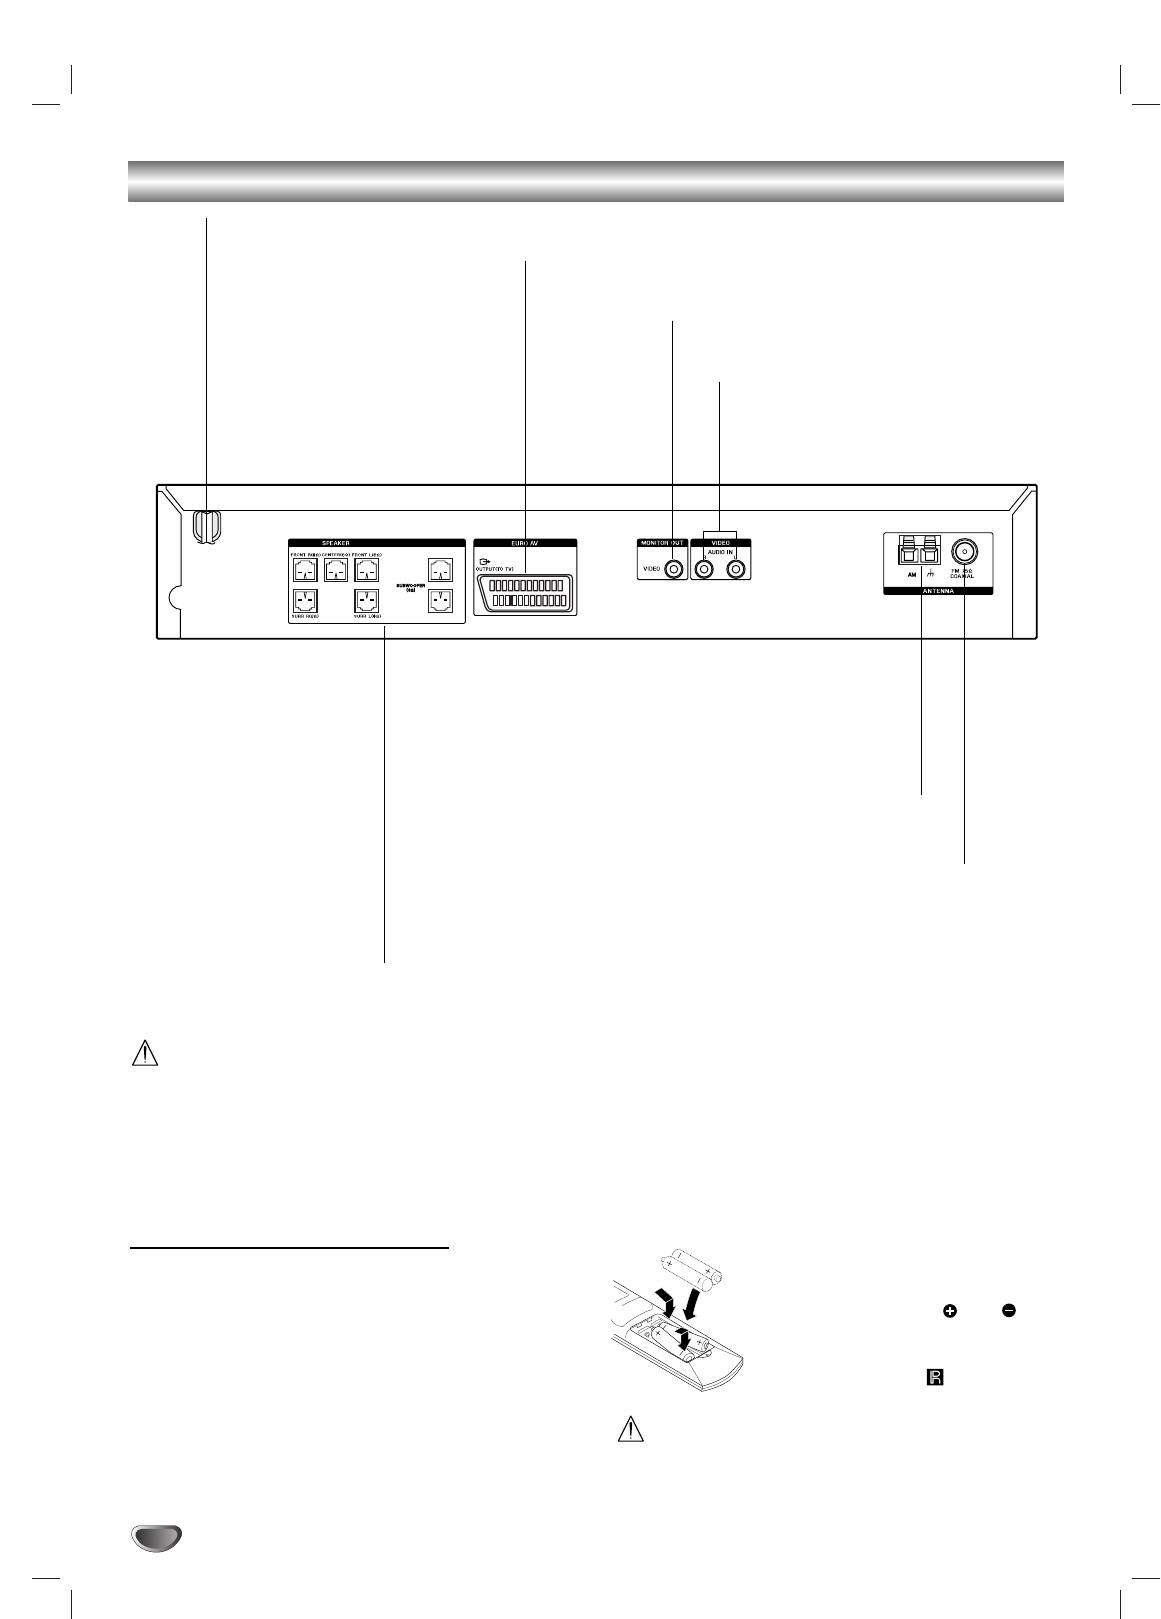
Rear Panel Connections
AC Power Cord
Plug into the power source.
EURO AV OUTPUT (TO TV)
Connect to your TV set.
MONITOR OUT (VIDEO)
Connect to a TV with video input.
VIDEO (AUDIO IN R/L)
Connect the audio output of an external
source (VCR, LD player, etc).
AM LOOP ANTENNA CONNECTORS
Connect the AM Loop antenna to this terminal.
FM ANTENNA CONNECTOR
Connect the FM antenna to this terminal.
SPEAKER CONNECTORS
Connect the six supplied speakers
to these terminals.
Do not touch the inner pins of the jacks on the rear
panel. Electrostatic discharge may cause permanent
damage to the unit.
Remote Control Operation Range
Remote control battery installation
Point the remote control at the remote sensor and press
Detach the battery cover on the rear of
the buttons.
the remote control, and insert two R6
Distance: About 6m (20ft) from the front of the
(size AA) batteries with and
remote sensor
aligned correctly.
Angle: About 30° in each direction of the front of the
When using the remote control, point it
remote sensor
at the remote sensor on the unit.
Do not mix old and new batteries.
10
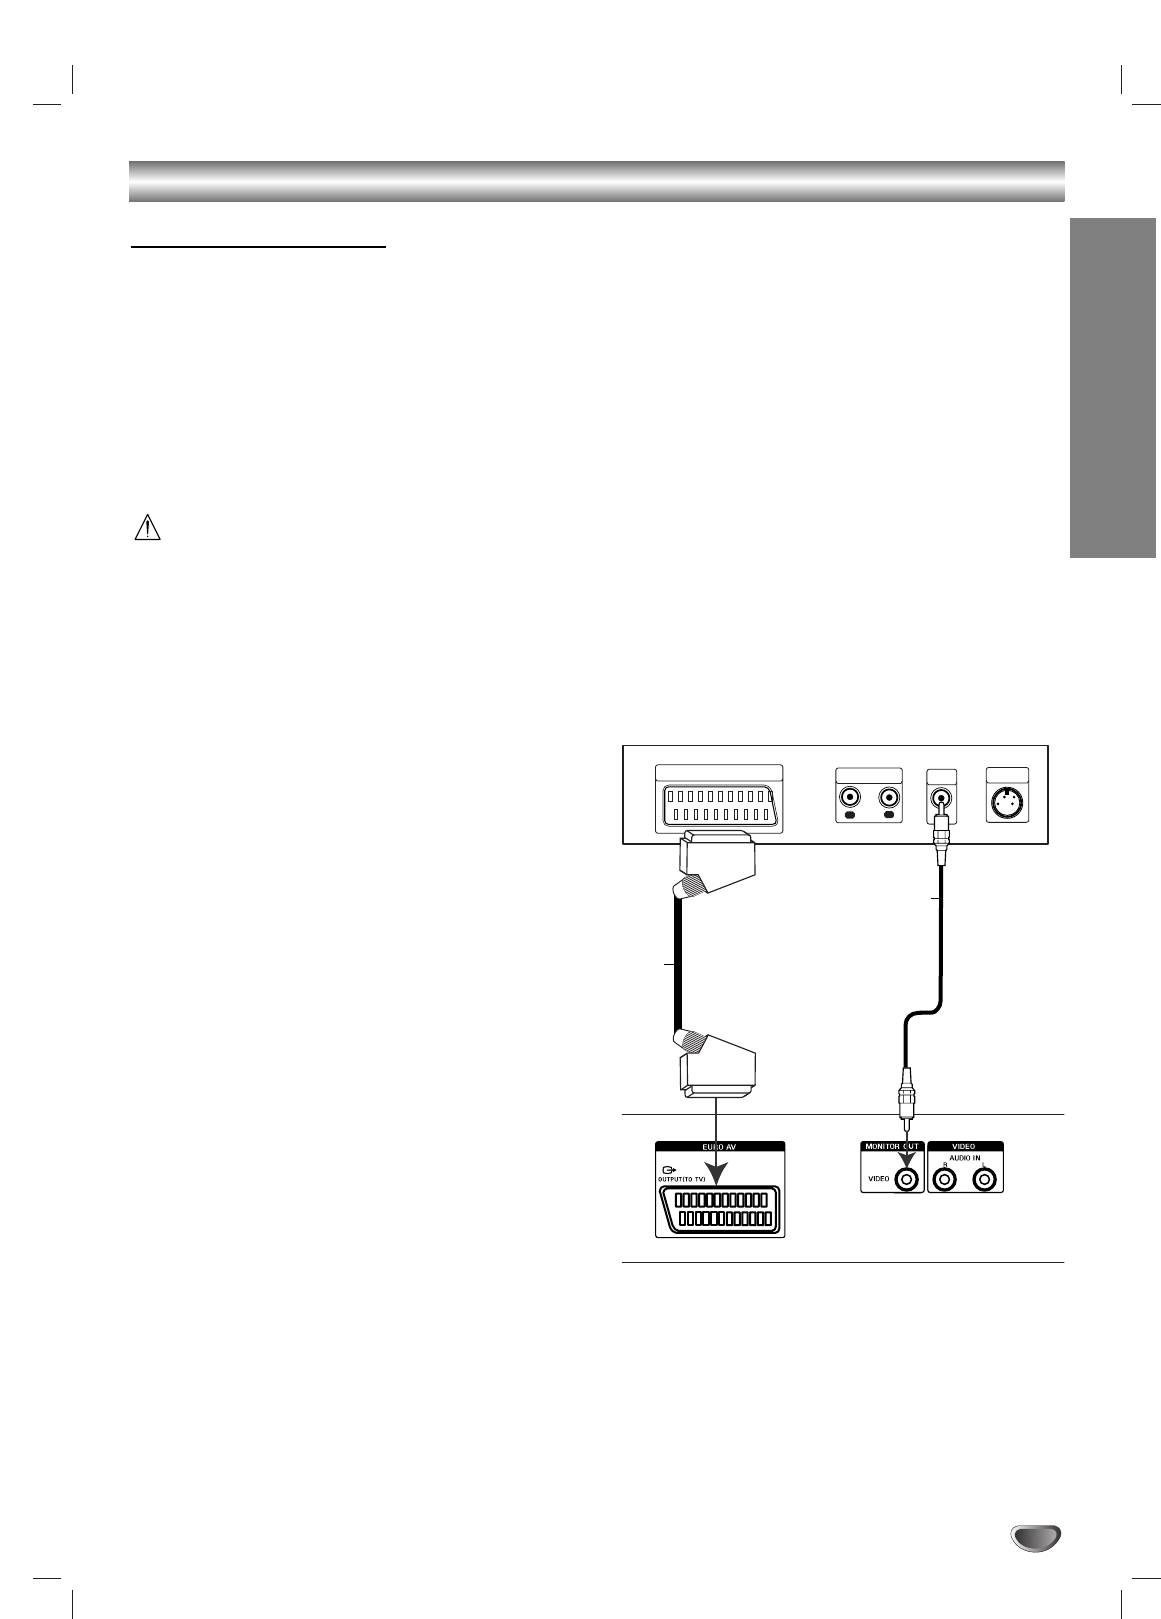
Connections
Connecting to a TV
Make one of the following connections, depending on
the capabilities of your existing equipment.
Tips
Depending on your TV and other equipment you
wish to connect, there are various ways you could
connect the
DVD Receiver
. Use one of the connec-
tions described below.
PREPARATION
Please refer to the manuals of your TV, VCR or other
devices as necessary to make the best connections.
–
Make sure the DVD Receiver is connected directly to
the TV. Select the correct AV input on your TV.
– Do not connect your
DVD Receiver
to TV via your
VCR.The DVD image could be distorted by the copy
protection system.
Video connection
Connect the MONITOR OUT jack on the DVD Receiver
to the video in jack on the TV using the video cable
supplied (V).
SCART connection
Connect the EURO AV OUTPUT (TO TV) jack on the
DVD Receiver to the SCART IN jack on the TV using
the Scart cable (S).
Note
When you connect the
DVD Receiver
to your TV, be
sure to turn off the power and unplug both units from
the wall outlet before making any connections.
11
Rear of TV
SCART INPUT
AUDIO INPUT
VIDEO
S-VIDEO
INPUT
INPUT
R
L
V
S
(not supplied) (not supplied)
Rear of DVD Receiver
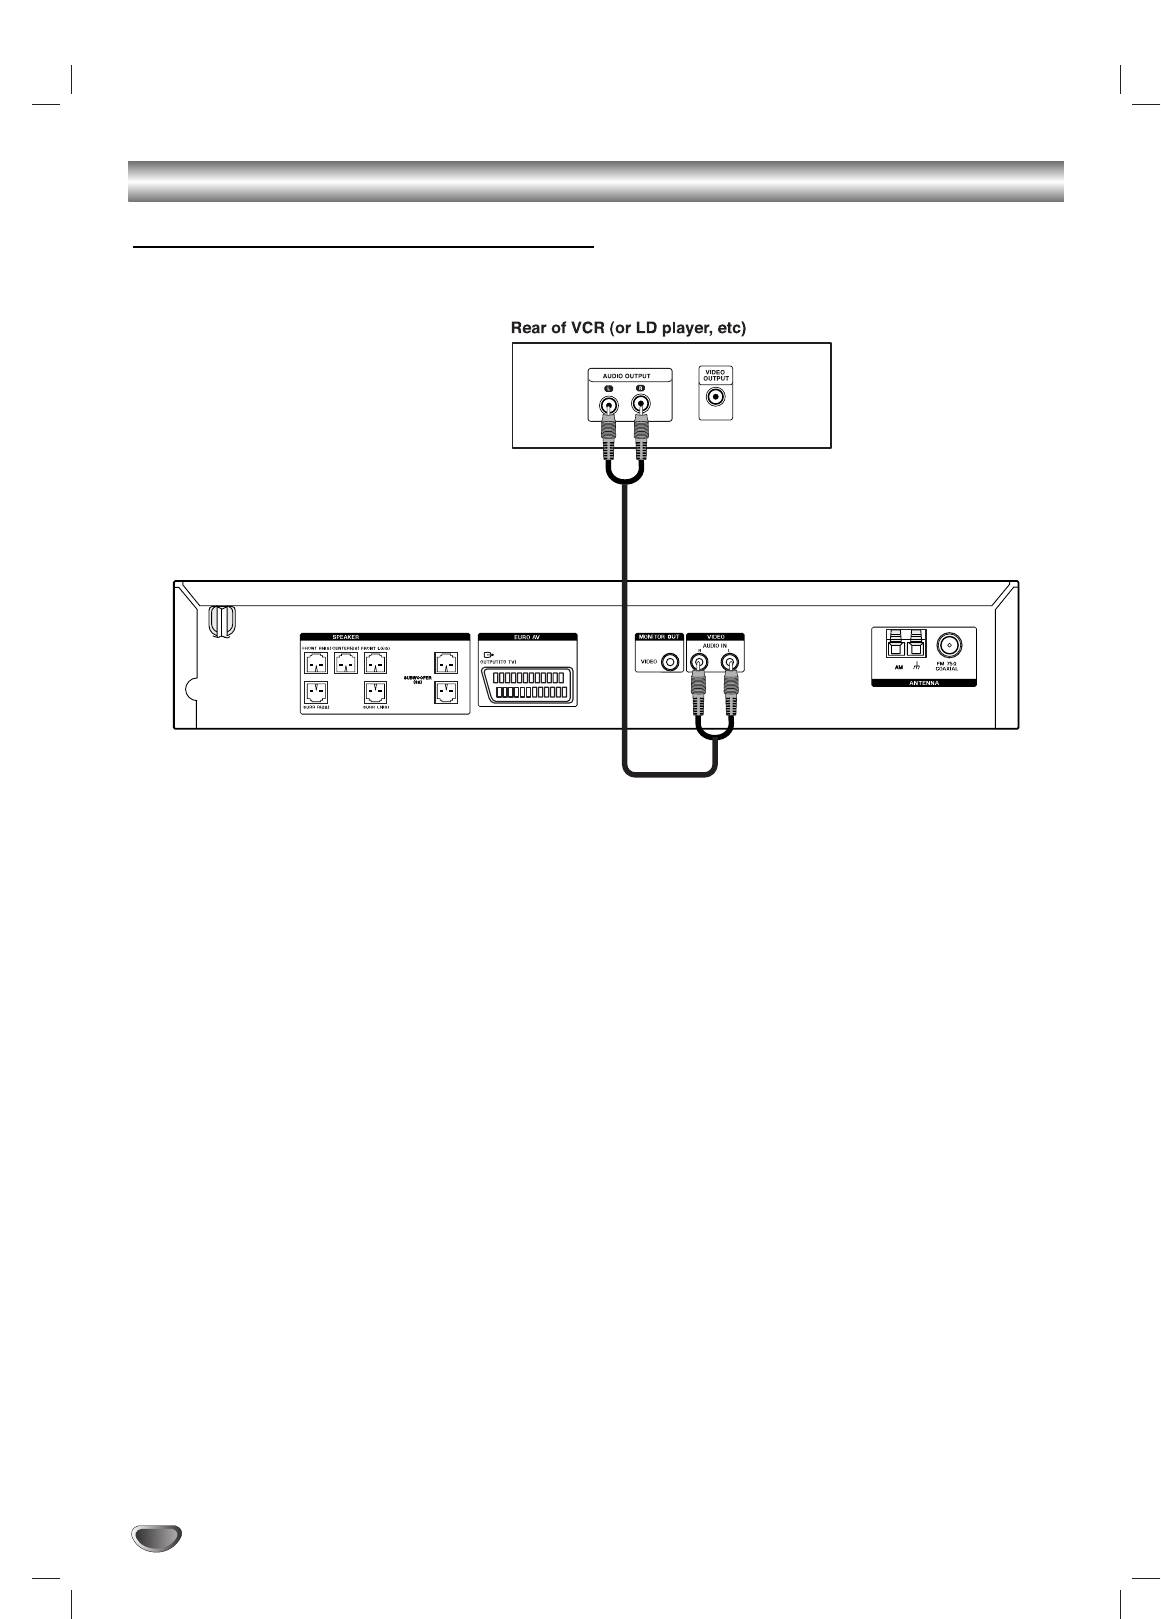
Connections (Continued)
Connecting to External Equipment
Connection
Tip
Connect the VIDEO (AUDIO L/R) jacks on the DVD
Press FUNCTION on the remote control to select input
Receiver to the AUDIO OUTPUT (L/R) jacks on the
to these jacks.
VCR, LD player, etc using the audio cables.
VIDEO appears on the Display Window.
12
(not supplied)
Connections (Continued)
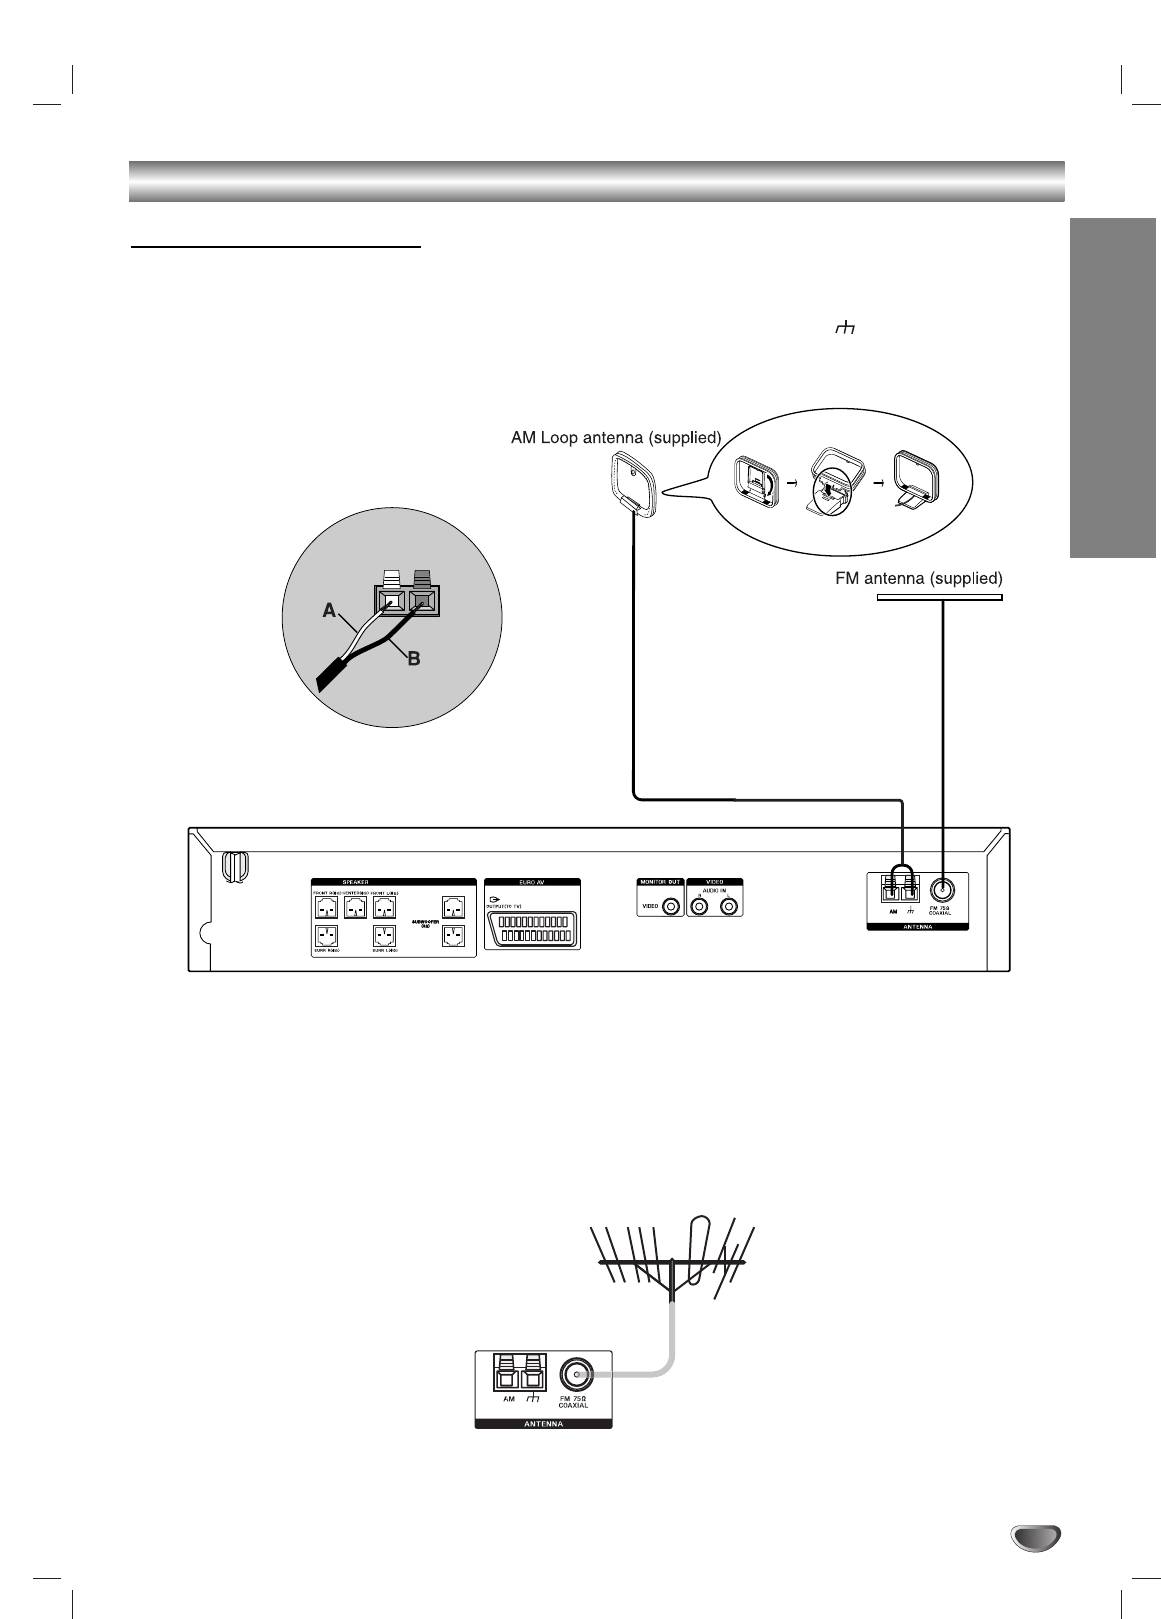
Antenna Connections
Connect the supplied FM/AM antenna for listening to the radio.
Connect the AM Loop antenna to the AM LOOP connector.
Connect the FM antenna to the FM 75 Ω COAXIAL connector.
When you connect the supplied AM Loop antenna, connect the black cord (B) to the terminal, and the white
cord (A) to the other terminal.
PREPARATION
Notes
To prevent noise pickup, keep the AM Loop antenna away from the DVD Receiver and other components.
Be sure to fully extend the FM antenna.
After connecting the FM antenna, keep it as horizontal as possible.
Tip
If you have poor FM reception, use a 75Ω coaxial cable (not supplied) to connect the system to an outdoor FM
antenna as shown below.
13
Connections (Continued)
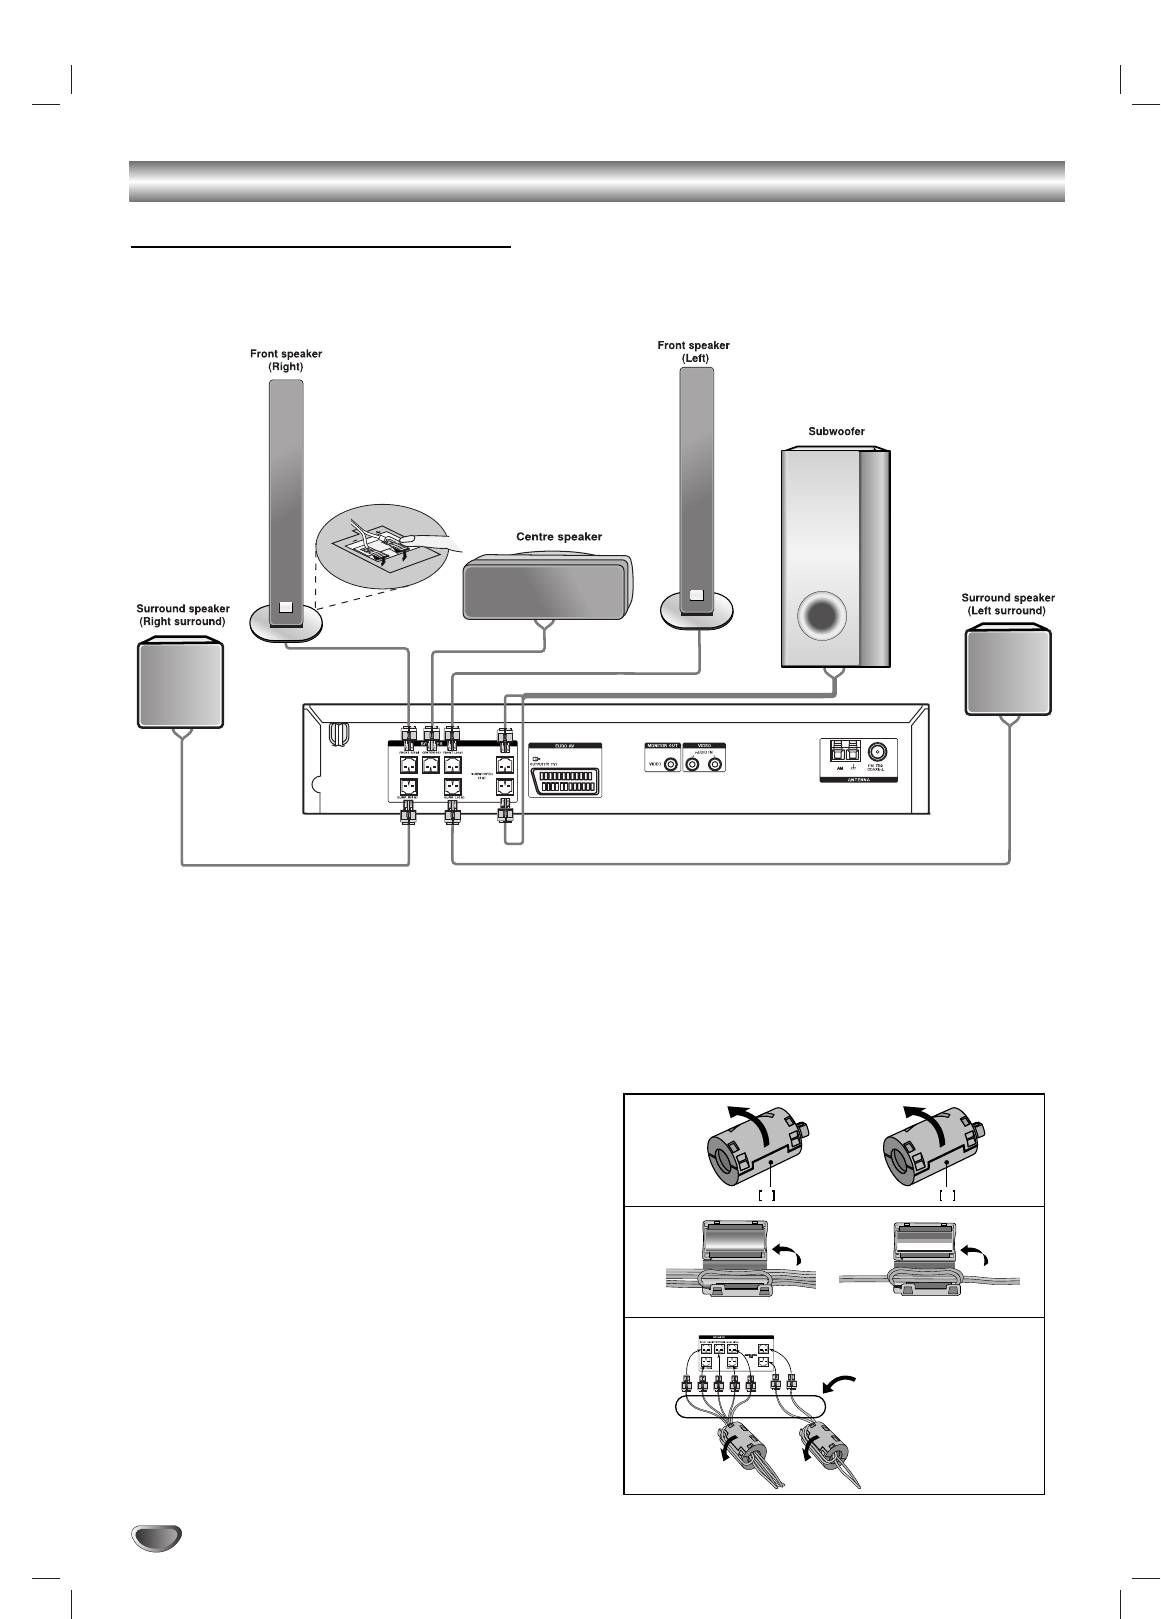
Speaker System Connection
Connect the speakers using the supplied speaker cords.
To obtain the best possible surround sound, adjust the speaker parameters (volume, distance, etc.).
Notes
Be sure to match the speaker cable to the appropriate terminal on the components: + to + and – to –. If the cables are
reversed, the sound will be distorted and will lack base.
If you use front speakers with low maximum input rating, adjust the volume carefully to avoid excessive output on the speakers.
Do not disassemble the front covers of supplied speakers.
Speaker stand is optional.
About Ferrite Core
Be sure to attach the ferrite core to the speaker cables
(for connecting to this unit).
This ferrite core can reduce noises.
How to attach the ferrite core
Press the stopper [a] of the ferrite core to open.
1
Wind the Subwoofer cable once on the ferrite core.
2
Wind the Center cable once on the ferrite core.
Pass the others straight on the other ferrite core.
3
Close the ferrite core unit it clicks.
4
Notes
Take care not to pinch the speaker cables between the ferrite
cores.
Attach the ferrite core near the unit (Refer to the fig.3 and
comment.).
14
1
a a
2
3
The length here is
short as much as
possible.
Connections (Continued)
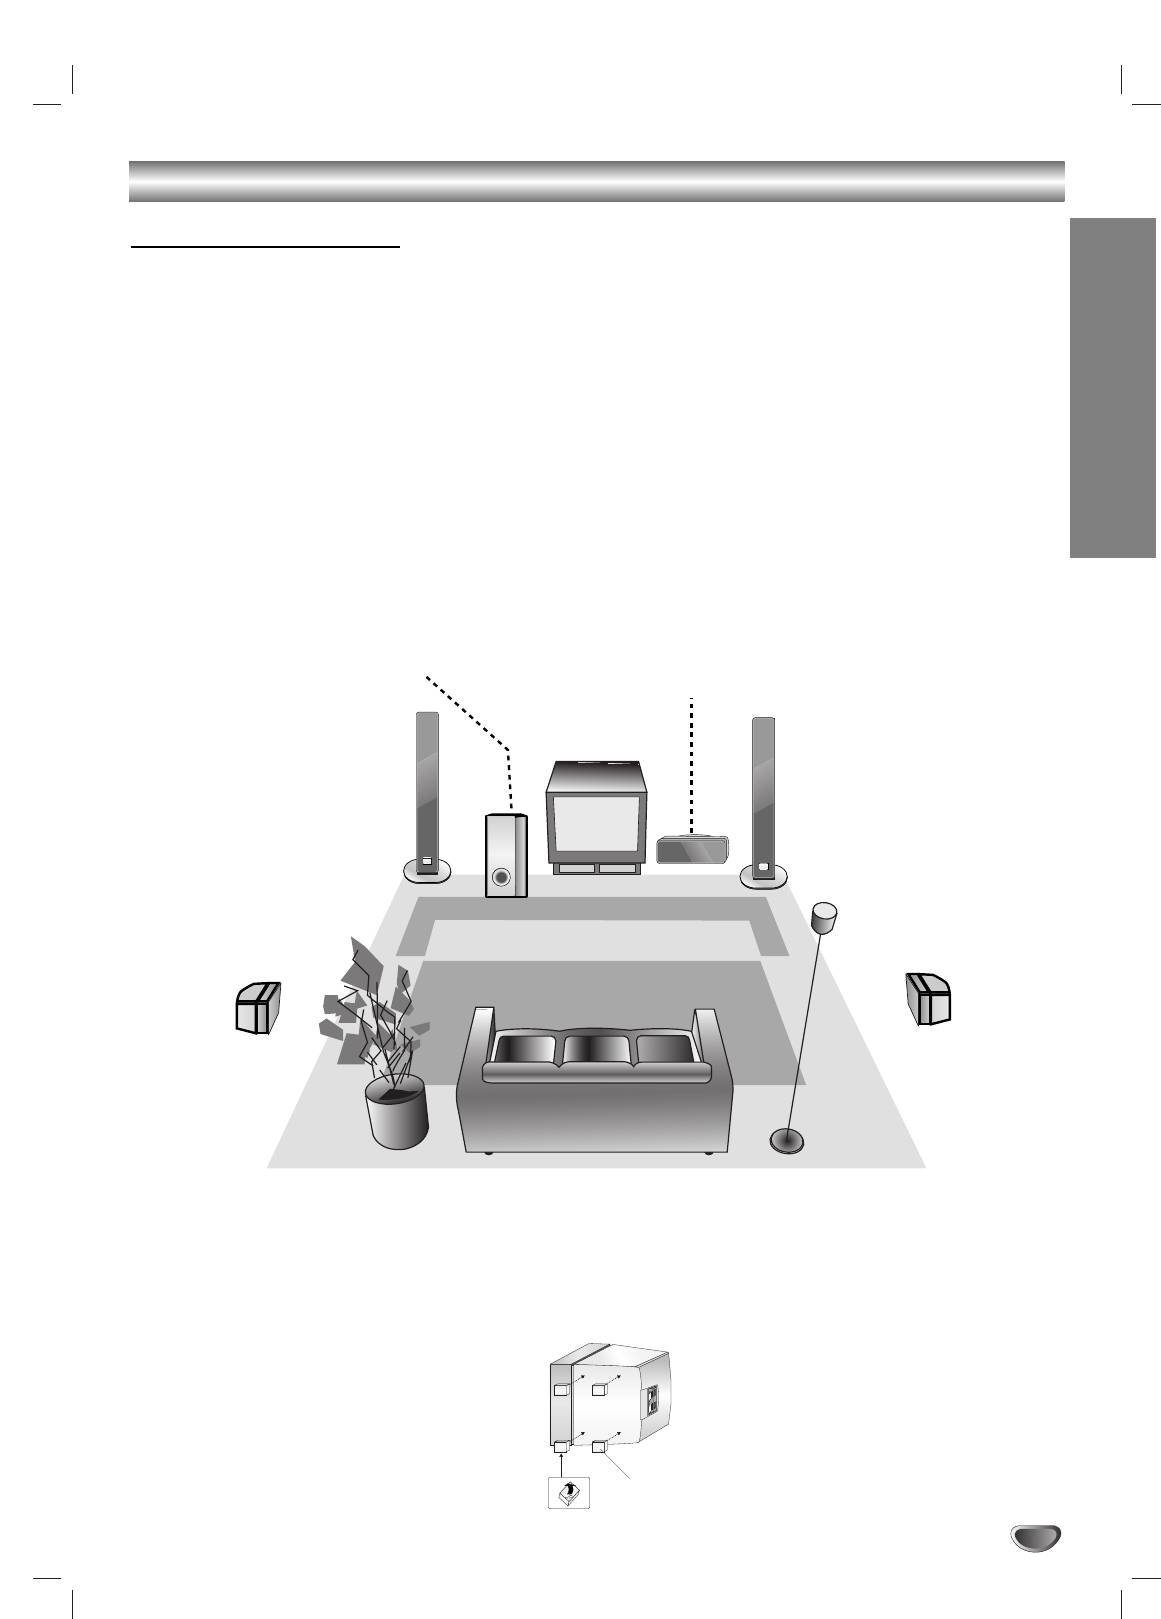
Speaker Positioning
In the case of normal position use the 6 speakers (2 front speakers, centre speaker, 2 surround speakers and
subwoofer).
•Front speakers
According to your listening position set up the speakers for equal distance. And by hearing position set up the interval between
speakers to 45 degree.
• Centre speaker
The centre speakers and front speakers are ideally the same height. But normally place it above or below the television.
• Surround speakers
PREPARATION
Place left and right behind the listening area.These speakers recreate sound motion and atmosphere required for surround
sound playback. For best results, do not install the surround speakers too far behind the listening position and install them at or
above the level of the listener’s ears. It is also effective to direct the surround speakers towards a wall or ceiling to further
disperse the sound.
In the case of a smaller room size, if the audience is near to the rear wall set the surround speakers opposite each other, and
set the surround speakers above 60 - 90 cm than the listener’s ears.
• Subwoofer
This can be placed in any front position.
Subwoofer
Centre Speaker
Front Speaker
Front Speaker
(Left)
(Right)
Surround Speaker
Surround Speaker
(Left)
(Right)
Speaker Positioning Example
To attach the foot pads
To prevent speaker vibration or movement while listening, attach the supplied foot pads to the speakers without
Front speakers and Subwoofer, as shown.
15
Foot pads
Selecting the Output/Input Source
Follow these guidelines to select and switch among the
various DVD Receiver input and output sources:
• CD/DVD
To view output from the DVD:
SONY TV DIRECT
Press SONY TV DIRECT on the remote.
The “CD/DVD” appears in the Display Window.
• TUNER FM/AM
To listen to AM/FM radio broadcasts:
Press TUNER/BAND to toggle between AM and FM
radio. The selected frequency appears in the display
window.
TUNER/
• INPUT SELECT
BAND
To listen to an audio source connected to the
AUDIO IN (L/R) jack of VIDEO:
FUNCTION
Press FUNCTION on the remote control repeatedly.
The “VIDEO” appears in the Display Window.
Audio will come from an external source connected
to the AUDIO IN (L/R) jacks of VIDEO (for rear
panel).
To listen to an audio source connected to the
EURO AV OUTPUT (TO TV):
Press FUNCTION on the remote control repeatedly.
The “TV” appears in the Display Window.
Audio will come from an external source connected
to the EURO AV OUTPUT (TO TV) (for rear panel).
16

Before Operation
Mini Glossary for Audio Stream &
Sound Mode
Surround mode
You can enjoy surround sound simply by selecting one
of the pre-programmed sound fields according to the
program you want to listen to.
DTS
Allows you to enjoy 5.1(or 6) discrete channels of high quality
A) By pressing MODE button
digital audio from DTS program sources such as discs, DVD
and compact discs, etc.bearing the trademark. DTS Digital
Each time you press MODE button, the sound mode is
Surround delivers up to 6 channels of transparent audio(which
changed in the following order;
means identical to the original masters) and results in excep-
tional clarity throughout a true 360 degree sound field.
FLAT → ROCK → POP → JAZZ → CLASSIC → NEWS →
“DTS” is a trademark of Digital Treater Systems, Inc.
FLAT ...
Manufactured under license from Digital Treater Systems, Inc.
PREPARATION
Tips
FLAT: Linear frequency response.
DOLBY DIGITAL
ROCK: Reproduces the acoustics of rock music.
The Dolby Digital surround format lets you enjoy up to 5.1
channels of digital surround sound from a Dolby Digital pro-
POP: Reproduces the acoustics of pop music.
gram source. If you play DVDs with “ ” mark, you can enjoy
JAZZ: Reproduces the acoustics of a jazz club.
even better sound quality, greater spatial accuracy, and
CLASSIC: Reproduces the acoustics of orchestral
improved dynamic range.
music.
NEWS: Reproduces the acoustics of TV news sound.
DOLBY PRO LOGIC
Use this mode when playing movie or Dolby Digital 2 channel
B) By pressing AUTO FORMAT DIRECT button
which carries the “ ” mark. This mode provides the effect
Each time you press AUTO FORMAT DIRECT button,
of being in a movie theatre or live concert house-an effect with
the sound mode is changed in the following order;
an intensity which can only be obtained through DOLBY PRO
LOGIC SURROUND. The effect of the front/back/left/right
A.F.D. AUTO → DOLBY PL → PLII MOVIE → PLII MUSIC →
movement of the sound image, as well as the sense of fixed
A.F.D. AUTO ...
position in the sound image, is much clearer and more dynam-
(This function available 2-channel mode only)
ic than before.
Notes
MP3 disc is not available.
DOLBY PRO LOGIC II
This function is available during only playback mode.
Dolby Pro Logic II creates five full-bandwidth output channels
Sound Mode is not applicable when headphone is used.
from two-channel sources.This is done using an advanced,
high-purity matrix surround decoder that extracts the spatial
When DVD is inserted.
properties of the original recording without adding any new
You can change the sound mode of DVD (Dolby Digital, DTS,
sounds or tonal colorations.
PRO LOGIC, etc) by pressing the AUDIO button on the remote
PLII MOVIE mode:
during playback.
The Movie mode is for use with stereo television shows and all
Although the DVD contents differ from disc to disc, the follow-
programs encoded in Dolby Surround.The result is enhanced
ing explains the basic operation when this feature is used.
soundfield directionality that approaches the quality of discrete
Each time you press AUDIO button, the sound mode of DVD is
5.1-channel sound.
changed as the following order;
PLII MUSIC mode:
The Music mode is for use with any stereo music recordings.
→→→
A.F.D. AUTO
Software with multichannel surround audio signals is played
For your reference
according to the way it was recorded.
Notes
•
The DVD Receiver memorizes the last mode
This function is available during only playback mode.
settings for each source individually.
A.F.D. AUTO is not applicable when headphone is used.
•
You can identify the encoding format of program
software by looking at its packaging.
- Dolby Digital discs are labeled with the logo.
- Dolby Surround encoded programs are labeled with
the logo.
- DTS Digital Surround discs are marked with the
.
Note
Sound Mode is not applicable when headphone is used.
17
Before Operation (Continued)
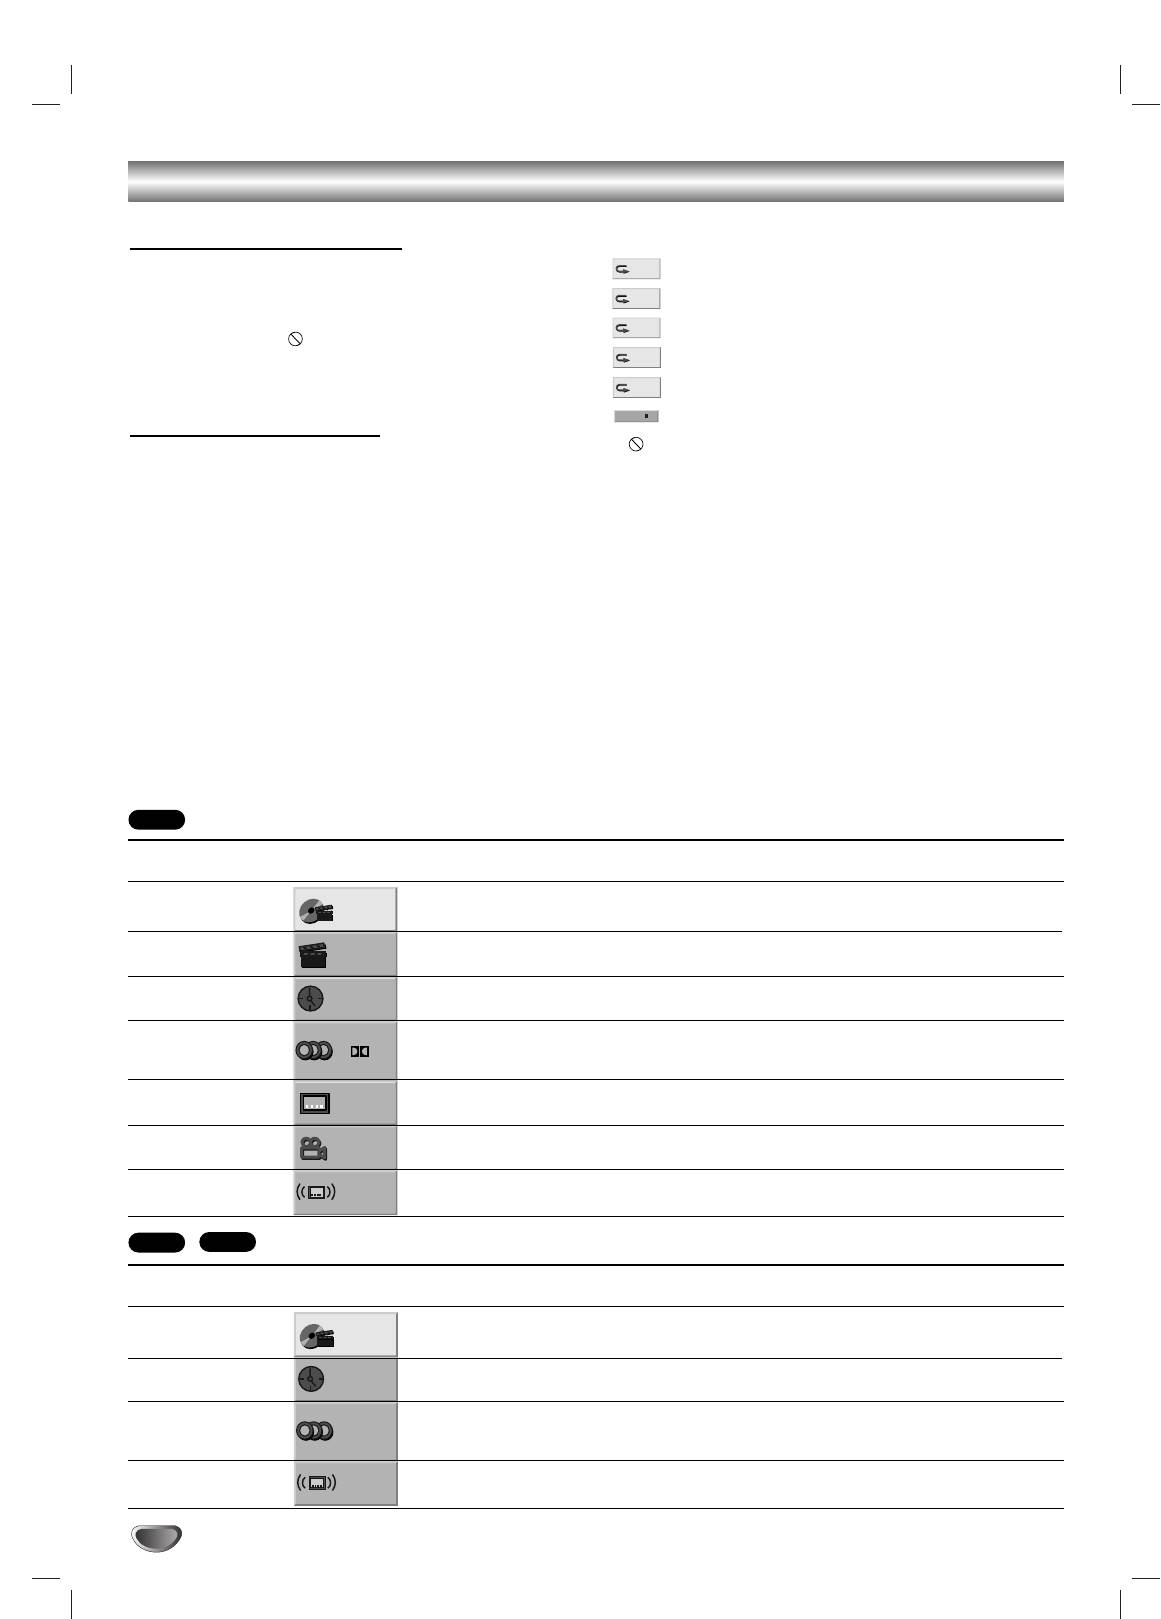
Temporary Feedback Field Icons
General Explanation
This manual gives basic instructions for operating the
Repeat Title
DVD Receiver. Some DVDs require specific operation or
Repeat Chapter
allow only limited operation during playback.When this
Repeat Track (non-PBC Video CDs, MP3, CD)
occurs, the symbol appears on the TV screen, indi-
cating that the operation is not permitted by the DVD
Repeat All Tracks (non-PBC Video CDs, MP3, CD)
Receiver or is not available on the disc.
Repeat Off
Resume play from this point
On-Screen Display
Action prohibited or not available
General playback status can be displayed on the TV
screen. Some items can be changed on the menu.
Notes
Some discs may not provide all of the features on the
On-screen display operation
on-screen display example shown below.
If no button is pressed for 10 seconds, the on-screen
Press DVD DISPLAY during playback.
display disappears.
1
Press V/v to select an item.
2
The selected item will be highlighted.
Press B/b to change the setting of an item.
3
The number buttons can also be used for setting
numbers (e.g., title number). For some functions,
press ENTER to execute the setting.
18
RESUME
OFF
ALL
TRACK
CHAPT
TITLE
Items
Function (Press V/v to select desired item)
Selection Method
Title Number
Shows the current title number and total number of titles,
B
/
b
,or
and skips to the desired title number.
Numbers, ENTER
Chapter Number
Shows the current chapter number and total number of
B
/
b
,
.
/
>
or
chapters, and skips to the desired chapter number.
Numbers, ENTER
Time search
Shows the elapsed playing time, and
Numbers, ENTER
searches the point directly from the elapsed time.
Audio language
Shows the current audio soundtrack language,
B
/
b
,or
and Digital Audio
encoding method, and channel number, and
AUDIO
Output mode
changes the setting.
Subtitle language
Shows the current subtitles language, and
B
/
b
,or
changes the setting.
SUBTITLE
Angle
Shows the current angle number and total number of
B
/
b
,or
angles, and changes the angle number.
ANGLE
Sound
Shows the current sound mode, and
AUTO FORMAT DIRECT
changes the setting.
1 /3
1 /12
0:20:09
1 ENG
D
5.1 CH
OFF
1 /1
AUTO
Items
Function (Press V/v to select desired item)
Selection Method
Track Number
Shows the current track number, total number of tracks, PBC
B
/
b
,or
On mode or skips to the desired track number in the PBC Off
Numbers, ENTER
mode
Time
Shows the elapsed playing time (Display only)
–
Audio Channel
Shows the audio channel, and
B
/
b
,or
changes the audio channel.
AUDIO
Sound
Shows the current sound mode, and
AUTO FORMAT DIRECT
changes the setting.
1 /3
0:20:09
ST
AUTO
DVD
VCD2.0
VCD1.1
Before Operation (Continued)
Menu Language
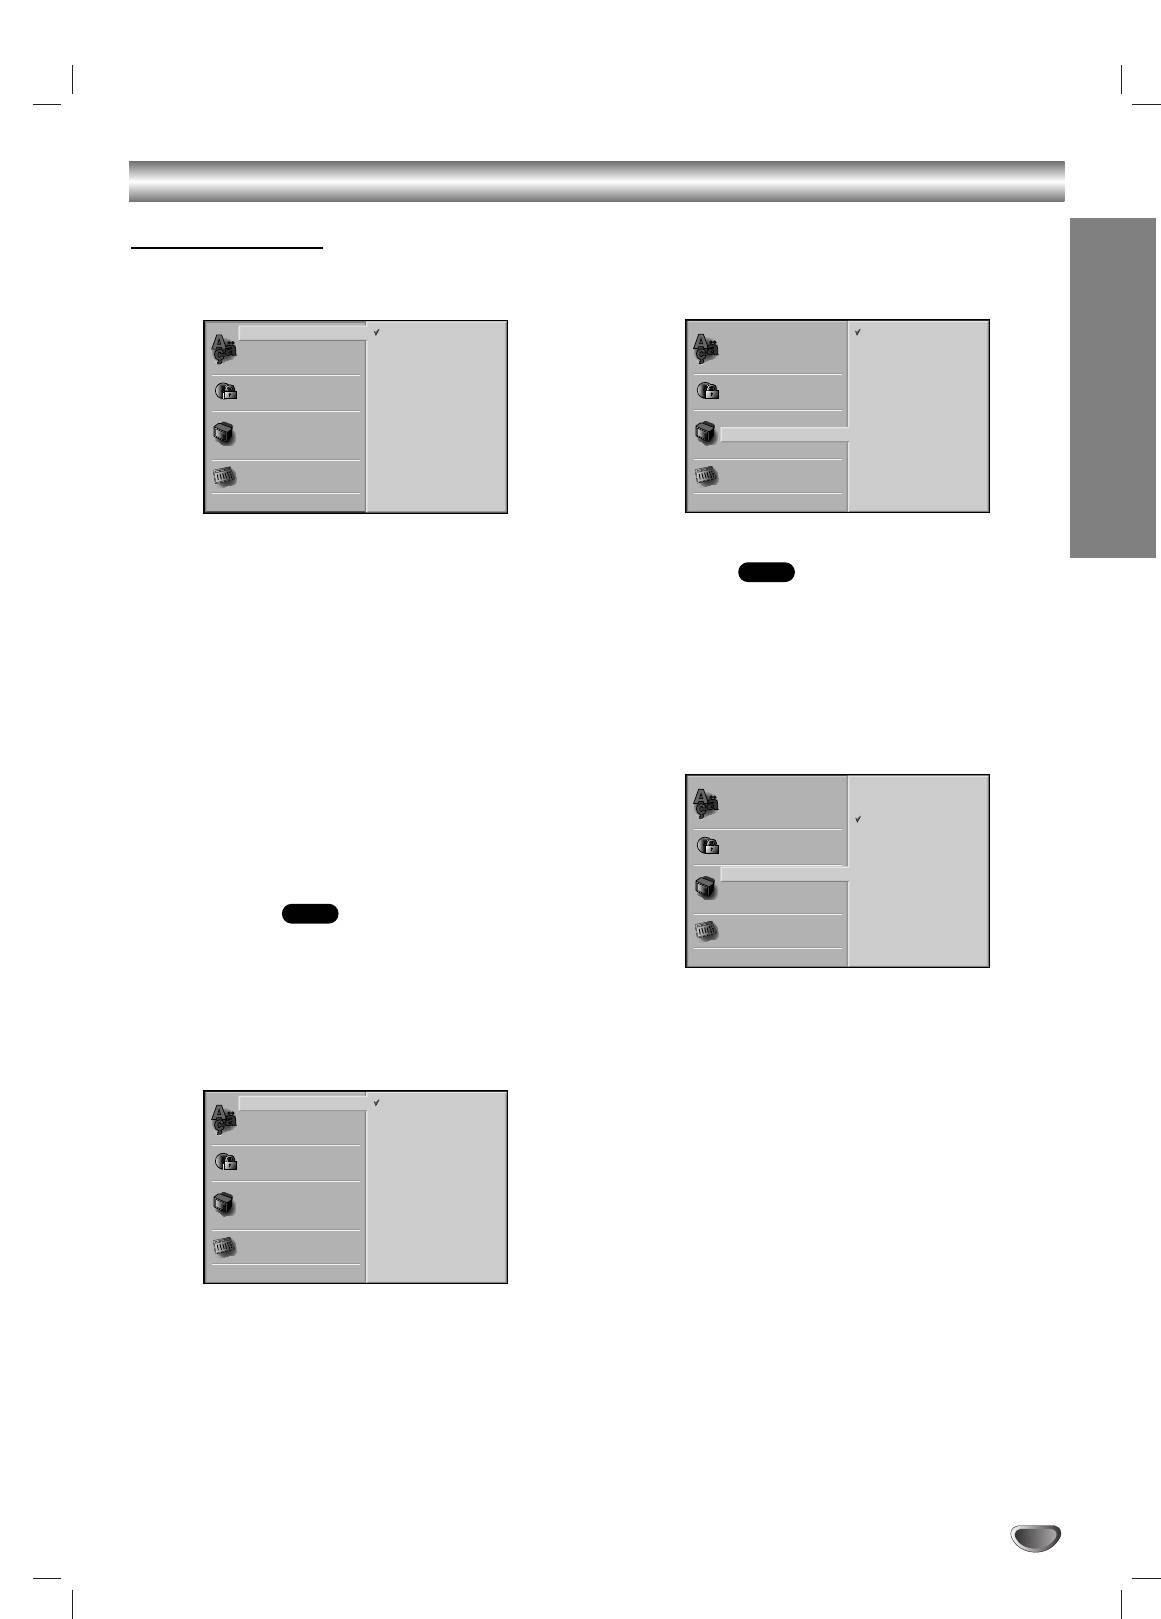
Initial Settings
Select a language for the Setup menu.This is the menu
You can set your personal preferences on the DVD
you see when you press DVD SETUP.
function mode.
PREPARATION
General Operation
TV Aspect
DVD
Press DVD SETUP.
4:3 Letterbox: Select when a standard 4:3 TV is con-
1
The Setup menu appears.
nected. Displays pictures with masking bars above and
Use V/v to select the desired option.
below the picture.
2
The screen will show the current setting for the
4:3 Panscan: Select when a standard 4:3 TV is con-
selected option, as well as alternate setting(s).
nected. Displays pictures cropped to fill your TV screen.
While the desired option is selected, press b,
Both sides of the picture are cut off.
3
then V/v to select the desired setting.
16:9 Wide: Select when a 16:9 wide TV is connected.
Press ENTER to confirm your selection.
4
Some options require additional steps.
Press DVD SETUP, RETURN, or H (PLAY) to
5
exit the setup menu.
Language
Disc Language
DVD
Select a language for the disc’s Menu, Audio, and
Subtitle features.
Original : The original language set for the disc is selected.
Other :To select another language, use number buttons to
enter the corresponding 4-digit number according to the
language code list on page 34. If you enter the wrong
language code, press CLEAR.
Note
Disc Language selection may not work for some DVDs.
19
Disc Audio
Original
Disc Audio
English
Disc Subtitle
Russian
Disc Subtitle
Russian
Disc Menu
English
Disc Menu
Rating
French
Rating
Area Code
German
Area Code
TV Aspect
Spanish
TV Aspect
Menu Language
Italian
Menu Language
Polish
Hungarian
5.1 Speaker Setup
Other – – – –
5.1 Speaker Setup
Others
Others
Disc Audio
4:3
Letterbox
Disc Subtitle
4:3
Panscan
Disc Menu
16:9
Wide
Rating
Area Code
TV Aspect
Menu Language
5.1 Speaker Setup
Others
Disc Audio
Original
Disc Subtitle
Russian
Disc Menu
English
Rating
French
Area Code
German
TV Aspect
Spanish
Menu Language
Italian
Polish
Hungarian
5.1 Speaker Setup
Other – – – –
Others
Before Operation (Continued)
Speaker Setup
Others
5.1 Speaker Settings
DVD
The DRC and PBC settings can be changed.
Press V/v to select the desired item and press
Select speaker settings, including volume balance and
ENTER.The setting of the selected item is changed
distance, or test the speaker settings.
between On and Off.
Speaker settings are only active on the Analog Multi-
Channel Output. (See “Speaker Setup”, page 29.)
Dynamic Range Control (DRC)
1
With the DVD*
format, you can hear a program’s
soundtrack in the most accurate and realistic presenta-
tion possible, thanks to digital audio technology.
However, you may wish to compress the dynamic range
of the audio output (the difference between the loudest
sounds and the quietest ones).Then, you may listen to
a movie at a lower volume without losing clarity of
sound. Set DRC to On for this effect.
*1:Dolby Digital only
Playback Control (PBC)
On: Video CDs with PBC are played according to the PBC.
Off: Video CDs with PBC are played the same way as Audio
CDs.
20
Disc Audio
DRC
Off
Disc Subtitle
PBC
On
Disc Audio
Disc Menu
Disc Subtitle
Rating
S S
Disc Menu
Area Code
Rating
Front L
TV Aspect
Area Code
Volume 0 dB
Menu Language
TV Aspect
Size Small
Menu Language
Distance 0.3 m
Test
5.1 Speaker Setup
Return
Others
5.1 Speaker Setup
Others


