Sony MSAC-US30 – страница 5
Инструкция к Зарядному Устройству Sony MSAC-US30
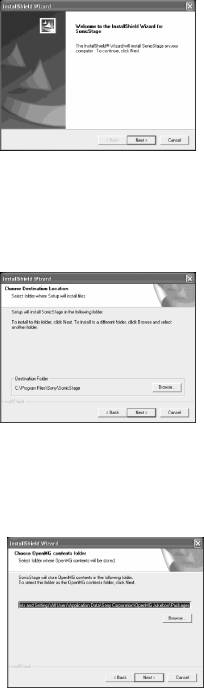
3 Click the [Next] button as prompted on the screen.
4 Select the folder in which you want to install “SonicStage”.
To change the folder suggested for the installation, click the [Browse]
button and then select the folder. When the installation destination
folder is decided, click the [Next] button.
5 Select the folder for storing the “OpenMG” contents.
To change the folder suggested for the installation, click the [Browse]
button and select the folder. When the storage destination folder is
decided, click the [Next] button.
20-GB
6 Click the [Finish] button.
7 Click the [Restart] button to restart your computer.
PNote
Be sure to connect this unit only after you have restarted your computer.
21-GB
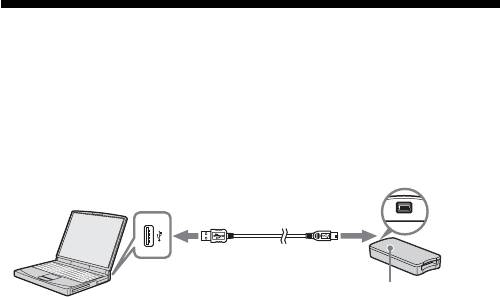
Connecting this unit to your computer
PNote
Be sure to install the supplied software before you connect this unit to your
computer. Restart your computer following installation.
Connect the USB jack on this unit to a USB jack on your computer using
the special USB cable supplied.
USB jack
USB jack
Mini-B
A connector
connector
Access lamp
* Serial number
(7-digit number on the
backside of this unit)
On the special USB cable
A connector: This is plugged into the USB jack on the computer. Any of
the jacks can be used if the computer is provided with
multiple USB jacks.
Mini-B connector: This is plugged into the USB jack on this unit.
1 Firmly insert the Mini-B connector of the USB cable into the
USB jack on this unit as far as it will go.
2 Plug the A connector of the USB cable into a USB jack on your
computer.
•The “Found New Hardware Wizard” starts up and installation of
the driver begins. Depending on the OS, the driver installation may
take place automatically.
•The location of the USB jack on the computer differs with the
computer used.
•When using a computer with multiple USB jacks, do not connect
other devices, with the exception of a standard mouse and keyboard,
to USB jacks at the same time as this unit. When using a desktop
computer, use a USB jack on the main unit of the computer. For
details, see “Recommended ways for connecting this unit” on page
23.
22-GB
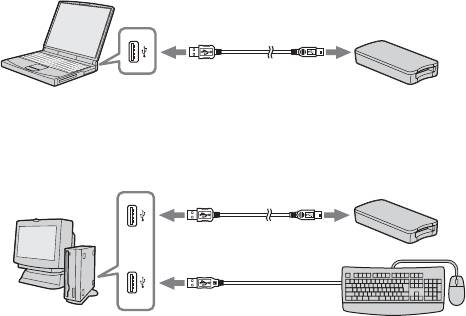
Recommended ways for connecting this unit
The operation of this unit has been confirmed when connected to the
computer in either of the following ways.
When this unit is connected to a USB jack on the computer main unit, and
nothing is connected to other USB jacks on the computer main unit.
When, on a computer with a USB keyboard and mouse as standard
equipment, the USB keyboard is connected to one of the USB jacks on the
computer main unit, and this unit is connected to another USB jack on the
computer main unit with the supplied USB cable.
PNotes
•When two or more USB devices except standard equipment are connected to
one computer, and both are used simultaneously, operation is not guaranteed
depending on the USB devices.
•Make sure to connect the supplied USB cable to a USB jack on the computer
main unit. Operation is not guaranteed if the cable is connected via the
keyboard or a USB hub, etc.
•Not all operations are guaranteed on all computers running under the
recommended environment.
•Make sure to use the specified USB cable (supplied) to connect to your
computer.
23-GB

Confirming that connections are
completed
In the following, Windows XP is used for instructions. Depending on the
OS type and the settings, the screens may look different.
1 Open the “My Computer” folder.
The “My Computer” folders appear.
2 Confirm that the newly recognized Memory Stick-MG(F:) icon
is shown.
PNote
Depending on the computer used, the drive letter (F:) may be different.
The connection is completed when the Memory Stick-MG(F:) icon is shown.
It may take a little while before the Memory Stick-MG(F:) icon appears.
PNotes
•Depending on the OS type used and the “Memory Stick”, the displayed icon
may appear as “Removable Disk (F:)” instead of “Memory Stick-MG(F:)”.
•If the Memory Stick icon is not shown, the device driver may not be installed
correctly. Perform the procedures described on the following page. When
using another “Removable Disk,” plural “Removable Disk” icons appear.
24-GB
When the removable disk (Memory
Stick icon) is not indicated
A separate device driver may already have been installed. Connect this
unit to your computer, and then perform the following procedure.
– When using Windows 2000/Windows XP –
Log on as Administrator or using a user ID that has administrative
privilege.
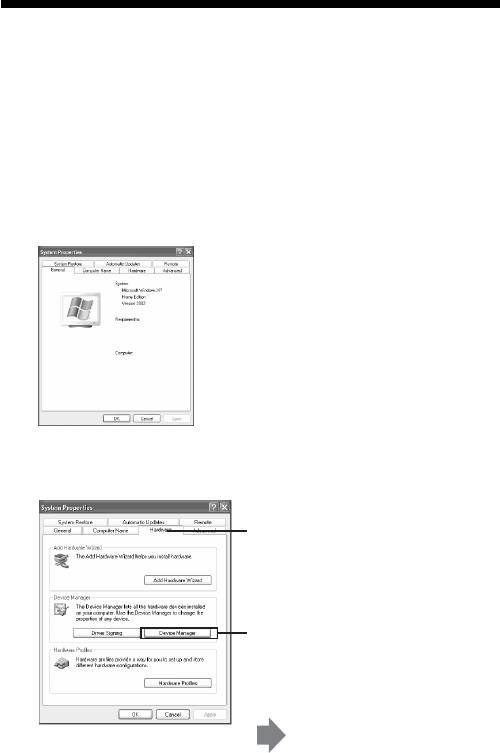
1 Double-click the “System” icon on the “Control Panel”.
The “System Properties” screen appears.
2 Check if the device driver has already been installed.
1 Click the [Hardware] tab on the
“System Properties” screen.
2 Click [Device Manager].
The “Device Manager” screen
appears.
25-GB
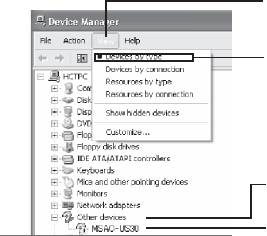
2 (Continued)
3 Click [View].
4 Click [View devices by type].
5 Double-click [Other devices].
6 Check whether [? MSAC-US30]
preceded by the “?” symbol is
shown.
3 Delete the driver if installed.
If you use the procedure described in Step 2 and confirm that [?
MSAC-US30] is shown under “Other devices” in the “View devices by
type” display, a separate device driver has already been installed.
Use the following procedure to delete this driver.
Do not delete other devices than [? MSAC-US30].
1 Right-click on [? MSAC-US30].
2 Click on [Remove]. The “Confirm Device Removal” screen
appears.
3 Click the [OK] button. The device is removed.
4 Restart your computer after disconnecting this unit from the
computer.
Install the device driver again by performing the procedure from
Step 1 described on page 15.
PNotes
•If you delete other devices than [? MSAC-US30], your computer may no
longer operate normally.
•You do not need to install “SonicStage” again if installation of
“SonicStage” has already been completed. Following completion of the
driver installation, restart your computer before you connect this unit to
the computer.
26-GB
– When using Windows 98SE/Windows Me –
1 Double-click the “System” icon on the “Control Panel”.
The “System Properties” screen appears.
2 Check if the device driver has already been installed.
1 Click the [Device Manager] tab on the “System Properties” screen.
2 Double-click [Other devices].
3 Check whether [? MSAC-US30] preceded by the “?” symbol is
shown.
3 Delete the driver if installed.
If you use the procedure described in Step 2 and find that [? MSAC-
US30] is shown under “Other devices,” a separate device driver has
already been installed.
Use the following procedure to delete this driver.
Do not delete other devices than [? MSAC-US30].
1 Click on [? MSAC-US30].
2 Click on [Remove]. The “Confirm Device Removal” screen appears.
3 Click the [OK] button. The device is removed.
4 Restart your computer after disconnecting this unit from the
computer.
Install the device driver again by performing the procedure from
Step 1 described on page 15.
PNotes
•If you delete other devices than [? MSAC-US30], your computer may no
longer operate normally.
•You do not need to install “SonicStage” again if installation of
“SonicStage” has already been completed. Following completion of the
driver installation, restart your computer before you connect this unit to
the computer.
27-GB

Copying image data recorded on
“Memory Stick” to your computer
If the USB cable used to connect this unit and your computer is
disconnected, the computer will no longer be able to recognize this unit
and the image data stored on the “Removable Disk (“Memory Stick”)” can
no longer be viewed on the computer. If you copy the image data stored
on the “Memory Stick” to your computer, the image data can be displayed
and processed on your computer even if this unit is not connected to your
computer.
When the USB cable is disconnected, the Memory Stick-MG(F:) icon
disappears.
For how to copy image data to your computer, see the manual for your
computer.
28-GB
Disconnecting the unit from your
computer
– For customers using Windows Me/Windows 2000/Windows XP –
Perform the procedure described below before disconnecting the USB
cable from the computer.
•The screens shown in Windows XP are used in the following
explanations.
The screens may differ slightly with the type of OS used.
•Customers using Windows 98SE do not need to perform this procedure.
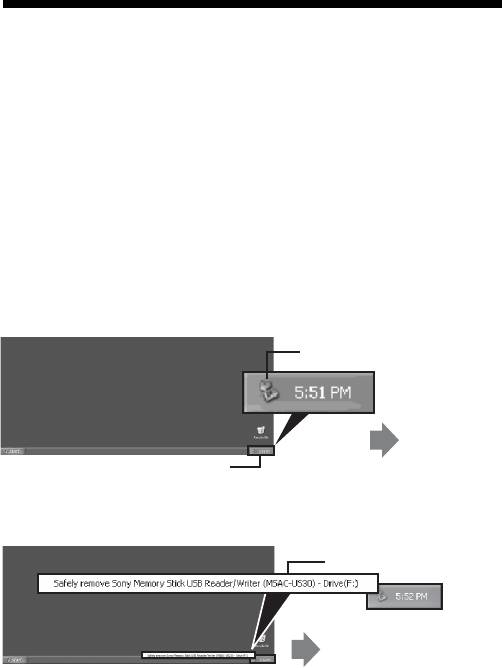
1 Click the “Unplug or Eject Hardware” icon in the task tray in
the lower right corner of the screen.
Click this icon.
A message
appears.
This section is the task tray.
2 Click “Safely remove Sony Memory Stick USB Reader/Writer
(MSAC-US30)-Drive (F:)”.
Click this section.
A message appears after a
little while.
* The drive letter “(F:)”, etc. differs with the computer used.
29-GB
3 [“Sony Memory Stick USB Reader/Writer (MSAC-US30) can be
safely removed.”] is displayed.
In this condition, you can safely remove this unit from your computer.
PNote
The indications may be different depending on the OS that you are using.
PNotes
•When you just want to remove the “Memory Stick” from this unit, the
procedure described above is not required.
•Do not remove the “Memory Stick” from this unit while the access lamp is
blinking. Data on the “Memory Stick” could be corrupted.
•When you carry out this operation, this unit is not recognized by your
computer. To make this unit recognize again, disconnect the USB cable from
your computer and connect the USB cable to your computer again.
30-GB

How to Use (When using Macintosh)
You can use the driver provided as a standard feature of the OS.
Operate as described in the following.
You can use this unit without installing the driver by
connecting this unit to your computer.
1 Turn on your computer.
2 Insert “Memory Stick” to this unit and connect the USB jack on
this unit with a USB jack on the computer main unit using the
special USB cable supplied.
See page 23 for how to connect this unit and your computer.
3 Driver installation starts automatically and the driver is
installed on the computer.
4 When driver installation is completed, a drive icon of this unit
appears on the desktop and this unit can now be used.
PNote
The drive icon of this unit is not displayed on the desktop when “Memory
Stick” is not inserted to this unit.
Removing this unit from your computer or removing
“Memory Stick” from this unit.
1 Close the software used by this unit.
2 Confirm that the access lamp is off.
3 Drag the drive icon of this unit to the Trash icon.
Alternatively, place the drive icon of this unit in the selected state and
select “Eject” from the “Special” menu in the upper left of the screen.
4 Remove this unit from your computer or remove “Memory
Stick” from this unit.
PNotes
•Do not remove the “Memory Stick” from this unit while the access lamp is
blinking. Data on the ”Memory Stick” could be corrupted.
•Removing this unit or the “Memory Stick” in this unit without performing the
operations above may cause damage to the “Memory Stick.” Sony will not be
liable for any damage caused as a result of not following the instructions
above.
31-GB

About “SonicStage”
“SonicStage” is comprehensive software for enjoying music.
With “SonicStage”, you can enjoy listening to music sources such as music
CDs, etc., or you can import music into the hard disk of your PC for a
complete management of your collection.*
Furthermore, music data that has been imported into the hard disk of your
PC can also be transferred to a MagicGate compatible “Memory Stick” so
that they can be enjoyed outside the PC environment.
* With “SonicStage”, music data imported into the hard disk of your PC is
managed using a special music database program called “Music Drive”.
Using “SonicStage” to listen to various music
sources
With “SonicStage”, you can play back the following music sources using
the simple, integrated mouse operations:
•Devices/tracks recorded on a medium connected to the USB port of your
PC. (This is available using the main unit and MagicGate compatible
“Memory Stick”.)
•Music CD
•Music files on your PC
•Music files provided by Internet music distribution services (EMD
services).
Creating a music database by importing music
from various music sources (“Music Drive”)
“SonicStage” uses the music database “Music Drive” to manage music files
that are stored in your PC.
Music files can be imported into “Music Drive” from various music
sources using the following methods:
•Record tracks from a music CD into “Music Drive”.
•Import music files already existing on your PC into “Music Drive”.
•Download music files from an Internet music distribution service and
import them into “Music Drive”.
32-GB
Categorizing imported music as desired (Play
List)
Music files imported into the hard disk (“Music Drive”) of your PC can be
categorized by adding information such as artist name, song title, cover
image, etc. or by using the “Play List” container.
Searching imported music using various
methods (Categorized List)
When using “Categorized List”, you can narrow down and display music
files in “Music Drive” in categories of “artist”, “genre”, “format”, etc., or
search using keywords and conditions.
Convenient when searching for a specific artist or genre from a large
volume of data imported into “Music Drive”.
Transferring imported music data to another
device/medium for listening outside the PC
environment
Music files imported into the hard disk (“Music Drive”) of your PC can be
transferred to a MagicGate compatible “Memory Stick”.
Music files transferred to a MagicGate compatible “Memory Stick” can be
played outside the PC environment using devices such as a portable audio
player, etc.
Listening to music files using sound effects and
equalizer
“SonicStage” is equipped with a “Vocal Canceller” sound effect. The
“Vocal Canceller” sound effect can be used to play back music tracks with
the vocals turned off (lowered) or with the pitch altered.
Furthermore, an equalizer effect can be added to music play back. Other
than the preexisting settings of “Rock”, “Jazz”, etc., you can store the
sound quality adjusted according to your tastes.
Enjoying music to images (Visualizer)
Various pattern images can be displayed on the Visualizer screen of
“SonicStage” to match the music being played.
It is also possible to enjoy watching Visualizer images on the entire screen
while listening to music.
For various uses of “SonicStage”, please refer to the “SonicStage” Help.
33-GB

Music files compatible with
“SonicStage”
With “SonicStage”, music files of the following formats can be imported
into “Music Drive”, the “SonicStage” music database.
OpenMG format music files
These are music files that have been converted using a format referred to
as ATRAC3 or ATRAC3plus and encrypted using the “OpenMG” format,
a format unique to the “OpenMG” copyright protection technology (file
extension: .omg). “OpenMG” format music files can be imported into
“Music Drive” using the following methods:
•Download “OpenMG” format music files from an EMD service and
import them into “Music Drive”.
•Record tracks of a music CD using the “OpenMG” (ATRAC3/
ATRAC3plus) format.
•Convert music files stored on a hard disk to “OpenMG” (ATRAC3/
ATRAC3plus) format and import.
•Transfer music tracks downloaded directly in a MagicGate compatible
“Memory Stick” from an EMD service, etc., to “Music Drive”.
WAV format music files
WAV format music files can be imported into “Music Drive” using the
following methods:
•Record tracks of a music CD using the WAV format.
•Import WAV format music files stored on a hard disk in the same format.
MP3 format music files
MP3 format music files can be imported into “Music Drive” using the
following method:
•Import MP3 format music files stored on a hard disk in the same format.
PNote
MP3 format music files cannot be imported if Windows Media Player
Version 6.4 or later is not installed in your PC. (
Windows Media Player can
be downloaded from the
“OpenMG”
homepage: http://www.openmg.
com/
).
34-GB
WMT (Windows Media Technologies)
compatible music files
WMT compatible music files can be imported into “Music Drive” using the
following methods:
•Download WMT compatible music files from an EMD service and import
them into “Music Drive”.
•Record tracks of a music CD using the Windows Media (WMA) format*.
•Import WMT compatible music files stored on a hard disk in the same
format.
* One of the WMT compatible music file formats.
PNote
WMT compatible music files cannot be played back if Windows Media
Player Version 7.0 or later is not installed in your PC. (Windows Media
Player can be downloaded from the “OpenMG” homepage: http://
www.openmg.com/).
PNote
There are some WAV format, MP3 format and WMT compatible music
files that cannot be imported depending on sampling rate, etc. For details
concerning music files that cannot be imported, please refer to “Importable
Files” in “SonicStage” Help.
35-GB

Check-in/check-out
Music files imported into the hard disk (“Music Drive”) of your PC can be
transferred to a MagicGate compatible “Memory Stick” using an operation
referred to as “check out.”
When recording tracks from a music CD to a MagicGate compatible
“Memory Stick”, the check-out process is automatically performed by
“SonicStage”. The audio tracks are continuously recorded in “Music
Drive”, and are then checked out to the MagicGate compatible “Memory
Stick.”
Music files checked out automatically or using the above operation can be
played back outside the PC environment using devices such as a
MagicGate compatible “Memory Stick” compatible audio player.
Furthermore, checked out music files can be returned to “Music Drive”
using the “check in” operation.
Such “check-in/check-out” operations (processes) are for the protection of
copyrighted music contents. For this reason, the following rules and
restrictions apply:
Each music file has “the right for up to 3 check-
outs.”
Music files imported into “Music Drive” from a CD recording, etc., can be
simultaneously checked out to 3 different devices/media. Furthermore,
play back is possible from the original music file retained in “Music Drive”
even after checking out to 3 devices/media.
Checking in music files that have been checked out makes them available
for check out again.
Checked out music files can only be checked
into the PC where the check-out was made.
Music files checked out from another PC cannot be checked in.
For details concerning “check-in/check-out”, please refer to the
“SonicStage” Help.
PNote
Depending on the music file, the “check-out rights” may be set to other
than 3 or there may be restrictions concerning the period or number of
times the file can be played back. Any files deleted on a different PC are
read as checked in files upon reconnection to the PC used to check out the
MagicGate compatible “Memory Stick”. Therefore, the remaining check-
out number of music files in the PC returns automatically.
36-GB

Before using “SonicStage” (Be sure to
read)
Before using “SonicStage”, please read the following cautionary items.
Cautions concerning launching “SonicStage”
and other “OpenMG” compatible software
Do not launch “SonicStage” and other “OpenMG” compatible software
(software capable of running/managing “OpenMG” format files)
simultaneously. Doing so may cause music files stored on the PC hard disk
or devices/media to be damaged, and rendered unusable.
Cautions concerning using “SonicStage” and
other “OpenMG” software at the same time
Please note the following when running “SonicStage” and other
“OpenMG” software at the same time.
When recording tracks from a music CD using “SonicStage”, do not run
other software capable of music CD playback. Recording of the music CD
may not perform properly.
When running other software while playing back music files using
“SonicStage”, the sound may pause momentarily.
Cautions when running Windows XP/Windows
Me system tool “System Restore”
Running “System Restore”, a system tool built in Windows XP and
Windows Me, may cause a malfunction in management data resulting in
all recorded or imported files to become unusable.
In order to prevent the loss of important music data, use the “SonicStage”
backup tool to backup music data before running “System Restore” on
your system. After using “System Restore,” saved music data can be made
to play back by restoring with the “SonicStage” back up tool.
For the use of the “SonicStage” backup tool, please refer to the
“SonicStage” Help.
37-GB
Cautions when using “OpenMG Jukebox”
“OpenMG Jukebox” Version 2.1 or earlier cannot be installed in a PC
already installed with “SonicStage”.
Although it is possible to install “OpenMG Jukebox” Version 2.2 or later in
a PC already installed with “SonicStage,” “SonicStage” and “OpenMG
Jukebox” cannot be run simultaneously.
Installing “OpenMG Jukebox” Version 2.2 or later in a PC already installed
with “SonicStage” causes the database that manages the music data (files)
to be shared.
Writing to a CD-RW/CD-R disc
This software is not compatible with writing of music data to CD-RW/
CD-R media.
Sony will not be liable for any loss of data resulting from such operation.
38-GB

Launching “SonicStage”
From the [Start] button of Windows, click [All Programs] –
[SonicStage] – [SonicStage].
“SonicStage” is launched and the main window appears.
PTips
•When using an operating system other than Windows XP, launch
“SonicStage” by clicking from the [Start] button of Windows: [Programs]
– [SonicStage] – [SonicStage].
•When launching “SonicStage” on your PC for the first time, the
“SonicStage playback settings” dialog box is displayed before the main
window appears. For details, please refer to “Launching “SonicStage “
for the first time” in “SonicStage” Help.
•“SonicStage” can also be launched by:
– Double clicking a SonicStage icon on the desktop if displayed.
(When using Windows XP, icons that have not been used for some time
are deleted from the desktop depending on the setting. If the
SonicStage icon does not appear on the desktop, launch from the start
menu.)
– Double click music files associated for playback on “SonicStage” using
Windows Explorer, etc.
PNote
When installing “OpenMG Jukebox” Version 2.2 or later in a PC already
installed with “SonicStage”, “SonicStage” and “OpenMG Jukebox” cannot
be run simultaneously.
For various uses of “SonicStage”, please refer to the “SonicStage” Help.
39-GB
