Sony Grand Wega KF-50SX200K: Replacing the Lamp
Replacing the Lamp: Sony Grand Wega KF-50SX200K
01GBKF50/42SX200K.fm Page 34 Tuesday, January 7, 2003 12:37 PM
Additional Information
Replacing the Lamp
When the lamp becomes dark or the picture colour is
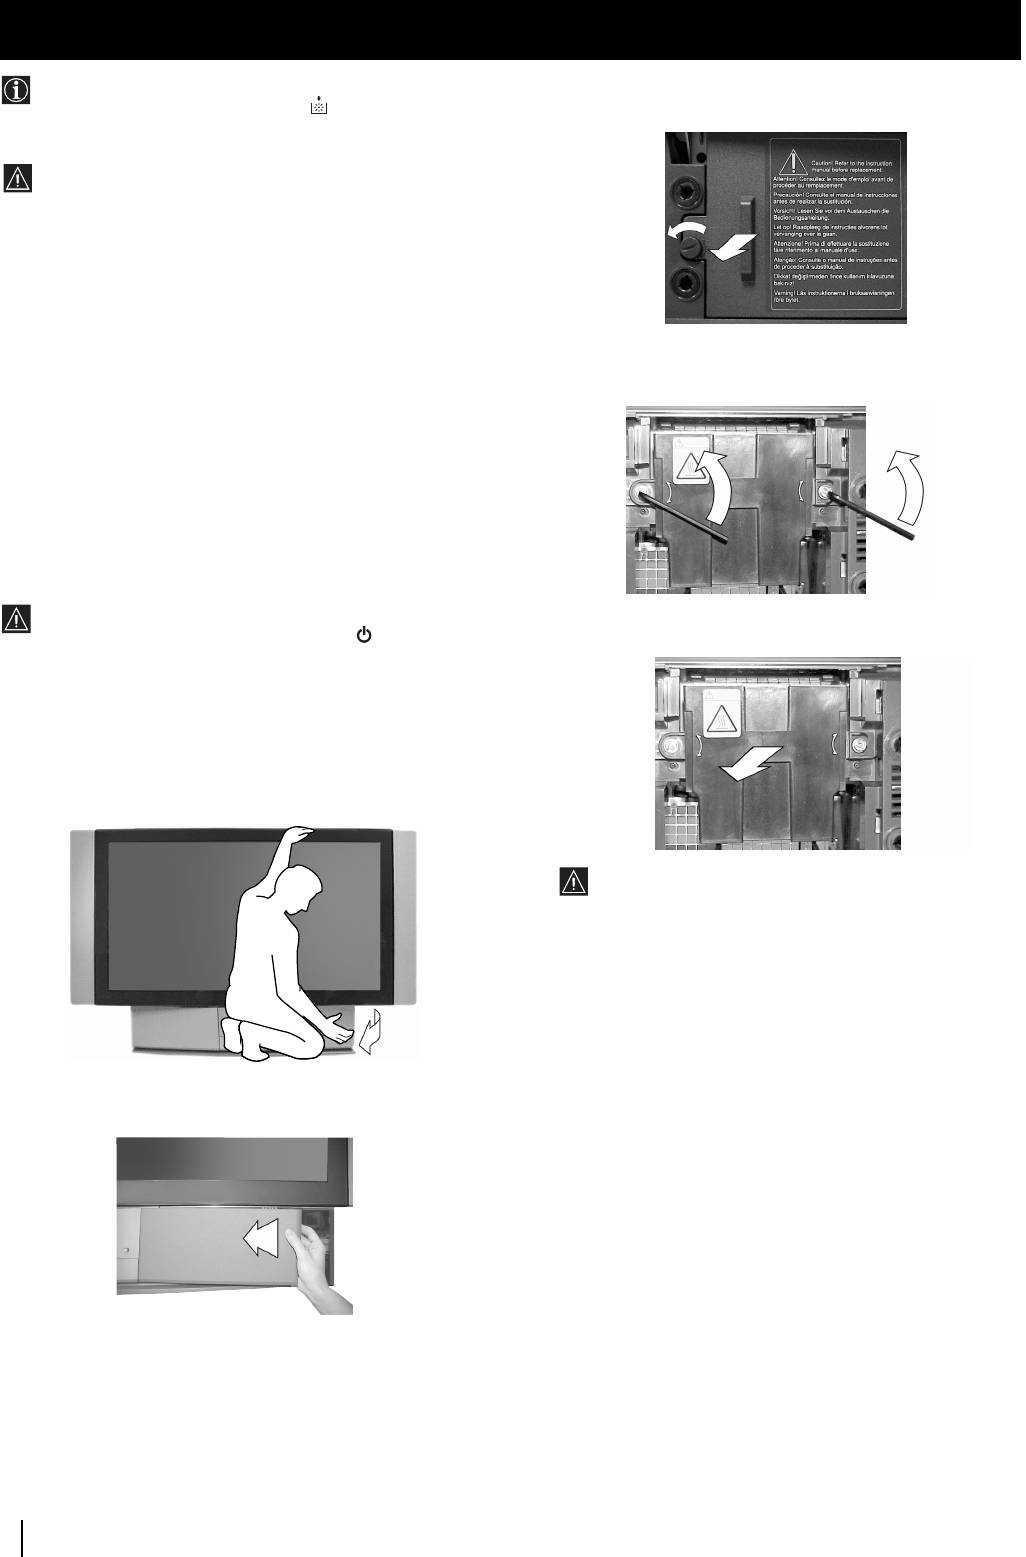
3 Loosen the screw with an object such as a coin and
not normal or the lamp indicator on the TV set
remove the lamp cover.
flashes, replace with a new lamp.
• Only use the lamp XL-2000E for replacement. If you
use another lamp, it may cause damage to the TV set.
• Do not remove the lamp except when replacing it.
• Before replacing the lamp, turn off the power and
disconnect the power cord.
• Replace the lamp only after it becomes cool. The front
glass of the lamp remains at least 100 °C (212 °F) even
after the power has been turned off for 30 minutes.
• Do not place the old lamp in proximity to children or
4 Loosen the two screws and pull out the lamp.
flammable material.
Loosen two screws with the hexagon key supplied.
• Do not get the old lamp wet, or insert objects inside
the lamp. It may cause the lamp to explode.
• Do not place the old lamp near easily flammable
objects, as this may cause fire. Also, do not put your
hand inside the lamp compartment, as you may be
burned.
• Attach the new lamp securely. If it is not securely
attached, the picture may become dark.
1 Turn off the power and disconnect the power cord.
• If you start changing the lamp without disconnecting
the power cord, the standby indicator
on the TV set
Pull out the lamp by the handle.
flashes. Disconnect the power cord to continue
changing the lamp.
• Replace the lamp 30 minutes or more after the power
is turned off to allow it to cool.
• Prepare the new lamp.
2 Remove the front panel.
The lamp is still extremely hot immediately after the
power is turned off. Be careful that you don’t touch
the front glass or surrounding area of the lamp or the
glass of the lamp compartment.
5 Attach the new lamp.
Replace the new lamp securely in the lamp receptacle and
fasten the screws tightly using the hexagon key supplied.
Remove the front panel without moving the TV set.
6 Attach the lamp cover.
Fasten the screw tightly with an object such as a coin.
7 Attach the front panel.
Attach the front panel locating the left hand edge of the
cover first and then pushing the right hand side back into
place.
Notes
• Do not touch or stain the front glass of the new lamp or the glass
of the lamp compartment. If the glass become dirty, the picture
quality may deteriorate or the lamp life may shorten.
• Attach the lamp cover firmly. If it is not firmly attached, the
Grasp the right side of the front panel with your fingers
power will not turn on.
and pull it forward. Be careful not to catch your
• When the lamp burns out, a noise is audible. This does not
fingernails.
indicate damage to the TV set.
• Consult your nearest Sony service center to obtain a new lamp.
• Always remember to dispose of used lamps in an
evironmentally friendly way.
34
Additional Information
Оглавление
- Introduction
- Safety Information
- Checking the Accessories Supplied s
- Overview of Remote Control Buttons
- Inserting Batteries into the Remote Control
- Connecting the Aerial and VCR
- Switching on the TV set and Automatically Tuning
- Changing the Screen Format
- On Screen display Menus Guide
- Adjusting the Picture
- Adjusting the Sound
- Using the Features Menu
- Manually Tuning the TV
- Labelling a channel
- Skipping Programme positions
- Using the "Further Programme Preset" function
- Inputting Your Personal ID
- Using the Demo Mode
- Adjusting the H Centre picture for an RGB source
- Labelling and Selecting the screen format of Input Sources
- Using Multi PIP (Picture In Picture)
- Teletext
- NexTView *
- Connecting Optional Equipment
- Using Optional Equipment
- Smartlink
- Remote Control Configuration for VCR/DVD
- Replacing the Lamp
- Optimum Viewing Area
- Specifications
- Troubleshooting
- Увод
- Техника на безопасност
- Проверка на доставените принадлежности
- Ocнoвнo oпиcaние на бутoните на диcтанциoннoтo упpавление
- Инсталиране на батериите в пулта за дистанционно управление
- Включване на антената и видеото
- Включване на aпapaтa и автоматично настройване
- Cмянa нa фopмaтa нa eкpaнa
- Cиcтeмa за бързо преминаване през менютата
- Настройване на oбpaзa
- Настройване на звyкa
- Използване на менюто «Характеристики»
- Ръчно настройване на тeлeвизopa
- Индивидуална идентификация на излъчваните програми
- Пропускане на програмни позиции
- Използване на функцията «Настройване (Продължение)»
- Зaдaвaнe на Вашата Персонална Идентификация
- Демонстриране на различните функции
- Настройка на хоризонталното центриране на образа за източник на RGB
- Разпознаване и избор на екранния формат за входния сигнал
- Група от образи (Multi PIP)
- Телетекст
- NexTView *
- Свързване на допълнителнa апаратypa
- Използване на допълнителнa апаратypa
- Смартлинк
- Конфигуриране на пулта за дистанционно управление на DVD или Видео апарата
- Смяна на лампата
- Оптимален ъгъл за гледане
- Cпeцификaции
- Oтcтpаняване на неизпpавнocти
- Úvod
- Bezpečnostní opatření
- Kontrola přídavných doplňků
- Přehled tlačítek dálkového ovladače
- Vložení baterií do dálkového ovladače
- Umístění aparátu th e set
- Zapnutí aparátu a automatické naladění
- Změna formátu zobrazení
- Stručný návod k volbě Menu
- Seřízení obrazu
- Seřízení zvuku
- Použití menu “Spec. funkce”
- Ruční ladění televizoru
- Identifikace jednotlivých vysílacích stanic
- Vynechávání programových pozic
- Použití funkce “Rozšířené předvolby”
- Zavedení Vašeho osobního ID čísla
- Ukázka různých funkcí
- Seřízení vodorovného centrování obrazu pro videozdroj RGB
- Identifikace a volba formátu zobrazení vstupních signálů
- Multi Obrazy (Multi PIP)
- Teletext
- NexTView *
- Připojení přídavných zařízení
- Použití přídavných zařízení
- Smartlink
- Instalace dálkového ovládání pro DVD nebo video
- Výměna žárovky
- Optimální úhel vidění
- Specifikace
- Řešení problémů
- Bevezetés
- Biztonsági előírások
- A mellékelt tartozékok ellenőrzése
- A távvezérlő gombjainak általános leírása
- Az elemek behelyezése a távvezérlőbe
- Az antenna és a video csatlakoztatása
- A készülék bekapcsolása és automatikus hangolás
- A képernyő formátumának változtatása
- Gyors útmutató a menükben való mozgáshoz
- A kép beállítása
- A hang beállítása
- A “Jellemzők” menü használata
- A TV kézi hangolása
- Az adók egyéni beazonosítása
- Programhelyek figyelmen kívül hagyása
- A “További programok tárolása” funkció használata
- Személyazonosítójának bevitele
- A különböző funkciók bemutatása
- A kép vízszintes közepének beállítása RGB forráshoz
- A bemenő források képformátumának beazonosítása és kiválasztása
- Dinamikus csatornaindex
- Teletext
- NexTView *
- Választható készülékek csatlakoztatása
- Választható készülékek használata
- Smartlink
- A távvezérlő beállítása DVD-hez vagy videomagnóhoz
- Az izzó cseréje
- Optimális látószög
- Műszaki jellemzők
- Problémamegoldás
- Wprowadzenie
- Informacje dotyczące bezpieczeństwa
- Sprawdzanie dostarczonych akcesoriów
- Przegląd przycisków pilota do zdalnego sterowania
- Wkładanie baterii do pilota
- Stabilne umocowanie urządzenia the set
- Włączanie telewizora i automatyczne programowanie
- Zmiana formatu ekranu
- Krótki przewodnik po systemie menu
- Regulacja obrazu
- Regulacja dźwięku
- Użycie menu “Funkcje”
- Ręczne programowanie urządzenia
- Identyfikacja poszczególnych kanałów
- Pomijanie numerów programów
- Stosowanie funkcji “Dalsze nastawianie”
- Wprowadzenie Identyfikatora Osobistego
- Przegląd poszczególnych funkcji
- Regulacja geometrii obrazu dla źródła RGB
- Identyfikacja i wybór formatu ekranu źródeł wejściowych
- Obrazy zwielokrotnione (Multi PIP)
- Telegazeta
- NexTView *
- Podłączanie dodatkowych urządzeń
- Zastosowanie dodatkowych urządzeń
- Smartlink
- Konfigurowanie pilota do nastawiania DVD lub magnetowidu
- Wymiana lampy
- Optymalny kąt oglądania
- Dane techniczne
- Rozwiązywanie problemów
- Введениe
- Общие правила техники безопасности
- Проверка комплектности поставки вспомогательных приспособлений
- Общее описание кнопок пульта дистанционного управления
- Как вставить батарейки в пульт дистанционного управления
- Подключение антенны и видео
- Включение aппapaтa и автоматический поиск
- Bведение и работа с системой меню
- Быстрая справка для перемещения по меню
- Настройка изображения
- Звуковая настройка
- Использование меню «Параметры»
- Ручная настройка программ ТВ
- Присвоение названий каналам
- Пропуск позиций программ
- Использование функции «Настройка (Продолжение)»
- Введение Персонального Пароля
- Демонстрация различных функций
- Настройка центровки изображения для источника RGB
- Присвоение имен и выбор формата экрана для источников входного сигнала
- Pежим Мульти PIP («Kартинка в Kартинке»)
- Телетекст
- NexTView *
- Подключение оборудования
- Использование дополнительного оборудования
- Смартлинк
- Настройка пульта дистанционного управления для DVD или видеомагнитофона
- Зaмeнa пpoeкциoннoй лaмпы
- Оптимальный угол зрения
- СПЕЦИФИКАЦИИ
- Bыявлeниe неисправностей
