Sony Grand Wega KF-42SX200K: NexTView *
NexTView *: Sony Grand Wega KF-42SX200K
28
NexTView
NexTView
* (depending on availability of service)
NexTView is an on-screen electronic programme guide (EPG), providing you with programme information for different
broadcasters.
NexTView *
Selecting your NexTView provider
The TV set automatically selects the best NexTView provider for
you.
This provider is available about 30 minutes after the channel tuning.
You can however change this selection of provider if you wish.
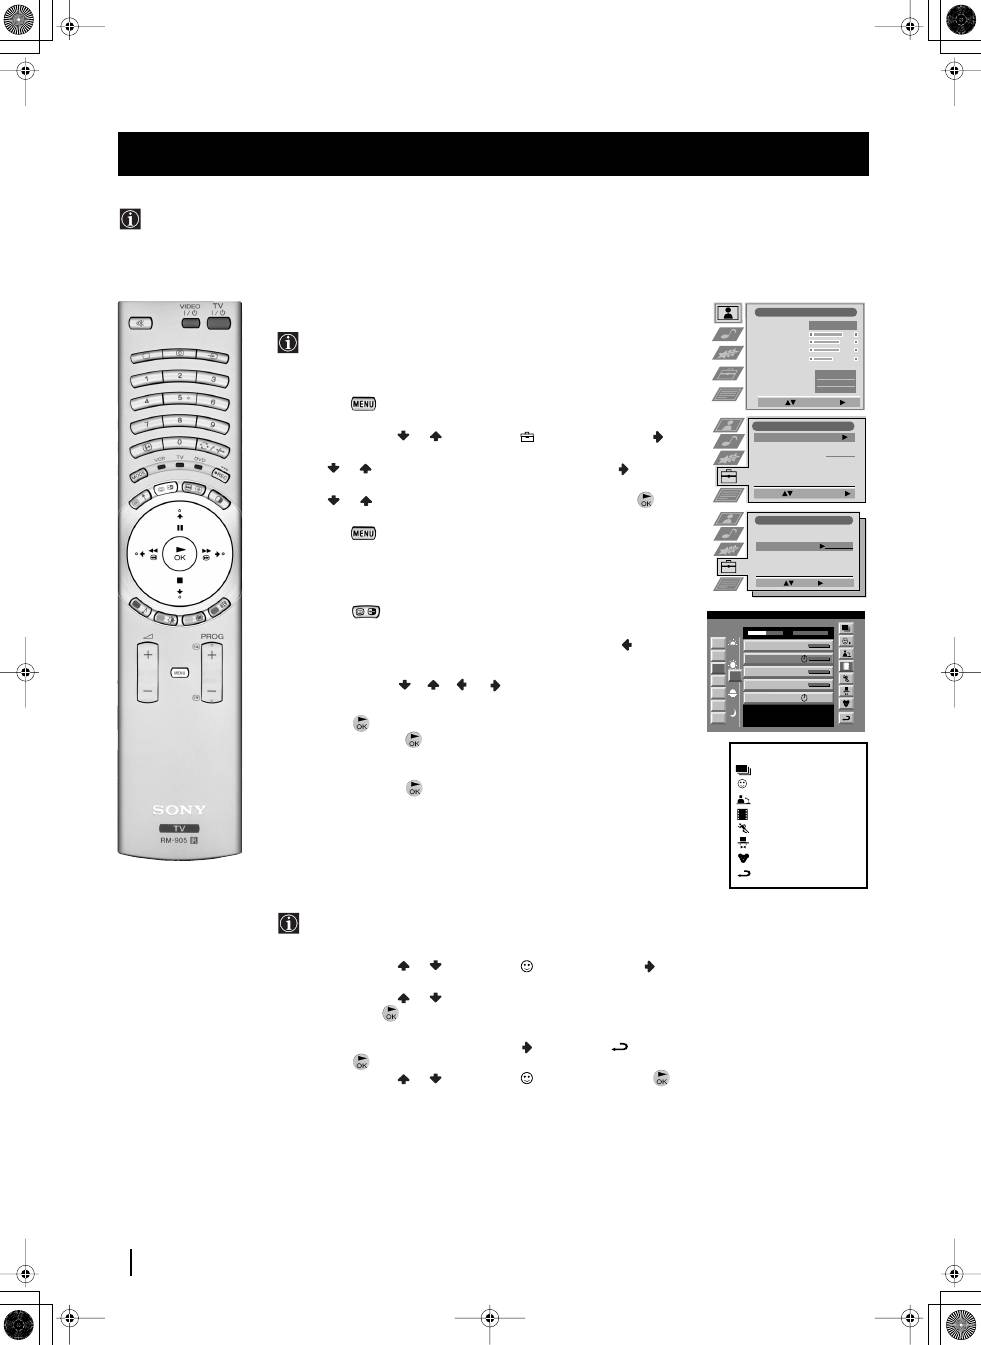
1
Press the
button on the remote control to display the menu
on the screen.
2
Push the joystick or to select the
symbol, then push
to enter the
Set Up
menu.
3
Push or to highlight
Select NexTView
then push
to enter. A
list is displayed containing all available NexTView providers.
4
Push or to select the desired provider then press the
button to store.
5
Press the
button to remove the menu from the screen.
Displaying NexTView
1
Press the
button repeatedly on the remote control to switch
NexTView on and off.
* In some cases, you may also need to push the joystick
to
display the Sony electronic programme guide.
2
Push the joystick
/
/
or
to move the cursor
around the screen.
3
Press the
button to confirm a selection.
a) If you press the
button in the date, time or icon (themes)
columns, you change the programme list according to the
selection.
b) If you press the
button in the programme list, you directly
display the channel if the broadcast is currently running, or,
you display the "Long Info" menu if the broadcast is running at
some future time.
Using the "Individual Setting" menu
You can make a personal list of the types of programmes you
wish to view on the programme guide.
1
Push the joystick or to select the
icon then push to
to
display the "Individual Setting" menu.
2
Push the joystick or to select your chosen item on the screen
then press the
button to confirm your choice.
3
Repeat step 2 for all the items you wish to have in your list.
4
When you have finished the list, push
to select the
icon.
5
Press the
button to return to the previous menu.
6
Push the joystick or to select the
icon then press the
button again to activate your "Individual Setting" filter.
continued...
Picture Adjustment
Select:
Enter Menu:
Picture Mode
Contrast
Brightness
Colour
Sharpness
Reset
AI
Noise Reduction
Colour Tone
Personal
On
Off
Normal
Set Up
Auto Tuning
Programme Sorting
Select NexTView
AV Preset
Manual Set Up
Select:
Start Auto Tuning
Start
- - - - - - -
7
Tue
07 Tue
12:38
8
Wed
10
Fri
11
Sat
12
Sun
13
Mon
9
Thu
12
SWISS
Star Wars
Super RTL
Hat der alte Hexenmeister sich doch
einmal fortbegeben, und nun sollen
seine Geister auch nach meinem Willen
leben.
Werner - Beinhart
Pro 7
Flui grüsst den Rest der Welt
Kabel 1
Once upon a time in the West
Euronews
International News
RTL Plus
10:35 - 12:45
10:20 - 12:00
10:45 - 10:50
11:00 - 11:20
11:45 - 12:50
TXT
TPS / RINGIER
Tue 07. 04 .98
Index
full selection list
personal selection
news broadcasts
movies
sports
entertainment
children
return to last menu
Enter:
Set Up
Auto Tuning
Programme Sorting
Select NexTView
AV Preset
Manual Set Up
Select:
- - - - - - -
01GBKF50/42SX200K.fm Page 28 Tuesday, January 7, 2003 12:37 PM
29
GB
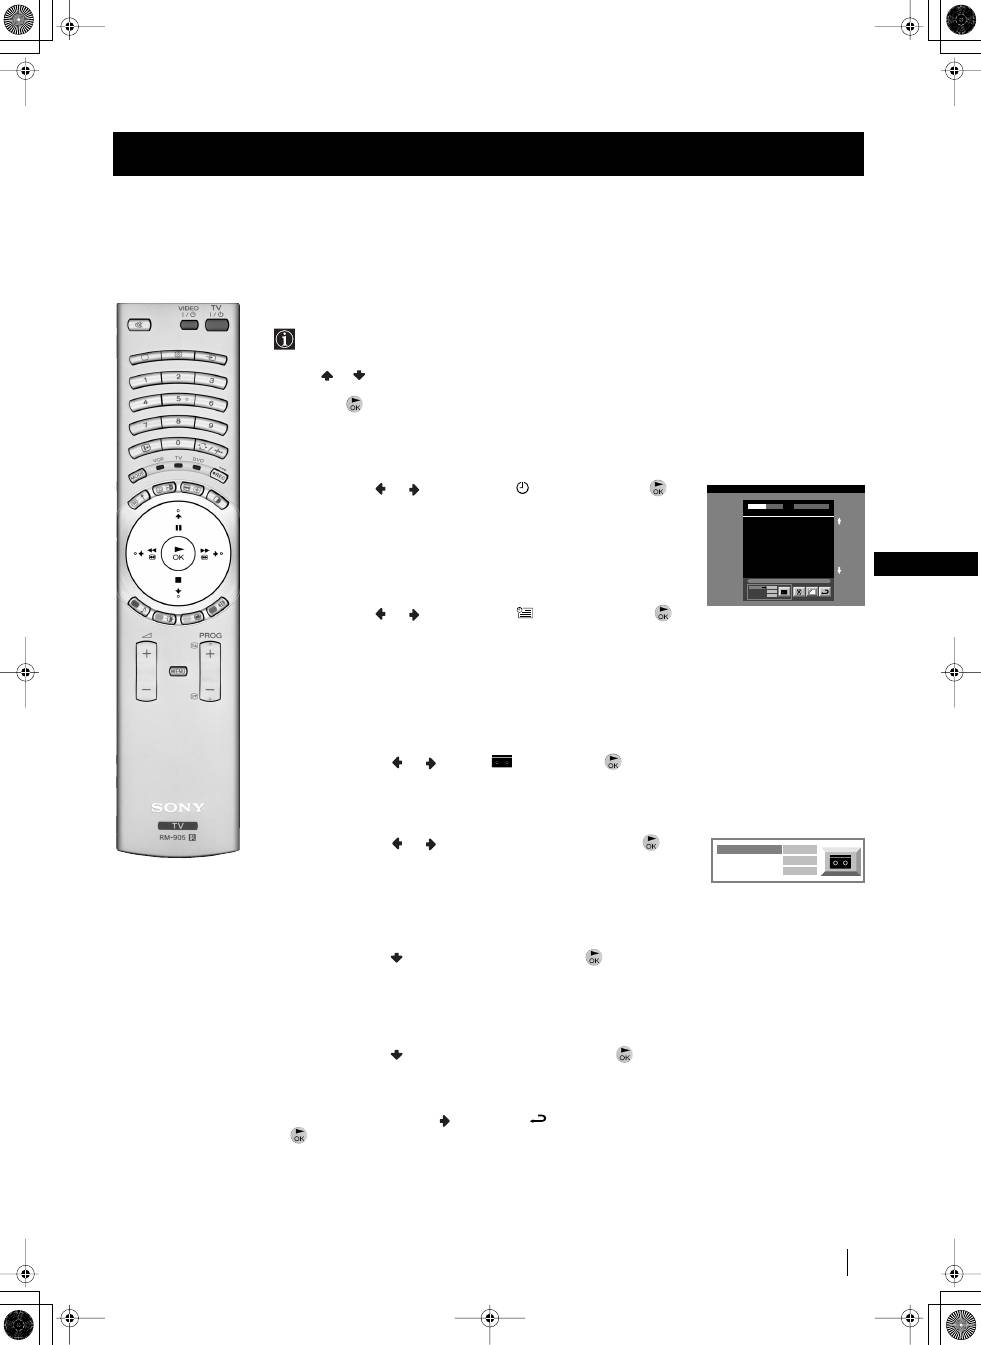
Using the Long Info menu
With this menu screen, you can set timers or record selected
programmes.
1
Push or to select a future programme in the programme list
column.
2
Press the
button to display the
Long Info
menu on the TV
screen.
To set the timer
Push the joystick
or
to highlight the
icon then press the
button repeatedly to "set the timer" or "cancel the timer". If you choose
to set the timer, the programme is marked with a clock symbol and a
message appears on the screen shortly before the programme is due
to start asking whether you wish to still view this programme.
To view the timer table
Push the joystick
or
to highlight the
icon then press the
button repeatedly to switch on/off the timer table. This table shows the
programmes on which you have already set a timer. (You can set a timer
on up to 5 programmes).
To record programmes
(only with Smartlink VCRs)
1
Connect your Smartlink VCR.
2
Push the joystick
or
to select
then press the
button
to download the information to your VCR.
3
To set up the VCR:
VPS/PDC
Push the joystick
or
to select
VPS
/
PDC
then press the
button repeatedly to select
On
or
Off
. With this setting on you have
the guaranteed recording of the whole broadcast should there be a
change in the TV programme. This only works if the selected
channel broadcasts a VPS/PDC signal.
Speed
Push the joystick to select
Speed
then press the
button
repeatedly to select between
SP
for standardplay or
LP
for longplay.
With longplay you can record twice as much on a videotape.
The picture quality however may suffer.
VCR Setup
Push the joystick to select
VCR Setup
then press the
button repeatedly to select which
VCR
you wish to programme,
namely
VCR1
or
VCR2
.
4
Finally, push the joystick
to select the
icon then press the
button to remove the menu from the TV screen.
NexTView
NexTView
07 Tue
12:38
Address Mapping
The position of the addresses in the
OSDA is shown in the following diagram.
The position values of the DPW are set
to '0'.
If other values are set, the complete
combination will be scrolled.
Example:
if the DPWC is set to '63', the char-
Speed
Timer Prog
VPS/PDC
SP
VCR1
On
This channel has been set for a timer
First nextTView/EPG-Providers in Europe
SWISS
TXT
TPS / RINGIER
nexTView
Tue 07. 04 .98
Speed
VCR Setup
VPS/PDC
SP
VCR1
On
01GBKF50/42SX200K.fm Page 29 Tuesday, January 7, 2003 12:37 PM
Оглавление
- Introduction
- Safety Information
- Overview of TV Buttons Checking the Accessories Supplied
- Overview of Remote Control Buttons
- Inserting Batteries into the Remote Control
- Connecting the Aerial and VCRStabilizing the TV set the set
- Switching on the TV set and Automatically Tuning
- Changing the Screen Format
- On Screen display Menus Guide
- Adjusting the Picture
- Adjusting the Sound
- Using the Features Menu
- Manually Tuning the TV
- Labelling a channel
- Skipping Programme positions
- Using the "Further Programme Preset" function
- Inputting Your Personal ID
- Using the Demo Mode
- Adjusting the H Centre picture for an RGB source
- Labelling and Selecting the screen format of Input Sources
- Using Multi PIP (Picture In Picture)
- Teletext
- NexTView *
- Connecting Optional Equipment
- Using Optional Equipment
- Smartlink
- Remote Control Configuration for VCR/DVD
- Replacing the Lamp
- Optimum Viewing Area
- Specifications
- Troubleshooting
- Увод
- Допълнителна техника на безопастнос
- Проверка на доставените принадлежности Основно описание на бутоните на aпapaтa
- Ocнoвнo oпиcaние на бутoните на диcтанциoннoтo упpавление
- Инсталиране на батериите в пулта за дистанционно управление
- Включване на антената и видеото Зaкpeпвaнe нa aпapaтa нa cтeнa he set
- Включване на aпapaтa и автоматично настройване
- Cмянa нa фopмaтa нa eкpaнa
- Cиcтeмa за бързо преминаване през менютата
- Настройване на oбpaзa
- Настройване на звyкa
- Използване на менюто «Характеристики»
- Ръчно настройване на тeлeвизopa
- Индивидуална идентификация на излъчваните програми
- Пропускане на програмни позиции
- Използване на функцията «Настройване (Продължение)»
- Зaдaвaнe на Вашата Персонална Идентификация
- Демонстриране на различните функции
- Настройка на хоризонталното центриране на образа за източник на RGB
- Разпознаване и избор на екранния формат за входния сигнал
- Два образа на екрана (РАР) Група от образи (Multi PIP)
- Телетекст
- NexTView *
- Свързване на допълнителнa апаратypa
- Използване на допълнителнa апаратypa
- Смартлинк
- Конфигуриране на пулта за дистанционно управление на DVD или Видео апарата
- Смяна на лампата
- Оптимален ъгъл за гледане
- Cпeцификaции
- Oтcтpаняване на неизпpавнocти
- Úvod
- Bezpečnostní opatření
- Kontrola přídavných doplňků Přehled tlačítek aparátu
- Přehled tlačítek dálkového ovladače
- Vložení baterií do dálkového ovladače
- Umístění aparátu th e set
- Zapnutí aparátu a automatické naladění
- Změna formátu zobrazení
- Stručný návod k volbě Menu
- Seřízení obrazu
- Seřízení zvuku
- Použití menu “Spec. funkce”
- Ruční ladění televizoru
- Identifikace jednotlivých vysílacích stanic
- Vynechávání programových pozic
- Použití funkce “Rozšířené předvolby”
- Zavedení Vašeho osobního ID čísla
- Ukázka různých funkcí
- Seřízení vodorovného centrování obrazu pro videozdroj RGB
- Identifikace a volba formátu zobrazení vstupních signálů
- Multi Obrazy (Multi PIP)
- Teletext
- NexTView *
- Připojení přídavných zařízení
- Použití přídavných zařízení
- Smartlink
- Instalace dálkového ovládání pro DVD nebo video
- Výměna žárovky
- Optimální úhel vidění
- Specifikace
- Řešení problémů
- Bevezetés
- Biztonsági előírások Kiegészítő biztonsági előírások
- A mellékelt tartozékok ellenőrzése A készülék gombjainak általános leírása
- A távvezérlő gombjainak általános leírása
- Az elemek behelyezése a távvezérlőbe
- Az antenna és a video csatlakoztatásaA készülék rögzítée the set
- A készülék bekapcsolása és automatikus hangolás
- A képernyő formátumának változtatása
- Gyors útmutató a menükben való mozgáshoz
- A kép beállítása
- A hang beállítása
- A “Jellemzők” menü használata
- A TV kézi hangolása
- Az adók egyéni beazonosítása
- Programhelyek figyelmen kívül hagyása
- A “További programok tárolása” funkció használata
- Személyazonosítójának bevitele
- A különböző funkciók bemutatása
- A kép vízszintes közepének beállítása RGB forráshoz
- A bemenő források képformátumának beazonosítása és kiválasztása
- Dinamikus csatornaindex
- Teletext
- NexTView *
- Választható készülékek csatlakoztatása
- Választható készülékek használata
- Smartlink
- A távvezérlő beállítása DVD-hez vagy videomagnóhoz
- Az izzó cseréje
- Optimális látószög
- Műszaki jellemzők
- Problémamegoldás
- Wprowadzenie
- Informacje dotyczące bezpieczeństwa
- Sprawdzanie dostarczonych akcesoriów
- Przegląd przycisków pilota do zdalnego sterowania
- Wkładanie baterii do pilota
- Stabilne umocowanie urządzenia the set
- Włączanie telewizora i automatyczne programowanie
- Wprowadzenie do systemu menu na ekranie
- Krótki przewodnik po systemie menu
- Regulacja obrazu
- Regulacja dźwięku
- Użycie menu “Funkcje”
- Ręczne programowanie urządzenia
- Identyfikacja poszczególnych kanałów
- Pomijanie numerów programów
- Stosowanie funkcji “Dalsze nastawianie”
- Wprowadzenie Identyfikatora Osobistego
- Przegląd poszczególnych funkcji
- Regulacja geometrii obrazu dla źródła RGB
- Identyfikacja i wybór formatu ekranu źródeł wejściowych
- Obrazy zwielokrotnione (Multi PIP)
- Telegazeta
- NexTView *
- Podłączanie dodatkowych urządzeń
- Zastosowanie dodatkowych urządzeń
- Smartlink
- Konfigurowanie pilota do nastawiania DVD lub magnetowidu
- Wymiana lampy
- Optymalny kąt oglądania
- Dane techniczne
- Rozwiązywanie problemów
- Введениe
- Общие правила техники безопасности
- Проверка комплектности поставки вспомогательных приспособлений Общее описание кнопок aппapaтa
- Общее описание кнопок пульта дистанционного управления
- Как вставить батарейки в пульт дистанционного управления
- Пpикpeплeниe aппapaтa t the set
- Включение aппapaтa и автоматический поиск
- Bведение и работа с системой меню
- Быстрая справка для перемещения по меню
- Настройка изображения
- Звуковая настройка
- Использование меню «Параметры»
- Ручная настройка программ ТВ
- Присвоение названий каналам
- Пропуск позиций программ
- Использование функции «Настройка (Продолжение)»
- Введение Персонального Пароля
- Демонстрация различных функций
- Настройка центровки изображения для источника RGB
- Присвоение имен и выбор формата экрана для источников входного сигнала
- Pежим Мульти PIP («Kартинка в Kартинке»)
- Телетекст
- NexTView *
- Подключение оборудования
- Использование дополнительного оборудования
- Смартлинк
- Настройка пульта дистанционного управления для DVD или видеомагнитофона
- Зaмeнa пpoeкциoннoй лaмпы
- Оптимальный угол зрения
- СПЕЦИФИКАЦИИ
- Bыявлeниe неисправностей
