Sony VPL-VW1100ES: Preparing Step 1
Preparing Step 1: Sony VPL-VW1100ES

9
US
Check the carton to make sure it contains the
following items:
• Remote control RM-PJ22 (1)
• Size AA (R6) manganese batteries (2)
• AC power cord for the projector (1)
• Plug holder (1)
• AC inlet cover (1)
• 3D glasses (2)
• Pouch for the 3D glasses (2)
• USB charging AC power adaptor (AC-
UD10) (1)
Specifications
Input voltage: AC 100 to 240 V, 0.2 A,
50/60 Hz
Rated output voltage: DC 5 V, 1.5 A
Please use the above power requirements.
• AC power cord for USB charging AC
power adaptor (1)
For the customers in the U.S.A. and
Canada
WARNING:
Using this unit at a voltage other than
120 V may require the use of a different
line cord or attachment plug, or both. To
reduce the risk of fire or electric shock,
refer servicing to qualified service
personnel.
• USB charging cable (G2551-0077-00/-01
or APY5244-010020/SONY) (1.2 m) (1)
• Quick Reference Manual (this manual) (1)
• Operating Instructions (CD-ROM) (1)
CAUTION
Danger of explosion if battery is incorrectly
replaced.
Replace only with the same or equivalent
type recommended by the manufacturer.
When you dispose of the battery, you must
obey the law in the relative area or country.
Installing batteries
Two size AA (R6) batteries are supplied for
Remote Control.
To avoid risk of explosion, use size AA (R6)
manganese or alkaline batteries.
Caution about handling the remote
control
• Handle the remote control with care. Do
not drop or step on it, or spill liquid of any
kind onto it.
• Do not place the remote control in a
location near a heat source, a place subject
to direct sunlight, or a damp room.
Preparing Step 1
Checking the Supplied
Accessories
Note
Inserting the Batteries into
the Remote Control
Push and slide to
open.
Insert the batteries
E
side first.
US
10
The manual can be read on a computer with
Adobe Reader installed.
You can download Adobe Reader free from
the Adobe website.
1
Open the index.html file in the CD-
ROM.
2
Select and click on the manual that
you want to read.
If you have lost or damaged the CD-ROM, you
can purchase a new one from your Sony dealer
or Sony service counter.
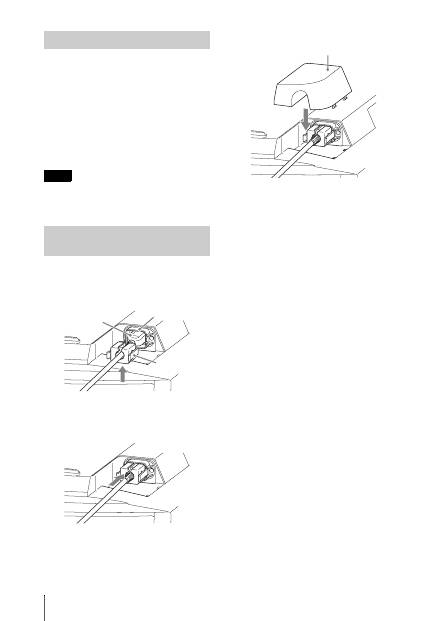
1
Plug the AC power cord into the AC
IN socket, then attach the plug holder
to the AC power cord.
2
Slide the plug holder over the AC
power cord to fix to the unit.
3
Attach the AC inlet cover to the unit.
Using the CD-ROM manual
Note
Connecting the AC Power
Cord
Plug holder
(supplied)
AC power cord
(supplied)
AC IN socket
AC inlet cover (supplied)
Оглавление
- このマニュアルについて
- 安全のために
- 光源用ランプについての安全上のご注意
- 電池についての安全上のご注意
- 天吊りする場合の安全上のご注意
- 3D メガネについての安全上のご注意
- 設置・使用時のご注意
- 準備する Step 1
- 設置する Step 2
- 接続する
- 見る Step 4
- 困ったときは
- メンテナンス
- About the Quick Reference Manual
- WARNING
- Precautions
- Notes on Installation and Usage
- Preparing Step 1
- Installing the Unit Step 2
- Connecting the Unit Step 3
- Selecting the Menu Language Step 4
- Projecting Step 5
- Error Handling
- Maintenance
- A propos du Guide de référence rapide
- AVERTISSEMENT
- Précautions
- Remarques sur l’installation et l’utilisation
- Préparation Etape 1
- Installation de l’appareil Etape 2
- Raccordement de l’appareil
- Sélection de la langue du menu Etape 4
- Projection Etape 5
- Gestion des erreurs
- Entretien
- Acerca del Manual de referencia rápida
- ADVERTENCIA
- Precauciones
- Notas sobre la instalación y el uso
- Preparación Paso 1
- Instalación de la unidad Paso 2
- Conexión de la unidad Paso 3
- Selección del idioma del menú Paso 4
- Proyección Paso 5
- Gestión de errores
- Mantenimiento
- Informationen zur Kurzreferenz
- WARNUNG
- Vorsichtsmaßnahmen
- Hinweise zu Installation und Gebrauch
- Vorbereitung Schritt 1
- Installieren des Geräts Schritt 2
- Anschließen des Geräts
- Wählen der Menüsprache Schritt 4
- Projizieren Schritt 5
- Störungsbehebung
- Wartung
- Informazioni sulla Guida rapida all’uso
- AVVERTENZA
- Precauzioni
- Note sull’installazione e sull’utilizzo
- Preparazione Punto 1
- Installazione dell’unità Punto 2
- Collegamento dell’unità
- Selezione della lingua del menu Punto 4
- Proiezione Punto 5
- Gestione degli errori
- Manutenzione
- О документе Краткое справочное руководство
- ПРЕДУПРЕЖДЕНИЕ
- Меры предосторожности
- Примечания по установке и эксплуатации
- Подготовка Шаг 1.
- Установка устройства Шаг 2.
- Подключение устройства Шаг 3.
- Выбор языка меню Шаг 4.
- Проецирование Шаг 5.
- Устранение ошибок
- Техническое обслуживание
