Sony VPL-VW1100ES: Installing the Unit Step 2
Installing the Unit Step 2: Sony VPL-VW1100ES
11
US
1
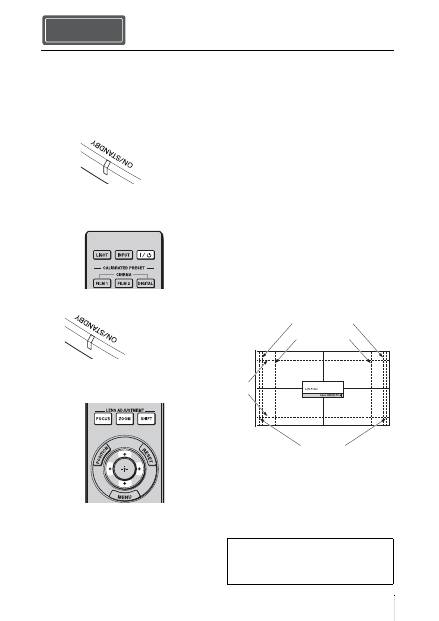
Position the unit parallel to the screen.
2
After connecting the AC power cord to
the unit, plug the AC power cord into
a wall outlet.
3
Press the
?
/
1
(ON/STANDBY) button
to turn on the unit.
4
Project an image on the screen, then
adjust the focus, size, and position.
a
Adjust the focus.
Press the LENS ADJUSTMENT
(FOCUS) button to display the Lens
Focus adjustment window (test pattern).
Then adjust the focus of the picture by
pressing the
M
/
m
/
<
/
,
buttons.
b
Adjust the picture size.
Press the LENS ADJUSTMENT
(ZOOM) button to display the Lens
Zoom adjustment window (test pattern).
Then adjust the size of the picture by
pressing the
M
/
m
/
<
/
,
buttons.
c
Adjust the picture position.
Press the LENS ADJUSTMENT
(SHIFT) button to display the Lens Shift
adjustment window (test pattern). Then
adjust to the proper position of the
picture by pressing the
M
/
m
/
<
/
,
buttons.
Lens adjustment window (test
pattern)
Installing the Unit Step 2
Lights in red.
Front of the unit
Flashes in green for
tens of seconds and
then lights in green.
Front of the unit
1.78:1 (16:9)
2.35:1
1.85:1
1.33:1 (4:3)
The dashed lines show the screen sizes of each
aspect ratio.
For more information, refer to
“Connections and Preparations” in the
Operating Instructions contained in the
supplied CD-ROM.
Оглавление
- このマニュアルについて
- 安全のために
- 光源用ランプについての安全上のご注意
- 電池についての安全上のご注意
- 天吊りする場合の安全上のご注意
- 3D メガネについての安全上のご注意
- 設置・使用時のご注意
- 準備する Step 1
- 設置する Step 2
- 接続する
- 見る Step 4
- 困ったときは
- メンテナンス
- About the Quick Reference Manual
- WARNING
- Precautions
- Notes on Installation and Usage
- Preparing Step 1
- Installing the Unit Step 2
- Connecting the Unit Step 3
- Selecting the Menu Language Step 4
- Projecting Step 5
- Error Handling
- Maintenance
- A propos du Guide de référence rapide
- AVERTISSEMENT
- Précautions
- Remarques sur l’installation et l’utilisation
- Préparation Etape 1
- Installation de l’appareil Etape 2
- Raccordement de l’appareil
- Sélection de la langue du menu Etape 4
- Projection Etape 5
- Gestion des erreurs
- Entretien
- Acerca del Manual de referencia rápida
- ADVERTENCIA
- Precauciones
- Notas sobre la instalación y el uso
- Preparación Paso 1
- Instalación de la unidad Paso 2
- Conexión de la unidad Paso 3
- Selección del idioma del menú Paso 4
- Proyección Paso 5
- Gestión de errores
- Mantenimiento
- Informationen zur Kurzreferenz
- WARNUNG
- Vorsichtsmaßnahmen
- Hinweise zu Installation und Gebrauch
- Vorbereitung Schritt 1
- Installieren des Geräts Schritt 2
- Anschließen des Geräts
- Wählen der Menüsprache Schritt 4
- Projizieren Schritt 5
- Störungsbehebung
- Wartung
- Informazioni sulla Guida rapida all’uso
- AVVERTENZA
- Precauzioni
- Note sull’installazione e sull’utilizzo
- Preparazione Punto 1
- Installazione dell’unità Punto 2
- Collegamento dell’unità
- Selezione della lingua del menu Punto 4
- Proiezione Punto 5
- Gestione degli errori
- Manutenzione
- О документе Краткое справочное руководство
- ПРЕДУПРЕЖДЕНИЕ
- Меры предосторожности
- Примечания по установке и эксплуатации
- Подготовка Шаг 1.
- Установка устройства Шаг 2.
- Подключение устройства Шаг 3.
- Выбор языка меню Шаг 4.
- Проецирование Шаг 5.
- Устранение ошибок
- Техническое обслуживание
