Sony VPL-VW1100ES: Error Handling
Error Handling: Sony VPL-VW1100ES
19
US
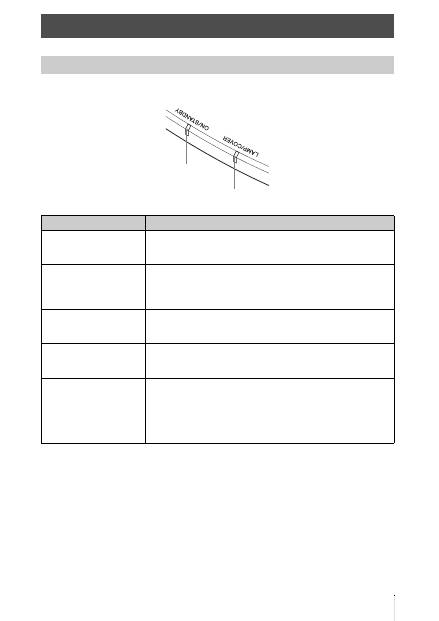
The ON/STANDBY or LAMP/COVER indicator lights up or flashes if there is any trouble with
your projector.
Error Handling
Warning Indicators
Symptom
Cause and Remedy
LAMP/COVER flashes in
red. (A repetition rate of 2
flashes)
c
Close the lamp cover securely, then tighten the screws securely.
LAMP/COVER flashes in
red. (A repetition rate of 3
flashes)
c
The temperature of lamp is unusually high. Turn off the power
and wait for the lamp to cool, then turn on the power again.
c
If the symptom persists, the lamp may be at the end of its
service life. In this case, replace the lamp with a new one.
ON/STANDBY flashes in
red. (A repetition rate of 4
flashes)
c
The fan is broken. Consult with qualified Sony personnel.
ON/STANDBY flashes in
red. (A repetition rate of 2
flashes)
c
The internal temperature is unusually high. Check to ensure that
if nothing is blocking the ventilation holes or whether or not the
unit is being used at high altitudes.
ON/STANDBY flashes in
red. (A repetition rate of 6
flashes)
c
Press the
?
/
1
(ON/STANDBY) button to turn on the unit. If the
power is not turned on, disconnect the AC power cord, then
confirm the ON/STANDBY lamp is turned off. After about 10
seconds, reconnect the AC power cord and turn on the power
again. If the indicators still light up, the electrical system has a
problem. Consult with qualified Sony personnel.
ON/STANDBY indicator
LAMP/COVER indicator
US
20
When a warning indicator other than the above starts flashing, and the symptom persists even after
carrying out the above methods, consult with qualified Sony personnel.
ON/STANDBY flashes in
red. (A repetition rate of 5
flashes)
c
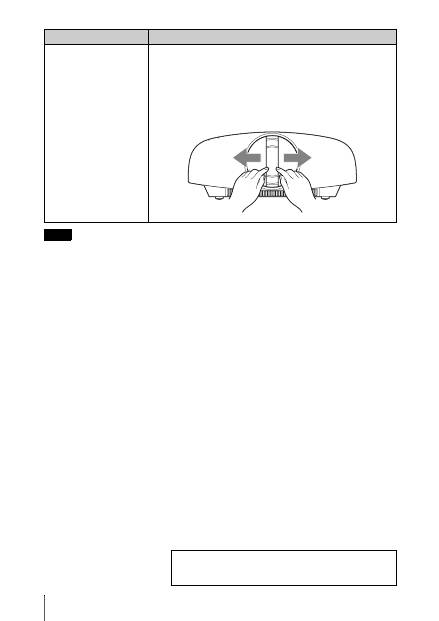
The lens protector is not fully open. Turn the power of the unit
off and then on again. If the lens protector still does not fully
open, consult with qualified Sony personnel.
Tip
In an urgent situation, refer to the illustration below to open the lens
protector with your hands. Press the
?
/
1
(ON/STANDBY) button to
turn the power on and operate the unit.
Note
Symptom
Cause and Remedy
If there is any problem or an error message appears on the
screen, refer to “Troubleshooting” in the Operating
Instructions contained in the supplied CD-ROM.
Оглавление
- このマニュアルについて
- 安全のために
- 光源用ランプについての安全上のご注意
- 電池についての安全上のご注意
- 天吊りする場合の安全上のご注意
- 3D メガネについての安全上のご注意
- 設置・使用時のご注意
- 準備する Step 1
- 設置する Step 2
- 接続する
- 見る Step 4
- 困ったときは
- メンテナンス
- About the Quick Reference Manual
- WARNING
- Precautions
- Notes on Installation and Usage
- Preparing Step 1
- Installing the Unit Step 2
- Connecting the Unit Step 3
- Selecting the Menu Language Step 4
- Projecting Step 5
- Error Handling
- Maintenance
- A propos du Guide de référence rapide
- AVERTISSEMENT
- Précautions
- Remarques sur l’installation et l’utilisation
- Préparation Etape 1
- Installation de l’appareil Etape 2
- Raccordement de l’appareil
- Sélection de la langue du menu Etape 4
- Projection Etape 5
- Gestion des erreurs
- Entretien
- Acerca del Manual de referencia rápida
- ADVERTENCIA
- Precauciones
- Notas sobre la instalación y el uso
- Preparación Paso 1
- Instalación de la unidad Paso 2
- Conexión de la unidad Paso 3
- Selección del idioma del menú Paso 4
- Proyección Paso 5
- Gestión de errores
- Mantenimiento
- Informationen zur Kurzreferenz
- WARNUNG
- Vorsichtsmaßnahmen
- Hinweise zu Installation und Gebrauch
- Vorbereitung Schritt 1
- Installieren des Geräts Schritt 2
- Anschließen des Geräts
- Wählen der Menüsprache Schritt 4
- Projizieren Schritt 5
- Störungsbehebung
- Wartung
- Informazioni sulla Guida rapida all’uso
- AVVERTENZA
- Precauzioni
- Note sull’installazione e sull’utilizzo
- Preparazione Punto 1
- Installazione dell’unità Punto 2
- Collegamento dell’unità
- Selezione della lingua del menu Punto 4
- Proiezione Punto 5
- Gestione degli errori
- Manutenzione
- О документе Краткое справочное руководство
- ПРЕДУПРЕЖДЕНИЕ
- Меры предосторожности
- Примечания по установке и эксплуатации
- Подготовка Шаг 1.
- Установка устройства Шаг 2.
- Подключение устройства Шаг 3.
- Выбор языка меню Шаг 4.
- Проецирование Шаг 5.
- Устранение ошибок
- Техническое обслуживание
