Sony CPD-E100P: Setup
Setup: Sony CPD-E100P
6
Setup
Before using your monitor, check that the following accessories
are included in your carton:
• Power cord (1)
• Warranty card (1)
• Notes on cleaning the screen’s surface (1)
• This instruction manual (1)
Step 1: Connect your monitor to
your computer
Turn off the monitor and computer before connecting.
Note
Do not touch the pins of the video cable connector as this might bend the
pins.
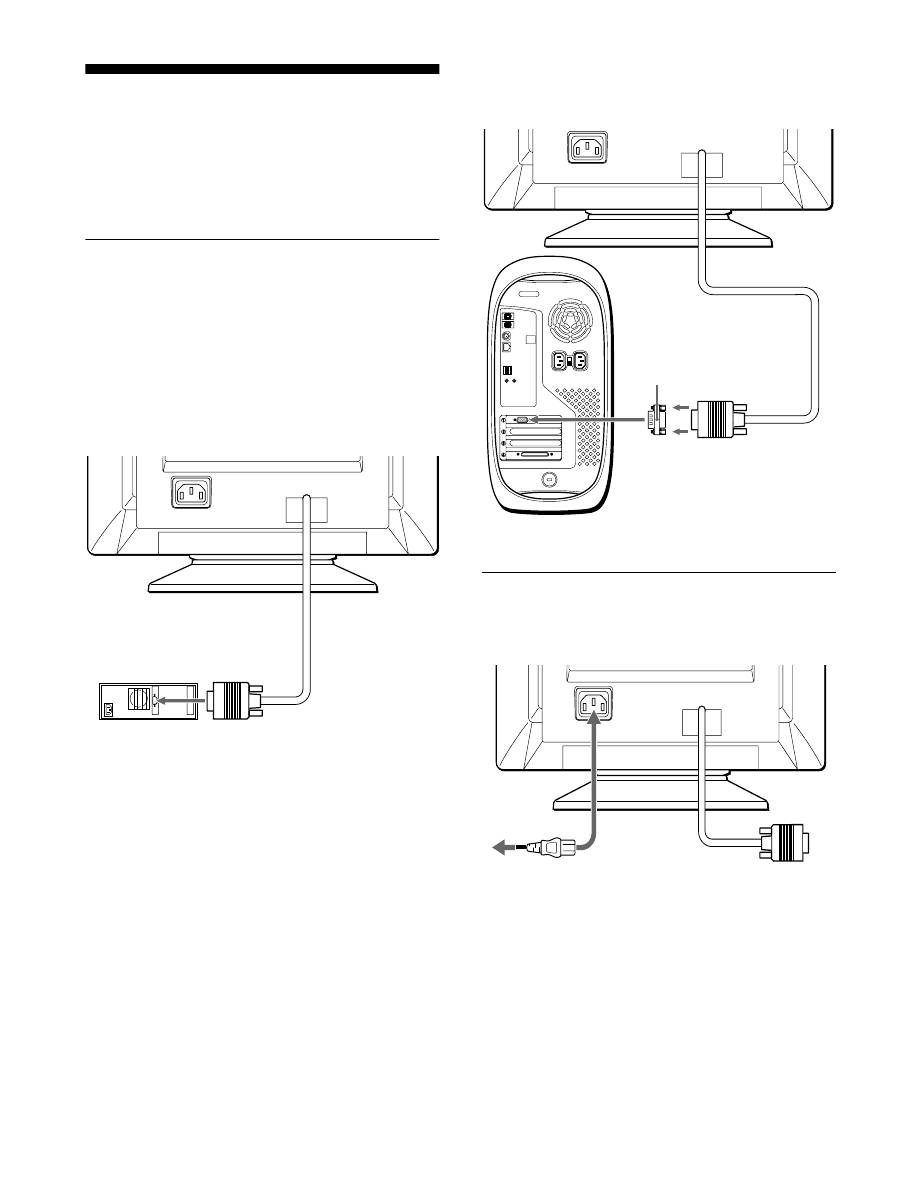
x
Connecting to an IBM PC/AT or compatible
computer
x
Connecting to a Macintosh or compatible
computer
Step 2: Connect the power cord
With the monitor and computer switched off, first connect the
power cord to the monitor, then connect it to a power outlet.
AC IN
IBM PC/AT or
compatible computer
to video output
AC IN
You will need a Macintosh adapter (not supplied).
Macintosh adapter (not supplied)
to video output
Macintosh or
compatible computer
AC IN
to AC IN
to a power outlet
power cord (supplied)

7
GB
Step 3: Turn on the monitor and
computer
First turn on the monitor, then turn on the computer.
The installation of your monitor is complete.
If necessary, use the monitor’s controls to adjust the picture.
If no picture appears on your screen
• Check that the monitor is correctly connected to the computer.
• If NO INPUT SIGNAL appears on the screen, confirm that
your computer’s graphic board is completely seated in the
correct bus slot.
• If you are replacing an old monitor with this model and OUT
OF SCAN RANGE appears on the screen, reconnect the old
monitor. Then adjust the computer’s graphic board so that the
horizontal frequency is between 30 – 70 kHz, and the vertical
frequency is between 48 – 120 Hz.
For more information about the on-screen messages, see “Trouble
symptoms and remedies” on page 14.
Setup on various OS (Operating System)
This monitor complies with the “DDC” Plug & Play standard and
automatically detects all the monitor’s information. No specific driver
needs to be installed to the computer.
If you connect the monitor to your PC, and then boot your PC for the first
time, the setup Wizard may be displayed on the screen. Click on “Next”
several times according to the instructions from the Wizard until the Plug
& Play Monitor is automatically selected so that you can use this monitor.
For customers using Windows NT4.0
Monitor setup in Windows NT4.0 does not use the display driver. Refer
to the Windows NT4.0 instruction manual for further details on adjusting
the resolution, refresh rate, and number of colors.
Selecting the on-screen menu
language (LANGUAGE/
INFORMATION)
English, French, German, Italian, Spanish, Russian and Japanese
versions of the on-screen menus are available. The default setting
is English.
1
Press the center of the control button.
See page 9 for more information on using the control button.
2
Move the control button
m
/
M
to highlight
LANGUAGE/INFORMATION and press the center of
the control button again.
3
Move the control button
m
/
M
to select
(LANGUAGE) and move
<
/
,
to select a language.
• ENGLISH
• FRANÇAIS: French
• DEUTSCH: German
• ITALIANO: Italian
• ESPAÑOL: Spanish
•
: Russian
•
: Japanese
To close the menu
Press the center of the control button once to return to the main MENU,
and press again selecting EXIT to return to normal viewing. If no buttons
are pressed, the menu closes automatically after about 30 seconds.
To reset to English
Press the RESET button while the
(LANGUAGE) menu is displayed
on the screen.
MENU
E
I T
H - S I Z E / CENT ER
V - S I Z E / CENT ER
P I N / P I N BA L ANCE
KEY / KEY BA L ANCE
ROT A T I ON
ZOOM
COLOR
SE L ECT
L ANGUAGE / I NFORMA T
N
O
I
DEGAUSS / CANCE L MO
E
R
I
MENU
MENU
ENGL I SH
FRAN A I S
DEUT SCH
I T A L I ANO
ESPA OL
SE L ECT
E
I T
LANGUAGE / I NFORMAT I ON
Оглавление
- Table of Contents
- Setup
- Customizing Your Monitor
- Technical Features
- Specifications
- Table des Matières
- Installation
- Personnalisation de votre moniteur
- Caractéristiques techniques
- Spécifications
- Inhalt
- Anschließen des Geräts
- Einstellen des Monitors
- Technische Merkmale
- Technische Daten
- Índice
- Instalación
- Personalización del monitor
- Características técnicas
- Especificaciones
- Indice
- Installazione
- Personalizzazione del monitor
- Caratteristiche
- Caratteristiche tecniche
- Ñîäåðæàíèå
- Ïîäãîòîâêà ê ðàáîòå
- Ïîäñòðîéêà ìîíèòîðà
- Òåõíè÷åñêèå îñîáåííîñòè
- Технические характеристики
- Appendix
