Parrot ASTEROID Tablet: инструкция
Раздел: Автомобильная техника
Тип: Мультимедиа
Инструкция к Мультимедиа Parrot ASTEROID Tablet
Quick start guide
Hurtig brugervejledning
Hurtigstartguide
Pikaopas
Snabbmanual
Rychlý návod k použití
Skrócona instrukcja obsługi
Hızlı kullanım kılavuzu
Краткое руководство по эксплуатации


Parrot ASTEROID Tablet
English ................................................................................
13
Dansk .................................................................................
27
Norsk ..................................................................................
43
Suomi .................................................................................
59
Svenska ..............................................................................
75
česky ...................................................................................
91
Polski ..................................................................................
105
Türkçe ................................................................................
121
РУССКИЙ ............................................................................
135
x2
4

5
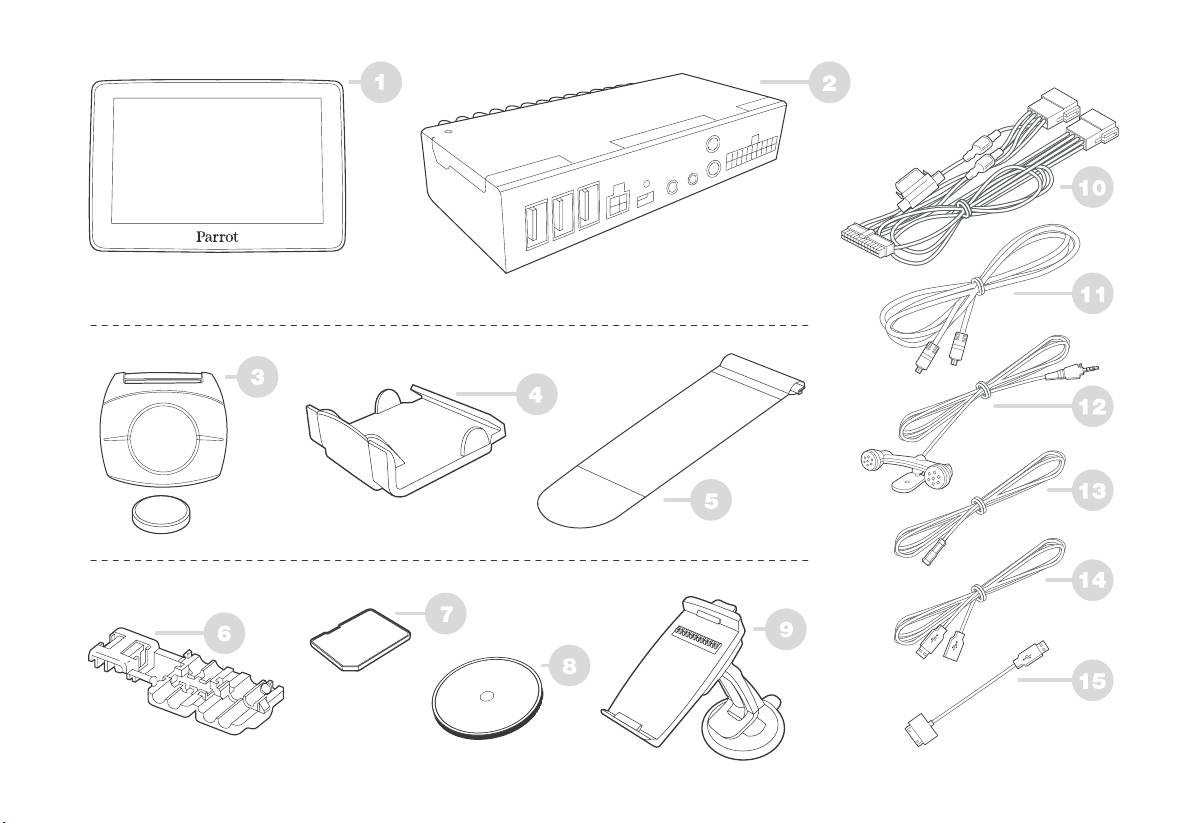
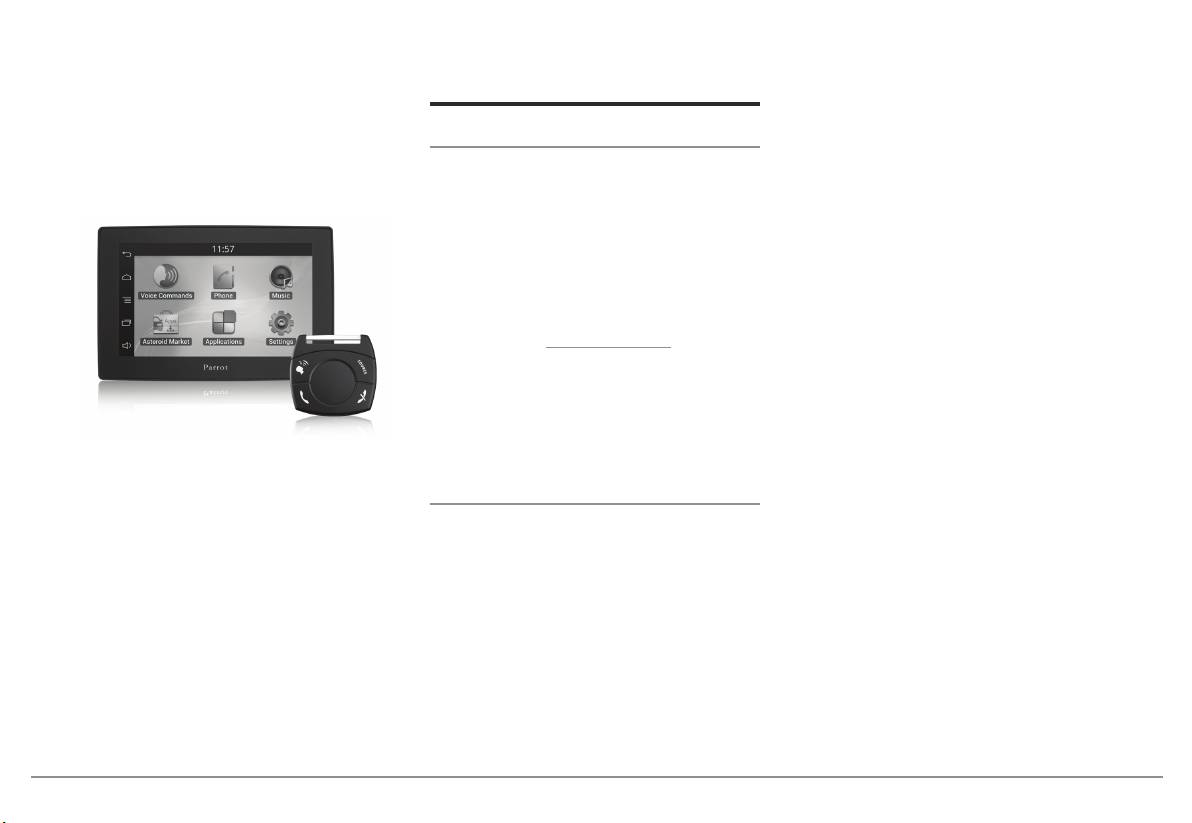
Screen
Skærm
Skjerm
Skärm
Näyttö
Displej
Wyświetlacz
Ekran
Дисплей
Electronic box
Styreboks
Elektronisk boks
Elektroniklåda
Elektroninen rasia
Elektronická jednotka
Skrzynka elektroniczna
Elektronik ünite
Электронный блок
Remote control ( 3 V - CR2032 battery )
Fjernbetjening (batteri 3V - CR2032)
Fjernkontroll (3 V batteri - CR2032)
Fjärrkontroll (3-voltsbatteri – CR2032)
Kaukosäädin (paristo 3 V - CR2032)
Dálkové ovládání (baterie 3 V - CR2032)
Pilot (bateria 3 V - CR2032)
Uzaktan kumanda (3 V - CR2032 pil)
Пульт дистанционного управления (элемент питания 3 В - CR2032)
Remote control support - dashboard
Remote control support - steering wheel
Parking brake cable crimp connector
Holder til ernbetjening - instrumentbræt
Holder til ernbetjening - rat
Kabelforbindelse til håndbremse
Fjernkontrollholder - instrumentbord
Fjernkontrollholder - ratt
Kabelovergang håndbremse
Hållare till ärrkontrollen – instrumentbräda
Hållare till ärrkontrollen – ratt
Anslutningsdon för handbromskabel
Kaukosäätimen kannatin - kojetaulu
Kaukosäätimen kannatin - ohjauspyörä
Seisontajarrujohdon liitin
Držák dálkového ovládání - palubní deska
Držák dálkového ovládání – volant
Přípojka kabelu ruční brzdy
Podstawa na pilota – deska rozdzielcza
Podstawa na pilota – kierownica
Łącze kabla z hamulcem ręcznym
Uzaktan kumanda - torpido desteği
Uzaktan kumanda - direksiyon desteği
El freni kablo rakoru
Кронштейн пульта дистанционного управления -
Кронштейн пульта дистанционного управления -
Штекер тросика стояночного тормоз
приборная панель
рулевое колесо
а
SD Card
Suction cup support
Craddle
ISO cable
Screen cable
SD-kort
Holder med sugekop
Holder til skærm
ISO kabel
Skærmkabel
SD-kort
Sugeskålfeste
Holder til å feste skjermen
ISO-kabel
Skjermkabel
SD-kort
Sugproppshållare
Skärmhållare
ISO-kabel
Skärmkabel
SD-kortti
Imukuppikannatin
Näytön kiinnityskannatin
ISO-johto
Näytön johto
SD karta
Přísavkový držák
Držák pro upevnění displeje
ISO kabel
Kabel displeje
Karta SD
Wspornik z ssawką
Wspornik do mocowania ekranu
Kabel ISO
Kabel ekranu
SD Kart
Vantuz desteği
Ekran bağlantı desteği
ISO kablosu
Ekran kablosu
Карта SD
Кронштейн на присоске
Кронштейн крепления дисплея
Кабель ISO
Кабель дисплея
Microphone
Parking brake cable extension lead
USB cable
USB / iPod cable extension
Mikrofon
Forlængerledning til håndbremsekabel
USB kabel
USB / iPod forlængerkabel
Mikrofon
Forlengelsesstykke håndbremsekabel
USB-kabel
Skjøteledning USB/iPod
Mikrofon
Förlängningssladd för handbromskabel
USB-kabel
USB-/iPod-förlängningssladd
Mikrofoni
Seisontajarrun johdon jatkos
USB-johto
Jatkos USB / iPod
Mikrofon
Propojovací kabel ruční brzdy
USB kabel
Propojovací kabel USB/iPod
Mikrofon
Przedłużacz kabla do hamulca ręcznego
Kabel USB
Przedłużacz USB / iPod
Mikrofon
El freni kablo uzatması
USB kablosu
USB / iPod uzatması
Микрофон
Удлинитель тросика стояночного тормоза
Кабель USB
Удлинитель USB/iPod

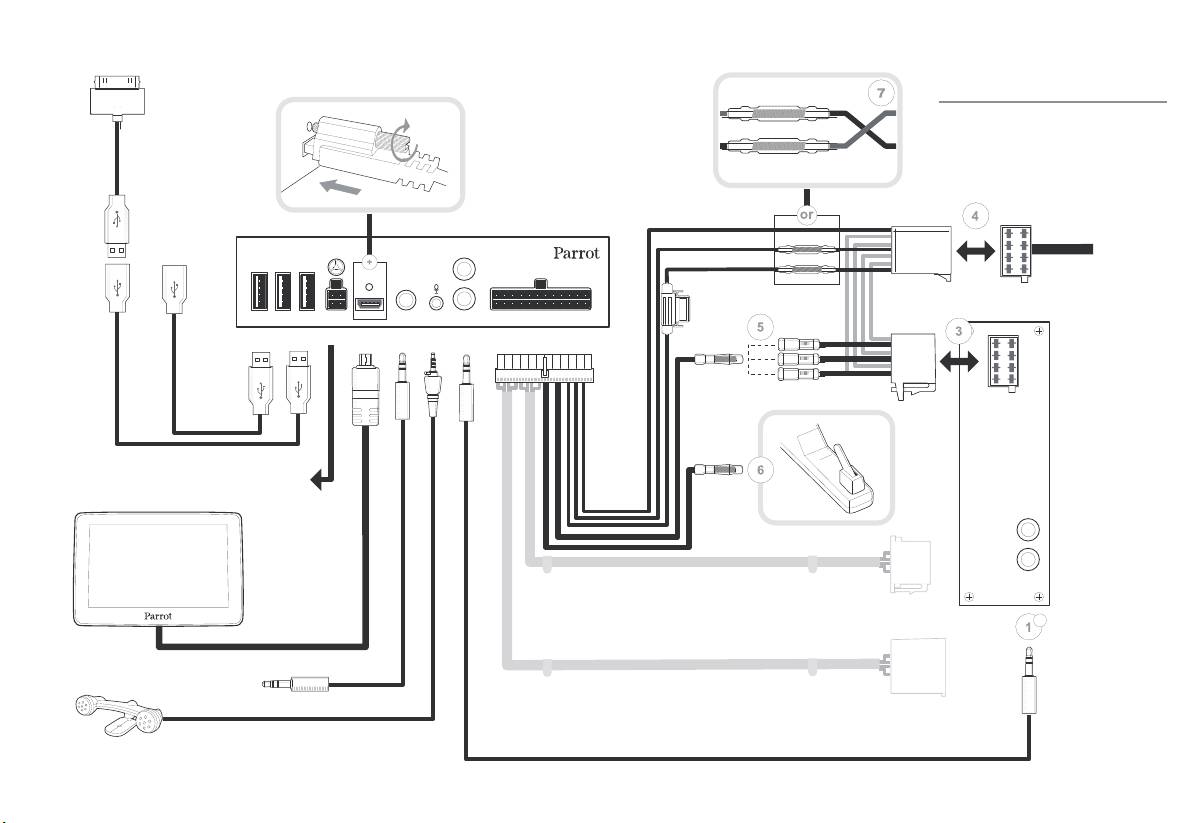
Iso InstallatIon
iPod
Ground (black)
Vehicle
power supply
12V ignition (orange)
12V permanent (red)
REAR
USB
Mute in
LINE IN
LINE OUT
Mute
1
2
1 2 3
FRONT
3
Parking
Brake
CAR
STEREO
UART plug
(For steering wheel control interface)
Screen
a
Vehicle
audio cable
Jack / Jack - Not provided
6
iPod
audIo system
wIth amplIfIer
Ground (black)
Vehicle
power supply
12V ignition (orange)
USB
REAR
12V permanent (red)
LINE IN
LINE OUT
1 2 3
FRONT
Mute in
Mute
1
x2
2
3
Parking
Brake
CAR
UART plug
STEREO
(For steering wheel control interface)
Screen
b
Line in
Jack / Jack - Not provided
Jack / Jack
Not provided
7
A
REAR
LINE OUT
FRONT
Parking
Brake
8
B C
9
E
D
F
10
G
11

12
English 13
13English 13
Quick start
guide
Content
Before you begin
I
nstallation
G
etting started
P
hone
M
usic
I
nternet
V
ideo
T
roubleshooting
G
eneral information
p.13
p
.14
p
.17
p
.20
p
.20
p
.22
p
.24
p
.24
p
notification bar.
Before you begin
About this guide
Warnings
All functions requiring an increased attention
In order to limit our paper consumption and as
should only be used w hile the vehicle is
part of our environmentally friendly and
responsible approach, Parrot prefers to put user
stationary. Your safety and the one of the other
documents online rather than print them out. This
road users prevails over phone calls, music and
simplified guide to the Parrot ASTEROID Tablet is
driving assistance applications. Be responsible:
therefore limited to providing you w ith the main
drive carefully and pay full attention to your
instructions that w ill make it easy for you to use
surrounding. Parrot denies any liability should
the device. More information can be found on
you choose not to respect this w arning.
the support section of our
w ebsite,
www.parrot.com
: the full manual, FAQs,
Use the Parrot ASTEROID Tablet w ith a
tutorials, and more.
re
asonable volume level so that you can hear all
external noises w hile driving.
Note: iPod® and iPhone® (in iPod mode) will be
referred to as an "iPod" in this manual.
The Parrot ASTEROID Tablet includes NdFeB
magnets w hich can damage objects sensitive to
Softw are updates
magnetic fields (pacemakers, credit cards,
Dow nload the latest update for free (and
mechanical clocks…).
consult the update procedure) on the Parrot
The Parking Brake w ire of the Parrot ASTEROID
ASTEROID Tablet support page on our w ebsite
Tablet's ISO cable detects w hether or not the
www.parrot.com
. These updates w ill enable you
hand brake is on. It must be connected follow ing
to receive new features and improve the
the installation instructions provide
d in this
product’s compatibility.
document. Incorrect installation or connection
Note: You can also download the Parrot ASTEROID
may be dangerous and illegal in many states /
Tablet's updates while connected to the Internet.
countries. Under no circumstances should the
.25
The availability of an update is indicated on the
screen w ithin the driver's field of vision

14 English
14
14 English
broadcast any videos w hile the vehicle is
represented on the diagrams p.6 / 7.
Installation
moving. The same applies to any w eb
applications.
Connecting the audio cable
Before you begin
Join the vehicle audio cable to the connector of
If you attempt to use an application that is not
Note: We advise our customers to have the Parrot
the Parrot ASTEROID Tablet (Connections 1A
intended for navigation or driving assistance
ASTEROID Tablet fitted by a certified Parrot
and 2).
w hen you are driving, an on-screen w arning
installer.
w ill be displayed. To w atch a video on the
Installing the Parrot ASTEROID Tablet is done by
If your vehicle is equipped w ith an amplifier, use
Parrot ASTEROID Tablet's screen, make sure
inserting it betw een the car stereo and the
the Front and Rear Line Out outputs on the
that the vehicle is stopped in a safe area and
vehicle.
electronic box to avoid saturation problems such
that the hand brake is on.
as popping in the speakers, background noise
Note: If your car stereo is not fitted with ISO
etc. Use one or tw o jack cable(s) to connect the
connectors, you need to purchase an ISO adapter
SD Card
Parrot ASTEROID Tablet Line out outputs to your
cable to simplify the wiring procedure. Refer to the
An SD card is included w ith the Parrot
Vehicle compatibility section on the Parrot
vehicle audio system (d
iagram p.7).
ASTEROID Tablet. It allow s you to store music
ASTEROID T
ablet support page to check whether an
ISO adapter is necessary on your vehicle.
tracks and applications w hich are not already
Connecting the pow er cable
installed on the Parrot ASTEROID Tablet. The
Start by removing the car stereo from your
1.
Unplug the battery before installing the
insertion of the SD card into the Parrot
vehicle. You may need release keys to do so.
pow er cable.
ASTEROID Tablet is mandatory to use audio-on-
Refer to your car stereo’s w iring diagram.
2.
Connect the ISO male connectors of the
demand and navigation applications.
Before you install the individual components,
Parrot ASTEROID Tablet to the car stereo
check that the installation locations have been
(Connection 3).
selected in such a w ay that the cable length is
3.
Join the vehicle’s pow er supply cable to the
sufficient to connect every element. Once the
ISO female connector of the Parrot
install
ation is complete, make sure that no cables
ASTEROID Tablet (Connection 4).
are pinched or trapped.
The red w ire of the Parrot ASTEROID Tablet
The connection number indications in the next
cable must correspond to the constant +12V
sections correspond to the connections
supply, the orange w ire to the ignition +12V and
the black w ire to ground. Check that the orange
are driving. Ensure that sufficient space is
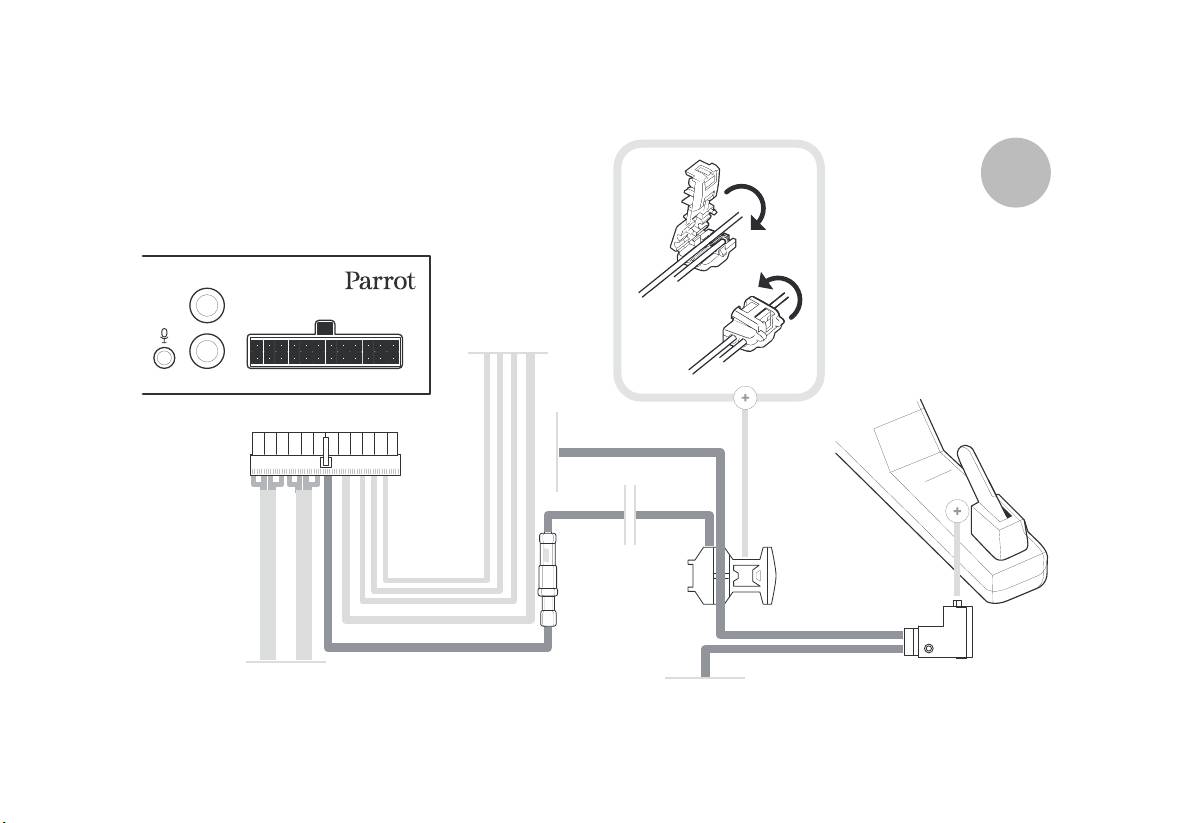
Connecting the hand brake cable
w ire is not connected to the constant +12V
provided around the heat sink of the product to
The parking brake cable allow s you to use the
supply, as you could run dow n the vehicle’s
ease heat removal.
video function of the Parrot ASTEROID Tablet
battery.
w hen the parking brake is engaged. If this cable
Carefully reinstall the car stereo. Do not force. If
Note: In order to check the wiring, connect the
is not connected to the vehicle parking brake
you are short of space behind the car stereo
to
screen before placing it on the dashboard. Refer to
signal cable, the video function w ill never be
install the electronic box, consider installing it in
the Checking the wiring section for more
available (diagram A p.8).
the glove box.
information.
1.
Connect the provided extension lead to the
Warning : Do not touch the electronic box while in
On some vehicles, there is no ignition +12V on
operation. Its surface temperature can be high.
Parrot ASTEROID Tablet green parking
the vehicle’s connectors. You must therefore
brake cable.
co
nnect the orange pow er supply w ire to the
Checking the w iring
fuse box or another ignition pow er source.
2.
Locate the parking brake signal cable of
To perform the installation check, turn the
your vehicle.
ignition on then off once the Parrot ASTEROID
Connecting the mute cable
3.
Install the Parrot ASTEROID Tablet parking
Tablet is installed: the message “Goodbye!” must
The mute function is used to cut the sound of
brake extension lead and the parking brake
be displayed.
your car stereo to enable the sound of the
signal cable on the provided crimp
If it is not the case, it is necessary to inverse the
Parrot ASTEROID Tablet (music, phone calls
connector.
positions o
f the red and orange w ires. Indeed,
etc.). Mute in 1, mute in 2 and mute in 3 are only
4.
Fold the crimp connector tw ice (diagram A
the red w ire of the pow er cable must be
suggested mute locations : the choice of the
p.8).
connected to the permanent 12V, the orange
mute-in jack depends on your car stereo’s
w ire to the 12V ignition and the black w ire to the
configuration. Test and ver
ify the mute on the
Installing the electronic box
ground. This can be done simply by reversing
vehicle then connect the free yellow w ire on the
Avoid installing th
e electronic box near heating
both fuse holders located on the Parrot w iring
ISO cable to the audio system’s corresponding
or air-conditioning system or on a spot directly
(connection 7).
mute-in jack (connection 5).
exposed to sunlight.
Make sure the electronic box stays fixed once it
is installed and that it w ill not move w hile you
15English 15

English 15
15English 15
the black w ire to ground. Check that the orange
are driving. Ensure that sufficient space is
Connecting the hand brake cable
w ire is not connected to the constant +12V
provided around the heat sink of the product to
The parking brake cable allow s you to use the
supply, as you could run dow n the vehicle’s
ease heat removal.
video function of the Parrot ASTEROID Tablet
battery.
w hen the parking brake is engaged. If this cable
Carefully reinstall the car stereo. Do not force. If
Note: In order to check the wiring, connect the
is not connected to the vehicle parking brake
you are short of space beh
ind the car stereo to
screen before placing it on the dashboard. Refer to
signal cable, the video function w ill never be
install the electronic box, consider installing it in
the Checking the wiring section for more
available (diagram A p.8).
the glove box.
information.
1.
Connect the provided extension lead to the
Warning : Do not touch the electronic box while in
On some vehicles, there is no ignition +12V on
operation. Its surface temperature can be high.
Parrot ASTEROID Tablet green parking
the vehicle’s connectors. You must therefore
brake cable.
connect the orange
pow er supply w ire to the
Checking the w iring
fuse box or another ignition pow er source.
2.
Locate the parking brake signal cable of
To perform the installation check, turn the
your vehicle
.
ignition on then off once the Parrot ASTEROID
Connecting the mute cable
3.
Install the Parrot ASTEROID Tablet parking
Tablet is installed: the message “Goodbye!” must
The mute function is used to cut the sound of
brake extension lead and the parking brake
be displayed.
your car stereo to enable the sound of the
signal cable on the provided crimp
If it is not the case, it is necessary to inverse the
Parrot ASTEROID Tablet (music, phone calls
connector.
positions of the red and orange w ires. Indeed,
etc.). Mute in 1, mute in 2 and mute in 3 are only
4.
Fold the crimp connector tw ice (diagram A
the red w ire of the pow er cable must be
suggested mute locations : the choice of the
p.8).
connected to the permanent 12V, the orange
mute-in jack depends on your car stereo’s
w ire to the 12V ignition and the black w ire to the
configuration. Test and verify the mute on the
Installing the electronic box
ground. This can be
done simply by reversing
vehicle then connect the free yellow w ire on the
Avoid installing the electronic box near heating
both fuse holders located on the Parrot w iring
ISO cable to the audio system’s correspond
ing
or air-conditioning system or on a spot directly
(connection 7).
mute-in jack (connection 5).
exposed to sunlight.
Make sure the electronic box stays fixed once it
is installed and that it w ill not move w hile you

16 English
16
16 English
Make sure you connect the iPod / iPhone cab
le
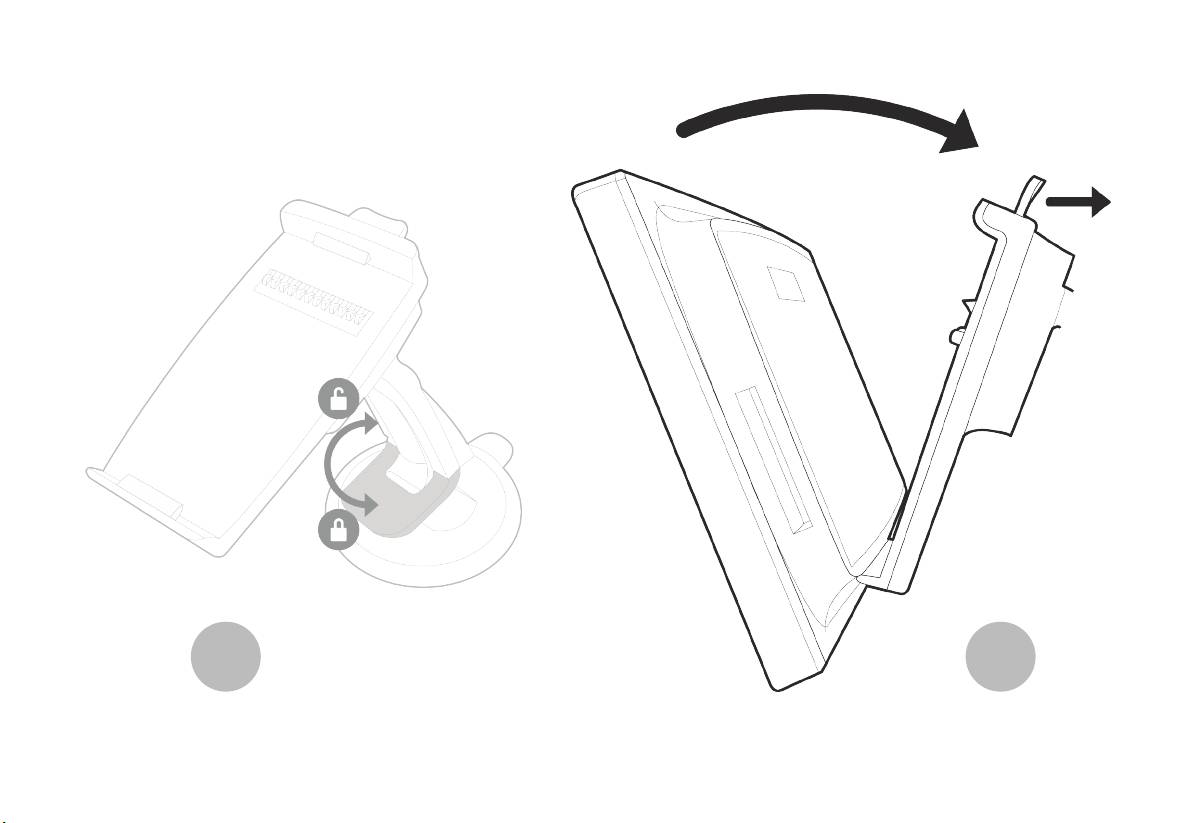
To mount the craddle, clean the selected
Installing the microphone
to its specific USB port. "iPod" is w ritten above
location and press the suction cup against the
We recommend that you slide the cable into the
it.
w indscreen or the circular part and lift the
groove behind the door seal.
locking lever until the mounting kit is correctly
To guarantee an optimal reception quality w e
If the cable runs above the pedals, ensure that it
fixed (diagram B p.9).
recommend you do not connect your internet
is properly secured.
USB key 3G on the Parrot ASTEROID Tablet
The cooling and heating cycle inside your
War ning: Do not run the microphone cable
directly : use the USB cable to install your
vehicle may cause the suction cup to detach
through the heating, ventilation or air
device on the dashboard (or any other open
from the w indscr
een. Make sure the suction cup
conditioning systems or in front of the side
area).
is properly affixed to the w indscreen each time
airbags.
you use the Parrot ASTEROID Tablet. If it is not
Make sure the microphone is installed as close
Installing the screen
the case, the device may fall w hilst driving.
to the mouth of the user as possible. The ideal
Clean the w indscreen and reinstall the suction
War ning: Avoid any installation which could
distance is 60 cm. The best p
ossible location for
hinder the use of any important command or
cup if necessary.
the microphone is near the interior rear-view
hinder the driver's visibility. Do not install the
Install the screen on the mounting kit starting
mirror.
Parrot ASTEROID Tablet in the airbag deployment
w ith its low er magnetic part.
area or in a possible head impact area. Make sure it
The microphone needs to be pointed tow ards
is not exposed to the air stream from air vents.
Remember to remove your screen w hen leaving
the user.
The craddle can be mounted on the w indscreen
the vehicle to avoid tempting any w ould-be
thiev
es and to prevent prolonged exposure to
Installing the USB cables
or on the circular part w hich is to be stuck on
the dashboard.
sunlight. Lift the lever located above the screen
Connect the USB cables to the Parrot ASTEROID
to remove it from the craddle. (diagram C p.9).
Tablet. We recommend you connect all audio
To make sure
the adhesive tape adheres w ell :
cables to the Parrot ASTEROID even if you do
clean the area w ith an appropriate cleaning
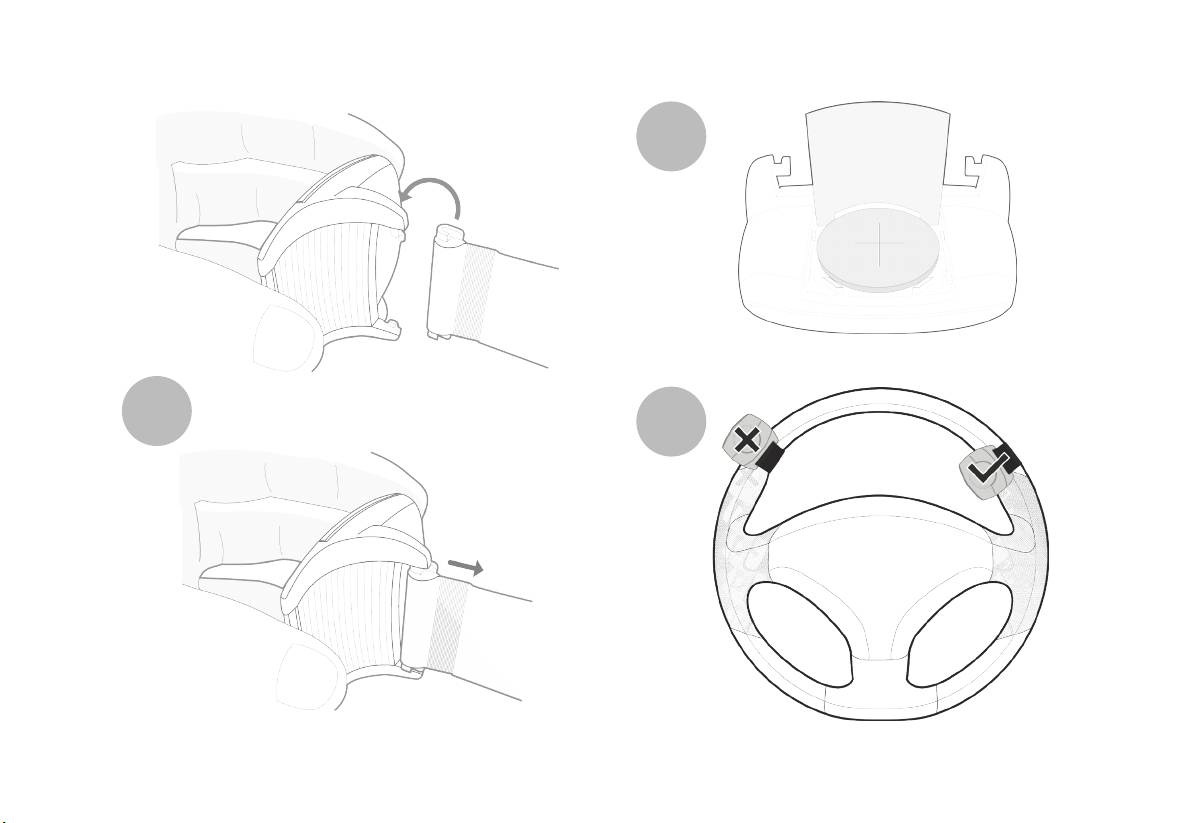
Installing the remote control
not plan on using them. Route the audio cables
product before sticking the support ;
Install the remote control on the steering w heel
to a suitable location in your vehicle such as the
once you have stuck the support on the
(diagram D p.10) or stick it on the dashboard
glove box or arm rest compartment. It may be
dashboard, w ait for approximately 2 hours
using the second support. Do not install the
necessary to drill a hole in your dashboard to do
w ithout handling it.
remote control on the outside of the steering
so. Avoid using USB extension cables.
English 17
17English 17
w heel and ensure it does not get in the w ay
corresponding to the current application. The
Getting started
w hen driving (diagram F p.10).
pop-up menu allow s you to change several
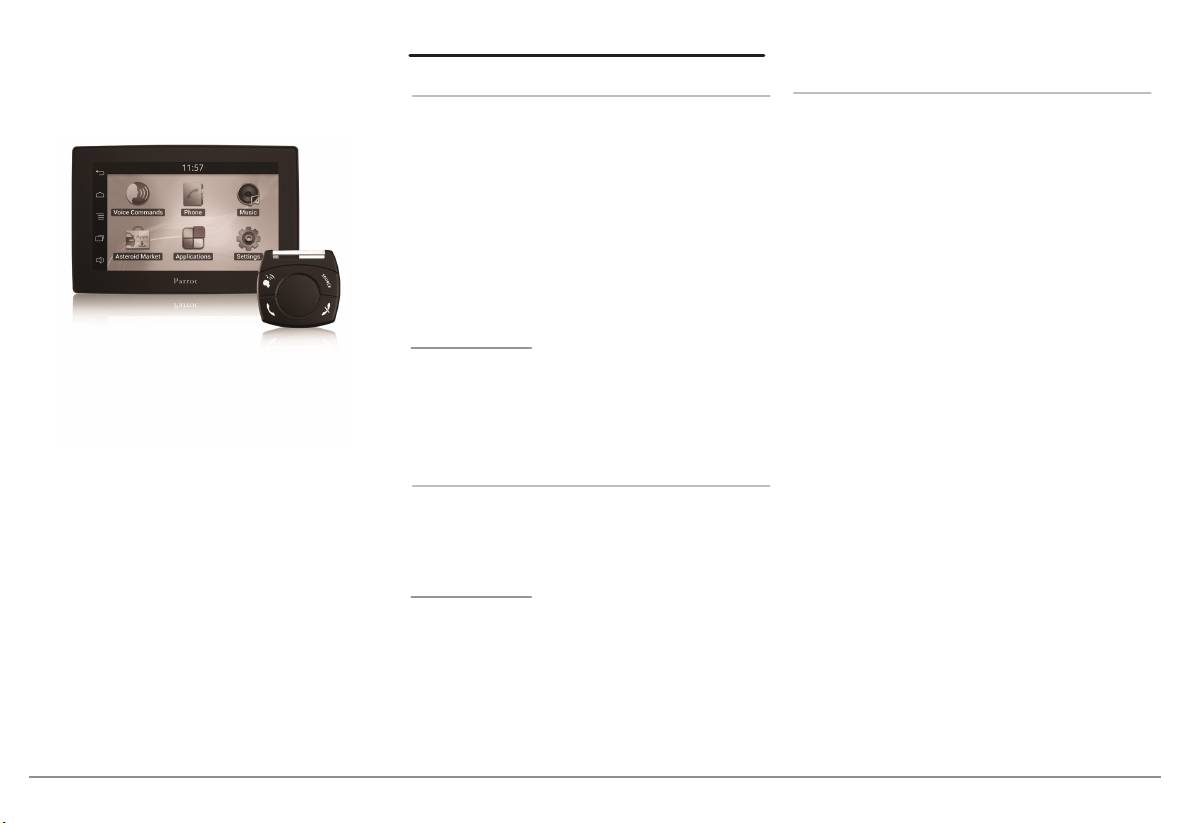
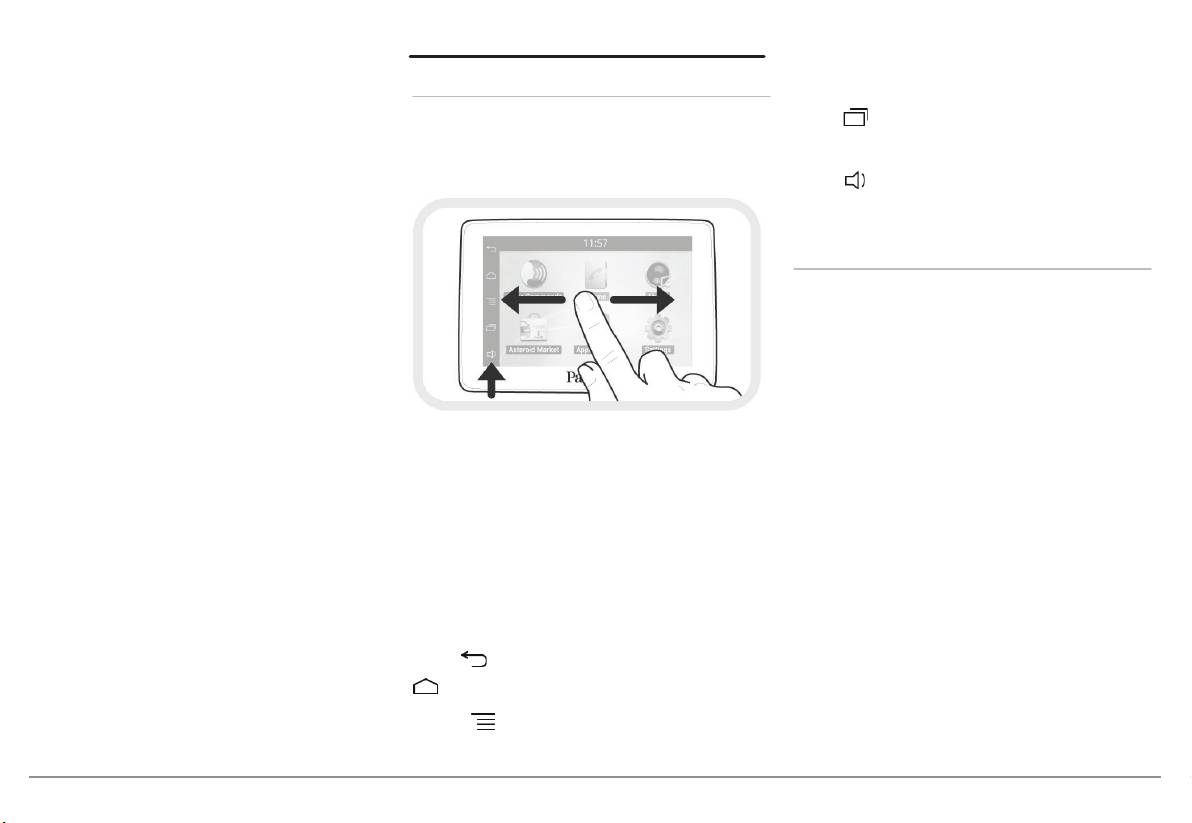
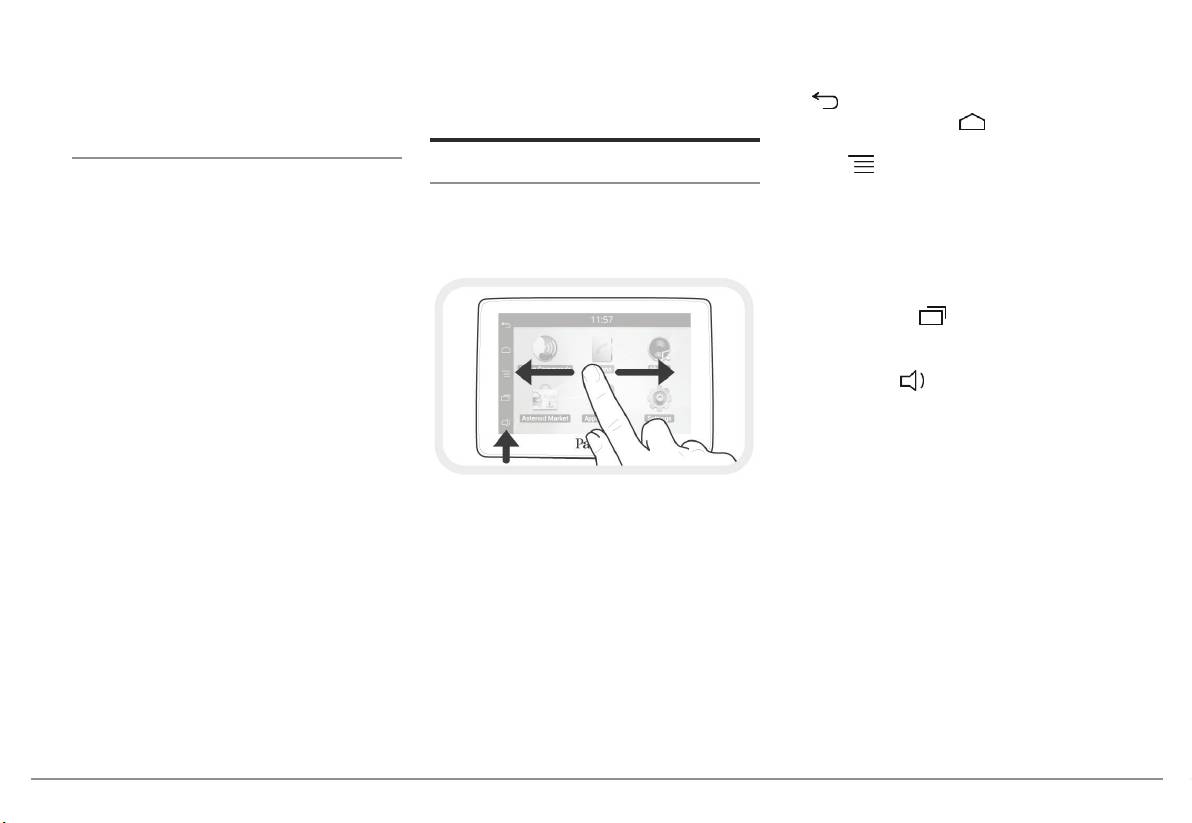
Home screen
settings or to access more functions.
Make sure it is securely attached, so that it does
not move w hen you are driving.
You get to the home screen w hen the Parrot
Press
to display the last applications used
ASTEROID Tablet turns on. The navigation
or currently in use.
Note: The remote control only works with a 3V
buttons are on the left side of the screen.
CR2032 battery. Make sure the battery is correctly
Press
to adjust the volume. Then slide the
positioned before inserting it into the remote
cursor to the left or to the right.
control (diagram E p.10).
Personalizing the home screen
To add an application shortcut on your home
screen:
1.
Tap Applications.
2.
Press and hold the application icon you are
interested in.
Slide your finger horizontally to the left. You w ill
discover more space for adding functions
3.
Drag the icon to the home screen w here
shortcuts.
you w ant to add it.
Touch an icon to get to the corresponding
To remove an application shortcut:
function. Touch the Applications icon for
1.
Press and hold the shortcut you w ant to
instance. The list of the available applications is
remove.
displayed. Slide your finger to brow se through
2.
Drag the icon upw ards to the Remove
the applications list.
indication. When the icon turns red, lift your
Press
to get back to previous menu. Press
finger.
to get to the home screen.
Press
to access the pop-up menu
18 English
18
18 English
volume.
Changing settings
Connecting a phone via Bluetooth
To change the Parrot ASTEROID Tablet settings,
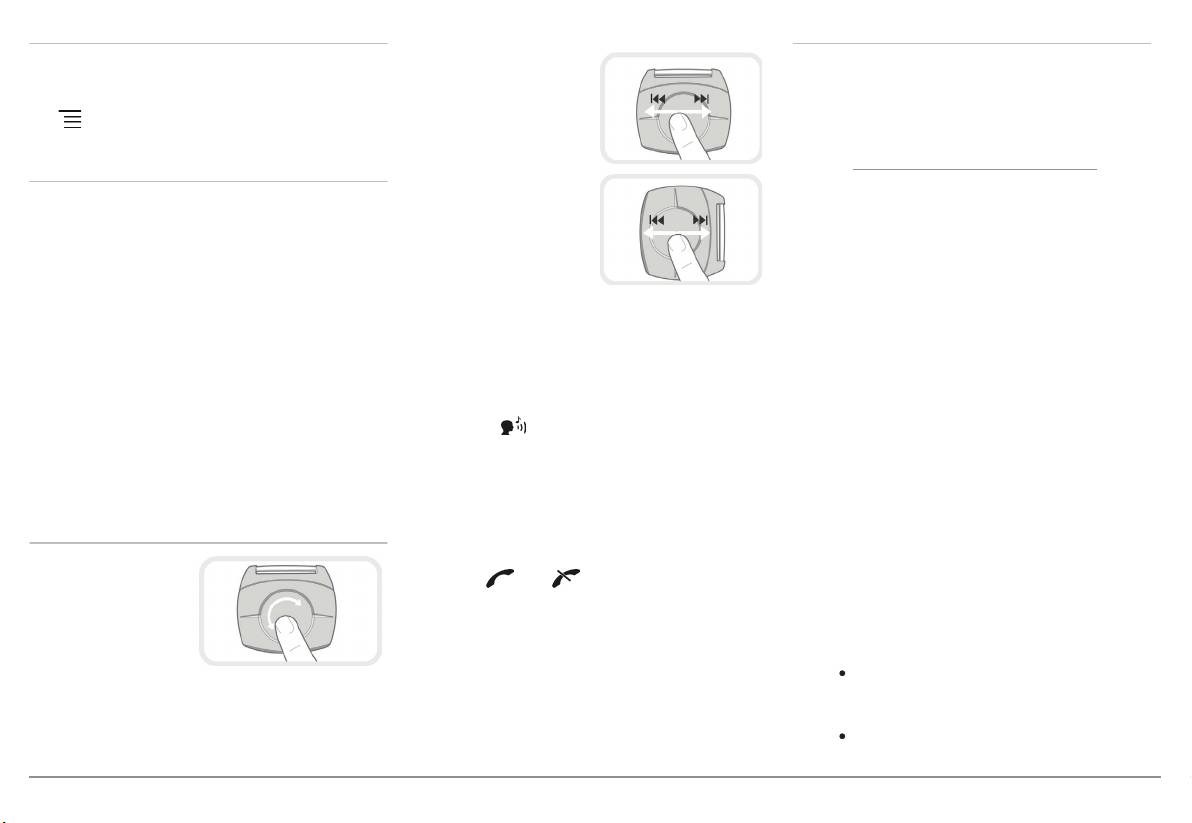
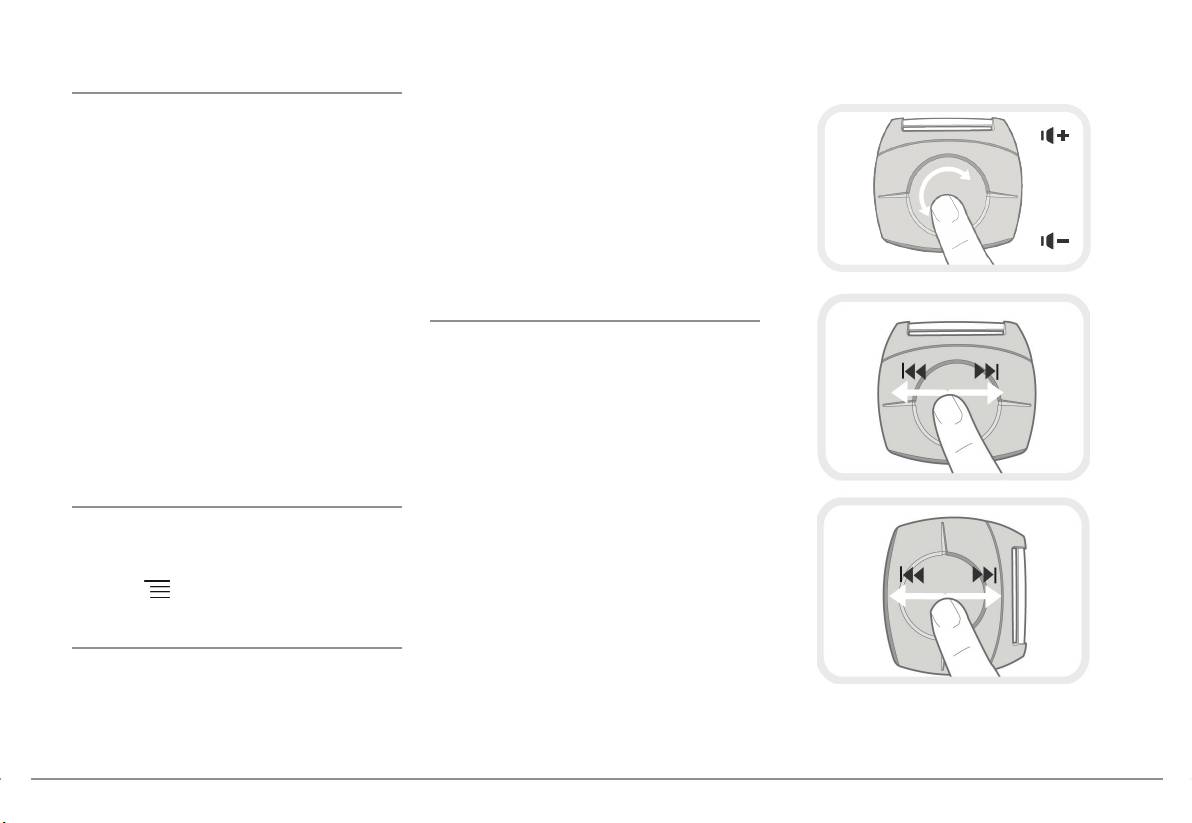
Slide your finger to the
Note : Refer to the compatibility page of our
tap Applications, then Settings. You can also
right on the touch
website to check if your phone is compatible with
sensitive pad to skip to
the Parrot ASTEROID Tablet and to consult the
tap
, then Settings.
the next track. Slide
specific pairing procedures for the most common
phones : www.parrot.com/uk/compatibility
.
Pairing the remote control
your finger to the left to
get back to the
If you are using the Parrot ASTEROID Tablet
To use the Parrot ASTEROID Tablet remote
previous track.
w ith your phone for the very first time, you must
control, you must first pair it w ith the screen. To
initially pair both devices. Once your telephone
do so:
Note : If the remote
is paired w ith the Parrot ASTEROID Tablet, the 2
control is installed on
1.
In the Settings menu, tap Remote controls >
the left side of your steering wheel, the procedure
devices w ill automatically connect w hen they
Wireless controller.
above is reversed.
are turned on (as w ell as
Bluetooth®
features)
2.
Tap Pair now .
and in proximity of each other.
Press the touch sensitive pad to pause / resume
3.
Press a button on the remote control.
playback.
1.
In the Settings menu, press Wireless &
netw orks > Bluetooth.
4.
Select the location of your remote control
Press the
button to start vocal music
on the screen of the Parrot ASTEROID
search. Refer to the Using vocal music search
2.
If necessary, activate the
Bluetooth and
Tablet.
for more information.
Discoverable options.
Press the SOURCE button to select the source
3.
From your phone, search for
Bluetooth
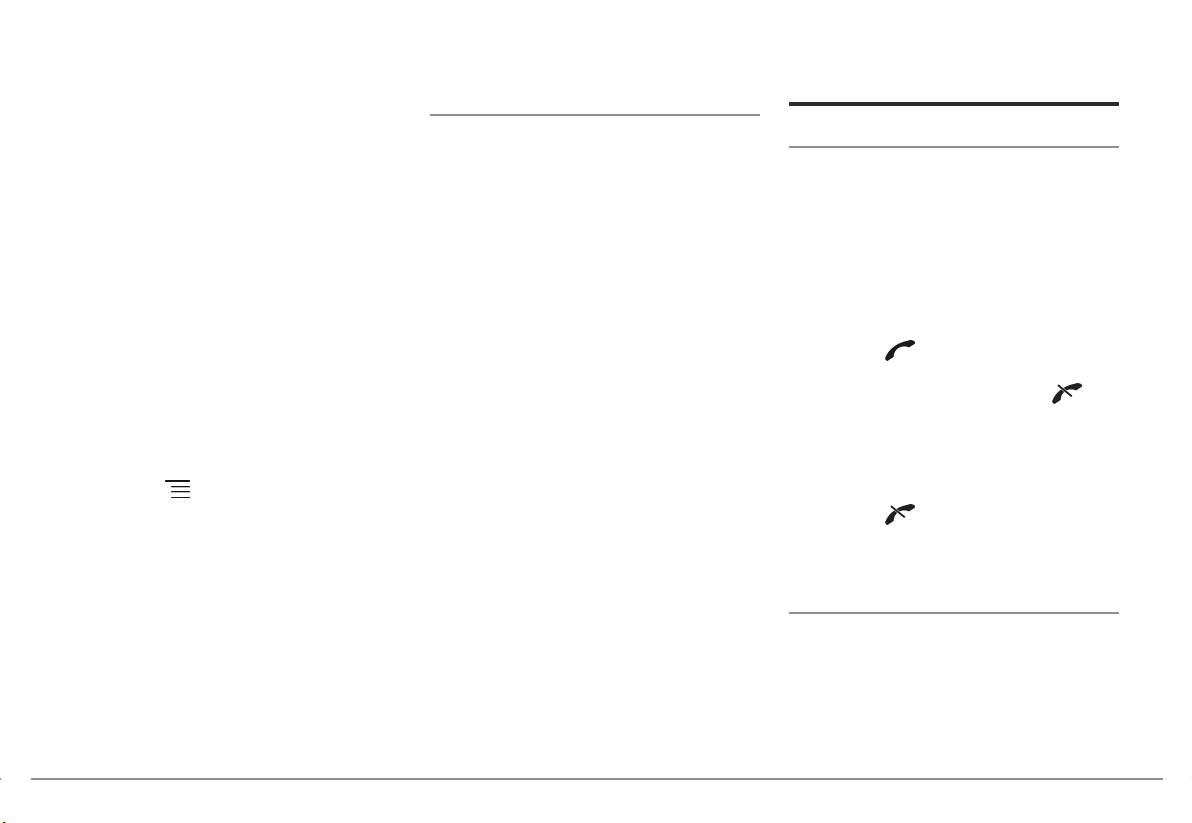
Using the remote control
of your audio files.
peripherals and select «Parrot ASTEROID
Slide your finger on
Tablet».
Press the
and buttons to make, accept
the touch sensitive
or refuse calls. Refer to the Phone section for
4.
The pairing procedure depends on w hich
pad w hile making
more information.
telephone model you have:
circles to modify the
volume. Slide your
Note : Do not leave the remote control in your bag
If the phone asks you to enter the
finger clockw ise to increase the volume. Slide
or pocket to avoid discharging its battery.
Bluetooth
PIN code, enter “0000”.
your finger counterclockw ise to decrease the
If the Parrot ASTEROID Tablet and your

English 19
19English 19
phone display tw o codes, verify that
w ith the oldest pairing to the Parrot ASTEROID
Note: Depending on the model of your phone, you
the codes are identical, then either
Tablet.
may need to authorize the access to your contacts
to the Parrot ASTEROID Tablet. Refer to the user
confirm or invalidate.
You can receive calls to the active or
guide of your phone for more information.
> The Parrot ASTEROID Tablet screen
secondary phones.
w ill display “Pairing successful”.
The automatic synchronization is limited to 5000
Only the phonebook for your active phone may
contacts (or phone numbers) for each paired
Note: Depending on the model of your phone, you
be accessed through the Parrot ASTEROID
phone.
may need to authorize the connection to the Parrot
Tablet. You can only make calls using the active
ASTEROID Tablet to allow further automatic
phone. How ever, you can easily sw itch
connections. Refer to the user guide of your phone
betw een the connected phones. To do so :
for more information.
1.
Tap Phone.
Connecting tw o phones via B
luetooth
2.
Tap
, then Phone.
To activate multipoint telephony and connect
3.
Select the active phone.
tw o phones :
1.
Tap Phone.
Synchronising the phonebook
2.
Tap
, then Bluetooth > Options.
With most of the phones compatible w ith
Bluetooth
, the phonebook is automatically
3.
Activate the Multipoint Telephony option.
synchronized in the Parrot ASTEROID Tablet’s
When the Parrot ASTEROID Tablet is sw itched
memory. Each time you change your directory,
on, it attempts to connect to all paired phones in
synchronisation w ill start automatically the next
the vehicle. If there are more than tw o paired
time the Parrot ASTEROID Tablet and your phone
phones in the vehicle, the device connects to
are connected.
the tw o phones w ith the oldest pairing.
War ning: Only the contacts stored in the phone
When tw o phones are connected to the Parrot
memory are synchronized. If your contacts are
ASTEROID Tablet, one of them becomes the
stored in your SIM card memory,
transfer them
active phone and the oth
er is the secondary
onto your phone memory.
phone. By default, the active phone is the one
20 English
20
20 English
2.
Say the name of the contact and the type of
Phone
Music
number («WORK», «MOBILE»...) if there are
Receiving a call
several numbers associated to your
Note: Several minutes of loading may be necessary
when connecting your audio peripheral (USB / SD /
contact.
An incoming call is indicated by a ringtone. The
iPod) to the Parrot ASTEROID Tablet for the first
> The call is automatically launched if the
name of the caller is announced if his number is
time, particularly if you are using audio peripheral
voice tag is correctly understood. If it is not
recorded in the phonebook of the phone
with a large capacity or containing many audio
the case, a confirmation message is asked.
connected to the Parrot ASTEROID Tablet.
files. This loading time will allow your audio files to
Confirm by say
ing «YES» or «CALL».
be accessible via voice recognition.
To answ er the call, press the button of
the remote control or the green button on
Note: At any time, press the
button of the
Using vocal music search
remote control or the
button on the screen to
the screen. Press the
button of the
The voice recognition function allow s you to
exit voice recognition mode.
remote control or the red button on the
select the artist / album you w ant to hear via
screen to end the call.
Making a call
voice recognition. This function is only available
if you are using the Parrot ASTEROID Tablet
To refuse the call, press the button of
1.
Tap Phone > Contacts.
w ith a USB / SD / iPod peripheral.
the remote control or the red button on the
2.
Tap the contact to call him or choose
screen.
1.
Press the
button on the remote control
betw een the different numbers of this
or tap Voice Commands on the screen.
contact («OFFICE», «MOBILE»...).
Making a call via voice recognition
2.
Say the name of the artist / album w hen
You can make a call using voice recognition
asked to do so.
directly after automatic synchronization. The
> The list of audio sources connected to the
Parrot ASTEROID Tablet w ill automatically
Parrot ASTEROID Tablet and applications
recognize the contact you w ish to call.
compatible w ith the vocal music search
1.
Press the
button to launch the voice
function w hich contain the artist / album
recognition feature.
that you selected w ill appear.
> The Parrot ASTEROID Tablet asks you the
Note: Check the albums and artists names in the
name of the contact you w ant to call.
metadatas of your music files. These nam
es may be

English 21
21English 21
different from the ones displayed on your music
2.
Press the SOURCE
button on the remote
Audio player connected via Bluetooth
files titles.
control (or tap Player on the screen) and
Note: The Parrot ASTEROID Tablet allows you to use
select SD. You can also tap Brow se to
the telephone and audio streaming functions from
iPod
brow se through the content of your SD
2 different phones without having to disconnect
1.
Connect your iPod to the iPod cable.
card.
one of them.
2.
Press the SOURCE button on the remote
3.
Tap track to start playback.
You can use the Parrot ASTEROID Tablet to
control (or tap Player on the screen) and
listen to songs stored on your mobile phone or
Note : Tap
to adjust several settings (audio,
select iPod. You can also tap Brow se to
Bluetooth
audio device. To do so, your phone /
repeat, random).
brow se through the content of your iPod.
audio device must support the
Bluetooth
A2DP
profile (Advanced Audio Distribution Profile). If
3.
USB storage device
Tap track to start playback.
you are using a
Bluetooth
audio player for the
The Parrot ASTEROID Tablet is compatible w ith
Note : Tap
to adjust several settings (audio,
first time, you have to pair both devices. If both
the majority of USB keys / MP3 audio player /
repeat, random).
devices are already paired:
external hard drive. There is no restriction in
terms of capacity of USB keys.
1.
Press the SOURCE button on the remote
SD card
control (or tap Player on the screen) and
You can use the follow ing SD cards (w ith
Only MP3 (Mpeg 1 Layer3), AAC or WMA
select Bluetooth Audio.
adapter if necessary) w ith the Parrot ASTEROID
formats are supported.
Tablet : SD, micro SD , mini SD, SDHC, mini
2.
Start playback on your
Bluetooth
audio
1.
Connect your USB device to the USB cable.
SDHC, micro SDHC. The SD card capacity must
player.
2.
Press the SOURCE button on the remote
not exceed 32Gb.
control (or tap Player on the screen) and
Car radio
Only MP3 (Mpeg 1 Layer3), AAC or WMA
select USB. You can also tap Brow se to
To get back to your car radio audio output,
formats are supported.
brow se throu
gh the content of your USB
press the SOURCE button on the remote control
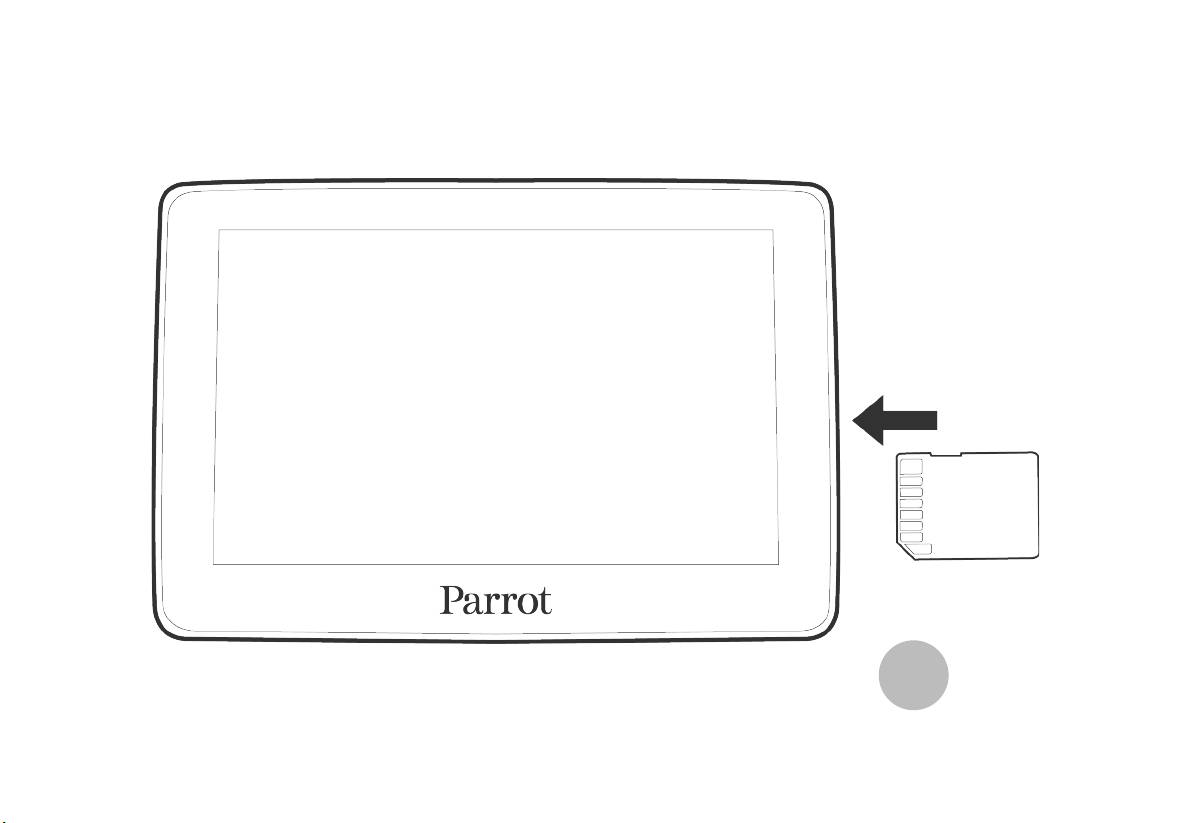
1.
Insert the SD card into the appropriate slot
storage device.
(or tap Music on the screen) and select Car
located on the right of the screen, w ith the
3.
Tap track to start playback.
radio.
contact surface facing you (diagram G
Note : Tap
to adjust several settings (audio,
p.11).
repeat, random).
22 English
22
22 English
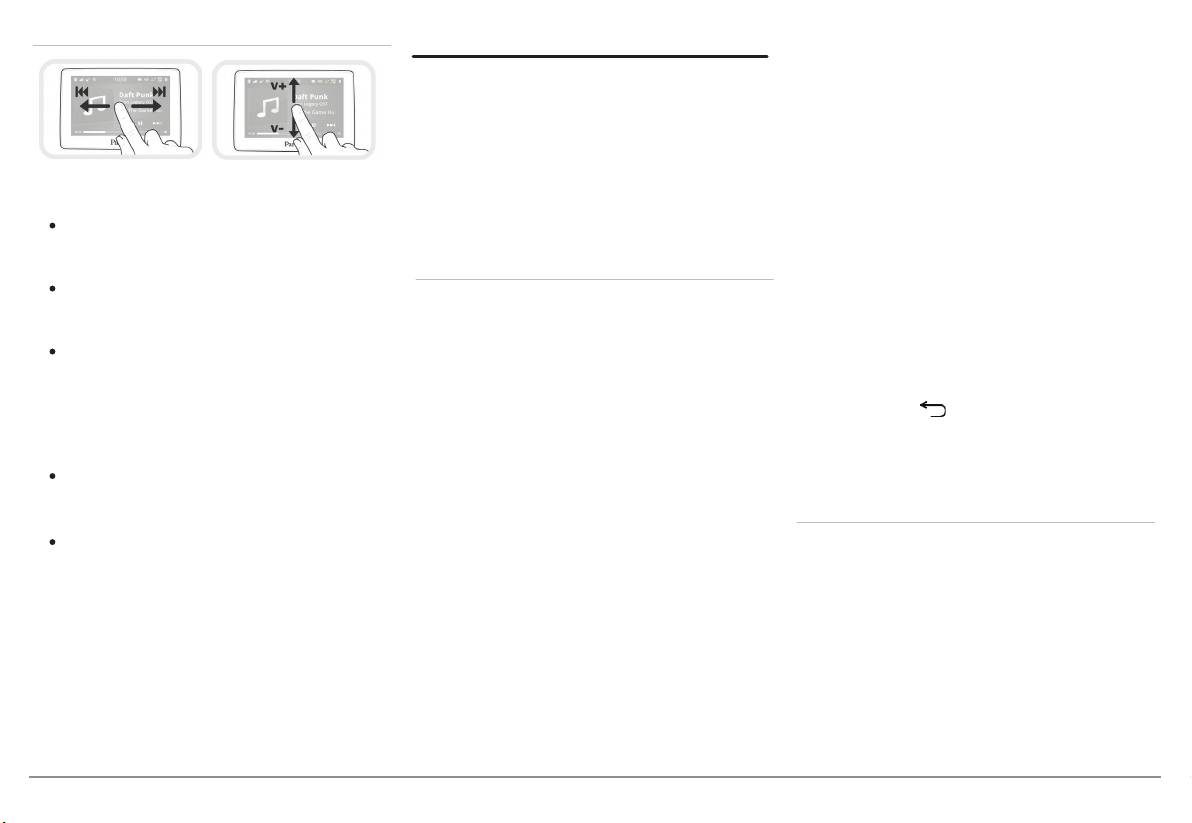
Screen commands
3.
If necessary, select your APN (Access
Internet
Point Name) from the suggested list. This
Warning: Internet connection via a 3G / 4G key
information is available in the documentation
requires a subscription offer with a telephone
provided w ith your 3G / 4G key. If your APN
operator. Using this service can result in significant
is not in th
e list, you can add it by selecting
roaming charges. Check the conditions of your
Settings > Wireless & netw orks > Mobile
subscription and consumption tracking with your
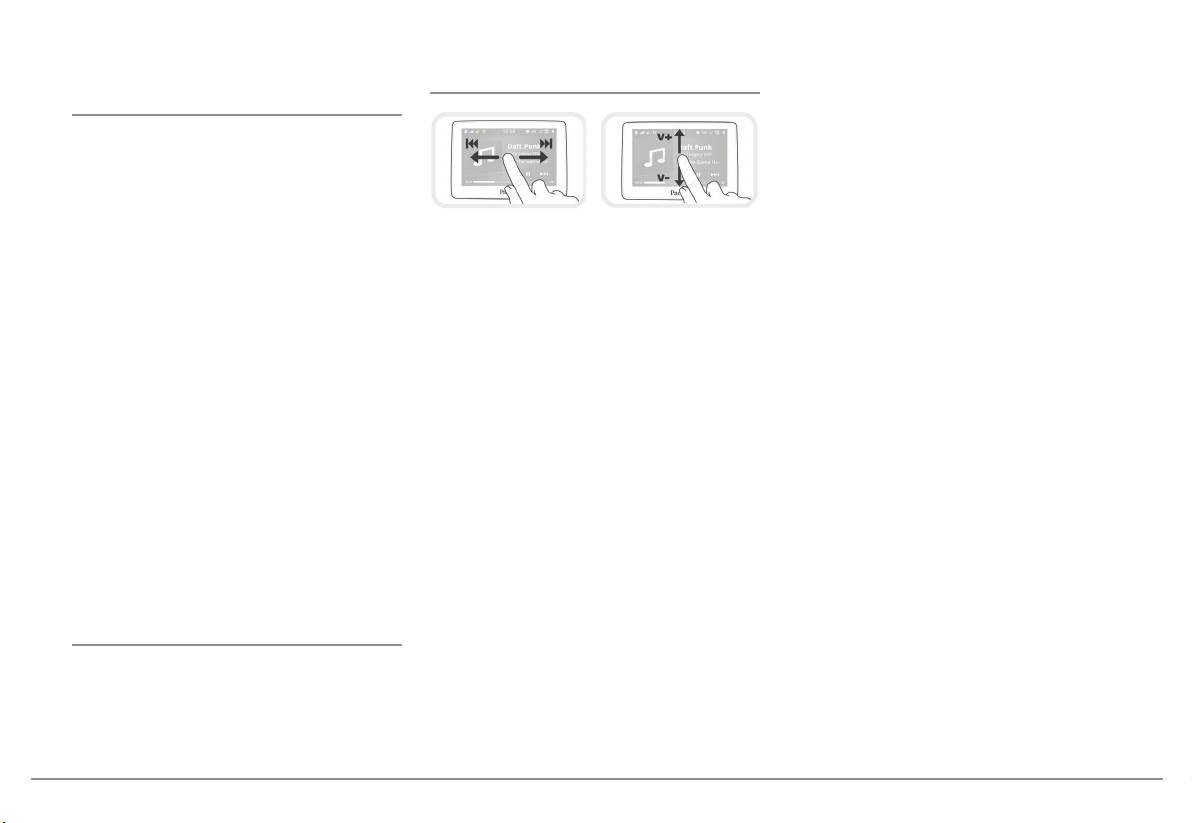
While playing a music track or the radio:
operator. Parrot disclaims any liability for
netw orks settings.
associated costs.
tap the screen to pause / resume playback
4.
Among the mobile access devices, select
or mute the radio ;
your 3G / 4G key.
Using a 3G / 4G key
slide your finger upw ards to increase the
5.
Select Access point > Other > Preset
Note: Refer to the compatibility section of the
volume ;
access points.
Parrot ASTEROID Tablet on our website to get the
slide your finger dow nw ards to decrease
list of 3G / 4G keys compatible with the Parrot
6.
Wait for approximately 30 seconds until the
the volume.
ASTEROID Tablet.
connection is established. You can also
While playing a music track (except audio
1.
Connect a 3G / 4G key to the Parrot
press the
button and brow se the
players connected using a jack / jack cable):
ASTEROID Tablet w ith a USB cable.
menus w hile the connection is being
> A pop-up w ill appear.
established.
slide your finger to the right to skip to the
next track ;
2.
Enter your PIN code then tap ENTER. Check
Sharing a phone 3G connection via Bluetooth
the Memorise option if you do not w ant to
slide your finger to the left to get back to
If you have a telephone that supports the DUN
enter the PIN code each time you use the
the previous track.
(Dial-Up Netw orking) or PAN (Personal Area
Parrot ASTEROID Tablet w i
th this 3G / 4G
Note : If you are using the Parrot ASTEROID Tablet
Netw ork)
Bluetooth
profiles, connecting your
key.
with an audio player connected via Bluetooth,
telephone via
Bluetooth
to the Parrot ASTEROID
these commands are only available if your audio
Note: You will be able to change this setting by
Tablet w ill allow for sharing of the telephone's
player supports the AVRCP profile (Audio/Video
selecting Settings > Wireless & networks > Mobile
3G connection.
Remote Control Profile).
networks settings. Among the mobile access
devices, select your 3G / 4G key, tap Forget PIN
Note: Refer to the compatibility page of our
code > Forget.
website to check if your phone allows 3G

English 23
23English 23
connection sharing via Bluetooth and to consult
corresponding procedure : www.parrot.com/uk/
1.
In the Parrot ASTEROID Tablet Settings
the corresponding procedure : www.parrot.com/
compatibility.
menu, tap Wireless & netw orks >Wi-Fi®.
uk/compatibility.
1.
Make sure that your phone’s keypad is
2.
Activate the Wi-Fi option.
1.
Allow connection sharing on your
unlocked, then connect the phone to the
3.
Tap Wi-Fi settings.
telephone. This procedure w ill vary
Parrot ASTEROID Tablet using a USB cable/
> The list of available Wi-Fi netw orks is
according to your telephone model. Refer to
micro-USB. You can also connect the
displayed.
the compatibility page of the Parrot
phone using the USB extension cable
ASTEROID Tablet for more information.
4.
Select the Wi-Fi netw ork.
provided w ith the Parrot ASTEROID Tablet.
2.
Connect your telephone to the Parrot
This connection also enables you to
5.
Enter the passw ord if necessary.
ASTEROID Tablet via
Bluetooth
.
recharge your phone’s battery.
Using the applications
3.
2.
On the Parrot ASTEROID Tablet, select
If necessary, select your APN (Access
Several types of applications are available w ith
Settings > Wireless & netw ork settings >
Point Name) from the suggested list, then
the Parrot ASTEROID Tablet : music, geolocation,
Mobile Netw orks settings > Mobile Access
check the option Select.
You can then
driver assistance... The available applications
devices.
modify this setting by selecting Settings >
are displayed on the product packaging.
Mobile Netw orks settings > Mobile Access
4.
Select your APN
(Access Point Name) from
device.
All applications may not be available in all
the suggested list, then check Select.
> A pop-up w indow indicating that USB
countries. The use of some applications may
connection sharing has been activated w ill
need prior subscription.
Sharing a phone 3G connection via USB
appear.
The Parrot ASTEROID Tablet is a multitasking
If you have a telephone that supports 3G
device: several applications can run
connection sharing via USB, connecting your
Note: Refer to the user guide of your phone for more
information.
simultaneously. For exampl
e, you can listen to a
telephone to the Parrot ASTEROID Tablet using a
Webradio station and use a driver assistance
USB / micro-USB cable (not provided) w ill allow
Connection to a Wi-Fi netw ork
application at the same time.
for sharing of the telephone's 3G connection.
If your smartphone can be used as a w ireless
For more information about installing and using
Note: Refer to the compatibility page of our
router or if a Wi-Fi netw ork is available next to
the available applications, refer to the ASTEROID
website to check if your phone allows 3G
your vehicle:
connection sharing via USB and to consult the
Market w eb page : www.asteroid market.com
.

24 English
24
24 English
1.
Delete the pairing on the Parrot ASTEROID
Video
Troubleshooting
Tablet. To do so, tap Settings > Wireless &
Warning : The Parrot ASTEROID Tablet video
Before you begin
netw orks > Bluetooth settings. Then click
function is dangerous and illegal in most countries
on the arrow besides your phone and tap
Make sure the “Goodbye” message is displayed
if it is used while driving. Consequently this
Disconnect & unpair.
on the Parrot ASTEROID Tablet screen w hen
function is only available when the vehicle is
stationary. To watch a video on the Parrot
you turn the ignition off. Refer to the Checking
2.
On your phone, erase the Parrot system
ASTEROID Tablet, park your vehicle and set your
the w iring section for more information.
from the list of
Bluetooth
peripherals (or
parking brake.
Make sure you have the latest softw are update
reboot your iPhone).
on your Parrot ASTEROID Tablet. To do so,
Watching videos stored on a SD card
3.
Repeat the pairing procedure for the 2
select Settings > About > Device Version.
devices.
The Parrot ASTEROID Tablet allow s you to
Compare this number w ith the one on the Parrot
w atch videos stored on a SD card. Only the
ASTEROID Tablet support page on our w ebsite
Problems w hile using the music function
MP2, MP4, H263, H264, WMV and SPARK
www.parrot.
com.
Reboot your iPod / iPhone before connecting it to
formats are supported.
the Parrot ASTEROID Tablet. To reboot your iPod
Note: You can also download the Parrot ASTEROID
1.
Insert the SD card into the appropriate slot
Tablet's updates while connected to the Internet.
/ iPhone:
(diagram G p.11).
The availability of an update is indicated on the
iPod: press Menu and the centre button
notification bar.
2.
Tap Applications > Gallery.
simultaneously until the iPod reboots.
3.
Select the video by tapping the
Problems w hile using the phone function
iPhone: Press the On/Off button and the
corresponding icon.
Make sure your phone is compatible w ith the
Home button simultaneously until the iPhone
Parrot ASTEROID Tablet. To do so, refer to the
reboots. Do not touch the screen w hen the
compatibility page on our w ebsite :
message “Slide to shutdow n” appears.
www.parrot.com/uk/compatibility
.
Note: this procedure will not erase any of your
If your phone is compatible w ith the Parrot
data.
ASTEROID Tablet and if you already have the
Some problems may occur if the iPod / SD card /
latest softw are update:
USB device is already connected to the Parrot

English 25
25English 25
ASTEROID Tablet before you turn on the ignition.
The utmost care has been taken w hen w riting
General information
Connect the iPod / SD card / USB device once
this guide,as part of the aim to provide you w ith
the ignition is turned on.
Warranty
accurate information. How ever, Parrot shall not
Without prejudice of legal w arranty, Parrot
be held responsible for any consequences
For more information
products are w arranted during 1 year from the
arising from any erro
rs or omissions in the
Refer to the Parrot ASTEROID Tablet support
date of purchase for defects in materials and
guide, nor for any damage or accidental loss of
page on our w ebsite www.parrot.com
.
w orkmanship, provided that no deterioration to
data resulting directly or indirectly from the use
the product has been made, and upon
of the information herein. Parrot reserves the
presentation of proof of purchase (invoice) to
right to amend or improve the product design or
the retailer. Warranty does not cover: upgrading
user guide w ithout any restrictions and w ithout
of the softw are items of the Parrot products
any obligation to notify users. As part of our
w ith Bluetooth cell phones for compatibi
lity
ongoing concern to upgrade and improve our
purpose, data recovery, deterioration of the
products, the product that you have purchased
external aspect due to normal w ear of the
may diff
er slightly from the model described in
product, any damage caused by accident,
this guide. If so, a later version of this guide
misuse, misapplication, or non-Parrot products.
might be available in electronic format at Parrot’s
Parrot is not responsible for storage, loss or
w ebsite at www.parrot.com
.
damaged to data during transit or repair. Any
Correct disposal of This Product (Waste
product w rongfully declared to be defective w ill
Electrical & Electronic Equipment)
be returned to sender and inspection, process
This marking
show n on the product or its
and carriage costs w ill be invoiced to hi
m.
literature, indicates that it should not be
Modifications
disposed w ith other household w astes at the
The explanations and specifications in this guide
end of its w orking life. To prevent possible harm
are given for information purposes only and may
to the environment or human health from
be modified w ithout prior notice. They are
uncontrolled w aste disposal, please separate
deemed to be correct at time of going to press.
this from other types of w astes and recycle it

26 English
26
26 English
responsibly to promote the sustainable reuse of
safety and regulatory standards.
material resources.
iPhone and iPod are trademarks of Apple Inc,
Parrot S.A.
Household users should contact either the
registered in the US and others countries.
Copyright © 2012 Parrot. All Rights Reserved.
retailer w here they purchased this product, or
Wi-Fi ® is a registered trademark of the Wi-Fi
their local government office, for details of
Alliance.
w here and how they can take this item for
All other trademarks mention
ed in this guide are
environmentally safe recycling. Business users
protected and are the property of their
should contact their supplier and the terms and
respective ow ners.
conditions of the purchase contract. This
product should not be mixe
d w ith other
commercial w astes for disposal.
Declaration of conformity
Registered Trademarks
Parrot SA, 174 quai de Jemmapes, 75010 Paris,
Parrot and the Parrot logo are registered
France, declare under their sole responsibility
trademarks of PARROT SA.
that the product described in this user guide
complies w ith technical standards EN300328
The
Bluetooth
® w ord mark and logos are
(v1.8.0), EN301489-1/-17(v2.1.1), EN300220-2
registered trademarks ow ned by
Bluetooth
SIG,
(V2.3.1), EN300440, EN60950-1: 04/2006 / A11:
Inc. and any use of such marks by Parrot S.A. is
2009 / A1 : 2010 / A2 : 2011,
EN 60065 :
under license. Bluetooth QDID : B013841,
05/2002 / A1 : 05/2006 / A11 : 2008 / A2 : 2010,
B013839, [-]
follow ing the provision of Radio Equipment ant
"Made for iPod / iPhone" means that an
Telecommunication Equipment directive 1999/5/
electronic accessory has been designed to
EC R&TTE, and w ith the requirements of
connect
specifically to iPod or iPhone,
directive EMC 2004/108/CE, directive 2006/95/CE
respectively, and has been certified by the
on low voltage equipment and 72/245/CEE
developer to meet Apple performance
Automotive directive amended by the 2009/19/
standards. Apple is not responsible for the
CE directive.
operation of this device or its compliance w ith
«Parking Brake» ledningen i ISO kablet til
Før du starter
Hurtig
Parrot ASTEROID Tablet giver mulighed
for at spore, om håndbremsen er trukket
om denne vejlednIng
brugervejledning
eller ikke. Den skal være tilsluttet i overen-
Parrot foretrækker at lægge brugervejle-
sstemmelse med installationsanvisningerne
dningerne ud online i stedet for at få dem
beskrevet i dette dokument. En ukorrekt
trykt for at begrænse papirforbruget og
installation eller tilslutning kan være farlig
af hensyn til miljøet. Denne korte guide
og ulovlig i mange stater / lande. Skærmen
giver derfor kun de vigtigste anvisninger om,
i førerens synsfelt må under ingen omstæn-
hvordan enheden bruges på en nem måde.
digheder vise videoer, mens bilen kører. Det
Du kan finde yderligere oplysninger under
samme gælder for alle webapplikationer.
rubrikken Support og downloading på vores
Hvis du forsøger at bruge en applikation, der
hjemmeside www.parrot.com: komplet
ikke er dedikeret til navigation eller hjælp
vejledning, FAQ, undervisningsprogram-
under kørsel, mens du kører, vil en advar-
mer…
sel blive vist på skærmen. For at se en video
på Parrot ASTEROID Tablets skærm, skal
Bemærk: iPod og iPhone (i funktionen iPod)
du parkere bilen et sikkert sted og trække
kaldes «iPod» i denne vejledning.
håndbremsen.
Brug Parrot ASTEROID Tablet med en for-
Indholdsfortegnelse
advarsler
nuftig lydstyrke, således at du altid kan høre
Før du starter
s.27
støj udefra under kørslen.
Funktioner, som kræver længere opmærk-
Montering
s.28
Parrot ASTEROID Tablet indeholder
somhed, må kun bruges, når bilen er stand-
Første gang enheden bruges
s.31
magneter af typen NdFeB, som kan beska-
set. Din egen og de andre trafikanters
Telefon
s.34
dige genstande, der er følsomme over for
sikkerhed har fortrinsret frem for telefono-
Musik
s.35
magnetiske felter (pacemaker, kreditkort,
pkald, musik eller applikationer med hjælp
Internet
s.38
mekaniske ure m.m.).
under kørsel. Vær ansvarlig: Kør forsigtigt og
Video
s.40
vær opmærksom på dine omgivelser. Parrot
Fejlfinding
s.40
frasiger sig ethvert ansvar, hvis du vælger at
Generelle oplysninger
s.41
tilsidesætte denne advarsel.
Dansk 27

opdaterIng
skal kablernes længde kontrolleres og man
Montering
skal tjekke, at placeringen er valgt således,
Du kan hente den sidste nye opdatering til
at kablernes længde er tilstrækkelig til at
produktet på vores websted www.parrot.
Bemærk: Vi anbefaler, at du kontakter en
forbinde de forskellige dele med hinanden.
com under rubrikken Support. Ved hjælp
kvalificeret person til at udføre denne
Kontroller, at Parrot ASTEROID Tablets ka-
af disse opdateringer kan du drage fordel
montering, f.eks. en autoriseret installatør fra
bler ikke har fået knæk eller er blevet klemt
af nye funktioner og forbedre dit produkts
vores netværk.
fast under monteringen.
kompatibilitet.
før du starter
Det er strengt nødvendigt at bruge
Bemærk: Du kan også hente opdateringer til
Monteringen af Parrot ASTEROID Tablet
det ISO-kabel, der følger med Parrot
Parrot ASTEROID Tablet, når enheden er
består i at sætte den ind mellem autora-
ASTEROID Mini.
forbundet med Internet. Meddelelsesbjælken
dioen og bilen.
vil angive, om der findes en ny opdatering.
Angivelserne «Tilslutning #» i afsnittede
Bemærk: Kablerne, der leveres sammen med
nedenfor svarer til de viste tilslutninger på
sd-kort
Parrot ASTEROID Tablet, er udstyret med ISO-
skemaerne s.6 / 7.
Parrot ASTEROID Tablet leveres sammen
stik. Hvis din autoradio ikke er udstyret med
med et SD-kort. SD-kortet giver mulighed
ISO-stik, skal du have en ISO kabel-adapter
tIlslutnIng af lydkablet
for at lagre musik og visse applikationer, der
for at kunne foretage monteringen. Se rubrik-
Forbind bilens lydledninger med Parrot
ikke findes direkte på Parrot ASTEROID
ken Kompatibilitet med biler på supportsiden
ASTEROID Tablets stik (Tilslutning 1A og
Tablet. Det er nødvendigt at sætte SD-kor-
til Parrot ASTEROID Tablet for at kontrollere,
2). Hvis bilen har et lydsystem med forstær-
tet ind i Parrot ASTEROID Tablet for at
om du har brug for en kabel-adapter.
ker, skal du bruge Jack Line Out Front og
bruge musikapplikationer og navigationsap-
Line Out Rear på styreboksen for at undgå
plikationer.
Begynd med at tage den oprindelige auto-
problemer med mætning af lyden (smæld
radio ud af bilen. Denne handling kan kræve
i højttalerne, permanent baggrundsstøj
udtræksnøgler.
m.m.). Forbind disse Line Out med dit
lydsystem ved at bruge et eller to jack-ka-
Se det elektriske diagram til din autoradio.
bler til at forbinde Parrot ASTEROID Tablet
Inden det Parrot ASTEROID Tablets fors-
med dit lydsystem (Tilslutning 1B på ske-
kellige dele fastgøres i kabinen, skal de
maet s.7).
forskellige kabler tilsluttes ved styrebo-
ksen. Før komponenterne sættes helt fast,
28 Dansk

tIlslutnIng af
tIlslutnIng af mute kablet
3. Anbring forlængerledningen til
strømforsynIngskablet
håndbremsekablet og håndbremsens
Mute funktionen giver mulighed for at
signalkabel på den medfølgende
aryde autoradioens lyd for at lytte til
1. Kobl bilens batteri fra før montering
kabel-forbindelse ved endestoppet.
Parrot ASTEROID Tablet (musik, samtaler
af strømforsyningskablet.
osv.). Valget af Mute indgangen (Mute in 1,
4. Fold forbindelsen to gange
2. Sæt Parrot ASTEROID Tablets
mute in 2 eller mute in 3) aænger af din
(skema A s.8).
ISO-hanstik ind i autoradioen
autoradios konfiguration. Identificer Mute
(tilslutning 3).
indgangen og forbind den dernæst med den
frie, gule ledning på ISO-kablet (tilslutning
monterIng af styreboksen
3. Forbind bilens ledningsnet med
5).
Parrot ASTEROID Tablets
Undgå at montere boksen i nærheden af
ISO-hunstik (tilslutning 4).
bilens varmesystem eller klimaanlæg eller et
tIlslutnIng af
sted, der udsættes for sollys.
håndbremsekablet
Kablets røde ledning skal svare til +12V
Sørg for at boksen ikke kan bevæge sig efter
konstant, den orange ledning til 12V ef-
Håndbremsekablet giver mulighed for
montering. Sørg for at bevare en fri afstand
tertænding og den sorte ledning til stel.
at bruge videofunktionen på Parrot
omkring produktets køler for at gøre det
Kontroller, at den orange ledning ikke er for-
ASTEROID Tablet, når håndbremsen er
lettere at udlede varme.
bundet med 12V konstant, da du risikerer at
trukket. Hvis kablet ikke er forbundet med
Når boksen er monteret, må den ikke
aflade bilens batteri.
signalkablet til bilens håndbremse, vil
forceres, når autoradioen sættes ind. Hvis
Bemærk: For at kontrollere monteringen,
videofunktionen ikke være tilgængelig (ske-
der ikke er plads nok bagved autoradioen,
skal du først forbinde skærmen uden at pla-
ma A s.8).
kan du f.eks. overveje at afmontere hands-
cere den på instrumentbrættet. Se afsnittet
kerummet.
1. Forbind den medfølgende
Kontroller monteringen for yderligere oplys-
forlængerledning til håndbremseka-
ninger.
Advarsel: Rør ikke ved styreboksen, når den er i
blet med det grønne kabel på Parrot
På visse biler er der ikke +12V efter tæn-
drift. Dens overflade kan blive meget varm.
ASTEROID Tablet (med angivelsen
ding på bilens stik. Det er således nødven-
Parking Brake).
digt at tilslutte den orange strømledning til
sikringsboksen eller til en anden strømkilde
2. Find din bils signalkabel til
efter tænding.
håndbremse. Dette kabel forbinder
din håndbremse med indikatoren for
håndbremse på instrumentbrættet.
Dansk 29

kontrol af monterIngen
monterIng af usb kablerne
Skærmens holder kan installeres på for-
ruden eller på det runde underlag, som du
Tænd og sluk derefter for tændingen i bilen,
Forbind USB kablerne med Parrot
først skal lime på instrumentbrættet.
når Parrot ASTEROID Tablet er monteret:
ASTEROID Tablet. Vi anbefaler, at
For at sikre en god fastgørelse af holderen:
Meddelelsen ”Farvel” skal vises på skær-
du tilslutter alle kablerne ved Parrot
men.
ASTEROID Tablet, også selv om du ikke
Hvis det ikke er tilfældet, skal der byttes om
nødvendigvis skal bruge dem. Før de rele-
• Rengør overfladen før holderen limes
på den røde og orange ledning. Den røde
vante stik ud af kortlommen eller hands-
på.
ledning til strømforsyningskablet skal være
kerummet. For at gøre det, kan det være
• Når holderen er sat op, skal du vente i
tilsluttet 12V konstant, den orange ledning
nødvendigt at bore et hul inde i instrument-
2 timer, før du håndterer den.
til 12V eftertænding og den sorte ledning til
brættet. Undgå så vidt muligt at anvende
stel. Dette gøres ganske enkelt ved at bytte
USB-forlængerledninger på flere meter.
Før du monterer holderen, skal du rengøre
om på de to kabelsko på Parrot kabelførin-
Det USB kabel, som du forbinder med
det valgte sted og dernæst trykke suge-
gen (tilslutning 7).
iPod forlængerledningen, skal tilsluttes ved
koppen godt ind mod forruden eller ned på
den hvide USB port, der er forudset hertil.
det runde underlag og sænke spærrehånd-
monterIng af mIkrofonen
Benævnelsen «iPod» er angivet ovenover
taget, indtil holderen sidder godt (skema B
denne port.
Vi anbefaler at glide kablet ind i renden
s.9).
Med henblik på at garantere en optimal
bagved dørens gummiliste.
Den normale cyklus med opvarmning og
modtagelseskvalitet må du ikke tilslutte din
Hvis kablet passerer ovenover pedalerne,
aøling inde i bilen kan bevirke, at suge-
3G-nøgle direkte til Parrot ASTEROID Ta-
skal du sørge for at det sidder godt fast.
koppen løsner sig. Hvis sugekoppen ikke
blet. Brug det medfølgende USB-kabel for
slutter korrekt til monteringsfladen, kan
at montere den på instrumentbrættet (eller
Advarsel: Før ikke mikrofonens kabel ind i
enheden falde af i et sving eller under kør-
ethvert andet ryddet område).
varmesystemet, ventilationssystemet, kli-
sel over bump. Kontroller derfor, at suge-
maanlægget eller foran bilens airbag i siden.
koppen sidder godt fast, hver gang du bruger
monterIng af skærmen
Parrot ASTEROID Tablet. Rengør forruden
Sørg for, at mikrofonen monteres så tæt på
Advarsel: Undgå en montering, der kan vans-
og monter om nødvendigt holderen igen.
brugerens hoved som muligt. Den ideelle
keliggøre brugen af vigtige betjeninger eller re-
Sæt skærmen ind i holderen ved at begynde
afstand er 60 cm. Det er bedst at montere
ducere chauørens udsyn. Installer ikke skær-
med den nederste magnetiske del.
mikrofonen i nærheden af bakspejlet.
men et sted, hvor den kan blive slynget frem
Husk at tage skærmen ud, når du forlader
Ret mikrofonen mod brugerens mund.
ved udløsningen af en airbag eller i nærheden af
bilen for at undgå indbrud og at udsætte
bilens åbninger til udluftning eller klimaanlæg.
den for sol i længere tid. Skærmen tages ud
30 Dansk
af holderen ved at trykke på udløseren ove-
For at vende tilbage til forrige menu, tryk
Første gang
nover skærmen (skema C s.9).
på
. For at vende direkte tilbage til velk-
enheden bruges
omstskærmen, tryk på .
monterIng af fjernbetjenIngen
velkomstskærm
Tryk på for at få adgang til den konteks-
Monter ernbetjeningen på rattet (skema D
tuelle menu, der svarer til den igangværende
s.10) eller lim den på instrumentbrættet ved
Når Parrot ASTEROID Tablet tænder, får du
applikation. Den kontekstuelle menu giver
hjælp af den selvklæbende holder. Monter
adgang til velkomstskærmen. Navigationsk-
blandt andet mulighed for at få adgang til
den ikke på rattets yderside, hvor den risi-
napperne sidder i skærmens venstre side.
applikationens ekstra funktioner eller visse
kerer at genere dig under kørslen (skema F
indstillinger.
s.10).
Sørg for at den sidder godt fast, så den ikke
Tryk på tasten for at vise de sidst
bevæger sig under kørslen.
anvendte eller igangværende applikationer.
Bemærk: Fjernbetjeningen strømforsynes
Tryk på tasten
for at ændre lydstyrke. Få
udelukkende af et batteri af typen 3V CR2032.
dernæst cursoren til at glide til venstre eller
Sørg for at batteriet vender rigtigt, når du sæt-
til højre.
ter det ind i ernbetjeningen (skema E s.10).
Glid fingeren hen over skærmen mod
venstre. Du får mere plads til at tilføje gen-
veje til dine foretrukne applikationer eller
funktioner.
Rør ved et ikon for at få adgang til den tilsva-
rende funktion. Rør f.eks. ved ikonet Appli-
kationer. Du får adgang til listen over tilgæn-
gelige applikationer på Parrot ASTEROID
Tablet. Glid fingeren hen over skærmen for
at se hele listen over disse applikationer.
Dansk 31
tIlpasnIng af velkomstskærmen
1. I menuen Parametre, tryk på
Forskudte betjeninger >
Sådan tilføjer du en genvej til en applikation
Fjernbetjening.
/ funktion på velkomstskærmen:
2. Tryk på Aktiver ernbetjening.
1. Tryk på Applikationer.
3. Tryk på en knap på ernbetjeningen.
2. Tryk i 2 sekunder på ikonet for den
applikation, du er interesseret i.
4. Vælg hvor ikonet for ernbetjening
skal sidde på skærmen til Parrot
3. Glid ikonet hen på den ønskede
ASTEROID Tablet.
plads.
anvendelse af fjernbetjenIngen
Sådan erner du en genvej:
Glid fingeren hen over den taktile over-
1. Tryk i 2 sekunder på det ikon, du
flade med en cirkelbevægelse for at ændre
ønsker at slette.
lydstyrke. Bevæg fingeren med solen for at
2. Glid ikonet opad mod angivelsen Slet.
øge lydstyrken. Bevæg fingeren mod solen
Når ikonet bliver rødt, kan du slippe
for at mindske lydstyrken.
det med fingeren.
Glid fingeren til højre for at skifte til det
ændrIng af parametre
næste musiknummer. Glid hurtigt fingeren
til venstre for at vende tilbage til det forrige
For at ændre Parrot ASTEROID Tablets
musiknummer.
parametre, tryk på Applikationer, og
dernæst på Parametre. Du kan ligeledes
Bemærk: Hvis du monterer ernbetjeningen på
trykke på
, og dernæst på Parametre.
venstre side af rattet, er betjeningen beskrevet
ovenfor omvendt.
parrIng af fjernbetjenIngen
For at bruge ernbetjeningen til Parrot
Tryk på cirklen i midten for at sætte på pause
ASTEROID Tablet, skal du først parre den
eller starte afspilningen af et musikstykke.
med skærmen. For at gøre dette:
32 Dansk

Tryk på tasten for at starte stemmesty-
for dem i nærheden af hinanden med
ringsfunktionen til musik. Se afsnittet Sådan
aktiveret Bluetooth® funktion.
Bemærk: På visse telefoner skal du autorisere
bruger du stemmestyringsfunktionen til
forbindelsen med Parrot ASTEROID Tablet
musik for yderligere oplysninger.
for at tillade automatisk forbindelse. Læs te-
1. I menuen Parametre, tryk på Trådløs
lefonens brugervejledning for yderligere oplys-
og netværk > Bluetooth.
Tryk på tasten SOURCE for at vælge
ninger.
lydkilde.
2. Aktiver om nødvendigt muligheden
Bluetooth og Muligheder >
tIlslutnIng af to telefoner
Tryk på tasterne og for at foretage,
Identificerbar.
For at aktivere funktionen, der tillader
acceptere eller afvise opkald. Se afsnittet
3. Søg på telefonen efter perifere
tilslutning af 2 telefoner:
Telefon pour for yderligere oplysninger.
Bluetooth enheder og vælg dernæst
1. Tryk på Telefon.
”Parrot ASTEROID Tablet”.
Bemærk: Lad ikke ernbetjeningen ligge i din
2. Tryk på
, og derefter på Bluetooth.
taske eller din lomme for ikke at aflade batte-
4. Fremgangsmåden for parring
riet.
aænger derefter af din
3. Tryk på Muligheder.
telefonmodel:
4. Aktiver muligheden dual mode.
tIlslutnIng af en
• Hvis telefonen beder dig om at
telefon vIa bluetooth
indtaste en Bluetooth PIN-kode,
Når der tændes for Parrot ASTEROID
Bemærk: Se siden med kompatibilitet på vores
indtast «0000».
Tablet, forsøger den at oprette en forbin-
hjemmeside for at undersøge, om din telefon er
delse med alle de parrede telefoner, der
• Hvis Parrot ASTEROID Tablet
kompatibel med Parrot ASTEROID Tablet og
findes i bilen. Hvis der findes mere end 2
og din telefon viser to koder, skal
se den tilsvarende fremgangsmåde for parring:
parrede telefoner i bilen, opretter den en
du kontrollere, om disse koder er
www.parrot.com/uk/compatibility.
forbindelse med de 2 telefoner, som har den
identiske og dernæst bekræfte
ældste parring.
eller aræfte.
Hvis det er første gang, du bruger en tele-
> Skærlen på Parrot ASTEROID
fon med Parrot ASTEROID Tablet, skal du
Tablet viser «Parring udført».
først parre de to enheder. Når din telefon er
blevet parret med Parrot ASTEROID Tablet,
vil forbindelsen mellem de to enheder blive
oprettet automatisk, hver gang der tændes
Dansk 33
Når 2 telefoner er forbundet med Parrot
synkronIserIng af
Telefon
ASTEROID Tablet, anses en ene af dem
telefonens telefonlIste
for at være den aktive telefon og den anden
Med de fleste Bluetooth-telefoner synkro-
sådan modtager du et opkald
for at være den sekundære telefon. I stan-
niseres telefonlisten automatisk med syste-
dard svarer den aktive telefon til den tele-
Et indkommende opkald angives ved en rin-
mets hukommelse. Hver gang du ændrer din
fon, der har den ældste parring med Parrot
getone. Navnet på kontaktpersonen med-
telefonliste, starter synkroniseringen igen
ASTEROID Tablet.
deles, hvis nummeret på denne kontaktper-
automatisk ved næste tilslutning.
son er gemt i telefonlisten på den telefon,
Du har mulighed for at modtage opkald fra
der er forbundet med Parrot ASTEROID
Advarsel: Det er kun de kontaktpersoner, som
den aktive telefon og den sekundære tele-
Tablet.
er gemt i telefonens hukommelse, der synkro-
fon.
niseres med Parrot ASTEROID Tablet. Hvis
dine kontaktpersoner er gemt på SIM-kortet,
• For at acceptere dette opkald, tryk på
Kun telefonlisten i den aktive telefon er til-
skal de føres over i telefonens hukommelse.
tasten
på ernbetjeningen eller
gængelig på Parrot ASTEROID Tablet. Du
Læs telefonens brugervejledning for yderligere
på grønne knap, der vises på skær-
kan kun foretage opkald med den aktive
oplysninger.
men. Tryk dernæst på tasten på
telefon. Du kan dog let skifte fra den ene til
Bemærk: På visse telefoner skal du give til-
ernbetjeningen eller på den røde
den anden telefon. For at gøre dette:
ladelse til, at Parrot ASTEROID Tablet får
tast på skærmen for at afslutte
1. Tryk på Telefon.
adgang til dine kontaktpersoner for at gen-
opkaldet.
nemføre synkroniseringen. Læs telefonens bru-
2. Tryk på
, og derefter på Telefon.
• For at afvise dette opkald, tryk på
gervejledning for yderligere oplysninger.
tasten
på ernbetjeningen eller
3. Vælg den aktive telefon.
på røde knap, der vises på skærmen.
Den automatiske synkronisering er begræn-
set til 5000 kontaktpersoner (eller telefon-
sådan foretager du
numre) pr. parret telefon.
et opkald vIa stemmestyrIng
Du kan foretage et opkald direkte med
stemmestyring efter synkronisering af din
telefons telefonliste. Parrot ASTEROID
Tablet genkender automatisk den kontakt-
person i din telefonliste, som du vil ringe til.
34 Dansk
1. Tryk på tasten
for at starte
sådan rInger du tIl
Musik
processen med stemmestyring.
en kontakt I telefonlIsten:
> Parrot ASTEROID Tablet beder om
Bemærk: Flere minutters overførsel kan være
navnet på den kontaktperson, du vil
1. Tryk på Telefon og dernæst på
påkrævet ved den første forbindelse mellem din
ringe til.
Kontakter.
perifere lydenhed (USB / SD / iPod) og Parrot
2. Sig navnet på den kontaktperson,
2. Tryk på kontakten for at starte
ASTEROID Tablet, især hvis det drejer sig om
opkaldet til standard nummeret eller
perifere enheder, som indeholder mange mu-
som du vil ringe til, efterfulgt af type
sikfiler. Efter endt overførsel er disse musikstyk-
telefonnummer (”KONTOR”,
vælg mellem kontaktpersonens
”MOBIL” osv.), hvis kontaktpersonen
forskellige numre (”KONTOR”,
ker tilgængelige ved hjælp af stemmestyring.
har flere numre.
”MOBIL” osv.).
sådan bruger du
> Opkaldet til denne kontaktperson
stemmestyrIngsfunktIonen
sker automatisk, hvis
tIl musIk
stemmekommandoen er opfattet
korrekt.
Med stemmestyringsfunktionen til musik
> I modsat fald udsender det håndfrie
kan du ved hjælp af stemmestyring vælge
system en anmodning om
de kunstnere eller albums, som du vil lytte
bekræftelse. Bekræft ved at sige ”JA”,
til. Denne funktion er til rådighed, hvis du
”RINGE” eller ”RING”.
anvender Parrot ASTEROID Tablet med en
perifer enhed af typen iPod / USB / SD, eller
Bemærk: Du kan annullere opkaldsprocedu-
hvis du anvender en musikapplikation, der
ren på et vilkårligt tidspunkt trykke på tasten
er kompatibel med denne funktion.
på ernbetjeningen eller på tasten på
skærmen.
1. Tryk på tasten
på ernbetjeni-
gen eller tryk på Stemmekomman-
doer på skærmen.
Dansk 35

2. Sig navnet på den kunstner eller det
Bemærk: Tryk på tasten for at ændre visse
usb
album, som du vil lytte til, når Parrot
indstillinger (lyd, gentagelse, tilfældig).
Parrot ASTEROID Tablet er kompatibel
ASTEROID Tablet beder dig om det.
med de fleste USB-nøgler / MP3-afspil-
> Derefter vises listen over lydkilder
sd
lere / eksterne hard disks. Der findes ingen
forbundet med Parrot ASTEROID
Du kan bruge følgende SD-kort (med adap-
begrænsning for USB-nøglens kapacitet. De
Tablet og musikapplikationer kompa-
ter om nødvendigt) sammen med Parrot
musikalske filer på din USB-nøgle kan være
tible med stemmestyringsfunktionen,
ASTEROID Tablet: SD, micro SD, mini SD,
i format MP3, AAC, WAV, OGG eller WMA.
som indeholder den kunstner / det
SDHC, mini SDHC, micro SDHC. SD-kor-
album, som du har valgt.
tets kapacitet må ikke overskride 32Go.
1. Forbind din USB-enhed med
De musikalske filer på dit SD-kort kan være
Bemærk: Kontroller navnet på kunstnere og
USB-kablet.
i format MP3, AAC, WAV, OGG eller WMA.
albums i dine musikfilers tags eller mærker
2. Tryk på tasten SOURCE på ern-
(metadata). De kan nemlig være forskellige fra
betjeningen (eller tryk på Musik på
de kunstnere og albums, der vises i titlen på dit
1. Sæt SD-kortet ind det forudsete sted
skærmen) og vælg USB. Du kan også
musiknummer.
på skærmens højre side(skema G s.11).
trykke på Gennemse for at navigere i
2. Tryk på tasten SOURCE på ern-
indholdet på din USB-enhed.
Ipod
betjeningen (eller tryk på Musik på
3. Tryk på musiknummeret for at starte
skærmen) og vælg SD. Du kan også
1. Forbind din iPod med iPod kablet.
afspilningen.
trykke på Gennemse for at navigere i
2. Tryk på tasten SOURCE på ern-
indholdet på dit SD-kort.
Bemærk: Tryk på tasten
for at ændre visse
betjeningen (eller tryk på Musik på
3. Tryk på musiknummeret for at starte
indstillinger (lyd, gentagelse, tilfældig).
skærmen) og vælg iPod. Du kan også
afspilningen.
trykke på Gennemse for at navigere i
indholdet på din iPod.
Bemærk: Tryk på tasten
for at ændre visse
3. Tryk på musiknummeret for at starte
indstillinger (lyd, gentagelse, tilfældig).
afspilningen.
36 Dansk
brug sammen med en
betjenInger på skærmen
Bemærk: Hvis du bruger Parrot ASTEROID
bluetooth-lydafspIller
Tablet sammen med en lydkilde forbundet
via Bluetooth, er disse betjeninger kun dispo-
Bemærk: Parrot ASTEROID Tablet giver dig
nible, hvis denne lydkilde understøtter AVRCP
mulighed for at bruge telefonifunktion og
profilen (Audio/Video Remote Control Profile).
lyd-streaming via Bluetooth med 2 forskellige
telefoner, uden du behøver at frakoble en af de
2 enheder.
Under afspilning af en musikfil eller radio:
Du kan bruge Parrot ASTEROID Tablet
• Tryk på skærmen for at sætte mu-
for at lytte til musikfiler, som er lagret
siknummeret på pause eller aryde
på en Bluetooth lydafspiller, hvis denne
radioens lyd.
understøtter A2DP-profilen (Advanced
Audio Distribution Profile). Hvis du bruger
• Glid din finger opad for at øge lydstyr-
lydafspilleren for første gang, skal du først
ken.
parre den med Parrot ASTEROID Tablet.
• Glid din finger nedad for at mindske
Hvis lydafspilleren allerede er parret med
lydstyrken.
Parrot ASTEROID Tablet:
Under afspilning af en musikfil (med undta-
1. Tryk på tasten SOURCE på ernbetje-
gelse af lydkilder forbundet via et jack / jack
ningen (eller tryk på Musik på skær-
kabel):
men) og vælg Audio Bluetooth.
• Glid fingeren til højre for at skifte til
2. Start afspilningen af et musikstykke på
det næste musiknummer.
lydafspilleren.
• Glid fingeren til venstre for at vende
tilbage til forrige musiknummer.
autoradIo
For at hente lyden fra din autoradio, tryk på
tasten SOURCE på ernbetjeningen (eller
tryk på Musik på skærmen) og vælg Car ra-
dio.
Dansk 37

Bemærk: Du kan ændre denne indstilling på
delIng af 3g
Internet
et senere tidspunkt ved at vælge Parametre >
tIlslutnIng vIa bluetooth
Trådløs og netværk > Mobildatanetværk. Vælg
Advarsel: Oprettelsen af en forbindelse til In-
Hvis du har en telefon, som understøtter
din 3G / 4G nøgle blandt de perifere enheder,
ternettet ved hjælp af en 3G/4G-nøgle kræver
profilen Bluetooth® DUN (Dial-Up Networ-
vælg Glem PIN-kode og derefter Glem.
et abonnement hos en telefonudbyder. Brugen
king) eller PAN (Personal Area Network),
af denne service kan medføre store omkostnin-
kan du dele din telefons 3G tilslutning via
ger til roaming. Kontroller dit abonnements
3. Vælg om nødvendigt din APN (Access
din telefons Bluetooth-forbindelse med Par-
betingelser, og hold løbende øje med dit forbrug
Point Name) i den foreslåede liste.
rot ASTEROID Tablet.
hos din udbyder. Parrot frasiger sig ethvert
Denne oplysning findes i den
ansvar vedrørende de tilknyttede omkostninger
medfølgende dokumentation til din
Bemærk: Se siden med kompatibilitet på vores
hertil.
3G / 4G nøgle. Hvis din APN ikke står
hjemmeside for at kontrollere, om din telefon
i denne liste, kan du tilføje den ved at
tillader deling af 3G tilslutning via Bluetooth
tIlslutnIng med en 3g / 4g nøgle
vælge Parametre > Trådløs og netværk
og se den tilsvarende fremgangsmåde: www.
> Mobildatanetværk.
parrot.com/uk/compatibility.
Bemærk: Se rubrikken Kompatibilitet med Par-
rot ASTEROID Tablet på vores hjemmeside for
4. Vælg din 3G / 4G nøgle blandt de peri-
at kalde listen over 3G / 4G nøgler, som er kom-
fere enheder.
1. Tillad deling af tilslutning på din tele-
patible med Parrot ASTEROID Tablet.
fon. Denne fremgangsmåde er forskel-
5. Vælg Adgangspunkt > Andet >
lig i forhold til din telefons model.
Forhåndsdefinerede adgangspunkter.
1. Forbind en 3G / 4G nøgle med Parrot
2. Forbind din telefon med Parrot
6. Vent indtil forbindelsen er oprettet. Du
ASTEROID Tablet via USB-kablet.
ASTEROID Tablet via Bluetooth.
kan også trykke på tasten
og
> En pop-up vises.
navigere i menuerne mens
3. På Parrot ASTEROID Tablet, vælg
2. Indtast din PIN-kode og tryk derefter
forbindelsen bliver oprettet.
Parametre > Trådløs og netværk >
på GODKEND. Sæt kryds ved muli-
Mobildatanetværk.
gheden Husk, hvis du foretrækker ikke
4. Vælg din APN (Access Point Name)
at blive bedt om PIN-koden ved hver
i den foreslåede liste og sæt dernæst
start af Parrot ASTEROID Tablet.
kryds ved muligheden Vælg.
38 Dansk

delIng af 3g tIlslutnIng vIa usb
Bemærk: Læs telefonens brugervejledning for
Du kan for eksempel lytte til en Webradio og
yderligere oplysninger.
bruge en applikation med hjælp under kør-
Hvis du har en telefon, der understøtter
sel samtidigt.
deling af 3G tilslutning via USB, skal du for-
tIlslutnIng ved et wI-fI netværk
For yderligere oplysninger om brugen af
binde din telefon med Parrot ASTEROID
tilgængelige applikationer, se websiden på
Tablet ved hjælp af et USB / micro USB ka-
Hvis din telefon tillader deling af sin 3G
ASTEROID Market: www.parrotasteroid.
bel (medfølger ikke) for at dele telefonens
tilslutning via Wi-Fi® eller hvis et andet
com.
3G tilslutning.
trådløst netværk er disponibelt i nærheden
af din bil:
Bemærk: Se siden med kompatibilitet på vores
hjemmeside for at kontrollere, om din telefon
1. I menuen Parametre på Parrot
tillader deling af 3G tilslutning via USB og se
ASTEROID Tablet, tryk på Trådløs og
den tilsvarende fremgangsmåde: www.parrot.
netværk > Wi-Fi.
com/uk/compatibility.
2. Aktiver muligheden Wi-Fi.
1. Kontroller, at tastaturet på din telefon
3. Tryk på Wi-Fi parametre.
er låst og forbind den dernæst med
> Listen over Wi-Fi netværk vises.
Parrot ASTEROID Tablet ved hjælp
4. Vælg Wi-Fi netværket.
af et USB / micro-USB kabel. Denne
tilslutning tillader ligeledes at oplade
5. Indtast om nødvendigt adgangskode.
din telefons batteri.
2. Vælg om nødvendigt din APN (Access
anvendelse af applIkatIonerne
Point Name) i den foreslåede liste og
sæt dernæst kryds ved muligheden
Du kan bruge flere typer applikationer sam-
Vælg. Du kan ændre denne indstilling
men med Parrot ASTEROID Tablet: musik,
på et senere tidspunkt ved at vælge
GPS og hjælp under kørsel.
Parametre > Trådløs og netværk >
De tilgængelige applikationer er forskellige
Mobildatanetværk > Mobile Access
i forhold til brugslandet. Visse applikationer
device.
kræver muligvis et abonnement.
> En pop-up angiver, at delingen af
Parrot ASTEROID Tablet kan multitaske:
USB tilslutningen er aktiveret.
Den kan bruge flere applikationer samtidigt.
Dansk 39

Hvis din telefon står angivet som kompati-
Video
Fejlfinding
bel, og din Parrot ASTEROID Tablet allere-
de har den seneste opdatering, skal du slette
Advarsel: Videofunktionen på Parrot ASTE-
før du starter
parringen mellem de to apparater på Parrot
ROID Tablet er farlig og ulovlig i mange lande,
Kontroller, at meddelelsen “Farvel” vises på
ASTEROID Tablet og din telefon, genstarte
hvis den bruges under kørsel. Denne funktion er
skærmen i Parrot ASTEROID Tablet, når du
de to enheder og derefter genoprette for-
derfor ikke tilgængelig mens bilen kører. For at
slukker for bilens motor. Se afsnittet Kontrol
bindelsen mellem de to enheder.
se en video på Parrot ASTEROID Tablet, skal
af monteringen for yderligere oplysninger.
du parkere bilen et sikkert sted og trække hånd-
Genopstart enheden. Det gør du ved at tage
problemer med
bremsen.
skærmen ud af holderen.
musIkfunktIonen
Kontroller, at du har den seneste opdate-
afspIlnIng af
Nulstil din iPod / iPhone, før du forbinder
ring på Parrot ASTEROID Tablet. Det gør
vIdeofIler på et sd-kort
den med Parrot ASTEROID Tablet igen. For
du ved at vælge Parametre > Apropos >
at nulstille en iPod / iPhone (denne proce-
Du kan afspille videofiler på Parrot
Version. Sammenlign versionens nummer
dure sletter ikke nogen data) skal du gøre
ASTEROID Tablet, som er lagret på et SD-
med det, der står på supportsiden til Parrot
følgende:
kort. Videofilerne på SD-kortet kan være
ASTEROID Tablet på vores hjemmeside
i format MP2, MP4, H263, H264, WMV og
www.parrot.com.
SPARK.
• iPod: Tryk på Menu og på den mid-
Bemærk: Du kan også hente opdateringer til
terste knap samtidigt, indtil iPod’en
Parrot ASTEROID Tablet, når enheden er for-
genstartes.
1. Sæt SD-kortet ind det forudsete sted
bundet med Internet. Meddelelsesbjælken vil
(skema G s.11).
• iPhone/iPod touch: Tryk på knappen
angive, om der findes en ny opdatering.
On/O og knappen Home samtidigt,
2. Tryk på Applikationer og dernæst på
indtil din iPhone genstartes. Du må
Galleri.
problemer med
ikke røre skærmen, når meddelelsen
telefonfunktIonen
3. Vælg videoen ved at trykke på det
“Lad fingeren glide for at slukke“ vises.
tilsvarende ikon.
Kontroller din telefons kompatibilitet med
Parrot ASTEROID Tablet. Det gør du ved
at se siden med kompatibilitet på vores
hjemmeside: www.parrot.com/uk/compati-
bility.
40 Dansk

Der kan opstå visse problemer, hvis den pe-
Et produkt, der viser sig ikke at være fejl-
Generelle oplysninger
rifere enhed allerede er tilsluttet ved Parrot
behæftet, vil blive returneret til afsenderen,
ASTEROID Tablet, når du drejer nøglen i
som vil få tilsendt en regning for udgifter til
garantI
tændingen. Prøv igen ved at tilslutte den
behandling, kontrol og transport.
perifere enhed, efter at du har drejet nøglen
Med forbehold af den lovbestemte garanti,
i tændingen.
garanterer PARROT kontraktligt produktet i
ændrInger
en periode på 12 måneder fra forbrugerens
Forklaringerne og specifikationerne i denne
for yderlIgere oplysnInger
oprindelige købsdato (undtagen sliddele
guide er kun vejledende og kan blive ændret
som garanteres i 6 måneder) mod mate-
Se supportsiden til Parrot ASTEROID
uden forudgående varsel. De anses for at
rialefejl og fabrikationsfejl ved præsentation
Tablet på vores hjemmeside
være korrekte på det tidspunkt, hvor de bli-
af beviset for køb (dato, sted, produktets
www.parrot.com.
ver trykt. Denne guide er blevet udarbejdet
serienummer) for forhandleren eller Parrot.
med største omhu i den hensigt at give dig
I løbet af den kontraktlige garantis varighed
den mest nøjagtige information.
skal det fejlbehæftede produkt returneres
Parrot kan dog ikke drages til ansvar for
i sin oprindelige emballage til forhandle-
konsekvenserne af fejl eller udeladelser i
rens kundeservice. Efter at have undersøgt
denne guide, eller for beskadigelser eller
produktet vil Parrot efter eget valg enten
utilsigtet tab af data, som direkte eller in-
udskifte produktet eller udstede et tilgode-
direkte er et resultat af brugen af informa-
havende med udelukkelse af enhver anden
tionen heri. Parrot forbeholder sig ret til at
godtgørelse.
ændre eller forbedre produktets design el-
Garantien dækker ikke opdatering af sof-
ler brugervejledningen uden nogen form for
tware indbefattet i Parrot produkter med
begrænsning og uden forpligtigelse til at un-
Bluetooth® mobiltelefoner beregnet til re-
derrette brugerne herom.
gnskabsføring, indhentning af data, udven-
Da vi konstant bestræber os på at opgra-
dig beskadigelse af produktet på grund af
dere og forbedre vores produkter, kan det
normal brug af produktet, enhver beskadi-
produkt, du har købt, være lidt forskellig fra
gelse forårsaget af et uheld, en unormal brug
den model, der er beskrevet i denne guide.
eller en ikke autoriseret brug af produktet, et
Hvis det er tilfældet, kan der fås en senere
ikke Parrot produkt. Parrot er ikke ansvarlig
udgave af denne guide i elektronisk format
for opbevaring, tab eller beskadigelse af
på Parrots website www.parrot.com.
data under transport eller reparation.
Dansk 41

korrekt affaldsbortskaffelse
overensstemmelseserklærIng
«Made for iPod / iPhone» betyder, at
af dette produkt(elektrIsk og
et elektronisk tilbehør er blevet specielt
Parrot SA, 174 quai de Jemmapes, 75010
elektronIsk udstyr)
designet til at kunne forbindes henholdsvist
Paris, Frankrig, erklærer under sit unikke
med en iPod eller en iPhone og at fabri-
Til dette formål har alle kommuner etableret
ansvar, at produktet beskrevet i nærværende
kanten attesterer, at det lever op til Apples
indsamlingsordninger, hvor aald af elek-
brugervejledning er i overensstemmelse med
standarder. Apple afviser ethvert ansvar
trisk og elektro-nisk udstyr gratis kan afle-
de tekniske standarder EN300328 (v1.8.0),
i forbindelse med disse tilbehørsdeles
veres af borgerne på genbrugsstationer eller
EN301489-1/-17 (v2.1.1), EN300220-2
virkemåde eller deres overensstemmelse
andre indsamlingssteder eller hentes direkte
(V2.3.1), EN300440, EN60950-1: 04/2006
med gældende forskrifter og sikkerhedss-
fra husholdningerne.
/ A11: 2009 / A1: 2010 / A2: 2011, EN 60065:
tandarder.
Nærmere information skal indhentes hos
05/2002 / A1: 05/2006 / A11: 2008 / A2:
kommunens tekniske forvaltning.Brugere
2010 iht. bestemmelserne i R&TTE direkti-
iPod, iPod Touch og iPhone er varemærker,
af elektrisk og elektronisk udstyr må ikke
vet 1999/5/EF, samt kravene i EMC-direk-
som tilhører Apple, Inc. og er registreret i
bortskae aald af elektrisk og elektro-
tivet 2004/108/EF, lavspændingsdirektivet
USA og andre lande.
nisk udstyr sammen med husholdning-
2006/95/EF samt direktivet 72/245/EØF om
saald. Brugere skal benytte de kommu-
radiostøjdæmpning af køretøjer som ændret
Wi-Fi er et registreret varemærke af Wi-Fi
nale indsamlingsordninger for at mindske
med direktivet 2009/19/EF.
Alliance.
den miljømæssige belastning i forbindelse
med bortskaelse af aald af elektrisk og
Alle de andre handelsmærker eller regis-
elek-tronisk udstyr og øge mulighederne for
trerede varemærker nævnt i nærværende
genbrug, genanvendelse og nyttiggørelse af
dokument er beskyttet med Copyright og er
aald af elektrisk og elektronisk udstyr.
deres respektive ejeres ejendom.
Navnet ”Gracenote”, logoet Gracenote, det
grafiske design Gracenote, benævnelsen
”Powered by Gracenote” er mærker eller
registrerede varemærker af Gracenote i
USA og /eller andre lande.
42 Dansk
