Parrot ASTEROID Mini: инструкция
Раздел: Автомобильная техника
Тип: Мультимедиа
Инструкция к Мультимедиа Parrot ASTEROID Mini

Quick start guide
Hurtig brugervejledning
Hurtigstartguide
Pikaopas
Snabbmanual
Rychlý návod k použití
Skrócona instrukcja obsługi
Hızlı kullanım kılavuzu
Краткое руководство по эксплуатации


Parrot ASTEROID Mini
English ..........................................................................
13
Dansk ...........................................................................
33
Norsk ............................................................................
53
Suomi ...........................................................................
73
Svenska ........................................................................
93
česky .............................................................................
113
Polski ............................................................................
133
Türkçe ..........................................................................
153
РУССКИЙ ..................................................................
173
2
10
7
1
11
x2
8
6
3
4
12
9
x3
x3
5
13

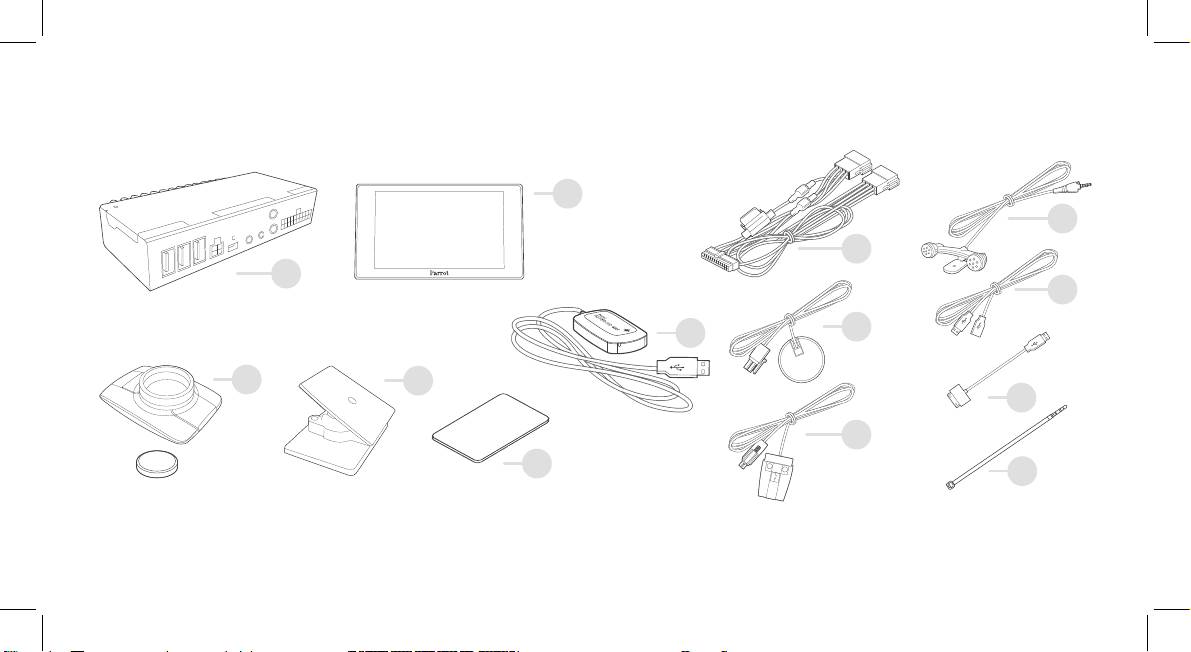
Electronic box / Styreboks / Elektronisk boks / Elektroniklåda / Elektroninen rasia / Elektronická jednotka / Skrzynka elektroniczna / Elektronik ünite / Электронный блок
Screen / Skærm / Skjerm / Skärm / Näyttö / Displej / Wyświetlacz / Ekran / Дисплей
Remote control ( 3 V - CR2032 battery ) / Fjernbetjening (batteri 3V - CR2032) / Fjernkontroll (3 V batteri - CR2032) / Fjärrkontroll (3-voltsbatteri – CR2032) / Kauk
osäädin (paristo 3 V - CR2032) /
Dálkové ovládání (baterie 3 V - CR2032) / Pilot (bateria 3 V - CR2032) / Uzaktan kumanda (3 V - CR2032 pil) /
Пульт дистанционного управления (элемент питания 3 В - CR2032)
Craddle / Holder til skærm / Holder til å feste skjermen / Skärmhållare / Näytön kiinnityskannatin / Držák pro upevnění displeje / Wspornik do mocowania ekranu
Ekran bağlantı desteği / Кронштейн крепления дисплея
Adhesive tape / Klæbestrimmel / Klebemiddel / Tarra / Klistermärke / Lepicí páska / Taśma samoprzylepna / Yapıştırıcı / Клейкая лента
GPS dongle / GPS-dongle / GPS-dongel / GPS-vastaanotin / GPS-dongel / GPS dongle / Antena GPS / GPS modülü / Аппаратный ключ GPS
ISO cable / ISO kabel / ISO-kabel / ISO-kabel / ISO-johto / ISO kabel / Kabel ISO / ISO kablosu / Кабель ISO
Remote control cable / Kabel til ernbetjening / Kabel til ernkontroll / Kaukosäätimen johto / Kabel dálkového ovládání / Fjärrkontrollkabel / Kabel pilota / Uzaktan kumanda kablosu /
Кабель пульта дистанционного управления
Screen cable / kærmkabel / Skjermkabel / Skärmkabel / Näytön johto / Kabel displeje / Kabel ekranu / Ekran kablosu / Кабель дисплея
Microphone / Mikrofon / Mikrofon / Mikrofon / Mikrofoni / Mikrofon / Mikrofon / Mikrofon / Микрофон
USB cable / USB kabel / USB-kabel / USB-kabel / USB-johto / USB kabel / Kabel USB / USB kablosu / Кабель USB
USB - iPod cable extension / USB - iPod forlængerkabel / Skjøteledning USB-iPod / USB-iPod-förlängningssladd / Jatkos USB - iPod / Propojovací kabel USB-iPod
Przedłużacz USB - iPod / USB - iPod uzatması / Удлинитель USB-iPod
Cable fastener / Kabelklemme / Klemskrue / Johtopidike / Kabelklämma / Kabelová příchytka / Zacisk do kabla / Kablo sıkıştırıcı / Кабельный зажим
2
10
7
1
11
x2
8
6
3
4
12
9
x3
x3
5
13
iPod
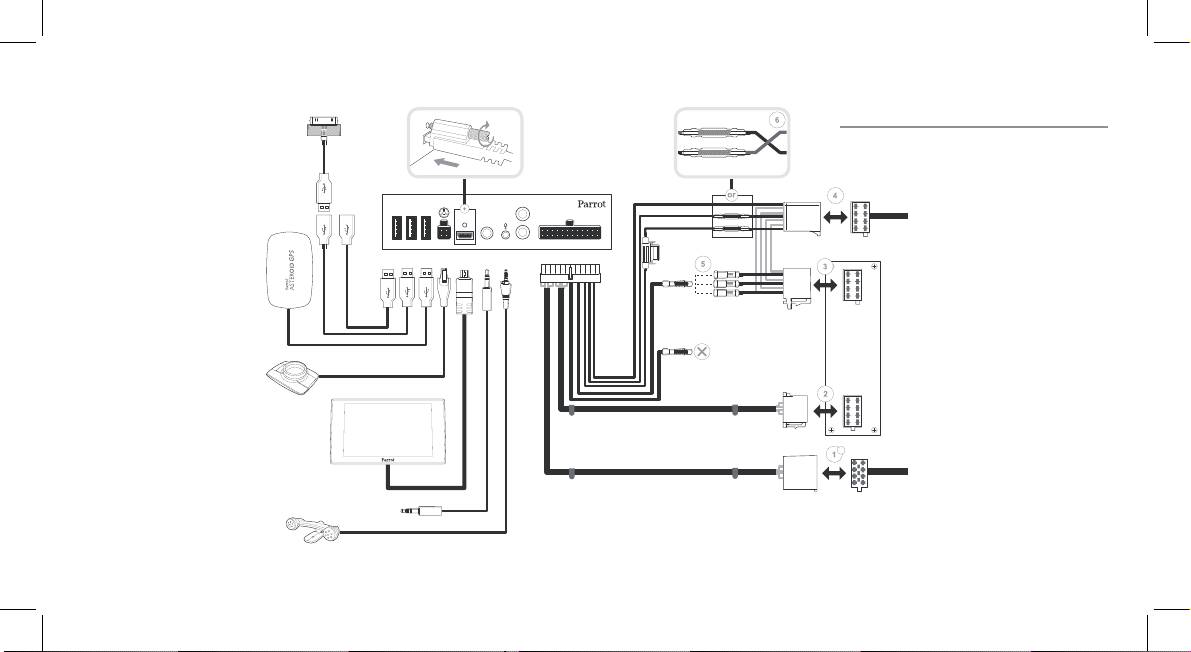
ISO INSTALLATION
REAR
Ground (black)
Vehicle
USB
power supply
12V ignition (orange)
GPS Dongle
LINE IN
LINE OUT
12V permanent (red)
1 2 3
FRONT
Mute in
Mute
1
2
3
Parking Brake
Not used
CAR
STEREO
Remote control
(or steering wheel control interface)
Screen
a
Vehicle
audio cable
Jack / Jack - Not provided
iPod
Ground (black)
Vehicle
power supply
USB
12V ignition (orange)
REAR
12V permanent (red)
GPS Dongle
LINE IN
LINE OUT
1 2 3
FRONT
Mute in
x2
Mute
1
2
3
Parking Brake
Not used
CAR
STEREO
Remote control
(or steering wheel control interface)
Screen
Not used
b
Line in
Jack / Jack
Not provided
Jack / Jack - Not provided
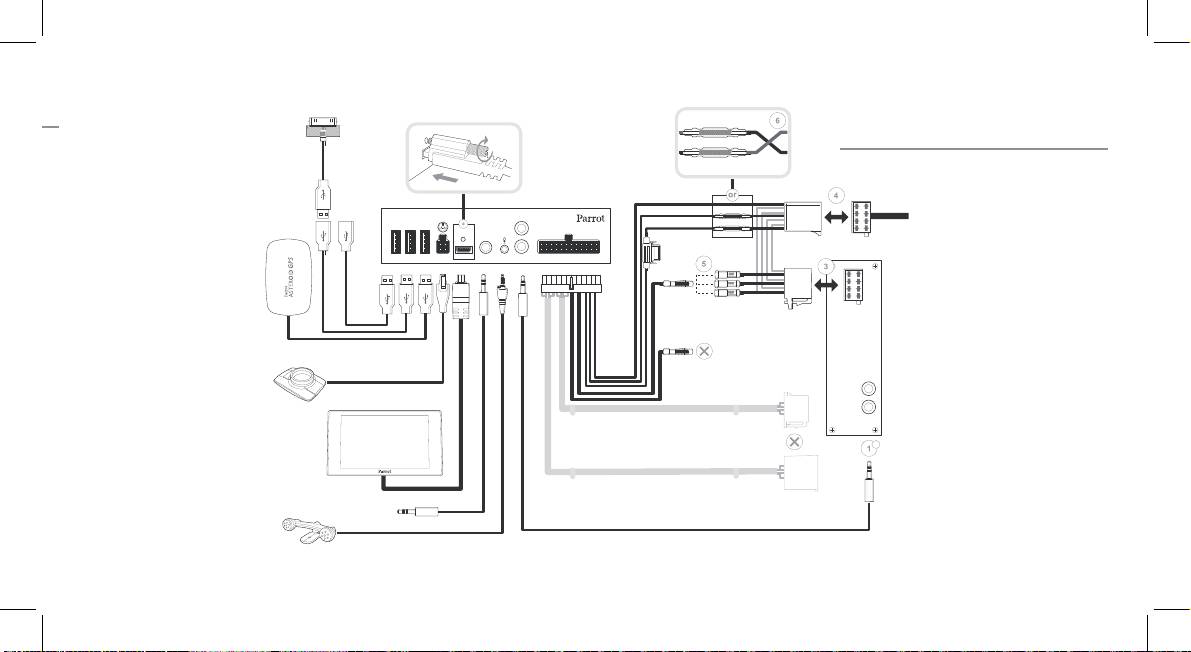
ISO INSTALLATION
AUDIO SYSTEM
WITH AMPLIFIER

A

B
C
D
E
13English
Quick start
guide
Content
Before you begin
Installation
Getting started
Phone
Music
Internet
Troubleshooting
General information
p.13
p.14
p.20
p.21
p.22
p.25
p.27
p.28
Before you begin
About this guide
In order to limit our paper consumption
and as part of our environmentally friendly
and responsible approach, Parrot prefers
to put user documents online rather than
print them out. This simplified guide to
the Parrot ASTEROID Mini is therefore
limited to providing you with the main
instructions that will make it easy for you
to use the device. More information can
be found
on the support section of our
website, www.parrot.com: the full
manual, FAQs, tutorials, and more.
Note: iPod® and iPhone® (in iPod mode)
will be referred to as an "iPod" in this
English 13
13English
Quick start
g
Content
uide
Before you begin
I
nstallation
G
etting started
P
hone
M
usic
I
nternet
T
roubleshooting
G
eneral information
p.13
p
.14
p
.20
p
.21
p
.22
p
.25
p
.27
p
Before you begin
About this guide
In order to limit our paper consumption
and as part of our environmentally friendly
and responsible approach, Parrot prefers
to put user documents online rather than
print them out. This simplified guide to
the Parrot ASTEROID Mini is therefore
limited to providing you with the main
instructions that will make it easy for you
.28
to use the device. More information can
be found on the support section of our
web
site, www.parrot.com: the full
manual, FAQs, tutorials, and more.
Note: iPod® and iPhone® (in iPod mode)
will be referred to as an "iPod" in this

14 English
14 English
applications. Be responsible: drive
manual.
Installation
carefully and pay full attention to your
Software updates
surrounding. Parrot denies any liability
Note: We advise our customers to have the
should you choose not to respect this
Parrot ASTEROID Mini fitted by a certified
Download the latest update for free (and
warning.
Parrot installer.
consult the update procedure) on the
Use the Parrot ASTEROID Mini with a
Parrot ASTEROID Mini support page on
reason
able volume level so that you can
Before you begin
our website www.parrot.com
. These
hear all external noises while driving.
updates will enable you to receive new
Installing the Parrot ASTEROID Mini is
features and improve the product’s
The Parrot ASTEROID Mini includes
done by inserting it between the car
compatibility.
NdFeB magnets which can damage objects
stereo and the vehicle.
sensitive to magnetic fields (pacemakers,
Note: If your car stereo is not fitted with ISO
Warnings
credit cards, mechanical clocks…).
connectors, you need to purchase an ISO
All functions requiring an increased
adapter cable to simplify the wiring
attention should only be used while the
procedure. Refer to the Vehicle
vehicle is stationary. Your safety and the
compatibility section on the Parrot
one of the other road users prevails over
ASTEROID Mini support page to check
phone calls, music and driving assistance
whether an ISO adapter is necessary on your
connections represented on the diagrams
vehicle.
Connecting the power cable
p.6 / 7.
Start by removing the car stereo from your
1.
Unplug the battery before installing
vehicle. You may need release keys to do
Connecting the audio cable
the power cable.
so.
Join the vehicle audio cable to the
2.
Connect the ISO male connectors of
Refer to your car stereo’s wiring diagram.
connector of the Parrot ASTEROID Mini
the Parrot ASTEROID Mini to the car
Before you install the individual
(Connections 1A and 2).
stereo (Con
nection 3).
components, check that the installation
If your vehicle is equipped with an
3.
Join the vehicle’s power supply cable
locations have been selected in such a way
amplifier, use the Front and Rear Line Out
to the ISO female connector of the
that the cable length is sufficient to
outputs on the elec
tronic box to avoid
Parrot ASTEROID Mini (Connection
connect every element. Once the
saturation problems such as popping in the
4).
installation is complete, make sure that no
speakers, background noise etc. Use one
The red wire of the Parrot ASTEROID
cables are pinched or trappe
d.
or two jack cable(s) to connect the Parrot
Mini cable must correspond to the
Use only the ISO cable provided with the
ASTEROID Mini Line out outputs to your
constant +12V supply, the orange wire to
Parrot ASTEROID Mini.
vehicle audio system (Connection 1B on
the ignition +12V and the black wire to
the diagram p. 7).
The connection number indications in the
ground. Check that the orange wire is not
next sections correspond to the
connected to the constant +12V supply, as
15English

English 15
applications. Be responsible: drive
manual.
Installation
carefully and pay full attention to your
Software updates
surrounding. Parrot denies any liability
Note: We advise our customers to have the
should you choose not to respect this
Parrot ASTEROID Mini fitted by a certified
Download the latest update for free (and
warning.
Parrot installer.
consult the update procedure) on the
Use the Parrot ASTEROID Mini with a
Parrot ASTEROID Mini support page on
reasonable volume level so that you can
Before you begin
our website www.parrot.com. These
hear all external noises while driving.
updates will enable you to receive new
Installing the Parrot ASTEROID Mini is
features and improve the product’s
The Parrot ASTEROID Mini includes
done by inserting it between the car
compatibility.
NdFeB magnets which can
damage objects
stereo and the vehicle.
sensitive to magnetic fields (pacemakers,
Note: If your car stereo is not fitted with ISO
Warnings
credit cards, mechanical clocks…).
connectors, you need to purchase an ISO
All functions requiring an increased
adapter cable to simplify the wiring
attention should only be used while the
procedure. Refer to the Vehicle
vehicle is stationary. Your safety and the
compatibility section on the Parrot
one of the o
ther road users prevails over
ASTEROID Mini support page to check
phone calls, music and driving assistance
whether an ISO adapter is necessary on your
14 English
15English
connections represented on the diagrams
vehicle.
Connecting the power cable
p.6 / 7.
Start by removing the car stereo from your
1.
Unplug the battery before installing
vehicle. You may need release keys to do
Connecting the audio cable
the power cable.
so.
Join the vehicle audio cable to the
2.
Connect the ISO male connectors of
Refer to your car stereo’s wiring diagram.
connector of the Parrot ASTEROID Mini
the Parrot ASTEROID Mini to the car
Before you install the individual
(Connections 1A and 2).
stereo (Connection 3).
components, check that the installation
If your vehicle is equipped with an
3.
Join the vehicle’s power supply cable
locations have been selected in such a way
amplifier, use the Front and Rear Line Out
to the ISO female connector of the
that the cable length is sufficient to
outputs on the electronic box to avoid
Parrot ASTEROID Mini (Connection
connect every element. Once the
saturation problems such as popping in the
4).
installation is complete, make sure that no
speakers, background noise etc. Use one
The red wire of the Parrot ASTEROID
cables are pinched or trapped.
or two jack cable(s) to connect the Parrot
Mini cable must correspond to the
Use on
ly the ISO cable provided with the
ASTEROID Mini Line out outputs to your
constant +12V supply, the orange wire to
Parrot ASTEROID Mini.
vehicle audio system (Connec
tion 1B on
the ignition +12V and the black wi
re to
the diagram p. 7).
The connection number indications in the
ground. Check that the orange wire is not
next sections correspond to the
connected to the constant +12V supply, as

16 English
16 English
you could run down the vehicle’s battery.
in 2 and mute in 3 are only suggested mute
force. If you are short of space behind the
locations : the choice of the mute-in jack
car stereo to install the electronic box,
Note: In order to check the wiring, connect
depends on your car stereo’s
consider installing it in the glove box.
the screen before placing it on the
configuration. Test and verify the mute on
dashboard. Refer to the Checking the wiring
the vehicle then connect the free yellow
Checkin
g the wiring
section for more information.
wire on the ISO cable to the audio
To perform the installation check, turn the
On some vehicles, there is no
system’s corresponding
mute-in jack
ignition on then off once the Parrot
ignition +12V on the vehicle’s connectors.
(connection 5).
ASTEROID Mini is installed: the message
You must therefore connect the orange
“Goodbye!” must be displayed.
power supply wire to the fuse box or
Installing the electronic box
another ignition power source.
If it is not the case, it is necessary to
Avoid installing the electronic box near
inverse the positions of the red and orange
heating or air-conditioning system or on a
Connecting the mute cable
wires. Indeed, the red wire of the power
spot directly exposed to sunlight.
cable must be connected to the
The mute function is used to cut the
Make sure the electronic box stays fixed
permanent 12V, the orange wire to the 12V
sound of your car stereo to enable the
once it is installed and that it will not move
ignition and the black wire to the ground.
sound of the Parrot ASTEROID Mini
while you are driving.
This can be don
e simply by reversing both
(music, phone calls etc.). Mute in 1, mute
fuse holders located on the Parrot wiring
Carefully reinstall the car stereo. Do not
(connection 7).
Warning: Do not run the microphone cable
in such a way as to obstruct or interfere
Installing the microphone
with the vehicles operation or cause injury
to its occupants. In particular vehicle safety
The optimum location for the microphone
device such as airbags and other SRS
is in the centre of the vehicles roof near
systems.
the rear view mirror. The microphone
ideally needs to be less than 60cm’s from
Installing the GPS receiver
the users mouth pointing directly towards
them with no obstructions.
Stick the GPS Receiver in an unobstructed
area
inside the car.
Please take care when routing the
microphone cable through the vehicle to
Athermic windshields and windows with a
the desired location, we recommend
built-in antenna can interfere with GPS
routing alongside
existing manufacture’s
reception and reduce the reliability of
wiring looms securing as you go making
information from navigation applications.
sure the microphone cable is not pinched
or trapped.
17English
The GPS antenna is located on
the side where "Parrot
ASTEROID GPS" is written and
where the star-shaped logo is.
This logo must always be
directed towards the sky.
If your vehicle has an athermic windshield,
stick the GPS Receiver on the windshield
on the non athermic area. The side where
the star-shaped logo is must be stuck on
the windshield (diagram B p.9).
Note : The non athermic area of the
windshield depends on the model of your
vehicle. It is usually located near the rear
view mirror.
If your vehicle does not have an athermic

English 17
you could run down the vehicle’s battery.
in 2 and mute in 3 are only suggested mute
force. If you are short of space behind the
locations : the choice of the mute-in jack
car stereo to install the elec
tronic box,
Note: In order to check the wiring, connect
depends on your car stereo’s
consider installing it in the glove box.
the screen before placing it on the
configuration. Test and verify the mute on
dashboard. Refer to the Checking the wiring
the vehicle then connect the free yellow
Checking the wiring
section for more information.
wire on the ISO cable to the audio
To perform the installation check, turn the
On some vehicles, there is no
system’s correspondin
g mute-in jack
ignition on then off once the Parrot
ignition +12V on the vehicle’s connectors.
(connection 5).
ASTEROID Mini is installed: the message
You must therefore connect the orange
“Goodbye!” must be displayed.
power supply wire to the fuse box or
Installing the electronic box
another ignition power source.
If it is not the case, it is necessary to
Avoid installing the electronic box near
inverse the positions of the red and orange
heating or air-conditioning system or on a
Connecting the mute cab
le
wires. Indeed, the red wire of the power
spot directly exposed to sunlight.
cable must be connected to the
The mute function is used to cut the
Make sure the electronic box stays fixed
permanent 12V, the orange wire to the 12V
sound of your car stereo to enable the
once it is installed and that it will not move
ignition and the black wire to the ground.
sound of the Parrot ASTEROID Mini
while you are driving.
This can be don
e simply by reversing both
(music, phone calls etc.). Mute in 1, mute
fuse holders located on the Parrot wiring
Carefully reinstall the car stereo. Do not
16 English
17English
(connection 7).
Warning: Do not run the microphone cable
in such a way as to obstruct or interfere
Installing the microphone
with the vehicles operation or cause injury
to its occupants. In particular vehicle safety
The optimum location for the microphone
device such as airbags and other SRS
is in the centre of the vehicles roof near
systems.
the rear view mirror. The microphone
ideally needs to be less than 60cm’s from
Installing the GPS receiver
the users mouth pointing directly towards
them with no obstructions.
Stick the GPS Receiver in an unobstructed
area inside the car.
Please take care when routing the
microphone cable through the vehicle to
Athermic windshields and windows with a
the desired location, we recommend
built-in antenna can interfere with GPS
routing alongside existing manufacture’s
reception and reduce the reliability of
wiring looms securing as you
go making
information from navigation applications.
sure the microphone cable is not pinched
or trapped.
The GPS antenna is located on
t
he side where "Parro
t
A
STEROID GPS" is written an
d
w
here the star-shaped logo is.
T
his logo must always be
d
irected towards the sky.
If your vehicle has an athermic windshield,
stick the GPS Receiver on the windshield
on the non athermic area. The side where
the star-shaped logo is must be stuck on
the windshield (diagram B p.9).
Note : The non athermic area of the
windshield depends on the model of your
vehicle. It is usually located near the rear
view mirror.
If your vehicle does not have an athermic

18 English
18 English
windshield, stick the GPS Receiver on the
Installing the USB cables
internet USB key 3G on the Parrot
dashboard. The side where the star-
ASTEROID Mini directly : use the USB
Connect the USB cables to the Parrot
shaped logo is must be visible (diagram A
cable to install your device on the
ASTEROID Mini. We recommend you
p.8).
dashboard (or any other open area).
connect all audio cables to the Parrot
To make sure the adhesive tape adheres
ASTEROID Mini even if you do not plan on
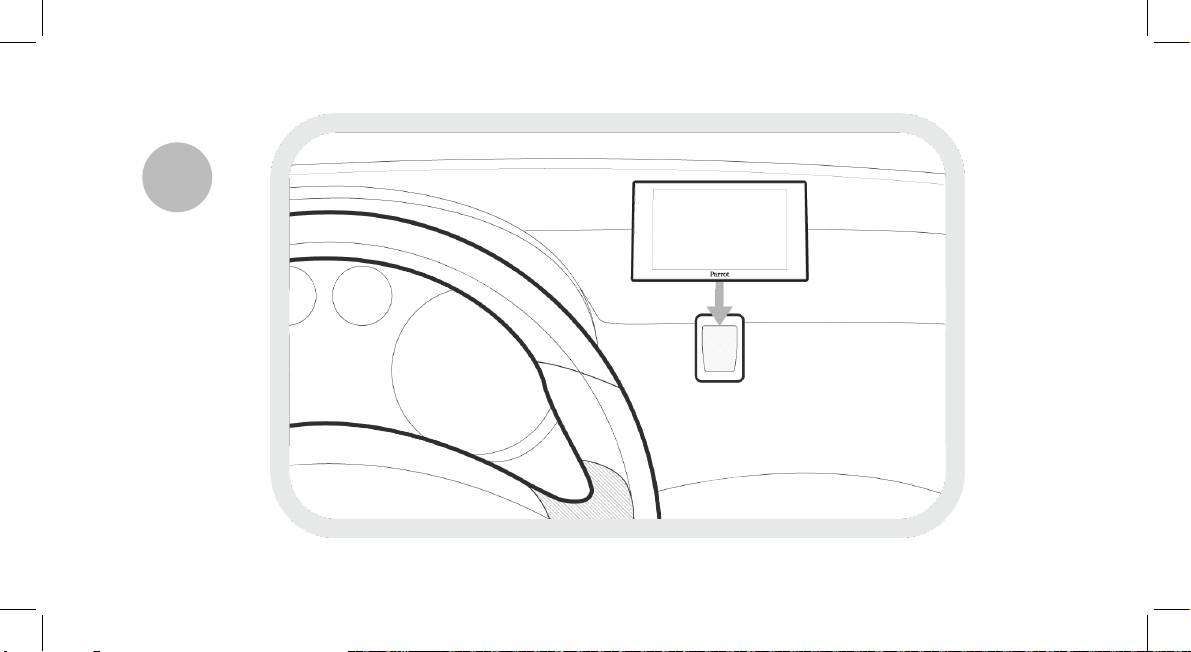
Installing the screen
well :
using them. Route the audio cables to a
clean the area with an appropriate
suitable location in your vehicle such as
War ning : Avoid any installation which
could hinder the use of any important
cleaning product before sticking the
the glove box or arm rest compartment. It
support ;
may be necessary to drill a hole in your
command or hinder the driver's visibility.
Do not install the Parrot ASTEROID Mini in
dashboard to do so. Avoid using USB
once you have stuck the support on
the airbag deployment area or in a possible
extension cables.
the dashboard, wait for approximately
head impact area. Make sure it is not
Make sure you connect the iPod cable to
2 hours without handling it.
exposed to the air stream from air vents.
its
specific USB port. "iPod" is written
Stick the support on the dashboard
above it.
(diagram C p.10).
To guarantee an optimal reception quality
To make sure the adhesive tape adheres
we recommend you do not connect your
well :
clean the area with an appropriate
well :
2.
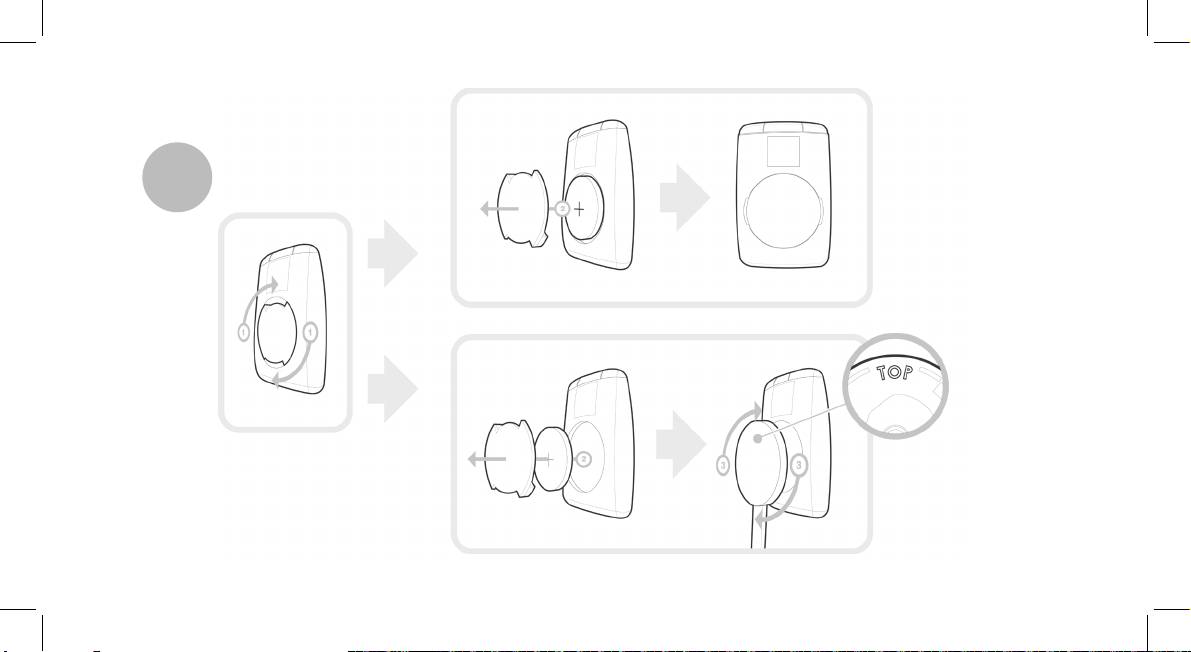
Insert a 3V CR2032 battery into the
cleaning product before sticking the
remote control. Mak
e sure the
clean the area with an appropriate
support ;
battery is correctly positioned.
cleaning product before sticking the
once you have stuck the support on
support ;
3.
Put the circular plastic part back by
the dashboard, wait for approximately
turning it counterclockwise.
once you have stuck the support on
2 hours without handling it.
the dashboard, wait for approximately
To connect the remote control to the
Remember to remove your screen when
2 hours without handling it.
electronic box (diagram D p.11) :
leaving the vehicle to avoid tempting any
There are two ways to supply power to the
1.
Remove the circular plastic part on
would-be thieves and to prevent
remote control : with a battery or by
the back of the remote by turning it
prolonged exposure to sunlight.
connecting it to the electronic box.
clockwise.
To supply power with a battery (diagram D
Installing the remote control
2.
Connect the remote control cable
p.11) :
into the battery compartment and
Stick the remote control support on your
turn it counterclockwise.
dashboard. To do so, use the adhesive
1.
Remove the circular plastic part on
the back of the remote by turning it
Connect the remote control cable to
tape located under the support.
3.
clockwise.
the elec
tronic box, next to the USB
To make sure the adhesive tape adheres
connectors (diagram p.6).
19English

English 19
windshield, stick the GPS Receiver on the
Installing the USB cables
internet USB key 3G on the Parrot
dashboard. The side where the star-
ASTEROID Mini directly : use the USB
Connect the USB cables to the Parrot
shaped logo is must be visible (diagram A
cable to install your device on the
ASTEROID Mini. We recommend you
p.8).
dashboard (or any other open area).
connect all audio cables to the Parrot
To make sure the adhesive tape adheres
ASTEROID Mini even if you do not plan on
Installing the screen
well :
using them. Route the audio cables to a
War ning : Avoid any installation which
clean the area with an appropriate
suitable location in your vehicle such as
could hinder the use of any important
cleaning product before sticking the
the glove box or arm rest compartment. It
command or hinder the driver's visibility.
support ;
may be necessary to drill a hole in your
Do not install the Parrot ASTEROID Mini in
dashboard to do so. Avoid using USB
once you have stuck the support on
the airbag deployment area or in a possible
extension cables.
the dashboard, wait for approximately
head impact area. Make sure it is not
Make sure you connect the iPod cable to
2 hours without handling it.
exposed to the air stream from air vents.
its
specific USB port. "iPod" is written
Stick the support on the dashboard
above it.
(diagram C p.10).
To guarantee an optimal reception quality
To make sure the adhesive tape adheres
we recommend you do not connect your
well :
18 English
19English
clean the area with an appropriate
well :
2.
Insert a 3V CR2032 battery into the
cleaning product before sticking the
remote control. Mak
e sure the
clean the area with an appropriate
support ;
battery is correctly positioned.
cleaning product before sticking the
once you have stuck the support on
support ;
3.
Put the circular plastic part back by
the dashboard, wait for approximately
turning it counterclockwise.
once you have stuck the support on
2 hours without handling it.
the dashboard, wait for approximately
To connect the remote control to the
Remember to remove your screen when
2 hours without handling it.
electronic box (diagram D p.11) :
leaving the vehicle to avoid tempting any
There are two ways to supply power to the
1.
Remove the circular plastic part on
would-be thieves and to prevent
remote control : with a battery or by
the back of the remote by turning it
prolonged exposure to sunlight.
connecting it to the electronic box.
clockwise.
To supply power with a battery (diagram D
Installing the remote control
2.
Connect the remote control cable
p.11) :
into the battery compartment and
Stick the remote control support on your
turn it counterclockwise.
dashboard. To do so, use the adhesive
1.
Remove the circular plastic part on
the back of the remote by turning it
tape located under the support.
3.
Connect the remote control cable to
clockwise.
the elec
tronic box, next to the USB
To make sure the adhesive tape adheres
connectors (diagram p.6).

20 English
20 English
Press the
button to get to the track list if
ASTEROID Mini, the 2 devices will
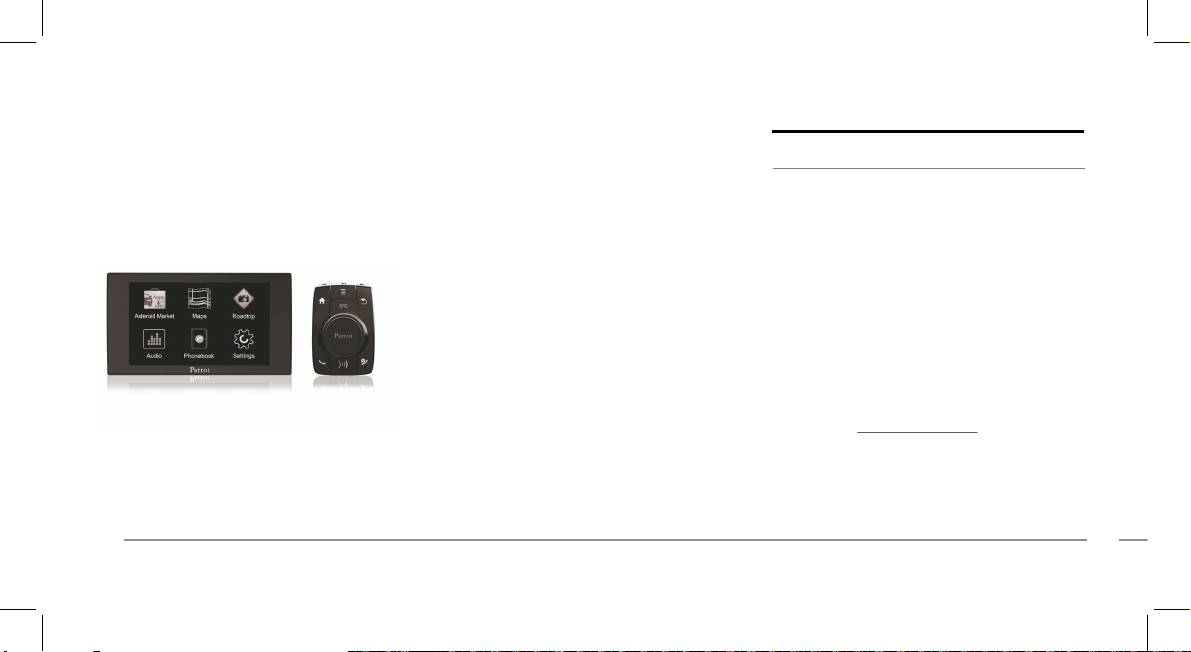
Getting started
a song is currently being played. While
automatically connect when they are
navigating through the menus, press the
turned on (as well as
Bluetooth®
features)
Navigating through the menus
SRC button to get to the Now Playing
and in proximity of each other.
Press the button to access the main
screen.
1.
From your phone, start a
Bluetooth
menu.
peripheral search and select «Parrot
Browse through the menus by turning the
Connecting a phone via Bluetooth
ASTEROID Mini».
jogwheel and confirm by pressing the
Note : Refer to the compatibility page of our
The
pairing procedure depends on
jogwheel.
2.
website to check if your phone is
your phone model:
Press the
button to get back to previous
compatible with the Parrot ASTEROID Mini
menu.
and to consult the specific pairing
If the phone asks you to enter
procedures for the most common phones :
the
Bluetooth
PIN code, enter
Press the
button to access the pop-up
www.parrot.com/uk/compatibility
.
“0000”.
menu corresponding to the current
application. The pop-up menu allows you
If you are using the Parrot ASTEROID Mini
If the Parrot ASTEROID Mini
to change several settings or browse more
with your phone for the very first time, you
and your phone display two
easily through the content of your audio
must initially pair both devices. Once your
codes, verify that the codes are
source or phonebook.
telephone is paired with the Parrot
identical, then either confirm
or invalidate.
automatically the next time the Parrot
Phone
> The Parrot ASTEROID Mini
ASTEROID Mini and your phone are
screen will display “Pairing
connected.
Receiving a call
successful”.
War ning : Only the contacts stored in the
An incoming call is indicated by a ringtone.
Note: Depending on the model of your
phone memory are synchronized. If your
The name of the caller is announc
ed if his
phone, you may need to authorize the
contacts are stored in your SIM card
number is recorded in the phonebook of
connection to the Parrot ASTEROID Mini to
memory, transfer them
onto your phone
the phone connected to the Parrot
allow further automatic connections. Refer
memory.
ASTEROID Mini.
to the user guide of your phone for more
Note: Depending on the model of your
information.
To answer the call, press the
phone, you may need to authorize the
button. Press the button to end
access to your contacts to the Parrot
Synchronising the phonebook
the call.
ASTEROID Mini. Refer to the user guide of
With most of the phones supporting
your phone for more information.
To refuse the call, press the
Bluetooth technology, the phonebook is
button.
The automatic synchronization is limited
automatically synchronized in the system’s
to 5000 contacts (or phone numbers) for
memory. Each time you change your
each paired phone.
directory, synchronisation will start
21English

English 21
Press the button to get to the track list if
ASTEROID Mini, the 2 devices will
Getting started
a song is currently being played. While
automatically connect when they are
navigating through the menus, press the
turned on (as well as
Bluetooth®
features)
Navigating through the menus
SRC button to get to the Now Playing
and in proximity of each other.
Press the button to access the main
screen.
1.
From your phone, start a
Bluetooth
menu.
peripheral search and select «Parrot
Browse through the menus by turning the
Connecting a phone via Bluetooth
ASTEROID Mini».
jogwheel and confirm by pressing the
Note : Refer to the compatibility page of our
jogwheel.
2.
The pairing procedure depends on
website to check if your phone is
your phone model:
Press the button to get back to previous
compatible with the Parrot ASTEROID Mini
menu.
and to consult the specific pairing
If the phone asks you to enter
procedures fo
r the most common phones :
the
Bluetooth
PIN code, enter
Press the button to access the pop-up
www.parrot.com/uk/compatibility.
“0000”.
menu corresponding to the current
application. The pop-up menu allows you
If you are using the Parrot ASTEROID Mini
If the Parrot ASTEROID Mini
to change several settings or browse more
with your phone for the very first time, you
and your phone display two
easily through the conte
nt of your audio
must initially pair both devices. Once your
codes, verify that the codes are
source or phonebook.
telephone is paired with the Parrot
identical, then either confirm
20 English
21English
or invalidate.
automatically the next time the Parrot
Phone
> The Parrot ASTEROID Mini
ASTEROID Mini and your phone are
screen will display “Pairing
connected.
Receiving a call
successful”.
War ning : Only the contacts stored in the
An incoming call is indicated by a ringtone.
Note: Depending on the model of your
phone memory are synchronized. If your
The name of the caller is announced if his
phone, you may need to authorize the
contacts are stored in your SIM card
number is recorded in the phonebook of
connection to the Parrot ASTEROID Mini to
memory, transfer them
onto your phone
the phone connected to the Parrot
allow further automatic connections. Refer
memory.
ASTEROID Mini.
to the user guide of your phone for more
Note: Depending on the model of your
information.
To answer the call, press the
phone, you may need to authorize the
button. Press the button to end
access to your contacts to the Parrot
Synchronising the phonebook
the call.
ASTEROID Mini. Refer to the user guide of
With most of the phones supporting
your phone for more information.
To refuse the call, press the
Bluetooth technology, the phonebook is
button.
The automatic synchronization is limited
automatically synchronized in the system’s
to 5000 contacts (or phone numbers) for
memory. Each time you change your
each paired phone.
directory, synchronisation will start
22 English
22 English
Making a call via voice recognition
the voice tag is correctly understood.
Music
If it is not the case, a confirmation
You can make a call using voice recognition
message is asked. Confirm by saying
Using vocal music search
directly after automatic synchronization.
«YES» or «CALL».
The Parrot ASTEROID Mini will
The voice recognition function allows you
automatically recognize the contact you
Note: At any time, press the
button to
to select the artist / album you want to
wish to call.
exit voice recognition mode.
hear via voice recognition. This function is
only available if you are using the Parrot
1.
Press the
button to launch the
ASTEROID Mini with a USB / SD / iPod
voice recognition feature.
peripheral.
> The Parrot ASTEROID Mini asks
you the name of the contact you want
1.
Press the
button.
to call.
2.
Say the name of the artist / album
2.
Say the name of the contact and the
when asked to do so.
type of number («WORK»,
> The list of audio sources connected
«MOBILE»...) if there are several
to the Parrot ASTEROID Mini and
numbers associated to your contact.
applications compatible with the
> The call is automatically launched if
vocal music search function which
contain the artist / album that you
4.
Select the track and press the
cable.
selected will appear.
jogwheel.
2.
Press the SRC button until the USB
Note: Check the albums and artists names
Note: To browse more easily through the
source is selected.
in the metadatas of your music files. These
content of your iPod, press the button
3.
Select one of the classification
names may be different from the ones
and select the first letter of your track /
criteria (artist, album, songs, genres,
displayed on your music files titles.
album / artist.
playlist) and press the jogwheel.
iPod
USB storage device
4.
Select the track and press the
jogwheel.
1.
Connect your iPod to the Parrot
The Parrot ASTEROID Mini is compatible
ASTEROID Mini USB cable with the
with the majority of USB keys / MP3 audio
Note: To browse more easily through the
player / external hard drive. There is no
content of your
USB storage device, press
USB / iPod extension lead.
restric
tion in terms of capacity of USB
the button and select the first letter of
2.
Press the SRC button until the iPod
your track / album / artist.
keys.
source is selected.
MP3 (mpeg1 layer3), AAC, WAV, OGG
3.
Select one of the classifi
cation
and WMA formats are supported.
criteria (artist, album, songs, genres,
playlist) and press the jogwheel.
1.
Connect your USB device to the USB
23English

English 23
Making a call via voice recognition
the voice tag is correctly understood.
Music
If it is not the case, a confirmation
You can make a call using voice recognition
message is asked. Confirm by saying
Using vocal music search
directly after automatic synchronization.
«YES» or «CALL».
The Parrot ASTEROID Mini will
The voice recognition function allows you
automatically recognize the contact you
Note: At any time, press the button to
to select the artist / alb
um you want to
wish to call.
exit voice recognition mode.
hear via voice recognition. This function is
only available if you are using the Parrot
1.
Press the button to launch the
ASTEROID Mini with a USB / SD / iPod
voice recognition feature.
peripheral.
> The Parrot ASTEROID Mini asks
you the name of the contact you want
1.
Press the
button.
to call.
2.
Say the name of the artist / album
2.
Say the name of the contact and the
when asked to do so.
type of number («WO
RK»,
> The list of audio sources connected
«MOBILE»...) if there are several
to the Parrot ASTEROID Mini and
numbers associated to your contact.
applications compatible with the
> The call is automatically launched if
vocal music search function which
22 English
23English
contain the artist / album that you
4.
Select the track and press the
cable.
selected will appear.
jogwheel.
2.
Press the SRC button until the USB
Note: Check the albums and artists names
Note: To browse more easily through the
source is selected.
in the metadatas of your music files. These
content of your iPod, press the
button
3.
Select one of the classification
names may be different from the ones
and select the first letter of your track /
criteria (artist, album, songs, genres,
displayed on your music files titles.
album / artist.
p
laylist) and press the jogwheel.
iPod
USB storage device
4.
Select the track and press the
jogwheel.
1.
Connect your iPod to the Parrot
The Parrot ASTEROID Mini is compatible
ASTEROID Mini USB cable with the
with the majority of USB keys / MP3 audio
Note: To browse more easily through the
content of your USB storage device, press
USB / iPod extension lead.
player / external hard drive. There is no
restriction in terms of capacity of USB
the
button and select the first letter of
2.
Press the SRC button until the iPod
your track / album / artist.
keys.
source is selected.
MP3 (mpeg1 layer3), AAC, WAV, OGG
3.
Select one of the classification
and WMA formats are supported.
criteria (artist, album, songs, genres,
playlist) and press the jogwheel.
1.
Connect your USB device to the USB

24 English
24 English
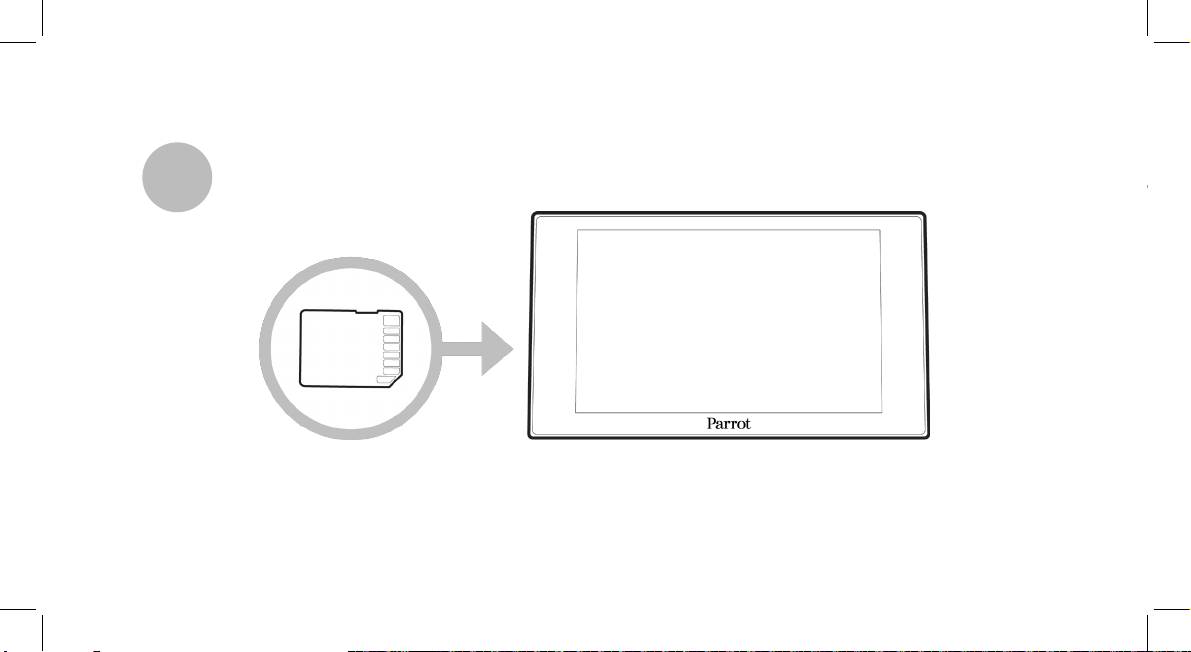
SD card
criteria (artist, album, songs, genres,
phone or
Bluetooth
audio device. To do so,
playlist) and press the jogwheel.
your phone / audio device must support
You can use the following SD cards (with
the
Bluetooth
A2DP profile (Advanced
adapter if necessary) with the Parrot
4.
Select the track and press the
Audio Distribution Profile).
ASTEROID Mini : SD, micro SD , mini SD,
jogwheel.
If you are using a
Bluetooth
audio player
SDHC, mini SDHC, micro SDHC. The SD
Note: To browse more easily through the
for the first time, you have to pair both
card capacity must not exceed 32Gb.
content of your USB storage device, press
devices. If both devices are already paired:
MP3 (Mpeg 1 Layer3), AAC, WAV, OGG
the
button and select the first letter of
and WMA formats are supported.
your track / album / artist.
1.
Press the SRC button until the
Bluetooth Audio source is selected.
1.
Insert the SD card into the
Audio player connected via Bluetooth
2.
Start playback on your
Bluetooth
audio
appropriate slot located on the right
player.
of the screen, with the contact
Note: The Parrot ASTEROID Mini allows you
surface facing you (diagram E p.12).
to use the phone and audio streaming
functions from 2 different phones without
2.
Press the SRC
button until the SD
having to disconnect one of them.
source is selected.
You can use the Parrot ASTEROID Mini to
3.
Select one of the classification
listen to songs stored on your mobile
3.
Enter your PIN c
ode using the
> The message "3G key configured"
Internet
jogwheel, then select OK. Check the
appears.
Connecting a 3G / 4G key
Memorise PIN code option if you
5.
Wait approximately 30 seconds until
would like your PIN code to be stored
the connection is established. You
Note: Refer to the compatibility section of
each time you turn on the Parrot
can also press the
button and
the Parrot ASTEROID Mini on our website to
ASTEROID Mini.
browse the menus while the
get the list of 3G / 4G keys compatible with
the Parrot ASTEROID Mini.
Note: You will be able to change this setting
connection is being established.
by selecting
Settings > Netw ork > 3G Key
.
1.
Connect a 3G key to the Parrot
Sharing a phone 3G connection via Bluetooth
ASTEROID Mini using a USB cable.
4.
Select your APN (Access Point
Name) from the suggested list. This
> A pop-up will appear.
Note: Refer to the compatibility page of our
information is available in the
website
to check if your phone allows 3G
2.
Select OK to activate the 3G
documentation provided with your 3G
connection sharing via Bluetooth and to
connection.
key. If your APN is
not in the list, you
consult the corresponding procedure :
> A Status of 3G connection pop-up
can add it by selecting Settings >
www.parrot.com/uk/compatibility.
appears, followed by another pop-up
Network > 3G Key > Configuration >
If you have a phone that supports the DUN
which asks for your PIN code.
New access point.
(Dial-Up Networking) or PAN (Personal
25English

English 25
SD card
criteria (artist, album, songs, genres,
phone or
Bluetooth
audio device. To do so,
playlist) and press the jogwheel.
your phone / audio device must support
You can use the following SD cards (with
the
Bluetooth
A2DP profile (Advanced
adapter if necessary) with the Parrot
4.
Select the track and press the
Audio Distribution Profile).
ASTEROID Mini : SD, micro SD , mini SD,
jogwheel.
If you are using a
Bluetooth
audio player
SDHC, mini SDHC, micro SDHC. The SD
Note: To browse more easily through the
for the first time, you have to pair both
card capacity must not exceed 32Gb.
content of your USB storage device, press
devices. If both devices are already paired:
MP3 (Mpeg 1 Layer3), AAC, WAV, OGG
the button and select the first letter of
and WMA formats are supported.
your track / album / artist.
1.
Press the SRC button until the
Bluetooth Audio source is selected.
1.
Insert the SD card into the
Audio player connected via Bluetooth
2.
Start playback on your
Bluetooth
audio
appropriate slot located on the right
player.
of the screen, with the contact
Note: The Pa
rrot ASTEROID Mini allows you
surface facing you (diagram E p.12)
.
to use the phone and audio streaming
functions from 2 different phones without
2.
Press the SRC button until the SD
having to disconnect one of them.
source is selected.
You can use the Parrot ASTEROID Mini to
3.
Select one of the classification
listen to songs stored on your mobile
24 English
25English
3.
Enter your PIN c
ode using the
> The message "3G key configured"
Internet
jogwheel, then select OK. Check the
appears.
Connecting a 3G / 4G key
Memorise PIN code option if you
5.
Wait approximately 30 seconds until
would like your PIN code to be stored
the connection is established. You
Note: Refer to the compatibility section of
each time you turn on the Parrot
can also press the
button and
the Parrot ASTEROID Mini on our website to
ASTEROID Mini.
browse the menus while the
get the list of 3G / 4G keys compatible with
the Parrot ASTEROID Mini.
Note: You will be able to change this setting
connection is being established.
by selecting
Settings > Netw ork > 3G Key
.
1.
Connect a 3G key to the Parrot
Sharing a phone 3G connection via Bluetooth
ASTEROID Mini using a USB cable.
4.
Select your APN (Access Point
Name) from the suggested list. This
> A pop-up will appear.
Note: Refer to the compatibility page of our
information is available in the
website to check if your phone allows 3G
2.
Select OK to activate the 3G
documentation provided with your 3G
connection sharing via Bluetooth and to
connection.
key. If your APN is
not in the list, you
consult the corresponding procedure :
> A Status of 3G connection pop-up
can add it by selecting Settings >
www.parrot.com/uk/compatibility
.
appears, followed by another pop-up
Network > 3G Key > Configuration >
If you have a phone that supports the DUN
which asks for your PIN code.
New access point.
(Dial-Up Networking) or PAN (Personal

26 English
26 English
Area Network)
Bluetooth
profiles, the
phone. This procedure will vary
also enables you to recharge your
Bluetooth
connecting your phone to the
according to your phone model.
phone’s battery.
Parrot ASTEROID Mini will allow for
3.
Select your APN (Access Point
sharing of the phone's 3G connection.
Sharing a phone 3G connection via USB
Name) from the suggested list, then
1.
Connect your phone to the Parrot
Note: Refer to the compatibility page of our
check the Select option. You can then
ASTEROID Mini via
Bluetooth
.
website to check if your phone allows 3G
modify this setting by selecting
connection sharing via USB and to consult
Settings >
Mobile Networks settings
2.
On the Parrot ASTEROID Mini,
the corresponding procedure :
> Mobile Access device.
select Settings > Network >
www.parrot.com/uk/compatibility
.
> A pop-up indicating that USB
Bluetooth > Configuration.
connection sharing has been activated
1.
Make sure that your phone’s keypad is
3.
Select your APN (Access Point
will appear.
unlocked.
Name) from the suggested list, then
check Select .
2.
Connect the phone to the Parrot
ASTEROID Market : Using the applications
ASTEROID Mini using a USB cable/
4.
Press the
button and select
Several types of applications are available
micro-USB and the USB extension
Connect.
with the ASTEROID Market : music,
cable provided with the Parrot
geolocation, driver assistance...
5.
Allow connection sharing on your
ASTEROID Mini. This connection
All applications may not be available in all
page on our website www.parrot.com.
Troubleshooting
countries. The use of some applications
may need prior subscription.
Problems while using the phone function
Before you begin
The Parrot ASTEROID Mini is a
Make sure your phone is compatible with
Make sure the “Goodbye” message is
multitasking device: several applications
the Parrot ASTEROID Mini. To do so,
displayed on the Parrot ASTEROID Mini
can run simultaneously. For example, you
refer to the compatibility page on our
screen when you turn the ignition off.
can listen to a Webradio station and use a
website : www.parrot.com/uk/
Refer to the Checking the wiring section
driver assistance application at the same
compatibility.
for more information.
time.
If your phone is compatible with the
Reset the Parrot ASTEROID Mini. To do
For more information about installing and
Parrot ASTEROID Mini and if you
so, select Settings > Advanced settings >
using the available applications, refer
to
already
have the latest software update:
Restore factory settings.
the ASTEROID Market web page :
Make sure you have the latest software
1.
Delete the pairing on the Parrot
www.parrotasteroid.com/
ASTEROID Mini. To do so, tap
update on your Parrot ASTEROID Mini. To
asteroidmarket.
Settings > Advanced settings >
do so, select Sett
ings > About > Device
Factory settings.
Version. Compare this number with the
one on the Parrot ASTEROID Mini support
2.
On your phone, erase the Parrot
27English

English 27
Area Network)
Bluetooth
profiles, the
phone. This procedure will vary
also enables you to recharge your
Bluetooth
connecting your phone to the
according to your phone model.
phone’s battery.
Parrot ASTEROID Mini will allow for
3.
Select your APN (Access Point
sharing of the phone's 3G connection.
Sharing a phone 3G connection via USB
Name) from the suggested list, then
1.
Connect your phone to the Parrot
Note: Refer to the compatibility page of our
check the Select option. You can then
ASTEROID Mini via
Bluetooth
.
website to check if your phone allows 3G
modify this setting by selecting
connection sharing via USB and to consult
Settings > Mobile Networks settings
2.
On the Parrot ASTEROID Mini,
the corresponding procedure :
> Mobile Access device.
select Settings > Network >
www.parrot.com/uk/compatibility.
> A pop-up ind
icating that USB
Bluetooth > Configuration.
connection sharing has been activated
1.
Make sure that your phone’s keypad is
3.
Select your APN (Access Point
will appear.
unlocked.
Name) from the suggested list, then
check Select .
2.
Connect th
e phone to the Parrot
ASTEROID Market : Using the applications
ASTEROID Mini using a USB cable/
4.
Press the
button and select
Several types of applications are available
micro-USB and the USB extension
Connect.
with the ASTEROID Market : music,
cable provided with the Parrot
geolocation, driver assistance...
5.
Allow connection sharing on your
ASTEROID Mini. This connection
26 English
27English
All applications may not be available in all
page on our website www.parrot.com
.
Troubleshooting
countries. The use of some applications
may need prior subscription.
Problems while using the phone function
Before you begin
The Parrot ASTEROID Mini is a
Make sure your phone is compatible with
Make sure the “Goodbye” message is
multitasking device: several applications
the Parrot ASTEROID Mini. To do so,
displayed on the Parrot ASTEROID Mini
can run simultaneously. For example, you
refer to the compatibility page on our
screen when you turn the ignition off.
can listen to a Webradio station and use a
website : www.parrot.com/uk/
Refer to the Checking the wiring section
driver assistance application at the same
compatibility.
for more information.
time.
If your phone is compatible with the
Reset the Parrot ASTEROID Mini. To do
For more information about installing and
Parrot ASTEROID Mini and if you
so, select Settings > Advanced settings >
using the available applications, refer to
already have the latest software update:
Restore factory settings.
the AST
EROID Market web page :
Delete the pairing on the Parrot
Make sure you have the latest software
1.
www.parrotasteroid.com/
ASTEROID Mini. To do so, tap
update on your Parrot ASTEROID Mini. To
asteroidmarket.
Settings > Advanced settings >
do so, select Settings > About > Device
Factory settings.
Version. Co
mpare this number with the
one on the Parrot ASTEROID Mini support
2.
On your phone, erase the Parrot

28 English
28 English
system from the list of
Bluetooth
“Slide to shutdown” appears.
General information
peripherals (or reboot your iPhone).
Note: this procedure will not erase any of
3.
Repeat the pairing procedure for the 2
your data.
devices.
Warranty
Some problems may occur if the iPod / SD
card / USB device is already connected to
Without prejudice of legal warranty, Parrot
Problems while using the music function
the Parrot ASTEROID Mini before you
contractually warrants during 12 months
Reboot your iPod / iPhone before
turn on the ignition. Connect the iPod / SD
from the date of initial purchase by the
connecting it to the Parrot ASTEROID
card / USB device once the ign
ition is
consumer (except wearing parts
Mini. To reboot your iPhone / iPod:
turned on.
guaranteed for 6 months) that the product
is free from defects in materials and
iPod: press Menu and the centre
For more information
workmanship, upon presentation of proof
button simultaneously until the iPod
of purchase (date, place of purchase,
reboots.
Refer to the Parrot ASTEROID Mini
serial number of the product) to the
support page on our website
iPhone: Press the On/Off button and
retailer or Parrot. During the contractual
www.parrot.com
.
the Home button simultaneously
warranty
period, the defective product
until the iPhone reboots. Do not
must be returned in its original packaging
touch the screen when the message
to the after-sales service of the retailer.
After inspection of the product, Parrot will
be invoiced to him.
design or user guide without any
proceed, at its option, to the replacement
restrictions and without any obligation to
Modifications
or the issue a credit note to the exclusion
notify users. As part of our ongoing
The explanations and specifications in this
of any other remedy.
concern to upgrade and improve our
guide are given for information purposes
Warranty does not cover: upgrading of the
products, the product that you have
only and may be modified w
ithout prior
software items of the Parrot products with
purchased may differ slightly from the
notice. They are deemed to be correct at
Bluetooth cell phones for compatibility
model described in this guide. If so, a later
time of going to press. The utmost care
purpose, data recovery, deterioration of
version of this guide might be available in
has been taken when writing this guide,as
the external aspect due to normal wear of
electronic format a
t Parrot’s website at
part of the aim to provide you with
the product, any damage caused by
www.parrot.com.
accurate information. However, Parrot
accide
nt, misuse, misapplication, or non-
Correct disposal of This Product (Waste
shall not be held responsible for any
Parrot products.
Electrical & Electronic Equipment)
consequences arising from any errors or
Parrot is not responsible for storage, loss
omissions in the guide, nor for any damage
or damaged to data during transit or repair.
This marking shown on the product or
or accidental loss of data resulting directly
Any product wrongfully declared to be
its literature, indicates that it should not
or indirectly from the use of the
defective will be returned to sender and
be disposed with other household wastes
information herein. Parrot reserves the
inspection, process and carriage costs will
at the end of its working life. To prevent
right to amend or improve the product
possible harm to the environment or
29English

English 29
system from the list of
Bluetooth
“Slide to shutdown” appears.
General information
peripherals (or reboot your iPhone).
Note: this procedure will not erase any of
3.
Repeat the pairing procedure for the 2
your data.
devices.
Warranty
Some problems may occur if the iPod / SD
card / USB device is already connected to
Without prejudice of legal warranty, Parrot
Problems while using the music function
the Parrot ASTEROID Mini before you
contractually warrants during 12 months
Reboot your iPod / iPhone before
turn on the ignition. Connect the iPod / SD
from the date of initial purchase by the
connecting it to the Parrot ASTEROID
card / USB device once the ign
ition is
consumer (except wearing parts
Mini. To reboot your iPhone / iPod:
turned on.
guaranteed for 6 months) that the product
is free from defects in materials and
iPod: press Menu and the centre
For more information
workmanship, upon presentation of proof
button simultaneously until the iPod
of purchase (date, place of purchase,
reboots.
Refer to the Parrot ASTEROID Mini
serial number of the product) to the
support page on our website
iPhone: Press the On/Off button and
retailer or Parrot. During the contractual
www.parrot.com
.
the Home button simultaneously
warranty
period, the defective product
until the iPhone reboots. Do not
must be returned in its original packaging
touch the screen when the message
to the after-sales service of the retailer.
28 English
29English
After inspection of the product, Parrot will
be invoiced to him.
design or user guide without any
proceed, at its option, to the replacement
restrictions and without any obligation to
Modifications
or the issue a credit note to the exclusion
notify users. As part of our ongoing
The explanations and specifications in this
of any other remedy.
concern to upgrade and improve our
guide are given for information purposes
Warranty does not cover: upgrading of the
products, the product that you have
only and may be modified without pr
ior
software items of the Parrot products with
purchased may differ slightly from the
notice. They are deemed to be correct at
Bluetooth cell phones for compatibility
model described in this guide. If so, a later
time of going to press. The utmost care
purpose, data recovery, deterioration of
version of this guide might be available in
has been taken when writing this guide,as
the external aspect due to normal wear of
electronic format at Parrot’
s website at
part of the aim to provide you with
the product, any damage caused by
www.parrot.com
.
accurate information. However, Parrot
accident, misus
e, misapplication, or non-
Correct disposal of This Product (Waste
shall not be held responsible for any
Parrot products.
Electrical & Electronic Equipment)
consequences arising from any errors or
Parrot is not responsible for storage, loss
omissions in the guide, nor for any damage
or damaged to data during transit or repair.
This marking
shown on the product or
or accidental loss of data resulting directly
Any product wrongfully declared to be
its literature, indicates that it should not
or indirectly from the use of the
defective will be returned to sender and
be disposed with other household wastes
informati
on herein. Parrot reserves the
inspection, process and carriage costs will
at the end of its working life. To prevent
right to amend or improve the product
possible harm to the environment or

30 English
30 English
human health from uncontrolled waste
trademarks of PARROT SA.
All other trademarks mentioned in this
disposal, please separate this from other
guide are protected and are the property
The Bluetooth word mark and logos are
types of wastes and recycle it responsibly
of their respective owners.
registered trademarks owned by
to promote the sustainable reuse of
Bluetooth SIG, Inc. and any use of such
Gracenote, the Gracenote logo and
material resources.
marks by Parrot S.A. is under license.
logotype and "Powered by Gracenote" are
Household users should contact either
Bluetooth QDID : B01
3841, B013839, [-]
either registered trademarks or
the retailer where they purchased this
trademarks of Gracenote Inc. in the United
"Made for iPod / iPhone" means that an
product, or their local government office,
States and/or other countries.
electronic accessory has been designed to
for details of where and how they can take
connect specifically to iPod or iPhone
Identification N. 394 149 496 R.C.S. PARIS
this item for environmentally safe
respectively, and has been certified by the
Parrot S.A.
recycling. Business users should
contact
developer to meet Apple performance
their supplier and the terms and
standards. Apple is not responsible for the
conditions of the purchase contract. This
operation of this device or its compliance
Copyright © 2012 Parrot. All Rights
product should not be mixed with other
with safety and regulatory standards.
Reserved.
commercial wastes for disposal.
iPod and iPhone are trademarks of Apple
Registered Trademarks
Inc, registered in the US
and others
Th
is device complies with Industry Canada
Parrot and the Parrot logo are registered
countries
licence-exempt RSS standard(s).
Operation is subject to the following two
conditions: (1) this device may not cause
interference, and (2) this device must
accept any interference, including
interference that may cause undesired
operation of the device.
This equipment complies with FCC’s and
IC’s RF radiation exposure limits set forth
for an uncontrolled environment.. The
antenna(s) used for this tr
ansmitter must
be installed and operated to provide a
separation distance of at least 20 cm from
all persons and must not be collocated or
operating in conjunction with.
31English

English 31
human health from uncontrolled waste
trademarks of PARROT SA.
All other trademarks mentioned in this
disposal, please separate this from other
guide are protected and are the property
The Bluetooth word mark and logos are
types of wastes and recycle it responsibly
of their respective owners.
registered trademarks owned by
to promote the sustainable reuse of
Bluetooth SIG, Inc. and any use of such
Gracenote, the Gracenote logo and
material resources.
marks by Parrot S.A. is under license.
logotype and "Powered by Gracenote" are
Household users should contact either
Bluetooth Q
DID : B013841, B013839, [-]
either registered trademarks or
the retailer where they purchased this
trademarks of Gracenote Inc. in the United
"Made for iPod / iPhone" means that an
product, or their local government office,
States and/or other countries.
electronic accessory has been designed to
for details of where and how they can take
connect specifically to iPod or iPhone
Identification N. 394 149 496 R.C.S. PARIS
this item for environmentally safe
respectively, and has been certified by the
Parrot S.A.
recycling. Business user
s should contact
developer to meet Apple performance
their supplier and the terms and
standards. Apple is not responsible for the
conditions of the purchase contract. This
operation of this device or its compliance
Copyright © 2012 Parrot. All Rights
product should not be mixed with other
with safety and regulatory standards.
Re
served.
commercial wastes for disposal.
iPod and iPhone are trademarks of Apple
Registered Trademarks
Inc, registered
in the US and others
This device complies with Industry Canada
Parrot and the Parrot logo are registered
countries
30 English
31English
licence-exempt RSS standard(s).
Operation is subject to the following two
conditions: (1) this device may not cause
interference, and (2) this device must
accept any interference, including
interference that may cause undesired
operation of the device.
This equipment complies with FCC’s and
IC’s RF radiation exposure limits set forth
for an uncontrolled environment.. The
antenna(s) used for this transmitter
must
be installed and operated to provide a
separation distance of at least 20 cm from
all persons and must not be collocated or
operating in conjunction with.


Før du starter
Hurtig
OM DENNE VEJLEDNING
Parrot foretrækker at lægge brugervejle-
brugervejledning
dningerne ud online i stedet for at få dem
trykt for at begrænse papirforbruget og
af hensyn til miljøet. Denne korte guide
Indholdsfortegnelse
giver derfor kun de vigtigste anvisninger
Før du starter
s.33
om, hvordan enheden bruges på en nem
Montering
s.34
måde. Du kan finde yderligere oplysnin-
Første gang enheden bruges
s.39
ger under rubrikken Support og downloa-
Telefon
s.41
ding på vores hjemmeside www.parrot.
Musik
s.42
com: komplet vejledning, FAQ, undervis-
Internet
s.45
ningsprogrammer…
Fejlfinding
s.48
Generelle oplysninger
s.50
Bemærk: iPod og iPhone (i funktionen iPod)
kaldes «iPod» i denne vejledning.
Dansk 33

ADVARSLER
OPDATERING
Montering
Funktioner, som kræver længereopmærk-
Du kan hente den sidste nye opdatering
somhed, må kun bruges, når bilen er
til produktet på vores websted www.par-
Bemærk: Vi anbefaler, at du kontakter en
standset. Din egen og de andre trafi-
rot.com under rubrikken Support. Ved
kvalificeret person til at udføre denne mon-
kanters sikkerhed har fortrinsret rem for
hjælp af disse opdateringer kan du drage
tering, f.eks. en autoriseret installatør fra
telefonopkald, musik eller applikationer
fordel af nye funktioner og forbedre dit
vores netværk.
med hjælp under kørsel. Vær ansvar-
produkts kompatibilitet.
lig: Kør forsigtigt og vær opmærksom på
FØR DU STARTER
dine omgivelser. Parrot frasiger sig thvert
Monteringen af Parrot ASTEROID Mini
ansvar, hvis du vælger at tilsidesætte
består i at sætte den ind mellem autora-
denne advarsel.
dioen og bilen.
Brug Parrot ASTEROID Mini med en for-
nuftig lydstyrke, således at du altid kan
Bemærk: Kablerne, der leveres sammen
høre støj udefra under kørslen. Parrot
med Parrot ASTEROID Mini, er udstyret
ASTEROID Mini indeholder magneter af
med ISO-stik. Hvis din autoradio ikke er
typen NdFeB, som kan beskadige gens-
udstyret med ISO-stik, skal du have en ISO
tande, der er følsomme over for magne-
kabel-adapter for at kunne foretage mon-
tiske felter (pacemaker, kreditkort, me-
teringen. Se rubrikken Kompatibilitet med
kaniske ure m.m.).
34 Dansk

biler på supportsiden til Parrot ASTEROID
monteringen. Det er strengt nødvendigt
(Tilslutning 1B på skemaet s.7).
Mini for at kontrollere, om du har brug for
at bruge det ISO-kabel, der følger med
en kabel-adapter.
Parrot ASTEROID Mini.
TILSLUTNING AF
Angivelserne «Tilslutning #» i afsnittede
STRØMFORSYNINGSKABLET
Begynd med at tage den oprindelige au-
nedenfor svarer til de viste tilslutninger
toradio ud af bilen. Denne handling kan
på skemaerne s.6 / 7.
1. Kobl bilens batteri fra før montering
kræve udtræksnøgler.
af strømforsyningskablet.
TILSLUTNING AF LYDKABLET
2. Sæt Parrot ASTEROID Minis
Se det elektriske diagram til din autora-
Forbind bilens lydledninger med Parrot
ISO-hanstik ind i autoradioen
dio. Inden det Parrot ASTEROID Minis
ASTEROID Minis stik (Tilslutning 1A
(tilslutning 3).
forskellige dele fastgøres i kabinen, skal
og 2). Hvis bilen har et lydsystem med
de forskellige kabler tilsluttes ved styre-
3. Forbind bilens ledningsnet med
forstærker, skal du bruge Jack Line Out
boksen. Før komponenterne sættes helt
Parrot ASTEROID Minis ISO-huns-
Front og Line Out Rear på styreboksen
fast, skal kablernes længde kontrolleres
tik (tilslutning 4).
for at undgå problemer med mætning af
og man skal tjekke, at placeringen er valgt
lyden (smæld i højttalerne, permanent
således, at kablernes længde er tils-
Kablets røde ledning skal svare til +12V
baggrundsstøj m.m.). Forbind disse Line
trækkelig til at forbinde de forskellige
konstant, den orange ledning til 12V ef-
Out med dit lydsystem ved at bruge et
dele med hinanden. Kontroller, at Parrot
tertænding og den sorte ledning til stel.
eller to jack-kabler til at forbinde Par-
ASTEROID Minis kabler ikke har fået
Kontroller, at den orange ledning ikke er
rot ASTEROID Mini med dit lydsystem
knæk eller er blevet klemt fast under
Dansk 35

forbundet med 12V konstant, da du ri-
mute indgangen og forbind den dernæst
Advarsel: Rør ikke ved styreboksen, når den
sikerer at aflade bilens batteri. Bemærk:
med den frie, gule ledning på ISO-kablet
er i drift. Dens overflade kan blive meget
For at kontrollere monteringen, skal du
(tilslutning 5).
varm.
først forbinde skærmen uden at placere
den på instrumentbrættet. Se afsnittet
MONTERING AF STYREBOKSEN
KONTROL AF MONTERINGEN
Kontroller monteringen for yderligere
Undgå at montere boksen i nærheden af
Tænd og sluk derefter for tændingen
oplysninger. På visse biler er der ikke +12V
bilens varmesystem eller klimaanlæg eller
i bilen, når Parrot ASTEROID Mini er
efter tænding på bilens stik. Det er såle-
et sted, der udsættes for sollys. Sørg for
monteret: Meddelelsen ”Farvel” skal
des nødvendigt at tilslutte den orange
at boksen ikke kan bevæge sig efter mon-
vises på skærmen.
strømledning til sikringsboksen eller til en
tering. Sørg for at bevare en fri afstand
Hvis det ikke er tilfældet, skal der byttes
anden strømkilde efter tænding.
omkring produktets køler for at gøre det
om på den røde og orange ledning. Den
lettere at udlede varme.
røde ledning til strømforsyningska-
TILSLUTNING AF MUTE KABLET
Når boksen er monteret, må den ikke
blet skal være tilsluttet 12V konstant,
Mute funktionen giver mulighed for at
forceres, når autoradioen sættes ind.
den orange ledning til 12V eftertæn-
aryde autoradioens lyd for at lytte til
Hvis der ikke er plads nok bagved autora-
ding og den sorte ledning til stel. Dette
Parrot ASTEROID Mini (musik, samtaler
dioen, kan du f.eks. overveje at afmontere
gøres ganske enkelt ved at bytte om på
osv.). Valget af Mute indgangen (Mute
handskerummet.
de to kabelsko på Parrot kabelføringen
in 1, mute in 2 eller mute in 3) aænger af
(tilslutning 6).
din autoradios konfiguration. Identificer
36 Dansk

MONTERING AF MIKROFONEN
MONTERING AF USB KABLERNE
tilslutte din 3G-nøgle direkte til Parrot
ASTEROID Mini. Brug det medfølgende
Vi anbefaler at glide kablet ind i renden
Forbind USB kablerne med Parrot
USB-kabel for at montere den på instru-
bagved dørens gummiliste. Hvis kablet
ASTEROID Mini. Vi anbefaler, at
mentbrættet (eller ethvert andet ryddet
passerer ovenover pedalerne, skal du
du tilslutter alle kablerne ved Parrot
område).
sørge for at det sidder godt fast.
ASTEROID Mini, også selv om du ikke
nødvendigvis skal bruge dem. Før de
MONTERING AF GPS-DONGLEN
Advarsel: Før ikke mikrofonens kabel ind i
relevante stik ud af kortlommen eller
varmesystemet, ventilationssystemet, kli-
handskerummet. For at gøre det, kan
Sæt GPS-donglen fast på
maanlægget eller foran bilens airbag i siden.
det være nødvendigt at bore et hul inde i
en plan overflade i en zone
instrumentbrættet. Undgå så vidt muligt
uden forhindringer inde i
Sørg for, at mikrofonen monteres så tæt
at anvende USB-forlængerledninger på
kabinen.Atermiske forru-
på brugerens hoved som muligt. Den
flere meter.
der og ruder med indlagt
ideelle afstand er 60 cm. Det er bedst at
Det USB kabel, som du forbinder med
antenne kan forringe GPS-modtagelsen
montere mikrofonen i nærheden af ba-
iPod forlængerledningen, skal tilsluttes
og svække nøjagtigheden af oplysninger
kspejlet. Ret mikrofonen mod brugerens
ved den hvide USB port, der er forudset
fra navigationsprogrammer. Donglens
mund.
hertil. Benævnelsen «iPod» er angivet
GPS-antenne sidder ved siden, hvor der
ovenover denne port.
står «Parrot ASTEROID GPS» og hvor
Med henblik på at garantere en opti-
der sidder et stjerneformet logo. Dette
mal modtagelseskvalitet må du ikke
logo skal altid være vendt op mod himlen.
Dansk 37

Vis din bil har en atermisk forrude, skal
• Rengør overfladen før holderen
• Rengør overfladen før holderen
GPS-donglen sættes fast på forruden i
limes på.
limes på.
en ikke atermisk zone. Siden ed det st-
• Når holderen er sat op, skal du vente
• Når holderen er sat op, skal du vente
jerneformede logo skal limes på forruden
i 2 timer, før du håndterer den.
i 2 timer, før du håndterer den.
(skema B s.8).
MONTERING AF SKÆRMEN
Husk at tage skærmen ud, når du forlader
Bemærk: Forrudens ikke atermiske zone
bilen for at undgå indbrud og at udsætte
aænger af din bilmodel. Den befinder sig
Advarsel: Undgå en montering, der kan
den for sol i længere tid.
som regel ved bakspejlet.
vanskeliggøre brugen af vigtige betjeninger
eller reducere chauørens udsyn. Installer
MONTERING
Hvis din bil ikke har en atermisk forrude,
ikke skærmen et sted, hvor den kan blive
AF FJERNBETJENINGEN
sæt GPS-donglen fast på instrument-
slynget frem ved udløsningen af en airbag
brættet. Siden med det stjerneformede
eller i nærheden af bilens åbninger til udluf-
Lim holderen til ernbetjeningen fast på
logo skal være synig (skema A s.9).
tning eller klimaanlæg.
instrumentbrættet ved hjælp af den me-
dfølgende klæbestrimmel.
For at sikre en god fastgørelse af holde-
Lim plasticholderen fast på instrument-
For at sikre en god fastgørelse af holde-
ren:
brættet (skema C s.10).
ren:
For at sikre en god fastgørelse af holde-
• Brug den dobbeltsidede klæbestri-
• Rengør overfladen før holderen
ren:
mmel.
limes på.
38 Dansk

• Når holderen er sat op, skal du vente
For at forbinde ernbetjeningen med
Første gang
i 2 timer, før du håndterer den.
styreboksen (skema D s.11):
enheden bruges
1. Tag den runde del i plastic bag på
Fjernbetjeningen kan strømforsynes på
ernbetjeningen af ved at dreje den
2 måder: med et batteri eller ved at for-
SÅDAN NAVIGERER
med uret.
binde den med styrboksen.
DU GENNEM MENUERNE
2. Sæt kablet i det sted, der er forudset
Tryk på tasten for at få adgang til hove-
For at strømforsyne ernbetjeningen
til batteriet, og drej det mod uret.
dmenuen.
med batteri (skema D s.11):
3. Forbind kablets anden ende med
1. Tag den runde del i plastic bag på
styreboksen ved siden af USB stik-
Du navigerer gennem menuerne ved at
ernbetjeningen af ved at dreje den
kene (skema s.6).
dreje på drejeknappen og godkender ved
med uret.
at trykke på drejeknappen.
For at vende tilbage til forrige menu, tryk
2. Sæt et batteri af typen 3V CR2032
på tasten .
ind det sted, der er forudset til det.
Sørg for at batteriet vender rigtigt.
Tryk på tasten for at få adgang til den
3. Sæt den runde del i plastic i igen ved
kontekstuelle menu, der svarer til den
at dreje den mod uret.
igangværende applikation. Den konteks
Dansk 39

tuelle menu gør det muligt bl.a. at få ad-
Hvis det er første gang, du bruger en te-
• Hvis Parrot ASTEROID Mini
gang til yderligere funktioner, ændre visse
lefon sammen med Parrot ASTEROID
og din telefon viser to koder,
indstillinger eller hurtigt gennemse ind-
Mini, skal du først parre de to enheder.
skal du kontrollere, om disse
holdet i telefonlisten eller lydkilden.
Når din telefon er blevet parret med
koder er identiske og dernæst
Under afspilning af en musikfil, tryk på
Parrot ASTEROID Mini, vil forbindelsen
bekræfte eller aræfte.
tasten for at vende tilbage til menuen.
mellem de to enheder blive oprettet au-
> Skærmen på Parrot
Omvendt skal du trykke på tasten SRC
tomatisk, hver gang der tændes for dem
ASTEROID Mini viser «Parring
for at vende tilbage til afspilleren, når du
i nærheden af hinanden med aktiveret
udført».
navigerer gennem menuerne.
Bluetooth® funktion.
Bemærk: På visse telefoner skal du autori-
1. Søg på telefonen efter perifere
TILSLUTNING AF
sere forbindelsen med Parrot ASTEROID
Bluetooth enheder og vælg dernæst
EN TELEFON VIA BLUETOOTH
Mini for at tillade automatisk forbindelse.
”Parrot ASTEROID Mini”.
Læs telefonens brugervejledning for yderli-
Bemærk: Se siden med kompatibilitet
2. Fremgangsmåden for parring
gere oplysninger.
på vores hjemmeside for at undersøge,
aænger derefter af din telefon-
om din telefon er kompatibel med Parrot
model:
SYNKRONISERING AF
ASTEROID Mini og se den tilsvarende
TELEFONENS TELEFONLISTE
fremgangsmåde for parring:
• Hvis telefonen beder dig om at
www.parrot.com/uk/compatibility.
indtaste en Bluetooth PIN-
Med de fleste Bluetooth-telefoner
kode, indtast «0000».
synkroniseres telefonlisten automa-
40 Dansk

tisk med systemets hukommelse. Hver
Den automatiske synkronisering er be-
Telefon
gang du ændrer din telefonliste, starter
grænset til 5000 kontaktpersoner (eller
synkroniseringen igen automatisk ved
telefonnumre) pr. parret telefon.
Sådan modtager du et opkald Et indkom-
næste tilslutning.
mende opkald angives ved en ringetone.
Navnet på kontaktpersonen meddeles,
Advarsel: Det er kun de kontaktpersoner,
hvis nummeret på denne kontaktperson
som er gemt i telefonens hukommelse,
er gemt i telefonlisten på den telefon,
der synkroniseres med Parrot ASTEROID
der er forbundet med Parrot ASTEROID
Mini. Hvis dine kontaktpersoner er gemt på
Mini.
SIM-kortet, skal de føres over i telefonens
hukommelse. Læs telefonens brugervejled-
• For at acceptere dette opkald, tryk å
ning for yderligere oplysninger.
tasten . Tryk dernæst på tasten
for at afslutte samtalen.
Bemærk: På visse telefoner skal du give til-
• For at afvise dette opkald, tryk på
ladelse til, at Parrot ASTEROID Mini får
tasten .
adgang til dine kontaktpersoner for at gen-
nemføre synkroniseringen. Læs telefonens
brugervejledning for yderligere oplysninger.
Dansk 41

SÅDAN FORETAGER DU
> Opkaldet til denne kontaktperson
Musik
ET OPKALD VIA STEMMESTYRING
sker automatisk, hvis stemmekom-
mandoen er opfattet korrekt.
Du kan foretage et opkald direkte med
Bemærk: Flere minutters overførsel kan være
> I modsat fald udsender det
stemmestyring efter synkronisering af din
påkrævet ved den første forbindelse mellem
håndfrie system en anmodning om
telefons telefonliste. Parrot ASTEROID
din perifere lydenhed (USB / SD / iPod) og
bekræftelse. Bekræft ved at sige
Mini genkender automatisk den kontakt-
Parrot ASTEROID Mini, især hvis det dre-
”JA”, ”RINGE” eller ”RING”.
person i din telefonliste, som du vil ringe
jer sig om perifere enheder, som indeholder
til.
mange musikfiler. Efter endt overførsel er
Bemærk: Du kan til enhver tid trykke på
disse musikstykker tilgængelige ved hjælp af
1. Tryk på tasten for at starte
tasten for at annullere opkaldet.
stemmestyring.
processen med stemmestyring.
> Parrot ASTEROID Mini beder om
SÅDAN BRUGER DU
navnet på den kontaktperson, du vil
STEMMESTYRINGSFUNKTIONEN
ringe til.
TIL MUSIK
2. Sig navnet på den kontaktperson,
Med stemmestyringsfunktionen til musik
som du vil ringe til, efterfulgt af
kan du ved hjælp af stemmestyring vælge
type telefonnummer (”KONTOR”,
de kunstnere eller albums, som du vil
”MOBIL” osv.), hvis kontaktper-
lytte til. Denne funktion er til rådighed,
sonen har flere numre.
42 Dansk

hvis du anvender Parrot ASTEROID Mini
Bemærk: Kontroller navnet på kunstnere og
Bemærk: Tryk på tasten og vælg det første
med en perifer enhed af typen iPod / USB
albums i dine musikfilers tags eller mærker
bogstav i navnet på din kunstner, album el-
/ SD, eller hvis du anvender en musikap-
(metadata). De kan nemlig være forskellige
ler musikstykke for at gøre det lettere at na-
plikation, der er kompatibel med denne
fra de kunstnere og albums, der vises i titlen
vigere gennem indholdet på din iPod.
funktion.
på dit musiknummer.
BRUG SAMMEN MED ET SD-KORT
1. Tryk på tasten på ernbetjenin-
BRUG SAMMEN MED EN IPOD
gen.
Du kan bruge følgende SD-kort (med
adapter om nødvendigt) sammen med
2. Sig navnet på den kunstner eller det
1. Forbind din iPod med USB kablet
Parrot ASTEROID Mini: SD, micro SD,
album, som du vil lytte til, når Parrot
via iPod forlængerledningen.
mini SD, SDHC, mini SDHC, micro SDHC.
ASTEROID Mini beder dig om det.
2. Tryk på tasten SRC, indtil iPod er
SD-kortets kapacitet må ikke overskride
> Derefter vises listen over lydkilder
valgt.
32Go. De musikalske filer på dit SD-kort
forbundet med Parrot ASTEROID
kan være i format MP3 (mpeg1 layer3),
Mini og musikapplikationer kom-
3. Vælg et sorteringskriterium
AAC, WAV, OGG eller WMA.
patible med stemmestyringsfunk-
(kunstner, album, musikstykke,
tionen, som indeholder den kunstner
playliste) og tryk på drejeknappen.
1. Sæt SD-kortet ind det forudsete
/ det album, du har valgt.
sted på skærmens højre side
4. Vælg et musikstykke og tryk på
(skema E s.12).
drejeknappen.
Dansk 43

2. Tryk på tasten SRC, indtil SD er
begrænsning for USB-nøglens kapacitet.
vigere gennem indholdet på din USB nøgle.
valgt.
De musikalske filer på din USB-nøgle kan
være i format MP3 (mpeg1 layer3), AAC,
BRUG SAMMEN MED EN
3. Vælg et sorteringskriterium
WAV, OGG eller WMA.
BLUETOOTH-LYDAFSPILLER
(kunstner, album, musikstykke,
playliste) og tryk på drejeknappen.
1. Forbind din USB-enhed med
Bemærk: Parrot ASTEROID Mini giver dig
USB-kablet.
mulighed for at bruge telefonifunktion og
4. Vælg et musikstykke og tryk på
lyd-streaming via Bluetooth med 2 forskel-
drejeknappen.
2. Tryk på tasten SRC, indtil USB er
lige telefoner, uden du behøver at frakoble
valgt.
en af de 2 enheder.
Bemærk: Tryk på tasten og vælg det første
3. Vælg et sorteringskriterium
bogstav i navnet på din kunstner, album el-
(kunstner, album, musikstykke,
Du kan bruge Parrot ASTEROID Mini
ler musikstykke for at gøre det lettere at na-
playliste) og tryk på drejeknappen.
for at lytte til musikfiler, som er lagret
vigere gennem indholdet på dit SDkort.
på en Bluetooth lydafspiller, hvis denne
4. Vælg et musikstykke og tryk på
understøtter A2DP-profilen (Advanced
BRUG SAMMEN
drejeknappen.
Audio Distribution Profile). Hvis du bru-
MED EN USB-NØGLE
ger lydafspilleren for første gang, skal du
Bemærk: Tryk på tasten og vælg det første
Parrot ASTEROID Mini er kompatibel
først parre den med Parrot ASTEROID
bogstav i navnet på din kunstner, album el-
med de fleste USB-nøgler / MP3-afspil
Mini. Hvis lydafspilleren allerede er par-
ler musikstykke for at gøre det lettere at na-
lere / eksterne harddiske. Der findes ingen
ret med Parrot ASTEROID Mini:
44 Dansk

1. Tryk på tasten SRC, indtil Bluetooth
lydstyrken.
Internet
Audio er valgt.
• Glid din finger nedad for at mindske
2. Start afspilningen af et musikstykke
lydstyrken.
Advarsel: Oprettelsen af en forbindelse til
på lydafspilleren.
Internettet ved hjælp af en 3G/4G-nøgle
Under afspilning af en musikfil (med un-
kræver et abonnement hos en telefonudby-
AUTORADIO
dtagelse af lydkilder forbundet via et jack
der. Brugen af denne service kan medføre
/ jack kabel):
store omkostninger til roaming. Kontrol-
For at hente lyden fra din autoradio, tryk
ler dit abonnements betingelser, og hold
på tasten SRC på ernbetjeningen (eller
• Glid fingeren til højre for at skifte til
løbende øje med dit forbrug hos din udbyder.
tryk på Musik på skærmen) og vælg
det næste musiknummer.
Parrot frasiger sig ethvert ansvar vedrørende
Car radio.
• Glid fingeren til venstre for at vende
de tilknyttede omkostninger hertil.
tilbage til forrige musiknummer.
BETJENINGER PÅ SKÆRMEN
TILSLUTNING
Under afspilning af en musikfil eller radio:
Bemærk: Hvis du bruger Parrot ASTEROID
MED EN 3G / 4G NØGLE
Mini sammen med en lydkilde forbundet
• Tryk på skærmen for at sætte mu-
Bemærk: Se rubrikken Kompatibilitet med
via Bluetooth, er disse betjeninger kun dis-
siknummeret på pause eller aryde
Parrot ASTEROID Mini på vores hjemme-
ponible, hvis denne lydkilde understøtter
radioens lyd.
side for at kalde listen over 3G / 4G nøgler,
AVRCP profilen (Audio/Video Remote
• Glid din finger opad for at øge
Control Profile).
Dansk 45

som er kompatible med Parrot ASTEROID
Bemærk: Du kan ændre denne indstilling på
DELING AF 3G
Mini.
et senere tidspunkt ved at vælge Parametre
TILSLUTNING VIA BLUETOOTH
> Netværk > 3G nøgle.
1. Tilslut en 3G-nøgle med Parrot
Hvis du har en telefon, som understøtter
ASTEROID Mini ved hjælp af et
4. Vælg din APN (Access Point
profilen Bluetooth DUN (Dial-Up
USB-kabel.
Name) i den foreslåede liste. Denne
Networking) eller PAN (Personal Area
> En pop-up vises.
oplysning findes i den medfølgende
Network), kan du dele din telefons 3G
dokumentation til din 3G nøgle.
tilslutning via din telefons Bluetooth-for-
2. Vælg OK for at aktivere 3G forbin-
Hvis din APN ikke står i denne liste,
bindelse med Parrot ASTEROID Mini.
delsen.
kan du tilføje den ved at vælge
> En pop-up med Status for 3G
Parametre > Netværk > 3G nøgle >
Bemærk: Se siden med kompatibilitet på
forbindelsen vises efterfulgt at en
Konfiguration > Nyt adgangspunkt.
vores hjemmeside for at kontrollere, om
anden pop-up, der beder dig om din
> Meddelelsen «3G nøgle konfigu-
din telefon tillader deling af 3G tilslutning
PIN-kode.
reret » vises.
via Bluetooth og se den tilsvarende frem-
3. Indtast din PIN-kode ved hjælp af
gangsmåde: www.parrot.com/uk/compati-
5. Vent ca. 30 sekunder, indtil
drejeknappen og vælg derefter OK.
bility.
forbindelsen er oprettet. Du kan
Sæt kryds ved muligheden Husk
også trykke på tasten og navigere i
1. Forbind din telefon med Parrot
PIN-kode, hvis du foretrækker ikke
menuerne, mens forbindelsen bliver
ASTEROID Mini via Bluetooth.
at blive bedt om PIN-koden ved
oprettet.
hver start af Parrot ASTEROID Mini.
46 Dansk

2. På Parrot ASTEROID Mini, vælg
USB og se den tilsvarende fremgangsmåde:
Netværk > USB.
Parametre > Netværk > Bluetooth >
www.parrot.com/uk/compatibility.
> En pop-up angiver, at delingen af
Konfiguration.
USB tilslutningen er aktiveret.
1. Sørg for at din telefons tastatur er
3. Vælg din APN (Access Point Name)
låst.
i den foreslåede liste og sæt dernæst
2. Forbind telefonen med Parrot
kryds ved muligheden Vælg.
ASTEROID Mini ved hjælp af USB
4. Tryk på tasten og vælg Forbind.
/ micro-USB kablet, der følger med
din telefon. Du kan også forbinde
5. Tillad deling af tilslutning på din
den ved hjælp af den USB forlæn
telefon. Denne fremgangsmåde er
gerledning, der følger med Parrot
forskellig i forhold til din telefons
ASTEROID Mini. Denne tilslutning
model.
tillader ligeledes at oplade din tele-
fons batteri.
DELING AF 3G
TILSLUTNING VIA USB
3. Vælg din APN (Access Point Name)
i den foreslåede liste og sæt dernæst
Bemærk: Se siden med kompatibilitet på
kryds ved muligheden Vælg. Du kan
vores hjemmeside for at kontrollere, om din
ændre denne indstilling på et senere
telefon tillader deling af 3G tilslutning via
tidspunkt ved at vælge Parametre >
Dansk 47

ANVENDELSE
AF APPLIKATIONERNE
Bemærk: Du kan også hente opdateringer til
Fejlfinding
Parrot ASTEROID Mini, når enheden er for-
Du kan bruge flere typer applikationer
bundet med Internet. Meddelelsesbjælken
sammen med Parrot ASTEROID Mini:
FØR DU STARTER
vil angive, om der findes en ny opdatering.
musik, GPS og hjælp under kørsel. De
Kontroller, at meddelelsen “Farvel” vises
tilgængelige applikationer er forskellige i
på skærmen i Parrot ASTEROID Mini, når
PROBLEMER MED
forhold til brugslandet. Visse applikatio-
du slukker for bilens motor. Se afsnittet
TELEFONFUNKTIONEN
ner kræver muligvis et abonnement. Par-
Kontrol af monteringen for yderligere
rot ASTEROID Mini kan multitaske:
Kontroller din telefons kompatibilitet
oplysninger. Genopstart enheden. Det
Den kan bruge flere applikationer samti-
med Parrot ASTEROID Mini. Det gør
gør du ved at tage skærmen ud af holde-
digt. Du kan for eksempel lytte til en We-
du ved at se siden med kompatibilitet
ren. Kontroller, at du har den seneste op-
bradio og bruge en applikation med hjælp
på vores hjemmeside: www.parrot.com/
datering på Parrot ASTEROID Mini. Det
under kørsel samtidigt.
uk/compatibility. Hvis din telefon står
gør du ved at vælge Parametre > Apro-
angivet som kompatibel, og din Parrot
pos > Version. Sammenlign versionens
For yderligere oplysninger om brugen af
ASTEROID Mini allerede har den se-
nummer med det, der står på supportsi-
tilgængelige applikationer, se websiden på
neste opdatering, skal du slette parrin-
den til Parrot ASTEROID Mini på vores
ASTEROID Market: www.parrotasteroid.
gen mellem de to apparater på Parrot
hjemmeside www.parrot.com.
com.
ASTEROID Mini og din telefon, genstarte
de to enheder og derefter genoprette for-
48 Dansk

bindelsen mellem de to enheder.
slukke“ vises.
Generelle oplysninger
PROBLEMER MED
Der kan opstå visse problemer, hvis den
MUSIKFUNKTIONEN
perifere enhed allerede er tilsluttet ved
GARANTI
Parrot ASTEROID Mini, når du dre-
Nulstil din iPod / iPhone, før du forbinder
jer nøglen i tændingen. Prøv igen ved at
Med forbehold af den lovbestemte ga-
den med Parrot ASTEROID Mini igen.
tilslutte den perifere enhed, efter at du
ranti, garanterer PARROT kontraktligt
For at nulstille en iPod / iPhone (denne
har drejet nøglen i tændingen.
produktet i en periode på 12 måneder fra
procedure sletter ikke nogen data) skal
forbrugerens oprindelige købsdato (und-
du gøre følgende:
FOR YDERLIGERE OPLYSNINGER
tagen sliddele som garanteres i 6 måne-
• iPod: Tryk på Menu og på den mid-
der) mod materialefejl og fabrikationsfe-
Se supportsiden til Parrot ASTEROID
terste knap samtidigt, indtil iPod’en
jl ved præsentation af beviset for køb
Mini på vores hjemmeside www.parrot.
genstartes.
(dato, sted, produktets serienummer) for
com.
forhandleren eller Parrot. I løbet af den
• iPhone/iPod touch: Tryk på knappen
kontraktlige garantis varighed skal det
On/O og knappen Home samti-
fejlbehæftede produkt returneres i sin
digt, indtil din iPhone genstartes.
oprindelige emballage til forhandlerens
kundeservice. Efter at have undersøgt
produktet vil Parrot efter eget valg enten
Du må ikke røre skærmen, når med-
udskifte produktet eller udstede et tilgo-
delelsen “Lad fingeren glide for at
Dansk 49

dehavende med udelukkelse af enhver
ÆNDRINGER
ber os på at opgradere og forbedre vores
anden godtgørelse.
produkter, kan det produkt, du har købt,
Forklaringerne og specifikationerne i
Garantien dækker ikke opdatering af sof-
være lidt forskellig fra den model, der
denne guide er kun vejledende og kan
tware indbefattet i Parrot produkter med
er beskrevet i denne guide. Hvis det er
blive ændret uden forudgående varsel.
Bluetooth® mobiltelefoner beregnet til
tilfældet, kan der fås en senere udgave
De anses for at være korrekte på det tids-
regnskabsføring, indhentning af data,
af denne guide i elektronisk format på
punkt, hvor de bliver trykt. Denne guide
udvendig beskadigelse af produktet på
Parrots website www.parrot.com.
er blevet udarbejdet med største omhu i
grund af normal brug af produktet, enh-
den hensigt at give dig den mest nøjagtige
ver beskadigelse forårsaget af et uheld,
KORREKT AFFALDSBORTSKAFFELSE
information. Parrot kan dog ikke drages
en unormal brug eller en ikke autoriseret
AF DETTE PRODUKT(ELEKTRISK OG
til ansvar for konsekvenserne af fejl el-
brug af produktet, et ikke Parrot pro-
ELEKTRONISK UDSTYR)
ler udeladelser i denne guide, eller for
dukt. Parrot er ikke ansvarlig for opbeva-
beskadigelser eller utilsigtet tab af data,
Til dette formål har alle kommuner eta-
ring, tab eller beskadigelse af data under
som direkte eller indirekte er et resultat af
bleret indsamlingsordninger, hvor aald
transport eller reparation. Et produkt,
brugen af informationen heri. Parrot for-
af elektrisk og elektro-nisk udstyr gratis
der viser sig ikke at være fejlbehæftet, vil
beholder sig ret til at ændre eller forbedre
kan afleveres af borgerne på genbrugss-
blive returneret til afsenderen, som vil få
produktets design eller brugervejlednin-
tationer eller andre indsamlingssteder
tilsendt en regning for udgifter til behan-
gen uden nogen form for begrænsning
eller hentes direkte fra husholdningerne.
dling, kontrol og transport.
og uden forpligtigelse til at underrette
Nærmere information skal indhentes hos
brugerne herom. Da vi konstant bestræ-
kommunens tekniske forvaltning.Brugere
50 Dansk

af elektrisk og elektronisk udstyr må ikke
17 (v2.1.1), EN300220-2 (V2.3.1),
Apple afviser ethvert ansvar i forbindelse
bortskae aald af elektrisk og elektro-
EN300440, EN60950-1: 04/2006 / A11:
med disse tilbehørsdeles virkemåde eller
nisk udstyr sammen med husholdning-
2009 / A1: 2010 / A2: 2011, EN 60065:
deres overensstemmelse med gældende
saald. Brugere skal benytte de kommu-
05/2002 / A1: 05/2006 / A11: 2008 /
forskrifter og sikkerhedsstandarder.
nale indsamlingsordninger for at mindske
A2: 2010 iht. bestemmelserne i R&TTE
den miljømæssige belastning i forbin-
direktivet 1999/5/EF, samt kravene i
iPod, iPod Touch og iPhone er varemær-
delse med bortskaelse af aald af elek-
EMC-direktivet 2004/108/EF, lavspæn-
ker, som tilhører Apple, Inc. og er regis-
trisk og elek-tronisk udstyr og øge mu-
dingsdirektivet 2006/95/EF samt direk-
treret i USA og andre lande. Wi-Fi er et
lighederne for genbrug, genanvendelse
tivet 72/245/EØF om radiostøjdæmpning
registreret varemærke af Wi-Fi Alliance.
og nyttiggørelse af aald af elektrisk og
af køretøjer som ændret med direktivet
elektronisk udstyr.
2009/19/EF.
Alle de andre handelsmærker eller regis-
trerede varemærker nævnt i nærværende
OVERENSSTEMMELSESERKLÆRING
«Made for iPod / iPhone» betyder, at et
dokument er beskyttet med Copyright og
elektronisk tilbehør er blevet specielt de-
er deres respektive ejeres ejendom. Na-
Parrot SA, 174 quai de Jemmapes, 75010
signet til at kunne forbindes henholdsvist
vnet ”Gracenote”, logoet Gracenote, det
Paris, Frankrig, erklærer under sit unikke
med en iPod eller en iPhone og at fa-
grafiske design Gracenote, benævnelsen
ansvar, at produktet beskrevet i nær-
brikanten attesterer, at det lever op til
”Powered by Gracenote” er mærker eller
værende brugervejledning er i overenss-
Apples standarder.
registrerede varemærker af Gracenote i
temmelse med de tekniske standarder
USA og /eller andre lande.
EN300328 (v1.8.0), EN301489- 1/-
Dansk 51

52 Dansk

Før du går i gang
ANGÅENDE DENNE VEILEDNINGEN
For å begrense papirforbruket, i samsvar
Hurtigstartguide
med vårt formål om å utvise ansvar og
respekt for miljøet, foretrekker Parrot å
gjøre brukerveiledningene tilgjengelige
Sammendrag
online snarere enn å trykke dem. Denne
Før du går i gang
s.53
forenklede veiledningen begrenser seg
Montering
s.54
imidlertid til å gi deg de grunnleggende
Første gangs bruk
s.59
instruksjonene som gjør det mulig å bruke
Telefon
s.61
apparatet på en enkel måte. Du finner
Musikk
s.62
mer informasjon i delen Support og ne-
Internett
s.65
dlastinger på vår webside www.parrot.
I tilfelle av problemer
s.68
com: Komplett bruksanvisning, Ofte
Generell informasjon
s.69
stilte spørsmål, veiledninger...
Norsk 53

Merk: iPod og iPhone (i modusen iPod) vil
Mini, sørg for at kjøretøyet står stille på
Montering
bli betegnet som «iPod» i denne håndboka.
et sikkert sted og at håndbremsen er ko-
blet til. Bruk Parrot ASTEROID Mini med
Merk: Vi anbefaler at du kontakter en
ADVARSLER
et fornuftig lydnivå, slik at du til enhver
fagperson til denne monteringen, gjerne en i
tid kan høre lyder utenfor under kjørin-
Funksjonene som krever lengre tids
vårt nettverk av godkjente montører.
gen. Parrot ASTEROID Mini inneholder
oppmerksomhet må kun benyttes når
magneter av typen NdFeB som kan ska-
kjøretøyet står stille. Din og andre tra-
FØR DU GÅR I GANG
de gjenstander som er følsomme overfor
fikanters sikkerhet har forrang over te-
magnetfelt (pacemakere, kredittkort,
Monteringen av Parrot ASTEROID Mini
lefonsamtaler, musikken og kjøreassis-
mekaniske klokker osv.).
består i å sette den inn mellom bilradioen
tanseprogrammene. Vær ansvarlig: Kjør
og kjøretøyet.
forsiktig, og ta hensyn til dine omgivelser.
OPPDATERING
Parrot fraskriver seg ethvert ansvar der-
Merk: Kablene som medfølger sammen
som du velger å ignorere denne advarse-
Last ned gratis den siste oppdateringen
med Parrot ASTEROID Mini er utstyrt med
len.
av produktet ditt på nettsiden vår, www.
ISO-kontakter. Hvis bilradioen din ikke er
Hvis du prøver å bruke et program som
parrot.com, under avsnittet Support.
utstyrt med ISO-kontakter, må du få tak
ikke er beregnet til navigering eller
Disse oppdateringene gjør at du kan dra
i en ISO-kabeladapter for å kunne foreta
kjøreassistanse mens du kjører, vil det
nytte av nye funksjonaliteter og forbedre
monteringen. Se avsnittet om kompatibili-
vises en advarsel på skjermen. For å se en
kompatibiliteten til apparatet ditt.
tet med kjøretøyer på supportsiden til Par-
video på skjermen til Parrot ASTEROID
54 Norsk

rot ASTEROID Mini for å kontrollere om du
oblingene som er presentert i skjemaene
KOBLE TIL STRØMLEDNINGEN
trenger en kabeladapter.
på s. 6/7.
1. Koble fra batteriet før du monterer
Ta ut den opprinnelige bilradioen fra
KOBLE TIL LYDKABELEN
strømledningen.
kjøretøyet. Denne handlingen kan kreve
Koble kjøretøyets lydkabler til kontakte-
2. Koble ISO hannkontakten på Parrot
bruk av uttrekksnøkler. Se elskjemaet for
ne til Parrot ASTEROID Mini (Tilkobling
ASTEROID Mini til bilradioen (tilk-
din bilradio. Før du fester de ulike delene
1A og 2). Hvis kjøretøyet er utstyrt
obling 3).
av Parrot ASTEROID Mini i kabinen, så
med et lydsystem med forsterker, så bruk
koble de ulike kablene til den elektroniske
3. Koble tilførselskablene på kjøreøtyet
utgangene Jack Line Out Front og Line
boksen. Før du fester delene godt, så
til ISO hunnkontakten på Parrot
Out Rear på den elektroniske boksen for
kontroller lengden på kablene og for-
ASTEROID Mini (tilkobling 4).
å unngå ethvert problem med overspen-
sikre deg om at plasseringene er valgt
ning (smell i høyttalerne, konstant susing
slik at lengden på kablene er tilstrekkelig
Den røde ledningen i kabelen må stemme
osv.). Koble disse Line Out-utgangene til
for å koble de løse delene til hverandre.
overens med +12 V permanent, den
lydsystemet ditt ved bruk av én eller to
Forsikre deg om at kablene til Parrot
oransje ledningen med 12 V tenning og
jackkabler for å koble Parrot ASTEROID
ASTEROID Mini ikke blir bøyd eller klemt
den svarte ledningen med jordforbin-
Mini til lydsystemet ditt (Tilkobling 1B på
ved monteringen. Du må ISO-kabelen
delsen. Kontroller at den oransje lednin-
skjemaet s.7).
som medfølger sammen med Parrot AS-
gen ikke er koblet til 12 V permanent, i så
TEROID Mini. Angivelsene «Tilkobling
fall risikerer du å lade ut bilbatteriet.
#» i de følgende avsnittene svarer til tilk-
Norsk 55

Merk: Før du fortsetter med å kontrollere
3) avhenger av konfigurasjonen av bilra-
Advarsel: Ikke berør den elektroniske boksen
monteringen, så koble til skjermen uten å
dioen. Velg mute-inngangen, og koble
når den er i drift. Temperaturen på over-
plassere den på instrumentbordet. Se avs-
den deretter til den ledige gule ledningen
flaten kan være høy.
nittet Kontrollere monteringen for mer in-
på ISO-kabelen (tilkobling 5).
formasjon.
KONTROLLERE MONTERINGEN
På visse kjøretøyer er det ikke noen +12V
MONTERE DEN
Tenn og avbryt deretter kontakten til
tenning på tilkoblingene til kjøretøyet.
ELEKTRONISKE BOKSEN
kjøretøyet når Parrot ASTEROID Mini
Derfor er det nødvendig å koble den
Unngå å montere boksen nærme sjåføren
er montert: Meldingen «Farvel» skal nå
oransje strømledningen til sikringsbo-
eller klimaanlegget eller på et sted som er
vises på skjermen. Dersom dette ikke sk-
ksen eller til en annen strømkilde etter
utsatt for sollys. Forsikre deg om at bo-
jer, må du bytte om plasseringene på den
tenning.
ksen sitter fast etter monteringen. Sørg
røde og oransje ledningen. Den røde le-
for at det er plass rundt radiatoren på
dningen til strømkabelen skal altså være
KOBLE TIL MUTE-KABELEN
produktet slik at varmen lett kan slippe
koblet til 12 V permanent, den oransje
Funksjonen Mute gjør det mulig å avbryte
ut. Når boksen er montert, så ikke bruk
ledningen til 12 V tenning og den svarte
lyden på bilradioen for å gi plass til lyden
mye krefter når du setter bilradioen tilba-
ledningen til jordforbindelsen. Dette
fra Parrot ASTEROID Mini (musikk, te-
ke på plass. Hvis det ikke er nok plass bak
gjøres ganske enkelt ved å bytte om de to
lefonsamtaler osv.). Valg av mute-inn-
bilradioen, så kan du for eksempel over-
kabelskoene på kabelsystemet til Parrot
gang (Mute in 1, mute in 2 eller mute in
veie å demontere hanskerommet.
(tilkobling.6).
56 Norsk

MONTERE MIKROFONEN
MONTERING AV USB-KABLENE
instrumentbordet (eller et annet utildekt
sted).
Vi anbefaler at du fører ledningen i
Koble USB-kablene til Parrot ASTE-
rennen bak sammenføyningen til bildø-
ROID Mini. Vi anbefaler deg å koble til
MONTERING AV GPS-DONGEL
ren. Hvis ledningen går over pedalene, så
alle kablene til Parrot ASTEROID Mini,
forsikre deg om at den er godt festet.
selv om du ikke nødvendigvis har tenkt
Fest GPS-dongelen på en
å bruke dem. Før lydkablene til et egnet
jevn overflate, i et område
Advarsel: Ikke før mikrofonkabelen inn i
sted som midtkonsollen eller hanskerom-
uten forhindringer inne
varme-, ventilasjons- eller klimaanleggsys-
met. Det kan kreve at det lages et hull i
i kabinen. Oppvarmede
temene eller foran sideairbagene.
instrumentbordet. Unngå så vidt mulig
frontruter og vinduer med
bruk av flere meter lange USB-skjøte-
innlagt antenne kan påvirke GPS-mot-
Sørg for at mikrofonen er montert så
ledninger. USB-kabelen som du kobler
takelsen og redusere påliteligheten til
nærme brukerens hode som mulig. Den
iPod-skjøteledningen til må absolutt
informasjonen fra navigasjonsprogram-
ideelle avstanden er 60 cm. Det anbe-
være koblet til den hvite USB-porten
mene. Dongelens GPS-antenne befinner
fales å montere mikrofonen nærme det
som er beregnet til
seg på siden hvor det står skrevet «Parrot
innvendige bakspeilet. Rett mikrofonen
dette. Det står «iPod» over denne. For å
ASTEROID GPS» og hvor logoen i form
mot brukerens munn.
sikre en optimal mottakskvalitet, anbe-
av en stjerne står. Denne logoen må all-
faler vi at du ikke kobler ditt 3G USB-mo-
tid være rettet mot himmelen. Dersom
dem direkte til Parrot ASTEROID Mini:
kjøretøyet har oppvarmede frontruter,
Bruk en USB-kabel for å montere den på
så fest GPS-dongelen på frontruten på
Norsk 57

høyde med det ikke-oppvarmede områ-
• rengjør overflaten på monteringssi-
• rengjør overflaten på monteringssi-
det. Siden hvor stjernelogoen befinner
den før du limer fast holderen;
den før du limer fast holderen;
seg må festes til frontruten (skjema B s.
• etter at holderen er festet, så vent i
• etter at holderen er festet, så vent i
9).
omlag 2 timer uten å røre den.
omlag 2 timer uten å røre den.
Merk: Det ikke-oppvarmede området på
MONTERE SKJERMEN
For å unngå risiko for tyveri og overdreven
frontruten avhenger av bilmodell. Vanligvis
eksponering for sollys, bør du ta av skjer-
befinner det seg på høyde med vindusvis-
Advarsel: Unngå enhver montering som kan
men når du forlater kjøretøyet.
kerne.
hemme bruken av viktige styremekanismer
eller som kan redusere utsynet til bilføreren.
MONTERE FJERNKONTROLLEN
Hvis kjøretøyet ditt ikke har oppvarmet
Ikke monter skjermen et sted hvor den kan
frontrute, så fest GPS-dongelen på ins-
bli slynget ut hvis en airbag foldes ut eller
Fest holderen til ernkontrollen på ins-
trumentbordet. Siden hvor stjernelogoen
i nærheten av en åpning til utlufting eller
trumentbordet ditt ved hjelp av klebe-
står må være synlig (skjema A s. 9).
kjøretøyets klimaanlegg.
middelet som er under den. Slik sikrer du
at holderen sitter godt fast:
Slik sikrer du at holderen sitter godt fast:
Fest plastholderen til instrumentbordet
• Rengjør overflaten på monteringssi-
ditt (skjema C s. 10). Slik sikrer du at hol-
• Bruk den medfølgende dobbeltsi-
den før du limer fast holderen;
deren sitter godt fast:
dige tapen;
58 Norsk

• Etter at holderen er festet, så vent i
Slik kobler du ernkontrollen til den elek-
Første gang den brukes
omlag 2 timer uten å røre den.
troniske boksen (skjema D s. 11):
Fjernkontrollen kan strømforsynes på to
NAVIGERE I MENYENE
måter: Med et batteri eller ved tilkobling
1. Ta av den runde plastbiten på bak-
til den elektroniske boksen. Slik gir du
Trykk på knappen for å gå til hoved-
siden av ernkontrollen ved å dreie
ernkontrollen strøm via batteri (skjema
menyen.
den i klokkeretningen.
D s. 11):
2. Koble til kabelen på høyde med
Naviger i menyene ved å dreie på hjulet,
1. Ta av den runde plastbiten på bak-
plassen som er beregnet til batteriet,
og godkjenn ved å trykke på hjulet.
siden av ernkontrollen ved å dreie
og drei den mot klokkeretningen.
den i klokkeretningen.
For å gå tilbake til forrige meny, trykk på
3. Koble den andre enden av kabelen
2. Sett inn et batteri av typen 3V
knappen .
til den elektroniske boksen, ved
CR2032 i rommet som er beregnet
siden av USB-kontaktene (skjema
til dette. Forsikre deg om at batteriet
Trykk på knappen for å komme til pop
s. 6).
sitter i riktig retning.
up-menyen som svarer til det aktuelle
programmet. Pop up-menyen gjør det
3. Sett på plass den runde plastskiven
især mulig for deg å få tilgang til program-
ved å dreie den mot klokkeretnin-
mets tilleggsfunksjoner, endre visse inns-
gen.
tillinger eller bla raskere igjennom innhol-
Norsk 59

det av adresselisten eller lydkilden din.
Når telefonen er paret med Parrot
identiske, og deretter bekreft
Under avspilling av en musikkfil, trykk på
ASTEROID Mini, vil forbindelsen mellom
eller annuller.
knappen for å gå tilbake til menyen. Når
de to apparatene skje automatisk så snart
> Skjermen til Parrot
du navigerer i menyene, så trykk på knap-
de to apparatene er tent og i nærheten av
ASTEROID Mini viser «Paring
pen SRC for å gå tilbake til avspilleren.
hverandre, med funksjonen Bluetooth®
gjennomført».
aktivert.
KOBLE TIL
Merk: På visse telefoner må du godkjenne
1. Fra telefonen søker du etter Blue-
EN TELEFON VIA BLUETOOTH
tilkoblingen til Parrot ASTEROID Mini for
tooth®-enheter og velger deretter
å tillate den automatiske tilkoblingen. Se i
Merk: Se kompatibilitetssiden på nettsiden
«Parrot ASTEROID Mini».
brukerveiledningen til telefonen for mer in-
vår for å kontrollere om telefonen din er
2. Paringsprosedyren avhenger altså av
formasjon.
kompatibel med Parrot ASTEROID Mini,
din telefonmodell:
og se den tilsvarende prosedyren for paring:
SYNKRONISERE
www.parrot.com/uk/compatibility.
• Hvis telefonen ber deg skrive
TELEFONENS ADRESSELISTE
inn PIN-koden for Bluetooth,
Dersom det er første gang du bruker en
så skriv inn «0000».
Med de fleste Bluetooth-telefoner blir
telefon sammen med Parrot ASTEROID
adresselisten automatisk synkronisert
• Hvis Parrot ASTEROID Mini og
Mini, må du først pare de to apparatene.
med systemets minne. Hver gang du
telefonen din viser to koder, så
endrer adresselisten din, vil synkronise-
kontroller om disse kodene er
ringen sette i gang igjen automatisk ved
60 Norsk
neste tilkobling.
FORETA ET ANROP VED
Telefon
HJELP AV STEMMEGJENKJENNING
Advarsel: Kun kontaktene som er registrert
MOTTA ET ANROP
Du kan innlede et anrop ved hjelp av
i telefonens minne blir synkronisert med
stemmegjenkjenning etter synkronisering
Parrot ASTEROID Mini. Hvis kontaktene
Et innkommende anrop angis med en
av adresselisten på telefonen din. Parrot
dine er registrert i minnet på SIM-kortet, så
ringetone. Navnet på kontakten uttales
ASTEROID Mini gjenkjenner automatisk
overfør dem til telefonens minne. Se i bru-
dersom nummeret til kontakten er regis-
kontakten i adresselisten din som du øns-
kerveiledningen til telefonen for mer infor-
trert i adresselisten på telefonen som er
ker å ringe til.
masjon.
forbundet til din Parrot ASTEROID Mini.
1. Trykk på knappen for å starte
• For å motta anropet, trykker du på
Merk: På visse telefoner må du godkjenne
prosessen med stemmegjenkjen-
knappen . Trykk på knappen
tilgang fra Parrot ASTEROID Mini til kon-
ning.
for å legge på.
taktene dine for å tillate synkroniseringen.
> Parrot ASTEROID Mini spør deg
Se i brukerveiledningen til telefonen for mer
• For å avvise anropet, trykker du på
om navnet på kontakten som du
informasjon.
knappen .
ønsker å ringe til.
2. Si navnet på kontakten etterfulgt av
Den automatiske synkroniseringen er be-
nummertypen («ARBEID»,
grenset til 5000 kontakter (eller telefon-
«MOBIL»...) hvis flere nummer er
numre) per paret telefon.
tilknyttet denne kontakten.
Norsk 61

> Anropet starter automatisk hvis
bruker et musikkprogram som er kompa-
Musikk
stemmekommandoen har blitt riktig
tibelt med denne funksjonen.
forstått.
Merk: Lastingen kan ta flere minutter ved
1. Trykk på knappen på ern-
> I motsatt fall utsender Parrot
den første tilkoblingen av din lydenhet
kontrollen.
ASTEROID Mini en bekreftelses-
(USB/SD/iPad) til Parrot ASTEROID Mini,
melding. Bekreft ved å si «JA»,
2. Si navnet på artisten eller albumet
især dersom lydenheten inneholder en stor
«RING OPP» eller «RINGE OPP».
du ønsker å høre på når Parrot
mengde musikkfiler. Denne lastetiden lar
ASTEROID Mini ber deg om det.
lydfilene bli tilgjengelige via stemmegjenk-
Merk: Du kan når som helst trykke på knap-
> Listen over lydkilder som er koblet
jenning.
pen for å avbryte anropsprosedyren.
til Parrot ASTEROID Mini og musik-
kprogrammene som er kompatible
BRUKE FUNKSJONEN STEMMEG-
med funksjonen stemmegjenkjen-
JENKJENNING AV MUSIKK
ning, og som inneholder artisten/
Funksjonen stemmegjenkjenning av mu-
albumet du har valgt, vises.
sikk gjør det mulig via stemmegjenkjen-
ning å velge hvilke artister eller album du
Merk: Kontroller navnene på artistene og
vil høre. Denne funksjonen er tilgjengelig
albumene i taggene (metadataen) til mu-
hvis du bruker Parrot ASTEROID Mini
sikkfilene. Disse kan være annerledes enn de
sammen med iPod/USB/SD, eller hvis du
som vises i titlene på musikkfilene.
62 Norsk

BRUK MED IPOD
BRUK MED ET SD-KORT
3. Velg ett av klassifiseringskriteriene
(artist, album, stykke, spilleliste), og
Du kan bruke de følgende SD-korte-
1. Koble iPoden din til USB-kabelen
trykk på hjulet.
ne (med adapter, om nødvendig) sam-
hvor forlengelsesstykket til iPod er
men med Parrot ASTEROID Mini: SD,
4. Velg et stykke, og trykk på hjulet.
koblet til.
mikro-SD, mini-SD, SDHC, mini-SDHC,
2. Trykk på knappen SRC inntil du kan
mikro-SDHC. Kapasiteten på SD-kortet
Merk: Trykk på knappen , og velg den første
velge iPod.
må ikke overstige 32 GB. Musikkfilene
bokstaven i navnet på artisten, albumet el-
på SD-kortet kan være i formatene MP3
ler musikkstykket for lettere å navigere i inn-
3. Velg ett av klassifiseringskriteriene
(mpeg1 layer3), AAC, WAV, OGG eller
holdet på SD-kortet ditt.
(artist, album, stykke, spilleliste), og
WMA.
trykk på hjulet.
BRUK MED EN USB-NØKKEL
1. Sett inn SD-kortet i plassen som er
4. Velg et stykke, og trykk på hjulet.
beregnet til dette, på høyre side av
Parrot ASTEROID Mini er kompatibel
skjermen (skjema E s. 12).
med de fleste USB-nøkler/MP3-spil-
Merk: Trykk på knappen , og velg den
lere/ eksterne harddisker. Det er ingen
første bokstaven i navnet på artisten, albu-
2. Trykk på knappen SRC inntil du kan
begrensninger i forhold til kapasiteten til
met eller musikkstykket for lettere å navi-
velge SD.
USB-nøklene. Musikkfilene på USB-nøk-
gere i innholdet på iPoden din.
kelen kan være i formatene MP3 (mpeg1
layer3), AAC, WAV, OGG eller WMA.
Norsk 63

1. Koble USB-enheten din til USB-ka-
mulig for deg å bruke telefonfunksjonen og
BILRADIO
belen.
lydstreaming via Bluetooth med to forskjel-
For å hente lyden fra bilradioen din, trykk
lige telefoner, uten å måtte koble fra det ene
2. Trykk på knappen SRC inntil du kan
på knappen SRC på ernkontrollen (eller
av de to apparatene.
velge USB.
trykk på Musikk på skjermen) og velg Car
radio.
3. Velg ett av klassifiseringskriteriene
Du kan bruke Parrot ASTEROID Mini
(artist, album, stykke, spilleliste), og
til å lytte til musikkfiler som er lagret på
SKJERMKOMMANDOER
trykk på hjulet.
en Bluetooth-lydavspiller dersom denne
støtter A2DP (Advanced Audio Distri-
Under avspillingen av en musikkfil eller
4. Velg et stykke, og trykk på hjulet.
bution Profile).Hvis du bruker lydavspil-
radioen:
leren for første gang, må du først pare
Merk: Trykk på knappen , og velg den
• Trykk på skjermen for å sette stykket
den til din Parrot ASTEROID Mini. Hvis
første bokstaven i navnet på artisten, albu-
på pause eller avbryte lyden fra
lydavspilleren allerede er paret til Parrot
met eller musikkstykket for lettere å navi-
radioen;
ASTEROID Mini:
gere i innholdet på USB-nøkkelen din.
• la fingeren din gli oppover for å øke
1. Trykk på knappen SRC inntil du kan
volumet;
BRUK MED EN
velge Bluetooth Audio.
BLUETOOTH-LYDAVSPILLER
• la fingeren din gli nedover for å
2. Start avspillingen av en musikkfil på
redusere volumet;
Merk: Parrot ASTEROID Mini gjør det
lydavspilleren.
64 Norsk

Under avspillingen av en musikkfil (med
1. Koble et 3G-modem til Parrot
Internett
unntak av lydkildene som er koblet til via
ASTEROID Mini via en USB-kabel.
en jack-kabel/jack):
> Et pop-up-vindu vises.
Advarsel: Internett-tilkobling via et 3G/4G
• La fingeren din gli mot høyre for å gå
USB-modem krever et abonnementstilbud
2. Velg OK for å aktivere 3G-tilkoblin-
til neste stykke;
fra en telefonoperatør. Bruken av denne
gen.
tjenesten kan medføre betydelige kostnader
> Et pop-up-vindu med rapport om
• la fingeren din gli mot venstre for å
ved roaming. Undersøk dine abonnements-
3G-tilkoblingen vises, etterfulgt av
gå til forrige stykke.
betingelser og ditt forbruk hos din operatør.
et annet pop-up-vindu som spør
Parrot fraskriver seg ethvert ansvar for
deg om PIN-koden din.
Merk: Hvis du bruker Parrot ASTEROID
kostnader forbundet med slik bruk.
Mini med en lydavspiller som er koblet til
3. Skriv inn PIN-koden din ved bruk av
via Bluetooth, er disse kommandoene kun
hjulet, og velg deretter OK. Kryss av
TILKOBLING
tilgjengelige dersom denne støtter profilen
for alternativet Huske PIN-koden
MED ET 3G/4G-MODEM
AVRCP (Audio/Video Remote Control Pro-
hvis du foretrekker at du ikke blir
file).
Merk: Se avsnittet om kompatibilitet med
bedt om PIN-koden hver gang du
Parrot ASTEROID Mini på nettsiden
starter opp Parrot ASTEROID Mini.
vår for å få vist listen over 3G/4G-mo-
demer som er kompatible med Parrot
Merk: Du kan senere endre denne justerin-
ASTEROID Mini.
gen ved å velge Innstillinger > Nettverk >
Norsk 65

3G-nøkkel.
DELING AV
2. På Parrot ASTEROID Mini velger
3G-TILKOBLING VIA BLUETOOTH
du Innstillinger > Nettverk > Blue-
4. Velg om nødvendig ditt APN (Ac-
tooth > Konfigurasjon.
cess Point Name) i den framlagte
Hvis du har en telefon som støtter Blue-
listen. Denne informasjonen er
tooth®-profilen DUN (Dial-Up Networ-
3. Velg ditt APN (Access Point Name)
tilgjengelig i dokumentasjonen som
king) eller PAN (Personal Area Network),
i den forelagte listen, og kryss av for
fulgte med 3G-modemet ditt. Hvis
gjør Bluetooth-tilkoblingen mellom din
alternativet Velge.
ditt APN ikke står på listen, kan du
telefon og Parrot ASTEROID Mini det
4. Trykk på knappen og velg Koble til.
legge det til ved å velge Innstillinger
mulig å dele telefonens 3G-tilkobling.
> Nettverk > 3G-nøkkel > Konfigu-
5. Godkjenn delingen av tilkobling på
rasjon > Nytt tilgangspunkt.
Merk: Se siden om kompatibilitet på nett-
telefonen din. Framgangsmåten for
> Meldingen «3G-nøkkel konfigu-
siden vår for å kontrollere om telefonen din
dette varierer avhengig av hvilken
rert » vises.
tillater deling av 3G-tilkobling via Bluetoo-
type telefon du har.
th, og se den tilsvarende framgangsmåten:
5. Vent i omlag 30 sekunder til
www.parrot.com/uk/compatibility.
DELING AV
tilkoblingen er etablert. Du kan også
3G-TILKOBLING VIA USB
trykke på knappen og navigere i
1. 1. Koble telefonen din til Parrot
menyene mens tilkoblingen blir
ASTEROID Mini via Bluetooth.
Merk: Se siden om kompatibilitet på nett-
etablert.
siden vår for å kontrollere om telefonen din
tillater deling av 3G-tilkobling via USB,
66 Norsk

og se den tilsvarende framgangsmåten:
Innstillinger > Nettverk > USB.
BRUKE PROGRAMMENE
www.parrot.com/uk/compatibility.
> Et pop-up-vindu som indikerer
Du har muligheten til å bruke flere ty-
at delingen av USB-tilkoblingen er
1. Forsikre deg om at tastaturet på
per programmer med Parrot ASTEROID
aktivert vises.
telefonen din er låst opp.
Mini: Musikk, geolokalisering, kjøreas-
sistanse. Hvilke program som er tilgjen-
2. Koble telefonen til Parrot
gelige varierer avhengig av land. Visse
ASTEROID Mini ved bruk av
programmer kan kreve et abonnement.
USB-kabelen/ mikro-USBen som
Parrot ASTEROID Mini er multitasking:
medfølger sammen med telefonen.
Flere programmer kan være i bruk samti-
Du kan også koble den til ved bruk
dig. Du kan for eksempel høre på nettra-
av USB-forlengelsesstykket som
dio og bruke et kjøreassistanseprogram
medfølger sammen med Parrot
samtidig. For mer informasjon om bruken
ASTEROID Mini. Denne tilkoblin-
av de tilgjengelige programmene, se nett-
gen gjør det også mulig å lade opp
siden til ASTEROID Market :
batteriet på telefonen din.
www.parrotasteroid.com.
3. Velg ditt APN (Access Point Name)
i den forelagte listen, og kryss av for
alternativet Velge. Du kan senere
endre denne justeringen ved å velge
Norsk 67

Merk: Du kan også laste ned oppdateringene
PROBLEMER KNYTTET
I tilfelle av problemer
til din Parrot ASTEROID Mini når denne er
TIL MUSIKKFUNKSJONEN
koblet til Internett. Varslingslinjen indikerer
FØR DU GÅR I GANG
Gjenstart din iPod/iPhone før du kobler
når en oppdatering er tilgjengelig.
den til Parrot ASTEROID Mini på nytt.
Forsikre deg om at meldingen “Farvel”
Slik gjenstarter du en iPod/iPhone (denne
vises på skjermen til Parrot ASTEROID
PROBLEMER KNYTTET TIL
prosedyren sletter ingen data):
Mini når du avbryter kontakten med
TELEFONFUNKSJONEN
kjøretøyet. Se avsnittet Kontrollere mon-
• iPod: Trykk samtidig på Meny og på
Kontroller om telefonen din er kompa-
teringen for mer informasjon. Gjenstart
midtknappen inntil iPod-en starter
tibel med Parrot ASTEROID Mini. For å
apparatet. For å gjøre det, ta skjermen ut
på nytt.
gjøre dette, se siden om kompatibilitet på
av holderen. Kontroller at du har den siste
hjemmesiden vår: www.parrot.com/uk/
• iPhone/iPod touch: Trykk sam-
oppdateringen på Parrot ASTEROID
compatibility. Hvis telefonen din er an-
tidig på On/O-knappen og på
Mini. For å gjøre dette, velg Innstillin-
gitt som kompatibel, og hvis din Parrot
Home-knappen inntil iPhone-en
ger> Om > Versjon. Sammenlign dette
ASTEROID Mini allerede har den siste
starter på nytt. Ikke berør skjermen
versjonsnummeret med det som er angitt
oppdateringen, så slett paringen mellom
når meldingen «Skyv for å slå av»
på supportsiden til Parrot ASTEROID
de to apparatene på Parrot ASTEROID
vises.
Mini på hjemmesiden vår,
Mini og på telefonen din, gjenstart de to
www.parrot.com.
apparatene og gjenetabler tilkoblingen
Visse problemer kan oppstå dersom den
mellom de to apparatene.
eksterne enheten allerede er koblet til
68 Norsk

Parrot ASTEROID Mini når du etablerer
kreditnote, ikke innbefattet noen annen
Generelle opplysninger
kontakt. Prøv på nytt ved å koble til den
form for vederlag. Hvis det viser seg at
eksterne enheten etter å ha etablert kon-
det innsendte produktet ikke er defekt,
GARANTI
takt.
vil det bli returnert til avsenderen, og
Med forbehold om lovmessige garanti-
utgiftene forbundet med behandling,
FOR MER INFORMASJON
rettigheter, yter PARROT en begrenset
kontroll og transport vil bli fakturert ve-
garanti i en periode på 12 måneder regnet
dkommende.
Se supportsiden for Parrot ASTEROID
fra den opprinnelige kjøpsdatoen (bort-
Mini på hjemmesiden vår,
sett fra slitedeler som har en garanti på 6
KORREKT AVHENDING
www.parrot.com.
måneder) for at produktet er uten mate-
AV DETTE PRODUKT
rialefeil eller fabrikasjonsfeil, ved fremvis-
(håndtering av elektrisk og elektronisk
ning av kjøpsbevis (dato, kjøpssted, pro-
avfall) Denne merkingen som vises på
duktets serienummer) til forhandleren
produktet eller dens dokumentasjon, in-
eller til Parrot. I den begrensede garan-
dikerer at den ikke skal kastes sammen
tiperioden, må det defekte produktet re-
med ordinært husholdningsavfall ved
turneres i originalemballasjen til forhan-
slutten av sin levetid. For å hindre mulige
dlerens servicesenter. Etter undersøkelse
skade på miljøet eller menneskelig helse
av produktet vil Parrot, etter eget skjønn,
fra ukontrollert avfallsavhending, venn-
enten erstatte produktet eller utstede en
ligst atskill dette fra andre typer avfall
Norsk 69

og resirkuler det ansvarlig for å fremme
eller forbedre produktet utforming eller
med ordinært husholdningsavfall ved
bærekraftig gjenbruk av materielle res-
innholdet i brukerveiledningen uten for-
slutten av sin levetid. For å hindre mu-
surser.
behold og uten forpliktelse til å informere
lige skade på miljøet eller menneskelig
brukerne. I rammen av vårt kontinuerlige
helse fra ukontrollert avfallsavhending,
ENDRINGER
arbeid med å oppgradere og forbedre
vennligst atskill dette fra andre typer
våre produkter kan det være at produktet
avfall og resirkuler det ansvarlig for å
Forklaringene og spesifikasjonene i
du kjøpte er noe forskjellig fra modellen
fremme bærekraftig gjenbruk av mate-
denne veiledningen gis kun i infor-
som er beskrevet i denne veiledningen.
rielle res-surser. Husholdningsbrukere
masjonsøyemed og kan endres uten
Er dette tilfelle, kan en oppdatert versjon
bør kontakte enten forhandleren der de
forvarsel. De anses for å være korrekte
av denne veiledningen være tilgjengelig i
kjøpte produktet, eller lokale myndighe-
på trykketidspunktet. Ved utarbeidelsen
elektronisk format på Parrots webområde
ter, for detaljer om hvor og hvordan frakte
av denne veiledningen har vi gått svært
på www.parrot.com.
denne artikkelen for miljømessig trygg re-
omhyggelig frem for å gi deg nøyak-
sirkulering.Forretningsbrukere bør kon-
tig informasjon. Men Parrot kan ikke
KORREKT AVHENDING AV DETTE
takte sin leverandør og undersøke vilk-
holdes ansvarlig for eventuelle følger
PRODUKT (HÅNDTERING AVELEK-
årene i kjøpekontrakten. Dette produktet
som oppstår ved feil eller utelatelser i
TRISK OG ELEKTRONISK AVFALL)
skal ikke blandes med kommersielt avfall
veiledningen, eller for skader eller tap av
som skal kastes.
data som direkte eller indirekte skyldes
Denne merkingen som vises på pro-
bruken av informasjonene i håndboken.
duktet eller dens dokumentasjon, in-
Parrot forbeholder seg retten til å endre
dikerer at den ikke skal kastes sammen
70 Norsk

SAMSVARSERKLÆRING
«Made for iPod / iPhone» innebærer at
Navnet «Gracenote», logoen Gracenote,
et elektronisk tilbehør har blitt utviklet
skrivemåten Gracenote, påtegnelsen
Parrot SA, 174 quai de Jemmapes,
spesielt for å kobles til henholdsvis en
«Powered by Gracenote» er varemerker
75010 Paris, Frankrike, erklærer med en-
iPod eller en iPhone, og utvikleren garan-
eller registrerte varemerker fra Grace-
eansvar at produktet som er beskrevet
terer at det svarer til Apples yteleskrav.
note i USA og/eller i andre land.
i den nærværende brukerveiledningen
Apple fraskriver seg ethvert ansvar i fo-
er i overensstemmelse med de teknis-
rhold til disse tilbehørsdelenes funksjon
ke standardene EN300328 (v1.8.0),
eller deres overensstemmelse med
EN301489-1/-17 (v2.1.1), EN300220-
gjeldende lovverk og sikkerhetskrav. iPod,
2 (V2.3.1), EN300440, EN60950-1:
iPod Touch og iPhone er varemerker til-
04/2006 / A11: 2009 / A1: 2010 / A2:
hørende Apple, Inc. innregistrert i USA
2011, EN 60065: 05/2002 / A1: 05/2006
og i andre land. Wi-Fi er et registrert va-
/ A11: 008 / A2: 2010 i overensstemmelse
remerke tilhørende Wi-Fi Alliance. Alle
med bestemmelsene i R&TTE-direkti-
de andre handelsmerkene og registrerte
vet 1999/5/EF, så vel som med kravene
varemerkene som er nevnt i det nær-
i direktiv EMC 2004/108/ EF, direktiv
værende dokumentet er beskyttet av lov
2006/95/EF om lavspenningsapparater
om opphavsrett og er deres respektive
og direktiv 72/245/EØF om kjøretøyers
eieres eiendom.
elektromagnetiske kompatibilitet, endret
ved direktiv 2009/19/EF.
Norsk 71

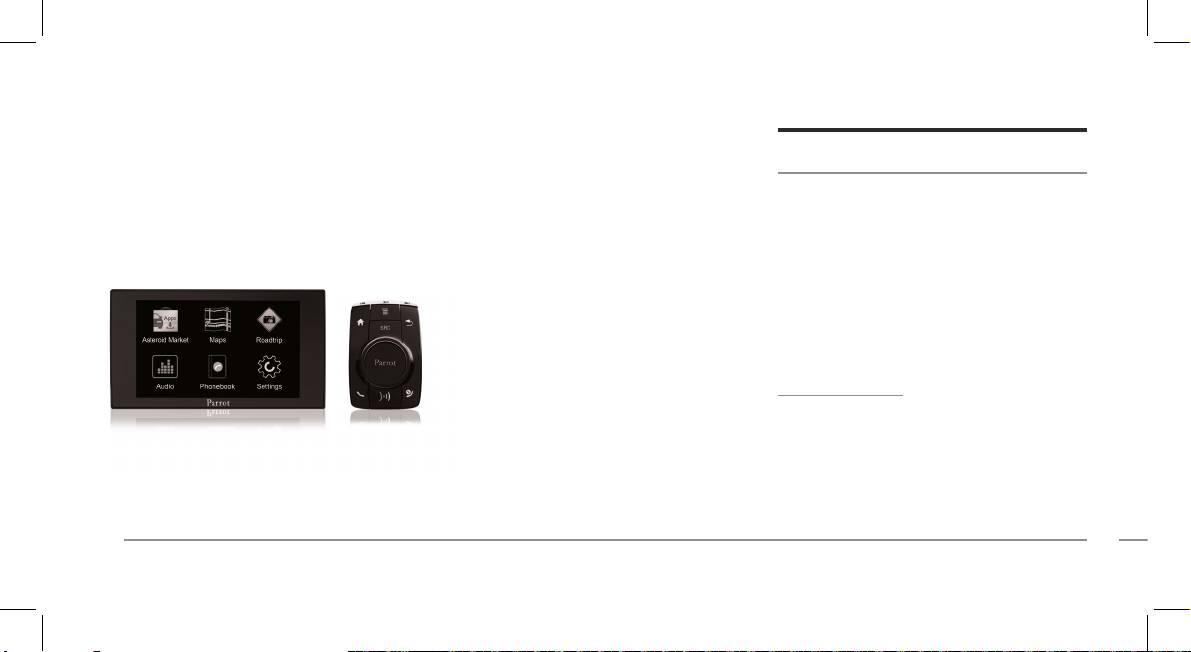
Ennen käyttöä
TIETOA TÄSTÄ OPPAASTA
Rajoittaaksemme paperin käyttöä ja
Pikaopas
toimiaksemme mahdollisimman vas-
tuullisesti ja kunnioittavasti ympäristöä
kohtaan, Parrot suosii käyttäjäasiakirjo-
Sisällysluettelo
jen lataamista internetiin niiden tulosta-
Ennen aloittamista
s.73
misen sijaan. Tässä pikaoppaassa on siksi
Asennus
s.74
ainoastaan tärkeimmät laitteen käyttöön
Ensimmäinen käyttökerta
s.79
liittyvät ohjeet. Saat lisätietoja Support
Puhelin
s.81
and Downloads -osiosta sivustoltamme
Musiikki
s.82
www.parrot.com: täydellinen käyttöoh-
Internet
s.86
je, useimmin kysytyt kysymykset, ope-
Ongelmatapauksissa
s.88
tusvideot...
Yleisiä tietoja
s.90
Suomi 73

Huomaa: iPodiin ja iPhoneen (iPod-käyttö-
vat vahingoittaa magneettikentille herk-
Asennus
tilassa) viitataan tässä käyttöoppaassa ter-
kiä esineitä (sydämentahdistimia, luotto-
millä «iPod».
kortteja, mekaanisia kelloja…).
Huomio: Suosittelemme, että tämän asen-
nuksen suorittaa asiantuntija, mieluiten
VAROITUKSIA
PÄIVITYS
valtuuttamamme asentaja.
Toimintoja, jotka vaativat käyttäjän
Lataa ilmaiseksi tuotteen uusin päivitys
pitkäkestoista huomiota, saa käyttää
sivuilla www.parrot.com osassa Support.
ENNEN KUIN ALOITAT
ainoastaan ajoneuvon ollessa py-
Päivitysten ansiosta voit hyötyä uusim-
Parrot ASTEROID Miniin asennuksessa
sähtyneenä. Oma turvallisuutesi ja mui-
mista toiminnoista ja parantaa tuotteen
se liitetään autoradion ja auton väliin.
den tienkäyttäjien turvallisuus on tärkey-
yhteensopivuutta eri puhelinten kanssa.
dessä etusijalla puheluihin, musiikkiin ja
Huom: Parrot ASTEROID Miniin mukana
ajamisen apusovelluksiin nähden. Toimi
toimitetuissa johdoissa on ISO-liittimet.
vastuullisesti: aja varovaisesti ja seuraa
Jos autoradiota ei ole varustettu ISO-liitti-
ympäristöäsi. Parrot sanoutuu irti kaikes-
millä, sinun tulee hankkia ISO-sovitinjohto,
ta vastuusta, jos jätät tämän varoituksen
jotta asennus onnistuu. Katso yhteensopi-
huomiotta.
vuusosaa Parrot ASTEROID Miniin tuki-
sivulla, jotta voisit vahvistaa, tarvitsetko
Parrot ASTEROID Mini sisältää
sovitinjohtoa.
NdFeB-tyyppisiä magneetteja, jotka voi-
74 Suomi

Irrota ensin ajoneuvon alkuperäinen au-
AUDIOJOHDON LIITTÄMINEN
SYÖTTÖJOHDON LIITTÄMINEN
toradio. Tähän toimenpiteeseen saatat
Liitä auton audiojohdinsarjat Parrot
tarvita irrotusavaimia. Tutustu autora-
1. Irrota akkuliitäntä ennen syöttöjo-
ASTEROID Miniin liittimiin (liitännät 1A
diosi kytkentäkaavioon. Ennen kuin kiin-
hdon asentamista.
ja 2). Jos auto on varustettu äänentois-
nität Parrot ASTEROID Miniin eri osat
tojärjestelmällä, jossa on vahvistin, käytä
2. Kytke Parrot ASTEROID Miniin
autoon, aloita liittämällä johdot elek-
pistokeulostuloja Jack Line Out ront ja
ISO-urosliitin autoradioon (liitin 3).
troniseen koteloon. Ennen kuin kiinnität
Line Out Rear elektronisessa rasiassa,
osat pysyvästi, tarkasta johtojen pituus
3. Kytke auton virransyöttöjohdinsarjat
jotta vältät saturaatio-ongelmat (melua
ja varmista, että asennuspaikat on valittu
Parrot ASTEROID Miniin ISO-naa-
kovaäänisissä, jatkuva kohina jne.). Liitä
siten, että johtojen pituus riittää eri osien
rasliittimeen (liitäntä 4).
nämä Line Out -ulostulot omaan audio-
liittämiseksi toisiinsa. Varmista, että
järjestelmääsi käyttäen yhtä tai kahta pis-
Parrot ASTEROID Miniin johtoja ei ole
Johdon punaisen johtimen tulee vastata
tokejohtoa liittääksesi tai Parrot ASTE-
taitettu eivätkä ne ole jääneet puristuk-
kiinteää +12V jännitettä, oranssin johti-
ROID Miniin omaan audiojärjestelmääsi
siin asennuksen jälkeen. Käytä ehdot-
men virtakytkimen jälkeistä 12V jänni-
(liitäntä 1B kuvassa sivulla 7.
tomasti Parrot ASTEROID Minin kans-
tettä ja mustan johtimen auton maadoi-
sa toimitettua ISO-johtoa. Merkinnät
tusta. Varmista, että oranssi johdin ei ole
«Liitäntä #» seuraavissa osissa vastaavat
kytkettynä kiinteään12V jännitteeseen.
liitäntöjä, jotka on esitetty kuvissa sivuilla
Muuten auton akku saattaa tyhjentyä ja
6 / 7.
handsfree-laite saattaa vaurioitua.
Suomi 75

Huom: Jotta voit tarkistaa asennuksen, si-
Etsi Mute-sisääntulo ja liitä se vapaaseen
olla korkea.
nun on ensin liitettävä näyttö kytkemättä
keltaiseen johtimeen ISO-johdossa
sitä kojetauluun. Lue lisää osiosta Asen-
(liitintä 5).
ASENNUKSEN TARKISTUS
nuksen tarkistus.
Kytke ja katkaise auton sytytysvirta, kun
ELEKTRONISEN RASIAN ASENNUS
Parrot ASTEROID Mini on asennettu:
Joidenkin autojen liittimissä ei ole +12 V
Älä laita rasiaa liian lähelle lämmitystä tai
viestin «Näkemiin» pitäisi tulla näyttöön.
virtakytkimen jälkeistä sytytysjännitettä.
ilmastointia ja paikkaan, jossa se on alt-
Jos viestiä ei näy, sinun tulee vaihtaa pu-
Silloin on syytä kytkeä oranssi johdin
tiina auringonvalolle.Varmista, että rasia
naisen ja oranssin johtimen paikat. Vir-
sulakerasiaan tai muuhun virtakytkimen
pysyy paikoillaan asennuksen jälkeen.
tajohdon punaisen johtimen tulee olla
jälkeiseen virtalähteeseen.
Jätä tilaa tuotteen jäähdyttimen ym-
liitettynä jatkuvaan 12 V jännitteeseen,
pärille, jotta lämpö pääsee haihtumaan
oranssin johtimen virtalukon jälkeiseen
MUTE-JOHDON LIITTÄMINEN
helpommin. Kun rasia on asennettu, älä
12 V sytytysjännitteeseen ja mustan joh-
Mute-toiminnon avulla voit katkaista
käytä voimaa, kun asennat autoradion.
timen auton runkoon. Tämä toimenpide
äänen autoradiosta antaaksesi äänen
Jos tila autoradion takana on liian pieni,
suoritetaan helposti vaihtamalla Parrotin
Parrot ASTEROID Miniille (musiikkia,
voit harkita esimerkiksi hansikaslokeron
kytkennässä olevien kahden kaapeliken-
viestejä...). Mute-sisääntulon valinta
irrottamista.
gän paikkaa (liitäntä 6).
(Mute in 1, mute in 2 tai mute in 3) riip-
puu autoradion konfiguraatiosta.
Varoitus: älä koske elektroniseen rasiaan,
kun se on käytössä. Pinnan lämpötila voi
76 Suomi

MIKROFONIN ASENNUS
USB-JOHTOJEN ASENNUS
käytä USB-johtoa asentaaksesi sen koje-
tauluun (tai johonkin muuhun vapaaseen
Me kehotamme liu’uttamaan johdon
Kytke USB-johdot Parrot ASTEROID
paikkaan).
kouruun oven tiivisteen takana. Jos johto
Minitiin. Suosittelemme, että kytket
kulkee polkimien yli, varmista, että se on
kaikki Parrot ASTEROID Miniin johdot,
GPS-VASTAANOTTIMEN ASENNUS
hyvin kiinnitetty.
vaikka et välttämättä aio käyttää niitä.
Vedä vastaavat liittimet ulos ajoneuvon
Kiinnitä GPS-vastaanotin
Varoitus: Älä laita mikrofonin johtoa kulk-
hansikaslokerosta tai säilytyslokerosta.
tasaiselle pinnalle ohjaa-
emaan lämmitysjärjestelmän tai ilmastoin-
Tätä varten voi olla tarpeen tehdä reikä
mon sisälle alueelle, jolla ei
nin sisään tai sivuturvatyynyjen edestä.
kojelaudan sisään. Useiden metrien pi-
ole esteitä. Lämpöä heijas-
tuisia USB-jatkojohtoja on syytä välttää.
tavat ja antennilla varuste-
Varmista, että mikrofoni on asennettu
Se USB-johto, johon liität iPodin jatko-
tut tuulilasit voivat häiritä GPS-signaalin
mahdollisimman lähelle käyttäjän päätä.
johdon, tulee ehdottomasti liittää valk-
vastaanottoa ja heikentää navigointiso-
Ihanteellinen etäisyys on 60 cm. Asenna
oiseen USB-porttiin, joka varattu tähän
velluksiin liittyvän tiedon luotettavuutta.
mikrofoni mieluiten lähelle sisätaustapei-
tarkoitukseen. Sen yläpuolella on mer-
Vastaanottimen GPS-antenni sijaitsee si-
liä. Suuntaa mikrofoni käyttäjän suuta
kintä «iPod». Jotta paras mahdollinen
vulla, johon on kirjoitettu «Parrot ASTE-
kohti.
vastaanotto varmistetaan, 3G-avainta
ROID GPS» ja jolla sijaitsee tähdenmuo-
ei saa liittää suoraan Parrot ASTEROID
toinen logo. Tämän logon tulee olla aina
Minitiin:
ylöspäin kohti taivasta. Jos autossa on
lämpöä heijastava tuulila si, kiinnitä GPS-
Suomi 77

avain tuulilasiin lämpöä heijastamatto-
• puhdista asennuspinta ennen kan-
• puhdista asennuspinta ennen kan-
maan osaan. Tähdenmuotoisella logolla
nattimen kiinnitystä,
nattimen kiinnitystä;
varustetun puolen tulee olla liimattuna
• kun kannatin on kiinnitetty, odota
• kun kannatin on kiinnitetty, odota
tuulilasiin (kuva F, s. 9).
noin 2 tuntia ennen sen käsittelyä.
noin 2 tuntia ennen sen käsittelyä.
Huom: Lämpöä heijastamaton alue tuu-
NÄYTÖN ASENNUS
Muista irrottaa näyttö, kun lähdet pois
lilasilla vaihtelee auton mallista riippuen.
autosta. Näin vältät varkausyritykset ja
Yleensä se sijaitsee taustapeilin luona.
Varoitus: Tuotetta ei saa asentaa niin, että
näytön liiallisen pitämisen suorassa au-
se vaikeuttaa tärkeiden ohjaustoimintojen
ringonvalossa.
Jos autossa ei ole lämpöä heijastavaa
käyttöä tai vähentää kuljettajan näky-
tuulilasia, kiinnitä GPS-vastaanotin ko-
vyyttä. Älä asenna näyttöä paikkaan, jossa
KAUKOSÄÄTIMEN ASENTAMINEN
jetauluun. Tähdenmuotoisella logolla
turvatyyny saattaa laueta sen päälle äläkä
varustetun puolen tulee olla näkyvissä
ajoneuvon tuuletusaukon tai ilmastoin-
Liimaa kaukosäätimen kannatin kojetau-
(kuva E, s. 9).
tiaukon läheisyyteen.
luun käyttäen tarraa, joka sijaitsee sen
alapuolella. Jotta kannatin on varmasti
Jotta kannatin on varmasti kiinni:
Liimaa muovinen kannatin kojetauluun
kiinni:
(kuva C, s. 10). Jotta kannatin on var-
• käytä toimitettua kaksipuolista
• puhdista asennuspinta ennen kan-
masti kiinni:
tarraa,
nattimen kiinnitystä;
78 Suomi

• kun kannatin on kiinnitetty, odota
1. Irrota pyöreä muovikappale
Ensimmäinen
noin 2 tuntia ennen sen käsittelyä.
kaukosäätimen selkäpuolella
kiertämällä sitä myötäpäivään.
käyttökerta
Kaukosäädin voi saada virtaa 2 tavalla:
2. Kytke johto paristolle varatun pai-
pariston avulla tai liittämällä se elek-
VALIKKOJEN SELAAMINEN
kan luo ja kierrä sitä myötäpäivään.
troniseen rasiaan. Kaukosäätimen vir-
Pääset päävalikkoon painamalla -näp-
ransyöttö paristolla (kuva D, s. 11):
3. Kytke johdon toinen pää elek-
päintä.
troniseen rasiaan USB-liittimien
1. Irrota pyöreä muovikappale
viereen (kuva s. 6).
kaukosäätimen selkäpuolella
Selaa valikkoja pyörittämällä säätöpyörää
kiertämällä sitä myötäpäivään.
ja vahvista valintasi painamalla säätöpy-
örää.
2. Laita 3V CR2032 -tyyppinen paristo
sille varattuun paikkaan. Varmista,
Pääset takaisin päävalikkoon painamalla
että paristo on oikeaan suuntaan
-näppäintä.
3. Laita pyöreä muovikappale takaisin
kiertämällä sitä vastapäivään.
Pääset käytössä olevaa sovellusta vas-
taavaan aihevalikkoon painamalla
Elektronisen rasian liittäminen (kuva D,
-näppäintä. Aihevalikon kautta pääset
s. 11):
sovelluksen lisätoimintoihin, muutta-
Suomi 79

maan tiettyjä asetuksia ja selaamaan no-
Jos käytät puhelinta ensimmäistä kertaa
• Jos puhelin pyytää antamaan
peammin hakemistosi tai audiolähteesi
yhdessä Parrot ASTEROID Minin kanssa,
PIN-koodin Bluetooth-yhteyttä
sisältöä.
on aluksi tehtävä pariliitäntä laitteiden
varten, näppäile «0000».
välille. Kun puhelin ja Parrot ASTEROID
• Jos Parrot ASTEROID Mini
Jos haluat palata päävalikkoon musiikki-
Mini on yhdistetty pariliitännän avul-
ja puhelimesi näyttävät kahta
tiedoston luvun aikana, paina -näp-
la, näiden 2 laitteen välille muodostuu
koodia, tarkista, että koodit
päintä. Jos taas haluat palata valikosta
yhteys automaattisesti aina, kun molem-
ovat identtiset ja vahvista tai
takaisin musiikkisoittimeen, paina
piin laitteisiin on kytketty virta, nämä 2
hylkää sitten.
SRC-näppäintä.
laitetta ovat toistensa läheisyydessä ja
> Parrot ASTEROID Minin
Bluetooth® -toiminto on aktivoitu.
näytössä on «Pariliitäntä on-
PUHELIMEN KYTKEMINEN
1. Suorita puhelimesta
nistui ».
BLUETOOTHIN KAUTTA
Bluetooth®-oheislaitteiden haku ja
Huom: Tarkista oman puhelimesi yhteen-
valitse «Parrot ASTEROID Mini».
Huom: Joissain puhelimissa pitää hyväksyä
sopivuus Parrot ASTEROID Minin kanssa
liitäntä Parrot ASTEROID Miniin, jotta au-
2. Yhdistäminen etenee tästä
verkkosivultamme ja etsi lisätietoja vas-
tomaattinen yhteys on mahdollinen. Katso
eteenpäin puhelimesi mallista
taavasta pariliitännän teosta:
lisätietoja puhelimen käyttöohjeista.
riippuen:
www.parrot.com/uk/compatibility.
80 Suomi

PUHELIMEN
Katso lisätietoja puhelimen käyttöohjeista.
Puhelin
OSOITEKIRJAN SYNKRONOINTI
Automaattinen synkronointi on rajoitettu
Suurimmassa osassa Bluetooth-puhe-
SAAPUVA PUHELU
5000 yhteystietoon (tai puhelinnume-
limia puhelimen luettelo synkronoituu
roon) liitettyä puhelinta kohti.
Soittoääni ilmoittaa tulevasta puhelus-
automaattisesti laitteen muistin kanssa.
ta. Laite ilmoittaa soittajan nimen, jos
Aina kun muokkaat luetteloa, synkro-
soittajan numero on tallennettu Parrot
nointi käynnistyy automaattisesti seu-
ASTEROID Miniin.
raavalla yhteyskerralla.
• Puhelun ottamiseksi vastaan on
Varoitus: Vain puhelimen muistiin tallen-
painettava . Paina , kun haluat
netut yhteystiedot synkronoituvat Parrot
lopettaa puhelun.
ASTEROID Miniin kanssa. Jos yhteystiedot
• Puhelun vastaanottamisesta
on tallennettu SIM-kortin muistiin, ne tulee
kieltäytymiseksi on painettava .
siirtää puhelimen muistiin. Katso lisätietoja
puhelimen käyttöohjeista.
PUHELUN SOITTO
ÄÄNITUNNISTUSTA KÄYTTÄEN
Huom: Joissain puhelimissa on hy-
väksyttävä Parrot ASTEROID Miniin pääsy
Voit aloittaa puhelun äänitunnistuksen
yhteystietoihin synkronoinnin sallimiseksi.
avulla, kun puhelimesi luettelo on synkro
Suomi 81

noitu. Parrot ASTEROID Mini tunnistaa
Vahvista sanomalla «KYLLÄ»,
Musiikki
automaattisesti luettelossa sen yhtey-
«SOITA» tai «SOITTAMINEN».
shenkilön, jolle haluat soittaa.
Huom: Useita minuutteja kestävä lataus
Huomio: Voit koska tahansa peruuttaa pu-
1. Aloita äänitunnistus painamalla .
voi olla tarpeen, kun liität audio-oheis-
helun soittamisen painamalla .
> Parrot ASTEROID Mini kysyy sen
laitteen (USB / SD/iPod) ensimmäistä
yhteystiedon nimeä, jolle haluat
kertaa ASTEROID Minitiin, erityisesti siinä
soittaa.
tapauksessa, että oheislaite sisältää huo-
mattavan määrän musiikkitiedostoja. La-
2. Sano ääneen sen yhteystiedon nimi,
tausaika mahdollistaa näiden tiedostojen
jolle haluat soittaa, sekä puhelin-
käytön äänitunnistuksen avulla.
numerotyyppi («TYÖ», «MATKA-
PUHELIN»...), jos yhteystiedolla on
ÄÄNITUNNISTUKSEN KÄYTTÖ
useita numeroita.
> Jos äänikomento on ymmärretty
Äänitunnistustoiminnon avulla voit valita
oikein, laite soittaa automaattisesti
äänitunnistuksen avulla artisteja tai albu-
yhteystiedolle.
meja, joita haluat kuunnella. Tämä toi-
> Jos äänikomentoa ei ole ymmär-
minto on käytettävissä, jos käytät Parrot
retty oikein, Parrot ASTEROID
ASTEROID Miniä iPodin, USB:n, SD:n
Mini pyytää vahvistamaan valinnan.
tai muun vastaavan oheislaitteen kans-
82 Suomi

sa, taijos käytät jotain tämän toiminnon
KÄYTTÖ IPODIN KANSSA
KÄYTTÖ SD-KORTIN KANSSA
kanssa yhteensopivaa sovellusta.
Voit käyttää seuraavia SD-kortteja
1. Liitä iPod USB-johtoon, johon
1. Paina kaukosäätimen -näppäintä.
(tarvittaessa adapterin kanssa) Parrot
iPodin jatkojohto on liitetty.
ASTEROID Minin kanssa: SD, mikro-SD,
2. Sano sen artistin tai albumin nimi,
2. Painele SRC-valitsinta, kunnes voit
mini-SD, SDHC, mini-SDHC, mikro-SD-
jota haluat kuunnella, kun Parrot
valita iPodin.
HC. SD-kortin kapasiteetti ei saa olla yli
ASTEROID Mini pyytää tekemään
32 gigatavua. SD-kortin musiikkitiedos-
niin.
3. Valitse jokin luokittelukriteeri (artis-
tot voivat olla tiedostomuodoltaan MP3
> Lista audiolähteistä, jotka on
ti, albumi, kappaleet, soittolista) ja
(mpeg1 layer3), AAC, WAV, OGG tai
liitetty Parrot ASTEROID Minmiin
paina säätöpyörää.
WMA.
ja musiikkisovelluksista, jotka ovat
4. Valitse kappale ka paina vierityspy-
yhteensopivia äänitunnistuksen
1. Laita SD-kortti sille varattuun paik-
örää.
kanssa ja joissa on valitun artistin /
kaan näytön oikealla puolella (kuva
albumin nimi.
E, s.12).
Huom: Paina valitsinta ja valitse artistin,
albumin tai kappaleen nimen ensimmäinen
2. Painele SRC-valitsinta, kunnes voit
Huom: Voit tarkistaa artistien ja albumien
kirjain navigoidaksesi helpommin iPodin
valita SD-kortin.
nimet musiikkitiedostojesi tageista (me-
sisällössä.
tatiedoista). Ne eivät välttämättä vastaa
musiikkitiedostoillesi annettuja nimiä.
Suomi 83

3. Valitse jokin luokittelukriteeri (artis-
layer3), AAC, WAV, OGG tai WMA.
KÄYTTÖ BLUETOOTH-
ti, albumi, kappaleet, soittolista) ja
AUDIOSOITTIMEN KANSSA
1. Kytke USB-laite USB-johdolla.
paina säätöpyörää.
Huom: Parrot ASTEROID Minin avulla
2. Painele SRC-valitsinta, kunnes voit
4. Valitse kappale ja paina säätöpy-
voit käyttää puhelin- ja audiosuoratoisto-
valita USB:n.
örää.
toimintoa Bluetoothin kautta 2 eri puhe-
3. Valitse jokin luokittelukriteeri (artis-
limella ilman, että sinun täytyy katkaista
Huom: Paina valitsinta ja valitse artistin,
ti, albumi, kappaleet, soittolista) ja
yhteyttä toiseen 2 laitteesta.
albumin tai kappaleen nimen ensimmäinen
paina säätöpyörää.
kirjain navigoidaksesi helpommin SD-kor-
Voit käyttää Parrot ASTEROID Miniä
4. Valitse kappale ja paina säätöpy-
tin sisällössä.
Bluetooth-audiosoittimeen tallennet-
örää.
tujen musiikkitiedostojen kuunteluun,
KÄYTTÖ USB-AVAIMEN KANSSA
jos soitin tukee A2DP-profiilia (Ad-
Huom: Paina valitsinta ja valitse artistin,
vanced Audio Distribution Profile). Jos
Parrot ASTEROID Mini on yhteensopi-
albumin tai kappaleen nimen ensimmäinen
käytät audiosoitinta ensimmäistä kertaa
va useimpien USB-avainten/MP3-soi-
kirjain navigoidaksesi helpommin USB-avai-
Parrot ASTEROID Minin kanssa, laitteet
tinten/ ulkoisten kiintolevyjen kans-
men sisällössä.
on yhdistettävä pariliitännän avulla. Kun
sa. USB-avainten koolla ei ole rajaa.
audiosoitin ja Parrot ASTEROID Mini on
USB-avaimen musiikkitiedostot voivat
jo yhdistetty:
olla tiedostomuodoltaan MP3 (mpeg1
84 Suomi

1. Painele SRC-valitsinta, kunnes voit
• liu’uta sormea ylöspäin nostaaksesi
Huom: Jos käytät Parrot ASTEROID
valita kohteen Bluetooth Audio.
äänentehoa;
Minitia audiosoittimen kanssa, joka on lii-
tetty Bluetoothin kautta, nämä ohjaimet
2. Käynnistä musiikkitiedoston luku
• liu’uta sormea alaspäin laskeaksesi
ovat käytettävissä vain, jos soitin tukee
audiosoittimestasi.
äänentehoa.
AVRCP-profiilia (Audio/Video Remote
Control Profile).
AUTORADIO
Musiikkitiedoston soiton aikana (lukuun
ottamatta audiolähteitä, jotka on kytketty
Saadaksesi takaisin autoradiosi äänen, si-
kaapelipistokkeen/pistokkeen avulla):
nun on painettava kaukosäätimessä SRC
(tai paina näytössä Musiikki) ja valittava
• Liu’uta sormea oikealle siirtyäksesi
Car radio.
seuraavaan kappaleeseen;
• Liu’uta sormea vasemmalle siir-
NÄYTÖN OHJAIMET
tyäksesi edelliseen kappaleeseen.
Musiikkitiedoston tai radion soittamisen
aikana:
• paina näyttöä keskeyttääksesi
kappaleen toiston ja katkaistaksesi
radion äänen;
Suomi 85

kanssa.
Huomio: Voit sitten muuttaa tätä säätöä
Internet
valitsemalla Parametrit > Verkko >
1. Kytke 3G-modeemi Parrot
3G-avain.
Varoitus: Internet-yhteys 3G/4G -mo-
ASTEROID Miniin USB-kaapelin
deemin välityksellä edellyttää liikkuvan
välityksellä.
4. Valitse tarvittaessa APN (Access
laajakaistapalvelun tilaamista puhelino-
> Näyttöön tulee ponnahdusikkuna.
Point Name) esitetystä listasta.
peraattorilta. Tällaisen palvelun käytöstä
Tämä tieto on saatavissa 3G-avai-
2. Valitse OK aktivoidaksesi 3G-yhtey-
voi syntyä huomattavia roaming-kuluja.
men kanssa toimitetuista asiakirjois-
den.
Tarkasta liikkuvan laajakaistapalvelusi
ta. Jos oma APN ei ole listalla, voit
> Näyttöön tulee 3G-liittymän tilan
ehdot ja kulut puhelinoperaattoriltasi. Par-
lisätä sen valitsemalla Parametrit >
esittävä ponnahdusikkuna, jota seu-
rot sanoutuu irti kaikesta vastuusta, joka
Verkko > 3G-avain > Konfiguraatio
raa toinen ponnahdusikkuna, joka
liittyy kyseisen palvelun kuluihin.
> Uusi liittymispiste.
pyytää sinun PIN-koodiasi.
> Viesti «3G-avain konfiguroitu»
LIITTÄMINEN
3. Syötä PIN-koodia käyttäen säätöpy-
ilmestyy näyttöön.
3G/4G-AVAIMEN AVULLA
örää ja valitse sitten OK. Rastita
5. Odota 30 sekuntia, kunnes yhteys
vaihtoehto Tallenna PIN-koodi, jos
Huom: Katso Parrot ASTEROID Minin
on saatu. Voit myös painaa ja
haluat, että PIN-koodia ei pyydetä
yhteensopivuusosaa kotisivuillamme nä-
navigoida valikoissa samalla, kun
joka kerta, kun Parrot ASTEROID
hdäksesi listan 3G/4G-avaimista, jotka
yhteyttä otetaan.
Mini käynnistetään.
sopivat yhteen Parrot ASTEROID Minin
86 Suomi

3G-YHTEYDEN JAKAMINEN
2. Valitse Parrot ASTEROID Minissä
parrot.com/uk/compatibility.
BLUETOOTHIN KAUTTA
Parametrit > Verkko > Bluetooth >
1. Varmista, että puhelimen näppäi-
Konfiguraatio.
Jos puhelimesi tukee Bluetooth DUN
mistö ei ole lukittuna.
(Dial-Up Networking) tai PAN (Personal
3. Valitse oma APN (Access Point
2. Liitä puhelin Parrot ASTEROID
Area Network) -profiilia, voit jakaa puhe-
Name) esitetyltä listalta, rastita
Miniin käyttäen USB / mikro-USB-
limen 3G-yhteyden puhelimesi ja Parrot
sitten vaihtoehto Valitse.
johtoa, joka on toimitettu puheli-
ASTEROID Minin välisen Bluetooth-
4. Paina -näppäintä ja valitse Yhdistä.
men mukana. Voit liittää sen myös
yhteyden kautta.
käyttäen USB-jatkojohtoa, joka on
5. Hyväksy yhteyden jakaminen puhe-
toimitettu Parrot ASTEROID Minin
Huom: Katso kotisivujemme yhteensopi-
limessa. Tämä menettely vaihtelee
kanssa. Tämän liitännän kautta voi
vuussivuja tarkastaaksesi, voiko puhelime-
puhelimen mallin mukaan.
ladata puhelimen akut.
si avulla jakaa 3G liittymän Bluetoothin
kautta, ja katso sovellettavaa menettely-
3G-YHTEYDEN
3. Valitse oma APN (Access Point
tapaa: www.parrot.com/uk/compatibility.
JAKAMINEN USB:N KAUTTA
Name) esitetyltä listalta, rastita
sitten vaihtoehto Valitse. Voit sitten
1. Yhdistä puhelimesi Parrot
Huom: Katso kotisivujemme yhteensopi-
muuttaa tätä säätöä valitsemalla
ASTEROID Miniin Bluetoo-
vuussivuja tarkastaaksesi, voiko puhelimesi
Parametrit > Verkko > 3G-avain.
th-yhteyden kautta.
avulla jakaa 3G liittymän USB:n kautta, ja
> USB-liitännän jakamisen ponna-
katso sovellettavaa menettelytapaa: www.
hdusikkuna tulee näyttöön.
Suomi 87

SOVELLUSTEN KÄYTTÖ
Internet-yhteydessä. Päivityksen saatavuus
Ongelmanratkaisu
ilmenee viestipalkissa.
Voit käyttää monenlaisia sovelluksia
Parrot ASTEROID Miniin kanssa: musiik-
ENNEN KUIN ALOITAT
PUHELINTOIMINTOON
kia, satelliittipaikannus, ajamisen apu-
Varmista, että «Näkemiin» -viesti tulee
LIITTYVÄT ONGELMAT
neuvoja. Käytössä olevat sovellukset ovat
Parrot ASTEROID Miniin näytölle, kun
erilaiset käyttömaasta riippuen. Jotkut
Tarkista puhelimesi yhteensopivuus
sammutat ajoneuvon virran. Lue lisää
sovellukset voivat olla maksullisia. Par-
Parrot ASTEROID Miniin kanssa. Tätä
osiosta Asennuksen tarkistus. Palauta
rot ASTEROID Mini on monikäyttöinen:
varten yhteensopivuus on tarkastettava
laite alkutilaan. Tätä varten näyttö on
yhtä aikaa voi käyttää useampia sovelluk-
kotisivuiltamme:
irrotettava alustalta. Tarkista, että Par-
sia. Voit esimerkiksi kuunnella verkkora-
www.parrot.com/uk/compatibility.
rot ASTEROID Miniissasi on viimeisin
diota ja käyttää ajon avustussovellusta
Jos puhelimesi on sivustomme mu-
päivitys. Valitse tätä varten Parametrit >
yhtä aikaa. Lisätietoa käytettävissä ole-
kaan yhteensopiva ja Parrot ASTEROID
Tietoja > Versio. Vertaa tätä versionume-
vista sovelluksista on ASTEROID Market
Miniissasi on viimeisin päivitys, poista
roa siihen numeroon, joka näkyy Parrot
-sivustolla: www.parrotasteroid.com.
laitteiden välinen pariliitos sekä Parrot
ASTEROID Miniin tukisivulla kotisivuil-
ASTEROID Miniista että puhelimesta,
lamme www.parrot.com.
käynnistä uudelleen molemmat laitteet
ja muodosta niiden välinen yhteys uu-
Huom: Voit myös ladata Parrot
delleen.
ASTEROID Miniin päivityksiä, kun se on
88 Suomi

MUSIIKKITOIMINTOON
Joitakin ongelmia voi ilmaantua, jos
Yleistä
LIITTYVÄT ONGELMAT
oheislaite on jo liitetty Parrot ASTEROID
Minitiin, kun virta kytketään päälle. ritä
Palauta iPod / iPhone -laitteesi alkutila
TAKUU
uudelleen niin, että liität laitteen vasta,
ennen uuden yhteyden muodostamista
un sytytysvirta on kytketty päälle.
PARROT takaa 12 kuukauden ajak-
Parrot ASTEROID Minitiin. IPod / iPhone
si alkuperäisestä asiakkaan tekemän
-laitteen alkutilan palautus (tämä toi-
LISÄTIETOJA
oston päivästä lukien (paitsi kuluville
menpide ei poista tietoja laitteesta):
osille 6 kuukautta), että tuotteessa
Lisätietoja Parrot ASTEROID Miniin
• iPod: paina yhtä aikaa Menu-näp-
ei ole materiaali- tai valmistusvikoja.
tukisivulta verkkosivulta:
päintä ja keskipainiketta kunnes
Takuuvaatimusta tehtäessä on Parro-
www.parrot.com.
iPod käynnistyy uudelleen.
tin jälleenmyyjälle esitettävä ostotodis-
tus (päivämäärä, ostopaikka, tuotteen
• iPhone / iPod touch paina yhtä aikaa
sarjanumero). Tämä takuu ei vaikuta
On/O-näppäintä ja Home-näp-
lainmukaisiin takuisiin. Sopimustakuun
päintä kunnes iPhone käynnistyy
voimassa olon aikana viallinen tuote on
uudelleen. Älä koske näyttöön,
palautettava alkuperäisessä pakkaukses-
kun siinä on viesti Liu’uta sammut-
sa jälleenmyyjän jälkimyyntipalveluun.
taaksesi ».
Tutkittuaan tuotteen Parrot päättää,
vaihtaako yhtiö tuotteen tai antaako
Suomi 89

yhtiö hyvitystä, joka sulkee pois kaikki
hen asentaa sen. Parrotia ei voi missään
Näin edistät materiaalisten aineiden
muut korvaukset. Takuu ei kata Blue-
tapauksessa pitää vastuussa tuotteen
kestävää uudelleenkäyttöä. Yksityiset
tooth® kännyköiden kanssa toimivien
toimintahäiriöstä, joka johtuu asen-
kuluttajat voivat ottaa yhteyttä siihen
Parrot-tuotteiden sisältävien ohjelmis-
nuksesta, jossa ei ole otettu huomioon
jälleenmyyjään, joka onmyynyt tuotteen
tojen päivitystä seuraavissa tarkoituksis-
käyttöoppaan ohjeita ja/tai käyttäjän
heille tai oman kunnan palveluihin saa-
sa: yhteensopivuus, tietojen talteenotto,
itsensä suorittamasta vääränlaisesta
dakseen tietoja tuotteen hävittämisestä
tuotteen ulkoinen kuluminen joka johtuu
asennuksesta.
ja sen ympäristöystävällisestä kier-
tuotteen normaalista käytöstä, mikä ta-
rätyksestä. Yritykset voivat ottaa yhteyttä
hansa onnettomuuden, tuotteen epänor-
TUOTTEEN KIERRÄTYS
tavaratoimittajaansa ja hakea lisätietoja
maalin tai luvattoman käytön tai muun
tuotteen myyntisopimuksen ehdoista.
Sähköiset ja elektroniset laitteistojätteet
kuin Parrot-tuotteen aiheuttama vahin-
Tuotetta ei saa hävittää muiden kaupal-
Tuotteessa ja sen käyttöoppaassa oleva
ko. Parrot ei ole vastuussa kuljetuksen tai
listen jätteiden kanssa.
tunnus merkitsee, että tuotetta ei saa
korjauksen aikana tapahtuvasta tuotteen
hävittää tavallisten kotitalousjätteiden
säilytyksestä, katoamisesta tai tietojen
MUUTOKSET
kanssa tuotteen käyttöajan loputtua.
vahingoittamisesta. Tuote, josta ei löydy
ätteiden valvomaton hävittäminen voi ai-
Käyttöoppaan sisältämät ohjeet ja tiedot
minkäänlaista vahinkoa tai vikaa pa-
heuttaa vahinkoa ympäristölle ja ihmisen
ovat viitteellisiä ja niitä voidaan muut-
lautetaan lähettäjälle. Lähettäjä maksaa
terveydelle. Älä sekoita tuotetta muiden
taa ilman ennakkoilmoitusta. Käyttöop-
käsittely-, tarkastus- ja kuljetuskulut.
tyyppiten jätteiden kanssa, vaan kier-
paan tiedot ovat oikeita oppaan tulostu-
Tuotteen teknisten ominaisuuksien takia
rätä se oikealla ja vastuullisella tavalla.
shet kellä. Tiedot on kirjoitettu suurella
suosittelemme, että annat huoltomie-
90 Suomi

huolella, jotta käyttäjä saisi käyttöönsä
VAATIMUSTENMUKAISUUSVAKUUTUS
«Made for iPod / iPhone» tarkoittaa, että
mahdollisimman tarkat tiedot. Parrot
elektroninen oheislaite on suunniteltu
Parrot SA, 174 quai de Jemmapes, 75010
S.A. yritystä ei voida kuitenkaan pitää
erityisesti liitettäväksi iPod- tai iPhone-
Pariisi, Ranska, ilmoittaa omalla vastuul-
vastuullisena suorasti tai epäsuorasti
laitteeseen ja suunnittelija takaa, että se
laan, että tässä käyttöoppaassa esitelty
mahdollisesta tahattomasta vahingos-
vastaa Applen toimintanormeja. Apple ei
tuote vastaa teknisiä normeja EN300328
ta tai tietojen katoamisesta, joka johtuu
ota vastuuta näiden oheislaitteiden toi-
(v1.8.0), EN301489-1/-17 (v2.1.1),
kyseisestä käyttöoppaasta puuttuvasta
minnasta tai niiden määräysten tai nor-
EN300220-2 (V2.3.1), EN300440,
tai virheellisestä tiedosta. Parrot S.A.
mien vastaavuudesta.
EN60950-1: 04/2006 / A11: 2009 / A1:
pidättää oikeuden korjata tai parantaa
2010 / A2: 2011, EN 60065: 05/2002 / A1:
tuotetta sekä sen käyttöopasta ilman ra-
iPod, iPod Touch ja iPhone ovat Apple,
05/2006 / A11: 2008 / A2: 2010 nou-
joituksia tai varoittamatta käyttäjää siitä
Inc-yhtiön tavaramerkkejä, jotka on
dattaen määräyksiä direktiiveissä
etukäteen. Parrot S.A. kehittää jatkuvasti
rekisteröity Yhdysvalloissa ja muissa
R&TTE 1999/5/EY sekä vaatimuksia
tuotteitaan, joten ostamasi tuote saattaa
maissa.
sähkömagneettisen yhteensopivuuden
olla hieman erilainen kuin käyttöoppaas-
direktiivissä 2004/108/EY, direktiivissä
sa esitelty tuote. Siinä tapauksessa voit
Wi-Fi on Wi-Fi Alliance rekisteröity tava-
2006/95/EY, jotka liittyvät pienjännite-
yrittää hakea uuden elektronisen version
ramerkki.
laitteisiin, sekä autodirektiivissä 72/245/
äyttöoppaasta nettisivulla
ETY, jota on täydennetty direktiivillä
www.parrot.com.
Kaikki muut käyttöoppaassa mainitut
2009/19/EY.
kaupalliset merkit ja rekisteröidyt tava-
ramerkit on suojattu tekijänoikeuksilla
Suomi 91

(Copyright), ja ne ovat jokaisen omis-
tajan omaa omaisuutta.
”Gracenote” -nimi, Gracenote-logo,
Gracenote-grafiikka, maininta ”Powered
by Gracenote” ovat merkkejä tai rekis-
teröityjä tavaramerkkejä Yhdysvalloissa
ja/tai muissa maissa.
92 Suomi
