Parrot ASTEROID Smart: инструкция
Раздел: Автомобильная техника
Тип: Мультимедиа
Инструкция к Мультимедиа Parrot ASTEROID Smart
Quick start guide
Hurtig brugervejledning
Hurtigstartguide
Pikaopas
Snabbmanual
Rychlý návod k použití
Skrócona instrukcja obsługi
Hızlı kullanım kılavuzu
Краткое руководство по эксплуатации


Parrot ASTEROID Smart
English ................................................................................
11
Dansk .................................................................................
27
Norsk ..................................................................................
43
Suomi .................................................................................
59
Svenska ..............................................................................
75
česky ...................................................................................
91
Polski ..................................................................................
105
Türkçe ................................................................................
121
РУССКИЙ ............................................................................
135
1
2
9
10
4
11
3
12
x2
13
5
8
x4
7
14
x3
6
4

Parrot Asteroid
Smart
5
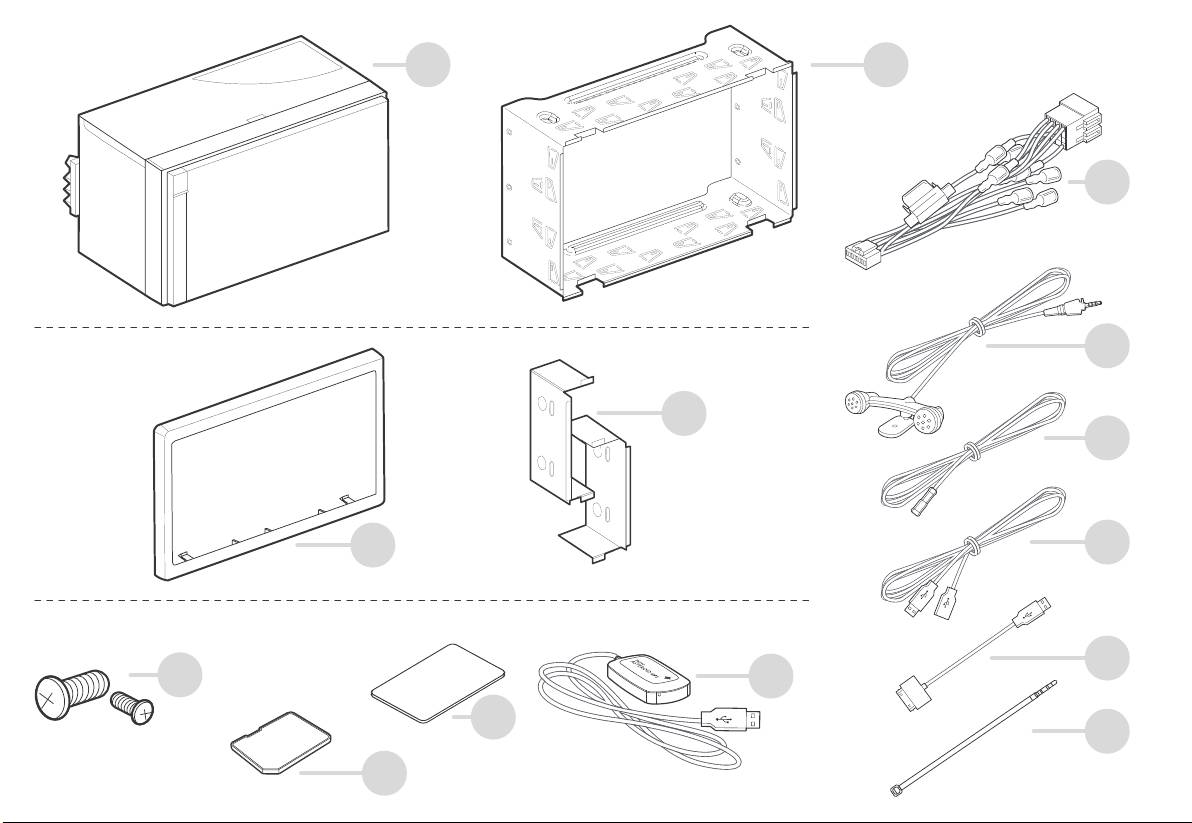
Holder
Monteringsholder
Holder til montering
Asennuskannatin
Monteringsfäste
Montážní držák
Podstawa do montażu
Montaj mesnedi
Монтажный кронштейн
Trim ring
Ramme
Ramme
Kehys
Ram
Rám
Ramka
Çerçeve
Рамка
Side brackets
Sidestøtter
Sidestøtter
Sivukannattimet
Sidofästen
Boční držáky
Wsporniki boczne
Yan destekler
Боковые кронштейны
Screws
Skruer
Skrue
Ruuvit
Skruv
Šrouby
Śruby
Vida
Винт
SD Card - Parrot ASTEROID Map
Adhesive tape
GPS dongle
ISO cable
Microphon
SD-kort - Parrot ASTEROID Map
Klæbestrimmel
GPS-dongle
ISO kabel
SD-kort - Parrot ASTEROID Map
Klebemiddel
GPS-dongel
ISO-kabel
SD-kortti - Parrot ASTEROID Map
Tarra
GPS-vastaanotin
ISO-kabel
SD-kort – Parrot ASTEROID-karta
Klistermärke
GPS-dongel
ISO-johto
SD karta - Parrot ASTEROID Map
Lepicí páska
GPS dongle
ISO kabel
Karta SD - Mapa Parrot ASTEROID
Taśma samoprzylepna
Antena GPS
Kabel ISO
SD Kart - Parrot ASTEROID Haritası
Yapıştırıcı
GPS modülü
ISO kablosu
Карта SD - Parrot ASTEROID Map
Клейкая лента
Аппаратный ключ GPS
Кабель ISO
e
Mikrofon
Mikrofon
Mikrofon
Mikrofoni
Mikrofon
Mikrofon
Mikrofon
Микрофон
Parking brake cable extension lead
USB cable
USB / iPod cable extension
Cable fastener
Forlængerledning til håndbremsekabel
USB kabel
USB / iPod forlængerledning
Kabelklemme
Forlengelsesstykke håndbremsekabel
USB-kabel
Skjøteledning USB/iPod
Klemskrue
Förlängningssladd för handbromskabel
USB-kabel
USB/iPod -jatkos
Johtopidike
Seisontajarrun johdon jatkos
USB-johto
USB-/iPod-förlängningssladd
Kabelklämma
Propojovací kabel ruční brzdy
USB kabel
Propojovací kabel USB/iPod
Kabelová příchytka
Przedłużacz kabla do hamulca ręcznego
Kabel USB
Przedłużacz USB / iPod
Zacisk do kabla
El freni kablo uzatması
USB kablosu
USB / iPod uzatması
Kablo sıkıştırıcı
Удлинитель тросика стояночного тормоза
Кабель USB
Удлинитель USB/iPod
Кабельный зажим
Cable tie slot Cable tie slot
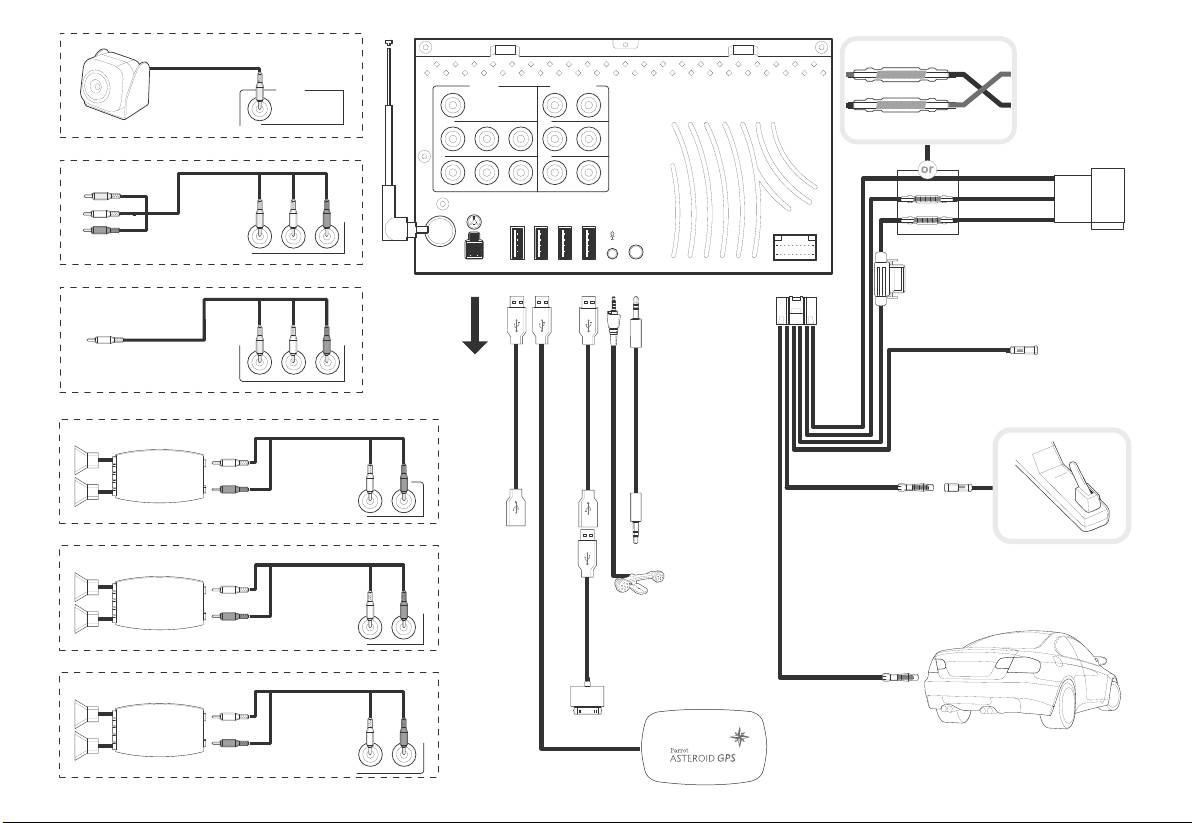
Rear view camera
Not provided
VIDEO
VIDEO AUDIO OUT
CAM
CAM
FRT
IN
RR
Ground (black)
Video source
Not provided
OUT
SW
12V ignition (red)
12V permanent (yellow)
USB USBUSB iPod
LINE IN
Speakers
IN
ANT
5V / 2A
Fuse 15A
Ground (black)
External monitor
Steering wheel
OUT
control Interface
( Parrot UNIKA )
Parking Brake ( light green)
AUDIO OUT
Jack / Jack
Not provided
Amplifier
FRT
USB
Amplifier
RR
Reverse lamp (orange)
iPod
Subwoofer
SW
Parrot Asteroid
GPS
6
A
B
7
C
D
8
E
F
9
G H
10
English 11
11English
Quick start
g
uide
Content
Before you begin
I
nstallation
G
etting started
P
hone
M
usic
I
nternet
V
ideo
T
roubleshooting
G
eneral information
p.11
p
.12
p
.15
p
.17
p
.18
p
.20
p
.22
p
.23
p
indicated on the notification bar.
Before you be gin
About this guide
Warnings
All functions requiring an increased attention
In order to limit our paper consumption and as
should only be used while the vehicle is
part of our environmentally friendly and
stationary. Your safety and the one of the other
responsible approach, Parrot prefers to put
user documents online rather than print them
road users prevails over phone calls, music and
out. This simplified guide to the Parrot
driving assistance applications. Be responsible:
ASTEROID Smart is therefore limited to
drive carefully and pay full attention to your
providing you with the main instructions that
surrounding. Parrot denies any liability should
will make it easy for you to use the device.
you choose not to respect this warning.
More information can be found on the support
Use the Parrot ASTEROID Smart with a
section of our w
ebsite, www.parrot.com: the
rea
sonable volume level so that you can hear all
full manual, FAQs, tutorials, and more.
external noises while driving.
Note: iPod®, iPhone® (in iPod mode) and iPad®
The Parrot ASTEROID Smart includes NdFeB
will be referred to as an "iPod" in this manual.
magnets which can damage objects sensitive to
magnetic fields (pacemakers, credit cards,
Softw are updates
mechanical clocks…).
Download the latest update for free (and
The Parking Brake wire of Parrot ASTEROID
consult the update procedure) on the Parrot
Smart's ISO cable detects whether or not the
ASTEROID Smart support page on our website
parking brake is on. It must be connected
www.parrot.com
. These updates will enable
.24
following the installation instructions provided
you to receive new features and improve the
in
this document. Incorrect installation or
product’s compatibility.
connection may be dangerous and illegal in
many states / countries. Under no
Note: You can also download the Parrot
circumstances should the screen within the
ASTEROID Smart's updates while connected to
the Internet. The availability of an update is
driver's field of vision broadcast any videos

12 English
12 English
while the vehicle is moving. The same applies
Confirm the proper function of you
r vehicle's
Installation
to any applications other than those for driving
other equipment after installing the Parrot
or navigation assistance.
ASTEROID Smart.
Note: We advise our customers to have the
If you attempt to use an application that is not
Parrot ASTEROID Smart fitted by a professional.
Do not install the Parrot ASTEROID Smart or
intended for navigation or driving assistance
one of its components where the airbag may
when you are driving, an on-screen warning will
Safety instructions
deploy.
be displayed. To watch a video on the Parrot
Turn the ignition off before installing the
Do not install the Parrot ASTEROID Smart in
ASTEROID Smart's screen, make sure that the
Parrot ASTEROID Smart.
places subject to high temperatures or
vehicle is stopped in a safe area and that the
humidity.
Do not install the Parrot ASTEROID Smart
parking b
rake is on.
where it may injure the driver or a passenger if
Make sure you leave enough space behind the
the vehicle stops suddenly.
Parrot ASTEROID Smart once installed so that
Steering w heel control interface
proper heat dispersal is ensured.
Do not install the Parrot ASTEROID Smart
A steering wheel control interface can be used
where it may interfere with the driver
to connect your vehicle’s steering wheel
Before you begin
operation of the vehicle.
controls to your Parrot car stereo. With this
Remove your car stereo from your vehicle. You
interface, you will be able to make phone calls
Do not drill holes in the dashboard or any panel
may need release keys to do so.
via the steering wheel controls while keeping
without first making sure there is nothing
your hands on the wheel. Refer to our website
behind it. Do not damage an
y fuel line,
Try to connect the audio and power connectors
www.parrot.com
for more information.
electronic component or cable.
of the Parrot ASTEROID Smart to the
connectors of your vehicle. If this connection is
If you need to use screws, do not allow them to
impossible, you have to obtain an ISO adapter
come into contact with any power cable.
before installing the Parrot ASTEROID Smart.
Install the Parrot ASTEROID Smart only on
Refer to the Vehicle compatibility section on
vehicles with a 12 V battery.
the Parrot ASTEROID Smart support page for
Place all cables away from hot places (heater
more information.
outlet) and moving parts (gear shift, seat
Co
mpare the Parrot ASTEROID Smart antenna
rails...). Make sure they will never wind around
connector to the antenna connector of your
the steering column or gearstick.
vehicle. If an adapter is necessary, contact your
English 13
13English
local car audio specialist.
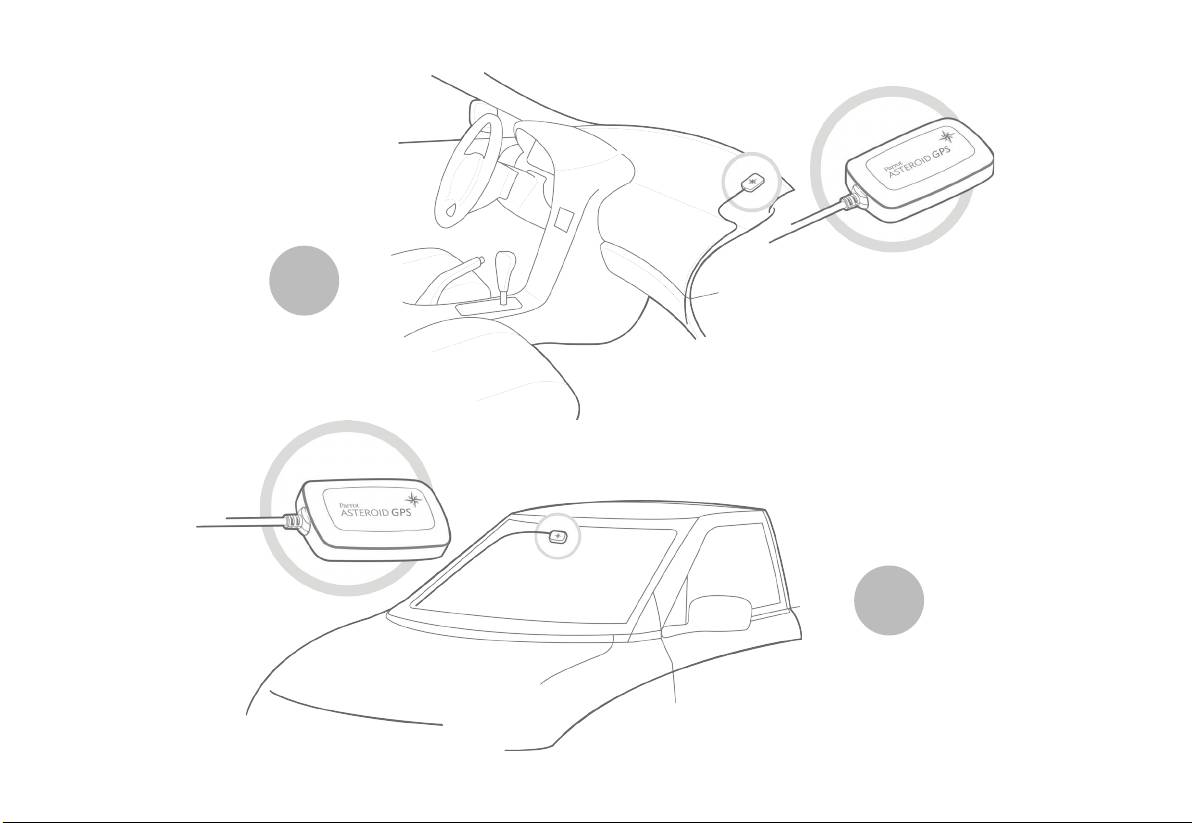
Installing the GPS receiver
Note : Make sure you also supply power to your
Stick the GPS receiver in an unobstructed area
antenna if it is amplified. Power to the antenna
inside the car.
can be supplied using the Parrot ASTEROID
Athermic windshields and windows with a
Smart ISO cable.
built-in antenna can interfere with GPS
reception and reduce the reliability of
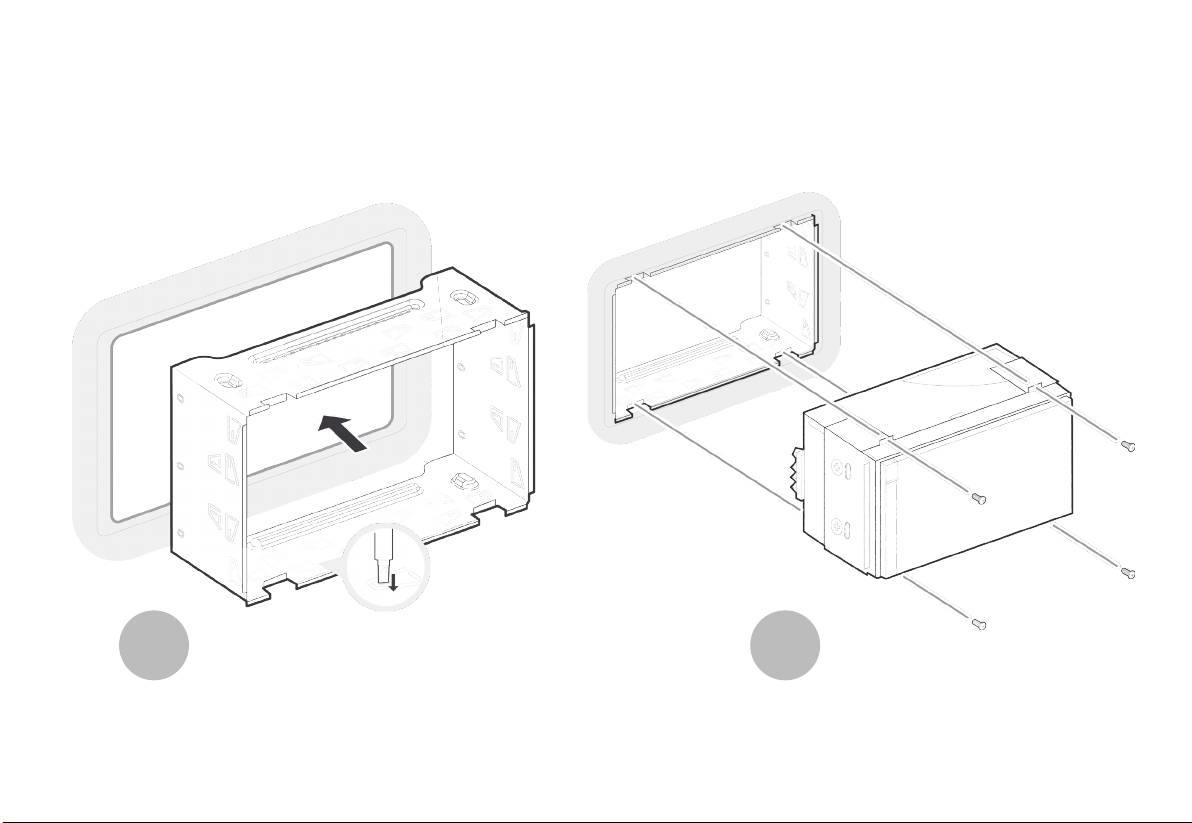
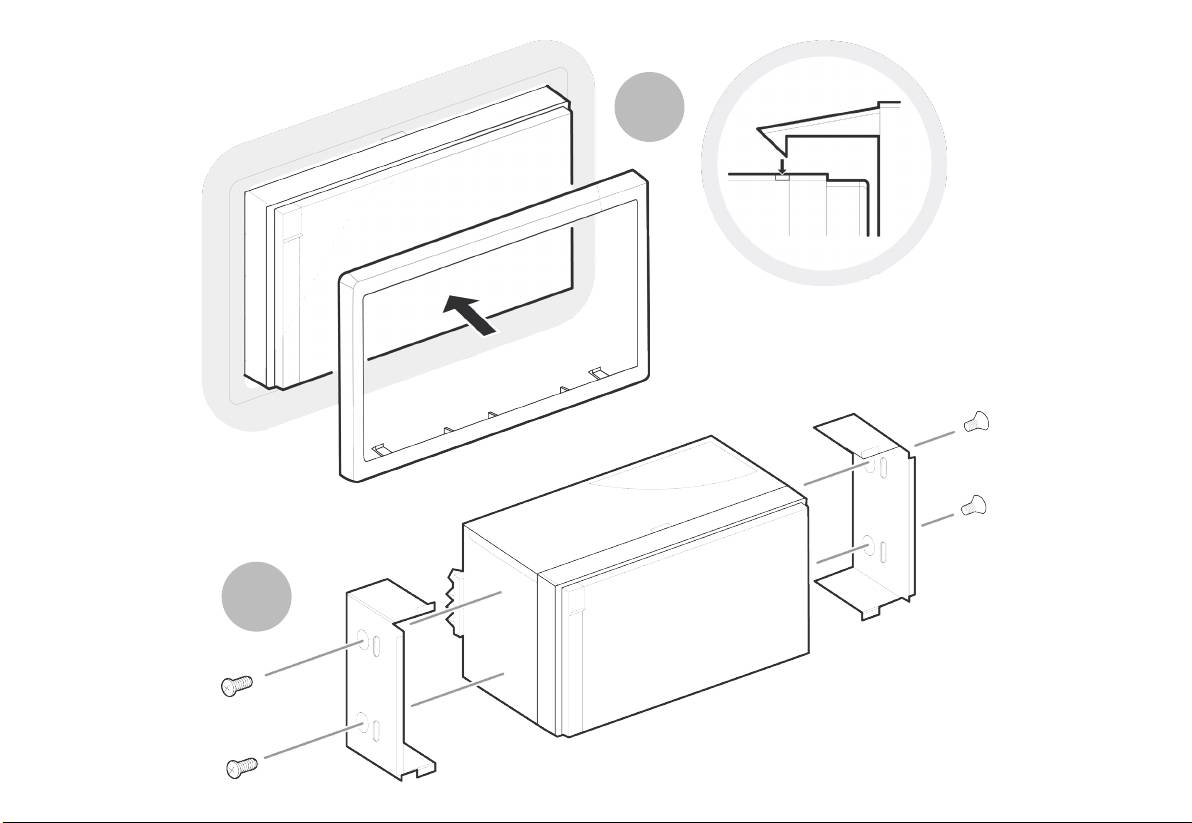
Installation using the holder
information from navigation applications.
1.
Loosen the 4 screws to remove the Parrot
ASTEROID Smart holder.
2.
Insert the holder into the dashboard. To do
so, bend the tabs 90 degrees (diagram A p.7)
3.
Install the Parrot ASTEROID Smart and
fasten the screws (diagram B p.7).
4.
Attach the trim ring (diagram C p.8).
Installation using the side screw holes
1.
Loosen the 4 screws to remove the Parrot
ASTEROID Smart holder.
2.
Remove the two side brackets (diagram D
p.8).
3.
Position the Parrot ASTEROID Smart so
that its screw holes are aligned with the
screw holes of the bracket.
4.
Tighten as many screws as necessary
depending on the model of your vehicle.
Only use the provided screws.
The GPS receiver antenna is located
o
n the side where "Parro
t
A
STEROID GPS" is written an
d
w
here the star-shaped logo is. Thi
s
l
ogo must always be directe
d
t
use the provided adhesive tape ;
clean the area with an appropriate cleaning
product before sticking the support ;
once you have stuck the support on the
dashboard, wait for approximately 2 hours
without handling it.
Connecting the parking brake lead
The parking brake lead allows you to use the
Parrot ASTEROID Smart video function or
applications only when the parking brake is set.
If this cable is not connected to your vehicle
owards the sky.
parking brake system, the video function will
not be available.
If your vehicle has an athermic windshield, stick
the GPS receiver on the windshield on the non
1.
Connect the parking brake extension lead
athermic area. The side where the star-shaped
to the Parrot ASTEROID Smart green
logo is must be stuck on the windshield
cable.
(diagram F p.9).
2.
Locate and test the parking brake signal
cable in the vehicle. This cable conn
ects
Note : The non athermic area of the windshield
your parking brake to the parking brake
depends on the model of your vehicle. It is
usually located near the rear view mirror.
signal on your dashboard.
If your vehicle does not have an athermic
3.
Route the Parrot ASTEROID Smart parking
windshield, stick t
he GPS receiver on the
brake extension lead (green) safely and
dashboard. The side where the star-shaped
securely from the Parrot ASTEROID Smart
logo is must be visible (diagram E p.9).
and connect this to the parking brake signal
cable using a suitable method.
To make sure the adhesive tape adheres well :

14 English
14 English
you
go making sure the microphone cable is not
Parrot wiring.
War ning: An improper connection or use of this
cable is dangerous and illegal in many states.
pinched or trapped.
Installing the USB cables
Warning: Do not run the microphone cable in
Installing a rear view camera
such a way as to obstruct or interfere with the
Connect the USB cables to the Parrot
If you are to use the Parrot ASTEROID Smart
vehicles operation or cause injury to its
ASTEROID Smart. We recommend you
with a rear view camera (not provided), the
occupants. In particular vehicle safety device
connect all audio cables to the Parrot
such as airbags and other SRS systems.
ASTEROID Smart even if you do not plan on
orange cable on the Parrot ASTEROID Smart
using them. Route the audio cables to a
ISO cable will detect when the gearstick is
ISO cable connection
suitable location in your vehicle such as the
moved to "reverse". Connect this cable to the
glove box or arm rest compartment. It may be
one providing power to the reverse lamp of
Connect the audio and power connectors of the
necessary to drill a hole in your dashboard to do
your vehicle in order to display the rear view
Parrot ASTEROID Smart to the ones of your
so. Avoid using USB extension cables.
camera image when backing your vehicle.
vehicle.
The USB cable (1.2m - 2A) to which you
will
Connect the rear view camera video cable to
Note: Use the provided cable ties to make sure
connect the USB / iPod cable extension must
the Video CAM c
onnector located at the back
the cables are well fixed to the car stereo. Insert
be connected to its specific white USB port.
of the Parrot ASTEROID Smart.
one of the cable ties into the slots in the top of
"iPod" is written above it.
the back of the car stereo (refer to the diagram
Installing the microphone
p.4).
To guarantee an optimal reception quality we
recommend you do not connect your internet
The optimum location for the microphone is in
Once the connections are made, check your
USB key 3G on the Parrot ASTEROID Smart
the centre of the vehicles roof near the rear
installation. To do so, turn the ignition on then
directly : use the USB cable to install your
view mirror. The microphone ideally needs to
off. The "Goodby
e" message must be
device on the dashboard (or any other open
be less than 60cm’s from the users mouth
displayed. If it is not the case, it is necessary to
area).
pointing directly towards them with no
swap the positions of the red and yellow wires.
obstructions.
Indeed, the red wire of the power cable must
Basic operations
Please take care when routing the microphone
be connected to the 12V ignition, the yellow
cable through the vehicle to the desired
wire to the permanent 12V and the black wire to
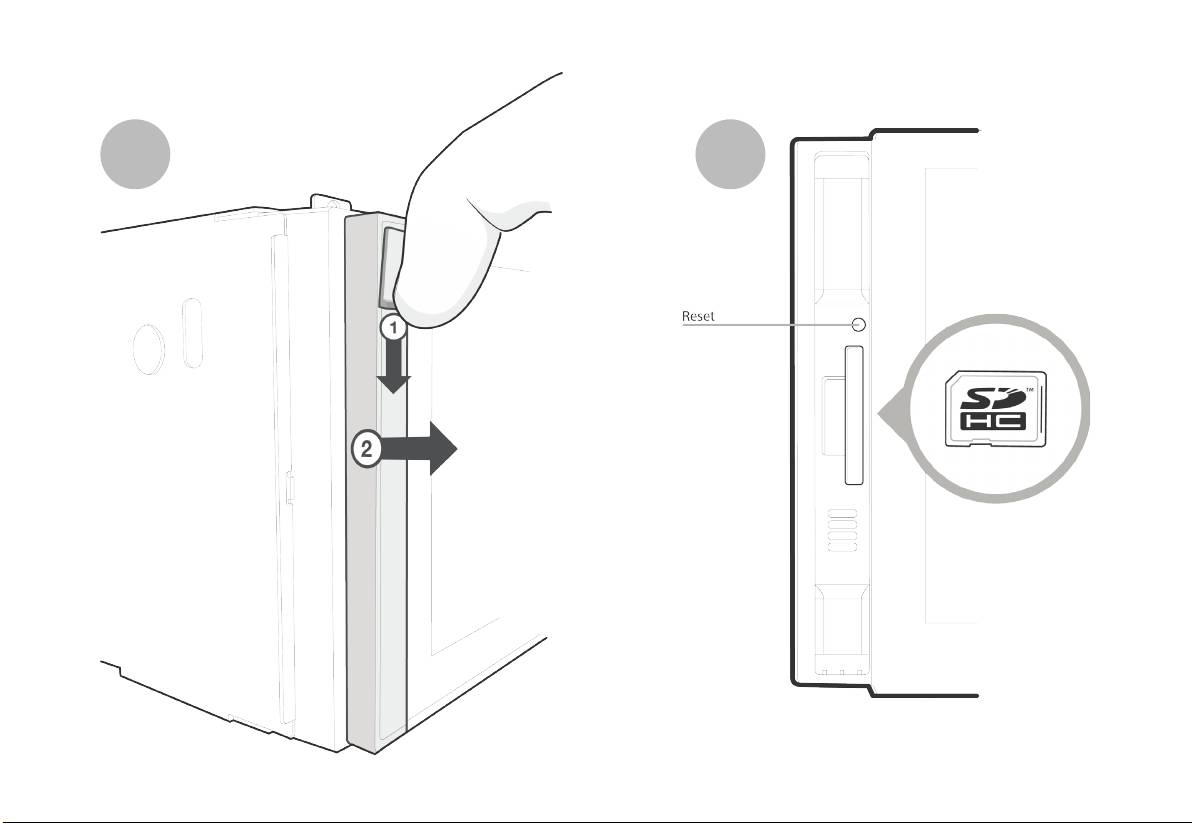
The Parrot ASTEROID Smart faceplate can be
location, we recommend routing alongside
the ground. This can be done simply by
removed to protect your unit from theft. The
existing manufacture’s wiring looms securing as
reversing both bullet connectors located on the
Parrot ASTEROID Smart cannot work without
its faceplate.
English 15
15English
Handle the faceplate with care. Do not force
Press
to display the last applications used
Getting started
while installing or removing it. Keep it away
or currently in use.
from sunlight, humidity or high temperatures.
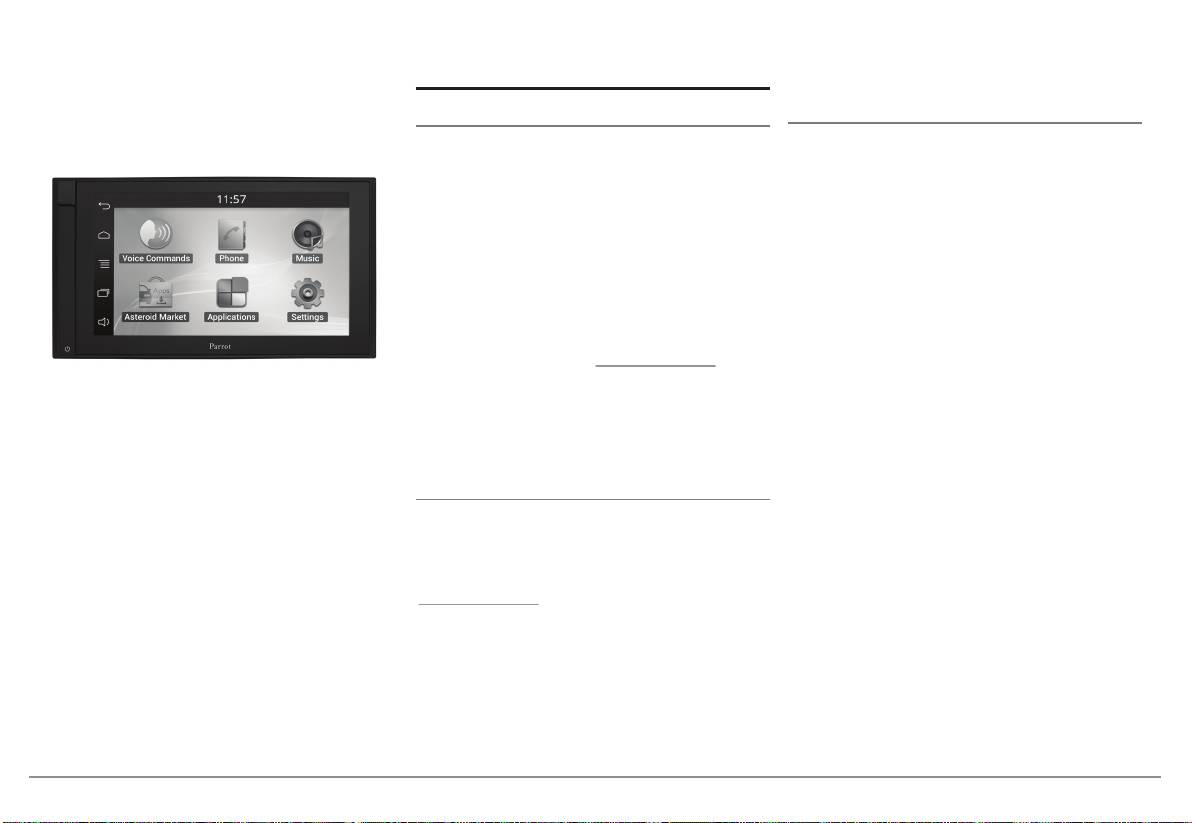
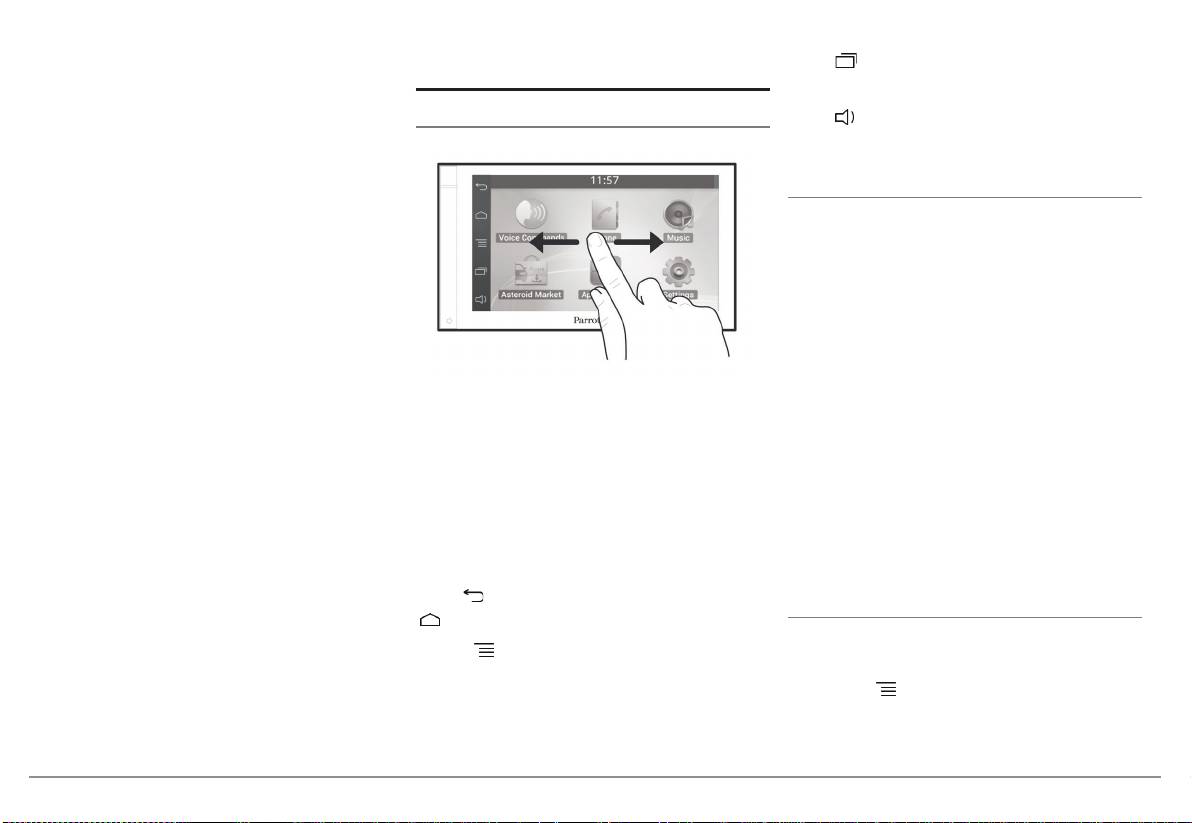
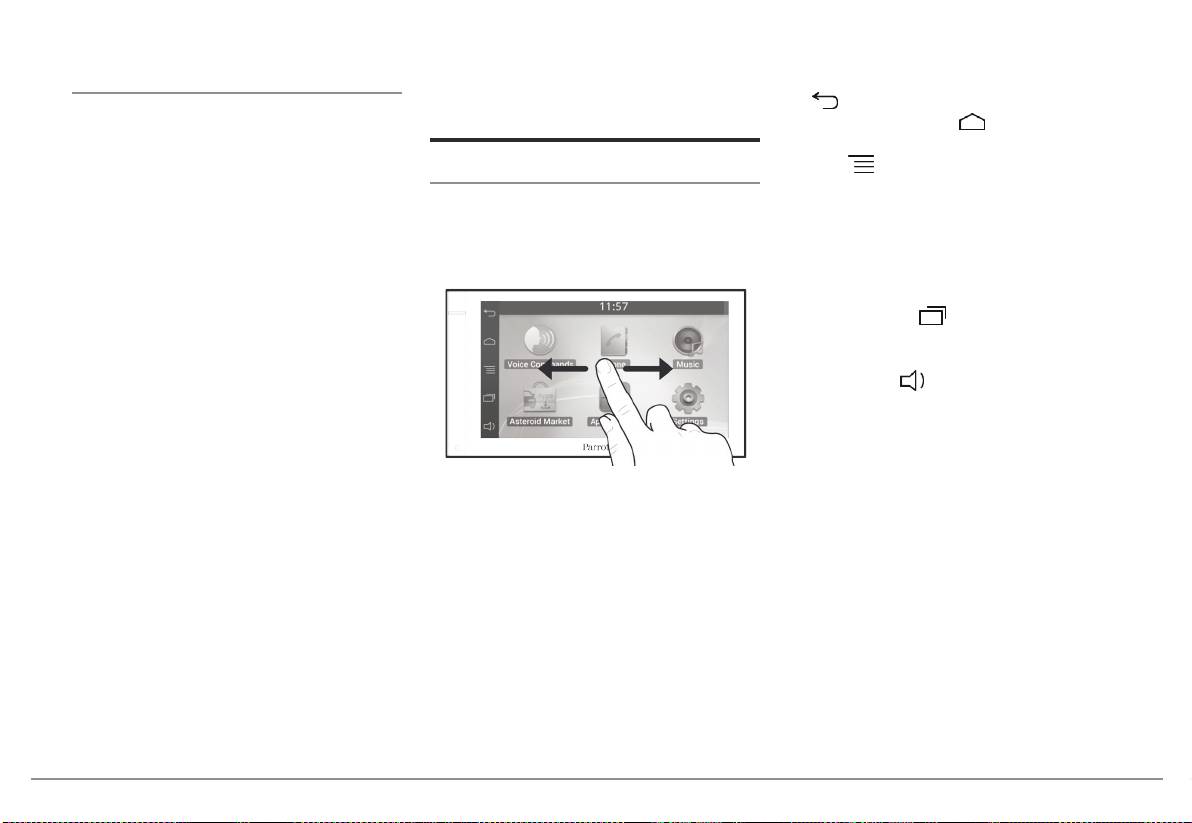
Home screen
Press
to adjust the volume. Then slide the
To remove the faceplate, hold down the button
cursor to the left or to the right.
on the top left and slide it downwards (diagram
G p.10).
Personalizing the home screen
To replace the faceplate, insert its magneted
To add an application shortcut on your home
inferior part then press the superior part until
screen:
you hear a click.
1.
Tap Applications.
2.
Press and hold the application icon you are
interested in.
3.
Drag the icon to the home screen where
Slide your finger horizontally to the left. You
you want to add it.
will discover more space for adding functions
To remove an application shortcut:
shortcuts.
1.
Press and hold the shortcut you want to
Touch an icon to get to the corresponding
remove.
function. Touch the Applications icon for
instance. The list of the available applications
2.
Drag the icon upwards to the Remove
is displayed. Slide your finger downward to
indication. When the icon turns red, lift
browse through the applications list.
your finger.
Press
to get back to previous menu. Press
Changing settings
to get to the home screen.
To change the Parrot ASTEROID Smart
Press
to access the pop-up menu
settings, tap Applications, then Settings. You
corresponding to the current application. The
can also tap
, then Settings.
pop-up menu allows you to change several
settings or to access more functions.

16 English
16 English
Smart.
Connecting a phone via Bluetooth
If the Parrot ASTEROID Smart and
your telephone display two codes,
You can receive calls to the main or secondary
Note : Refer to the compatibility page of our
verify that the codes are identical,
phones.
website to check if your phone is compatible
then either confirm or invalidate.
with the Parrot ASTEROID Smart and to consult
Only the phonebook for your main phone may
the specific pairing procedures for the most
Note: Depending on the model of your phone,
be accessed through the Parrot ASTEROID
common phones : www.parrot.com/uk/
you may need to authorize the connection to the
Smart. You can only make calls using the main
compatibility.
Parrot ASTEROID Smart to allow further
phone. However, you can easily switch
automatic connections. Refer to the user guide
between the connected phones. To do so :
If you are using the Parrot ASTEROID Smart
of your phone for more information.
with your phone for the very first time, you
1.
Tap Phone.
must initially pair both devices. Once your
Connecting tw o phones
2.
Tap
, then Phone.
telephone is paired with the Parrot ASTEROID
Smart, the 2 devices will automatically connect
To activate multipoint telephony and connect
3.
Select the main phone.
when they are turned on (as well as
Bluetooth®
two phones :
features) and in proximity of each other.
Synchronising the phonebook
1.
Tap Phone.
1.
In the Settings menu, press Wireless &
With most of the
Bluetooth
phones, the
2.
Tap
, then Bluetooth > Options.
networks > Bluetooth.
phonebook is automatically synchronized in the
3.
Activate the Multipoint Telephony option.
system’s memory. Each time you change your
2.
If necessary, activate the
Bluetooth
and
When the Parrot ASTEROID Smart is switched
directory, synchronisation will start
Discoverable options.
on, it attempts to connect to all paired phones
automatically the next time it is connected.
3.
From your phone, search for
Bluetooth
in the vehicle. If there are more than two paired
Warning: Only the contacts stored in the phone
peripherals and select «Parrot ASTEROID
phones in the vehicle, the device connects to
memory are synchronized. If your contacts are
Smart».
the two phones with the oldest pairing.
stored in your SIM card memory, transfer them
4.
The pairing procedure depends on which
When two phones are connected to the Parrot
onto your phone memory.
telephone model you have:
ASTEROID Smart, one of them becomes the
The automatic synchronization is l
imited to
main phone and the other i
s the secondary
If the phone asks you to enter the
5000 contacts (or phone numbers) for each
phone. By default, the main phone is the one
Bluetooth
PIN code, enter “0000”.
paired phone.
with the oldest pairing to the Parrot ASTEROID

English 17
17English
contact.
Phone
Music
> The call is automatically launched if the
voice tag is correctly understood. If it is not
Receiving a c all
Note: Several minutes of loading may be
the case, a confirmation message is asked.
necessary when connecting your audio
An incoming call is indicated by a ringtone. The
Confirm by saying «YES» or «CALL».
peripheral (USB / SD / iPod) to the Parrot
name of the caller is announced if his number is
ASTEROID Smart for the first time, particularly if
recorded in the phonebook of the phone
Note: At any time, press the the
button to exit
you are using audio peripheral with a large
voice recognition mode.
connected to the Parrot ASTEROID Smart.
capacity or containing many audio files. This
loading time will allow your audio files to be
If you want to answer the call, tap the
accessible via voice recognition.
green button on the Parrot ASTEROID
Smart screen. Then tap the red button to
Using vocal music search
end the call.
The voice recognition function allows you to
If you want to refuse this call, tap the red
select the artist / album you want to hear via
button.
voice recognition. This function is only
available if you are using the Parrot ASTEROID
Making a call via voice recognition
Smart with a USB / SD / iPod peripheral or
You can make a call using voice recognition
music applications compatible with this
directly after automatic synchronization. The
feature.
Parrot ASTEROID Smart will automatically
recognize the contact you wish to call.
1.
Tap Voice Commands > Music.
1.
Tap Voice Command > Contacts to launch
2.
Say the name of the artist / album when
the voice recognition feature.
asked to do so.
> The Parrot ASTEROID Smart asks you the
> The list of audio sources connected to
name of the contact you want to call.
the Parrot
ASTEROID Smart and
applications compatible with the vocal
2.
Say the name of the contact and the type of
music search function which contain the
number («WORK», «CELLPHONE»...) if
artist / album that you selected will
there a
re several numbers associated to your
appear.

18 English
18 English
Note: Check the albums and artists names in the
iPod
SD card
metadatas of your music files. These names may
1. Connect the USB / iPod extension lead to
The SD card capacity must not exceed 32Gb.
be different from the ones displayed on your
the USB cable connected to the white USB
Only MP3, AAC, WAV, OGG or WMA formats
music files titles.
port and connect your iPod to it.
are supported.
Radio
2. Tap Music > iPod. You can also tap Browse
Note : To remove the SD card, put a fingernail
to browse through the content of your iPod.
into the ridge on the exposed end of the SD card.
1.
Tap Music >Tuner.
3. Tap a track to start playback.
1.
Remove the Parrot ASTEROID Smart
2.
Slide the slider to the left / right to change
faceplate.
the radio station.
USB storage device
2.
Insert the SD card into the appropriate slot
To get the list of all available stations:
The Parrot ASTEROID Smart is compatible
with the contact surface facing left
1.
Tap Music >Tuner.
with the majority of USB keys / MP3 audio
(diagram H p.10).
player / external hard drive. There is no
2.
Press the
button and select New scan
3.
Reattach the faceplate.
restriction in terms of capacity of USB keys.
> OK.
Tap Music > SD. You can also tap Browse
Only MP3, AAC or WMA formats are
4.
t
o browse through the content of your SD
1.
Tap Music > Tuner.
supported.
card.
2.
Select the frequency manually or in
1.
Connect your USB storage device to the
5.
Tap a track to start playback.
Fullscan mode.
Parrot ASTEROID Smart using the USB
3.
Press the
button then select Add to
cable or the USB connectors on the back of
Audio player connected via Bluetooth
presets.
the car stereo
> To select a stored station, select the
Note : The Parrot ASTEROID Smart allows you to
2.
Tap Music > USB. You can also tap Browse
Presets mode.
use the telephone and audio streaming
to browse through
the content of your
functions from 2 different phones without
Note: You can store as many stations as you
USB device.
having to disconnect one of them.
want.
3.
Tap a track to start playback.
You can use the Parrot ASTEROID Smart to
listen to songs stored on your mobile phone or
Bluetooth
audio device. To do so, your phone /
English 19
19English
audio device must support the
Bluetooth
A2DP
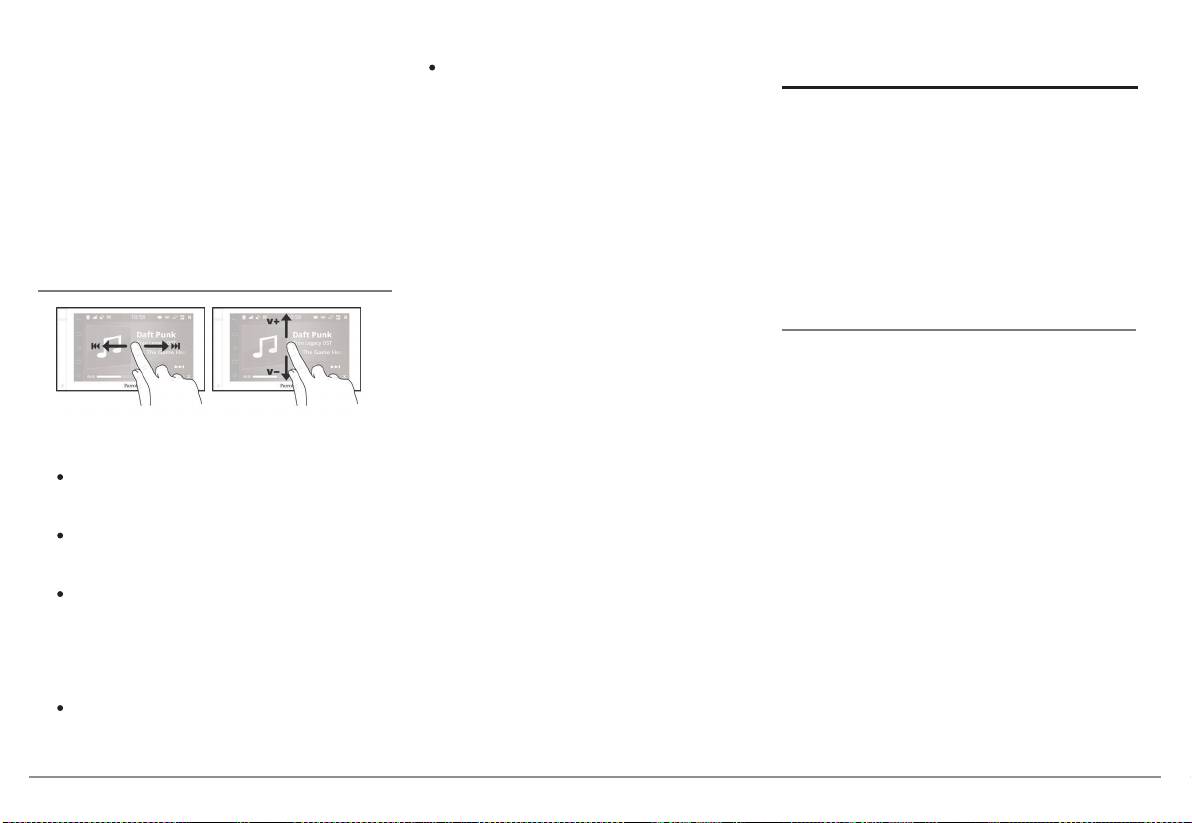
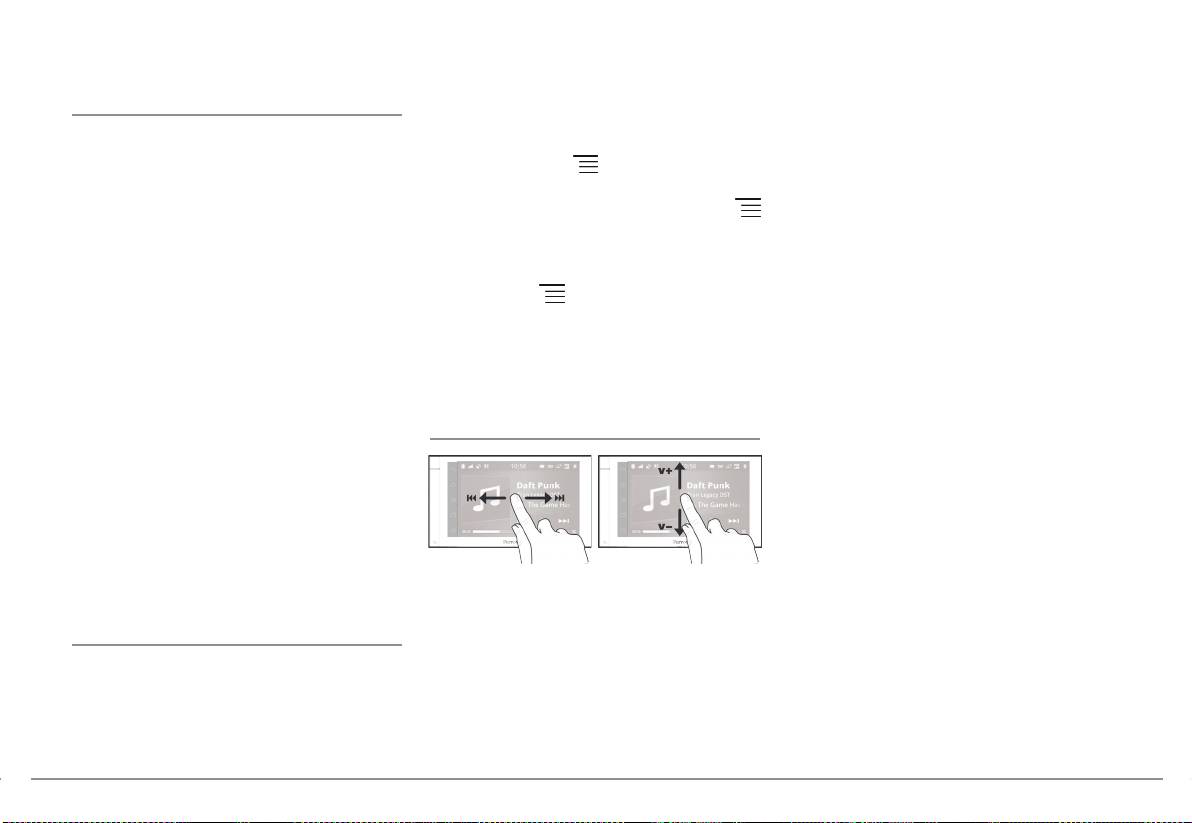
slide your finger to the left to get back to
Internet
profile (Advanced Audio Distribution Profile).
the previous track.
If you are using a
Bluetooth
audio player for the
Warning: Internet connection via a 3G key
Note : If you are using the Parrot ASTEROID
first time, you have to pair both devices.
requires a subscription offer with a telephone
Smart with an audio player connected via
operator. Using this service can result in
If both devices are already paired:
Bluetooth, these commands are only available if
significant roaming charges. Check the
your audio player supports the AVRCP profile
1.
Tap Music > Bluetooth Audio.
conditions of your subscription and
(Audio/Video Remote Control Profile).
consumption tracking with your operator.
2.
Start playing a song on your audio player.
Parrot disclaims any liability for associated
costs.
Screen commands
Connection w ith a 3G/4G key
Note : Refer to the compatibility section of our
website to see the list of 3G / 4G keys that are
compatible with the Parrot ASTEROID Smart.
While playing a music track or the radio:
1.
Connect a 3G key to the Parrot ASTEROID
Smart with a USB cable.
tap the screen to pause / resume playback
> A pop-up will appear.
or mute the radio ;
Note : To ensure optimum reception quality, do
slide your finger upwards to increase the
not connect your 3G/4G key to the back of the
volume ;
Parrot ASTEROID Smart: use a USB cable to
slide your finger downwards to decrease
install the accessory on the dashboard (or
any
the volume.
other unobstructed area).
While playing a music track (except audio
2.
Enter your PIN code using the knob, then
players connected using a jack / jack cable):
select ENTER. Check the Memorise PIN
code option if you would like your PIN
slide your finger to the right to skip to the
code to be stored each time you turn on
next track ;

20 English
20 English
the Parrot ASTEROID Smart.
Connection via Bluetooth
Connection via USB
Note: You will be able to change this setting by
If you have a telephone that supports the
Note : Refer to the compatibility section of our
selecting Settings > Wireless and network
Bluetooth®
profile, DUN (Dial-Up Networking)
website to check if your phone supports 3G
settings > Mobile data networks. Among the
or PAN (Personal Area Network), the
connection sharing via USB and to consult the
mobile access devices, select your 3G / 4G key,
Bluetooth
connecting your telephone to the
corresponding procedure for the most common
tap Forget PIN code > Forget.
Parrot ASTEROID Smart will allow for sharing
phones : www.parrot.com/uk/compatibility
.
of the telephone's 3G connection.
3.
Select your APN (Access Point Name)
1.
Make sure that your phone’s keypad is
from the suggested list. This information
Note : Refer to the compatibility section of our
unlocked, then connect the phone to the
is available in the documentation provided
website to check if your phone allows the 3G
Parrot ASTEROID Smart using the USB
with your 3G / 4G key. If your APN is not in
connection sharing via Bluetooth® and to
cable/micro-USB provided with your
the
list, you can add it by selecting Settings
consult the corresponding pr
ocedure :
phone. You can also connect the phone
> Wireless and network settings > Mobile
www.parrot.com/uk/compatibility
.
using the USB extension cable provided
data networks.
with the Parrot ASTEROID Smart. This
1.
Connect your telephone to the Parrot
4.
Among the mobile access devices, select
connection also enables you to recharge
ASTEROID Smart via
Bluetooth
.
your 3G / 4G key.
your phone’s battery.
2.
On the Parrot ASTEROID Smart, select
5.
Select Access point > Other > Preset
Settings > Wireless and network settings >
Note: Do not use the white iPod USB port to
access points.
connect your phone to the Parrot ASTE
ROID
Mobile networks settings > Mobile access
Smart.
Wait approximately 30 seconds until the
devices.
6.
connection is established. You can also
Select your APN (Access Point Name)
2.
Select your APN (Access Point Name)
3.
press the
button and browse the
from the suggested list, then check Select.
from the suggested list, then check the
menus while the connection is being
option Select. You can then modify this
4.
Press the
button and select Connect.
established.
setting by selecting Settings > Wireless
5.
Allow connection sharing on your
and networks > Mobile data networks.
telephone. This procedure will vary
> A pop-up window indicating that USB
according to your telephone model.
connection sharing has been activated will
appear.

English 21
21English
a Webradio station and use a driver assistance
Connection to a Wi-Fi netw ork
Video
applicat
ion at the same time.
If your smartphone can be used as a wireless
For more information about installing and using
Warning : The Parrot ASTEROID Smart video
router or if a Wi-Fi® network is available next to
the available applications, refer to the
function (besides the video stream from the rear
your vehicle:
ASTEROID Market web page :
view camera) is dangerous and illegal in most
1.
Activate the hotspot function on your
www.parrotasteroid.com/asteroidmarket
.
countries if it is used while driving. Consequently
smartphone.
this function is only available when the vehicle is
stationary. To watch a video on the Parrot
2.
In the Parrot ASTEROID Smart Settings
ASTEROID Smart, park your vehicle in a safe
menu, tap Wireless & networks >Wi-Fi.
place and set your parking brake.
3.
Activate the Wi-Fi option.
> The list of available Wi-Fi networks is
Rear view camera
displayed.
If your vehicle is equipped with a rear view
4.
Select the Wi-Fi network generated by
camera, you can use the Parrot ASTEROID
your smartphone.
Smart screen to view the video stream of this
camera in order to ease your reverse parkings.
5.
Enter the password if necessary
.
Consult the installation diagram p.4 and the
Using the applications
section "Installing a rear view camera" for more
information about the connection of the rear
Several types of applications are available with
view camera to the Parrot ASTEROID Smart.
the ASTEROID Market : music, geolocation,
driver assistance...
The video stream of the rear view camera
appears a
utomatically while backing up. The
All applications may not be available in all
image from the rear view camera may appear
countries. The use of some applications may
reversed.
need prior subscription.
Note : At any time, tap Video switch to toggle
The Parrot ASTEROID Smart is a multitasking
between the video from the rear view camera
device: several applications can run
and the video from an iPod connected with an
simultaneously. For example, you can listen to
AV / iPod cable.

22 English
22 English
Playback of a video via an external source
Screen connected to video output terminals
Troubleshooting
You can display on the Parrot ASTEROID Smart
Video output terminals allow you to connect a
Before you begin
the video output from an external video source.
screen for rear seat passengers to view the
videos recorded on your SD card. Consult the
Make sure the “Goodbye” message is displayed
Connect your video source to the Parrot
installation diagram p.4 for more information
on the Parrot ASTEROID Smart screen when
ASTEROID Smart using an AV / iPod cable
about the connection of the screen for rear
you turn the ignition off. Refer to the Checking
(which is not provided) (diagram p. 4).
seat passengers to the Parrot ASTEROID
the wiring section for more information.
1.
Tap Applications > Video IN.
Smart.
Reset the Parrot ASTEROID Smart. To do so,
2.
Start the playback of a video on your
Warning : Never locate the screen where the
remove the faceplate then use a paper clip to
source.
driver could see the videos while driving.
press the Reset button. Hold down the Reset
button for 3 seconds (diagram G p.10).
Note : At any time, tap Video switch to toggle
between the video from the rear view camera
Make sure you have the latest software update
and the video from an exter
nal source connected
on your Parrot
ASTEROID Smart. To do so,
with an AV / iPod cable.
select Settings > About > Version. Compare
this number with the one on the Parrot
Playback of a video via a SD card
ASTEROID Smart support page on our website.
The Parrot ASTEROID Smart allows you to
watch videos stored on a SD card. Only the
Problems w hile using the phone function
MP2, MP4, H263, H264, WMV and SPARK
Make sure your phone is compatible with the
formats are supported.
Parrot ASTEROID Smart. To do so, refer to the
compatibility list of the Parrot ASTEROID
1.
Insert the SD card into the appropriate slot
Smart available on our website
(diagram H p.10).
www.parrot.com
, in the Support section.
2.
Tap Applications > Gallery.
If your phone is compatible with the Parrot
3.
Select the video by tapping the
ASTEROID Smart and if you already have the
corresponding icon.
latest software update:

English 23
23English
1.
Erase the memory of the Parrot
Off button and the Home button
General information
ASTEROID Smart. To do so, select
simultaneously until the iPhone reboots.
Settings > Advanced settings > Factory
Do not touch the screen when the
Warranty
settings.
message “Slide to shutdown” appears.
Without prejudice of legal warranty, Parrot
2.
On your telephone, erase the Parrot
Some problems may occur if the iPod / SD
contractually warrants during 12 months from
system from the list of
Bluetooth
card / USB device is already connected to the
the date of initial purchase by the consumer
peripherals (or reboot your iPod).
Parrot ASTEROID Smart before you turn on the
(except wearing parts guaranteed for 6
ignition. Connect the iPod / SD card / USB
months) that the product is free from defects
3.
Repeat the pairing procedure for the 2
device once the ignition is turned on.
in materials and workmanship, upon
devices.
presentation of proof of purchase (date, place
For more in
formation
of purchase, serial number of the product) to
Problems w hile using the music function
the retailer or Parrot. During the contractual
Refer to the Parrot ASTEROID Smart support
Several minutes of loading may be necessary
warrant
y period, the defective product must be
page on our website.
when connecting your audio peripheral (USB /
returned in its original packaging to the after-
SD / iPod) to the Parrot ASTEROID Smart for
sales service of the retailer. After inspection of
the first time, particularly if you are using audio
the product, Parrot will proceed, at its option,
peripheral with a large capacity or containing
to the replacement or the issue a credit note to
many audio files. This loading time will allow
the exclusion of any other remedy.
your audio files to be accessible via voice
Warranty does not cover: upgrading of the
recognition.
software items of the Parrot products with
Reboot your iPod / iPhone before connecting it
Bluetooth cell phones for compatibility
to the Parrot ASTEROID Sma
rt. To reboot your
purpose, da
ta recovery, deterioration of the
iPod / iPhone (this procedure will not erase any
external aspect due to normal wear of the
of your data) :
product, any damage caused by accident,
misuse, misapplication, or non-Parrot
iPod: press Menu and the centre button
products.
simultaneously until the iPod reboots.
Parrot is not responsible for storage, loss or
iPhone / iPad / iPod touch®: Press the On/
damaged to data during transit or repair. Any

24 English
24 English
product wrongfully declared to be defective
The explanations and specifications in this
interference, and
will be returned to sender and inspection,
guide are
given for information purposes only
(2). this device must accept any interference
process and carriage costs will be invoiced to
and may be modified without prior notice. They
received, including interference that may cause
him.
are deemed to be correct at time of going to
undesired operation.
press. The utmost care has been taken when
Note: The manufacturer is not responsible for
writing this guide,as part of the aim to provide
Correct disposal of This Product (Waste
any radio or tv interference caused by
you with accurate information. However,
Electrical & Electronic Equipment)
unauthorized modificat
ions to this equipment.
Parrot shall not be held responsible for any
Such modifications could void the user’s
consequences arising from any errors or
This marking
shown on the product or its
authority to operate the equipment.
omissions in the guide, nor for any damage or
literature, indicates that it should not be
accidental loss o
f data resulting directly or
Canada Class B statement: This Class B digital
disposed with other household wastes at the
indirectly from the use of the information
apparatus complies with Canadian ICES-003.
end of its working life. To prevent possible
herein. Parrot reserves the right to amend or
harm to the environment or human health from
improve the product design or user guide
uncontrolled waste disposal, please separate
Copyrights
without any restrictions and without any
this from other types of wastes and recycle it
Identification N. 394 149 496 R.C.S. PARIS
obligation to notify users. As part of our
responsibly to promote the sustainable reuse
ongoing concern to upgrade and improve our
Parrot S.A.
of material resources.
products, the product that you have purchased
Copyright © 2012 Parrot. All Rights Reserved.
Household users should contact either the
may differ slightly from the model described in
retailer where they purchased this product, or
this guide. If so, a later ve
rsion of this guide
their local government office, for details of
Declaration of Conformity
might be available in electronic format at
where and how they can take this item for
Parrot’s website at www.parrot.com
.
We, Parrot S.A. 174 quai de Jemmapes, 75010
environmentally safe recycling. Business users
Paris, France, declare under our sole
should contact their supplier and the terms and
responsibility that our product, the Parrot
FCC Compliance Statement
conditions of the purchase contract. This
ASTEROID Smart to which this declaration
product should not be mixed with other
This device complies with part 15 of the FCC
relates is in conformity with appropriate
commercial wastes for disposal.
rules. Operation is subject to the following two
standards IEC/EN 60065: 2002 / A1:2006 / A11:
conditions:
2008 / A2: 2010 / A12: 2011, EN 300328 v1.8.1,
(1). this device may not cause harmful
EN 301 489-1 (2008:V1.8.1) and EN 301 489-17
Modifications

English 25
25English
v1.3.2 following the provision of
and others countries
Radio&Telecommunication equipment
iPad is a trademark of Apple Inc.
directive 1999/5/EC R&TTE, Safety directive
Wi-Fi is a registered trademark of the Wi-Fi
2006/95/EC and EMC directive Automotive
Alliance.
2009/19/CE.
http://www.parrot.com/fr/support/parrot-
Gracenote, the Gracenote logo and logotype
asteroid-smart/asteroid-
and "Powered by Gracenote" are either
smart_ce_conformity_declaration.pdf
registered trademarks or trademarks of
Gracenote Inc. in the United States and/or
oth
er countries.
Registered Trademarks
All other trademarks mentioned in this guide
Parrot and the Parrot logo are registered
are protected and are the property of their
trademarks of PARROT SA.
respective owners.
The Bluetooth word mark is are registered
trademarks owne
d by Bluetooth SIG, Inc. and
This device complies with Industry Canada
any use of such marks by Parrot S.A. is under
licence-exempt RSS standard(s). Operation is
license. Bluetooth QDID : B013841, B013839,
subject to the following two conditions: (1) this
[-]
device may not cause interference, and (2) this
"Made for iPod / iPhone / iPad" means that an
device must accept any interference, including
electronic accessory has been designed to
interference that may cause undesired
connect specifically to iPod, iPhone or iPad,
operation of the d
evice.
respectively, and has been certified by the
This equipment complies with FCC’s and IC’s
developer to meet Apple performance
RF radiation exposure limits set forth for an
standards. Apple is not responsible for the
uncontrolled environment.. The antenna(s)
operation of this device or i
ts compliance with
used for this transmitter must be installed and
safety and regulatory standards.
operated to provide a separation distance of at
iPad, iPod, iPod Touch and iPhone are
least 20 cm from all persons and must not be
trademarks of Apple Inc, registered in the US
collocated or operating in conjunction with.


«Parking Brake» ledningen i ISO kablet til
Før du starter
Hurtig
Parrot ASTEROID Smart giver mulighed
for at spore, om håndbremsen er trukket
Om denne vejledning
brugervejledning
eller ikke. Den skal være tilsluttet i overen-
Parrot foretrækker at lægge brugervejle-
sstemmelse med installationsanvisningerne
dningerne ud online i stedet for at få dem
beskrevet i dette dokument. En ukorrekt
trykt for at begrænse papirforbruget og
installation eller tilslutning kan være farlig
af hensyn til miljøet. Denne korte guide
og ulovlig i mange stater / lande. Skærmen
giver derfor kun de vigtigste anvisninger om,
i førerens synsfelt må under ingen omstæn-
hvordan enheden bruges på en nem måde.
digheder vise videoer, mens bilen kører. Det
Du kan finde yderligere oplysninger under
samme gælder for alle webapplikationer.
rubrikken Support og downloading på vores
Hvis du forsøger at bruge en applikation, der
hjemmeside www.parrot.com: komplet
ikke er dedikeret til navigation eller hjælp
vejledning, FAQ, undervisningsprogram-
under kørsel, mens du kører, vil en advar-
mer…
sel blive vist på skærmen. For at se en video
på Parrot ASTEROID Smart skærm, skal
Bemærk: iPod og iPhone (i funktionen iPod)
du parkere bilen et sikkert sted og trække
kaldes «iPod» i denne vejledning.
håndbremsen.
Brug Parrot ASTEROID Smart med en for-
Indholdsfortegnelse
AdvArsler
nuftig lydstyrke, således at du altid kan høre
Før du starter
s.27
støj udefra under kørslen.
Funktioner, som kræver længere opmærk-
Montering
s.28
Parrot ASTEROID Smart indeholder
somhed, må kun bruges, når bilen er stand-
Første gang enheden bruges
s.31
magneter af typen NdFeB, som kan beska-
set. Din egen og de andre trafikanters
Telefon
s.33
dige genstande, der er følsomme over for
sikkerhed har fortrinsret frem for telefono-
Musik
s.34
magnetiske felter (pacemaker, kreditkort,
pkald, musik eller applikationer med hjælp
Internet
s.37
mekaniske ure m.m.).
under kørsel. Vær ansvarlig: Kør forsigtigt og
Video
s.39
vær opmærksom på dine omgivelser. Parrot
Fejlfinding
s.40
frasiger sig ethvert ansvar, hvis du vælger at
Generelle oplysninger
s.41
tilsidesætte denne advarsel.
Dansk 27

OpdAtering
af varme zoner (åbninger til varmeanlæg
Montering
m.m.), bevægelige dele (gearstang m.m.) og
Du kan hente den sidste nye opdatering til
at de ikke risikerer at rulle sig rundt om rats-
produktet på vores websted www.parrot.
Bemærk: Vi anbefaler, at du kontakter en kva-
tammen eller gearstangen.
com under rubrikken Support. Ved hjælp
lificeret person for at udføre denne montering,
Kontroller at bilens udstyr fungerer korrekt
af disse opdateringer kan du drage fordel
f.eks. en autoriseret installatør fra vores net-
efter montering af Parrot ASTEROID Smart.
af nye funktioner og forbedre dit produkts
værk.
Monter ikke Parrot ASTEROID Smart eller
kompatibilitet.
en af komponenterne et sted, hvor bilens
sikkerhedsAnvisninger
airbags kan blive udløst.
Bemærk: Du kan også hente opdateringer til
Sluk motoren, før der udføres enhver form
Monter ikke Parrot ASTEROID Smart et
Parrot ASTEROID Smart, når enheden er
for tilslutning.
fugtigt sted eller et sted, der kan blive meget
forbundet med Internet. Meddelelsesbjælken
Monter aldrig Parrot ASTEROID Smart et
varmt.
vil angive, om der findes en ny opdatering.
sted, hvor den risikerer at kvæste føreren
Sørg for en tilstrækkelig fri afstand bagved
eller en passager i tilfælde af en pludselig
Parrot ASTEROID Smart for at tillade en
sd-kOrt
opbremsning.
spredning af varmen fra enheden.
Parrot ASTEROID Smart leveres sammen
Monter aldrig Parrot ASTEROID Smart et
med et SD-kort. SD-kortet giver mulighed
sted, hvor den kan genere kørslen.
Før du stArter
for at lagre musik og visse applikationer, der
Bor aldrig hul i en skillevæg eller i instru-
Tag den oprindelige autoradio ud af bilen.
ikke findes direkte på Parrot ASTEROID
mentbrættet uden først at have kontrolle-
Denne handling kan kræve udtræksnøgler.
Tablet. Det er nødvendigt at sætte SD-kor-
ret, hvad der sidder bagved. Pas på aldrig at
Kontroller, at det er muligt at oprette en for-
tet ind i Parrot ASTEROID Smart for at
beskadige en elektronisk komponent eller et
bindelse mellem lydstikkene, strømforsy-
bruge musikapplikationer og navigationsap-
kabel.
ningen til Parrot ASTEROID Smart og bilens
plikationer.
Hvis du bruger skruerne, skal du sørge for at
tilslutningsstik ved at sammenligne de to
de ikke kommer i kontakt med et strømfor-
stik. Hvis tilslutningen ikke er mulig, skal du
syningskabel.
bruge en ISO-adapter for at tilpasse Parrot
Parrot ASTEROID Smart er udelukkende
ASTEROID til bilens særlige tilslutningssys-
udviklet til at fungere i et køretøj med et bat-
tem. Se rubrikken Kompatibilitet med biler
teri på 12 V. Hvis dit køretøj (f.eks.: en last-
på supportsiden til Parrot ASTEROID Smart
bil) har et batteri på 24 V, skal der anvendes
for at kontrollere, om du har brug for en ka-
en negativ booster.
bel-adapter.
Sørg for at kablerne installeres på afstand
28 Dansk
Sammenlign antennestikket til Parrot
3. Placer Parrot ASTEROID Smart såle-
Hvis din bil ikke har en atermisk forrude, sæt
ASTEROID Smart og antennestikket i bilen.
des, at hullerne til skruerne er ud for
GPS-donglen fast på instrumentbrættet. Si-
Hvis det er nødvendigt at bruge en anten-
bilens skruehuller.
den med det stjerneformede logo skal være
neadapter, skal du kontakte en kvalificeret
synig (skema E s.9).
4. Skru så mange skruer i, som er nødven-
tekniker for yderligere oplysninger.
For at sikre en god fastgørelse af holderen:
dige til din bilmodel. Brug udelukkende
de medfølgende skruer.
• Brug den dobbeltsidede klæbestrim-
Bemærk: Hvis antennen er forstærket, har du
mel.
også mulighed for at strømforsyne den ved
mOntering AF gps-dOnglen
hjælp af det ISO-kabel, der leveres sammen
• Rengør overfladen før holderen limes
med Parrot ASTEROID Smart.
Sæt GPS-donglen fast på en plan overflade
på.
i en zone uden forhindringer inde i kabinen.
• Når holderen er sat op, skal du vente i
mOntering med hOlder
Atermiske forruder og ruder med indlagt
2 timer, før du håndterer den.
antenne kan forringe GPS-modtagelsen og
1. Skru de 4 skruer af for at tage holderen
svække nøjagtigheden af oplysninger fra na-
tilslutning
af Parrot ASTEROID Smart.
vigationsprogrammer.
AF håndbremsekAblet
Donglens GPS-antenne sidder
2. Sæt monteringsholderen på og sæt
ved siden, hvor der står «Parrot
Håndbremsekablet giver mulighed for
den fast i kabinen. Det gør du ved at
ASTEROID GPS» og hvor der
at bruge videofunktionen på Parrot
bøje tungerne udad og folde dem 90°
sidder et stjerneformet logo.
ASTEROID Smart, når håndbremsen er
(skema A s.7).
Dette logo skal altid være vendt
trukket. Hvis kablet ikke er forbundet med
3. Monter Parrot ASTEROID Smart og
op mod himlen.
signalkablet til bilens håndbremse, vil video-
fastgør den med de 4 skruer (skema B
Vis din bil har en atermisk forrude, skal
funktionen ikke være tilgængelig.
s.7).
GPS-donglen sættes fast på forruden i en
1. Forbind den medfølgende forlængerle-
ikke atermisk zone. Siden med det stjerne-
4. Clips plasticrammen på (skema C s.8)
dning til håndbremsekablet med det
formede logo skal limes på forruden (skema
grønne kabel på Parrot ASTEROID
F s.9).
Montering Med skruerne i siden
Smart.
Bemærk: Forrudens ikke atermiske zone
2. Find og afprøv din bils signalkabel til
1. Skru de 4 skruer af for at tage holderen
aænger af din bilmodel. Den befinder sig som
håndbremse. Dette kabel forbinder
af Parrot ASTEROID Smart.
regel ved bakspejlet.
din håndbremse med indikatoren for
2. Tag de 2 sidestøtter af (skema D s.8).
håndbremse på instrumentbrættet.
Dansk 29

3. Anbring forlængerledningen til hånd-
Advarsel: Før ikke mikrofonens kabel ind i
på de to kabelsko på Parrot kabelføringen.
bremsekablet på Parrot ASTEROID
varmesystemet, ventilationssystemet, kli-
Smart (grøn) et sikkert sted og forbind
maanlægget eller foran bilens airbag i siden.
mOntering AF usb kAblerne
den med håndbremsens signalkabel
Forbind USB kablerne med Parrot
ved hjælp af en passende metode.
Sørg for, at mikrofonen monteres så tæt på
ASTEROID Smart. Vi anbefaler, at du
brugerens hoved som muligt. Den ideelle
tilslutter alle kablerne til Parrot ASTEROID
Advarsel: En ukorrekt tilslutning eller anven-
afstand er 60 cm. Mikrofonen skal helst pla-
Smart, også selv om du ikke nødvendigvis
delse af håndbremsekablet er farlig og ulovlig i
ceres i nærheden af bakspejlet.
skal bruge dem. Før de relevante stik ud af
mange lande.
Ret mikrofonen mod brugerens mund.
kortlommen eller handskerummet. For at
gøre det, kan det være nødvendigt at bore et
mOntering AF bAkkAmerA
tilslutning AF isO-kAblet
hul inde i instrumentbrættet. Undgå så vidt
Hvis du bruger Parrot ASTEROID Smart
Forbind bilens lydstik og strømforsy-
muligt at anvende USB-forlængerledninger
sammen med et bakkamera (medfølger
ning med stiktilslutningerne på Parrot
på flere meter.
ikke), tillader det orange ISO-kabel på Par-
ASTEROID Smart.
Det USB kabel (1,2m – 2A), som du for-
rot ASTEROID Smart at spore, om din bil
binder med iPod forlængerledningen, skal
kører fremad eller tilbage. Forbind dette
Bemærk: Brug de medfølgende kabelklemmer
tilsluttes ved den hvide USB port, der er fo-
kabel med det kabel, der tænder dine bag-
til at fastgøre kablerne på autoradioen. Sæt en
rudset hertil. Benævnelsen «iPod» er angi-
lygter, for at vise bakkameraets videosignal
af kabelklemmerne på det sted, der er forudset
vet ovenover denne port.
når du bakker.
til det i øverste venstre side bag på autoradioen
Med henblik på at garantere en optimal
Forbind ligeledes bakkameraets videokabel
(Se skema s.4).
modtagelseskvalitet må du ikke tilslutte
med Video CAM stikkene, der sidder bag på
din 3G-nøgle direkte til Parrot ASTEROID
Parrot ASTEROID Smart.
Kontroller monteringen. Det gør du ved at
Smart: Brug det medfølgende USB-kabel
tænde og derefter slukke for tændingen i
for at montere den på instrumentbrættet
mOntering AF mikrOFOn
bilen, når Parrot ASTEROID Smart er mon-
(eller ethvert andet ryddet område).
teret: Meddelelsen ”Farvel” skal vises på
Vi anbefaler at glide kablet ind i renden ba-
skærmen. Hvis det ikke er tilfældet, skal der
gved dørens gummiliste.
byttes om på den røde og gule ledning. Den
Hvis kablet passerer ovenover pedalerne,
gule ledning til strømkablet skal være tilslut-
skal du sørge for at det sidder godt fast.
tet 12V konstant, den røde ledning til 12V
eftertænding og den sorte ledning til stel.
Dette gøres ganske enkelt ved at bytte om
30 Dansk
tyverisikring
For at vende tilbage til forrige menu, tryk
Første gang
på
. For at vende direkte tilbage til velk-
Parrot ASTEROID Smart har en afta-
enheden bruges
omstskærmen, tryk på .
gelig front for at forhindre tyveri. Parrot
ASTEROID Smart kan ikke fungere, når
velkOmstskærm
Tryk på for at få adgang til den konteks-
fronten er taget af.
tuelle menu, der svarer til den igangværende
Håndter den aftagelige front forsigtigt. For-
Når Parrot ASTEROID Smart tænder, får du
applikation. Den kontekstuelle menu giver
cer den ikke, når den sættes på eller tages af.
adgang til velkomstskærmen. Navigationsk-
blandt andet mulighed for at få adgang til
Opbevar den et sikkert sted beskyttet mod
napperne sidder i skærmens venstre side.
applikationens ekstra funktioner eller visse
solstråler, høje temperaturer og fugt.
indstillinger.
Tag fronten af ved at glide den øverste del
af fronten nedad og derefter trække fronten
Tryk på tasten for at vise de sidst
forsigtigt udad (skema G s.10).
anvendte eller igangværende applikationer.
Fronten sættes på igen ved først at sætte
den nederste magnetiske del på og dernæst
Tryk på tasten
for at ændre lydstyrke. Få
trykke den øverste del ind, indtil du hører et
dernæst cursoren til at glide til venstre eller
klik.
til højre.
Glid fingeren hen over skærmen mod
venstre. Du får mere plads til at tilføje gen-
veje til dine foretrukne applikationer eller
funktioner.
Rør ved et ikon for at få adgang til den tilsva-
rende funktion. Rør f.eks. ved ikonet Appli-
kationer. Du får adgang til listen over tilgæn-
gelige applikationer på Parrot ASTEROID
Smart. Glid fingeren hen over skærmen for
at se hele listen over disse applikationer.
Dansk 31

tilpAsning AF velkOmstskærmen
tilslutning AF en
• Hvis telefonen beder dig om at
teleFOn viA bluetOOth
indtaste en Bluetooth PIN-kode,
Sådan tilføjer du en genvej til en applikation
indtast «0000».
/ funktion på velkomstskærmen:
Bemærk: Se siden med kompatibilitet på vores
hjemmeside for at undersøge, om din telefon er
• Hvis Parrot ASTEROID Smart
1. Tryk på Applikationer.
kompatibel med Parrot ASTEROID Smart og
og din telefon viser to koder, skal
2. Tryk i 2 sekunder på ikonet for den
se den tilsvarende fremgangsmåde for parring:
du kontrollere, om disse koder er
applikation, du er interesseret i.
www.parrot.com/uk/compatibility.
identiske og dernæst bekræfte
eller aræfte.
3. Glid ikonet hen på den ønskede
Hvis det er første gang, du bruger en tele-
> Skærlen på Parrot ASTEROID
plads.
fon med Parrot ASTEROID Smart, skal du
Tablet viser «Parring udført».
først parre de to enheder. Når din telefon er
Sådan erner du en genvej:
blevet parret med Parrot ASTEROID Smart,
Bemærk: På visse telefoner skal du autorisere
1. Tryk i 2 sekunder på det ikon, du
vil forbindelsen mellem de to enheder blive
forbindelsen med Parrot ASTEROID Smart
ønsker at slette.
oprettet automatisk, hver gang der tændes
for at tillade automatisk forbindelse. Læs te-
for dem i nærheden af hinanden med
lefonens brugervejledning for yderligere oplys-
2. Glid ikonet opad mod angivelsen Slet.
aktiveret Bluetooth® funktion.
ninger.
Når ikonet bliver rødt, kan du slippe
det med fingeren.
tilslutning AF tO teleFOner
1. I menuen Parametre, tryk på Trådløs
ændring AF pArAmetre
og netværk > Bluetooth.
For at aktivere funktionen, der tillader
tilslutning af 2 telefoner:
For at ændre Parrot ASTEROID Smart
2. Aktiver om nødvendigt muligheden
parametre, tryk på Applikationer, og
Bluetooth og Muligheder >
1. Tryk på Telefon.
dernæst på Parametre. Du kan ligeledes
Identificerbar.
2. Tryk på
, og derefter på Bluetooth.
trykke på
, og dernæst på Parametre.
3. Søg på telefonen efter perifere
3. Tryk på Muligheder.
Bluetooth enheder og vælg dernæst
”Parrot ASTEROID Smart”.
4. Aktiver muligheden dual mode.
4. Fremgangsmåden for parring
Når der tændes for Parrot ASTEROID
aænger derefter af din
Tablet, forsøger den at oprette en forbin-
telefonmodel:
delse med alle de parrede telefoner, der
32 Dansk
findes i bilen. Hvis der findes mere end 2
synkrOnisering AF
Telefon
parrede telefoner i bilen, opretter den en
teleFOnens teleFOnliste
forbindelse med de 2 telefoner, som har den
Med de fleste Bluetooth-telefoner synkro-
sådAn mOdtAger du et OpkAld
ældste parring.
niseres telefonlisten automatisk med syste-
Når 2 telefoner er forbundet med Parrot
Et indkommende opkald angives ved en rin-
mets hukommelse. Hver gang du ændrer din
ASTEROID Smart, anses en ene af dem for
getone. Navnet på kontaktpersonen med-
telefonliste, starter synkroniseringen igen
at være den aktive telefon og den anden
deles, hvis nummeret på denne kontaktper-
automatisk ved næste tilslutning.
for at være den sekundære telefon. I stan-
son er gemt i telefonlisten på den telefon,
dard svarer den aktive telefon til den tele-
der er forbundet med Parrot ASTEROID
Advarsel: Det er kun de kontaktpersoner, som
fon, der har den ældste parring med Parrot
Smart.
er gemt i telefonens hukommelse, der synkro-
ASTEROID Smart.
niseres med Parrot ASTEROID Smart. Hvis
dine kontaktpersoner er gemt på SIM-kortet,
• For at acceptere dette opkald, tryk på
Du har mulighed for at modtage opkald fra
skal de føres over i telefonens hukommelse.
tasten
på ernbetjeningen eller
den aktive telefon og den sekundære tele-
Læs telefonens brugervejledning for yderligere
på grønne knap, der vises på skær-
fon.
oplysninger.
men. Tryk dernæst på tasten på
Bemærk: På visse telefoner skal du give til-
ernbetjeningen eller på den røde
Kun telefonlisten i den aktive telefon er til-
ladelse til, at Parrot ASTEROID Smart får
tast på skærmen for at afslutte
gængelig på Parrot ASTEROID Smart. Du
adgang til dine kontaktpersoner for at gen-
opkaldet.
kan kun foretage opkald med den aktive
nemføre synkroniseringen. Læs telefonens bru-
telefon. Du kan dog let skifte fra den ene til
• For at afvise dette opkald, tryk på
gervejledning for yderligere oplysninger.
den anden telefon. For at gøre dette:
tasten
på ernbetjeningen eller
på røde knap, der vises på skærmen.
1. Tryk på Telefon.
Den automatiske synkronisering er begræn-
set til 5000 kontaktpersoner (eller telefon-
2. Tryk på
, og derefter på Telefon.
sådAn FOretAger du
numre) pr. parret telefon.
et OpkAld viA stemmestyring
3. Vælg den aktive telefon.
Du kan foretage et opkald direkte med
stemmestyring efter synkronisering af din
telefons telefonliste. Parrot ASTEROID
Tablet genkender automatisk den kontakt-
person i din telefonliste, som du vil ringe til.
Dansk 33
1. Tryk på tasten
for at starte
sådAn ringer du til
Musik
processen med stemmestyring.
en kOntAkt i teleFOnlisten:
> Parrot ASTEROID Smart beder om
Bemærk: Flere minutters overførsel kan være
navnet på den kontaktperson, du vil
1. Tryk på Telefon og dernæst på
påkrævet ved den første forbindelse mellem din
ringe til.
Kontakter.
perifere lydenhed (USB / SD / iPod) og Parrot
2. Sig navnet på den kontaktperson,
2. Tryk på kontakten for at starte
ASTEROID Smart, især hvis det drejer sig om
opkaldet til standard nummeret eller
perifere enheder, som indeholder mange mu-
som du vil ringe til, efterfulgt af type
sikfiler. Efter endt overførsel er disse musikstyk-
telefonnummer (”KONTOR”,
vælg mellem kontaktpersonens
”MOBIL” osv.), hvis kontaktpersonen
forskellige numre (”KONTOR”,
ker tilgængelige ved hjælp af stemmestyring.
har flere numre.
”MOBIL” osv.).
sådAn bruger du
> Opkaldet til denne kontaktperson
stemmestyringsFunktiOnen
sker automatisk, hvis
til musik
stemmekommandoen er opfattet
korrekt.
Med stemmestyringsfunktionen til musik
> I modsat fald udsender det håndfrie
kan du ved hjælp af stemmestyring vælge
system en anmodning om
de kunstnere eller albums, som du vil lytte
bekræftelse. Bekræft ved at sige ”JA”,
til. Denne funktion er til rådighed, hvis du
”RINGE” eller ”RING”.
anvender Parrot ASTEROID Smart med en
perifer enhed af typen iPod / USB / SD, eller
Bemærk: Du kan annullere opkaldsprocedu-
hvis du anvender en musikapplikation, der
ren på et vilkårligt tidspunkt trykke på tasten
er kompatibel med denne funktion.
på ernbetjeningen eller på tasten på
skærmen.
1. Tryk på tasten
på ernbetjeni-
gen eller tryk på Stemmekomman-
doer på skærmen.
34 Dansk

2. Sig navnet på den kunstner eller det
Bemærk: Tryk på tasten for at ændre visse
usb
album, som du vil lytte til, når Parrot
indstillinger (lyd, gentagelse, tilfældig).
Parrot ASTEROID Smart er kompatibel
ASTEROID Smart beder dig om det.
med de fleste USB-nøgler / MP3-afspil-
> Derefter vises listen over lydkilder
sd
lere / eksterne hard disks. Der findes ingen
forbundet med Parrot ASTEROID
Du kan bruge følgende SD-kort (med adap-
begrænsning for USB-nøglens kapacitet. De
Tablet og musikapplikationer kompa-
ter om nødvendigt) sammen med Parrot
musikalske filer på din USB-nøgle kan være
tible med stemmestyringsfunktionen,
ASTEROID Smart: SD, micro SD, mini SD,
i format MP3, AAC, WAV, OGG eller WMA.
som indeholder den kunstner / det
SDHC, mini SDHC, micro SDHC. SD-kor-
album, som du har valgt.
tets kapacitet må ikke overskride 32Go.
1. Forbind din USB-enhed med
De musikalske filer på dit SD-kort kan være
Bemærk: Kontroller navnet på kunstnere og
USB-kablet.
i format MP3, AAC, WAV, OGG eller WMA.
albums i dine musikfilers tags eller mærker
2. Tryk på tasten SOURCE på ern-
(metadata). De kan nemlig være forskellige fra
betjeningen (eller tryk på Musik på
de kunstnere og albums, der vises i titlen på dit
1. Sæt SD-kortet ind det forudsete sted
skærmen) og vælg USB. Du kan også
musiknummer.
på skærmens højre side(skema G s.11).
trykke på Gennemse for at navigere i
2. Tryk på tasten SOURCE på ern-
indholdet på din USB-enhed.
ipOd
betjeningen (eller tryk på Musik på
3. Tryk på musiknummeret for at starte
skærmen) og vælg SD. Du kan også
1. Forbind din iPod med iPod kablet.
afspilningen.
trykke på Gennemse for at navigere i
2. Tryk på tasten SOURCE på ern-
indholdet på dit SD-kort.
Bemærk: Tryk på tasten
for at ændre visse
betjeningen (eller tryk på Musik på
3. Tryk på musiknummeret for at starte
indstillinger (lyd, gentagelse, tilfældig).
skærmen) og vælg iPod. Du kan også
afspilningen.
trykke på Gennemse for at navigere i
indholdet på din iPod.
Bemærk: Tryk på tasten
for at ændre visse
3. Tryk på musiknummeret for at starte
indstillinger (lyd, gentagelse, tilfældig).
afspilningen.
Dansk 35
brug sAmmen med en
2. Glid cursoren til venstre eller til højre
• Glid din finger nedad for at mindske
bluetOOth-lydAFspiller
for at vælge en frekvens.
lydstyrken.
Bemærk: Parrot ASTEROID Smart giver dig
For at se listen over alle tilgængelige statio-
Under afspilning af en musikfil (med undta-
mulighed for at bruge telefonifunktion og
ner, tryk på tasten og tryk på Ny scan >
gelse af lydkilder forbundet via et jack / jack
lyd-streaming via Bluetooth med 2 forskellige
OK.
kabel):
telefoner, uden du behøver at frakoble en af de
For at indlæse en station, tryk på tasten
2 enheder.
• Glid fingeren til højre for at skifte til
og vælg dernæst muligheden Føj til favorit-
det næste musiknummer.
ter.
Du kan bruge Parrot ASTEROID Smart
For at få adgang til de indlæste stationer,
• Glid fingeren til venstre for at vende
for at lytte til musikfiler, som er lagret
tryk på tasten og tryk dernæst på Mode
tilbage til forrige musiknummer.
på en Bluetooth lydafspiller, hvis denne
> Favoritter.
understøtter A2DP-profilen (Advanced
Bemærk: Hvis du bruger Parrot ASTEROID
Audio Distribution Profile). Hvis du bruger
Bemærk: Du kan indlæse et ubegrænset antal
Smart sammen med en lydkilde forbundet via
lydafspilleren for første gang, skal du først
stationer.
Bluetooth, er disse betjeninger kun disponible,
parre den med Parrot ASTEROID Smart.
hvis denne lydkilde understøtter AVRCP pro-
Hvis lydafspilleren allerede er parret med
betjeninger
filen (Audio/Video Remote Control Profile).
Parrot ASTEROID Smart:
1. Tryk på tasten SOURCE på ernbetje-
ningen (eller tryk på Musik på skær-
men) og vælg Audio Bluetooth.
2. Start afspilningen af et musikstykke på
lydafspilleren.
Under afspilning af en musikfil eller radio:
• Tryk på skærmen for at sætte mu-
rAdiO
siknummeret på pause eller aryde
Sådan vælger du en radiofrekvens:
radioens lyd.
1. Tryk på Musik > Radio.
• Glid din finger opad for at øge lydstyr-
ken.
36 Dansk

Bemærk: Du kan ændre denne indstilling på
deling AF 3g
Internet
et senere tidspunkt ved at vælge Parametre >
tilslutning viA bluetOOth
Trådløs og netværk > Mobildatanetværk. Vælg
Advarsel: Oprettelsen af en forbindelse til In-
Hvis du har en telefon, som understøtter
din 3G / 4G nøgle blandt de perifere enheder,
ternettet ved hjælp af en 3G/4G-nøgle kræver
profilen Bluetooth® DUN (Dial-Up Networ-
vælg Glem PIN-kode og derefter Glem.
et abonnement hos en telefonudbyder. Brugen
king) eller PAN (Personal Area Network),
af denne service kan medføre store omkostnin-
kan du dele din telefons 3G tilslutning via
ger til roaming. Kontroller dit abonnements
3. Vælg om nødvendigt din APN (Access
din telefons Bluetooth-forbindelse med Par-
betingelser, og hold løbende øje med dit forbrug
Point Name) i den foreslåede liste.
rot ASTEROID Smart.
hos din udbyder. Parrot frasiger sig ethvert
Denne oplysning findes i den
ansvar vedrørende de tilknyttede omkostninger
medfølgende dokumentation til din
Bemærk: Se siden med kompatibilitet på vores
hertil.
3G / 4G nøgle. Hvis din APN ikke står
hjemmeside for at kontrollere, om din telefon
i denne liste, kan du tilføje den ved at
tillader deling af 3G tilslutning via Bluetooth
tilslutning med en 3g / 4g nøgle
vælge Parametre > Trådløs og netværk
og se den tilsvarende fremgangsmåde: www.
> Mobildatanetværk.
parrot.com/uk/compatibility.
Bemærk: Se rubrikken Kompatibilitet med Par-
rot ASTEROID Smart på vores hjemmeside for
4. Vælg din 3G / 4G nøgle blandt de peri-
at kalde listen over 3G / 4G nøgler, som er kom-
fere enheder.
1. Tillad deling af tilslutning på din tele-
patible med Parrot ASTEROID Smart.
fon. Denne fremgangsmåde er forskel-
5. Vælg Adgangspunkt > Andet >
lig i forhold til din telefons model.
Forhåndsdefinerede adgangspunkter.
1. Forbind en 3G / 4G nøgle med Parrot
2. Forbind din telefon med Parrot
6. Vent indtil forbindelsen er oprettet. Du
ASTEROID Smart via USB-kablet.
ASTEROID Smart via Bluetooth.
kan også trykke på tasten
og
> En pop-up vises.
navigere i menuerne mens
3. På Parrot ASTEROID Smart, vælg
2. Indtast din PIN-kode og tryk derefter
forbindelsen bliver oprettet.
Parametre > Trådløs og netværk >
på GODKEND. Sæt kryds ved muli-
Mobildatanetværk.
gheden Husk, hvis du foretrækker ikke
4. Vælg din APN (Access Point Name)
at blive bedt om PIN-koden ved hver
i den foreslåede liste og sæt dernæst
start af Parrot ASTEROID Smart.
kryds ved muligheden Vælg.
Dansk 37

deling AF 3g tilslutning viA usb
Bemærk: Læs telefonens brugervejledning for
Du kan for eksempel lytte til en Webradio og
yderligere oplysninger.
bruge en applikation med hjælp under kør-
Hvis du har en telefon, der understøtter
sel samtidigt.
deling af 3G tilslutning via USB, skal du for-
tilslutning ved et Wi-Fi netværk
For yderligere oplysninger om brugen af
binde din telefon med Parrot ASTEROID
tilgængelige applikationer, se websiden på
Smart ved hjælp af et USB / micro USB ka-
Hvis din telefon tillader deling af sin 3G
ASTEROID Market: www.parrotasteroid.
bel (medfølger ikke) for at dele telefonens
tilslutning via Wi-Fi® eller hvis et andet
com.
3G tilslutning.
trådløst netværk er disponibelt i nærheden
af din bil:
Bemærk: Se siden med kompatibilitet på vores
hjemmeside for at kontrollere, om din telefon
1. I menuen Parametre på Parrot
tillader deling af 3G tilslutning via USB og se
ASTEROID Smart, tryk på Trådløs og
den tilsvarende fremgangsmåde: www.parrot.
netværk > Wi-Fi.
com/uk/compatibility.
2. Aktiver muligheden Wi-Fi.
1. Kontroller, at tastaturet på din telefon
3. Tryk på Wi-Fi parametre.
er låst og forbind den dernæst med
> Listen over Wi-Fi netværk vises.
Parrot ASTEROID Smart ved hjælp
4. Vælg Wi-Fi netværket.
af et USB / micro-USB kabel. Denne
tilslutning tillader ligeledes at oplade
5. Indtast om nødvendigt adgangskode.
din telefons batteri.
2. Vælg om nødvendigt din APN (Access
Anvendelse AF ApplikAtiOnerne
Point Name) i den foreslåede liste og
sæt dernæst kryds ved muligheden
Du kan bruge flere typer applikationer sam-
Vælg. Du kan ændre denne indstilling
men med Parrot ASTEROID Smart: musik,
på et senere tidspunkt ved at vælge
GPS og hjælp under kørsel.
Parametre > Trådløs og netværk >
De tilgængelige applikationer er forskellige
Mobildatanetværk > Mobile Access
i forhold til brugslandet. Visse applikationer
device.
kræver muligvis et abonnement.
> En pop-up angiver, at delingen af
Parrot ASTEROID Smart kan multitaske:
USB tilslutningen er aktiveret.
Den kan bruge flere applikationer samtidigt.
38 Dansk

AFspilning AF
3. Vælg videoen ved at trykke på det
Video
en videO FrA en ekstern kilde
tilsvarende ikon.
Advarsel: Videofunktionen på Parrot ASTE-
Du kan vise en video fra en ekstern
Anvendelse AF en skærm
ROID Smart er farlig og ulovlig i mange lande,
videokilde på Parrot ASTEROID Smart.
tilsluttet ved videOudgAngen
hvis den bruges under kørsel. Denne funktion er
Forbind din videokilde med Parrot
derfor ikke tilgængelig mens bilen kører. For at
ASTEROID Smart ved hjælp af et AV kabel
Video-udgangene giver mulighed for at
se en video på Parrot ASTEROID Smart, skal
(medfølger ikke) (skema s.4).
tilslutte en skærm til passagererne på
du parkere bilen et sikkert sted og trække hånd-
bagsædet, så de kan se videoer lagret på
1. Tryk på Applikationer > Videoindgang.
bremsen.
SD-kortet. Se monteringsskemaet s.4 for
2. Start afspilningen af en video på din
yderligere oplysninger om tilslutning af en
bAkkAmerA
kilde.
skærm til passagererne på bagsædet ved
Parrot ASTEROID Smart.
Hvis din bil er udstyret med et bakkame-
Bemærk: Du kan til enhver tid trykke på Video
ra, kan du bruge skærmen på Parrot
switch for at skifte mellem videoen fra bak-
Advarsel: Monter aldrig skærmen et sted, hvor
ASTEROID Smart til at se videoflowet fra
kameraet og videoen fra en ekstern kilde for-
føreren kan se videoerne under kørsel.
dette kamera, som en hjælp mens du par-
bundet via et AV / iPod kabel.
kerer bilen i bakgear. Se monteringsskemaet
s.4 og afsnittet «Montering af bakkamera»
AFspilning
for yderligere oplysninger om bakkameraets
AF videOFiler på et sd-kOrt
tilslutning ved Parrot ASTEROID Smart.
Bakkameraets videoflow vises automatisk
Du kan afspille videofiler på Parrot
på skærmen, når du er i bakgear. Billedet fra
ASTEROID Smart, som er lagret på et SD-
dette bakkamera kan se ud til at være spe-
kort. Videofilerne på SD-kortet kan være
jlvendt.
i format MP2, MP4, H263, H264, WMV og
SPARK.
Bemærk: Du kan til enhver tid trykke på Video
1. Sæt SD-kortet ind det sted, der er
switch for at skifte mellem videoen fra bak-
forudset til det bag på den aftagelige
kameraet og videoen fra en iPod forbundet via
front (skema s.5).
et AV / iPod kabel.
2. Tryk på Applikationer > Galleri.
Dansk 39

prOblemer med
indtil din iPhone genstartes. Du må
Fejlfinding
teleFOnFunktiOnen
ikke røre skærmen, når meddelelsen
“Lad fingeren glide for at slukke“ vises.
Før du stArter
Kontroller din telefons kompatibilitet med
Parrot ASTEROID Smart. Det gør du ved
Kontroller, at meddelelsen “Farvel” vises på
Der kan opstå visse problemer, hvis den pe-
at se siden med kompatibilitet på vores
skærmen i Parrot ASTEROID Smart, når du
rifere enhed allerede er tilsluttet ved Parrot
hjemmeside: www.parrot.com/uk/compati-
slukker for bilens motor. Se afsnittet Kontrol
ASTEROID Smart, når du drejer nøglen i
bility.
af monteringen for yderligere oplysninger.
tændingen. Prøv igen ved at tilslutte den
Nulstil enheden. For at gøre dette skal du
perifere enhed, efter at du har drejet nøglen
Hvis din telefon står angivet som kompati-
erne fronten og derefter bruge en kugle-
i tændingen.
bel, og din Parrot ASTEROID Smart allerede
pen eller en anden genstand og trykke på
har den seneste opdatering, skal du slette
tasten Reset. Hold knappen Reset inde i 3
FOr yderligere Oplysninger
parringen mellem de to apparater på Parrot
sekunder (skema s.5). Du kan ligeledes ge-
ASTEROID Smart og din telefon, genstarte
Se supportsiden til Parrot ASTEROID
noprette de oprindelige parametre ved at
de to enheder og derefter genoprette for-
Smart på vores hjemmeside
vælge Parametre > Avancerede parametre >
bindelsen mellem de to enheder.
www.parrot.com.
Fortrolighed > Genopret fabriksværdier.
Kontroller, at du har den seneste opdate-
prOblemer med
ring på Parrot ASTEROID Smart. Det gør
musikFunktiOnen
du ved at vælge Parametre > Apropos >
Version. Sammenlign versionens nummer
Nulstil din iPod / iPhone, før du forbinder
med det, der står på supportsiden til Parrot
den med Parrot ASTEROID Smart igen. For
ASTEROID Smart.
at nulstille en iPod / iPhone (denne proce-
dure sletter ikke nogen data) skal du gøre
Bemærk: Du kan også hente opdateringer til
følgende:
Parrot ASTEROID Smart, når enheden er for-
bundet med Internet. Meddelelsesbjælken vil
• iPod: Tryk på Menu og på den mid-
angive, om der findes en ny opdatering.
terste knap samtidigt, indtil iPod’en
genstartes.
• iPhone/iPod touch: Tryk på knappen
On/O og knappen Home samtidigt,
40 Dansk

Et produkt, der viser sig ikke at være fejl-
kOrrekt AFFAldsbOrtskAFFelse
Generelle oplysninger
behæftet, vil blive returneret til afsenderen,
AF dette prOdukt(elektrisk Og
som vil få tilsendt en regning for udgifter til
elektrOnisk udstyr)
gArAnti
behandling, kontrol og transport.
Til dette formål har alle kommuner etableret
Med forbehold af den lovbestemte garanti,
indsamlingsordninger, hvor aald af elek-
garanterer PARROT kontraktligt produktet i
ændringer
trisk og elektro-nisk udstyr gratis kan afle-
en periode på 12 måneder fra forbrugerens
Forklaringerne og specifikationerne i denne
veres af borgerne på genbrugsstationer eller
oprindelige købsdato (undtagen sliddele
guide er kun vejledende og kan blive ændret
andre indsamlingssteder eller hentes direkte
som garanteres i 6 måneder) mod mate-
uden forudgående varsel. De anses for at
fra husholdningerne.
rialefejl og fabrikationsfejl ved præsentation
være korrekte på det tidspunkt, hvor de bli-
Nærmere information skal indhentes hos
af beviset for køb (dato, sted, produktets
ver trykt. Denne guide er blevet udarbejdet
kommunens tekniske forvaltning.Brugere
serienummer) for forhandleren eller Parrot.
med største omhu i den hensigt at give dig
af elektrisk og elektronisk udstyr må ikke
I løbet af den kontraktlige garantis varighed
den mest nøjagtige information.
bortskae aald af elektrisk og elektro-
skal det fejlbehæftede produkt returneres
Parrot kan dog ikke drages til ansvar for
nisk udstyr sammen med husholdning-
i sin oprindelige emballage til forhandle-
konsekvenserne af fejl eller udeladelser i
saald. Brugere skal benytte de kommu-
rens kundeservice. Efter at have undersøgt
denne guide, eller for beskadigelser eller
nale indsamlingsordninger for at mindske
produktet vil Parrot efter eget valg enten
utilsigtet tab af data, som direkte eller in-
den miljømæssige belastning i forbindelse
udskifte produktet eller udstede et tilgode-
direkte er et resultat af brugen af informa-
med bortskaelse af aald af elektrisk og
havende med udelukkelse af enhver anden
tionen heri. Parrot forbeholder sig ret til at
elek-tronisk udstyr og øge mulighederne for
godtgørelse.
ændre eller forbedre produktets design el-
genbrug, genanvendelse og nyttiggørelse af
Garantien dækker ikke opdatering af sof-
ler brugervejledningen uden nogen form for
aald af elektrisk og elektronisk udstyr.
tware indbefattet i Parrot produkter med
begrænsning og uden forpligtigelse til at un-
Bluetooth® mobiltelefoner beregnet til re-
derrette brugerne herom.
gnskabsføring, indhentning af data, udven-
Da vi konstant bestræber os på at opgra-
dig beskadigelse af produktet på grund af
dere og forbedre vores produkter, kan det
normal brug af produktet, enhver beskadi-
produkt, du har købt, være lidt forskellig fra
gelse forårsaget af et uheld, en unormal brug
den model, der er beskrevet i denne guide.
eller en ikke autoriseret brug af produktet, et
Hvis det er tilfældet, kan der fås en senere
ikke Parrot produkt. Parrot er ikke ansvarlig
udgave af denne guide i elektronisk format
for opbevaring, tab eller beskadigelse af
på Parrots website www.parrot.com.
data under transport eller reparation.
Dansk 41

Overensstemmelseserklæring
«Made for iPod / iPhone» betyder, at
et elektronisk tilbehør er blevet specielt
Parrot SA, 174 quai de Jemmapes, 75010
designet til at kunne forbindes henholdsvist
Paris, Frankrig, erklærer under sit unikke
med en iPod eller en iPhone og at fabri-
ansvar, at produktet beskrevet i nærværende
kanten attesterer, at det lever op til Apples
brugervejledning er i overensstemmelse med
standarder. Apple afviser ethvert ansvar
de tekniske standarder EN300328 (v1.8.0),
i forbindelse med disse tilbehørsdeles
EN301489-1/-17 (v2.1.1), EN300220-2
virkemåde eller deres overensstemmelse
(V2.3.1), EN300440, EN60950-1: 04/2006
med gældende forskrifter og sikkerhedss-
/ A11: 2009 / A1: 2010 / A2: 2011, EN 60065:
tandarder.
05/2002 / A1: 05/2006 / A11: 2008 / A2:
2010 iht. bestemmelserne i R&TTE direkti-
iPod, iPod Touch og iPhone er varemærker,
vet 1999/5/EF, samt kravene i EMC-direk-
som tilhører Apple, Inc. og er registreret i
tivet 2004/108/EF, lavspændingsdirektivet
USA og andre lande.
2006/95/EF samt direktivet 72/245/EØF om
radiostøjdæmpning af køretøjer som ændret
Wi-Fi er et registreret varemærke af Wi-Fi
med direktivet 2009/19/EF.
Alliance.
Alle de andre handelsmærker eller regis-
trerede varemærker nævnt i nærværende
dokument er beskyttet med Copyright og er
deres respektive ejeres ejendom.
Navnet ”Gracenote”, logoet Gracenote, det
grafiske design Gracenote, benævnelsen
”Powered by Gracenote” er mærker eller
registrerede varemærker af Gracenote i
USA og /eller andre lande.
