Parrot ASTEROID Classic: инструкция
Раздел: Автомобильная техника
Тип: Мультимедиа
Инструкция к Мультимедиа Parrot ASTEROID Classic
Parrot ASTEROID
Quick Start Guide
Hurtig start guide
Краткое руководство по эксплуатации
Hurtig brugervejledning
Pikakäyttöopas
Skrócona instrukcja obsługi
Hızlı kullanı kılavuzu
Snabb bruksanvisning
Rychlý návod k použití


Parrot ASTEROID
English.....................................................................................
5
Norsk........................................................................................
13
РУССКИЙ................................................................................
21
Dansk.......................................................................................
29
Suomi.......................................................................................
37
Polski........................................................................................
45
Türkçe.......................................................................................
53
Svenska....................................................................................
61
česky........................................................................................
69
www.parrot.com
SOURCE
GPS
10A
PARROT
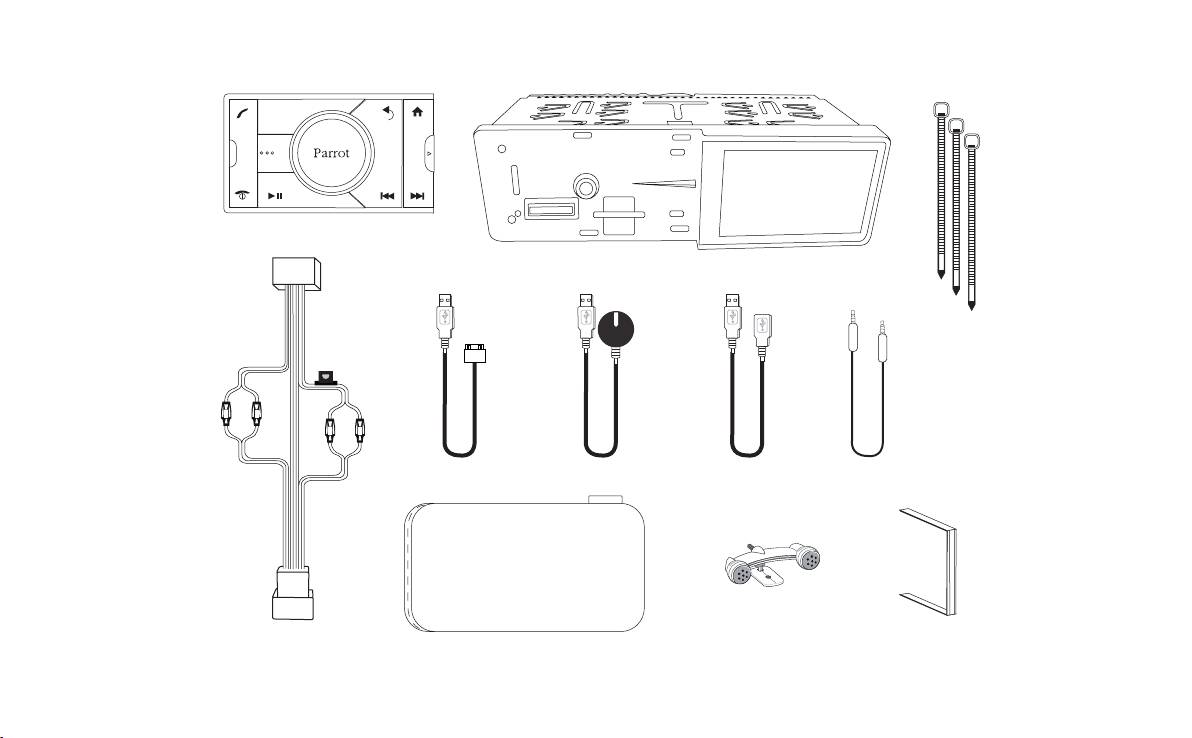
Kit content / Pakkens innhold / I förpackningen ingår / Sættets indhold / Obsah balení / Zawartość opakowania / Содержимое упаковки / Ambalajın içeriği
Before you begin
Quick start
About this guide
In order to limit our paper consumption, and as part of
our environmentally friendly and responsible approach,
guide
Parrot prefers to put user documents online rather than
print them out. This simplied guide to the Parrot
ASTEROID is therefore limited to providing you with
the main instructions that will make it easy for you to
use the device. More information can be found on the
Support & Downloads section of our website, www.
parrot.com: the full manual, FAQs, tutorials, and more.
Note: iPod and iPhone (in iPod mode) will be referred
to as an «iPod» in this manual.
Warnings
All functions requiring an increased attention should only be •
Content
used while the vehicle is stationary . Your safety and the one
of the other road users prevails over phone calls, music and
navigation instructions. Be responsible: drive carefully and
Before you begin.................................................
p.5
pay full attention to your surrounding. Parrot denies any li-
Installation.............................................................
p.7
ability should you choose not to respect this warning.
Getting started.......................................................
p.8
Use the Parrot ASTEROID with a reasonable volume level so •
Phone....................................................................
that you can hear all external noises while driving.
p.9
Music.....................................................................
p.9
The Parrot ASTEROID includes NdFeB magnets which can •
damage objects sensitive to magnetic elds (pacemakers,
Internet..................................................................
p.10
credit cards, mechanical clocks…).
Troubleshooting.....................................................
p.11
General information..............................................
p.11
English
5
6
English

English
7
Installation
Check the wiring (as explained in the Final check 4.
To guarantee an optimal reception quality we recommend •
section).
you do not connect your internet USB key 3G on the
Safety instructions
Install the audio cables (as explained in the Installing the 5.
Parrot ASTEROID directly : use the USB cable to install your
cables section).
device on the dashboard (or any other open area).
Note: We advise our customers to have the Parrot
Install the double microphone (as explained in the 6.
Use the provided cable ties to make sure the cables are well •
ASTEROID tted by a professional.
Installing the microphone section)
xed to the car stereo. Insert one of the cable ties into the
Slide the car stereo into the Parrot ASTEROID cage and 7.
slot in the top left of the back of the car stereo (ref er to the
Turn the ignition off before installing the Parrot ASTEROID.•
install the faceplate.
diagram).
Install the Parrot ASTEROID only on vehicles with a 12 V •
battery .
Final check
Installing the microphone
Place all cables away from hot places (heater outlet) and •
Once all the connections are made, turn the ignition on then •
Make sure the microphone is installed as close to the mouth •
moving parts (gear shift, seat rails...).
off to perform the installation test. The “Goodbye” message
of the user as possible. The ideal distance is 60 cm. The
must be displayed.
best possible location for the microphone is near the rear-
Before you begin
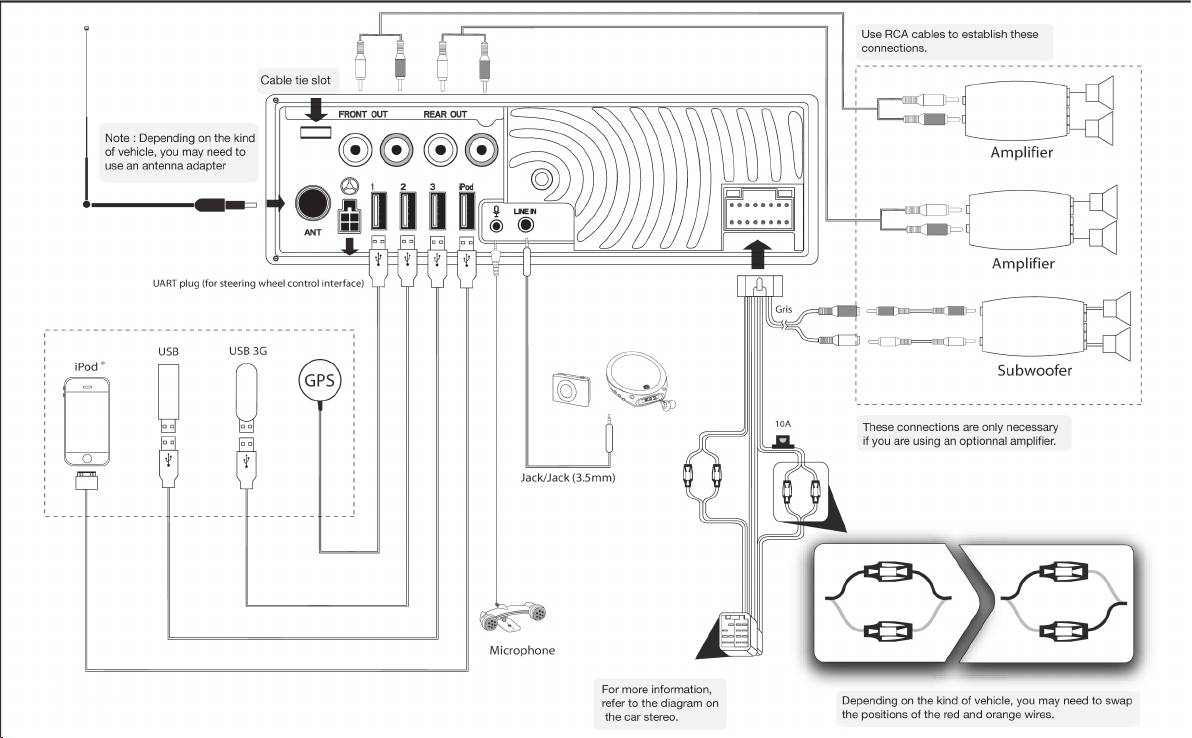
If it is not the case, it is necessary to swap the positions of •
view mirror.
Remove your car stereo from your vehicle. You may need •
the red and yellow wires. Indeed, the red wire of the power
The microphone needs to be pointed towards the user.•
release keys to do so.
cable must be connected to the 12V ignition, the yellow wire
to the permanent 12V and the black wire to the ground. This
Try to connect the audio and power connectors of the Parrot •
can be done simply by reversing both fuse holders located
ASTEROID to the connectors of your vehicle. If this connec-
on the Parrot wiring.
tion is impossible, you have to obtain an ISO adapter before
installing the Parrot ASTEROID.
Installing the cables
Compare the Parrot ASTEROID antenna connector to •
Connect the iPod / iPhone®, USB, Jack cables and the GPS •
the antenna connector of your vehicle. If an adapter is
dongle to the Parrot ASTEROID. We recommend you con-
necessary, contact your local car audio specialist. Make
nect all audio cables to the Parrot ASTEROID even if you do
sure you also supply power to your antenna if it is ampli-
not plan on using them. Route the audio cables to a suitable
ed. Power to the antenna can be supplied using the Parrot
location in your vehicle such as the glove box or arm rest
ASTEROID ISO cable.
compartment. It may be necessary to drill a hole in your
dashboard to do so. Avoid using USB extension cables.
Installing the car stereo
Make sure y ou connect the iPod / iPhone cable to its •
Insert the cage and x it into the dashboard using the 1.
specic USB port. “iPod” is written above it. Use the dou-
bracket mounting tab.
ble-sided tape to stick the GPS dongle to your dashboard.
Access the vehicles car stereo wiring harness from behind 2.
Once you have stuck the dongle to the dashboard, wait for
the dashboard.
approximately 2 hours to make sure the adhesive tape ad-
Connect the audio and power connectors of the Parrot 3.
heres well.
ASTEROID to the ones of your vehicle.
8
English
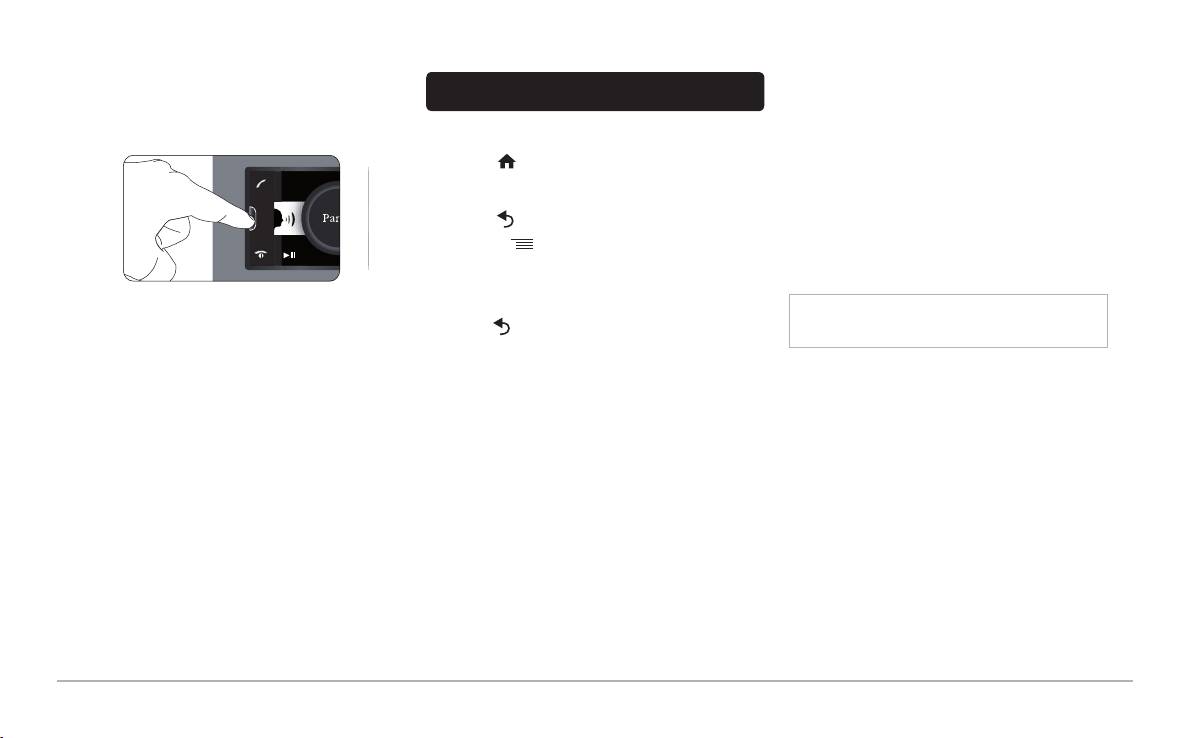
Basic operations
established each time the Parrot ASTEROID is turned on
near your phone.
To remove the faceplate, press the eject button on its left. •
Place the faceplate into the provided carrying case in order
You can pair up to 10 devices with the Parrot ASTEROID. If •
to protect it from scratches and dust.
you attempt to pair an 11th phone, you will get the « Memory
Navigating through the menus
full » message. You must then delete a phone from the paired
Press the button to access the main menu. •
devices list. To do so:
Browse through the menus by turning the wheel and conrm •
Select 1. Settings > Phone > Paired devices.
by pressing the wheel.
Select the phone then select 2. Delete.
Press the •
button to get back to previous menu.
Synchronising the phonebook
Press the •
button to access the pop-up menu
With most of the Bluetooth phones, the phonebook is •
corresponding to the current application. The popup menu
automatically synchronized in the system’s memory .
allows you to change several settings or browse more
easily through the content of your audio source or
Warning: Only the contacts stored in the phone memory
To attach the faceplate, put it on the right side of the car •
phonebook.
are synchronized. If your contacts are stored in your SIM
stereo. Once the faceplate and the car stereo magnets con-
Press the•
button to get to the track list if a song is current-
card memory, transfer them onto your phone memory.
nect, press the left side.
ly being played. While navigating through the menus, press
To remove the car stereo from the dashboard, insert the pro-•
the SOURCE button to get to the Now Play ing screen.
If your phone does not support automatic synchronization, •
vided extraction key until they click into place.
you can also use the Object Push function of your phone to
Connecting a phone to the Parrot ASTEROID
send contacts from your mobile to the Parrot ASTEROID via
Bef ore pairing your phone with the Parrot ASTEROID, make •
Bluetooth. To do so, select Settings > Telephony > Special
sure that it is visible by all Bluetooth devices. To do so, se-
pairing > Object Push.
lect Settings >Telephony > Visibility then make sure the op-
tion is checked. If it is not the case, check it by pressing the
jogwheel.
Prior to using the Parrot ASTEROID with your phone for the •
very rst time, you must initially pair both dev ices. To do
so:
From y our phone, search f or Bluetooth1.
®
peripherals
and select “Parrot ASTEROID “.
Enter «0 0 0 0» on your phone when prompted to 2.
do so.
> “Pairing successful” is displayed.
Once y our phone is paired to the Parrot ASTEROID, the •
connection between both devices will be automatically
SOURCE
SD
RESET
Getting started

English
9
Phone
Using the Parrot ASTEROID while on a call
Music
Use the jog wheel during a call to adjust the communication •
volume. The volume setting is saved for subsequent calls.
Using the voice recognition function
Receiving a call
During a call, if you want to continue the conversation on •
The voice recognition function allows you to select the artist •
An incoming call is indicated by a ringtone. The name of the •
your phone (private conversation), press the
button.
/ album you want to hear via voice recognition. This f unction
caller is announced if his number is recorded in the phone-
is only av ailable If you are using the Parrot ASTEROID with
book of the phone connected to the Parrot ASTEROID.
The Parrot ASTEROID allows you to send DTMF while on •
a USB / SD / iPod peripheral.
If y ou want to answer the call, press the -
button.
call. To do so, press the jogwheel.
Then press the
button to end the call.
Note : Several minutes of loading may be necessar when
If y ou want to ref use this call, press the -
button.
connecting your audio peripheral (USB / SD / iPod) to the
Parrot ASTEROID for the rst time, particularly if you are
using audio peripheral with a large capacity or containing
Making a call
many audio les. This loading time will allow your audio
To make a call vIa voice recognition:•
les to be accessible via voice recognition.
Press the 1.
button to launch the voice recognition
feature.
Press the •
button then say the name of the artist /
> The Parrot ASTEROID asks y ou the name of the
album.
contact y ou want to call.
Say the name of the contact and the type of number 2.
Check the albums and artists names in the metadatas of •
(«Work», «Cellphone»...) if there are several numbers
your music les. These names may be different from the
associated to your contact.
ones displayed on your music les titles.
> The call is automatically launched if the voice tag is
correctly understood.
Radio
> If it is not the case, a conf irmation message is asked.
To select a f requency:•
Conrm by saying «Yes» or «Call».
Press the SOURCE button until the 1. Radio source is
selected.
Note: At any time, press the button to exit voice
Press briey the 2.
. buttons to change
recognition mode
manually the radio station. Hold down the
buttons to tune to the next av ailable radio station.
Hold down the •
button to redial the last dialled number.

10
English
To get the list of all av ailable stations:•
Start playing a song on your audio player.3.
Internet
Press the SOURCE button until the 1. Radio source is
selected.
Audio player connected via Bluetooth
Press the 2.
button and select Fullscan.
Connecting the Parrot ASTEROID to the internet
You can use the Parrot ASTEROID to listen to songs stored •
To memorize a station:•
on your mobile phone or Bluetooth audio device. To do so,
Use a USB cable to connect an internet USB key to the •
your phone / audio device must support the Bluetooth A2DP
Parrot ASTEROID. Then follow the displayed instructions.
Press the SOURCE button until the1. Radio source is
prole (Advanced Audio Distribution Prole).
selected.
Select the frequency manually or in 2. Fullscan mode.
If you are using a Bluetooth audio player for the rst time, •
Warning: Using the Parrot Asteroid applications require
you have to pair both devices.
a USB internet key and an appropriate subscription offer.
Press the 3.
, button then select Add to presets.
Connecting the Parrot ASTEROID to Internet using an
> To select a stored station, select the Presets mode.
If both devices are already paired:•
internet USB key may result in large additional roaming
Press the SOURCE button until the 1. Bluetooth Audio
fees. Check the terms of use with your provider for more
iPod
source is selected
information. Make sure you check regularly your allowan-
Connect your iPod using the iPod connector then press
Start playing a song on your audio player.2.
ce and usage. Parrot is not responsible for any overcharge
the SOURCE button until the iPod source is selected.
resulting in the use of the Parrot ASTEROID.
USB storage device
If your phone supports the DUN Bluetooth prole (Dial-Up •
Connect your USB storage device to the Parrot 1.
Networking), connecting your phone to the Parrot ASTER-
ASTEROID using the USB cable or the USB connectors
OID via Bluetooth will also allow you to use the Internet ap-
on the back of the car stereo
plications.
Press the SOURCE button until the USB source is 2.
selected.
Using the Parrot ASTEROID applications
Several types of applications are available with the Parrot •
SD card
ASTEROID : music, geolocation, driver assistance... The
Remov e the Parrot ASTEROID faceplate.1.
available applications are listed in the Parrot Asteroid menu
Insert the SD card into the appropriate slot with the contact 2.
and displayed on the product packaging.
surface facing down.
All applications may not be available in all countries. The use •
Reattach the faceplate.3.
of some applications may need prior subscription.
Press the SOURCE button until the SD source is 4.
Please refer to our website • www.parrot.com for more
selected.
information.
Analogue audio player
Connect the audio player using the Jack connector.1.
Press the SOURCE button until the Line in source is 2.
selected.

English
11
Troubleshooting
Problems while using the music function
Several minutes of loading may be necessary when con-•
necting y our audio peripheral (USB / SD / iPod) to the
Warranty
Before you begin
Parrot ASTEROID for the rst time, particularly if you are
Without prejudice of legal warranty , Parrot products are war-
Make sure the “• Goodbye” message is displayed on the
using audio peripheral with a large capacity or containing
ranted during 1 year from the date of purchase for defects in
Parrot ASTEROID screen when you turn the ignition off . Re-
many audio les. This loading time will allow your audio les
materials and workmanship, provided that no deterioration to
fer to the Checking the wiring section for more information.
to be accessible via voice recognition.
the product has been made, and upon presentation of proof
of purchase (inv oice) to the retailer. Warranty does not cover:
Reset the Parrot ASTEROID. To do so, remove the •
Reboot your iPod / iPhone bef ore connecting it to the Parrot •
upgrading of the software items of the Parrot products with
faceplate then use a paper clip to press the Reset button.
ASTEROID. To reboot your iPod / iPhone (this procedure
Bluetooth cell phones for compatibility purpose, data recovery
Hold down the Reset button for 3 seconds.
will not erase any of your data) :
,deterioration of the external aspect due to normal wear of the
iPod: press Menu and the centre button simultaneously -
product, any damage caused by accident, misuse, misappli-
until the iPod reboots.
cation, or non-Parrot products. Parrot is not responsible for
iPhone: Press the On/Of f button and the Home button -
storage, loss or damaged to data during transit or repair. Any
simultaneously until the iPhone reboots. Do not touch
product wrongfully declared to be def ective will be returned
the screen when the message “Slide to shutdown”
to sender and inspection, process and carriage costs will be
appears.
invoiced to him.
Some problems may occur if the iPod / SD card / USB de-•
Make sure you have the latest software update on your •
vice is already connected to the Parrot ASTEROID before
Correct disposal of This Product (Waste Elec-
Parrot ASTEROID. To do so, select Settings > About >
you turn on the ignition. Connect the iPod / SD card / USB
trical & Electronic Equipment)
Version. Compare this number with the one on our website,
dev ice once the ignition is turned on.
This marking shown on the product or its literature, indicates
Downloads section.
that it should not be disposed with other household wastes at
the end of its working life. To prevent possible harm to the en-
Problems while using the phone function
vironment or human health from uncontrolled waste disposal,
Make sure your phone is compatible with the Parrot •
please separate this from other ty pes of wastes and recycle
ASTEROID. To do so, refer to the compatibiity list
it responsibly to promote the sustainable reuse of material
of the Parrot ASTEROID available on our website
resources. Household users should contact either the retailer
www.parrot.com, in the Support & Downloads section.
where they purchased this product, or their local government
If y our phone is compatible with the Parrot ASTEROID and •
of ce, for details of where and how they can take this item
if you already have the latest software update:
f or env ironmentally safe recycling. Business users should
contract their supplier and the terms and conditions of the pur-
Erase the memory of the Parrot ASTEROID. To do so, select •
chase contract. This product should not be mixed with other
Settings > Advanced settings > Factory settings.
commercial wastes for disposal.
On your telephone, erase the Parrot system from the list 1.
of Bluetooth peripherals (or reboot your iPhone®).
Repeat the pairing procedure for the 2 devices.2.
RESET
General information

Modications
Declaration of Conformity
The explanations and specications in this guide are given for
We, Parrot S.A. 174 quai de Jemmapes,75010
inf ormation purposes only and may be modied without prior
Paris, France, declare under our sole responsibi-
notice. They are deemed to be correct at time of going to press.
lity that our product, the Parrot ASTEROID to which
The utmost care has been taken when writing this guide,as
this declaration relates is in conformity with appropriate stan-
part of the aim to provide you with accurate information. Howe-
dards EN 60065 :2002/A1 :2006/A11 :2008, EN 50371 (2002),
ver, Parrot shall not be held responsible for any consequences
EN 300328 v 1.7.1 and EN 301 489-17 v 1.3.2 following the
arising from any errors or omissions in the guide, nor for any
provision of Radio Equipment and Telecommunication
damage or accidental loss of data resulting directly or indirectly
Equipment directive 1999/5/EC R&TTE and 2004/104/CE
from the use of the information herein. Parrot reserves the right
Automotive directive amended by the 2009/19/CE directive.
to amend or improve the product design or user guide without
http://www.parrot.com/fr/support/guidesdaideenligne/parrot-
any restrictions and without any obligation to notify users. As
asteroid/asteroid_ce_conformity _declaration.pdf
part of our ongoing concern to upgrade and improve our pro-
ducts, the product that you have purchased may differ slightly
f rom the model described in this guide. If so, a later v ersion
of this guide might be available in electronic format at Parrot’s
website at www.parrot.com.
FCC Compliance Statement
This device complies with part 15 of the FCC rules. Opera-
tion is subject to the following two conditions: (1). this device
may not cause harmful interference, and (2). this device must
accept any interference received, including interference that
may cause undesired operation. Note: The manufacturer is not
responsible for any radio or tv interference caused by unautho-
rized modications to this equipment. Such modications could
void the user’s authority to operate the equipment. Canada
Class B statement: This Class B digital apparatus complies
with Canadian ICES-003
Copyrights
Copy right © 2011 Parrot. All Rights Reserved
12
English
