Sony VRD-P1: Parts and controls
Parts and controls: Sony VRD-P1
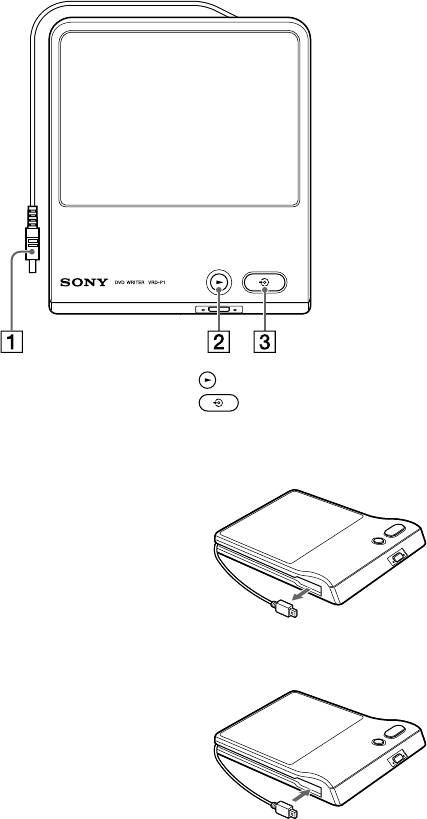
Parts and controls
Top panel
USB cable (page 10, 11)
(play) button (page 11)
(DISC BURN) button (page 10)
About the USB cable
Pulling out the USB cable
Pull out the connector of the USB cable from the
side groove of the unit.
If you have any difficulty doing this, push the tip
of the connector so that the connector protrudes
from the unit, then pull out.
Storing the USB cable
Store the USB cable in the side groove of the unit.
8 GB
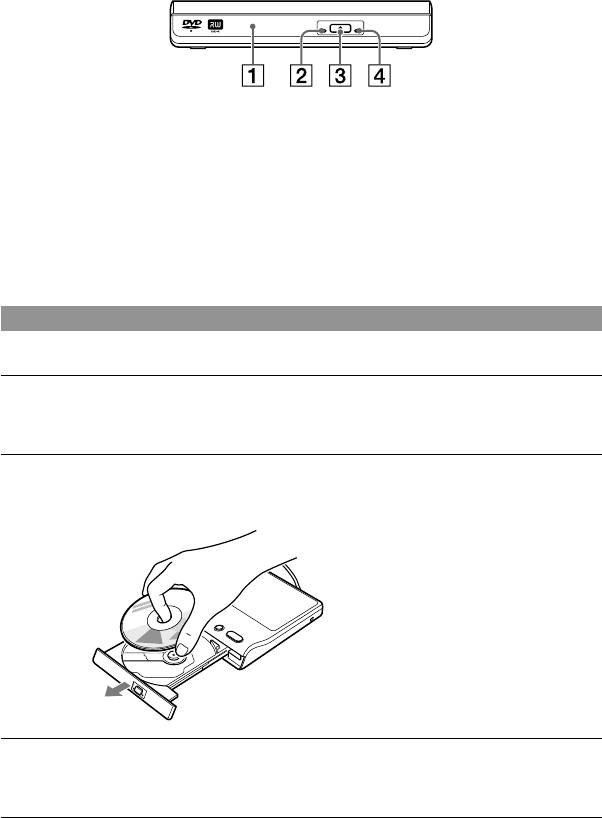
Front side
Disc tray
Emergency eject hole
If you cannot open the disc tray with the
ACCESS lamp
(eject) button, insert a pin or straightened
(eject) button
paper clip into this hole to open the disc tray.
About the power supply
The power of the unit is supplied from the connected Handycam
. Make sure to connect the
Handycam
to a power outlet using an AC adapter. You do not need to connect the unit to a
power outlet.
Inserting a disc
The unit can open its disc tray only when it is connected to a Handycam
.
Press the (eject) button to open the disc tray.
The disc tray opens only halfway. Open it fully by hand.
Place the disc on the disc tray, recording side down.
The disc should click into place.
Do not touch the recording
surface of the disc.
Push the disc tray to close.
Push the disc tray until it clicks.
9 GB
Оглавление
- Safety Regulations
- Table of contents
- Read this first
- Main features
- Parts and controls
- Recording
- Playback
- Video Lengths and Recording Time
- About HD (High Definition) disc compatibility
- Troubleshooting
- Precautions
- Specifications
- Consignes de sécurité
- Table des matières
- A lire avant utilisation
- Principales fonctions
- Eléments et commandes
- Enregistrement
- Lecture
- Durée de la vidéo et temps d’enregistrement
- À propos de la compatibilité des disques HD (haute définition)
- Dépannage
- Précautions
- Caractéristiques techniques
- Sicherheitsbestimmungen
- Inhalt
- Bitte zuerst lesen!
- Wichtigste Merkmale und Funktionen
- Teile und Bedienelemente
- Aufnahme
- Wiedergabe
- Videolänge und Aufnahmezeit
- Hinweise zur Kompatibilität von HD-Medien (High Definition)
- Störungsbehebung
- Sicherheitsmaßnahmen
- Technische Daten
- Norme di sicurezza
- Sommario
- Informazioni da leggere prima dell’uso
- Caratteristiche principali
- Componenti e comandi
- Registrazione
- Riproduzione
- Lunghezza dei video e tempi di registrazione
- Informazioni sulla compatibilità dei dischi HD (High Definition)
- Risoluzione dei problemi
- Precauzioni
- Caratteristiche tecniche
- Normas de seguridad
- Índice
- Información importante
- Características principales
- Componentes y controles
- Grabación
- Reproducción
- Tamaños de vídeo y tiempo de grabación
- Acerca de la compatibilidad de los discos HD (alta definición)
- Solución de problemas
- Precauciones
- Especificaciones
- Правила техники безопасности
- Содержание
- Прочтите перед началом работы
- Основные функции
- Детали и регуляторы
- Запись
- Воспроизведение
- Продолжительность видео и время записи
- Примечания о совместимости дисков высокой четкости
- Поиск и устранение неисправностей
- Меры предосторожности
- Технические характеристики
- Normas de segurança
- Índice
- Leia isto primeiro
- Funções principais
- Peças e controlos
- Gravação
- Reprodução
- Duração dos Vídeos e Tempo de Gravação
- Sobre a compatibilidade de discos HD (Alta Definição)
- Resolução de problemas
- Precauções
- Especificações
- Veiligheidsvoorschriften
- Inhoudsopgave
- Lees eerst dit
- Belangrijkste kenmerken
- Onderdelen en bedieningsknoppen
- Branden
- Afspelen
- Lengte van de video en opnameduur
- Opmerkingen over de compatibiliteit van HD-schijven (hoge definitie)
- Bij problemen
- Voorzorgsmaatregelen
- Technische gegevens
