Sony VRD-P1: instruction
Class: Household, kitchen appliances, electronics and equipment
Type:
Manual for Sony VRD-P1
Table of contents

4-138-185-13(1)
DVD Writer
Operating Instructions
GB
Mode d’emploi
FR
Bedienungsanleitung
DE
Istruzioni per l’uso
IT
Manual de instrucciones
ES
Инструкция по эксплуатации
RU
Manual de Instruções
PT
Gebruiksaanwijzing
NL
DVDirect Express
VRD-P1
2008 Sony Corporation
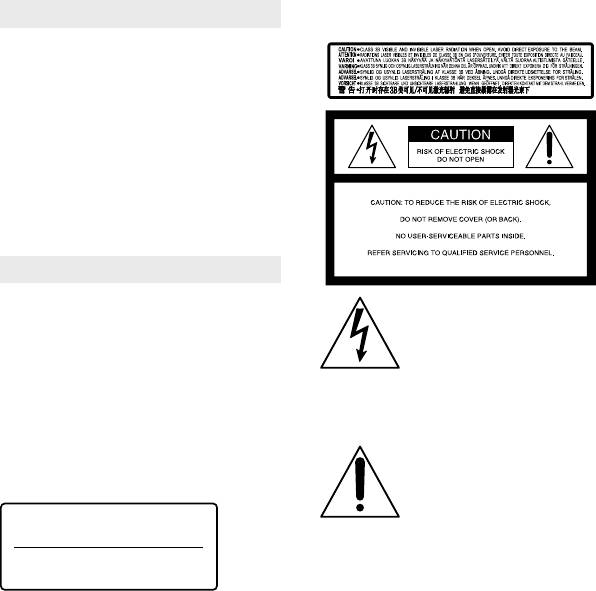
WARNING
To reduce the risk of fire or electric
shock, do not expose this apparatus to
rain or moisture.
To prevent fire or shock hazard, do not
place objects filled with liquids, such as
vases, on the apparatus.
Do not install this equipment in a
confined space such as a bookshelf or
similar unit.
CAUTION
The use of optical instruments with this
product will increase eye hazard. As
the laser beam used in this DVD writer
is harmful to eyes, do not attempt
to disassemble the cabinet. Refer
servicing to qualified personnel only.
This appliance is classified as a CLASS
1 LASER product. The CLASS 1 LASER
PRODUCT MARKING is located on the
bottom exterior.
2 GB
CLASS 1
LASER PRODUCT
LASER KLASSE 1
PRODUKT
Safety Regulations
This label is located on the laser protective
housing inside the enclosure.
This symbol is intended to
alert the user to the presence
of uninsulated “dangerous
voltage” within the product’s
enclosure that may be of
sufficient magnitude to
constitute a risk of electric
shock to persons.
This symbol is intended to
alert the user to the presence
of important operating and
maintenance (servicing)
instructions in the literature
accompanying the appliance.
This graphical symbol is located on the
bottom of the unit.
LUOKAN 1 LASERLAITE
KLASS 1 LASER APPARAT

Important Safety Instructions
14) Refer all servicing to qualified service
personnel. Servicing is required when
1) Read these instructions.
the apparatus has been damaged in any
2) Keep these instructions.
way, such as power-supply cord or plug
3) Heed all warnings.
is damaged, liquid has been spilled or
4) Follow all instructions.
objects have fallen into the apparatus, the
5) Do not use this apparatus near water.
apparatus has been exposed to rain or
6) Clean only with dry cloth.
moisture, does not operate normally, or has
7) Do not block any ventilation
been dropped.
openings. Install in accordance with the
manufacturer’s instructions.
8) Do not install near any heat sources
such as radiators, heat registers, stoves, or
other apparatus (including amplifiers) that
produce heat.
9) Do not defeat the safety purpose of
the polarized or grounding-type plug. A
polarized plug has two blades with one
wider than the other. A grounding type
plug has two blades and a third grounding
prong. The wide blade or the third prong
are provided for your safety. If the provided
plug does not fit into your outlet, consult
an electrician for replacement of the
obsolete outlet.
10) Protect the power cord from being
walked on or pinched particularly at plugs,
GB
convenience receptacles, and the point
where they exit from the apparatus.
11) Only use attachments/accessories
specified by the manufacturer.
12) Use only with the cart, stand,
tripod, bracket, or table specified by the
manufacturer, or sold with the apparatus.
When a cart is used, use caution when
moving the cart/apparatus combination to
avoid injury from tip-over.
13) Unplug this apparatus during lightning
storms or when unused for long periods
of time.
3 GB
FCC Compliance Statements
Instead it shall be handed over to the
applicable collection point for the recycling
This equipment has been tested and found
of electrical and electronic equipment.
to comply with the limits for a Class B
By ensuring this product is disposed of
digital device, pursuant to Part 15 of the
correctly, you will help prevent potential
FCC Rules. These limits are designed to
negative consequences for the environment
provide reasonable protection against
and human health, which could otherwise
harmful interference in a residential
be caused by inappropriate waste handling
installation.
of this product. The recycling of materials
This equipment generates, uses, and
will help to conserve natural resources. For
can radiate radio frequency energy and,
more detailed information about recycling
if not installed and used in accordance
of this product, please contact your local
with the instructions, may cause harmful
Civic Office, your household waste disposal
interference to radio communications.
service or the shop where you purchased
However, there is no guarantee that
the product.
interference will not occur in a particular
installation.
The manufacturer of this product is Sony
If this equipment does cause harmful
Corporation, 1-7-1 Konan Minato-ku
interference to radio or television
Tokyo, 108-0075 Japan. The Authorized
reception, which can be determined
Representative for EMC and product safety
by turning the equipment off and on,
is Sony Deutschland GmbH, Hedelfinger
the user is encouraged to try to correct
Strasse 61, 70327 Stuttgart, Germany. For
the interference by one or more of the
any service or guarantee matters please
following measures:
refer to the addresses given in separate
Reorient or relocate the receiving antenna.
service or guarantee documents.
Increase the separation between the equipment
and receiver.
The nameplate is located on the bottom of
Connect the equipment into an outlet on a
circuit different from that to which the receiver
the unit.
is connected.
Consult the dealer or an experienced radio/TV
For Customers in U.S.A
technician for help.
Owner’s Record
The product label is located on the bottom
You are cautioned that any changes or
of the unit. Record the serial number in
modifications not expressly approved in
the space provided below. Refer to them
this manual could void your authority to
whenever you call upon your Sony dealer
operate this equipment.
regarding this product.
Disposal of Old Electrical &
Model: VRD-P1
Electronic Equipment
Serial Number: _______
(Applicable in the
European Union and other
European countries with
separate collection
systems)
This symbol on the product or on its
packaging indicates that this product
shall not be treated as household waste.
4 GB

Table of contents
Safety Regulations .................................................................................................................................2
Read this first ...........................................................................................................................................6
Supplied items ...........................................................................................................................6
Notes on use ...............................................................................................................................6
Main features ...........................................................................................................................................7
Compatible device ....................................................................................................................7
Supported discs .........................................................................................................................7
Parts and controls...................................................................................................................................8
Inserting a disc ...........................................................................................................................9
Recording ...............................................................................................................................................10
Playback ..................................................................................................................................................11
Video Lengths and Recording Time ..............................................................................................12
Disc space (recordable time) available for recording videos ..................................12
Time required for recording ...............................................................................................12
About HD (High Definition) disc compatibility ........................................................................13
Troubleshooting ..............................................................................................................................14
Precautions ............................................................................................................................................15
Specifications ........................................................................................................................................16
Also refer to the operating instructions of your Handycam
This unit can be used only by connecting to a Handycam
. For details on operation, also
refer to the operating instructions of your Handycam
.
In this document, “Handycam
” refers to a Sony camcorder.
5 GB

Read this first
Supplied items
Please confirm that the package contains
the following items. If any of these items
are missing or damaged, please contact
your dealer.
Operating instructions (this document)
Notes on use
Operation and storage conditions
Do not apply shock or vibration to the
unit. The unit may not operate properly.
Do not use the unit in very loud areas.
The unit may not operate properly.
When connecting the unit’s USB cable
to the Handycam
, be sure to insert
the connector plug in the correct way.
Pushing the plug forcibly into the
terminal may damage the terminal and
may result in a malfunction of the unit or
the Handycam
.
On recording
Television programs, movies, video
tapes, and other materials may be
copyrighted. Unauthorized recording of
such materials may be contrary to the
copyright laws.
6 GB
Main features
By connecting the unit to your Handycam
, you can easily record videos to a disc without
using a computer (One Touch Disc Burn). The created disc can be played by connecting the
unit to the Handycam
(One Touch Play). Also, you can play videos on a TV by connecting
the Handycam
to the TV.
In addition, operating the unit from the Handycam
, you can enjoy some useful functions.
The functions differ according to the Handycam
. For details, refer to the operating
instructions of your Handycam
.
Compatible device
This unit is designed exclusively for use with a Handycam
. Connect the unit to
a Handycam
compatible with the DVDirect Express. For details on compatible
Handycam
models, refer to the following address:
http://www.sony.com/DVDirect/Compatibility
You cannot use this unit with an incompatible Handycam
or video camera other than
Sony.
You cannot use this unit for copying or playback of a disc by connecting to a computer;
neither can it be used as an external disc drive.
Supported discs
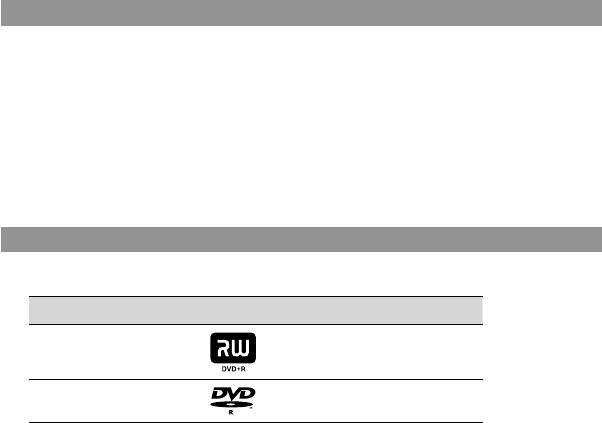
The following writable new or unused 12 cm discs are compatible with this unit.
Disc type Logo Writing speed
DVD+R Up to 16x
DVD-R Up to 16x
Double/dual layer discs and 8cm discs are not supported.
DVD+RW and DVD-RW discs are not supported.
Notes on using discs
Only new or unused discs can be used for this unit.
The quality of commercially made recordable discs can vary. Sub-standard discs may not
record normally.
Some recorded discs may not be playable due to recording quality or physical condition of
the disc, or the characteristics of the playback device.
You cannot play back discs recorded on other video devices, or commercially prerecorded
discs.
7 GB
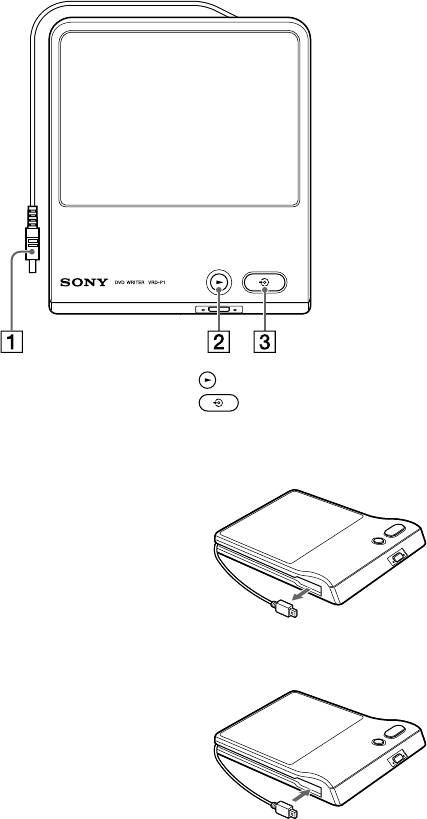
Parts and controls
Top panel
USB cable (page 10, 11)
(play) button (page 11)
(DISC BURN) button (page 10)
About the USB cable
Pulling out the USB cable
Pull out the connector of the USB cable from the
side groove of the unit.
If you have any difficulty doing this, push the tip
of the connector so that the connector protrudes
from the unit, then pull out.
Storing the USB cable
Store the USB cable in the side groove of the unit.
8 GB
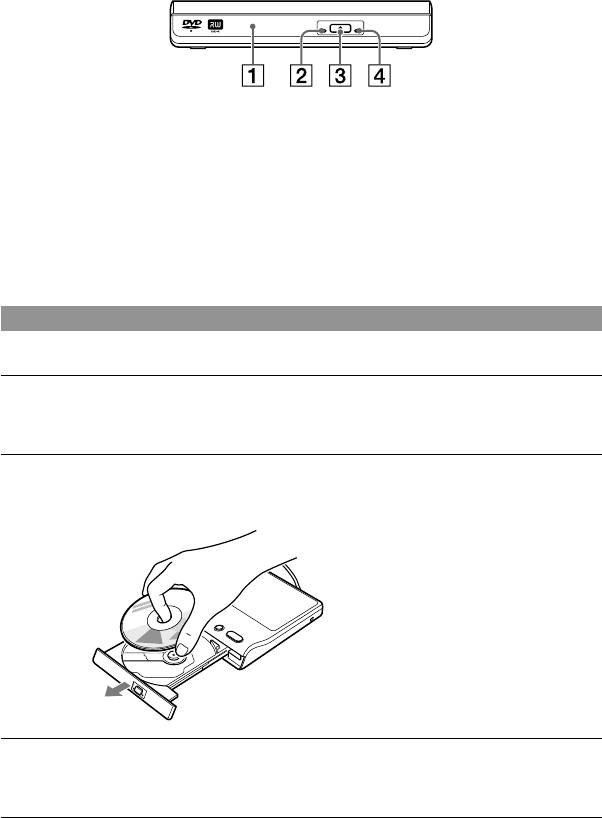
Front side
Disc tray
Emergency eject hole
If you cannot open the disc tray with the
ACCESS lamp
(eject) button, insert a pin or straightened
(eject) button
paper clip into this hole to open the disc tray.
About the power supply
The power of the unit is supplied from the connected Handycam
. Make sure to connect the
Handycam
to a power outlet using an AC adapter. You do not need to connect the unit to a
power outlet.
Inserting a disc
The unit can open its disc tray only when it is connected to a Handycam
.
Press the (eject) button to open the disc tray.
The disc tray opens only halfway. Open it fully by hand.
Place the disc on the disc tray, recording side down.
The disc should click into place.
Do not touch the recording
surface of the disc.
Push the disc tray to close.
Push the disc tray until it clicks.
9 GB
Recording
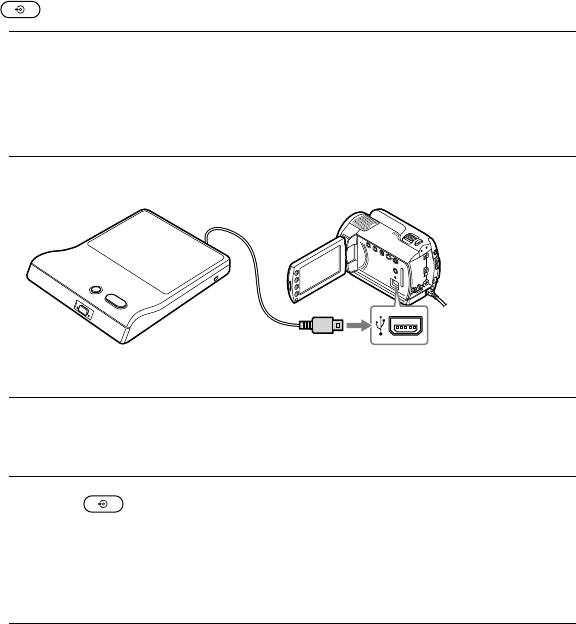
Connecting this unit to the Handycam
, you can record videos to the disc by simply pressing
the (DISC BURN) button.
Turn on the Handycam
.
1
Make sure to connect the Handycam
to a power outlet using an AC adapter.
If you do not use an AC adapter for the Handycam
, the unit does not work when it is
connected to the Handycam
.
Connect the unit to the USB port of the Handycam
.
2
USB port
(Type Mini-AB)
You cannot use a USB extension cable.
Insert a new or unused disc.
3
For details, see “Inserting a disc” (page 9).
Press the (DISC BURN) button.
4
The videos which were newly recorded by the Handycam
and were not copied yet are
recorded to the disc.
If the video content exceeds a single disc, repeat steps 3 and 4.
You cannot add videos to a disc already recorded on by this unit.
Operating from a Handycam
Operating from a Handycam
, several convenient recording functions are available. For
instance, you can select scenes to record. For details, refer to the operating instructions of
your Handycam
.
Checking your recording
When you record videos to a disc by this unit, make sure that the recording was successful by
playing the disc before erasing the video from the Handycam
.
10 GB
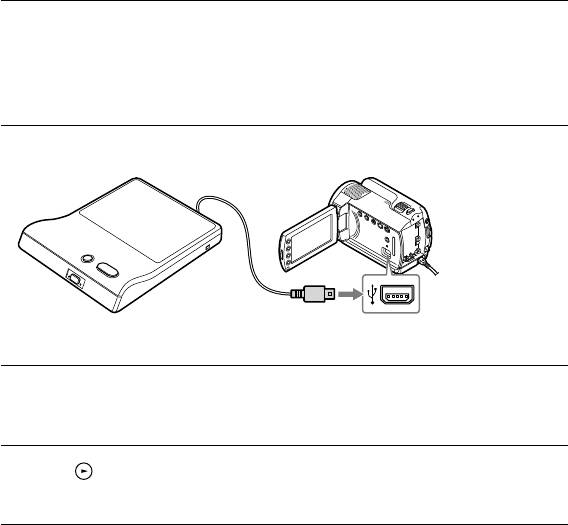
Playback
You can use this unit to play back created discs, viewing them either in the display of a
connected Handycam
or on a TV. To view on a TV, you need to connect a Handycam
to the TV. For details about connecting to a TV, refer to the operating instructions of your
Handycam
.
Turn on the Handycam
.
1
Make sure to connect the Handycam
to a power outlet using an AC adapter.
If you do not use an AC adapter for the Handycam
, the unit will not work when it is
connected to the Handycam
.
Connect the unit to the USB port of the Handycam
.
2
USB port
(Type Mini-AB)
You cannot use a USB extension cable.
Insert the disc recorded by this unit.
3
For details, see “Inserting a disc” (page 9).
Press the (play) button.
4
Playback starts from the beginning of the disc.
Operating from a Handycam
You can also play videos by operating the Handycam
itself. For details, refer to the
operating instructions of your Handycam
.
About playing the created disc on other devices
With a High Definition Handycam
, you can create High Definition discs (AVCHD format).
For details on playing a disc on other devices, refer to page 13.
11 GB
Video Lengths and Recording Time
Disc space (recordable time) available for recording videos
Available recording time of video on a disc depends on the Handycam
REC mode setting.
High Definition (HD) Standard Definition (SD)
REC mode Recordable time* REC mode Recordable time*
HD FH approx. 30 minutes STD HQ/HQ approx. 1 hour
HD HQ approx. 55 minutes SP approx. 1 hour 30
minutes
HD SP approx. 1 hour 10
LP approx. 3 hours
minutes
HD LP approx. 1 hour 35
* Single disc
minutes
Hints
When down-converting to SD (Standard Definition) with an appropriate Handycam
model, you can
record up to approx. 2 hours 40 minutes on a disc. (Picture quality may depend on the recording time.)
Available REC modes vary between Handycam
models.
Time required for recording
When recording video, the length of time required for recording depends on the model of
Handycam
, the REC mode setting used to shoot the video and the number of scenes the
video contains. Typically, more time is required to record videos onto a disc if the video has
been recorded at a higher image quality (bit rate) setting. Down-converting to SD (Standard
Definition) video takes more than the actual video time.
Recording HD (High Definition) video or SD
approx. 20 minutes ~ 1 hour
(Standard Definition) video as is
Down-converting to SD (Standard Definition) video approx. 1 hour 5 minutes ~ 3 hours
Notes
You cannot record HD (High Definition) video taken in REC mode at a bit rate exceeding 18Mbps, such
as in [HD FX] mode (for example, High Definition Handycam
) in AVCHD format.
If the time of a scene exceeds the disc’s capacity, recording will not be possible. In this case, divide the
scene using the edit function of the Handycam
.
12 GB
About HD (High Definition) disc compatibility
An HD (High Definition) disc cannot be played on an AVCHD incompatible DVD player or
recorder.
Do not insert an HD (High Definition) disc in an AVCHD incompatible DVD player or
recorder. The DVD player or recorder may fail to eject the disc and may erase its contents.
An HD (High Definition) disc can be played on an AVCHD compatible Blu-ray Disc player/
recorder, Playstation 3
or other compatible device.
Type of created disc and compatible devices
HD (High Definition) disc (containing High Definition videos)
No
Yes
Yes
DVD device
AVCHD format
compatible device
Computer*
SD (Standard Definition) disc (containing Standard Definition videos)
Yes
Yes
Yes
DVD device
AVCHD format
compatible device
Computer*
* Install the AVCHD compatible application on your computer beforehand. Even in the case of a
computer environment that satisfies system requirements, there may be noise in video playback,
frames may be dropped, or sound may be lost intermittently. (This does not depend on the quality
of the created disc.)
13 GB

Troubleshooting
If you experience any of the following
A disc cannot be played.
difficulties while using the unit, use this
You can play back only discs created by this
troubleshooting guide to help remedy the
unit. You cannot play back discs recorded on
problem before requesting repairs. Refer
other video devices, or commercially pre-
also to the operating instructions of your
recorded discs.
Handycam
. If the problem persists,
Make sure that the disc has no dust, dirt or
contact your Sony dealer.
fingerprints on the playback side.
Make sure that the disc is placed on the disc
The Handycam
is connected, but the
tray with its playback side down.
unit does not work.
Make sure that your Handycam
is supported
The disc cannot be ejected.
by this unit (page 7).
The (eject) button does not work.
Make sure that the Handycam
is connected
Disconnect the USB cable from the
to a power outlet by its AC adapter.
Handycam
, turn off the power of the
Make sure that the Handycam
is configured
Handycam
, then turn it on again, reconnect
correctly and the USB cable is connected
the USB cable to the Handycam
, and then
properly to the Handycam
.
press the (eject) button. If this does not
Disconnect the USB cable from the
work, open the disc tray using the emergency
Handycam
. Turn off the Handycam
, and
eject hole (page 9).
then turn it on again. Then connect the USB
The unit can open its disc tray only when it
cable to the Handycam
again.
is connected to the Handycam
. Make sure
that the unit is connected to the Handycam
Video cannot be recorded to the disc.
properly.
Make sure that the Handycam
is connected
Video recorded using the (DISC BURN)
to a power outlet using an AC adapter.
button on the Handycam
cannot be recorded
The disc cannot be ejected while recording or
using the (DISC BURN) button again. (The
playing a disc.
same disc cannot be created again using the
(DISC BURN) button.) To create copies of the
same disc, select the [DISC BURN OPTION]
setting on the Handycam
.
Make sure that the disc is compatible with this
unit (page 7).
Make sure that the disc is new or unused.
A disc that has already been recorded on or
formatted by another device cannot be used.
Make sure that the disc has no dust, dirt or
fingerprints on the recording side.
Make sure that the disc is placed on the disc
tray with its recording side down.
Vibration of the unit may cause a malfunction
of the Handycam
. Do not place the
Handycam
on the unit.
14 GB
Precautions
On use and care
Condensation
Do not use or store the unit and accessories in the
Do not expose the unit to sudden temperature
following locations:
changes. Do not use the unit immediately
Anywhere extremely hot, cold or humid.
after moving it from a cold to warm location
Never leave exposed to temperatures above
or raising the room temperature suddenly, as
60 ºC, such as under direct sunlight, near
condensation may have formed within the unit.
heaters or in a car parked in the sun. They may
If the temperature changes suddenly while using
malfunction or become deformed.
the unit, turn off the power and stop use for at
Near strong magnetic fields or mechanical
least one hour.
vibration.
When moving the unit between temperature
The unit may malfunction.
extremes, place it in an air-tight plastic bag.
Near strong radio waves or radiation.
Allow at least one hour for the unit to adapt to
The unit may not be able to record properly.
the ambient temperature before use.
On a sandy beach or anywhere dusty.
If sand or dust gets in the unit, malfunction or
Handling discs
irreparable damage may result.
Handle the discs only by the edges. Never touch
the playback/recording surface.
On handling the casing
Do not affix labels on discs.
If the casing is soiled, clean it with a soft cloth
Do not store discs in dusty or humid locations,
lightly moistened with water, and then wipe the
in direct sunlight, or near heat generating
casing with a dry soft cloth.
devices.
Avoid the following to avoid damage to the
To protect important data, always keep discs in
finish:
their cases.
Chemicals such as thinner, benzene, alcohol,
Clean the disc with a cleaning cloth. Wipe the
chemical cloths, repellent, insecticide and
disc from the center out.
sunscreen
Data may not be recorded properly if there
Handling the unit with the above substances
are scratches or dust on writable discs. Handle
on your hands
discs very carefully.
Leaving the casing in contact with rubber or
vinyl objects for a long period of time
Transportation
Please repack the unit in its original carton when
shipping.
If the unit is to be shipped, remove any disc
beforehand.
15 GB

Specifications
Recording
Supported devices
Handycam
supported by the DVDirect Express
For details about Handycam
supported by the
unit, see the following address:
http://www.sony.com/DVDirect/Compatibility
Recordable discs
DVD+R, DVD-R 12cm discs
Playback
Playable discs
Discs created with VRD-P1 (Other commercial or
recorded discs are not supported.)
General
Consumption: 7 W (max.)
Operating temperature: 5 ºC to 35 ºC
Storage temperature: -20 ºC to + 60 ºC
Size: Approx. 143 × 162.5 × 25 mm (W×D×H)
including the projecting parts
Weight: Approx. 400 g
Design and specifications are subject to change
without notice.
“Handycam” and are
registered trademarks of Sony Corporation.
“DVDirect” and DVDirect logo are trademarks
of Sony Corporation.
Other system and product names used herein
are registered trademarks or trademarks of their
respective manufacturers, although the and
marks are not used in the text.
16 GB
AVERTISSEMENT
Pour réduire le risque d’incendie ou
d’électrocution, placez cet appareil à
l’abri de la pluie et de l’humidité.
Pour prévenir tout risque d’incendie ou
d’électrocution, ne placez pas d’objets
remplis de liquides, comme des vases,
sur l’appareil.
N’installez pas cet appareil dans
un espace confiné comme une
bibliothèque ou une armoire similaire.
ATTENTION
L’utilisation d’instruments optiques
avec ce produit augmente les risques
pour les yeux. Comme le rayon laser
utilisé dans ce graveur de DVD est
dangereux pour les yeux, n’essayez
pas de démonter son boîtier. Seul
un technicien qualifié peut effectuer
l’entretien.
Cet appareil fait partie des produits
CLASS 1 LASER. L’étiquette CLASS
1 LASER se trouve sur le dessous, à
l’extérieur de l’appareil.
2 FR
CLASS 1
LASER PRODUCT
LASER KLASSE 1
PRODUKT
Consignes de sécurité
Cette étiquette se trouve sur le boîtier de
protection du laser, à l’intérieur du coffret.
Ce symbole est destiné à
avertir l’utilisateur de la
présence, dans le boîtier
du produit, d’une « tension
dangereuse » non isolée
dont l’amplitude peut être
suffisante pour présenter un
risque d’électrocution.
Ce symbole est destiné à
avertir l’utilisateur de la
présence d’instructions
d’utilisation et de
maintenance (entretien)
importantes dans la
documentation qui
accompagne l’appareil.
Ce symbole graphique se trouve sur le
dessous de l’appareil.

Consignes de sécurité importantes
13) Débranchez l’appareil pendant les
orages ou lorsque vous ne l’utilisez pas
1) Lisez ces instructions.
pendant des périodes prolongées.
2) Conservez ces instructions.
14) Tout entretien ne peut être effectué que
3) Tenez compte de tous les avertissements.
par un technicien qualifié. Un entretien est
4) Respectez toutes les instructions.
nécessaire si l’appareil a été endommagé
5) N’utilisez pas cet appareil à proximité
d’une quelconque manière, par exemple
de l’eau.
si le cordon ou la fiche d’alimentation est
6) Nettoyez l’appareil uniquement avec un
endommagé, si du liquide a pénétré dans
chiffon sec.
l’appareil ou si des objets sont tombés à
7) Ne bloquez pas les ouvertures
l’intérieur de celui-ci, s’il a été exposé à la
de ventilation. Installez l’appareil
pluie ou à l’humidité, s’il ne fonctionne pas
conformément aux instructions du
normalement ou s’il a subi une chute.
fabricant.
8) N’installez pas l’appareil à proximité
d’une source de chaleur, telle qu’un
radiateur, un poêle, une cuisinière ou
d’autres appareils (notamment des
amplificateurs) qui produisent de la
chaleur.
9) Pour des raisons de sécurité, veillez à
utiliser une fiche polarisée ou une fiche
avec terre. Une fiche polarisée possède deux
lames dont une est plus large que l’autre.
Une fiche avec terre possède deux lames
et une broche de mise à la masse. La lame
large ou la troisième broche sont prévues
pour votre sécurité. Si la fiche fournie
n’est pas adaptée à la prise, consultez un
FR
électricien pour remplacer la prise obsolète.
10) Protégez le cordon d’alimentation
afin d’éviter qu’il soit piétiné ou pincé, en
particulier au niveau des fiches, des prises
multiples et du point de sortie de l’appareil.
11) Utilisez uniquement des options/
accessoires spécifiés par le fabricant.
12) Utilisez l’appareil uniquement avec le
chariot, le socle, le trépied, le support ou la
table spécifiés par le fabricant, ou vendus
avec l’appareil. Si vous utilisez un chariot,
soyez prudent lors du déplacement de la
combinaison chariot/appareil afin d’éviter
de vous blesser lors du transport.
3 FR
Déclarations de conformité de la FCC
Traitement des appareils
électriques et
Cet équipement a été testé et déclaré
électroniques en fin de vie
conforme aux normes relatives au matériel
(Applicable dans les pays
numérique de la classe B, fixées par l’article
de l’Union Européenne et
15 des règlements de la FCC. Ces limites
aux autres pays européens
sont destinées à assurer une protection
disposant de systèmes de
suffisante contre les interférences dans une
collecte sélective)
installation résidentielle.
Ce symbole, apposé sur le produit ou sur
Cet équipement génère, utilise et peut
son emballage, indique que ce produit
dégager de l’énergie hautes fréquences qui,
ne doit pas être traité avec les déchets
en cas d’installation et d’utilisation non
ménagers. Il doit être remis à un point de
conformes aux instructions, peuvent être à
collecte approprié pour le recyclage des
l’origine d’interférences dans la réception
équipements électriques et électroniques.
radio et télévision.
En s’assurant que ce produit est bien mis au
Toutefois, rien ne garantit qu’il n’y aura pas
rebut de manière appropriée, vous aiderez
interférences dans une installation donnée.
à prévenir les conséquences négatives
En cas d’interférences dans la réception
potentielles pour l’environnement et la
radio et télévision, il est possible de
santé humaine. Le recyclage des matériaux
déterminer si elles sont dues au matériel
aidera à préserver les ressources naturelles.
en éteignant et en rallumant l’appareil,
Pour toute information supplémentaire
et si c’est le cas, l’utilisateur est invité à
au sujet du recyclage de ce produit, vous
corriger le problème de l’une des manières
pouvez contacter votre municipalité, votre
suivantes :
déchetterie ou le magasin où vous avez
Modifier l’orientation ou l’emplacement de
acheté le produit.
l’antenne de réception.
Eloigner l’appareil du récepteur.
Raccorder l’appareil à une prise située sur un
Le fabricant de ce produit est Sony
circuit différent de celui du récepteur.
Corporation, 1-7-1 Konan Minato-
Consulter le revendeur ou un technicien radio/
ku Tokyo, 108-0075 Japon. Le
TV expérimenté pour obtenir une assistance.
représentant agréé pour la compatibilité
électromagnétique et la sécurité du produit
N’oubliez pas que toute modification non
est Sony Deutschland GmbH, Hedelfinger
expressément approuvée dans ce manuel
Strasse 61, 70327 Stuttgart, Allemagne.
peut annuler votre droit d’utilisation de cet
Pour toute question relative à la garantie ou
équipement.
aux réparations, adressez-vous aux adresses
reprises dans les documents de garantie et
de réparation.
La plaque signalétique se trouve sur le
dessous de l’appareil.
