Sony VPL-HW55ES: instruction
Class: Household, kitchen appliances, electronics and equipment
Type: Home Theater System
Manual for Sony VPL-HW55ES
Table of contents
- About the Quick Reference Manual
- WARNING
- For the Customers in Brazil only
- Precautions On preventing internal heat build- up On repacking On watching 3D video images On LCD Projector On condensation
- Notes on Installation and Usage
- Unsuitable Conditions
- Safety precautions for installing the unit on a ceiling
- Preparing Step 1 Checking the Supplied Accessories Inserting the Batteries into the Remote Control Using the CD-ROM manual
- a b Installing the Unit Step 2
- c
- Connecting the Unit Step 3 Connecting to a VCR
- To connect to equipment with component video output connectors
- Connecting to a Computer
- Connecting to a 3D Sync Transmitter
- Selecting the Menu Language Step 4
- Projecting Step 5
- Selecting the Picture Viewing Mode
- Error Handling Warning Indicators
- 1 2 Maintenance Replacing the Lamp
- 3 6
- 7 14
- Cleaning the Air Filter
M:\081\XPML A7.0\ML\New Folder (2)\4534762111_VPL-HW55ES-
HW40ES_ML\4534762111\4534762111VPLHW55ESHW40ESSY\01G
B-VPLHW55ESSY\100BCO.fm
masterpage:Back
Cover
VPL-HW55ES/HW40ES
4-534-762-
11
(1)
© 2014 Sony Corporation Printed in China
M:\081\XPML A7.0\ML\New Folder (2)\4534762111_VPL-HW55ES-
HW40ES_ML\4534762111\4534762111VPLHW55ESHW40ESSY\01G
B-VPLHW55ESSY\010COV.fm
masterpage:Back
Cover
Video
Projector
VPL-HW55ES/HW40ES
VPL-HW55ES/HW40ES
4-534-762-
11
(1)
4-534-762-
11
(1)
Quick Reference Manual ____________
US
Guide de référence rapide __________
FR
Manual de referencia rápida _________
ES
Kurzreferenz_______________________
DE
Guida rapida all’uso ________________
IT
Краткое справочное руководство
__
RU
US
2
This Quick Reference Manual explains the installation and basic operations for projecting
pictures. It also describes important notes and cautions to which you have to pay attention when
handling and using this unit.
Refer to “Warning Indicators,” “Replacing the Lamp,” and “Cleaning the Air Filter” as
necessary.
For details on the operations, refer to the Operating Instructions contained in the supplied CD-
ROM.
About the Quick Reference Manual
Preparing
....................................................Page 9
Installing the Unit
..................................Page 10
Connecting the Unit
.............................Page 12
Selecting the Menu Language
........Page 16
Projecting
..................................................Page 17
Error Handling
Warning Indicators
.........................................Page 19
Maintenance
Replacing the Lamp
.......................................Page 20
Cleaning the Air Filter
....................................Page 23
Step 1 Step 2 Step 3 Step 4 Step 5
3
US
Before operating the unit, please read this
manual thoroughly and retain it for future
reference.
WARNING
To reduce the risk of fire or electric
shock, do not expose this apparatus
to rain or moisture.
To avoid electrical shock, do not open
the cabinet. Refer servicing to
qualified personnel only.
WARNING
THIS APPARATUS MUST BE
EARTHED.
WARNING
When installing the unit, incorporate a
readily accessible disconnect device in the
fixed wiring, or connect the power plug to an
easily accessible socket-outlet near the unit.
If a fault should occur during operation of
the unit, operate the disconnect device to
switch the power supply off, or disconnect
the power plug.
For the customers in the U.S.A.
This equipment has been tested and found to
comply with the limits for a Class B digital
device, pursuant to part 15 of the FCC Rules.
These limits are designed to provide
reasonable protection against harmful
interference in a residential installation. This
equipment generates, uses and can radiate
radio frequency energy and, if not installed
and used in accordance with the instructions,
may cause harmful interference to radio
communications. However, there is no
guarantee that interference will not occur in
a particular installation. If this equipment
does cause harmful interference to radio or
television reception, which can be
determined by turning the equipment off and
on, the user is encouraged to try to correct
the interference by one or more of the
following measures:
- Reorient or relocate the receiving antenna.
- Increase the separation between the
equipment and receiver.
- Connect the equipment into an outlet on a
circuit different from that to which the
receiver is connected.
- Consult the dealer or an experienced
radio/TV technician for help.
You are cautioned that any changes or
modifications not expressly approved in this
manual could void your authority to operate
this equipment.
All interface cables used to connect
peripherals must be shielded in order to
comply with the limits for a digital device
pursuant to Subpart B of part 15 of FCC
Rules.
If you have any questions about this product,
you may call;
Sony Customer Information Service Center
1-800-222-7669 or http://www.sony.com/
For the customers in Canada
CAN ICES-3 (B)/NMB-3(B)
For the customers in Europe
This product has been manufactured by or
on behalf of Sony Corporation, 1-7-1 Konan
Minato-ku Tokyo, 108-0075 Japan. Inquiries
related to product compliance based on
European Union legislation shall be
addressed to the authorized representative,
Sony Deutschland GmbH, Hedelfinger
Strasse 61, 70327 Stuttgart, Germany. For
any service or guarantee matters, please
Declaration of Conformity
Trade Name:
SONY
Model:
VPL-HW55ES
VPL-HW40ES
Responsible party: Sony Electronics Inc.
Address:
16530 Via Esprillo,
San Diego, CA 92127
U.S.A.
Telephone Number: 858-942-2230
This device complies with part 15 of the
FCC Rules. Operation is subject to the
following two conditions: (1) This device
may not cause harmful interference, and
(2) this device must accept any interference
received, including interference that may
cause undesired operation.
US
US
4
refer to the addresses provided in the
separate service or guarantee documents.
For kundene i Norge
Dette utstyret kan kobles til et IT-
strømfordelingssystem.
For the customers in Taiwan only
For the Customers in Brazil only
DESCARTE DE PILHAS E BATERIAS
Pilhas e Baterias não recarregáveis
Atenção:
Verifique as instruções de uso do aparelho
certificando-se de que as polaridades (+) e
(-) estão no sentido indicado. As pilhas
poderão vazar ou explodir se as polaridades
forem invertidas, expostas ao fogo,
desmontadas ou recarregadas.
Evite misturar com pilhas de outro tipo ou
com pilhas usadas, transportá-las ou
armazená-las soltas, pois aumenta o risco de
vazamento.
Retire as pilhas caso o aparelho não esteja
sendo utilizado, para evitar possíveis danos
na eventualidade de ocorrer vazamento.
As pilhas devem ser armazenadas em local
seco e ventilado.
No caso de vazamento da pilha, evite o
contato com a mesma.
Lave qualquer parte do corpo afetado com
água abundante.
Ocorrendo irritação, procure auxílio médico.
Não remova o invólucro da pilha.
Mantenha fora do alcance das crianças. Em
caso de ingestão procure auxílio médico
imediatamente.
DESCARTE DE PILHAS E BATERIAS
Este produto contém bateria de alimentação
integrada (não removível pelo usuário) que
só deve ser substituída por profissionais
qualificados. Ao fim da vida útil do
equipamento, disponha-o em um ponto de
coleta na Rede Autorizada Sony ou nas lojas
Sony, de forma a garantir o tratamento
adequado da bateria.
For the customers in the U.S.A.
SONY LIMITED WARRANTY
- Please
visit http://www.sony.com/psa/warranty
for important information and complete
terms and conditions of Sony’s limited
warranty applicable to this product.
For the customers in Canada
SONY LIMITED WARRANTY
- Please
visit http://www.sonybiz.ca/solutions/
Support.do for important information and
complete terms and conditions of Sony’s
limited warranty applicable to this product.
For the customers in Europe
Sony Professional Solutions Europe -
Standard Warranty and Exceptions on
Standard Warranty.
Please visit http://www.pro.sony.eu/
warranty for important information and
complete terms and conditions.
For the customers in Korea
SONY LIMITED WARRANTY
- Please
visit http://bpeng.sony.co.kr/handler/
BPAS-Start for important information and
complete terms and conditions of Sony’s
limited warranty applicable to this product.

5
US
Precautions
On safety
• Check that the operating voltage of your
unit is identical with the voltage of your
local power supply.
• Should any liquid or solid object fall into
the cabinet, unplug the unit and have it
checked by qualified personnel before
operating it further.
• Unplug the unit from the wall outlet if it is
not to be used for several days.
• To disconnect the cord, pull it out by the
plug. Never pull the cord itself.
• The wall outlet should be near the unit and
easily accessible.
• The unit is not disconnected to the AC
power source (mains) as long as it is
connected to the wall outlet, even if the
unit itself has been turned off.
• Do not look into the lens while the lamp is
on.
• Do not place your hand or objects near the
ventilation holes. The air coming out is
hot.
On preventing internal heat build-
up
After you turn off the power with the
?
/
1
(ON/STANDBY) switch, do not disconnect
the unit from the wall outlet while the
cooling fan is still running.
Caution
This unit is equipped with ventilation holes
(intake) and ventilation holes (exhaust). Do
not block or place anything near these holes,
or internal heat build-up may occur, causing
picture degradation or damage to the unit.
On repacking
Save the original shipping carton and
packing material; they will come in handy if
you ever have to ship your unit. For
maximum protection, repack your unit as it
was originally packed at the factory.
On watching 3D video images
Safety precautions
• You should only use the 3D glasses for
watching 3D video images.
• If you observe flickering or flashing, turn
off the lighting in the room.
• Not for use by children without proper
adult supervision.
• Be careful not to pinch your fingers in
hinges of the 3D glasses when bending the
temple frames.
• Do not drop or modify these 3D glasses.
• If these glasses are broken, keep broken
pieces away from your mouth or eyes.
On LCD Projector
The LCD projector is manufactured using
high-precision technology. You may,
however, see tiny black points and/or bright
points (red, blue, or green) that continuously
appear on the LCD projector. This is a
normal result of the manufacturing process
and does not indicate a malfunction.
Also, when you use multiple LCD projectors
to project onto a screen, even if they are of
the same model, the color reproduction
among projectors may vary, since color
balance may be set differently from one
projector to the next.
On condensation
If the room temperature where the projector
is installed changes rapidly, or if the
projector is moved suddenly from a cold to a
warm place, condensation in the projector
may occur. As the condensation may cause
malfunction, be careful in adjusting
temperature settings of the air conditioner. If
condensation occurs, leave the projector
turned on for about two hours before use.
US
6
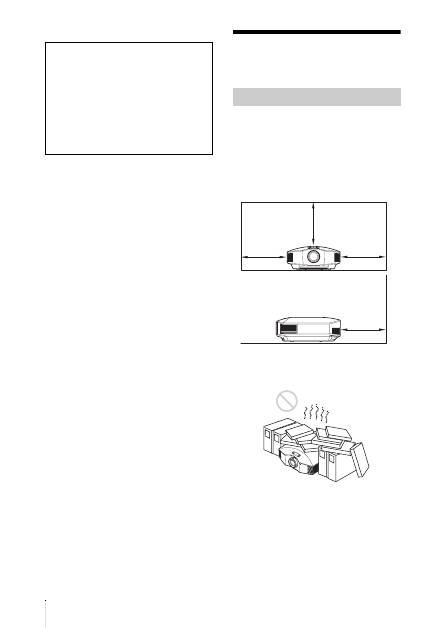
Notes on Installation and Usage
Do not place the unit in the following
situations, which may cause malfunction or
damage to the unit.
Near walls
To maintain the performance and reliability
of the unit, leave space between walls and
the unit as illustrated.
Poorly ventilated location
Leave space of more than 30 cm (11
7
/
8
inches) around the unit.
SONY WILL NOT BE LIABLE FOR
DAMAGES OF ANY KIND
RESULTING FROM A FAILURE TO
IMPLEMENT PROPER SECURITY
MEASURES ON TRANSMISSION
DEVICES, UNAVOIDABLE DATA
LEAKS RESULTING FROM
TRANSMISSION SPECIFICATIONS,
OR SECURITY PROBLEMS OF ANY
KIND.
Unsuitable installation
30 cm
(11
7
/
8
inches)
30 cm
(11
7
/
8
inches)
30 cm
(11
7
/
8
inches)
30 cm
(11
7
/
8
inches)
7
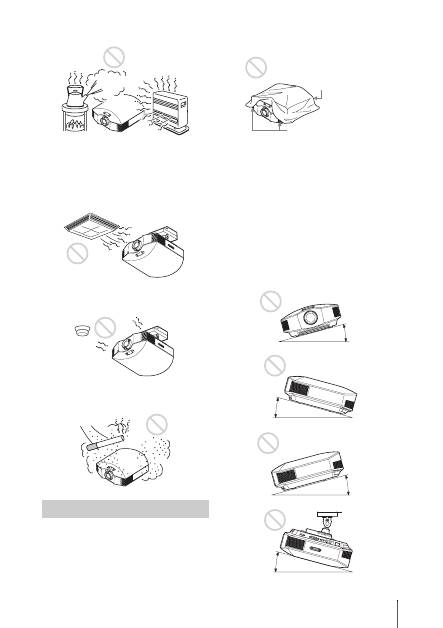
US
Hot and humid
Locations subject to direct cool or
warm air from an air-conditioner
Installing the unit in such a location may
cause a malfunction of the unit due to
moisture condensation or rise in
temperature.
Near a heat or smoke sensor
Malfunction of the sensor may occur.
Very dusty and extremely smoky
locations
Do not do any of the following while using
the unit.
Blocking the ventilation holes (intake
or exhaust)
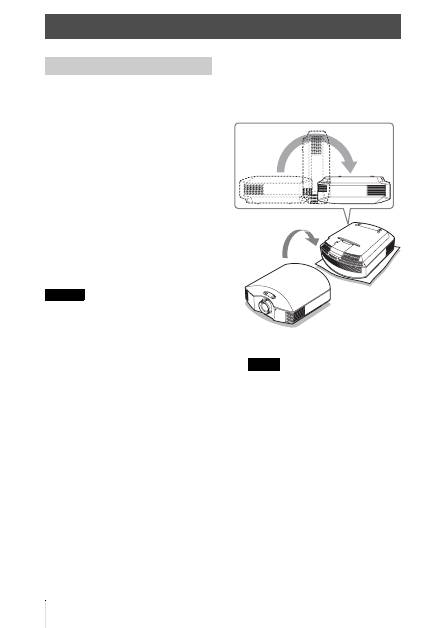
Tilting front/rear and left/right
Avoid using the unit tilted at an angle of
more than 15 degrees.
Do not install the unit anywhere other than
on a level surface or on the ceiling. Installing
the unit in such a location may result in
uneven color uniformity or reduce the
reliability of the effects of the lamp.
If the unit is tilted up or down, the image on
the screen may be trapezoidal.
Position the unit so that the lens is parallel to
the screen.
Unsuitable Conditions
Ventilation holes
(exhaust)
Ventilation holes
(intake)
15° or more
15° or more
15° or more
15° or more
US
8
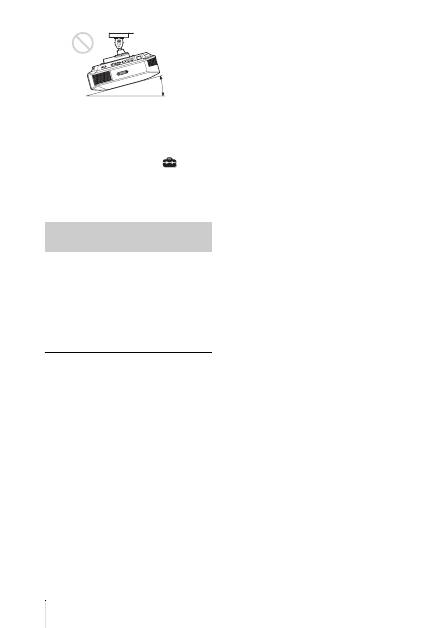
When installing the unit at high
altitudes
When using the unit at an altitude of
1,500 m (approx. 4,900 ft) or higher, set
“Cooling Setting” on the Setup
menu to
“High”. Failing to set this mode when using
the unit at high altitudes could have adverse
effects, such as reducing the reliability of
certain components.
• Never mount the projector on the ceiling
or move it by yourself. Be sure to consult
with qualified Sony personnel (charged).
• When installing the unit on a ceiling, be
sure to use a safety wire, etc., to prevent
the unit from falling. Entrust the
installation to an experienced contractor or
installer.
For dealers
• When the projector is mounted on the
ceiling, a Sony bracket or recommended
equivalent must be used for installation.
• Be sure to secure the cabinet cover firmly
when installing to the ceiling firmly.
Safety precautions for
installing the unit on a ceiling
15° or more
9
US
Check the carton to make sure it contains the
following items:
• Remote control (1)
• Size AA (R6) manganese batteries (2)
• AC power cord (1)
• Lens cap (1)
When you have purchased the projector,
the lens cap is put onto the lens. Remove
this lens cap when you use the projector.
• Quick Reference Manual (this manual) (1)
• Operating Instructions (CD-ROM) (1)
For VPL-HW55ES, the following items are
also contained.
• 3D glasses (2)
• Pouch for the 3D glasses (2)
• USB charging cable (APY5244010020/
SONY) (1.2 m) (2)
• Operating Instructions for the 3D glasses
(1)
CAUTION
Danger of explosion if battery is incorrectly
replaced.
Replace only with the same or equivalent
type recommended by the manufacturer.
When you dispose of the battery, you must
obey the law in the relative area or country.
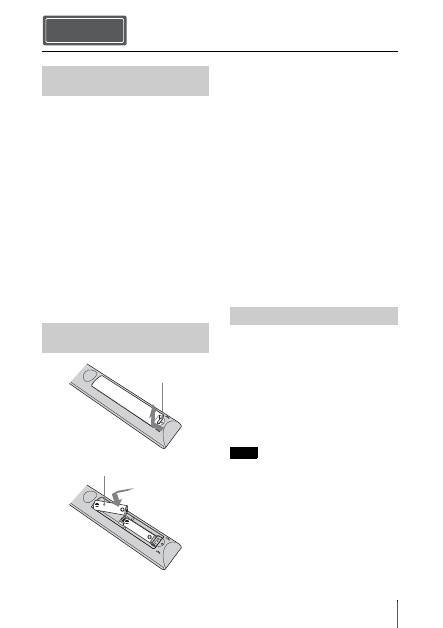
Installing batteries
Two size AA (R6) batteries are supplied for
Remote Control.
To avoid risk of explosion, use size AA (R6)
manganese or alkaline batteries.
Caution about handling the remote
control
• Handle the remote control with care. Do
not drop or step on it, or spill liquid of any
kind onto it.
• Do not place the remote control in a
location near a heat source, a place subject
to direct sunlight, or a damp room.
The manual can be read on a computer with
Adobe Reader installed.
You can download Adobe Reader free from
the Adobe website.
1
Open the index.html file in the CD-
ROM.
2
Select and click on the manual that
you want to read.
If you have lost or damaged the CD-ROM, you
can purchase a new one from your Sony dealer
or Sony service counter.
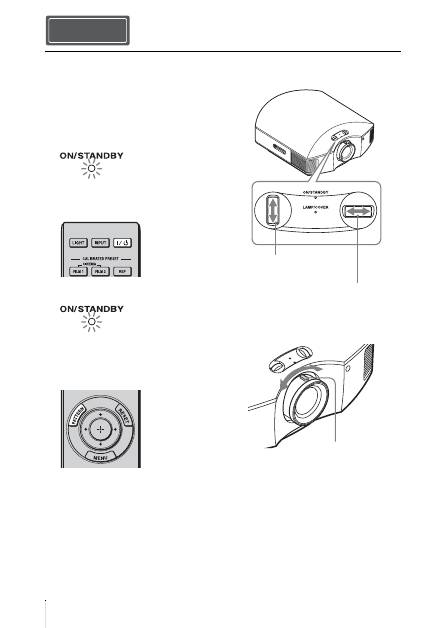
Preparing Step 1
Checking the Supplied
Accessories
Inserting the Batteries into
the Remote Control
Push and slide to
open.
Insert the batteries
E
side first.
Using the CD-ROM manual
Note
US
10
1
Position the unit so that the lens is
parallel to the screen.
2
After connecting the AC cord to the
projector, plug the AC cord into a wall
outlet.
3
Press the
?
/
1
(ON/STANDBY)
switch to turn on the projector.
4
Press the PATTERN button to display
a test signal for performing
adjustments.
a
Move both lens shift dials to
adjust the picture position.
b
Adjust the picture size using the
zoom lever.
Installing the Unit Step 2
Lights in red.
Top of the unit
Flashes in green for a
while (tens of seconds)
and then lights in green.
Top of the unit
To adjust the vertical
position
To adjust the horizontal
position
Zoom lever
11
US
c
Adjust the focus using the focus
ring.
Lens adjustment window (test pattern)
Focus ring
2.35:1
4:3
1.85:1
The dashed lines show the screen sizes of each
aspect ratio.
For more information, refer to
“Connections and Preparations” in the
Operating Instructions contained in the
supplied CD-ROM.
US
12
When making connections, be sure to do the following:
• Turn off all equipment before making any connections.
• Use the proper cables for each connection.
• Insert the cable plugs properly; poor connection at the plugs may cause a malfunction or poor
picture quality. When pulling out a cable, be sure to pull it out from the plug, not the cable
itself.
• Refer to the operating instructions of the connected equipment.
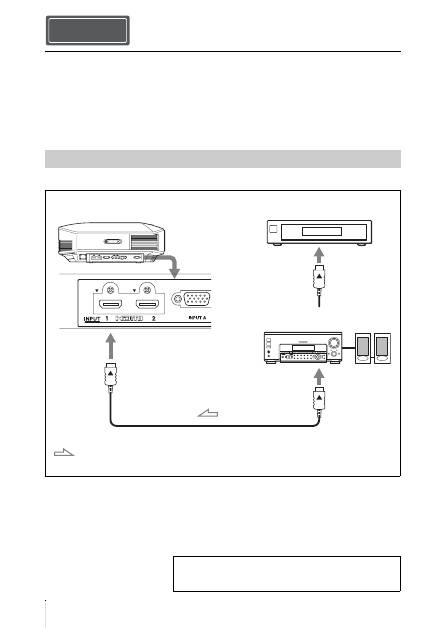
To connect to equipment with HDMI output connectors
Connecting the Unit Step 3
Connecting to a VCR
HDMI cable (not supplied)
: Video signal flow
Right side of the projector
Equipment with HDMI
output connectors
to HDMI output
AV amplifier with HDMI
input/output connectors
Speakers
When using an HDMI cable, be sure to use a Sony HDMI
cable or another cable that has the HDMI logo.
For more information, refer to “Connections and
Preparations” in the Operating Instructions contained in
the supplied CD-ROM.
13
US
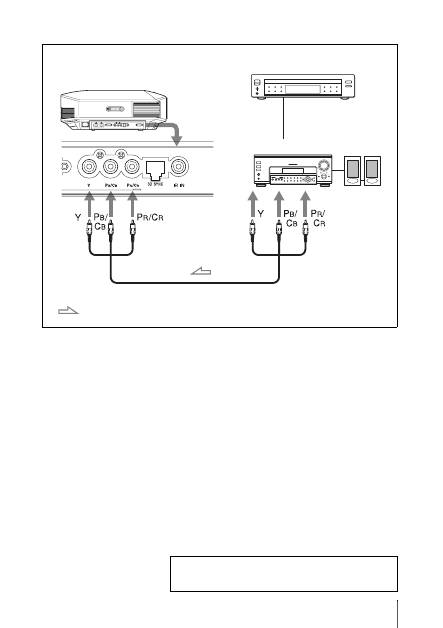
To connect to equipment with component video output connectors
Component video cable (not supplied)
: Video signal flow
Equipment with component
video output connectors
Right side of the projector
AV amplifier
Speakers
For more information, refer to “Connections and
Preparations” in the Operating Instructions contained in
the supplied CD-ROM.
US
14
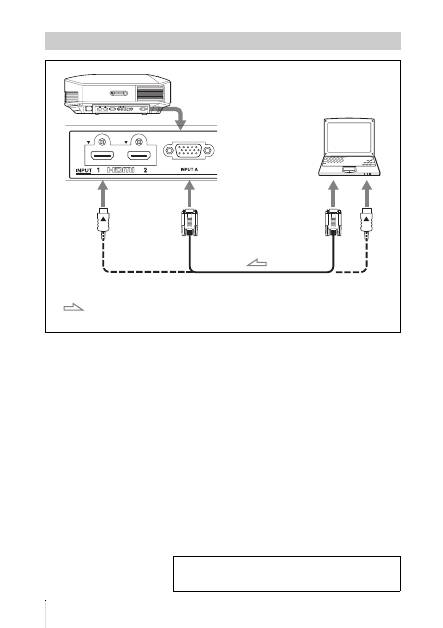
Connecting to a Computer
HD-Dsub15 pin cable (not supplied) or HDMI cable (not supplied)
: Video signal flow
Right side of the projector
to monitor output
Computer
When using an HDMI cable, be sure to use a Sony HDMI
cable or another cable that has the HDMI logo.
For more information, refer to “Connections and
Preparations” in the Operating Instructions contained in
the supplied CD-ROM.
15
US
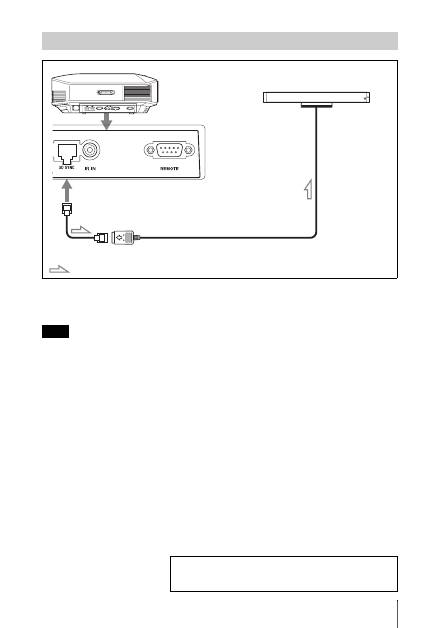
CAUTION
Be sure to use straight-type LAN cable of up to 15 m labeled TYPE CM, and do not use an
extension cord.
You can use a 3D Sync Transmitter separate from this unit, using an optional LAN cable (straight-
type).
If the usage environment has interference of a continuous specific frequency, synchronization of 3D
image signals and the 3D glasses may be lost. In this case, use a LAN cable labeled Category 7.
When watching 3D images in an environment that has even more interference, use the internal
transmitter.
Connecting to a 3D Sync Transmitter
Note
Right side of the projector
3D Sync Transmitter
(not supplied)
Connecting cable
: 3D sync signal flow
For more information, refer to “Connections and
Preparations” in the Operating Instructions contained in
the supplied CD-ROM.
US
16
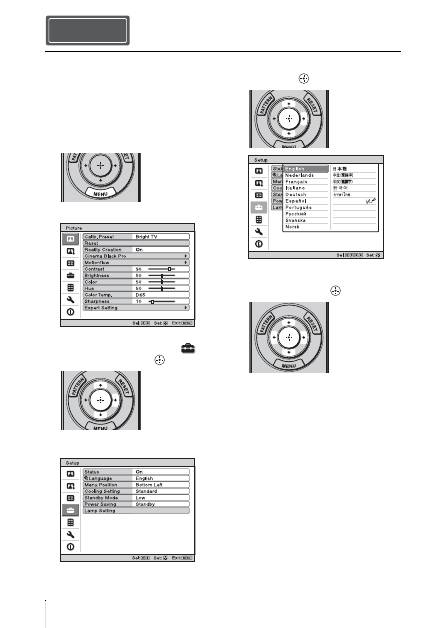
You can select one of 16 languages for
displaying the menu and other on-screen
displays. The factory default setting is
English. To change the current menu
language, set the desired language with the
menu screen.
1
Press MENU.
The menu appears.
2
Press
M
/
m
to select the Setup
menu, and press
,
or
.
The setting items of the selected menu
appear.
3
Press
M
/
m
to select “Language,” and
press
,
or
.
4
Press
M
/
m
/
<
/
,
to select a
language, and press
.
The menu changes to the selected
language.
To clear the menu
Press MENU.
Selecting the Menu Language Step 4
17
US
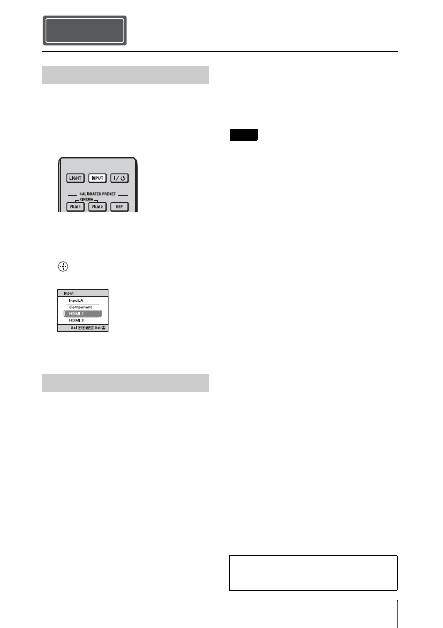
1
Power on both the projector and the
equipment connected to the unit.
2
Press INPUT to display the input
palette on the screen.
3
Select the equipment from which you
want to display images.
Press INPUT repeatedly or press
M
/
m
/
(enter) to select the equipment from
which to project.
1
Press the
?
/
1
(ON/STANDBY)
switch.
A message “POWER OFF?” appears on
the screen.
2
Press the
?
/
1
(ON/STANDBY) switch
again before the message disappears.
The ON/STANDBY indicator flashes in
green and the fan continues to run to
reduce the internal heat. First, the ON/
STANDBY indicator flashes quickly,
during which you will not be able to
light up the lamp with the
?
/
1
(ON/
STANDBY) switch.
The fan stops and the ON/STANDBY
indicator changes from flashing green to
remaining red.
The power is turned off completely, and you
can disconnect the AC power cord.
Never disconnect the AC power cord while the
indicator is flashing.
You can turn off the projector by holding the
?
/
1
(ON/STANDBY) switch for about 1 second,
instead of performing the above steps.
Projecting Step 5
Projecting the Picture
Turning Off the Power
Example: To view the picture from the
video equipment connected to the HDMI
1 connector of this unit.
Note
For more information, refer to
“Projecting” in the Operating Instructions
contained in the supplied CD-ROM.
US
18
Press one of the CALIBRATED PRESET
buttons.
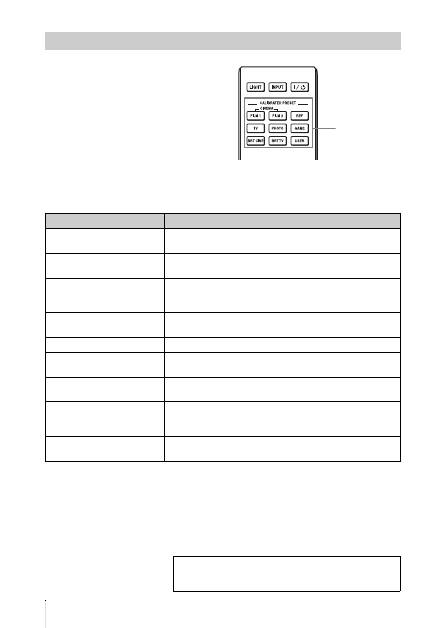
Selecting the Picture Viewing Mode
CALIBRATED
PRESET buttons
Setting items
Description
CINEMA FILM 1
Picture quality suited to reproducing the highly dynamic and
clear images typical of master positive film.
CINEMA FILM 2
Picture quality suited to reproducing the rich tone and color
typical of a movie theater.
REF
A picture quality setup suitable for when you want to reproduce
faithfully the original image quality, or for enjoying image
quality, without any adjustment.
TV
Picture quality suited for watching TV programs, sports,
concerts, etc.
PHOTO
Ideal for projecting still images taken with a digital camera.
GAME
Picture quality suited to gaming, with well-modulated colors
and fast response.
BRT CINE
Picture quality suited for watching movies in a bright
environment, such as a living room.
BRT TV
Picture quality suited for watching TV programs, sports,
concerts, and other video images in a bright environment, such
as a living room.
USER
Adjusts the picture quality to suit your taste then saves the
setting. The factory default setting is the same as “REF.”
For more information, refer to “Projecting” in the
Operating Instructions contained in the supplied CD-
ROM.
19
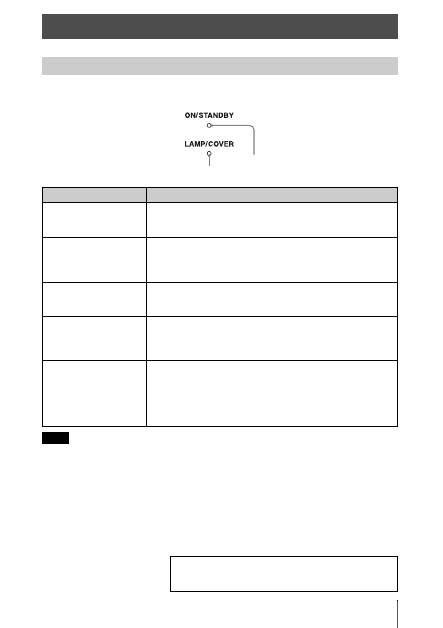
US
The ON/STANDBY or LAMP/COVER indicator lights up or flashes if there is any trouble with
your projector.
When a warning indicator other than the above starts flashing, and the symptom persists even after
carrying out the above methods, consult with qualified Sony personnel.
Error Handling
Warning Indicators
Symptom
Cause and Remedy
LAMP/COVER flashes in
red. (A repetition rate of 2
flashes)
c
Close the lamp cover securely, then tighten the screws securely.
c
Close the filter holder securely.
LAMP/COVER flashes in
red. (A repetition rate of 3
flashes)
c
The lamp has reached the end of its useful lifespan. Replace the
lamp.
c
The lamp has reached a high temperature. Wait until the lamp
cools, and then turn on the power again.
ON/STANDBY flashes in
red. (A repetition rate of 4
flashes)
c
The fan is broken. Consult with qualified Sony personnel.
ON/STANDBY flashes in
red. (A repetition rate of 2
flashes)
c
The internal temperature is unusually high. Check to ensure that
if nothing is blocking the ventilation holes or whether or not the
projector is being used at high altitudes.
ON/STANDBY flashes in
red. (A repetition rate of 6
flashes)
c
Press the
I
/
1
(ON/STANDBY) switch to turn on the projector.
If the power is not turned on, disconnect the AC power cord,
then confirm the ON/STANDBY lamp is turned off. After about
10 seconds, reconnect the AC power cord and turn on the power
again. If the indicators still light up, the electrical system has a
problem. Consult with qualified Sony personnel.
Note
ON/STANDBY indicator
LAMP/COVER indicator
If there is any problem or an error message appears on the
screen, refer to “Troubleshooting” in the Operating
Instructions contained in the supplied CD-ROM.
US
20
Tools you need to get started:
•
Projector Lamp LMP-H202 (optional)
•
Standard Phillips screwdriver
•
Cloth (for scratch protection)
The lamp used for the light source has a
certain lifespan. When the lamp dims, the
color balance of the picture becomes
strange, or “Please replace the Lamp/Filter.”
appears on the screen, the lamp may be
exhausted. Replace the lamp with a new one
without delay.
Use an LMP-H202 Projector Lamp as the
replacement lamp.
The air filter is supplied with the LMP-H202
Projector Lamp. When you replace the lamp,
it is also time to replace the air filter.
Whenever you replace the lamp, be sure to
replace the air filter with a new one. Also
clean the ventilation holes (intake).
• The lamp remains hot after the projector is
turned off with the
?
/
1
(ON/STANDBY)
switch. If you touch the lamp, you may burn
your fingers. When you replace the lamp,
wait for at least 1 hour for the lamp to cool.
• Do not touch the surface of the lens. If you
touch it, wipe off the fingerprints with a soft
cloth.
• Pay special attention to replacing the lamp
when the projector is installed on the ceiling.
• When removing the lamp unit, make sure it
remains horizontal, then pull straight up. Do
not tilt the lamp unit. If you pull out the lamp
unit while tilted and if the lamp breaks, the
pieces may scatter, causing injury.
• When you remove the air filter, be careful not
to let any dust fall into the projector.
• Replacing the air filter is crucial to maintain
the good performance of the projector or to
prevent malfunction to it. When a warning
message for replacing the air filter appears,
replace the air filter immediately.
1
Turn off the projector and unplug the
AC power cord.
2
When setting the projector on a flat
surface such as a desk etc., put a cloth
to prevent the surface from being
scratched. Reverse the projector as
illustrated, then place it on the cloth.
• When the lamp is damaged the broken
pieces of the lamp may become
scattered, if you do not reverse the
projector. This may cause injury.
• Be sure that the projector is placed on a
stable surface.
Maintenance
Replacing the Lamp
Caution
Notes
