Sony VPL-HW55ES: 7 14
7 14: Sony VPL-HW55ES
Table of contents
- About the Quick Reference Manual
- WARNING
- For the Customers in Brazil only
- Precautions On preventing internal heat build- up On repacking On watching 3D video images On LCD Projector On condensation
- Notes on Installation and Usage
- Unsuitable Conditions
- Safety precautions for installing the unit on a ceiling
- Preparing Step 1 Checking the Supplied Accessories Inserting the Batteries into the Remote Control Using the CD-ROM manual
- a b Installing the Unit Step 2
- c
- Connecting the Unit Step 3 Connecting to a VCR
- To connect to equipment with component video output connectors
- Connecting to a Computer
- Connecting to a 3D Sync Transmitter
- Selecting the Menu Language Step 4
- Projecting Step 5
- Selecting the Picture Viewing Mode
- Error Handling Warning Indicators
- 1 2 Maintenance Replacing the Lamp
- 3 6
- 7 14
- Cleaning the Air Filter
US
22
7
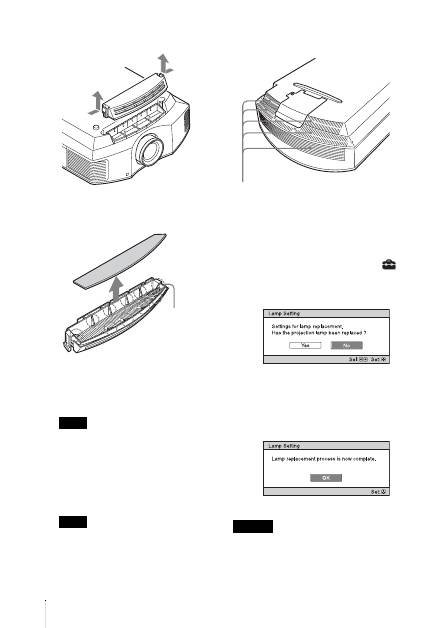
Remove the filter holder.
8
Remove the air filter.
9
Attach the new air filter so that it fits
into each claws (10 positions) on the
filter holder.
Attach the air filter aligning it with the
shape of the filter holder.
Also, do not touch the fan after removing
the air filter that is set deep inside the
projector.
10
Attach the filter holder.
The projector will not turn on unless the
filter holder is securely closed.
11
Wipe dust off the ventilation holes
(intake) with a soft cloth.
12
Place the project back on its original
position.
13
Turn on the projector, then select the
desired setting item on the Setup
menu. The menu screen below will be
appeared.
Tip
If “Settings Lock” is set to “Level B,” set to
“Off” once.
14
Select “Yes”.
Do not put your hands into the lamp
replacement slot, and do not allow any liquid or
other objects into the slot to avoid electrical
shock or fire.
Note
Note
Claws
Caution
Ventilation holes (intake)
