Sony VPL-HW55ES: Connecting to a 3D Sync Transmitter
Connecting to a 3D Sync Transmitter: Sony VPL-HW55ES
Table of contents
- About the Quick Reference Manual
- WARNING
- For the Customers in Brazil only
- Precautions On preventing internal heat build- up On repacking On watching 3D video images On LCD Projector On condensation
- Notes on Installation and Usage
- Unsuitable Conditions
- Safety precautions for installing the unit on a ceiling
- Preparing Step 1 Checking the Supplied Accessories Inserting the Batteries into the Remote Control Using the CD-ROM manual
- a b Installing the Unit Step 2
- c
- Connecting the Unit Step 3 Connecting to a VCR
- To connect to equipment with component video output connectors
- Connecting to a Computer
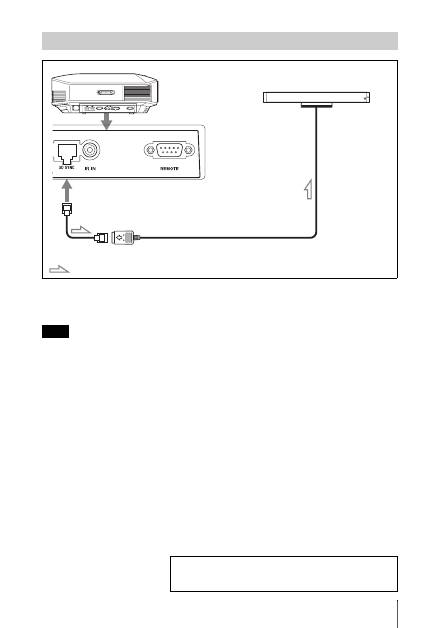
- Connecting to a 3D Sync Transmitter
- Selecting the Menu Language Step 4
- Projecting Step 5
- Selecting the Picture Viewing Mode
- Error Handling Warning Indicators
- 1 2 Maintenance Replacing the Lamp
- 3 6
- 7 14
- Cleaning the Air Filter
15
US
CAUTION
Be sure to use straight-type LAN cable of up to 15 m labeled TYPE CM, and do not use an
extension cord.
You can use a 3D Sync Transmitter separate from this unit, using an optional LAN cable (straight-
type).
If the usage environment has interference of a continuous specific frequency, synchronization of 3D
image signals and the 3D glasses may be lost. In this case, use a LAN cable labeled Category 7.
When watching 3D images in an environment that has even more interference, use the internal
transmitter.
Connecting to a 3D Sync Transmitter
Note
Right side of the projector
3D Sync Transmitter
(not supplied)
Connecting cable
: 3D sync signal flow
For more information, refer to “Connections and
Preparations” in the Operating Instructions contained in
the supplied CD-ROM.
