Sony IPT-DS1: instruction
Class: Electronics
Type:
Manual for Sony IPT-DS1
Table of contents

4-181-337-01 (1)
4-181-337-01 (1)
取扱説明書
補足
DSC-TX7/DSC-TX7C
をお使いのお客様へ
JP
Supplement of the Operating Instructions
For DSC-TX7/DSC-TX7C Users
GB
Supplément au Mode d’emploi
Pour les utilisateurs des DSC-TX7/DSC-TX7C
FR
Ergänzung der Bedienungsanleitung
Für Benutzer von DSC-TX7/DSC-TX7C
DE
Suplemento del Manual de instrucciones
IPT-DS1/IPT-DS1C
Para los usuarios de la DSC-TX7/DSC-TX7C
ES
Aanvulling op de gebruiksaanwijzing
Voor DSC-TX7/DSC-TX7C-gebruikers
NL
Tillägg till Bruksanvisningen
För användare av DSC-TX7/DSC-TX7C
SE
Supplemento alle istruzioni per l’uso
Per i possessori della fotocamera modello DSC-TX7 o DSC-TX7C
IT
Suplemento ao Manual de Instruções
Para utilizadores das máquinas DSC-TX7/DSC-TX7C
PT
Дополнение к инструкции по эксплуатации
Для пользователей моделей DSC-TX7/DSC-TX7C
RU
使用說明書補充資料
DSC-TX7/DSC-TX7C使用者須知
CT
使用说明书附录
致DSC-TX7/DSC-TX7C用户
CS
사용설명서 부록
DSC-TX7/DSC-TX7C 사용자를 위해서
KR
AR
IPT-DS1/IPT-DS1C
© 2009 Sony Corporation
© 2009 Sony Corporation

2-JP
日本語
目次
DSC-TX7/DSC-TX7C
をお使いのお客様へ
.....................................3
各部のなまえ
.........................................................................................4
インテリジェントパンチルター本体
インテリジェントパンチルターを準備する
......................................5
ベースの取りはずしかた
ベース、プレートを選ぶ
ベースを取り付ける
プレートを取り付ける/取りはずす
オーダー撮影をする
.............................................................................6

DSC-TX7/DSC-TX7C
をお使いのお
客様へ
本書「
DSC-TX7/DSC-TX7C
をお使いのお客様へ」以外に、別冊・取扱説明
書、およびお使いのカメラの取扱説明書もご確認ください。
本機は防じん、防滴、防水仕様ではありません
ご注意
対象のカメラと本機はすべての国や地域で取り扱いをしているわけでは
ありません。
ベースとプレートについて
ご使用の際は必ずカメラに対応をした適切なベースとプレートを
1
つ
ずつ取り付けてください。(
5
ページ)
間違ったベースとプレートを取り付けると、本機もしくはカメラを破
損することがあります。
同梱物について
DSC-TX7/DSC-TX7C
対応の本機には、ベース
B
とプレート
b1
と本書が
追加で付属されています。
3-JP
4-JP
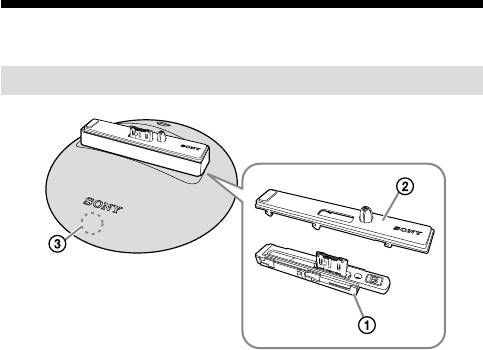
各部のなまえ
インテリジェントパンチルター本体
ベース
プレート
タッチセンサー
ちょっと一言
DSC-TX7/DSC-TX7C
使用時にはタッチセンサー付近が点灯します。

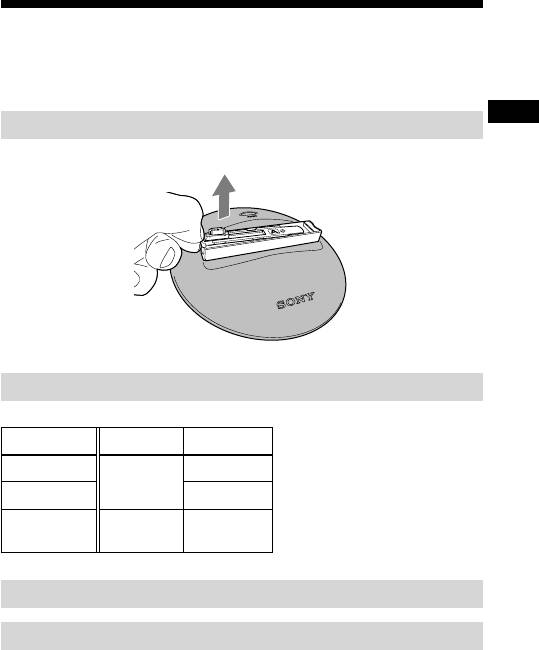
インテリジェントパンチルターを準備
する
お買い上げ時、チルトアーム内に「ベース
A
」が取り付けられています。
DSC-TX7/DSC-TX7C
をお使いの場合は、必ずベース、プレートを取り換
えてからお使いください。
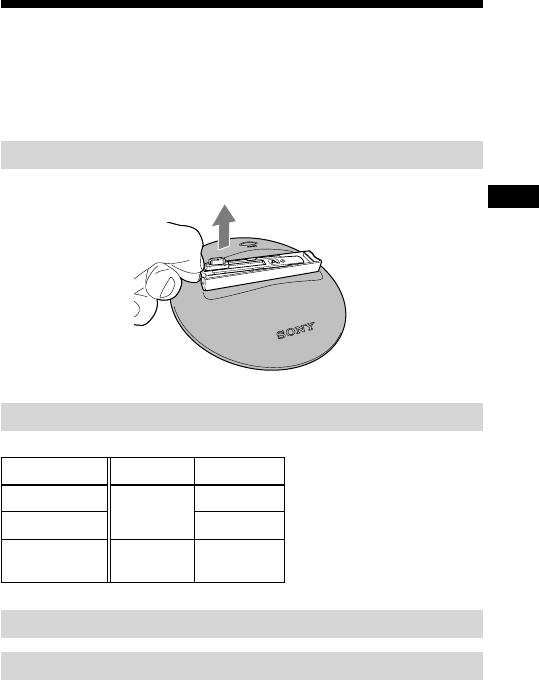
ベースの取りはずしかた
ベースの左側の側面に指をかけて持ち上げてください。
ベース、プレートを選ぶ
お使いのカメラに合わせてベース、プレートを選んでください。
カメラ名 ベース名 プレート名
DSC-TX1
a1
A
DSC-WX1 a2
DSC-TX7/DSC-TX7C B b1
ベースを取り付ける
プレートを取り付ける/取りはずす
取扱説明書の「インテリジェントパンチルターを準備する」を参照してく
ださい。
5-JP

オーダー撮影をする
オーダー撮影とは
任意のタイミングで、撮影の指示を本機に出すことができる機能です。
これによって今までできなかった、ポーズを決めての写真を楽しめるよ
うになります。
オーダー撮影手順
1.
自動撮影中あるいはメニューモード中にタッチセンサーに触れ
る
カメラ(
DSC-TX7/DSC-TX7C
)のセルフタイマーランプが点滅して
「ピッピッピッ」と操作音が鳴り、オーダー撮影が開始されます。
カメラが被写体の顔を検出して構図が決まると「ピピピ」と高速で操
作音が鳴り、
2
秒後にシャッターが切れます。
ちょっと一言
カメラと被写体の距離が離れている場合、顔検出ができないことがあ
ります。
最終的に被写体の顔を検出できなかった場合でも、
1
枚は撮影します。
オーダー撮影を途中でキャンセルするときはもう
1
度タッチセンサー
に触れます。
MENU
ボタンを押してもキャンセルできます。
構図が決まったあとは
MENU
ボタンを押してのキャンセルはできませ
ん。
撮影処理中は、オーダー撮影を受け付けません。
(撮影処理とはカメラがシャッターを切ってから画像を保存するまで
の間です。)
オーダー撮影後は、自動撮影モードに戻ります。
6-JP

English
Table of contents
To DSC-TX7/DSC-TX7C users.........................................................................3
Identifying parts ..................................................................................................4
Main unit
Preparing the intelligent pantilter .....................................................................5
Removing the base
Selecting a base and plate
Mounting the base
Attaching/Removing the plate
On-demand shot..................................................................................................6
2-GB

To DSC-TX7/DSC-TX7C users
As well as this booklet “For DSC-TX7/DSC-TX7C Users”, please read the separate
Operating Instructions and the operating instructions of your camera.
This unit is not a dust-proofed, moist-proofed, or water proofed
product.
Note ¦
Compatible cameras and this unit may not be available in all countries or regions.
About the base and plates
Always use a suitable base and plate for your camera. Using an unsuitable base or
plate may damage this unit or your camera. (page 5)
About the included items
“Base B”, “plate b1” and “this booklet” are supplied with this unit that is
compatible with the DSC-TX7/DSC-TX7C.
3-GB

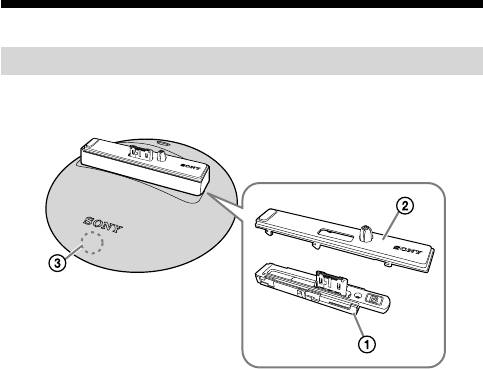
Identifying parts
Main unit
Base
Plate
Touch sensor
Tips ¼
When you use this unit with the DSC-TX7/DSC-TX7C, main body around the touch
sensor lights up.
4-GB
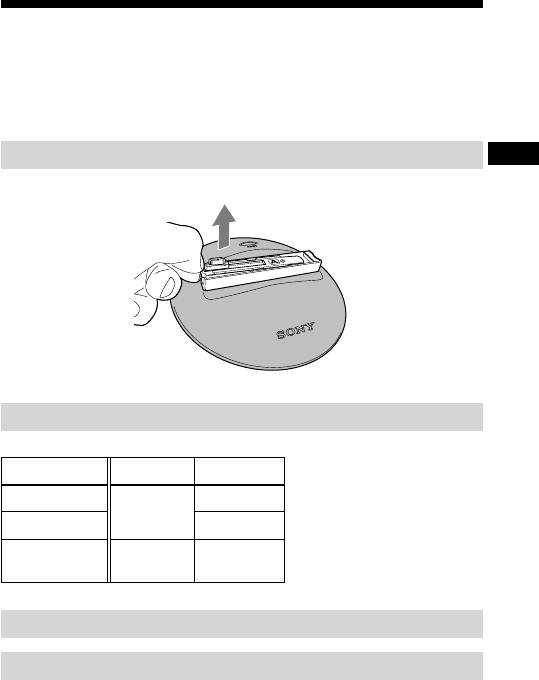
Preparing the intelligent pantilter
At the time of purchase, Base A is attached in the tilt arm.
When using the DSC-TX7/DSC-TX7C, you must replace the base and plate
beforehand.
Removing the base
Put your finger on the left side of the base and lift up.
Selecting a base and plate
Align with your camera to select a base and plate.
Camera Base Plate
DSC-TX1
a1
A
DSC-WX1 a2
DSC-TX7/
B b1
DSC-TX7C
Mounting the base
Attaching/Removing the plate
Refer to “Preparing the intelligent pantilter” in the operating instructions.
5-GB

On-demand shot
What is On-demand shot?
This is a function that enables you to send recording instructions to the main unit at a
time of your choice.
On-demand shot sequence
1. Touch the touch sensor during automatic shooting or in MENU mode.
The self-timer lamp of the camera (DSC-TX7/DSC-TX7C) flashes, there is a
repeated beeping and On-demand shot begins.
The camera searches for the face of a subject. When it has chosen a composition
there is a fast beeping and two seconds later the shutter opens.
Tips ¼
ˎ
When the camera is separated from the object, camera may not search for the face
definitely.
ˎ
Though the camera cannot search for the face definitely, the camera takes at least
one shot.
ˎ
To cancel On-demand shot during operation, press the touch sensor once more.
You can also cancel On-demand shot by pressing the MENU button.
ˎ
You cannot cancel On-demand shot by pressing the MENU button after setting the
composition.
ˎ
This unit cannot accept On-demand shot during the shooting processing.
(“Shooting processing” means a session between releasing the shutter and saving an
image.)
ˎ
After finishing On-demand shot, this unit turns back to the automatic shooting
mode.
6-GB

Français
Table des matières
Pour les utilisateurs des DSC-TX7/DSC-TX7C ..............................................3
Identification des éléments ................................................................................4
Appareil
Préparation de la station intelligente
(inclinaison horizontale et verticale) ........................................................5
Dépose de la base
Sélection d’une base et d’une plaque
Installation de la base
Pose/Dépose de la plaque
Prise de vue sur demande ...................................................................................6
2-FR

Pour les utilisateurs des DSC-TX7/DSC-
TX7C
En plus de cette brochure «Pour les utilisateurs des DSC-TX7/DSC-TX7C», veuillez
lire le Mode d’emploi séparé ainsi que le mode d’emploi de votre appareil photo.
Cet appareil n’est pas un produit étanche à la poussière, à
l’humidité ou à l’eau.
Remarque ¦
Les appareils photo compatibles et cet appareil ne sont pas commercialisés dans tous
les pays ou toutes les régions.
À propos de la base et des plaques
Utilisez toujours la base et la plaque adaptées à votre appareil photo. Cet appareil
ou l’appareil photo peuvent être endommagés si la base ou la plaque utilisée n’est
pas adaptée. (page 5)
À propos des articles fournis
La «base B», la «plaque b1» et «cette brochure» sont fournies avec cet appareil
compatible avec les DSC-TX7/DSC-TX7C.
3-FR
Identification des éléments
Appareil
Base
Plaque
Détecteur à effleurement
Conseils ¼
Lorsque vous utilisez cet appareil avec le DSC-TX7/DSC-TX7C, la partie autour du
détecteur à effleurement s’allume.
4-FR
Préparation de la station intelligente
(inclinaison horizontale et verticale)
La base A a été rattachée au bras inclinable en usine.
Lorsque vous utilisez le DSC-TX7/DSC-TX7C, vous devez remplacer la base et la
plaque au préalable.
Dépose de la base
Posez le doigt sur le côté gauche de la base et soulevez-la.
Sélection d’une base et d’une plaque
Selon sur l’appareil photo sélectionnez une base ou une plaque.
Appareil photo Base Plaque
DSC-TX1
a1
A
DSC-WX1 a2
DSC-TX7/
B b1
DSC-TX7C
Installation de la base
Pose/Dépose de la plaque
Reportez-vous à «Préparation de la station intelligente (inclinaison horizontale et
verticale)» dans le mode d’emploi.
5-FR

Prise de vue sur demande
Qu’est-ce que la prise de vue sur demande ?
Il s’agit d’une fonction qui permet d’envoyer des instructions d’enregistrement à
l’appareil au moment souhaité.
Déroulement de la prise de vue sur demande
1. Touchez le détecteur à effleurement pendant la prise de vue
automatique ou en mode MENU.
Le témoin de retardateur de l’appareil photo (DSC-TX7/DSC-TX7C) clignote,
plusieurs bips sont émis et la prise de vue sur demande commence.
L’appareil photo recherche le visage d’un sujet. Lorsqu’une composition a été
choisie, des bips rapides sont émis et deux secondes plus tard l’obturateur s’ouvre.
Conseils ¼
ˎ
Lorsque l’appareil photo est éloigné du sujet, il peut ne pas rechercher du tout le
visage.
ˎ
Même si l’appareil photo ne peut pas repérer de visage, il prend au moins une photo.
Pour annuler la prise de vue sur demande en cours, appuyez une nouvelle fois sur le ˎ
détecteur à effleurement.
Vous pouvez aussi annuler la prise de vue sur demande en appuyant sur la touche
MENU.
ˎ
Vous ne pouvez pas annuler la prise de vue sur demande en appuyant sur la touche
MENU après avoir réglé la composition.
ˎ
La prise de vue sur demande n’est pas disponible pendant le traitement de la prise
de vue.
(Le «traitement de la prise de vue» signifie la période entre le relâchement de
l’obturateur et la sauvegarde d’une photo.)
ˎ
Lorsque la prise de vue sur demande est terminée, l’appareil revient au mode de
prise de vue automatique.
6-FR

Deutsch
Inhaltsverzeichnis
An Benutzer von DSC-TX7/DSC-TX7C .........................................................3
Identifikation der Teile .......................................................................................4
Hauptgerät
Vorbereitung des Intelligenten Schwenkkopfes...............................................5
Abnehmen der Basis
Auswählen einer Basis und Platte
Anbringen der Basis
Anbringen/Abnehmen der Platte
Aufnahme auf Abruf ...........................................................................................6
2-DE

An Benutzer von DSC-TX7/DSC-TX7C
Neben dieser Broschüre „Für Benutzer von DSC-TX7/DSC-TX7C“ lesen Sie bitte die
getrennte Bedienungsanleitung ebenso wie die Bda Ihrer Kamera.
Dieses Gerät ist nicht staubdicht, feuchtigkeitsfest oder
wasserfest konstruiert.
Hinweis ¦
Kompatible Kameras und dieses Gerät sind möglicherweise nicht in allen Ländern
oder Regionen erhältlich.
Über die Basis und Platten
Verwenden Sie immer eine geeignete Basis und Platte für Ihre Kamera. Bei
Verwendung einer ungeeigneten Basis oder Platte kann dieses Gerät oder Ihre
Kamera beschädigt werden. (Seite 5)
Über das mitgelieferte Zubehör
„Basis B“, „Platte b1“ und „diese Broschüre“ sind mit diesem Gerät mitgeliefert,
das mit der DSC-TX7/DSC-TX7C kompatibel ist.
3-DE

Identifikation der Teile
Hauptgerät
Basis
Platte
Berührungssensor
Tipps ¼
Wenn Sie dieses Gerät mit der DSC-TX7/DSC-TX7C verwenden, leuchtet der
Hauptkörper im Bereich des Berührungssensors auf.
4-DE
Vorbereitung des Intelligenten
Schwenkkopfes
Beim Kauf ist die Basis A ist im Neigearm vormontiert.
Bei Verwendung der DSC-TX7/DSC-TX7C müssen Sie die Basis und Platte vorher
auswechseln.
Abnehmen der Basis
Setzen Sie Ihren Finger auf die linke Seite der Basis und heben an.
Auswählen einer Basis und Platte
Richten Sie das Gerät mit Ihrer Kamera aus, um eine Basis und Platte auszuwählen.
Kamera Basis Platte
DSC-TX1
a1
A
DSC-WX1 a2
DSC-TX7/
B b1
DSC-TX7C
Anbringen der Basis
Anbringen/Abnehmen der Platte
Siehe „Vorbereitung des Intelligenten Schwenkkopfes“ in der getrennten
Bedienungsanleitung.
5-DE
