Sony SU-WTS1: instruction
Class: Furniture
Type:
Manual for Sony SU-WTS1
Table of contents
- For Users For dealers or authorized service personnel
- Step 1: Check the Parts
- 4 Step 2: Remove Stands from the TV
- Step 3: Attach the Mounting Arms to the TV
- 6 Step 4: Fasten Lower Mount Wall Brackets (Example for securing to a wood wall)
- Step 5: Secure Upper Mount Wall Brackets
- 8 Step 6: Mount the TV to the Mount Wall Brackets Step 7: Adjust Tension
- Proper Ventilation
4-091-928-11(2)
© 2002 Sony Corporation
Wall-Mount Bracket
Dealers Installation Manual
Installationshandbuch für Händler
Manual de instalación para el distribuidor
Manuel d’installation destiné aux revendeurs
Manuale di installazione per rivenditori
Installatiehandleiding voor dealers
Manual de instalação para os distribuidores
Руководство по установке для дилеров
US
GB
DE
SU-WTS1
ES
NL
PT
RU
FR
IT
This installation manual is for dealers or authorized
service personnel. Never install the unit by
yourself, otherwise it may result in serious bodily
injury. We are not liable for any damage or injury
caused by mishandling or improper installation. Your
Statutory Rights (if any) are not affected.
Dieses Installationshandbuch richtet sich an den
Händler bzw. den autorisierten Kundendienst.
Installieren Sie das Gerät auf keinen Fall selbst.
Andernfalls besteht die Gefahr schwerer
Verletzungen. Der Hersteller übernimmt keine
Haftung für Verletzungen bzw. Sachschäden, die
durch unsachgemäßen Umgang mit dem Gerät oder
eine fehlerhafte Installation verursacht werden. Ihre
gesetzlichen Rechte, sofern vorhanden, werden
davon nicht berührt.
Este manual de instalación está dirigido a los
proveedores o al personal de servicio técnico
autorizado. Nunca instale la unidad usted mismo,
ya que de lo contrario podría sufrir graves
lesiones personales. No nos responsabilizamos de
ninguna herida o daño provocado por una
manipulación incorrecta o una instalación
inadecuada. Sus derechos legales (en caso de
haberlos) no se ven afectados.
Le présent manuel d’installation est destiné aux
revendeurs et au personnel agréé de service après-
vente. N’installez jamais l’appareil tout seul car
vous risqueriez de vous blesser gravement. Nous
rejetons toute responsabilité quant aux dommages ou
blessures résultant d’une mauvaise manipulation ou
d’une mauvaise installation de l’appareil. Cette clause
ne remet pas en cause vos droits légaux qui
pourraient s’appliquer.
Il presente manuale di installazione è riservato ai
rivenditori o al personale di assistenza autorizzato.
Installare l’apparecchio solo in presenza di
personale specializzato, onde evitare di
procurarsi ferite gravi. La casa produttrice non è
responsabile per eventuali danni o ferite risultanti da
un uso errato o un’installazione non adeguata. I diritti
legali, se previsti, non vengono violati.
Deze installatiehandleiding is bestemd voor dealers
en bevoegd onderhoudspersoneel. Monteer de
steun nooit alleen, anders kunt u ernstig
lichamelijk letsel oplopen. Sony is niet aansprakelijk
voor enige schade of letsel als gevolg van onjuist
handelen of onjuiste installatie. Uw wettelijke rechten
(indien van toepassing) worden niet aangetast.
Este manual de instalação destina-se aos
distribuidores ou técnicos de assistência autorizados.
Nunca instale a unidade sozinho pois se o fizer
pode ferir-se gravemente. Não nos
responsabilizamos por danos ou ferimentos causados
por uma instalação indevida ou utilização
inadequada. Os seus direitos estatutários (se
existirem) não são afectados.
Настоящее руководство по установке
предназначено для дилеров или уполномоченных
специалистов по обслуживанию.
Ни в коем
случае не устанавливайте устройство
самостоятельно - это может стать причиной
получения серьезных травм.
Мы не несем
ответственности в случае повреждения или
получения травм в результате неправильного
обращения или ненадлежащей установки. Это не
влияет на ваши законные права (если таковые
имеются).
GB
DE
ES
FR
IT
NL
PT
RU
2
For Users
This installation manual is for dealers or authorized service
personnel. Never install the unit by yourself, otherwise
it may result in serious bodily injury.
Consult dealers or authorized service personnel for the
installation of this unit. We are not liable for any damage or
injury caused by mishandling or improper installation. Your
Statutory Rights (if any) are not affected.
For dealers or authorized service
personnel
For safety installation of the unit, be sure to read this
manual thoroughly.
We are not liable for any damage or injury caused by
mishandling or improper installation. Your Statutory Rights
(if any) are not affected.
Safety Precautions
Wall Mounting Bracket for KZ-32TS1E/
KZ-42TS1E
Read the following safety information prior to installation.
Danger
Failure to follow directions may result in
serious bodily injury or damage to the
unit.
Installation
• Before installing the unit, read this manual and the TV’s
operating instructions thoroughly, and install the unit
properly.
• Instructions must be followed precisely for safe and stable
installation.
• Install the Wall-Mount Bracket by the proper installation
procedure for the wall material and structure. Improper
installation procedure may result in the TV dropping, and
causing bodily injury or damage to the TV.
• The wall should be capable of supporting a weight of at
least four (4) times the TV weight (KZ-32TS1E
25.5kg
×
4=102kg, KZ-42TS1E 37kg
×
4=148kg).
• Always have at least two persons install the Wall-Mount
Bracket. If the work is done by a single person, the TV
may be dropped and may cause an injury, or damage the
TV.
• Do not alter the parts of Wall-Mount Bracket. Do not make
improper use of the Wall-Mount Bracket.
• Before installation of the TV, pull the equipment power
plug from the wall receptacle. Installing the TV with the
power cable plug inserted in an outlet may result in fire or
electric shock.
• Do not use screws and attachment parts other than items
supplied.
• The screws securing the Wall-Mount Bracket to the wall
are not supplied. Use the proper screws for the wall
material and structure.
• Assemble properly in the instructed order.
• Tighten the bolts and screws to the designated position
securely.
• Do not subject the TV to shock during installation.
• Observe the following to guarantee correct performance
of the TV and prevent any trouble.
– Do not install the TV to any wall other than a vertical
plain.
– To prevent fire or shock hazard, do not expose the TV
to rain or moisture.
– Do not cover the ventilation openings of the TV. For
ventilation, leave a space of at least 10cm (100mm) all
around the set.
– Never place the TV in hot, humid or excessively dusty
places. Do not install the TV where it may be exposed
to mechanical vibrations.
– To prevent fire, keep inflammable objects or naked
lights (e.g. candles) away from the TV.
– Do not cover the ventilation openings of the TV with
items such as curtains or newspapers etc.
– Do not install the TV over or under the air-conditioner.
– Never spill liquid of any kind on the TV.
After installation
• Do not remove backing or bolts after mounting the TV.
• Consult dealers or authorized service personnel when
moving or shifting unit, or adjusting the angle of unit, after
installation.
• Do not climb on the unit once assembled and installed.
• After proper installation, secure the cables so that people
or objects do not get tangled in them.
• If the Wall-Mount Bracket is removed after installing them
on the wall, the screw holes are left.
• Using the TV for a long period may discolour the wall due
to heat generated by the TV.
• After installation, please hand this installation manual to
the users so that they read it thoroughly and retain it for
future reference (This may need for moving the TV or
maintenance of TV).
3
GB
We recommend that you first thoroughly read this manual to
familiarize yourself with the use of this unit as well as proper
installation and safety precautions. Retain this manual in an easily
accessible location for future reference.
MOUNTING POINTS FOR PLASMA MODELS
KZ-32TS1E / KZ-42TS1E
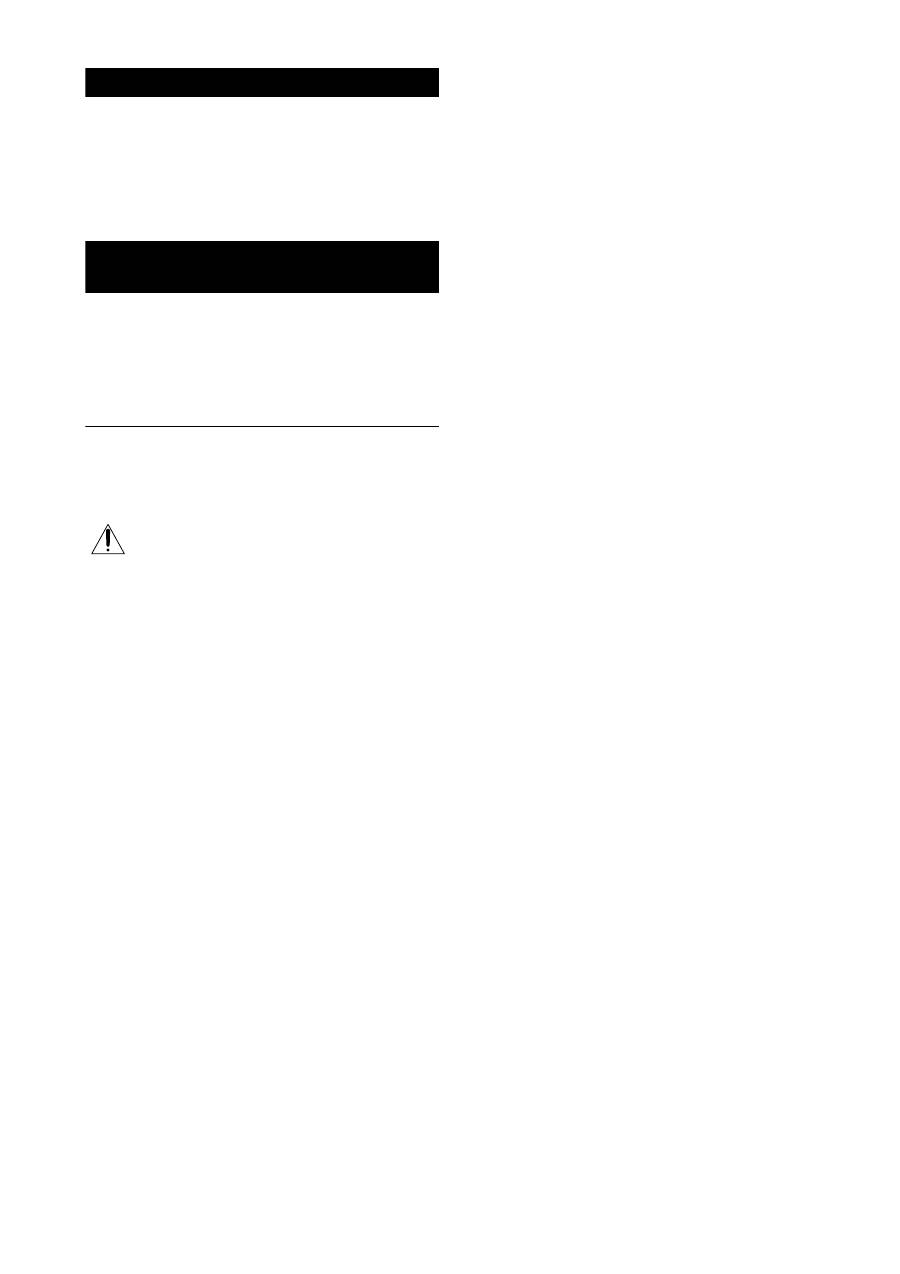
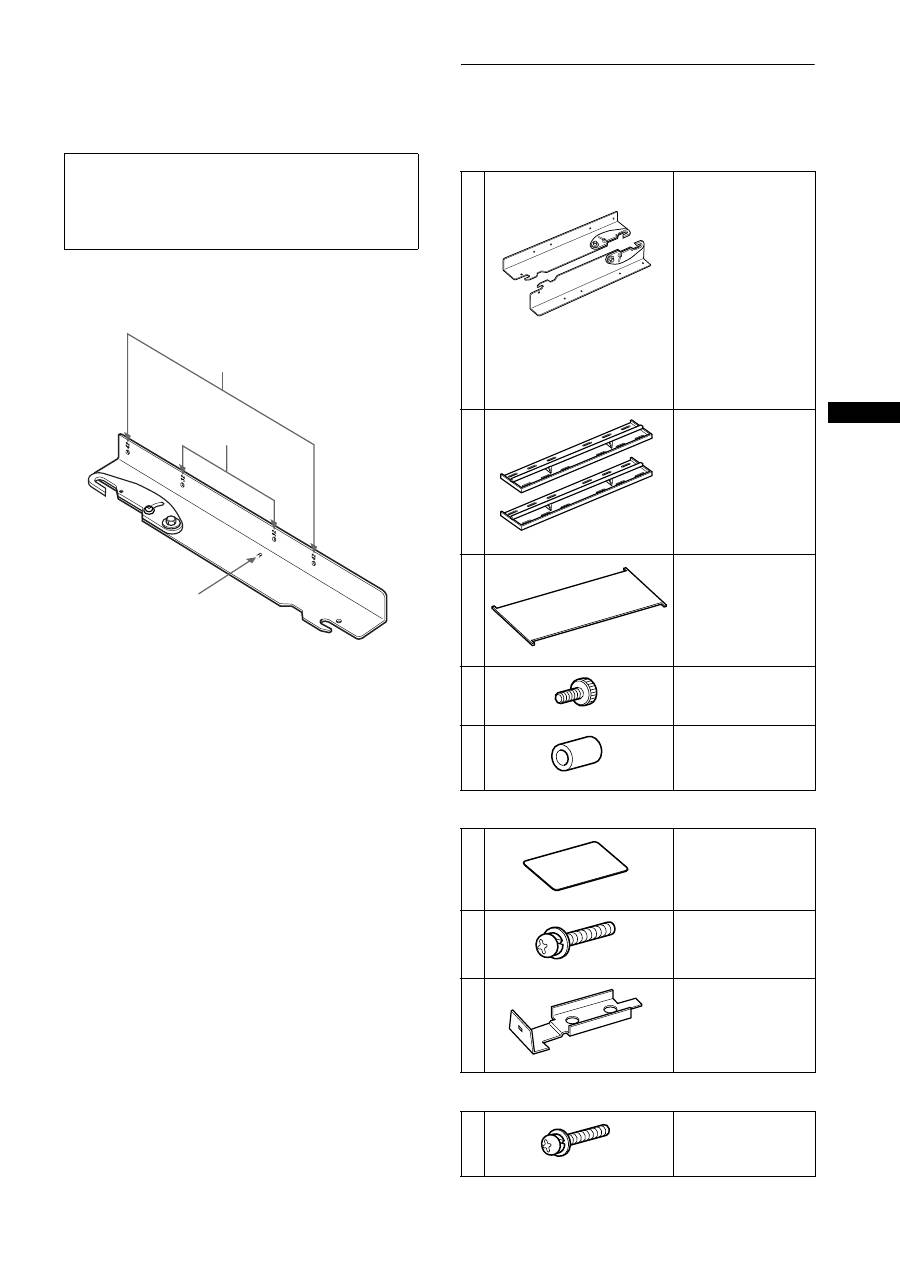
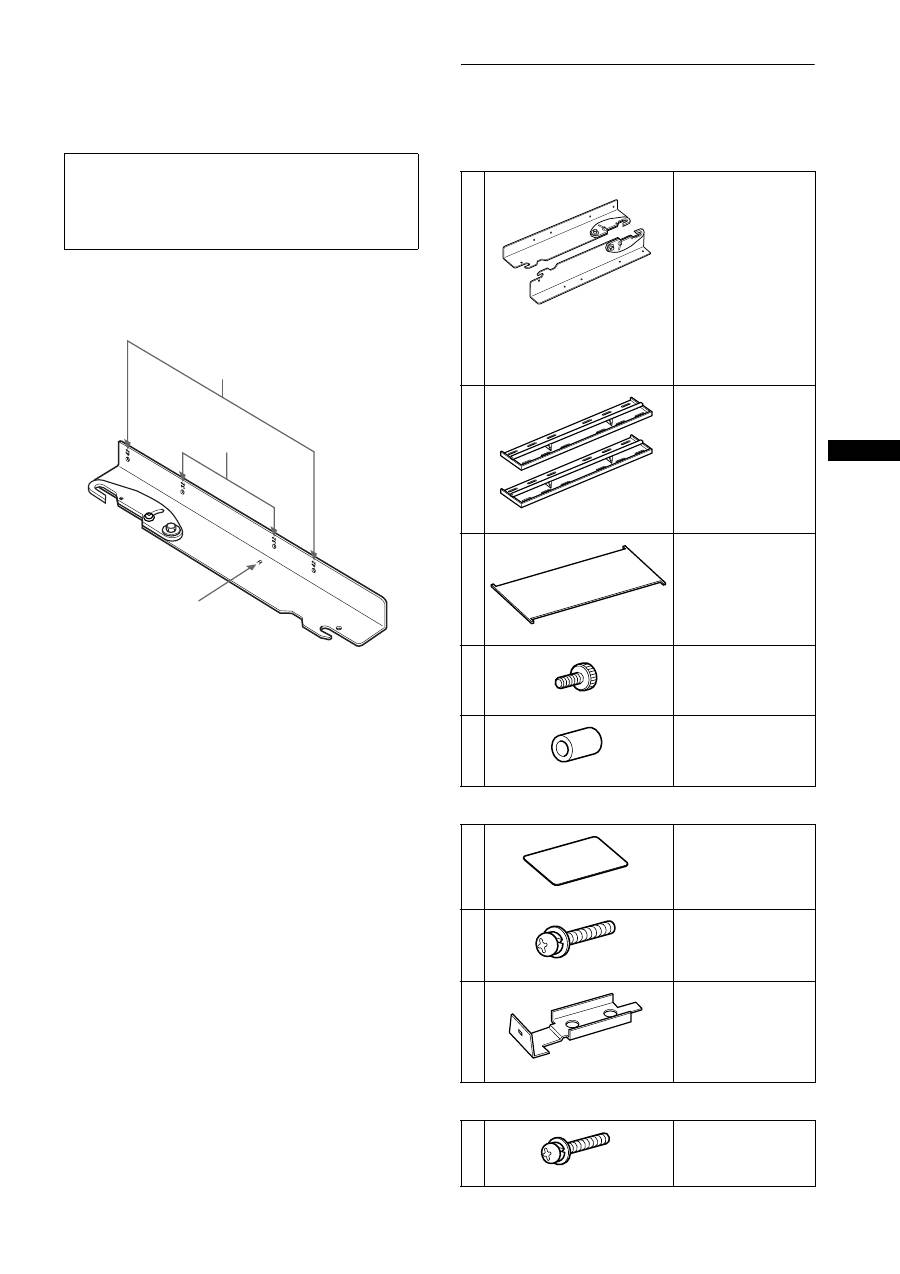
Step 1: Check the Parts
Check for missing parts after opening.
For KZ-32TS1E only
For KZ-42TS1E only
NOTE
During installation, the cardboard template (Item
C
) in the
parts list is required for proper separation of the wall plates.
Do not discard the cardboard template before using.
KZ-32TS1E
KZ-42TS1E
left/right
indication
A
Left and right mounting
arms for the (KZ-
32TS1E) (KZ-42TS1E)
TV
...............................
1pc. (left), 1pc. (right)
Note:
Mounting points for the
TVs differ. Please see
diagram for mounting point
specifications.
B
Mount wall brackets
......
2 pcs.
C
Cardboard template for
230 mm accurate
separation of the wall
brackets
.........................
1 pc.
D
6 mm
×
12 mm Safety
knobs .................... 4 pcs.
E
15 mm Nylon spacers
....
4 pcs.
F
Cover Sheet ............1 pc.
G
5 mm
×
40 mm
Phillips screws...... 4 pcs.
H
Covers .................. 2 pcs.
I
4 mm
×
35 mm Phillips
screws ................... 4 pcs.
(R)
4-091-921-01
(L)
4-091-922-01
4-091-923-01
4-091-924-01
4-091-925-01
4-091-926-01
4-091-927-01
4-957-517-01
4-089-347-01
7-682-969-09
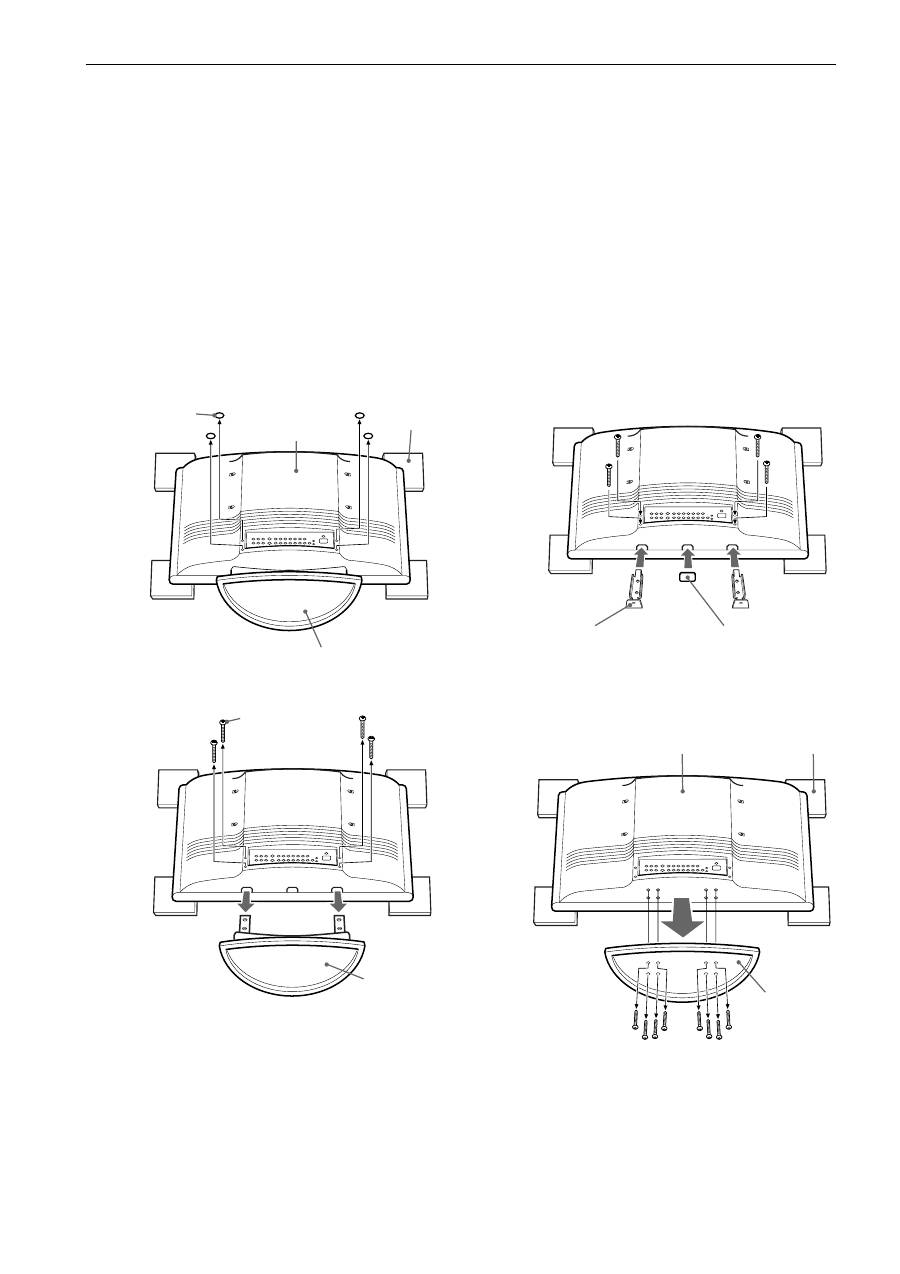
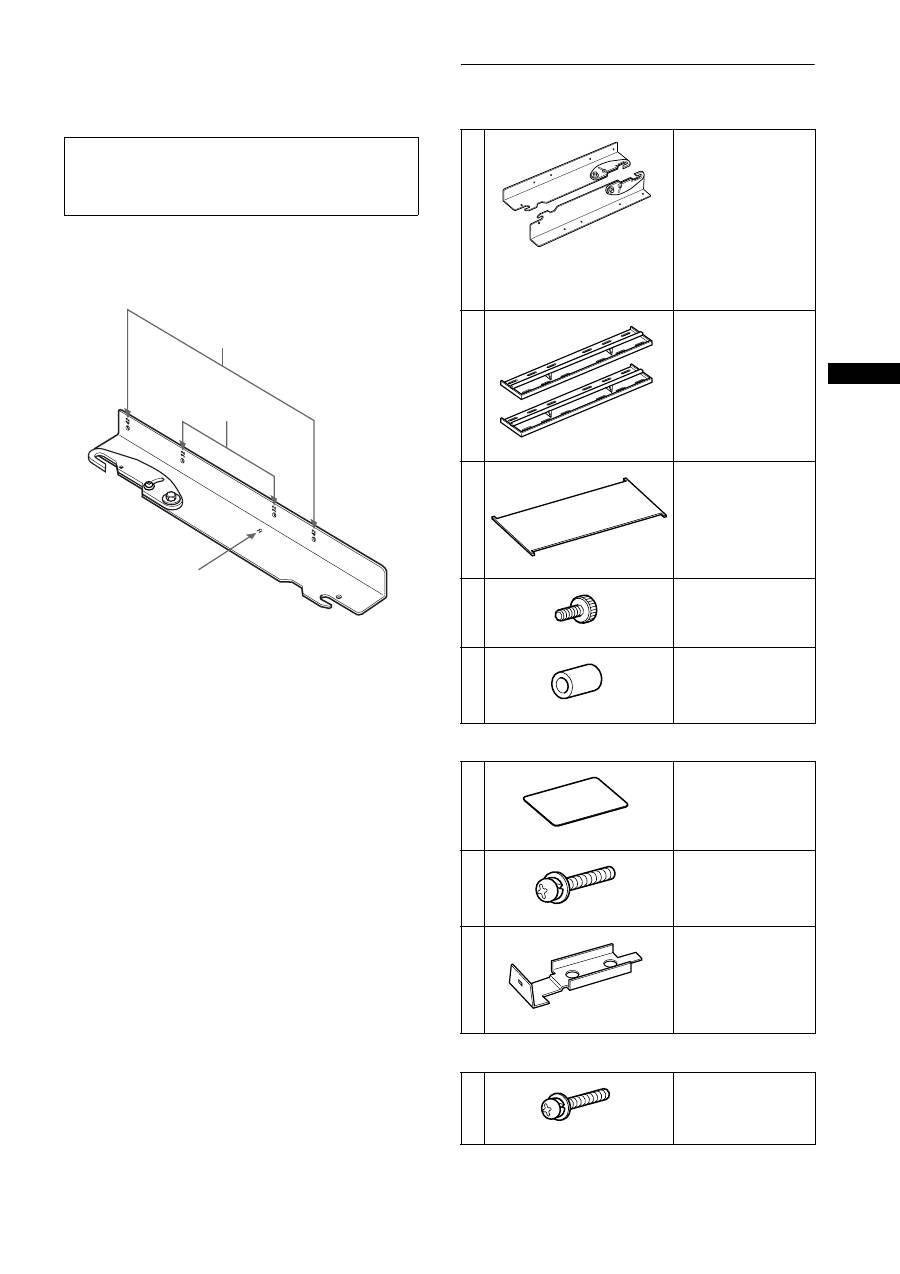
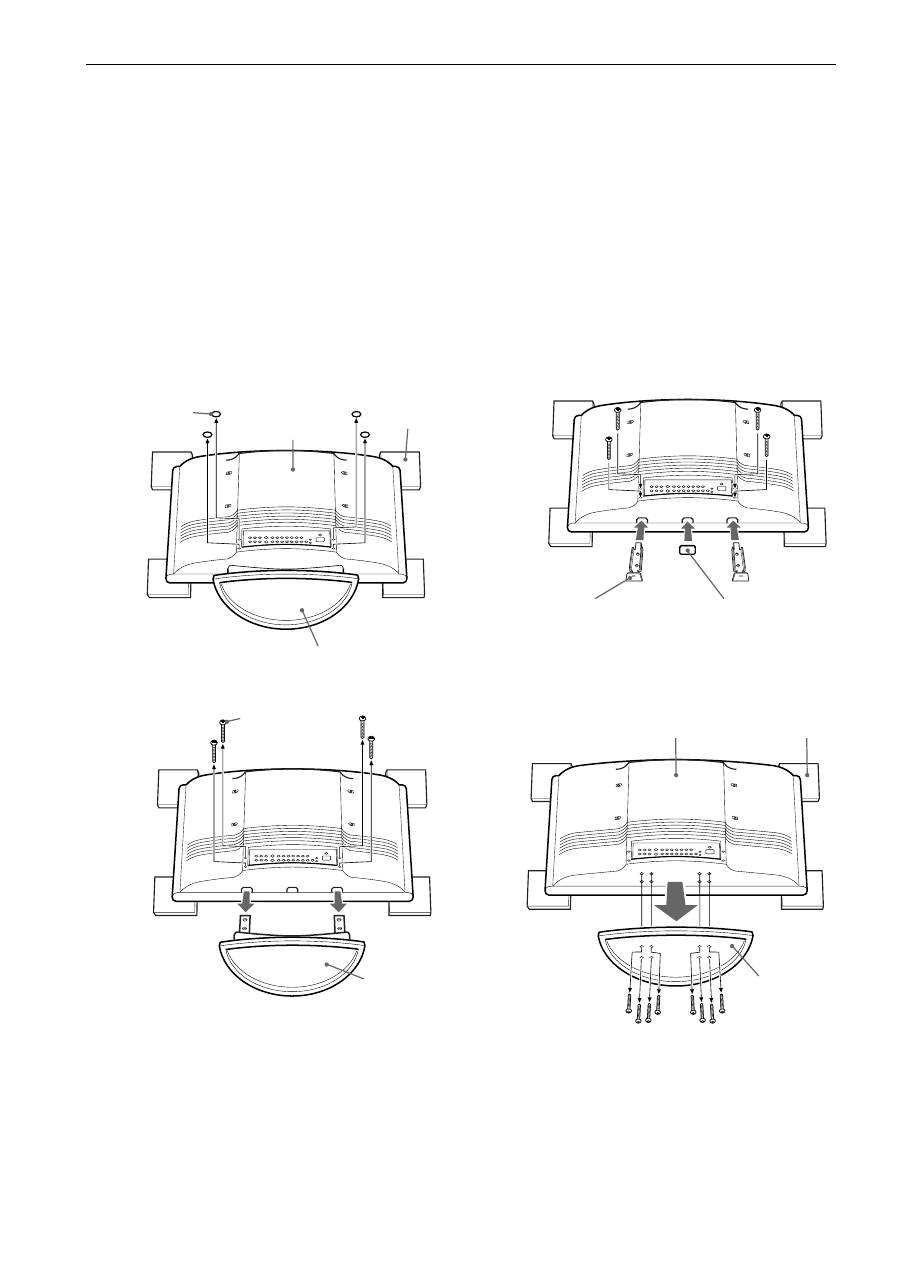
4 Step 2: Remove Stands from the TV
1
Place the 32” model (KZ-32TS1E) or 42” model (KZ-42TS1E) on 4 cushioned supports (not supplied).
The TV screen should face down, parallel to the floor and the base/stand should not touch the floor.
2
Pull the base/stand out from the TV.
For KZ-32TS1E
At the bottom of the rear panel of the TV, cut out the 4 rear panel caps (if there are any) with clippers and scrape the plastic clean with
reamers, so each opening is round and smooth enough to allow a screw to be removed.
For KZ-42TS1E
At the bottom of the stand of the TV, you will see the screws securing the stand. With a (Philips) magnetic screwdriver, remove all the
screws that secure the base to the TV.
3
For KZ-32TS1E only
Attach the covers (
F
,
H
) on the bottom of the TV.
KZ-32TS1E
How to remove the stand and assemble the
covers
KZ-42TS1E
How to remove the stand
1
Rear of TV
Remove the four
(4) caps from
the chassis (if
there are caps).
Stand
Cushioned
support
Remove the four (4)
screws.
Remove
stand and
store away.
2
Secure the two covers (
H
)
with M6 that was previously
removed from the TV stand.
Close rectangle
hole by cover
sheet (
F
).
3
Rear of TV
Remove
the eight
(8) screws.
Remove stand
and store away.
Cushioned
support
2
1
5
GB
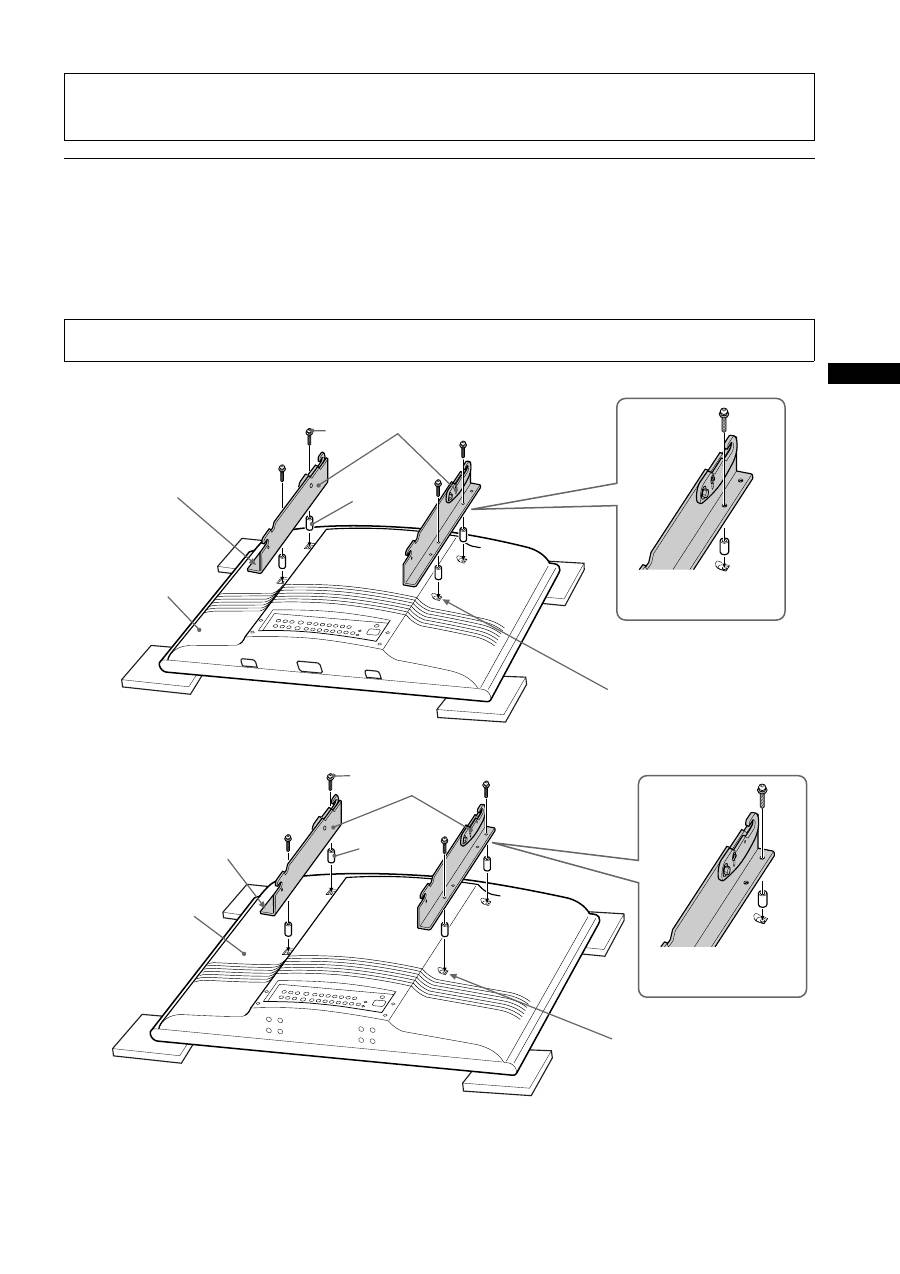
Step 3: Attach the Mounting Arms to the TV
Use the hardware chart in “Step1: Check the Parts” on page 3 of this manual to identify the appropriate hardware. Mounting points on the
mounting arms (
A
) differ depending on TV size. See “MOUNTING POINTS FOR PLASMA MODELS KZ-32TS1E / KZ-42TS1E” on
page 3 of this manual.
Invert the TV on a soft, flat surface and locate the mounting points on the back of the TV. Secure the left and right
mounting arms (
A
) to the TV with the screws (
G
,
I
), making sure that the upper hook screw, nut and reference arrow
are facing the outside edges of the TV.
KZ-32TS1E
KZ-42TS1E
Caution
Installation of units is to be carried out by dealers or authorized service personnel only. Install in appropriate location by checking the
wall structure and durability for safety and accident prevention.
Note
Do not overtighten the bracket mounting screws as damage to the TV internal mounting threads could occur.
Arrow must face out prior
to installation
Securing the mounting
arms.
A
G
E
Remove the screws attached at these
4 positions, then attach the mounting
arms to the TV. Keep the screws
supplied with the TV for use when not
using the Wall-Mount Bracket.
Rear of TV
Arrow must face out prior
to installation
Securing the mounting
arms.
Rear of TV
A
I
E
Remove the screws attached at
these 4 positions, then attach the
mounting arms to the TV. Keep
the screws supplied with the TV
for use when not using the Wall-
Mount Bracket.
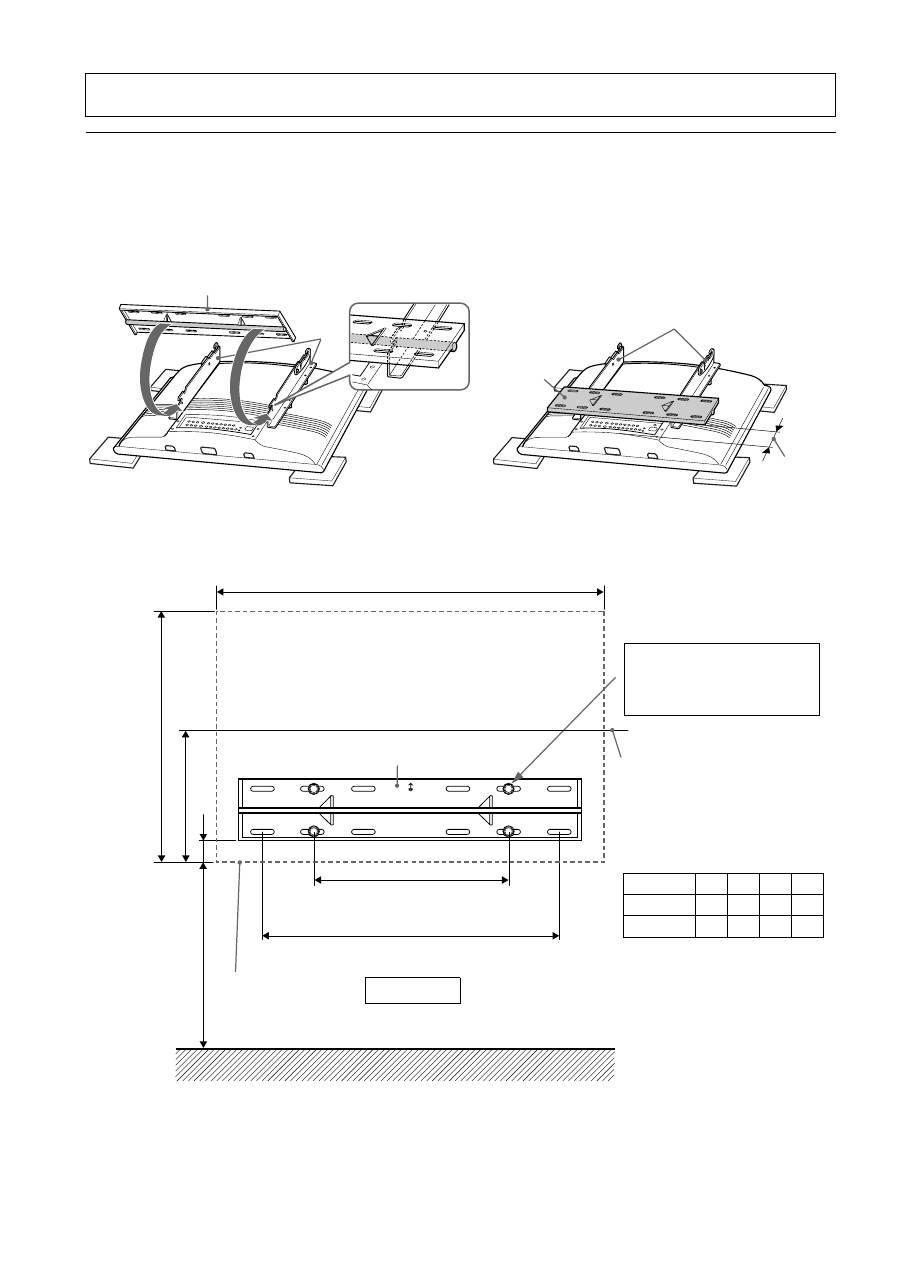
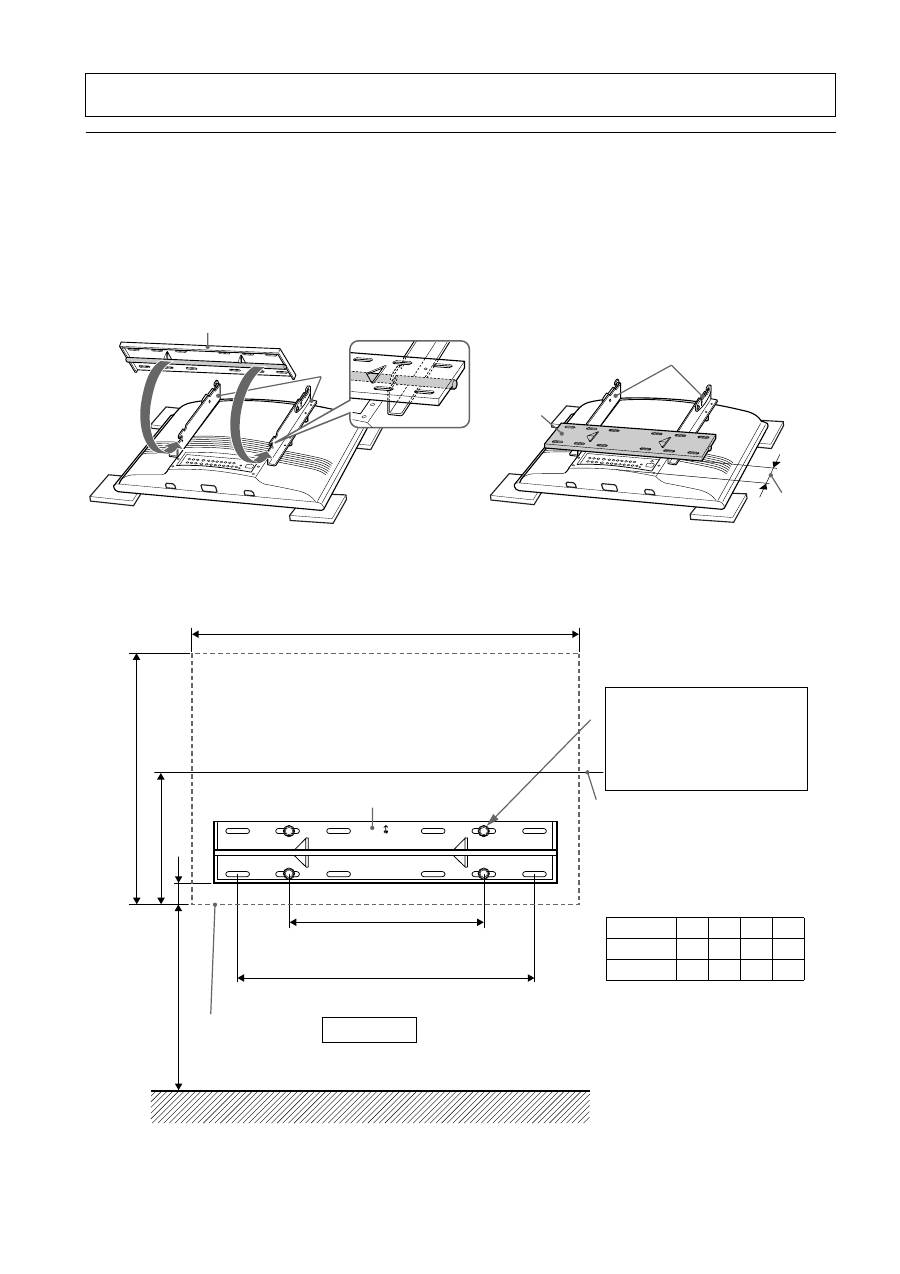
6 Step 4: Fasten Lower Mount Wall Brackets (Example for securing to a wood wall)
The mount wall brackets (
B
) must be secured to the wall capable of supporting at least four (4) times the weight of the unit (KZ-32TS1E
25.5 kg
×
4 = 102 kg, KZ-42TS1E 37 kg
×
4 = 148 kg). To determine the centre viewing height of the TV:
1
Temporarily position the rod of the lower mount wall bracket (
B
) to the bottom hook of the secured mounting arms
(
A
) and determine and note the distance between the bottom of the TV to the bottom of the mount wall bracket (
A
).
2
Measure the distance from the floor to where the bottom of the TV will be (Example 1500 mm). Add the noted
distance to the 1500 mm mark and mark your first securing points (Example 1500 mm + 70 mm = 1570 mm). Level
and secure the bottom mount wall bracket (
B
) with four (4) lag bolts and flat washers (not supplied).
Caution
Install the unit by the proper installation procedure for the wall material and structure.
B
A
A
B
Measure
and note
B
Wall structure
Lag bolts and flat washers (not
supplied)
Caution
• Use the proper screws for the wall
material and structure.
• Must secure to the wall.
Floor line
TV line
Reference Dimensions
unit: mm
A
B
C
D
KZ-32TS1E
70
310
568
856
KZ-42TS1E
120
380
707 1056
1500 mm
D
C
B
A
406 mm
610 mm
Center of a screen
7
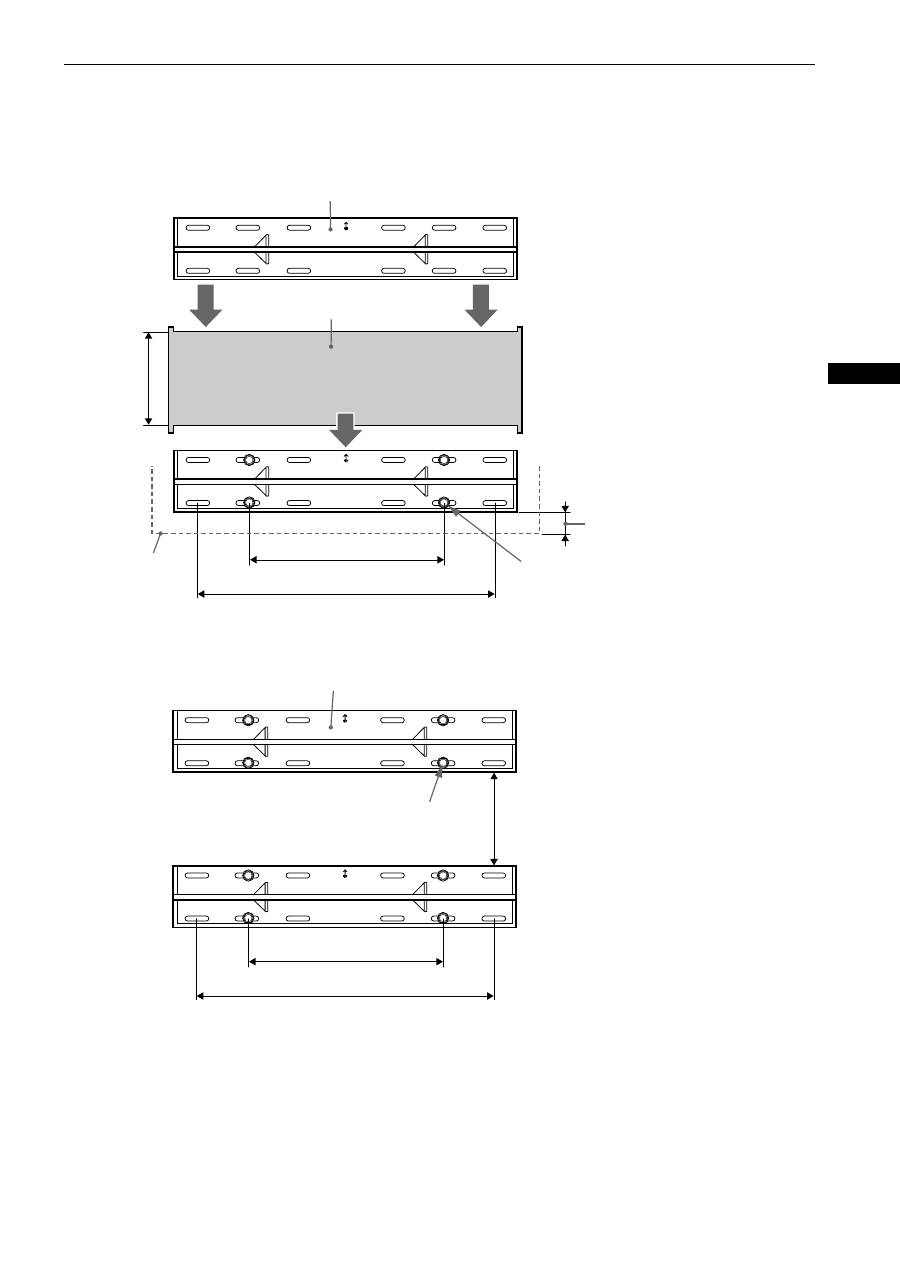
GB
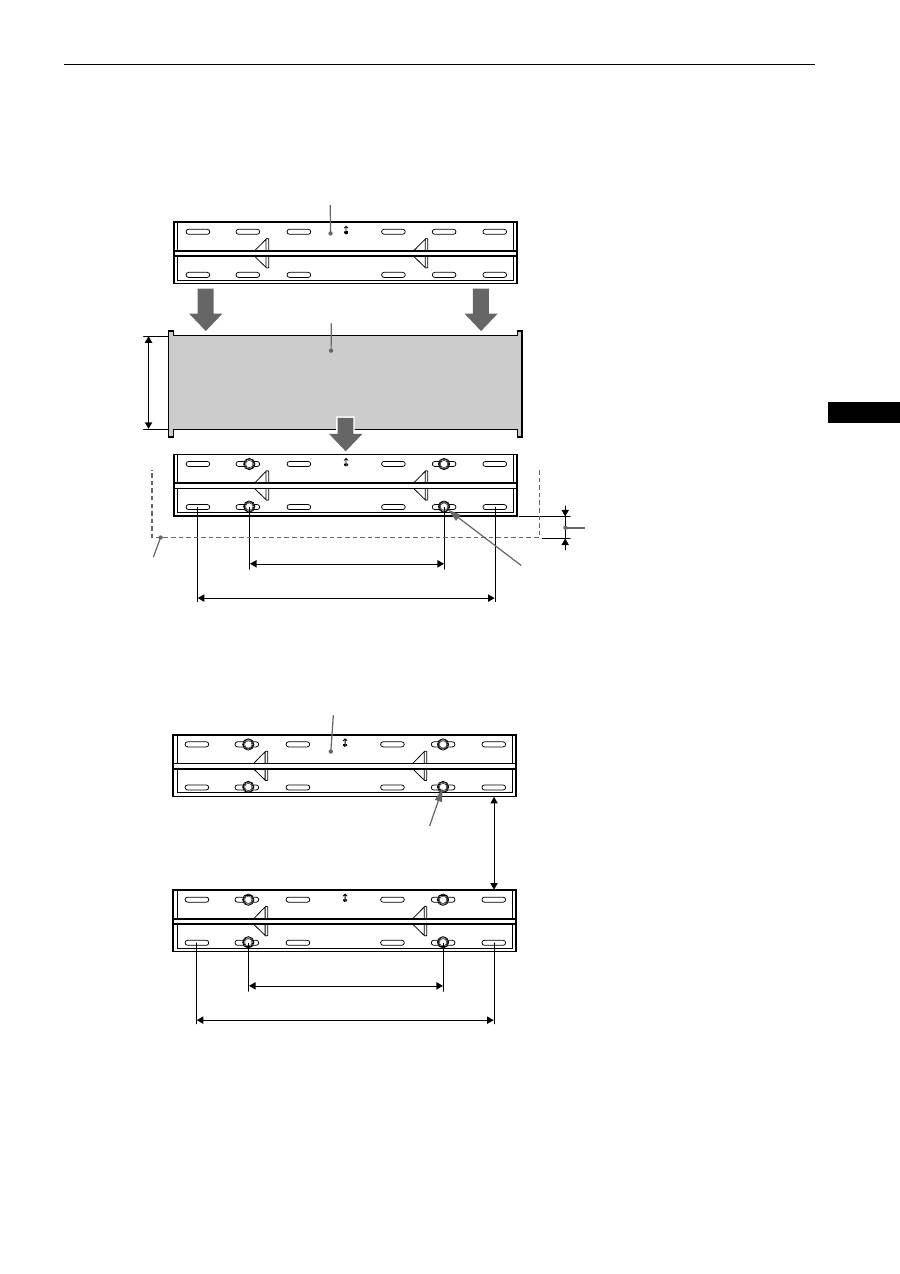
Step 5: Secure Upper Mount Wall Brackets
1
With the lower mount wall bracket secured to the wall structure, place the supplied cardboard template (
C
) over
the top outside edges of the lower mount wall bracket. Place the bottom and outside edges of the upper mount
wall bracket (
B
) into the top portion of the cardboard template (
C
) and mark the second set of securing points for
the upper mount wall bracket (
B
).
2
Secure the upper mount wall bracket (
B
) with the four (4) lag bolts and flat washers (not supplied). The mount wall
bracket must be secured to wall capable of supporting at least four (4) times the weight of the unit. The distance
between the two mount wall brackets should end up at 230mm.
B
C
Set on top of cardboard template (
C
)
and secure.
Set on top of secured lower mount wall
bracket.
Lab bolts and flat
washers (not supplied)
406 mm
610 mm
230 mm
TV line
Dimension noted in Step1 of “Step4:
Fasten Lower Mount Wall Brackets” on
page 6.
B
Lab bolts and flat washers
(not supplied)
230 mm
406 mm
610 mm
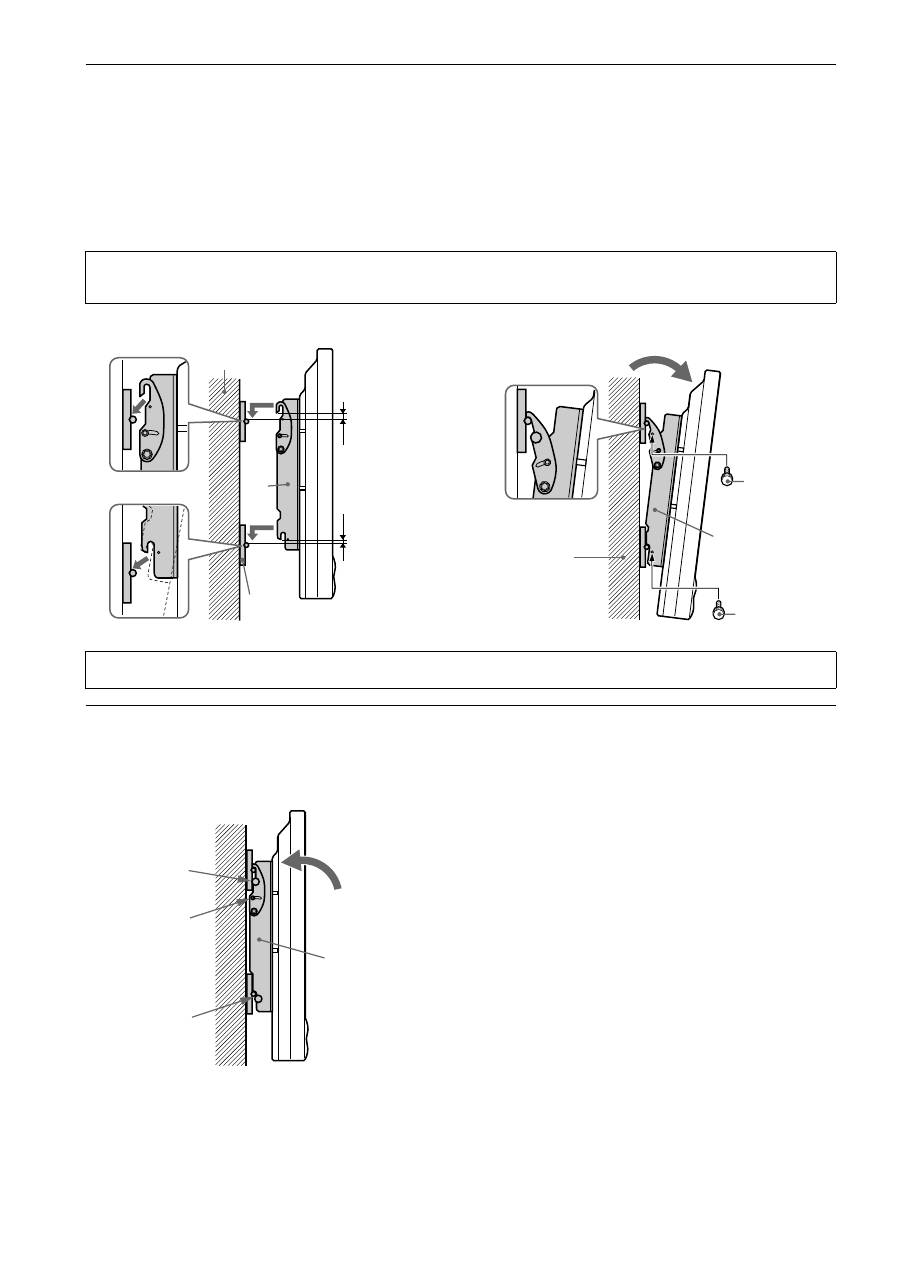
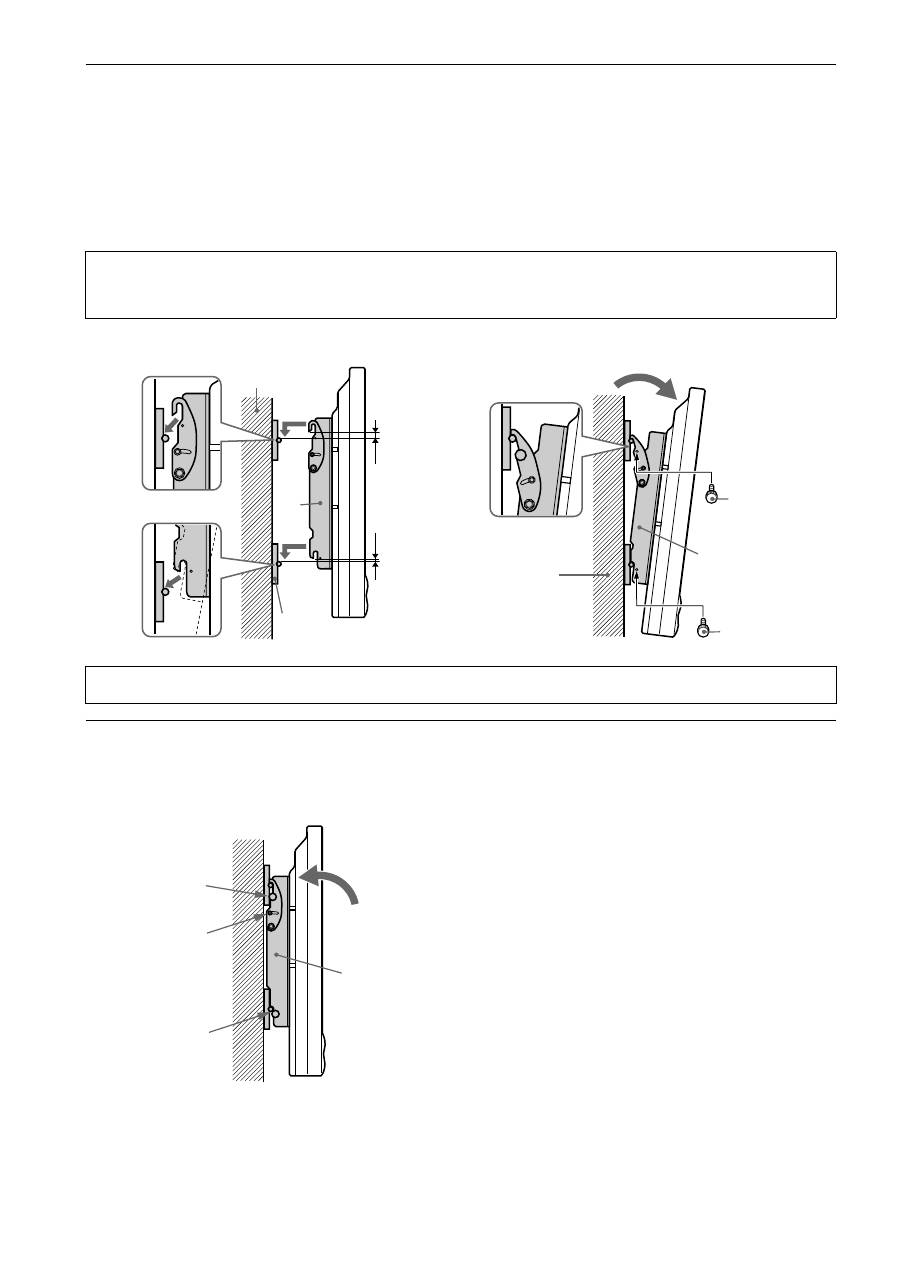
8 Step 6: Mount the TV to the Mount Wall Brackets
1
With the upper tilt hooks on the mounting arms (
A
) in the flat position, raise the TV with mounting arms (
A
)
attached (2 people minimum recommended) and place the TV flat against wall with the upper and lower mounting
arms (
A
) attaching slots slightly higher than the steel receiving rods of the upper and lower mount wall brackets
(
B
).
2
With the TV reasonably level, lower the TV until the mounting arms (
A
) receiving slots are fully installed into the
upper and lower mount wall brackets (
B
) steel rods. Gently pull the left and right upper edges of the TV to extend
the mount to its maximum 10° tilt and install the four 6 mm safety knobs (
D
) on each mounting arm (
A
) for
security.
Step 7: Adjust Tension
Tension:
To adjust the tilting tension, tighten the 5 mm screws on both sides of the brackets.
Note
To remove the TV from the wall, simply extend the TV to its maximum tilt range, remove the four 6 mm safety knobs (
D
) push the TV back to its flat
wall position and lift the unit up and out from the wall.
Wall structure
Cl
e
a
rance
A
B
A
Wall structure
D
Safety knob
D
Safety knob
Caution
Be sure to install the four safety knobs (
D
) to prevent the TV from falling down.
D
M5 tension
screw
D
A
9
GB
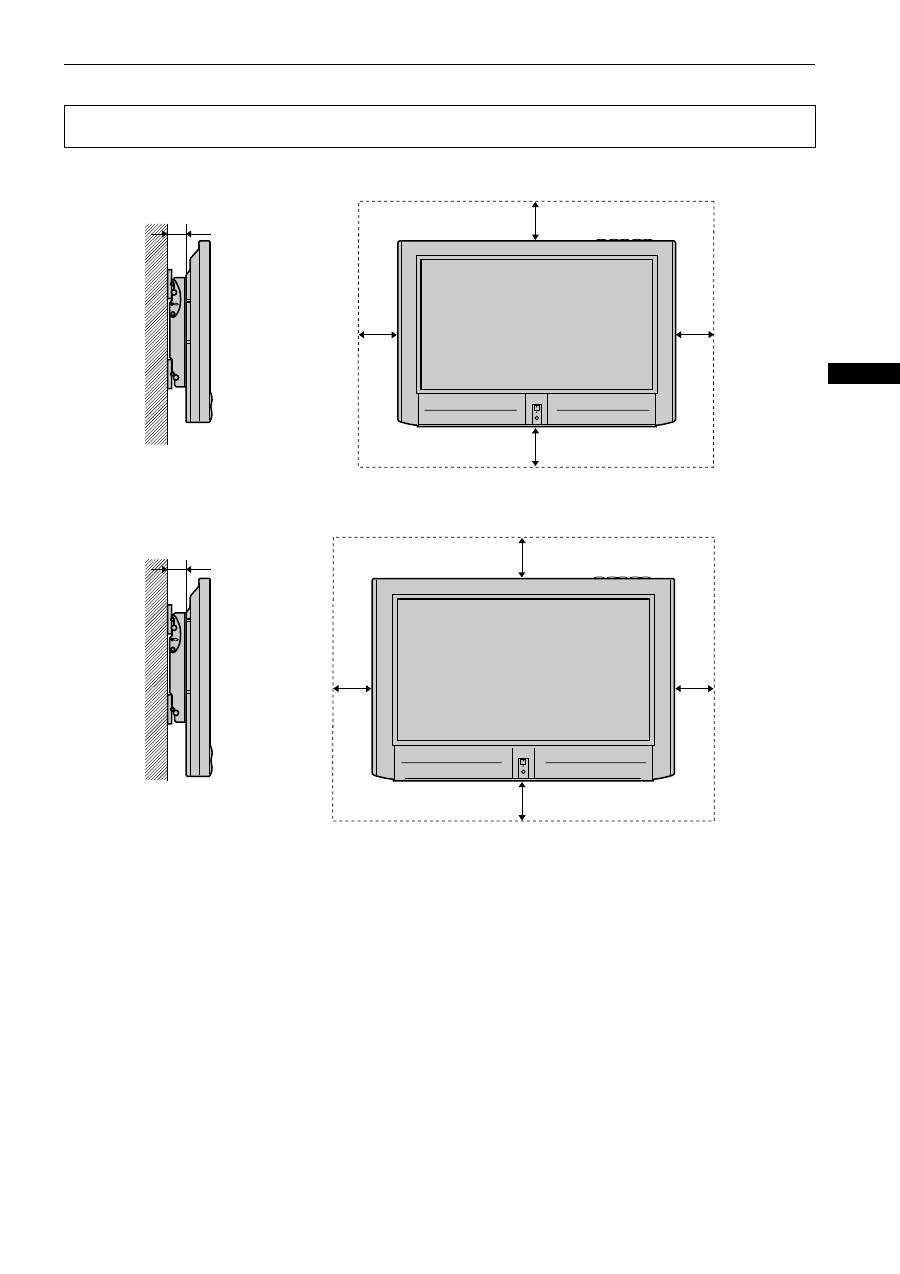
Proper Ventilation
KZ-32TS1E
KZ-42TS1E
CAUTION
When installing the TV, space should be maintained for proper ventilation of the TV unit.
70 mm
100 mm
100 mm
100
mm
100
mm
80 mm
100 mm
100 mm
100
mm
100
mm
2
Wichtiger Hinweis für Endkunden
Dieses Installationshandbuch richtet sich an den Händler
bzw. den autorisierten Kundendienst. Installieren Sie das
Gerät auf keinen Fall selbst. Andernfalls besteht die
Gefahr schwerer Verletzungen.
Wenden Sie sich zur Installation dieses Geräts bitte an
einen Händler oder einen autorisierten Kundendienst. Der
Hersteller übernimmt keine Haftung für Verletzungen bzw.
Sachschäden, die durch unsachgemäßen Umgang mit dem
Gerät oder eine fehlerhafte Installation entstehen. Ihre
gesetzlichen Rechte, sofern vorhanden, werden davon
nicht berührt.
Hinweis für den Händler und den
autorisierten Kundendienst
Lesen Sie dieses Handbuch bitte unbedingt sorgfältig
durch, damit Sie das Gerät sicher installieren können.
Der Hersteller übernimmt keine Haftung für Verletzungen
bzw. Sachschäden, die durch unsachgemäßen Umgang
mit dem Gerät oder eine fehlerhafte Installation entstehen.
Ihre gesetzlichen Rechte, sofern vorhanden, werden davon
nicht berührt.
Sicherheitsmaßnahmen
Wandmontageschienen für KZ-32TS1E/
KZ-42TS1E
Lesen Sie die folgenden Sicherheitshinweise vor der
Installation durch.
Gefahr
Wenn Sie die Anweisungen nicht
beachten, kann es zu schweren
Verletzungen oder Schäden am Gerät
kommen.
Installation
• Lesen Sie vor der Installation des Geräts dieses
Handbuch und die Bedienungsanleitung zu dem
Fernsehgerät sorgfältig durch und installieren Sie das
Gerät ordnungsgemäß.
• Befolgen Sie die Anweisungen unbedingt genau, um eine
sichere und stabile Installation zu gewährleisten.
• Richten Sie sich bei der Installation der
Wandmontageschiene nach dem Material und der
Struktur der Wand. Wenn bei der Montage die
Beschaffenheit der Wand nicht angemessen
berücksichtigt wird, kann das Fernsehgerät
herunterfallen. Dabei besteht die Gefahr von
Verletzungen bzw. Schäden am Fernsehgerät.
• Die Wand muss eine Tragfähigkeit von mindestens dem
Vierfachen (4) des Gewichts des Fernsehgeräts
aufweisen (KZ-32TS1E: 25,5 kg
×
4 = 102 kg,
KZ-42TS1E: 37 kg
×
4 = 148 kg).
• Beim Einhängen des Fernsehgeräts in die
Wandmontageschiene müssen mindestens zwei
Personen mitarbeiten. Wenn eine einzelne Person
versucht, das Fernsehgerät einzuhängen, kann dieses
herunterfallen. Dabei besteht die Gefahr von
Verletzungen bzw. Schäden am Fernsehgerät.
• Verändern Sie nichts an der Wandmontageschiene.
Verwenden Sie die Wandmontageschiene ausschließlich
in der angegebenen Art und Weise.
• Trennen Sie das Netzkabel des Fernsehgeräts von der
Netzsteckdose, bevor Sie das Fernsehgerät installieren.
Wird das Fernsehgerät mit eingestecktem Netzkabel
installiert, besteht Feuergefahr und die Gefahr eines
elektrischen Schlags.
• Verwenden Sie ausschließlich die mitgelieferten
Schrauben und Montageteile.
• Es werden keine Schrauben zum Anbringen der
Wandmontageschiene an der Wand mitgeliefert.
Verwenden Sie für Material und Struktur der Wand
geeignete Schrauben.
• Gehen Sie bei der Montage in der Reihenfolge vor, die in
den Anweisungen vorgegeben ist.
• Ziehen Sie alle Schraubenbolzen und Schrauben fest an.
• Achten Sie darauf, dass das Fernsehgerät bei der
Installation nicht durch Stöße beschädigt wird.
• Beachten Sie die folgenden Anweisungen, um einen
einwandfreien Betrieb des Fernsehgeräts zu
gewährleisten und Störungen zu vermeiden.
– Installieren Sie das Fernsehgerät ausschließlich an
einer vertikalen, ebenen Wand.
– Um Feuergefahr und die Gefahr eines elektrischen
Schlags zu vermeiden, setzen Sie das Fernsehgerät
weder Regen noch sonstiger Feuchtigkeit aus.
– Blockieren Sie nicht die Lüftungsöffnungen am
Fernsehgerät. Lassen Sie um das Fernsehgerät
mindestens 10 cm (100 mm) frei, um eine
ausreichende Belüftung zu gewährleisten.
– Stellen Sie das Fernsehgerät nicht in heißer, feuchter
oder übermäßig staubiger Umgebung auf. Stellen Sie
das Fernsehgerät nicht an Orten auf, an denen es
mechanischen Vibrationen ausgesetzt ist.
– Um Feuergefahr zu vermeiden, halten Sie brennbare
Materialien bzw. offenes Feuer (z. B. Kerzen) vom
Fernsehgerät fern.
– Blockieren Sie die Lüftungsöffnungen am Fernsehgerät
nicht mit Vorhängen, Zeitungen usw.
– Stellen Sie das Fernsehgerät nicht über oder unter
einer Klimaanlage auf.
– Achten Sie darauf, dass keinerlei Flüssigkeit in das
Fernsehgerät gelangt.
Nach der Installation
• Entfernen Sie nach der Montage des Fernsehgeräts
keine Abdeckungen oder Schraubenbolzen.
• Wenn Sie das Gerät nach der Installation versetzen oder
seinen Neigungswinkel einstellen wollen, wenden Sie
sich bitte an einen Händler oder einen autorisierten
Kundendienst.
• Klettern Sie nach der Installation und Montage des
Geräts nicht auf das Gerät.
• Sichern Sie die Kabel nach Installation so, dass niemand
darüber stolpern und sich nichts darin verfangen kann.
• Wenn Sie die Wandmontageschiene zu einem späteren
Zeitpunkt von der Wand entfernen, bleiben die
Bohrlöcher sichtbar.
• Nach längerer Nutzung des Fernsehgeräts kann sich
durch die vom Fernsehgerät abgestrahlte Hitze die Wand
verfärben.
• Händigen Sie dieses Installationshandbuch nach der
Installation bitte an den Endkunden aus, damit dieser es
lesen und darin nachschlagen kann. Die im
Installationshandbuch enthaltenen Informationen werden
später eventuell benötigt, wenn das Fernsehgerät
abgenommen bzw. gewartet werden muss.
3
DE
Es empfiehlt sich, dieses Handbuch zunächst sorgfältig
durchzulesen, um sich mit dem Gerät und den korrekten
Installationsverfahren sowie den Sicherheitsmaßnahmen vertraut
zu machen. Heben Sie dieses Handbuch zum späteren
Nachschlagen leicht zugänglich auf.
MONTAGESTELLEN FÜR PLASMAMODELLE
KZ-32TS1E / KZ-42TS1E
Schritt 1: Überprüfen der gelieferten Teile
Überprüfen Sie die Lieferung nach dem Öffnen auf
Vollständigkeit.
Nur für KZ-32TS1E
Nur für KZ-42TS1E
HINWEIS
Während der Installation benötigen Sie die Pappschablone
(Artikel
C
in der Teileliste), um die Wandmontageschienen
im richtigen Abstand montieren zu können.
Werfen Sie die Pappschablone nicht vorher weg.
KZ-32TS1E
KZ-42TS1E
Links-/Rechts-
Kennzeichnung
A
Halterungsarm links und
rechts für das
Fernsehgerät
(KZ-32TS1E,
KZ-42TS1E)
................
1 Stück (links),
1 Stück (rechts)
Hinweis:
Die Montagestellen
unterscheiden sich je nach
Fernsehgerät. Die
Montagestellen für die
verschiedenen Modelle
entnehmen Sie bitte der
Abbildung.
B
Wandmontageschienen
...
2 Stück
C
Pappschablone für
präzise Montage der
Wandmontageschienen
im richtigen Abstand
(230 mm) ........... 1 Stück
D
Sicherungsschrauben,
6 mm
×
12 mm
.............
4 Stück
E
15-mm-Abstandsstücke
(Nylon) ............. 4 Stück
F
Abdeckplatte ..... 1 Stück
G
5 mm
×
40 mm
Kreuzschlitzschrauben
...
4 Stück
H
Abdeckwinkel ... 2 Stück
I
Kreuzschlitzschrauben,
4 mm
×
35 mm
.............
4 Stück
(R)
4-091-921-01
(L)
4-091-922-01
4-091-923-01
4-091-924-01
4-091-925-01
4-091-926-01
4-091-927-01
4-957-517-01
4-089-347-01
7-682-969-09

4 Schritt 2: Abnehmen des Ständers vom Fernsehgerät
1
Legen Sie das 32-Zoll-Modell (KZ-32TS1E) oder das 42-Zoll-Modell (KZ-42TS1E) auf 4 gepolsterte Unterlagen (nicht
mitgeliefert).
Legen Sie das Fernsehgerät waagrecht zum Boden so hin, dass die Vorderseite nach unten weist. Der Fuß/Ständer darf den Boden nicht
berühren.
2
Ziehen Sie den Fuß/Ständer aus dem Fernsehgerät heraus.
Beim KZ-32TS1E
Schneiden Sie unten an der Rückseite des Fernsehgeräts die 4 Stanzungen (sofern vorhanden) mit einem Schneidwerkzeug aus und
schleifen Sie die Öffnungen mit einer Reibahle so ab, dass die Öffnungen rund und glatt genug sind, um die Schrauben zu entfernen.
Beim KZ-42TS1E
An der Unterseite des Ständers am Fernsehgerät befinden sich die Schrauben, mit denen der Ständer befestigt ist. Lösen Sie alle
Schrauben, mit denen der Fuß am Fernsehgerät befestigt ist, mit einem Kreuzschlitzschraubenzieher mit magnetischer Spitze.
3
Nur beim KZ-32TS1E
Bringen Sie die Abdeckungen (
F
,
H
) an der Unterseite des Fernsehgeräts an.
KZ-32TS1E
So nehmen Sie den Ständer ab und bringen die
Abdeckungen an
KZ-42TS1E
So nehmen Sie den Ständer ab
1
Rückseite des
Fernsehgeräts
Nehmen Sie die
vier (4) Kappen
(sofern
vorhanden) vom
Chassis ab.
Ständer
Gepolsterte
Unterlagen
Lösen Sie die vier
(4) Schrauben.
Nehmen Sie
den Ständer
ab und
heben Sie
ihn auf.
2
Befestigen Sie die zwei
Abdeckwinkel (
H
) mit den zuvor
vom Ständer abgenommenen
M6-Schrauben.
Schließen Sie die
rechteckige Öffnung
mit der Abdeckplatte
(
F
).
3
Rückseite des Fernsehgeräts
Lösen Sie
die acht (8)
Schrauben.
Nehmen Sie den
Ständer ab und
heben Sie ihn
auf.
2
1
Gepolsterte
Unterlagen

5
DE
Schritt 3: Anbringen der Halterungsarme am Fernsehgerät
Sehen Sie in der Teileliste unter „Schritt 1: Überprüfen der gelieferten Teile“ auf Seite 3 in diesem Handbuch nach und legen Sie die
richtigen Teile bereit. Die Montagestellen an den Halterungsarmen (
A
) unterscheiden sich je nach Größe des Fernsehgeräts.
Siehe „MONTAGESTELLEN FÜR PLASMAMODELLE KZ-32TS1E / KZ-42TS1E“ auf Seite 3 in diesem Handbuch.
Legen Sie das Fernsehgerät mit der Vorderseite nach unten auf eine weiche ebene Fläche und suchen Sie die
Montagestellen an der Rückseite des Fernsehgeräts. Befestigen Sie den linken und den rechten Halterungsarm (
A
)
mit den Schrauben (
G
,
I
) am Fernsehgerät. Achten Sie darauf, dass die Schraube für den oberen Haken, die Mutter
und der Pfeil auf die Außenkanten des Fernsehgeräts weisen.
KZ-32TS1E
KZ-42TS1E
Vorsicht
Die Installation darf nur von einem Händler oder einem autorisierten Kundendienst ausgeführt werden. Überprüfen Sie vor der
Installation die Wandstruktur und die Tragfähigkeit der Wand, damit Sie das Gerät so installieren können, dass Unfälle ausgeschlossen
sind.
Hinweis
Ziehen Sie die Schrauben zum Befestigen der Halterungsarme nicht zu fest an. Andernfalls können die Gewinde am Fernsehgerät beschädigt werden.
Pfeil muss vor der Installation
nach außen weisen.
Befestigen der
Halterungsarme.
A
G
E
Lösen Sie die Schrauben an diesen
4 Stellen und bringen Sie dann die
Halterungsarme am Fernsehgerät
an. Bewahren Sie die mit dem
Fernsehgerät gelieferten Schrauben
auf. Sie benötigen sie, wenn Sie das
Gerät nicht mehr an der
Wandmontageschiene installieren
möchten.
Rückseite des
Fernsehgeräts
Pfeil muss vor der Installation
nach außen weisen.
Befestigen der
Halterungsarme.
Rückseite des
Fernsehgeräts
A
I
E
Lösen Sie die Schrauben an diesen
4 Stellen und bringen Sie dann die
Halterungsarme am Fernsehgerät
an. Bewahren Sie die mit dem
Fernsehgerät gelieferten Schrauben
auf. Sie benötigen sie, wenn Sie das
Gerät nicht mehr an der
Wandmontageschiene installieren
möchten.
6 Schritt 4: Befestigen der unteren Wandmontageschiene (Beispiel für Montage an einer Holzwand)
Wandmontageschienen (
B
) dürfen nur an einer Wand angebracht werden, die mindestens das Vierfache (4fache) des Gerätegewichts
tragen kann (beim KZ-32TS1E: 25,5 kg
×
4 = 102 kg, beim KZ-42TS1E: 37 kg
×
4 = 148 kg). So ermitteln Sie die richtige Montagehöhe
für das Fernsehgerät:
1
Hängen Sie die Haltestange an der unteren Wandmontageschiene (
B
) provisorisch in die unteren Haken der
bereits befestigten Halterungsarme (
A
) ein. Messen und notieren Sie den Abstand zwischen der Unterkante des
Fernsehgeräts und der Unterkante der Wandmontageschiene (
A
).
2
Messen Sie den Abstand vom Boden bis zu der Höhe, in der sich die Unterkante des Fernsehgeräts befinden soll
(Beispiel: 1.500 mm). Addieren Sie den notierten Abstand zu dem 1.500-mm-Wert und markieren Sie die ersten
Befestigungspunkte (Beispiel: 1.500 mm + 70 mm = 1.570 mm). Richten Sie die untere Wandmontageschiene (
B
)
waagrecht aus und befestigen Sie sie mit vier (4) Schraubenbolzen und Flachunterlegscheiben (nicht mitgeliefert).
Vorsicht
Verwenden Sie zur Installation des Geräts für das Material und die Struktur der Wand geeignete Befestigungen.
B
A
A
B
Messen und
notieren Sie
den Abstand.
B
Umriss des
Fernsehgeräts
Wand
406 mm
610 mm
A
1.500 mm
Boden
Mitte des Bildschirms
Schraubenbolzen und
Flachunterlegscheiben (nicht
mitgeliefert)
Vorsicht
• Verwenden Sie für Material und
Struktur der Wand geeignete
Schrauben.
• Bringen Sie die Schiene sicher an
der Wand an.
Referenzmaße
Einheit: mm
A
B
C
D
KZ-32TS1E
70
310
568
856
KZ-42TS1E 120
380
707 1056
D
C
B
7
DE
Schritt 5: Befestigen der oberen Wandmontageschiene
1
Wenn Sie die untere Wandmontageschiene sicher an der Wand angebracht haben, legen Sie die mitgelieferte
Pappschablone (
C
) an die oberen Außenkanten der unteren Wandmontageschiene an. Setzen Sie die Unten- und
Außenkanten der oberen Wandmontageschiene (
B
) an der Oberkante der Pappschablone (
C
) an und markieren
Sie die Befestigungspunkte für die obere Wandmontageschiene (
B
).
2
Befestigen Sie die obere Wandmontageschiene (
B
) mit vier (4) Schraubenbolzen und Flachunterlegscheiben
(nicht mitgeliefert). Die Wandmontageschiene muss an einer Wand befestigt werden, deren Tragfähigkeit
mindestens dem Vierfachen (4) des Gewichts des Geräts entspricht. Der Abstand zwischen den beiden
Wandmontageschienen muss 230 mm betragen.
B
C
Setzen Sie die Schiene an der Oberkante der
Pappschablone (
C
) an und befestigen Sie sie.
Setzen Sie die Schablone an der bereits
befestigten unteren Wandmontageschiene an.
Schraubenbolzen und
Flachunterlegscheiben (nicht mitgeliefert)
406 mm
610 mm
230 mm
Umriss des
Fernsehgeräts
Abstand, den Sie in Schritt 1 unter
„Schritt 4: Befestigen der unteren
Wandmontageschiene“ auf Seite 6
notiert haben.
B
Schraubenbolzen und
Flachunterlegscheiben (nicht mitgeliefert)
230 mm
406 mm
610 mm
8 Schritt 6: Einhängen des Fernsehgeräts in die Wandmontageschienen
1
Legen Sie die oberen Schrägstellhaken der Halterungsarme (
A
) flach an. Heben Sie das Fernsehgerät mit den
daran montierten Halterungsarmen (
A
) an (mindestens 2 Personen). Halten Sie das Fernsehgerät flach an die
Wand, so dass die oberen und unteren Haken an den Halterungsarmen (
A
) etwas höher liegen als die
Haltestangen der oberen und unteren Wandmontageschiene (
B
).
2
Halten Sie das Fernsehgerät möglichst waagrecht und senken Sie es dann ab, bis die Haken der Halterungsarme
(
A
) richtig in die Stahlstangen der oberen und unteren Wandmontageschiene (
B
) greifen. Ziehen Sie das
Fernsehgerät an der Oberkante links und rechts vorsichtig nach vorn, bis die maximale Neigung von 10° erreicht
ist, und bringen Sie an jedem Halterungsarm (
A
) vier 6-mm-Sicherungsschrauben (
D
) an.
Schritt 7: Einstellen der Neigungsspannung
Spannung:
Zum Einstellen der Neigungsspannung ziehen Sie die 5-mm-Schrauben auf beiden Seiten der Schienen an.
Hinweis
Um das Fernsehgerät von der Wand abzunehmen, ziehen Sie es einfach bis zur maximalen Neigung nach vorn. Entfernen Sie dann die vier 6-mm-
Sicherungsschrauben (
D
) und drücken Sie das Fernsehgerät wieder flach an die Wand. Danach können Sie das Gerät anheben und von der Wand
abnehmen.
Wand
A
b
st
ände
A
B
A
Wand
D
Sicherungsschraube
D
Sicherungsschraube
Vorsicht
Bringen Sie unbedingt die vier Sicherungsschrauben (
D
) an, um zu verhindern, dass das Fernsehgerät herunterfällt.
D
M5-
Spannschraube
D
A

9
DE
Belüftung
KZ-32TS1E
KZ-42TS1E
VORSICHT
Achten Sie bei der Installation des Fernsehgeräts auf genügend große Freiräume, um eine ausreichende Belüftung des Fernsehgeräts zu gewährleisten.
70 mm
100 mm
100 mm
100
mm
100
mm
80 mm
100 mm
100 mm
100
mm
100
mm
2
Para los usuarios
Este manual de instalación está dirigido a los proveedores
o al personal de servicio técnico autorizado. No instale
nunca la unidad por su cuenta. De lo contrario, podrían
producirse graves daños personales.
Consulte al proveedor o al personal de servicio técnico
autorizado para la instalación de esta unidad. Declinamos
cualquier responsabilidad por los daños o heridas
producidos por una manipulación incorrecta o una
instalación inadecuada. Sus derechos legales (en caso de
haberlos) no se ven afectados.
Para los proveedores o el personal de
servicio técnico autorizado
Para garantizar la seguridad de la instalación de la unidad,
lea atentamente este manual.
Declinamos cualquier responsabilidad por los daños o
heridas producidos por una manipulación incorrecta o una
instalación inadecuada. Sus derechos legales (en caso de
haberlos) no se ven afectados.
Precauciones de seguridad
Soporte mural de montaje para los
modelos KZ-32TS1E/KZ-42TS1E
Lea la siguiente información de seguridad antes de la
instalación.
Peligro
El incumplimiento de las instrucciones
puede provocar daños personales o en
la unidad.
Instalación
• Antes de instalar la unidad, lea atentamente este manual
y las instrucciones de funcionamiento del TV y realice la
instalación correctamente.
• Debe seguir las instrucciones rigurosamente para
realizar una instalación segura y estable.
• Instale los soportes murales de montaje mediante el
procedimiento de instalación adecuado en función del
material y la estructura de la pared. Si la instalación es
incorrecta, el televisor puede caerse al suelo,
produciendo daños personales o en el televisor.
• La pared debe soportar un peso de al menos cuatro (4)
veces el peso del TV (KZ-32TS1E 25,5 kg
×
4 = 102 kg,
KZ-42TS1E 37 kg
×
4 = 148 kg).
• La instalación de los soportes murales de montaje deben
realizarla al menos dos personas. Si lo intenta una
persona sola, el TV puede caer al suelo y producir daños
personales o en el TV.
• No modifique los componentes de los soportes murales
de montaje. No haga un uso inadecuado de dichos
soportes.
• Antes de instalar el TV, extraiga el enchufe de
alimentación del equipo de la toma de corriente. Si instala
el TV con el cable de alimentación enchufado en una
toma de corriente, pueden producirse descargas
eléctricas o un incendio.
• No utilice tornillos ni componentes diferentes a los
incluidos.
• Los tornillos que fijan los soportes murales de montaje no
están incluidos. Utilice los adecuados según el material y
la estructura de la pared.
• Realice el montaje correcto en el orden indicado.
• Apriete correctamente los tornillos en la posición
indicada.
• No golpee el TV durante la instalación.
• Cumpla los siguientes pasos para garantizar un correcto
rendimiento del TV y evitar cualquier problema.
– No instale el TV en una pared que no sea vertical.
– Para evitar descargas eléctricas e incendios, no
exponga el TV a la lluvia ni la humedad.
– No cubra los orificios de ventilación del TV. Para la
ventilación, mantenga un espacio de al menos 10 cm
(100 mm) alrededor del equipo.
– No coloque nunca el TV en lugares calurosos,
húmedos o excesivamente polvorientos. No instale el
TV en lugares expuestos a vibraciones mecánicas.
– Para evitar incendios, mantenga alejados del TV
cualquier objeto inflamable o llamas sin protección
(p. ej. velas).
– No cubra los orificios de ventilación del TV con
elementos como cortinas, periódicos, etc.
– No instale el TV sobre o bajo un aparato de aire
acondicionado.
– No derrame ningún líquido sobre el TV.
Después de la instalación
• No retire los refuerzos ni los tornillos después de montar
el TV.
• Consulte al proveedor o al personal de servicio técnico
autorizado para mover o cambiar la unidad, o ajustar el
ángulo de ésta después de la instalación.
• No se suba en la unidad una vez montada e instalada.
• Después de una correcta instalación, sujete los cables
para que nada ni nadie quede enredado.
• Si retira los soportes murales de montaje después de
instalarlos en la pared, los orificios de los tornillos
quedarán visibles.
• Si utiliza el televisor durante un período de tiempo
prolongado, es posible que el color de la pared se vea
afectado debido al calor que genera dicho televisor.
• Después de la instalación, proporcione este manual de
instalación al usuario para que pueda leerlo atentamente
y guardarlo para poder consultarlo en un futuro (para
mover o reparar el TV).
3
ES
Le recomendamos que lea atentamente este manual para
familiarizarse con el uso de la unidad, así como con su correcta
instalación y las precauciones de seguridad. Conserve este
manual en un lugar fácilmente accesible para poder consultarlo en
un futuro.
PUNTOS DE MONTAJE PARA LOS MODELOS DE
PLASMA KZ-32TS1E / KZ-42TS1E
Paso 1: Comprobación de los componentes
Compruebe que no falta ningún componente después de abrir el
embalaje.
Sólo KZ-32TS1E
Sólo KZ-42TS1E
NOTA
Durante la instalación, necesitará la plantilla de cartón
(Elemento
C
) de la lista de componentes para obtener una
separación adecuada de los soportes murales.
No deseche la plantilla de cartón antes de utilizarla.
KZ-32TS1E
KZ-42TS1E
indicación de derecha
(R) e izquierda (L)
A
Brazos de montaje
izquierdo y derecho para
el TV (KZ-32TS1E)
(KZ-42TS1E)
...............
1 pieza (izquierda),
1 pieza (derecha)
Nota:
Los puntos de montaje
dependen del modelo de
TV. Consulte el esquema
para conocer las
especificaciones de los
puntos de montaje.
B
Soportes murales de
montaje ............. 2 piezas
C
Plantilla de cartón para
obtener una separación
exacta de 230 mm en los
soportes murales
............
1 pieza
D
Tornillos de seguridad de
6 mm
×
12 mm
.............
4 piezas
E
Separadores de nylon de
15 mm ............. 4 piezas
F
Placa de cobertura
.........
1 pieza
G
Tornillos Phillips de
5 mm
×
40 mm
.............
4 piezas
H
Cubiertas .......... 2 piezas
I
Tornillos Phillips de
4 mm
×
35 mm
.............
4 piezas
(R)
4-091-921-01
(L)
4-091-922-01
4-091-923-01
4-091-924-01
4-091-925-01
4-091-926-01
4-091-927-01
4-957-517-01
4-089-347-01
7-682-969-09
4 Paso 2: Desmontaje de los soportes del TV
1
Coloque el modelo de 32” (KZ-32TS1E) o de 42” (KZ-42TS1E) sobre 4 soportes acolchados (no incluidos).
La pantalla del TV debe situarse hacia abajo, paralela con el suelo. La base/soporte no debe tocar el suelo.
2
Extraiga la base/soporte del TV.
En el modelo KZ-32TS1E
En la parte inferior del panel posterior del TV, recorte las 4 tapas del panel posterior (si las hay) mediante unas tijeras adecuadas y raspe
las rebabas de plástico con un escariador, para que el orificio sea lo suficientemente redondo y liso como para poder retirar un tornillo.
En el modelo KZ-42TS1E
En la parte inferior del soporte del TV, se encuentran los tornillos que lo sujetan. Mediante un destornillador magnético (Phillips), retire
los tornillos que sujetan el soporte al TV.
3
Sólo KZ-32TS1E
Instale las cubiertas (
F
,
H
) en la parte inferior del televisor.
KZ-32TS1E
Desmontaje del soporte y montaje de las
cubiertas
KZ-42TS1E
Desmontaje del soporte
1
Parte posterior del TV
Retire las
cuatro (4) tapas
del chasis
(si las hubiera).
Soporte
Soporte
acolchado
Retire los cuatro
(4) tornillos.
Retire el
soporte y
guárdelo.
2
Fije las dos cubiertas (
H
) mediante
M6, retirado anteriormente del soporte
del TV.
Cierre el orificio
rectangular mediante la
placa de cobertura (
F
).
3
Parte posterior del TV
Retire los ocho
(8) tornillos.
Retire el soporte y
guárdelo.
2
1
Soporte
acolchado
