Sony CPD-120AS: instruction
Class: Computer equipment, hardware, accessories
Type: Monitor
Manual for Sony CPD-120AS
Table of contents
- Owner’s Record
- Table of Contents
- Introduction Plug and play
- Precautions Maintenance Transportation
- Warning on Power Connection
- Functions of Controls
- Functions of Controls
- Functions of Controls
- Getting Started Installation p Step 1: Connect the computer
- p CPD-120AS p CPD-220AS
- p Step 2: Connect the power cord p Step 3: Turn on the display and computer. p Step 4: If necessary...
- Using Your Display Preset and user modes
- Using the tilt-swivel
- Damper wire
- Adjustments Adjusting volume
- Adjusting the picture contrast
- Adjusting the picture brightness
- Adjusting the picture centering
- Adjusting the picture size
- Adjusting the picture rotation
- Adjusting the pincushion
- Setting the color temperature
- Resetting
- Available Features Selecting Graphic Picture Enhancement (GPE)
- Selecting Bass Boost
- Power Saving Function
- Specifications
- Troubleshooting
- Troubleshooting
- Troubleshooting

3-861-348-11 (1)
Trinitro
Trinitron
Multimedia
n
Multimedia Computer Display
Computer Display
GB
Operating Instructions
F
Mode d’emploi
D
Bedienungsanleitung
ES
Manual de instrucciones
I
Istruzioni per l’uso
RF
Инструкция по эксплуатации
CPD-120AS
CPD-220AS
1997 by Sony Corporation
Owner’s Record
The model and serial numbers are located
at the rear of the unit. Record the serial
number in the space provided below. Refer
to these numbers whenever you call upon
your dealer regarding this product.
Model No. CPD-120AS/220AS
Serial No.
WARNING
To prevent fire or shock hazard, do
not expose the unit to rain or
moisture.
Dangerously high voltages are
present inside the set. Do not open
the cabinet. Refer servicing to
qualified personnel only.
As an ENERGY STAR Partner, Sony
Corporation has determined that this
product meets the ENERGY STAR
guidelines for energy efficiency.
GB
2

Table of Contents
Introduction .................................................................................4
Plug and play............................................................................................... 4
Precautions................................................................................... 5
Functions of Controls ..................................................................7
Getting Started ..........................................................................10
Installation ................................................................................................. 10
Using Your Display .................................................................... 13
Preset and user modes.............................................................................. 13
Using the tilt-swivel.................................................................................. 14
Damper wire .............................................................................................. 15
Adjustments...............................................................................16
GB
Adjusting volume ..................................................................................... 16
Adjusting the picture contrast................................................................. 17
F
Adjusting the picture brightness ............................................................ 18
D
Adjusting the picture centering .............................................................. 19
ES
Adjusting the picture size ........................................................................ 20
Adjusting the picture rotation................................................................. 21
I
Adjusting the pincushion ........................................................................ 22
RF
Setting the color temperature .................................................................. 23
Resetting ..................................................................................................... 24
Available Features .....................................................................25
Selecting Graphic Picture Enhancement (GPE) .................................... 25
Selecting Bass Boost .................................................................................. 26
Power Saving Function .............................................................27
Specifications ............................................................................. 28
Troubleshooting.........................................................................30
GB
3

Introduction
Congratulations on your purchase of a Sony Multiscan CPD-120AS/
220AS display!
This display incorporates over 25 years of Sony experience with Trinitron
display technology, ensuring excellent performance and outstanding
reliability.
This display’s wide scan range (30 – 70 kHz), together with Digital
Multiscan Technology, allows it to sync to any video mode from
standard VGA through VESA 1024 × 768 at 85 Hz (VESA 1280 × 1024 at
60 Hz).
In addition, its two factory preset color modes and one user adjustable
color mode gives you unprecedented flexibility in matching on-screen
colors to hard copy printouts.
Furthermore, it features:
• Graphic Picture Enhancement function
enabling you to create pictures for the multi-media sources.
• Bass Boost Function
enabling you to select sound quality according to the source.
• Excellent sound reproduction
via a 10 W sub-woofer and two 3.5 W tweeter speakers.
All together, CPD-120AS/220AS delivers incredible performance with
the quality and support you can expect from Sony.
Plug and play
This display complies with the DDC™1 and DDC2B which are the
Display Data Channel (DDC) standards of VESA.
When a DDC1 host system is connected, the display synchronizes with
the V. CLK in accordance with the VESA standards and outputs the
EDID (Extended Display Identification Data) to the data line.
When a DDC2B host system is connected, the display automatically
switches to DDC2B communication.
DDC™ is a trademark of Video Electronics Standard Association.
GB
Introduction
4

Precautions
Installation
• Prevent internal heat build-up by allowing adequate air circulation.
Do not place the unit on surfaces (rugs, blankets, etc.) or near
materials (curtains, draperies) that may block the ventilation holes.
• Do not install the unit near heat sources such as radiators or air ducts,
nor in a place subject to direct sunlight, excessive dust, mechanical
vibration or shock.
• Do not place the unit near equipment which generates magnetism,
such as a converter or high voltage power lines.
Maintenance
• Clean the cabinet, glass panel and controls with a soft cloth lightly
moistened with a mild detergent solution. Do not use any type of
abrasive pad, scouring powder or solvent, such as alcohol or benzine.
• Do not rub, touch, or tap the surface of the screen with sharp or
abrasive items, like a ball point pen or a screwdriver, as this type of
contact may result in a scratched picture tube.
Transportation
• Do not discard the carton and packing materials. When transporting
the unit, use these packing materials so that the unit is properly
packaged.
• When carrying the unit, pay attention not to get your hands caught
between the display and the tilt-swivel.
Continued to the next page ➔
Precautions
GB
5
Warning on Power Connection
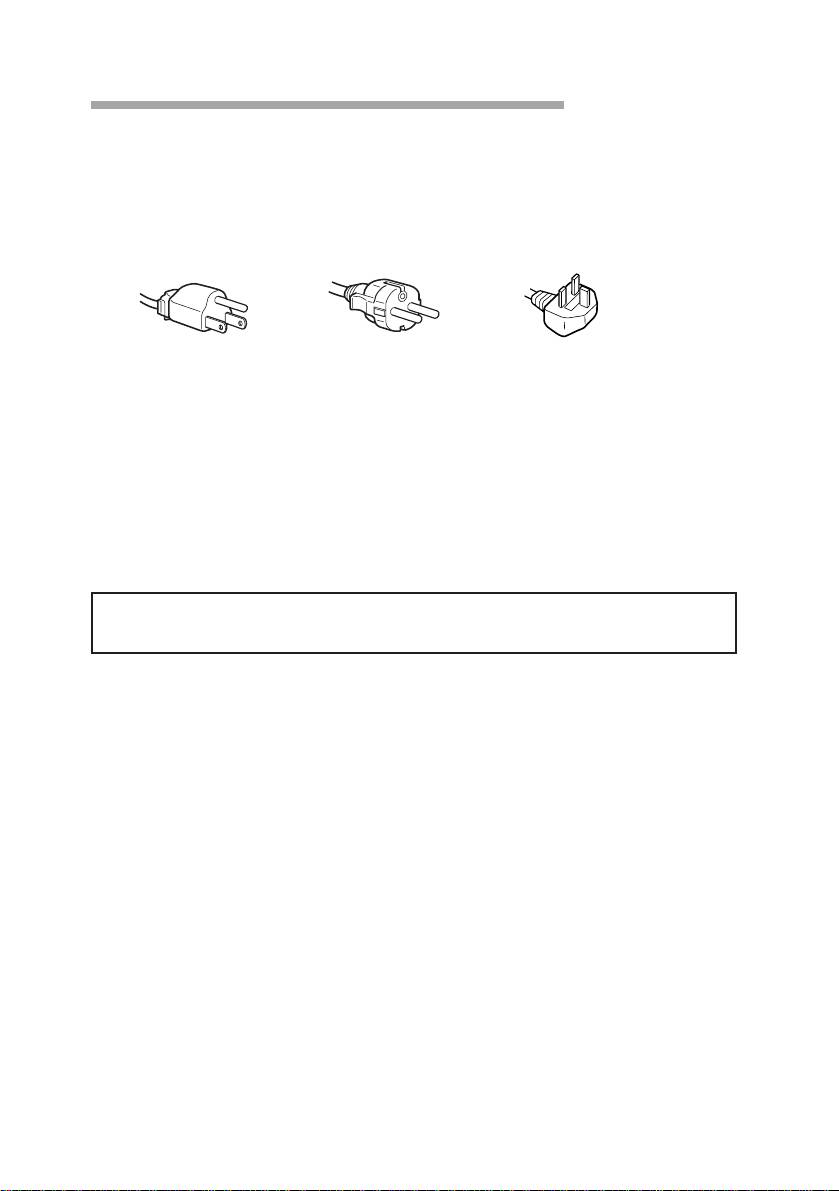
• Use the supplied power cord.
For the customers in UK.
If you use the display in UK, please use the supplied UK cable with
UK plug.
for 100 to 120 V AC for 220 to 240 V AC for 240 V AC only
• Before disconnecting the power cord, wait at least 30 seconds after
turning off the power switch to discharge static electricity from the
CRT display surface.
• After the power has been turned on, the CRT is demagnetized for
approximately 5 seconds. This generates a strong magnetic field
around the bezel which may affect the data stored on magnetic tape or
disks near the bezel. Place such magnetic recording equipment and
tapes/disks at a distance from this unit.
The socket-outlet shall be installed near the equipment and shall be
easily accessible.
GB
Precautions
6
Functions of Controls
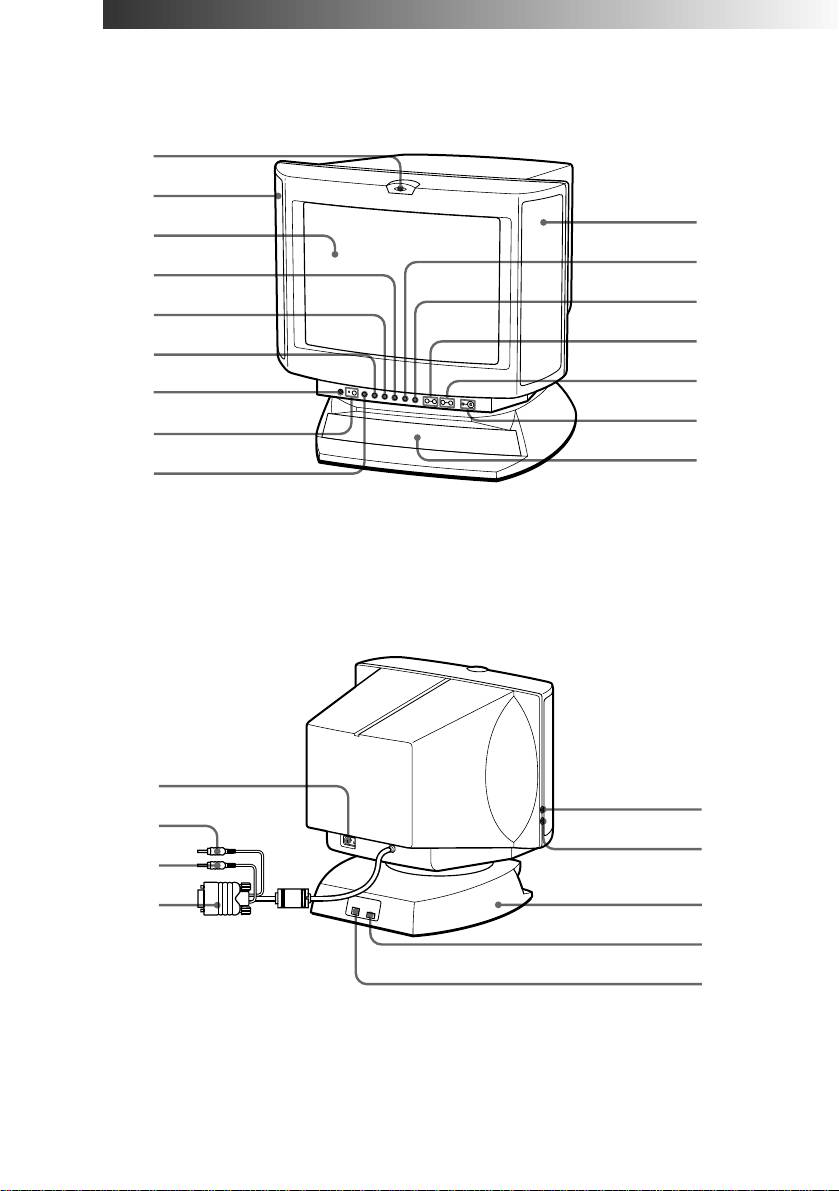
Front
1
2
2
3
!º
4
!¡
5
!™
6
!£
7
!¢
8
!∞
9
Rear
p CPD-120AS
!§
@™
!¶
@¡
!•
!ª
@£
@º
@¢
Continued to the next page ➔
Functions of Controls
GB
7
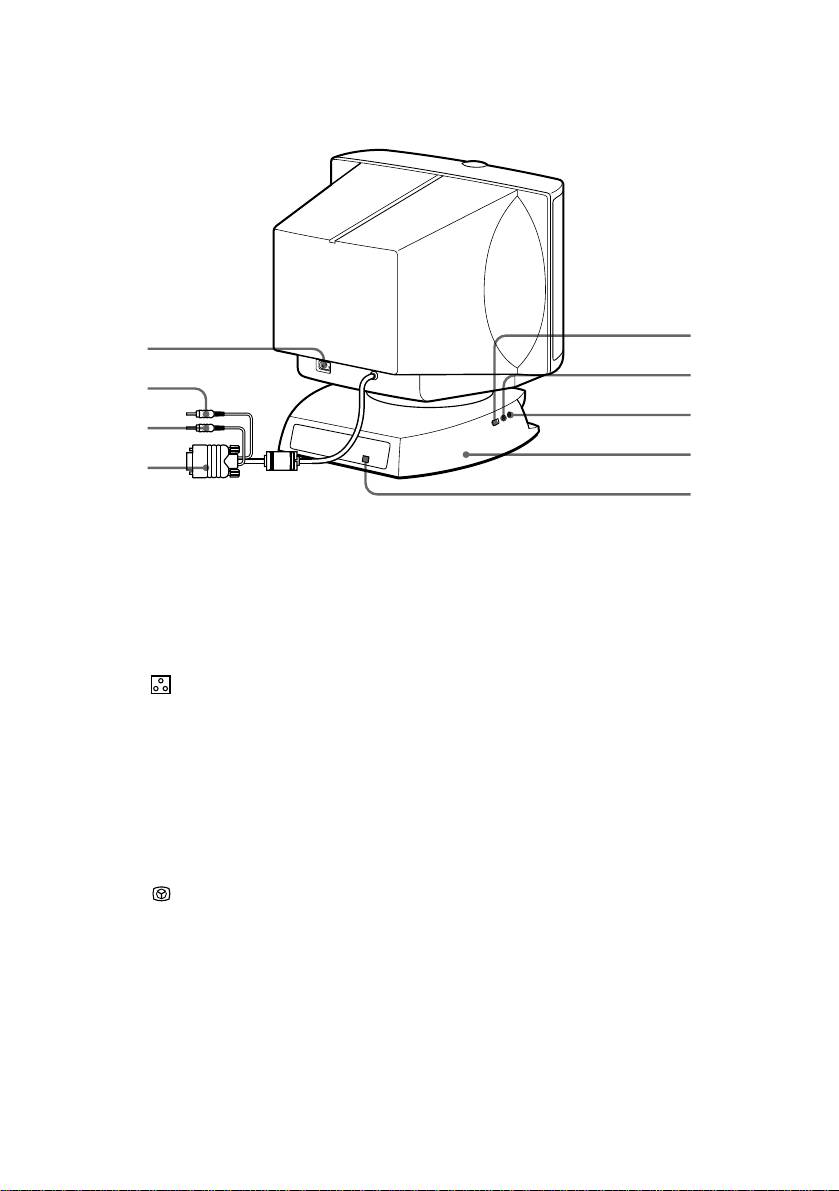
p CPD-220AS
@º
!§
@¡
!¶
@™
!•
@£
!ª
@¢
1
Microphone
The internal microphone is turned off when an
external microphone is connected.
2
Main speaker
—
3
Display
Displays OSD when adjusting.
4
Å Size button
Adjusts picture size (page 20).
5
d Geometry button
Adjusts pincushion and rotation (pages 21, 22).
6
Color
Adjusts color temperature (page 23).
temperature button
? Reset switch
Resets adjustments to factory setting (page 24).
7
¤ Mute button and
Mutes sound (page 17).
8
indicator
≥ Volume/Bass
Adjusts speaker volume or selects bass boost
9
boost button
mode (page 26).
S Centering
Adjusts picture centering (page 19).
!º
button
Brightness/GPE
Adjusts picture brightness or selects GPE mode
!¡
button
(page 25).
. Volume –/+
Adjusts speaker volume (page 16).
!™
buttons
The default setting of the volume level is 30 %.
> –/+ Contrast
Adjusts picture contrast (page 17).
!£
button
!¢
u Power switch
Turns on and off the display.
and indicator
!∞
Sub woofer
—
GB
Functions of Controls
8

!§
AC IN connector
Connect the supplied power cord (page 12).
!¶
2 Audio plug (green)
Connect to the computer’s speaker output
(page 11).
!•
h MIC plug (red)
Connect to the computer’s microphone input
(page 11).
!ª
; Video signal cable
Connect to the computer’s video output
(blue)
(page 11).
@º
USB downstream
Connect to a USB device (page 11).
connector
@¡
h Microphone jack
Connect a microphone (not supplied).
@™
2 Headphones jack
Connect headphones (not supplied). The
speakers are turned off when headphones are
connected.
@£
Tilt-Swivel
Adjusts the angle of the display (page 14).
@¢
USB upstream
Connect to the computer’s USB ports when
connector
using a USB (universal serial bus) device
connected to the display (page 11).
Functions of Controls
GB
9

Getting Started
Before using this display, please make sure that the following items are
included in your package:
• Multimedia computer display (1)
• Warranty card (1)
• Operating instruction manual (1)
• Windows 95 Monitor Information Disk and its instruction manual (1)
✎ Tip
1)
This display will sync with any IBM or compatible system equipped with VGA
or greater
graphics capability. Although this display will sync to other platforms running at horizontal
2)
frequencies between 30 and 70 kHz, including Macintosh
and Power Macintosh systems, a
cable adapter is required. Please consult Sony Technical Support for advice on which adapter is
suitable for your needs.
1) VGA is a trademark of IBM Corporation.
2) Macintosh is a trademark of Apple Computer Inc.
Installation
p Step 1: Connect the computer
With the computer switched off, connect the video signal cable to the
display (VGA) connector on your computer. If your computer supports
the DDC plug-and-play standard, this connection will enable the DDC
communication between the display and the computer.
Also the video signal cable is combined with audio and microphone
cables. If your computer is equipped with sound capability, connect the
audio and microphone plugs to appropriate jacks located on your
computer.
If you use a USB (universal serial bus) device, connect the USB device to
the USB downstream jack and the PC to the USB upstream jack.
GB
Getting Started
10

p CPD-120AS
Computer
to USB port
Blue (to display
connector)
Green (to speaker
connector)
Red (to microphone
connector)
to
p CPD-220AS
Computer
to USB port
Blue (to display
connector)
Green (to speaker
connector)
Red (to microphone
connector)
to
✔Note on handling the video signal cable
Do not touch the pins of the video signal cable.
✔Note on USB ports
USB ports are included to provide state-of-the-art technology. Until USB support is
available at the operating system level, you must supply drivers to use USB devices. You
can upgrade your operating system to a version that supports USB at the operating system
level once a version becomes available.
See the manual that came with your USB device for more information on setting it up and
using it.
Continued to the next page ➔
Getting Started
GB
11
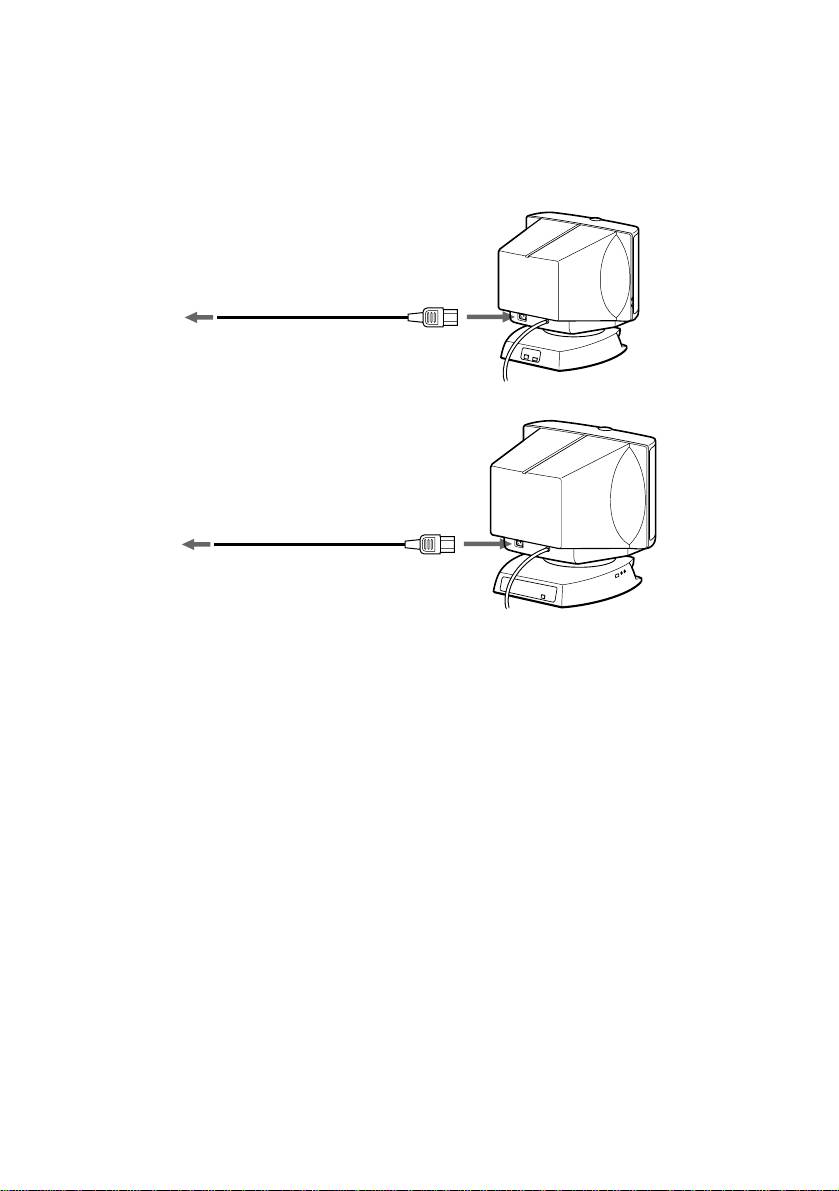
p Step 2: Connect the power cord
With the display switched off, connect the power cord to the display and
the other end to a power outlet.
p CPD-120AS
to a power outlet
Power cord (supplied)
p CPD-220AS
to a power outlet
Power cord (supplied)
p Step 3: Turn on the display and computer.
p Step 4: If necessary...
Adjust the user controls according to your personal preference.
The installation of your display is complete. Enjoy your display.
GB
Getting Started
12

Using Your Display
Preset and user modes
The Multiscan CPD-120AS/220AS display has factory preset modes for
the 10 most popular industry standards for true “plug and play”
capability.
For less common modes, its Digital Multiscan Technology will perform
all of the complex adjustments necessary to ensure a high quality picture
for any timing between 30 and 70 kHz.
NO.
Resolution
Horizontal
Vertical
(dots × lines)
Frequency
Frequency
1
640 × 400
31.5 kHz
70 Hz
2
640 × 480
31.5 kHz
60 Hz
3
640 × 480
43.3 kHz
85 Hz
4
800 × 600
37.9 kHz
60 Hz
5
800 × 600
46.9 kHz
75 Hz
6
1024 × 768
60.0 kHz
75 Hz
7
1024 × 768
68.7 kHz
85 Hz
8
1152 × 864
44.8 kHz
47 Hz (95 Hz interlace)
9
1152 × 864
54.8 kHz
60 Hz
10
1280 × 1024
64.0 kHz
60 Hz
®
✔Note for Windows
95 users
Install the new model information of the Sony computer display from “Windows 95 Monitor
Information disk” into your PC. (To install the file, refer to the attached “About the Windows
95 Monitor Infomration Disk”.)
This display complies with “VESA DDC,” the standards of Plug & Play. If your PC/graphic board
complies with DDC, select “Plug & Play Display (VESA DDC)” or this display’s model name
(CPD-120AS/220AS) as “Display type” from “Control Panel” on Windows 95. Some PC/
graphic boards do not comply with DDC. Even if they comply with DDC, that may have some
problems on connecting this display. In this case, select this display’s model name (CPD-
120AS/220AS) as “Display type” on Windows 95.
®
Windows
is a registered trademark of Microsoft Corporation in the United States and other
countries.
✔Note on recommended horizontal timing conditions
Horizontal sync width should be more than 1.0 µsec.
Horizontal blanking width should be more than 3.6 µsec.
Continued to the next page ➔
Using Your Display
GB
13
p To enter new timings
When using a video mode that is not one of the 10 factory preset modes,
some fine tuning may be required to optimize the display to your
preferences. Simply adjust the display according to the adjustment
instructions. The adjustments will be stored automatically and recalled
whenever that mode is used.
A total of 10 user-defined modes can be stored in memory. If an 11th
mode is entered, it will replace the first.
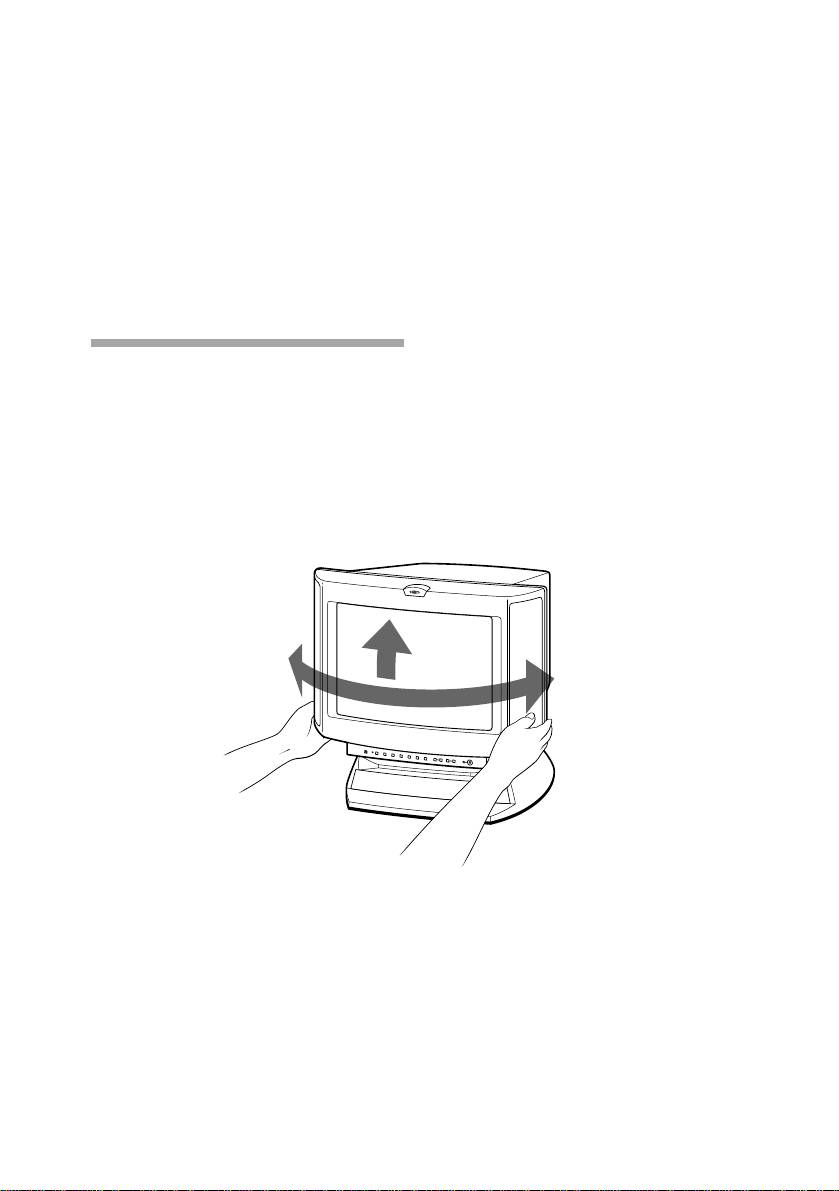
Using the tilt-swivel
With the tilt-swivel, this unit can be adjusted to be viewed at your
desired angle within 90° horizontally and 7° vertically.
To turn the unit vertically and horizontally, hold it at its bottom with
both hands.
Pay attention not to get your hands caught between the display and the
tilt-swivel.
45˚
7˚
45˚
GB
Using Your Display
14

Damper wire
Using a white background, very thin horizontal lines on the screen are
visible as shown below. These lines are the damper wires.
The Trinitron tube has a vertically striped Aperture Grille inside. The
Aperture Grille allows more light to pass through to the screen giving
the Trinitron CRT more color and brightness.
The damper wires are attached to the Aperture Grille to prevent
vibration of the Aperture Grille wire so that the screen image is
constantly stable.
3
Approx. 6 cm (2
/8 inches)
(CPD-220AS only)
Damper wires
Approx. 6 cm
3
(2
/8 inches)
Using Your Display
GB
15
Adjustments
When one of the preset-type signals is input, no picture adjustment is
necessary.
You can, however, adjust the picture to your preference by following the
procedure described below.
To adjust the display, turn on the display and computer.
Select the adjustment item. You can adjust all items via the OSD (On
Screen Display).
Adjustments are automatically stored in the display’s memory.
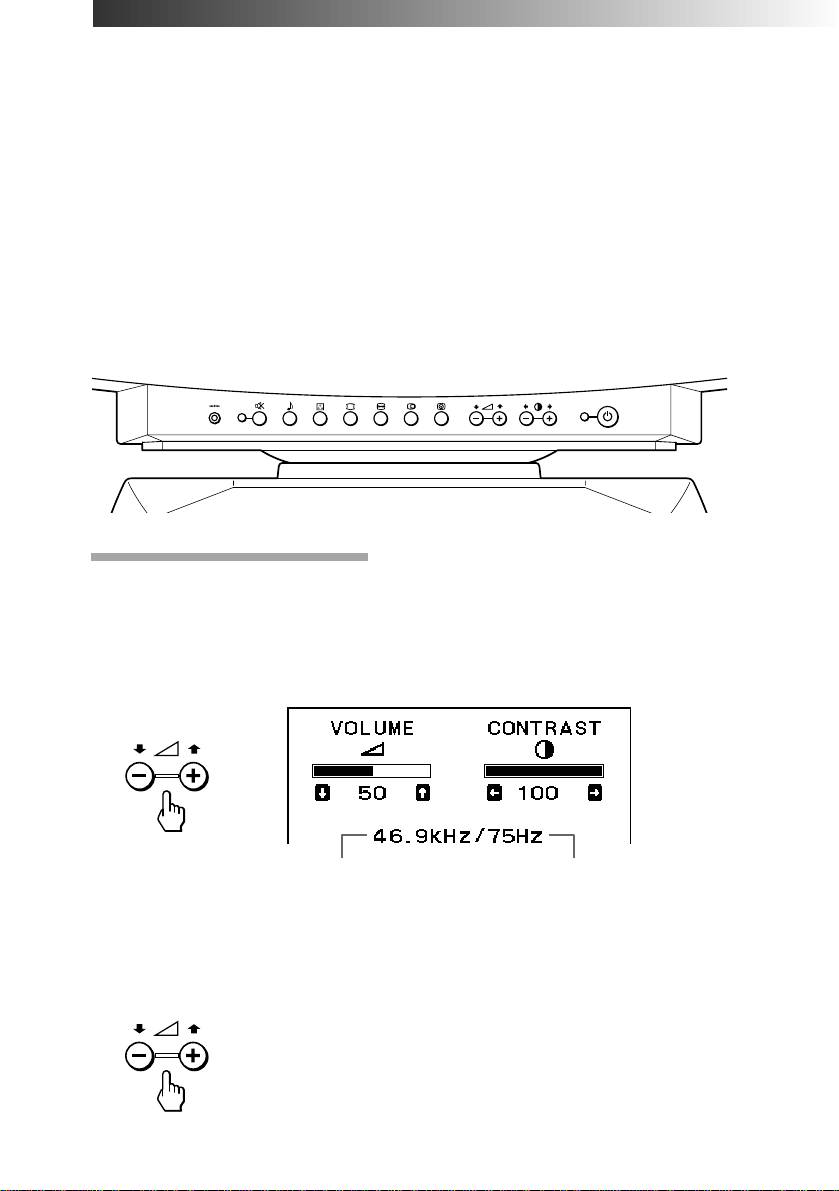
Control Panel
Adjusting volume
1. Press the . + or – button.
The VOLUME/CONTRAST OSD appears.
The horizontal and vertical frequencies for each input signal received
appear.
Horizontal
Vertical
frequency
frequency
2. Press the . +/– buttons to adjust volume.
+ to increase volume
– to decrease volume
GB
Adjustments
16

The VOLUME/CONTRAST OSD disappears 3 seconds after you release
the buttons.
✎ Tips
• The default setting of the volume level is 30 %.
• Adjust the volume while listening to the sound.
• Excessively high volume may cause howling.
p To mute the sound
Press the ¤ button. The ¤ indicator lights. The light indicates mute
function is in active mode.
Press again to cancel muting.
You can cancel muting also by pressing the . + button.
✎ Tip
¤ appears instead of . on the VOLUME/CONTRAST OSD while the sound is muted.
Adjusting the picture contrast
The adjustment data becomes the common setting for all input signals.
1. Press the > + or – button.
The VOLUME/CONTRAST OSD appears.
The horizontal and vertical frequencies for each input signal received
appear.
Continued to the next page ➔
Adjustments
GB
17
2. Press the > +/– buttons to adjust the picture contrast.
+ for more contrast
– for less contrast
The VOLUME/CONTRAST OSD disappears 3 seconds after you release
the buttons.
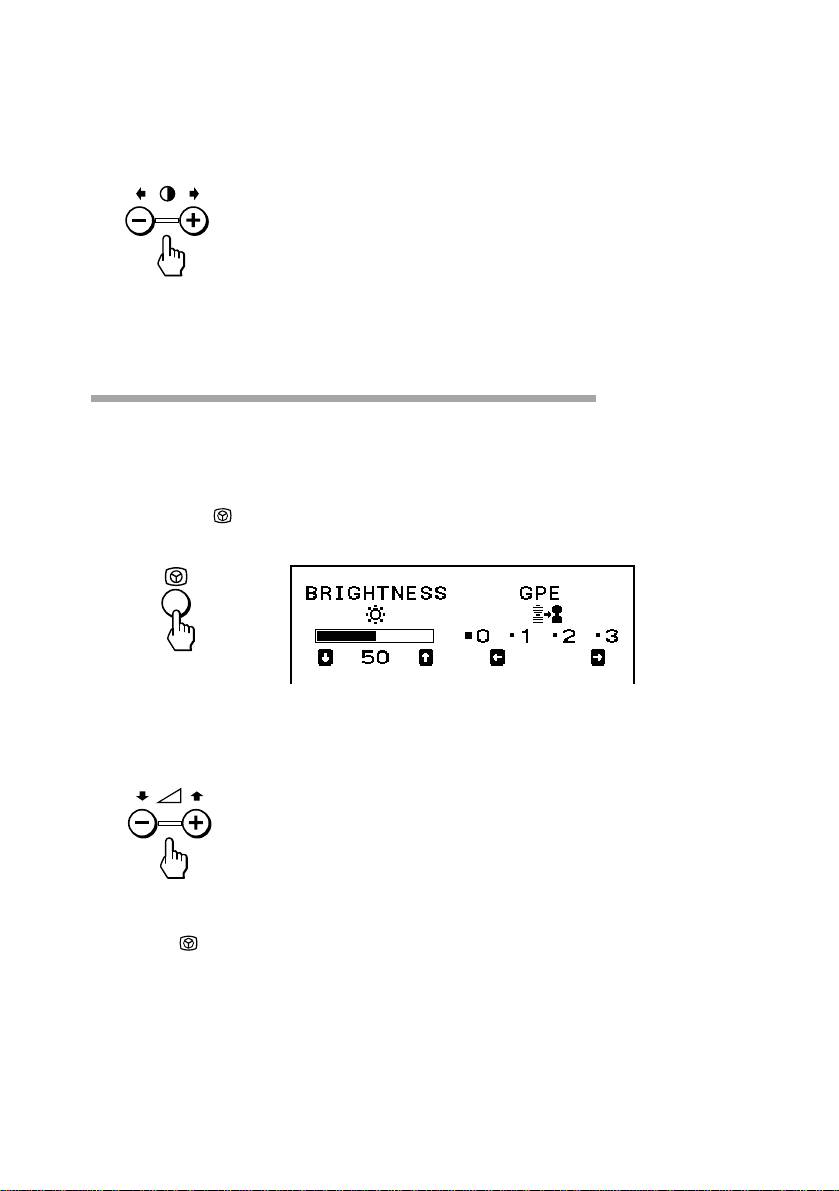
Adjusting the picture brightness
The adjustment data becomes the common setting for all input signals.
1. Press the button.
The BRIGHTNESS/GPE OSD appears.
2. Press the . +/– buttons to adjust the picture brightness.
+ for more brightness
– for less brightness
To exit the OSD
Press the button again.
✎ Tip
If you don’t touch any buttons the OSD automatically disappears after 10 seconds.
When you want to adjust another item, press the button of the item. The OSD of the selected
item appears.
GB
Adjustments
18

Adjusting the picture centering
The adjustment data becomes the individual setting for each input signal
received.
1. Press the S button.
The CENTER OSD appears.
2. For vertical adjustment For horizontal adjustment
Press the . +/– buttons. Press the > +/– buttons.
+ to move up + to move right
– to move down – to move left
To exit the OSD
Press the S button again.
✎ Tip
If you don’t touch any buttons, the OSD automatically disappears after 10 seconds.
When you want to adjust another item, press the button of the item. The OSD of the selected
item appears.
Adjustments
GB
19
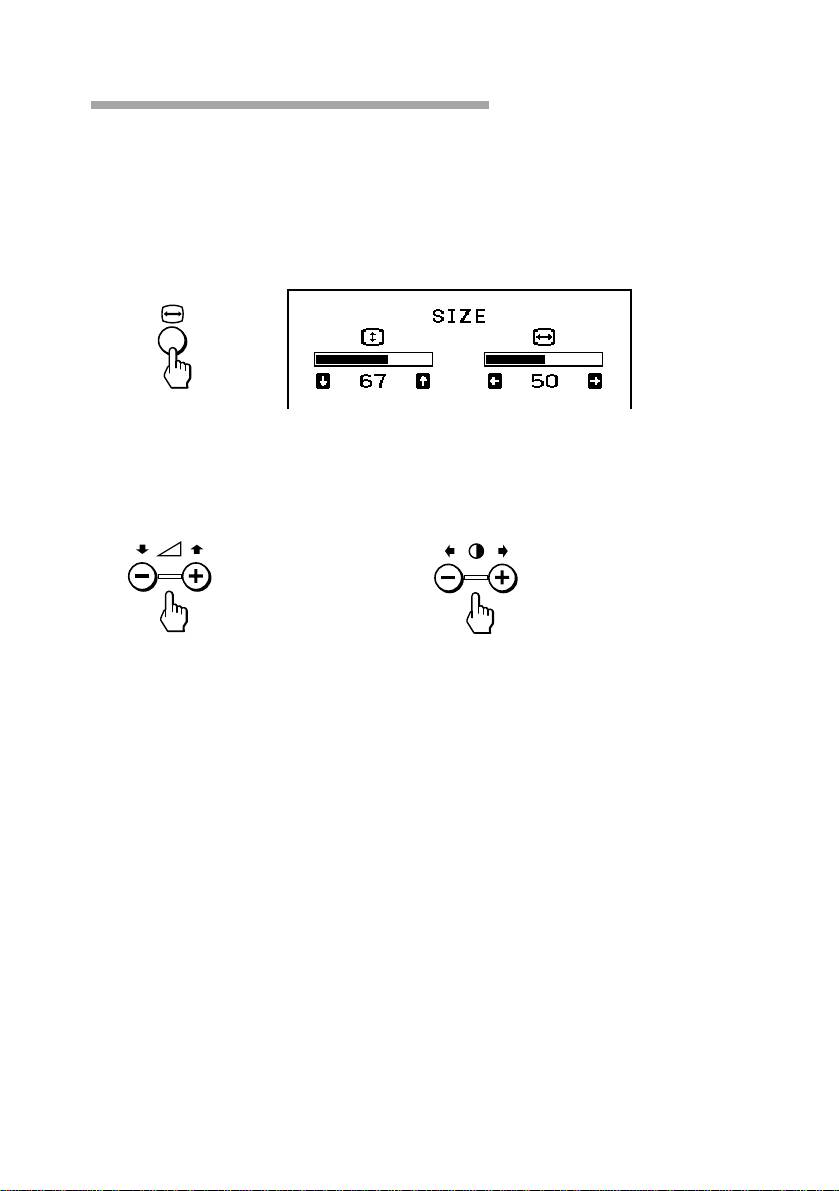
Adjusting the picture size
The adjustment data becomes the individual setting for each input signal
received.
1. Press the Å button.
The SIZE OSD appears.
2. For vertical adjustment For horizontal adjustment
Press the . +/– buttons. Press the > +/– buttons.
+ to increase + to increase
– to decrease – to decrease
To exit the OSD
Press the Å button again.
✎ Tip
If you don’t touch any buttons, the OSD automatically disappears after 10 seconds.
When you want to adjust another item, press the button of the item. The OSD of the selected
item appears.
GB
Adjustments
20
