Sony KV-29FQ85K: instruction
Class: Household, kitchen appliances, electronics and equipment
Type:
Manual for Sony KV-29FQ85K
Table of contents
4-095-508-41 (1)
R
Colour Television
GB
Operating Instructions
Before operating the TV, please read the “Safety Information”
section of this manual. Retain this manual for future reference.
BG
Инструкции за използване
Преди да използвате телевизора, прочетете раздела
"Информация за безопасността" на това ръководство.
Запазете това ръководство за бъдещи справки.
CZ
Návod k použití
Před zapnutím televizoru si prosím pozorně přečtěte část
"Bezpečnostní upozornění" v tomto návodu. Návod si uschovejte
i pro budoucí potřebu.
HU
Kezelési utasítás
Mielőtt elkezdené használni a televíziót, kérjük, olvassa el a jelen
kézikönyv Biztonsági tudnivalók c. szakaszát. Őrizze meg a
kézikönyvet későbbi használatra.
PL
Instrukcja obsługi
Przed przystąpieniem do eksploatacji telewizora należy zapoznać się z
rozdziałem "Informacje dotyczšce bezpieczeństwa" w niniejszej instrukcji.
Prosimy o zachowanie niniejszej instrukcji do wglądu w przyszłości.
RU
Инструкция по эксплуатации
Перед тем как включить телевизор, просим Вас ознакомиться с
разделом "Общие правила техники безопасности" настоящей
инструкции. Сохраняйте настоящую инструкцию на будущее.
KV-29FQ85K
©2003 by Sony Corporation

Introduction
Thank you for choosing this Sony product.
Before operating the TV, please read this manual thoroughly and retain it for future reference.
• Symbols used in the manual:
• Important information.
• Buttons shaded white on the remote control show you
the buttons you have to press to follow the sequence of
• Information on a feature.
the instructions.
• 1,2... Sequence of instructions.
• Informs you of the result of the instructions.
Table of Contents
Introduction .......................................................................................................................................................... 3
Safety Information................................................................................................................................................ 4
Overview & Installation
Checking the Accessories Supplied...................................................................................................................... 5
Inserting Batteries into the Remote Control ......................................................................................................... 5
Overview of Remote Control Buttons.................................................................................................................. 6
GB
Overview of the TV Buttons ................................................................................................................................ 7
Connecting the Aerial and VCR........................................................................................................................... 7
First Time Operation
Switching on the TV and Automatically Tuning ................................................................................................. 8
TV Functions
Introducing and Using the Menu System .......................................................................................................... 10
The Picture Adjustment menu ..................................................................................................................... 11
The Sound Adjustment menu ....................................................................................................................... 12
The Features menu........................................................................................................................................ 14
AV3 Output ............................................................................................................................................ 14
Connection Guide................................................................................................................................... 15
Picture rotation ....................................................................................................................................... 15
RGB Centring......................................................................................................................................... 15
The Set Up menu .......................................................................................................................................... 16
Language................................................................................................................................................ 16
Country................................................................................................................................................... 16
Auto Tuning ........................................................................................................................................... 16
Programme Sorting ................................................................................................................................ 16
Programme Labels ................................................................................................................................. 17
AV Preset ............................................................................................................................................... 17
Manual Programme Preset ..................................................................................................................... 18
PAP (Picture And Picture).................................................................................................................................. 19
Teletext.................................................................................................................................................................. 20
NexTView...............................................................................................................................................................21
Additional Information
Connecting Equipment to the TV........................................................................................................................22
Viewing pictures from equipment connected to the TV......................................................................................23
Learning functions from other Remote Controls.................................................................................................24
Remote Control Configuration for VCR or DVD ...............................................................................................26
Technical Specifications......................................................................................................................................27
Troubleshooting...................................................................................................................................................28
How to lift the TV ................................................................................................................................Back cover
Table of Contents
3

Safety Information
For environmental and safety reasons, it
is recommended that the TV set is not
Never push objects of any kind into the
This set is to operate on a 220-240V AC
left in standby mode when not in use.
set as this could result in a fire or electric
supply only. Take care not to connect
Disconnect from the mains. However,
shock. Never spill liquid of any kind on
too many appliances to the same power
some TVs may have features which
the set. If any liquid or solid object does
socket as this could result in fire or
require they are left in standby. The
fall into the cabinet, do not operate the
electric shock.
instructions in this manual will inform
TV. Have it checked immediately by
qualified personnel.
you if this applies.
Do not open the cabinet and the rear cover
For your own safety, do not touch any
To prevent fire or shock hazard, do not
of the TV. Refer to qualified service
part of the TV, power lead or aerial lead
expose the TV to rain or moisture.
personnel only.
during lightning storms.
Do not cover the ventilation openings of
Never place the TV in hot, humid or
To prevent fire, keep inflammable
the TV For ventilation, leave a space of
excessively dusty places. Do not
objects or naked lights (eg candles)
at least 10cm all around the set.
install the TV where it may be
away from the TV.
exposed to mechanical vibrations.
Clean the screen and cabinet with a soft,
Take care not to place heavy objects on
lightly dampened cloth. Do not use any
Pull out the power lead by the plug.
the power lead as this could result in
type of abrasive pad, alkaline cleaner,
Do not pull on the power lead itself.
damage.
scouring powder or solvent, such as alcohol
We recommend you wind any excess
or benzine, or antistatic spray. As a safety
lead around the holders provided on
precaution, unplug the TV before cleaning
the rear of the TV.
it.
Unplug the power lead before moving
the TV. Avoid uneven surfaces, quick
Place the TV on a secure stable stand.
Do not cover the ventilation
steps or excessive force. If the set has
Never attempt to move the TV and stand
openings of the TV with items such
been dropped or damaged, have it
together -always move the TV and stand
as curtains or newspapers etc.
checked immediately by qualified
separately. Do not place the TV on its
service personnel.
side or face up. Do not allow children to
climb on to it.
4
Safety Information

Checking the Accessories supplied
GB
2 Batteries (AA size)
1 Remote control (RM-943)
Inserting Batteries into the Remote Control
Make sure you insert the supplied batteries using the correct polarities.
Always remember to dispose of used batteries in an environmental friendly way.
Overview & Installation
5
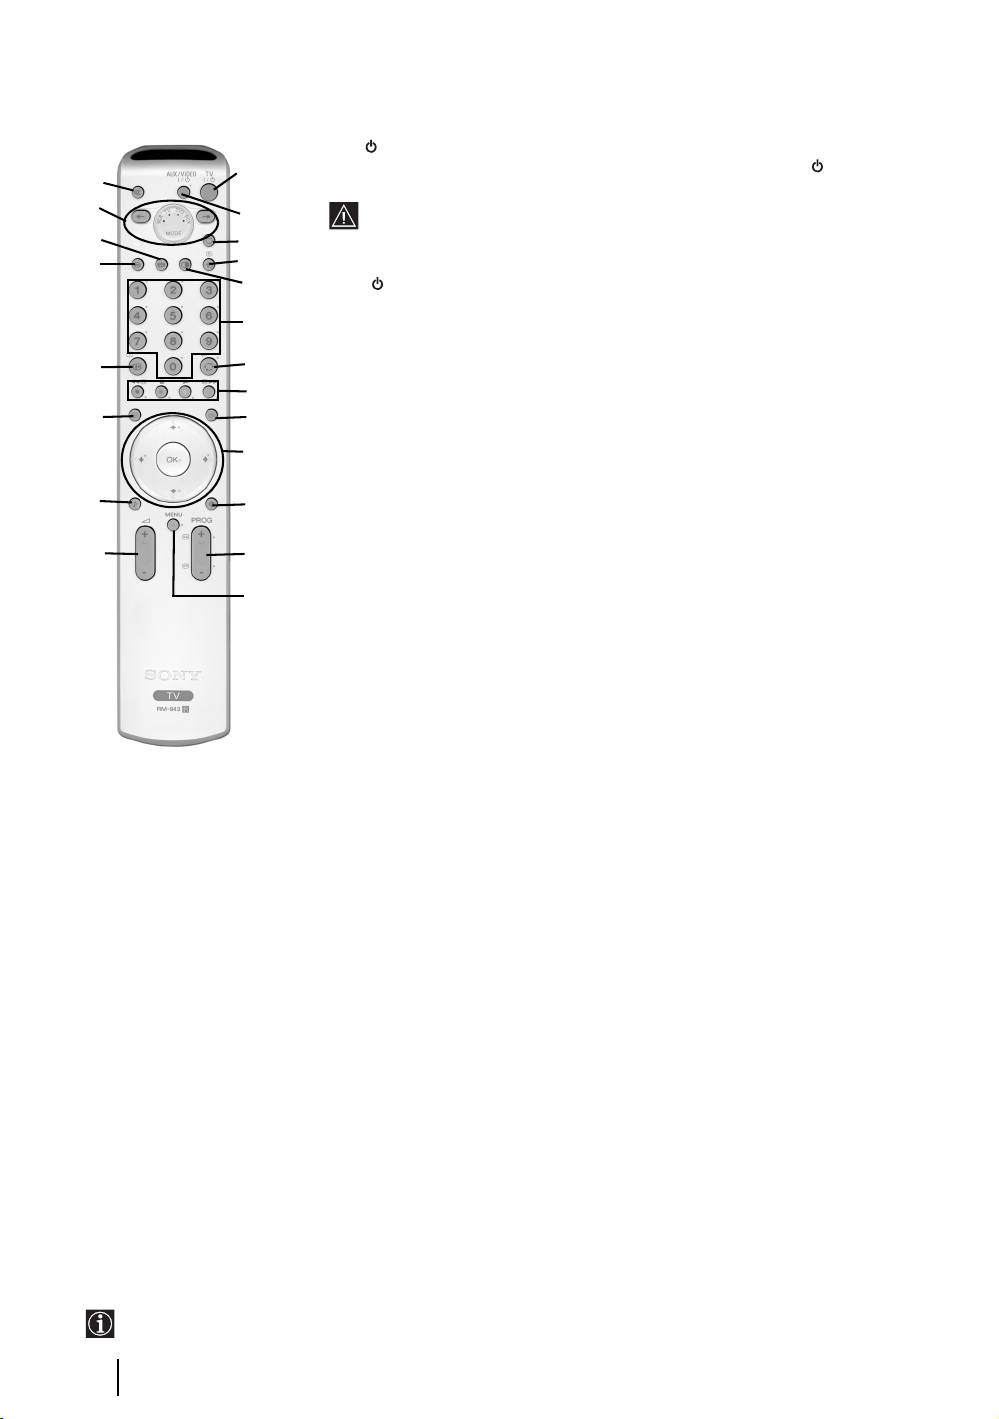
Overview of Remote Control Buttons
1 TV I/ : To Temporarily Switch Off TV (standby mode):
Press this button to temporarily switch off TV (the standby indicator on the TV
1
wa
lights up). Press again to switch on TV from standby mode.
w;
• To save energy we recommend switching off completely when TV is not in
2
use.
ql
3
• After 15 minutes without TV signal and without any button being pressed,
the TV switches automatically into standby mode.
qk
4
5
2 Aux I/ : press this button to switch your VCR or DVD on or off. For AUX function,
refer to page 24.
6
3 Selecting TV mode: press this button to switch off PAP, Teletext or Video input
mode.
qj
7
4 Selecting input source: press this button repeatedly until the desired input
8
symbol of the source appears on the TV screen. Refer to page 23.
qh
9
5 PAP (Picture And Picture): press this button to divide the screen into two for
watching two channels simultaneously. Refer to page 19.
q;
6 Selecting broadcast channels: if Media Selector (w; is switched to TV, press
these buttons to select channels. For double-digit programme numbers, enter the
qg
qa
second digit within 2.5 seconds.
7 a) Watching last channel selected: if Media Selector (w;) is switched to TV,
qf
qs
press this button to return to the previous channel you were watching (provided
you watched it for at least 5 seconds).
qd
b) Selecting VCR double-digit: if Media Selector (w;) is switched to VCR,
press this button to select double-digit channels for Sony's VCR e.g. 23, press
-/-- first and next the buttons 2 and 3.
8 a) Fastext: if Media Selector (w;) is switched to TV and whilst you are in Teletext
mode, these buttons can be used as Fastext buttons. For details see page 20.
b) Operating VCR or DVD: if Media Selector (w;) is switched to VCR or DVD,
these buttons will operate the main functions of your VCR or DVD, once the
remote control has been programmed. Refer to page 26.
9 Teletext: press this button to switch on Teletext. For
qh NexTView: press this button to display NexTView.
details see page 20.
For details. Refer to page 21.
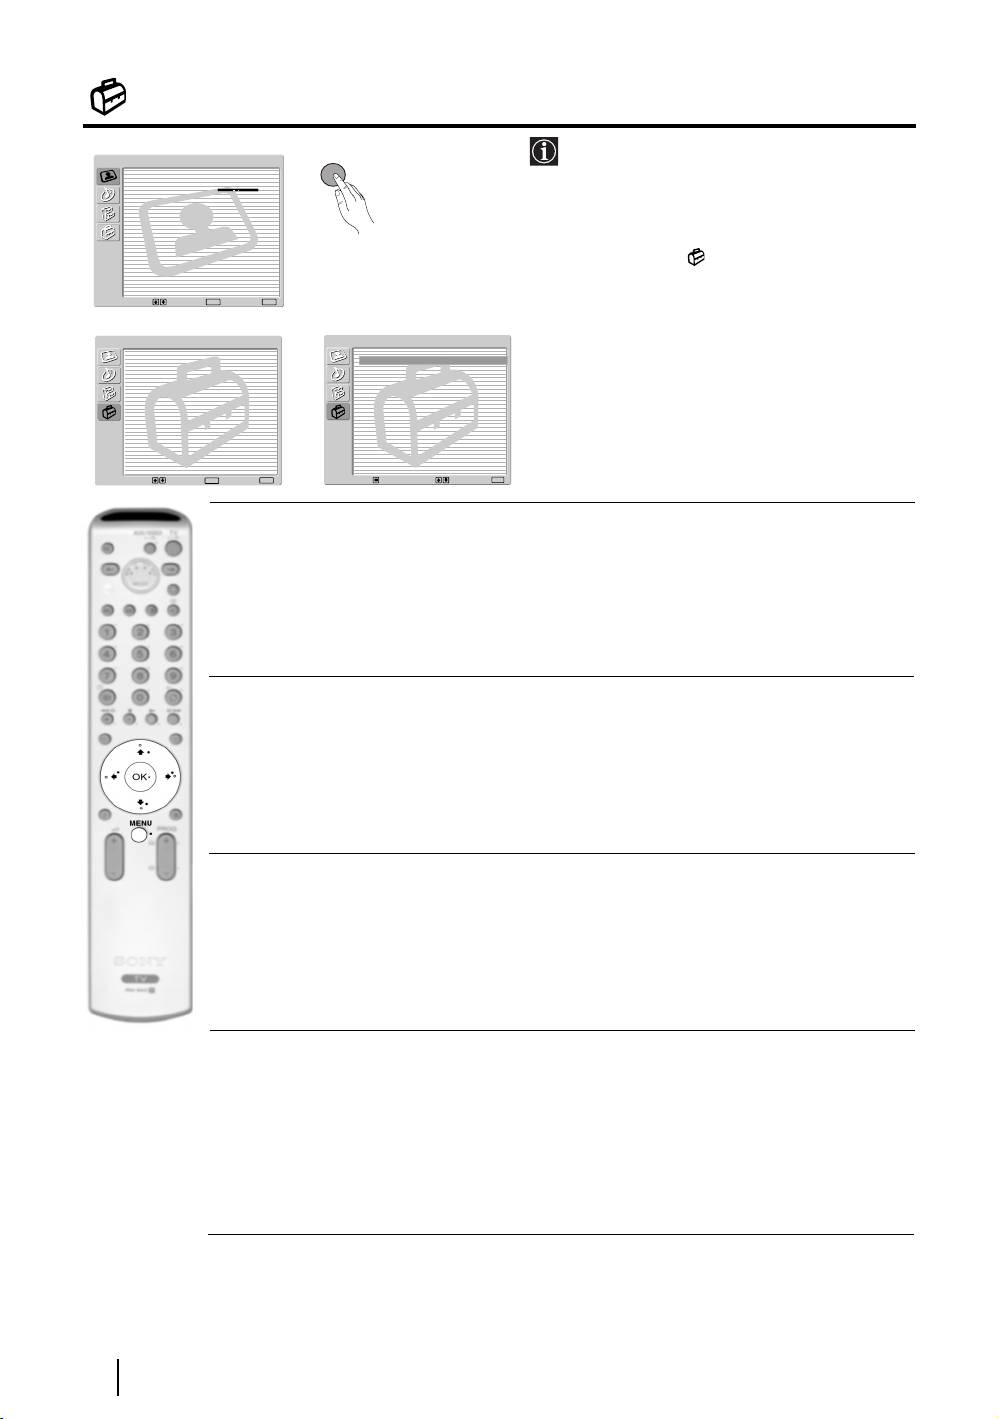
q; a) Displaying a channel index: if Media Selector
qj Displaying Info: press this button to display all on-
(w;) is switched to TV and MENU is switched off,
screen indication such as channel number, etc. Press
press OK to display a channel overview. If you
again to cancel.
want to select a channel, press v or V next press
qk Freezing the picture: Press this button to freeze
again the OK button to watch the selected channel.
the picture. The screen is divided into two screens.
b) Navigator: if Media Selector (w;) is switched to
On the left with the normal picture, on the right the
TV and MENU (qd) is switched on, use these
picture is freezed. Press this button again to return to
buttons to navigate through the menu system of the
the normal picture.
TV. Refer to page 10.
ql Selecting the screen format: press this button
qa Selecting picture mode: press this button
repeatedly to change the format of the screen. 4/3 for
repeatedly to change the picture mode. For details on
a conventional picture or 16/9 for a imitation of wide
the different picture modes. Refer to page 11.
screen.
qs Selecting broadcast channels: press these
w; Media Selector: press these buttons to select which
buttons to select the next or previous broadcast
device you want to operate, TV, VCR, DVD or AUX.
channel.
A green light will be momentarily lit to show which
qd Menu system: press this button to enter the TV
one you have selected. For details refer to pages 24 -
menu system. Refer to page 10.
26.
qf Adjusting volume: press these buttons to increase
wa Muting the sound: press this button to mute the
or decrease the audio volume.
TV sound. Press again to restore the sound.
qg Selecting the sound effect:
Press this button
repeatedly to change the sound effect. For details on
different sound effects. Refer to page 12.
The buttons labelled 4, qs and qj are also used for Teletext operation. For details see page 20.
6
Overview & Installation
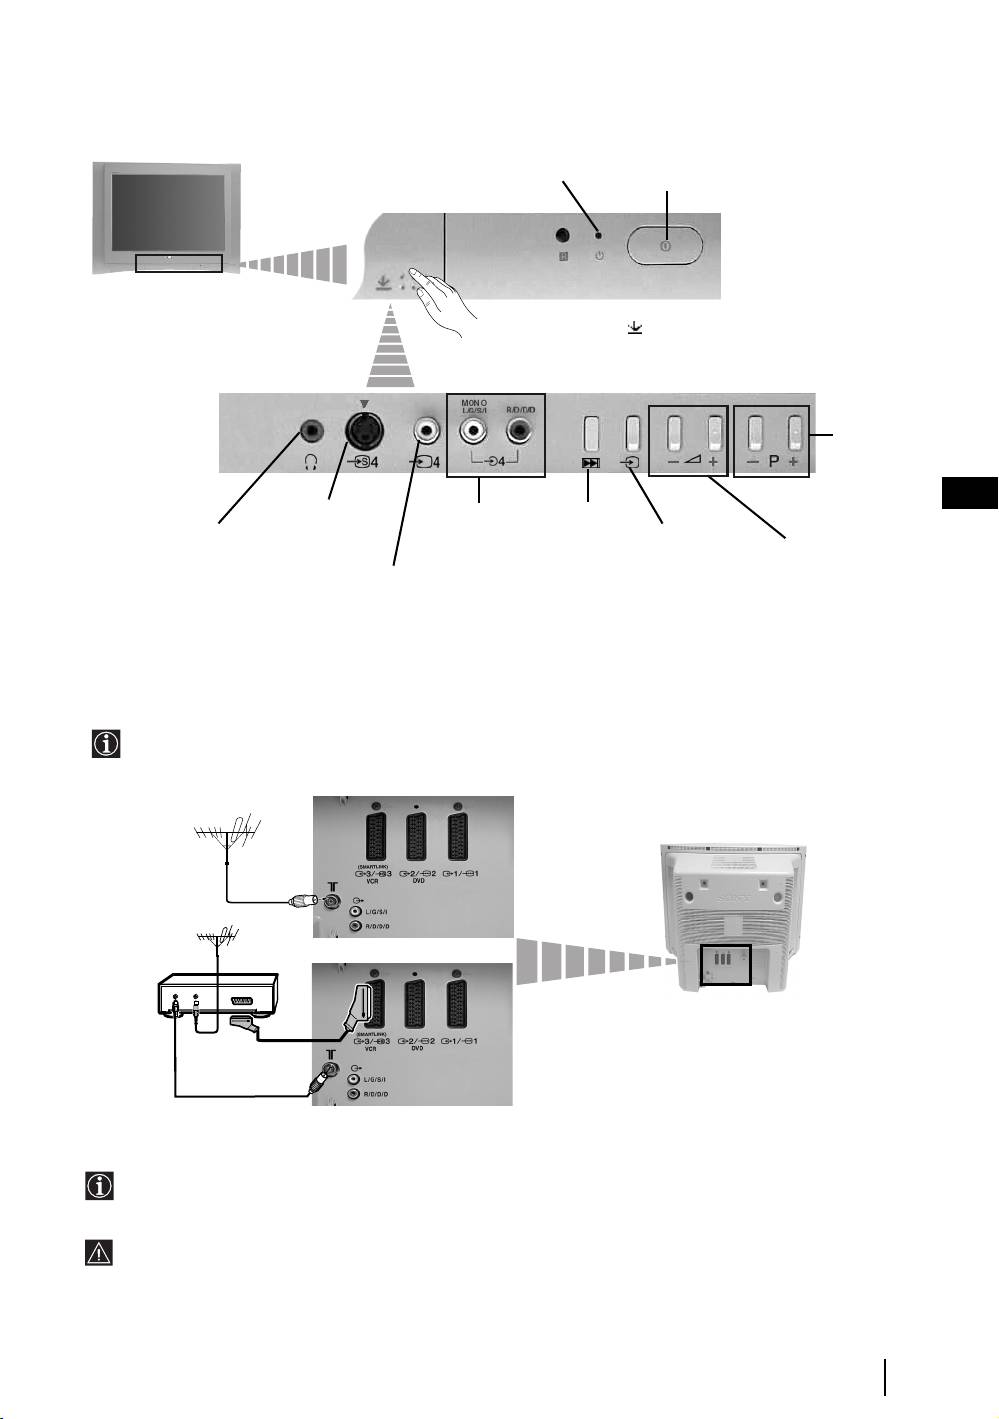
Overview of the TV Buttons
Standby indicator
On/Off button
Press on the mark .
Programme
Up or Down
Buttons
(Selects TV
channels)
GB
S video
Audio Input
Auto Start Up
Input jack
jacks
Headphones jack
Button
Selecting
Input source
Volume control
(starts the auto
buttons
Video Input jack
Start Up
sequence, see
page 8)
Connecting the Aerial and VCR
• Connecting cables are not supplied.
• For more details of VCR connections as well as other connections, please refer to page 22.
or
VCR
OUT IN
The Scart lead is optional. If you use this optional connection it can improve picture and sound quality when
using a VCR.
If you do not use a Scart lead, you will need to manually tune the VCR to a spare channel once the autotune
procedure has been completed. Refer to “Manual Programme Preset” on page 18. Also refer to your VCR
instruction manual to find out how to find the output channel of your VCR.
Overview & Installation
7
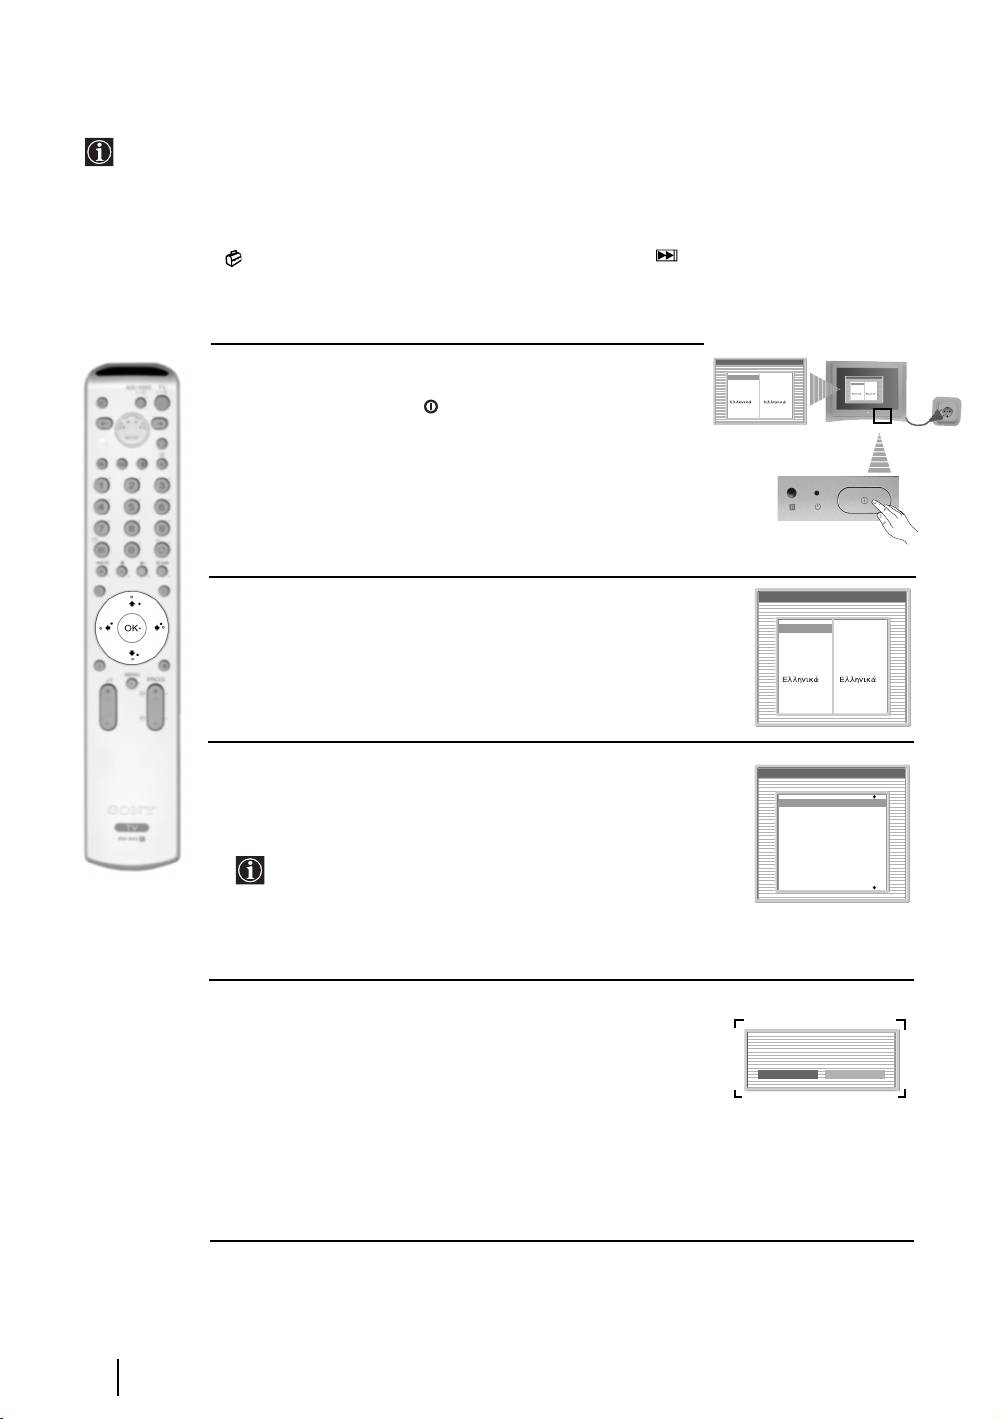
Switching On the TV and Automatically Tuning
The first time you switch on your TV, a sequence of menu screens appear on the TV enabling you to: 1) choose
the language of the menu screen 2) Choose the country in which you are going to operate the TV, 3) adjust the
picture slant, 4) check how to connect optional equipment to your TV, 5) search and store all available channels
(TV Broadcast) and 6) change the order in which the channels (TV Broadcast) appear on the screen.
However, if you need to change any of these settings at a later date, you can do that by selecting the appropriate
option in the (Set Up menu) or by pressing the Auto Start Up Button on the TV set.
Language
1 Connect the TV plug to the mains socket (220-240V AC, 50Hz)
Select language
English
Nederlands
English
Nederlands
Language
Select language
Français
English
Italiano
Français
Nederlands
Italiano
Français
English
Nederlands
Français
The first time that the TV set is connected, it is usually turned on.
Italiano
Deutsch
Deutsch
Deutsch
Türkçe
Italiano
Deutsch
Español
Türkçe
Türkçe
Türkçe
Português
Polski
Español
Português
Polski
Español
If the TV is off, press the on/off button on the TV set to turn
Português
Español
Polski
Português
Polski
on the TV.
The first time you switch on the TV, a Language menu displays
automatically on the TV screen.
Language
2 Press the V, v, B or b buttons on the remote control to select
Select language
your language, then press the OK button to confirm your
English
English
selection. From now on all the menus will appear in your chosen
Nederlands
Nederlands
Français
Français
Italiano
Italiano
language.
Deutsch
Deutsch
Türkçe
Türkçe
Español
Español
Português
Português
Polski
Polski
Country
3 The Country menu appears automatically. Press the v or V
Select country
Off
button to select the country in which you are using the TV. Press
Ireland
the OK button to confirm your selection.
Nederland
België/Belgique
Luxembourg
France
• If the country in which you want to use the TV set
Italia
Schweiz/Suisse/Svizzera
does not appear in the list, select “off” instead of a country.
• To avoid wrong teletext characters for cyrillic languages we
recommend selecting Russia country if your own country
does not appear in the list.
4 Because of the earth’s magnetism, the picture might slant. The
Picture Rotation menu allows you to correct the picture slant if
it is necessary.
If picture slants, please
adjust picture rotation.
Not necessary
Adjust now
a) If it is not necessary, press OK to select Not necessary.
b) If it is necessary, press B or b to select Adjust now, then press
OK and correct any slant of the picture between –5 and +5 by
pressing
v or V. Finally press OK to store.
continued...
8
First Time Operation
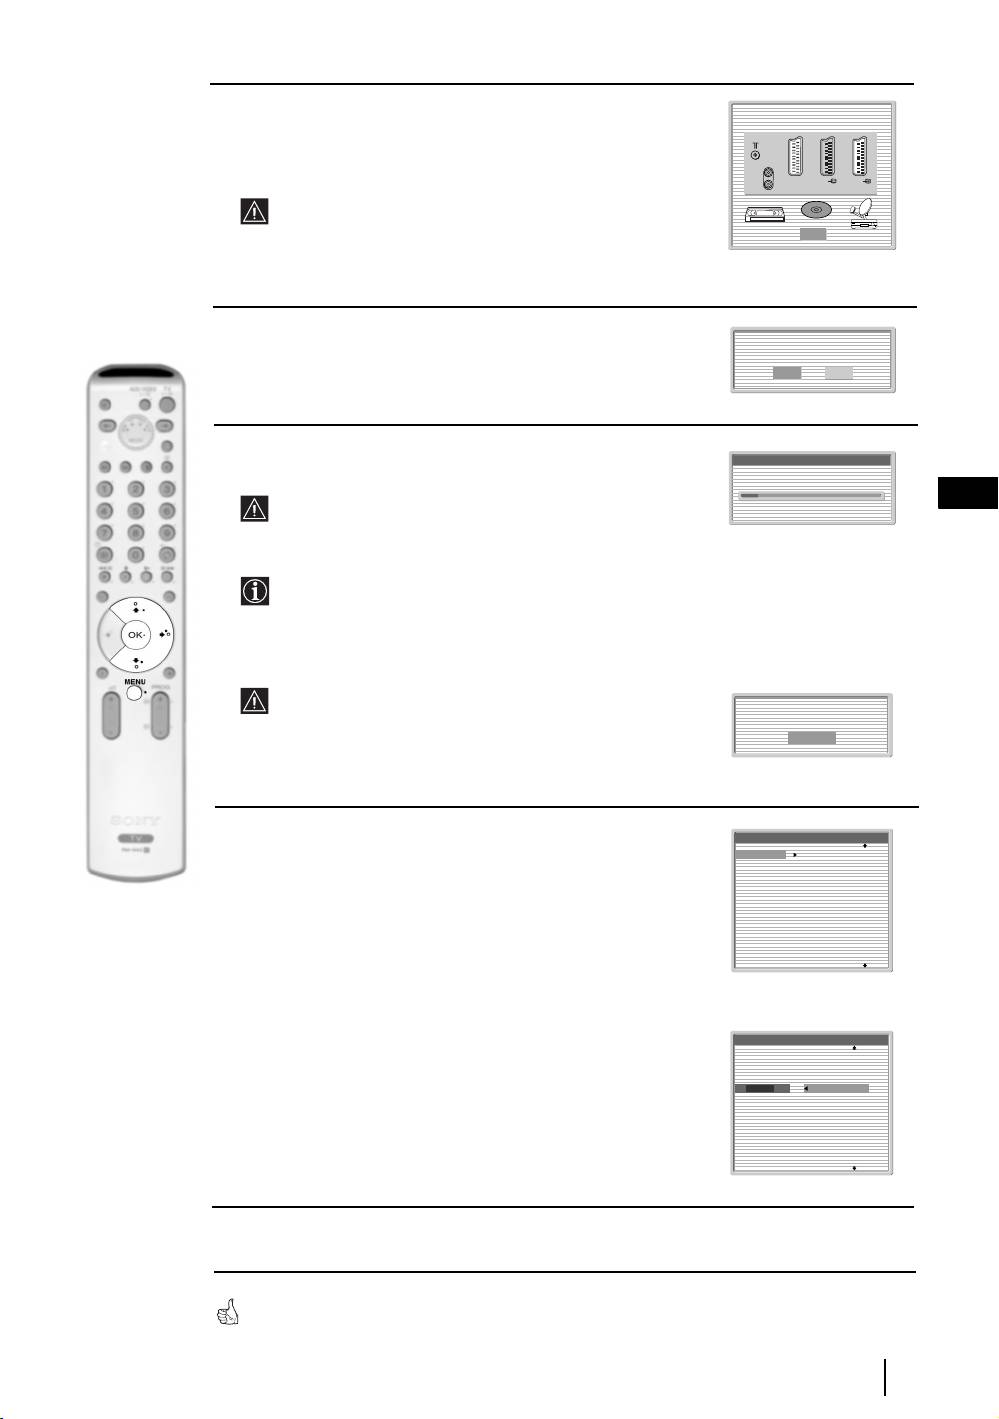
5 A diagram will appear showing you how to connect a wide range
Please connect your equipment
according to this chart
of equipment to your TV set. Follow the instructions and finally
press the OK button to remove the picture and continue the
automatic process.
:
After the automatic tuning process has finished and the
optional equipment has been connected at this stage, we
OK
recommend you follow the instructions explained on the
section "Connection Guide" on page 15 to get the optimum
settings related with the optional equipment.
6 The Auto Tuning menu appears on the screen. Press the OK
Do you want to start
button to select Yes.
automatic tuning?
Yes No
7 The TV starts to automatically search and store all
Auto Tuning
available broadcast channels for you.
Programmes found: 4
GB
This procedure could take some minutes. Please be patient
and do not press any buttons, otherwise automatic tuning
will not be completed.
In some countries the TV Broadcaster installs the channels
automatically (ACI system). In this case, the TV
Broadcaster sends a menu in which you can select your city
by pressing the
v or V button and OK to store the
channels.
If no channels were found during the auto tune process, a
message appears automatically on the screen asking you to
No channel found.
Please connect aerial
connect the aerial. Check the aerial connection (refer to
Confirm
page 7). Press the OK button to restart the auto tuning
process.
8 After all available channels are captured and stored,
Programme Sorting
the Programme Sorting menu automatically appears
01
TVE
02
TVE2
on the screen enabling you to change the order in
03
TV3
which the channels are stored.
04
C33
05
C27
06
C58
a) If you wish to keep the broadcast channels in the tuned order,
07
S02
08
S06
go to step 9.
b) If you wish to store the channels in a different order:
1 Press the v or V button to select the programme
number with the channel (TV Broadcast) you wish
Programme Sorting
to move. Press the b button.
01
TVE
02
TVE2
2 Press the v or V button to select the new
03
TV3
04
C33
01 TVE
programme number position for your selected
05
C27
06
C58
channel (TV Broadcast). Press the OK button to store.
07
S02
08
S06
3 Repeat steps b)1 and b)2 if you wish to change
the order of the other channels.
9 Press the MENU button to remove the menu from the screen
9
:
1
1
/ 1
1
:
:
2
2
/ 2
2
:
:
3
3
/q
q
3
3
DVD
Your TV is now ready for use
First Time Operation

Introducing and Using the Menu System
Your TV uses an On-Screen menu system to guide you through the operations. Use the following buttons on
the Remote Control to operate the menu system:
Picture Adjustment
1 To switch on the menu screens:
Picture Mode: Live
Contrast:
Reset
Noise Reduction: Auto
Picture Adjustment
Press the MENU button to switch the first level menu on.
Colour Tone: Cool
Picture Mode: Live
Contrast:
Reset
Noise Reduction: Auto
Colour Tone: Cool
Select: Enter:
OK
Exit:
MENU
Select: Enter:
OK
Exit:
MENU
2 To navigate through the menus:
• To highlight and select the desired menu or option, press
v or V.
• To enter the selected menu or option, press OK or
b.
• To return to the last menu or option, press OK or
B.
• To alter the settings of your selected option, press v/V/B or b.
• To confirm and store your selection, press OK.
3 To switch off the menu screens:
Press the MENU button to remove the menu from the screen.
10
TV Functions

The Picture Adjustment Menu
MENU
The “Picture Adjustment” menu allows you to
alter the picture settings.
To do this:
Picture Adjustment
Picture Adjustment
Press the MENU button and then press OK to
Picture Mode: Live
Picture Mode: Live
Contrast:
Contrast:
enter this menu. Next press
v or V to select the
Reset
Reset
Noise Reduction: Auto
Noise Reduction: Auto
desired option and press OK. Finally read below
Colour Tone: Cool
Colour Tone: Cool
,
how to operate into each option.
Select: Enter:
OK
Exit:
MENU
Select:Back:
Enter:
OK
Picture Mode This option allows you to customise the Picture Mode based on the programme
you are watching. After selecting this option press OK. Next press repeatedly
v
or
V to select:
Personal (for individual settings).
GB
Live (for live broadcast programmes, DVD and Digital Set Top Box receivers)
Movie (for films).
Once you have selected your desired option, press OK to store.
"Brightness", "Colour" and "Sharpness" level of "Live" and "Movie" mode are fixed on the
factory to get the best picture quality.
Contrast Press
B or b to reduce or enhance picture contrast. Next press OK to store.
Brightness Press
B or b to darken or brighten the picture. Next press OK to store.
This option only appears and only can be altered if "Picture Mode" is set to "Personal".
Colour Press
B or b to decrease or to increase color intensity. Next press OK to store.
This option only appears and only can be altered if "Picture Mode" is set to "Personal".
Hue Press
B or b to decrease or to increase the green tones. Next press OK to store.
This option only appears for NTSC signal (e.g. USA video tapes).
Sharpness Press
B or b to soften or to sharpen the picture. Next press OK to store.
This option only appears and only can be altered if "Picture Mode" is set to "Personal".
Reset Press OK to reset the picture to the factory preset levels.
Noise This option is set to Auto to automatically reduce the snowy picture
Reduction visible in the broadcast signal. However, it can be modified by pressing
v or V
to select Off, Low, Mid or High. Finally press OK to store.
Colour Tone This option allows you to alter the tint of the picture. After selecting this option
press
b. Next press repeatedly v or V to select: Warm (gives the white colours
a red tint), Normal (gives the white colours a neutral tint), Cold (gives the white
colours a blue tint). Next press OK to store.
TV Functions
11
The Sound Adjustment Menu
The “Sound Adjustment” menu allows you to
MENU
Picture Adjustment
alter the sound settings.
Picture Mode: Live
Contrast:
Reset
Noise Reduction: Auto
Colour Tone: Cool
To do this:
Press the MENU button and press
v to select
, then press OK to enter this menu. Next
press
v or V to select the desired option and
Select: Enter:
OK
Exit:
MENU
press OK. Finally read below how to operate
m
into each option.
Sound Adjustment
Sound Adjustment
Sound Effect: Dolby Virtual
Sound Effect: Dolby Virtual
Treble:
Treble:
Bass:
Bass:
Balance:
Balance:
Reset
Reset
Dual Sound: Stereo
,
Dual Sound: Stereo
Auto Volume: Off
Auto Volume: Off
TV Speakers: On
TV Speakers: On
Headphones Set Up
Headphones Set Up
Select: Enter:
OK
Exit:
MENU
Select:Back:
Enter:
OK
Sound This option allows you to customise the Sound Effect. After selecting this
Effect option press OK. Next press repeatedly
v or V to select:
Off (Flat response).
Natural (Enhances clarity, detail and presence of sound by using “BBE High
Definition Sound system”*).
Dynamic (“BBE High Definition Sound system”* intensifies clarity and
presence of sound for better intelligibility and musical realism).
Dolby** (Dolby Virtual, simulates the sound effect of “Dolby Surround Pro
Virtual Logic”).
Once you have selected your desired option, press OK to store.
Treble Press
B or b to decrease higher-frequency sounds. Next press OK to store.
Bass Press
B or b to decrease or to increase the lower-frequency sounds. Next press
OK to store.
Balance Press
B or b to emphasise the left or the right speaker. Next press OK to store.
Reset Press OK to reset the sound to the factory preset levels. Next press OK to store.
Dual Sound • For a Stereo broadcast:
Press
v or V to select Stereo or Mono. Next press OK to store.
• For a bilingual broadcast:
Press
v or V to select Mono (for mono channel if available), A (for channel 1)
or B (for channel 2). Next press OK to store.
continued...
12
TV Functions
Auto Volume Press v or V to select On (the volume level of the channels will stay the same,
independent of the broadcast signal, e.g. in the case of advertisements) or Off (the
volume level changes according to the broadcast signal). Next press OK to store.
If you select “Dolby Virtual” on the “Sound Effect” option, the “Auto Volume” option will
automatically be switched to “Off” and vice versa.
TV Speakers This option allows you to select if you want to listen the TV from the TV speakers
or from an external amplifier connected to the audio outputs on the rear of the TV.
After selecting this option, press OK. Next press repeatedly
v
or
V
to select:
On (to listen the TV from the TV set speakers).
One time off (to listen to the TV from the external amplifier only one
time. By using this option, any time the TV is turned
off/on, it returns to the default setting "On").
Permanent off (to always listen to the TV from external amplifier).
Once you have selected your desired option, press OK to store.
GB
If you have selected "One time off" or "Permanent off", the volume of the external equipment
can also be altered by pressing the 2 +/- buttons of the remote control. When the volume
buttons are pressed, the symbol
% will appear indicating that the volume you are altering is
not the volume of the TV set speakers, it is from the external equipment.
Headphones Set Up This option allows you to customise the headphones volume and the
PAP settings (refer to page 19 for details on PAP).
After selecting this option press OK. Next press repeatedly
v or V to select:
Volume Press
B or b to decrease or increase the volume level
from the headphones.
Dual Sound • For a Stereo broadcast:
Press
v or V to select Stereo or Mono
• For a bilingual broadcast:
Press
v or V to select mono (for mono channel if
available), A (for channel 1) or B (for channel 2).
PAP Sound Select Frame if you want to listen to
the active screen (framed) of the PAP screen (see page
19), select Left picture if you want to listen to the left
screen or select Right picture if you want to listen to
the right screen.
* The “BBE High Definition Sound system” is manufactured by Sony Corporation under
license from BBE Sound, Inc. It is covered by U.S. Patent No. 4,638,258 and No.
4,482,866. The word “BBE” and BBE Symbol are trademarks of BBE Sound, Inc.
**This TV has been designed to create surround sound effect by simulating the sound of four
speakers with two speakers, when the broadcast audio signal is Dolby Surround encoded.
The sound effect can also be improved by connecting a suitable external amplifier (for
details refer to page 23).
** Manufactured under license from Dolby Laboratories. “Dolby” and the double-D symbol
are trademarks of Dolby Laboratories.
TV Functions
13
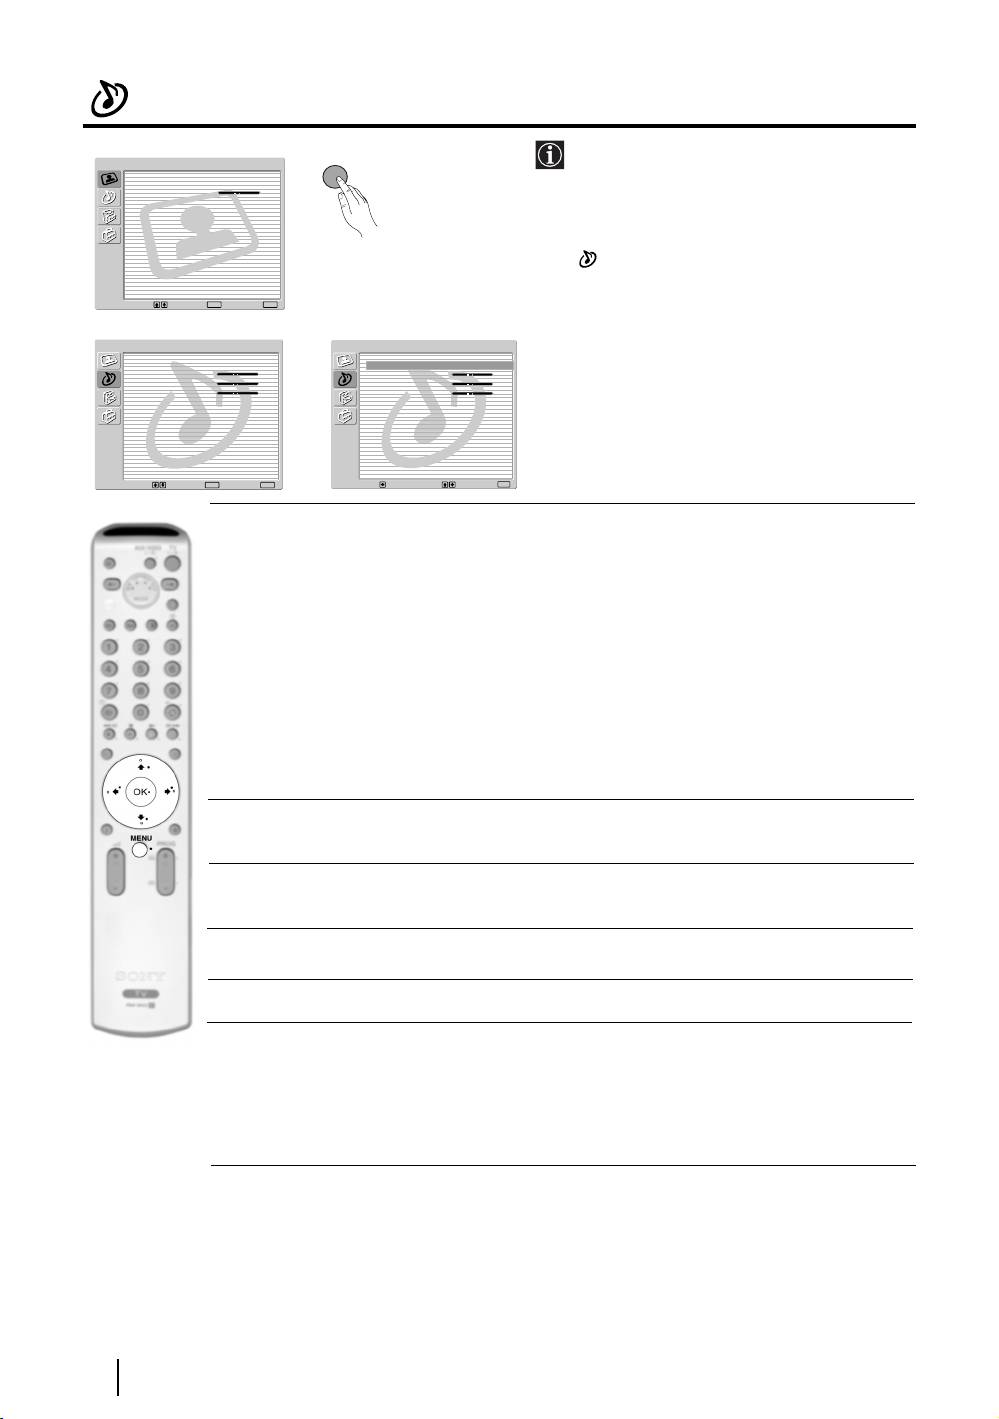
The Features Menu
MENU
The “Features” menu allows you to alter
Picture Adjustment
various settings of the TV.
Picture Mode: Live
Contrast:
Reset
Noise Reduction: Auto
Colour Tone: Cool
To do this:
Press the MENU button and press
v twice to
select , then press OK to enter this menu.
Next press
v or V to select the desired option
Select: Enter:
OK
Exit:
MENU
and press OK. Finally read below how to
m
operate into each option.
Features
Features
AV3 Output TV
AV3 Output TV
Connection Guide
Connection Guide
Picture Rotation
Picture Rotation
,
Select: Enter:
OK
Exit:
MENU
Select:Back:
Enter: :
OK
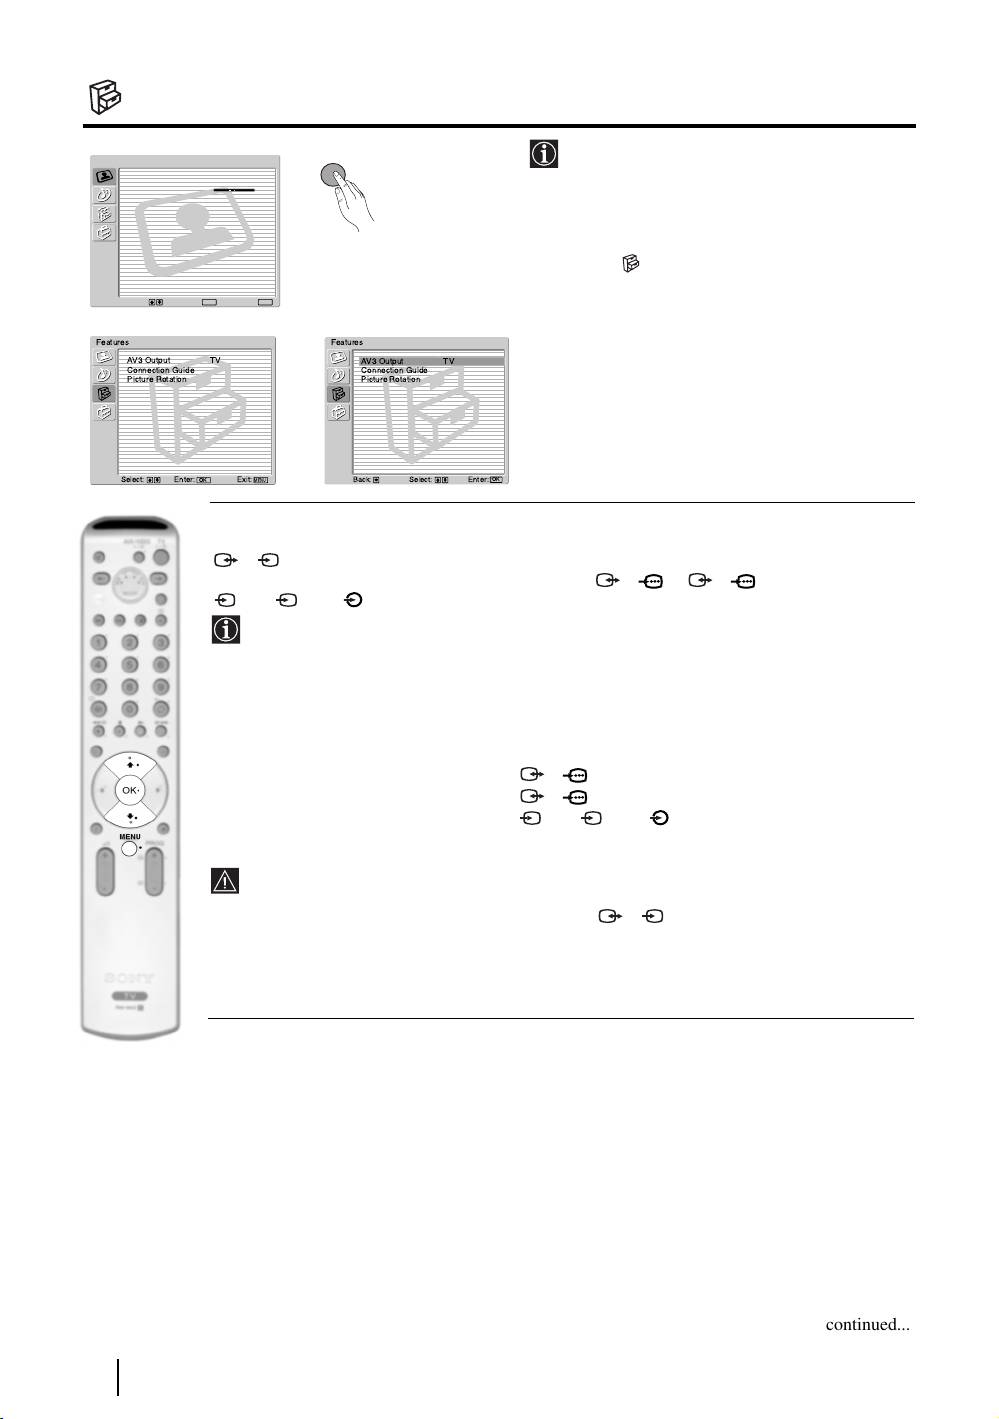
AV3 OUTPUT
This option allows you to select the source to be output from the Scart connector
3/ 3 so that you can record from this Scart any signal coming from the TV or from an
S
external equipment connected to the Scart connector 1/ 1, 2/ 2 or front connectors
S
4 or 4 and 4.
If your VCR supports SmartLink, this procedure is not necessary.
To do this:
Once you have entered into the "Features" menu as it is explained in the previous page and after
selecting the option, press OK. Then press
v
or
V
to select the desired output signal:
TV to output the aerial source.
AV1 to output sources connected to 1/ 1.
AV2 to output sources connected to 2/ 2.
AV4 to output sources connected to 4 or 4 and 4.
S
AUTO to output the signal that is being viewed on the TV.
• If you select “AUTO”, the output signal will always be the same one that is displayed on
the screen.
• If you have connected a decoder to the Scart 3/ 3 or to a VCR connected to this
S
Scart, please remember to change back the “AV3 Output” to “TV” for correct
unscrambling.
continued...
14
TV Functions

CONNECTION GUIDE
Even you have already connected the external equipment to the TV set, it is important for you to
follow the instructions of this menu. If you proceed in this way, you will get the optimum picture
settings related with the optional equipment.
To do this:
1 Once you have entered the "Features" menu as it is explained in the previous page and after
selecting the option, press OK. Next press
v or V to chose the equipment you want to connect
among the available: SAT (satellite), Decoder, DVD, GAME, VIDEO or DVD rec. (DVD
recorder). Next press
b to select the equipment chosen (equipment selected also can be deleted
by pressing
B). Once you have selected all the equipment to be connected, press v or V to
select "Confirm" and press OK.
2 A new menu will appear showing you on which Scart connector of the rear of the TV should be
connected each equipment. Please connect each equipment according to this information to get
the optimum picture setting of the optional equipment.
3 Once you have connected the optional equipment, press B or b to select "OK" and finally press
the OK button of the remote control.
We strongly recommend you to follow our connection proposals, but in case you do not agree press B
or b to select «No» and next press the OK button. A new menu appears on the screen in which you
GB
can assign the connections according to your preferences.
PICTURE ROTATION
Because of the earth’s magnetism, the picture may slant. If this is the case, you can correct the
pictures slant by using this option.
To do this:
Once you have entered the "Features" menu as it is explained in the previous page and after
selecting the option, press OK. Then press
v or V to correct any slant of the picture between -5
and +5.
RGB CENTRING
This option is only available if an RGB source has been connected to the TV.
This option allows you to readjust the horizontal position of the picture in case you need to do it
when connecting an RGB source.
To do this:
Once you have entered the "Features" menu as it is explained in the previous page and while
watching an RGB source select the “RGB Centring” option and press OK. Then press
v or V to
adjust the centre of the picture between –5 and +5. Finally press OK to confirm and store.
TV Functions
15
The Set Up Menu
The “Set Up” menu allows you to alter various
MENU
Picture Adjustment
options on this TV.
Picture Mode: Live
Contrast:
Reset
Noise Reduction: Auto
Colour Tone: Cool
To do this:
Press the MENU button and press
v
three
times to select , then press OK to enter this
menu. Next press
v
or
V
to select the desired
Select: Enter:
OK
Exit:
MENU
option and press OK. Finally read below how
m
to operate into each option.
Set Up
Set Up
Language
Language
Country
Country
Auto Tuning
Auto Tuning
Programme Sorting
Programme Sorting
Programme Labels
Programme Labels
AV Preset
,
AV Preset
Manual Programme Preset
Manual Programme Preset
Select: Exit:
Enter:
OK
MENU
Select:Back:
Enter:
OK
LANGUAGE
This option allows you to select the language that menus are displayed in.
To do this:
After selecting the option, press OK and then proceed in the same way as in step 2 of the section
"Switching On the TV and Automatically Tuning" on page 8.
COUNTRY
This option allows you to select the country in which you wish to operate the TV set.
To do this:
After selecting the option, press OK and then proceed in the same way as in step 3 of the section
"Switching On the TV and Automatically Tuning" on page 8.
AUTO TUNING
This option allows you to automatically search for and store all available TV channels.
To do this:
After selecting the option, press OK and then proceed in the same way as in the steps 6 and 7 of
the section “Switching On the TV and Automatically Tuning” on page 9.
PROGRAMME SORTING
This option allows you to change the order in which the channels (TV Broadcast) appear on the
screen.
To do this:
After selecting the option, press OK and then proceed in the same way as in the step 8 of the section
“Switching On the TV and Automatically Tuning” on page 9.
continued...
16
TV Functions

PROGRAMME LABELS
This option allows you to name a channel using up to five characters (letters or numbers).
To do this:
1 Once you have entered the "Set Up" menu as it is explained in the previous page and after selecting the option,
press OK, then press v or V to select the programme number with the channel you wish to name. Next press OK.
2 With the first element of the Label column highlighted, press OK and
v
,
V
, B or b to select the letter, next
press OK.
When you have finished, press
v
,
V
, B or b to select the word “End” on the screen and finally press OK to
turn off the menu from the screen.
• To correct the letter, select "
%" on the screen to go back and press OK.
• For a blank, select " " on the screen and press OK.
AV PRESET
This option allows you to:
a) Designate a name to the external equipment you have connected to the input sockets of the TV set.
GB
To do this:
1 Once you have entered the "Set Up" menu as it is explained in the previous page and after selecting the option,
press OK, then press
v
or
V
to select the input source you wish to name: AV1, AV2 or AV3 for the rear Scarts
and AV4 for front connectors. Next press OK twice.
2 A label automatically appears in the label column:
a) If you want to use one of the predefined labels, press
v or V to select the desired label and finally press OK.
The total predefined labels are: VIDEO, DVD, CABLE, GAME, CAM (camcorder) or SAT
(satellite).
b) If you want to set a different label, select Edit and press OK. Then, with the first element highlighted, press
v, V, B or b to select the letter, next press OK. When you have finished, press v, V, B or b to select
the word “End” on the screen and finally press OK to turn off the menu from the screen.
• To correct the letter, select "
%" on the screen to go back and press OK.
• For a blank, select " " on the screen and press OK.
b) Change the input sound level of the optional equipment connected.
To do this:
Once you have entered the "Set Up" menu as it is explained in the previous page and after selecting the option
press OK, then press
v
or
V
to select the input source you want to alter the input sound level: AV1, AV2 or
AV3 for the rear Scarts and AV4 for front connectors. Next press twice
b to highlight the Sound Offset column.
Finally press OK and
v
or
V
to alter the input sound level between -9 and +9.
continued...
TV Functions
17

MANUAL PROGRAMME PRESET
This option allows you to:
a) Preset channels or the VCR channel one by one to the programme order of your choice.
To do this:
1 Once you have entered the “Set Up”menu as it is explained on page 16 and after selecting the "Manual
Programme Preset" option, press OK. Next with Programme option highlighted press OK.
Press
v or V to select which programme number you want to preset the channel on (for VCR, select
programme number “0”). Then press B.
2 The following option is only available depending on the country you have selected in the “Country”
menu.
After selecting the System option, press OK. Then press
v
or
V
to select the TV Broadcast system (B/G
for western European countries or D/K for eastern European countries. Then press B.
3 After selecting the Channel Number option, press OK. Next press
v
or
V
to select the channel tuning ("C"
for terrestrial channels or "S" for cable channels). Then press the number buttons to enter directly the channel
number of the TV Broadcast or the channel of the VCR signal. If you do not know the channel number, press
b and v or V to search for it. When you have tuned the desired channel, press OK twice to store.
Repeat all the above steps to tune and store more channels.
b) Label a channel using up to five characters.
To do this:
Once you have entered the “Set Up”menu as it is explained on page 16 and after selecting the "Manual
Programme Preset" option, press OK. Next with the Programme option, highlighted press the PROG +/- button
to select the programme number with the channel you wish to name. When the programme you want to name
appears on the screen, select the Label option and press OK. Then, with the first element highlighted, press
v
,
V
, B or b to select the letter, next press OK. When you have finished, press
v
,
V
, B or b to select the word
“End” on the screen and finally press OK to turn off the menu from the screen.
• To correct the letter, select "%" on the screen to go back and press OK.
• For a blank, select " " on the screen and press OK.
c) Fine tune the broadcast reception. Normally the automatic fine tuning (AFT) will give the best possible picture,
however you can manually fine tune the TV to obtain a better picture reception in case the picture is distorted.
To do this:
While watching the channel (TV Broadcast) you wish to fine tune, and once you have entered the “Set Up” menu
as it is explained on page 16 and after selecting the "Manual Programme" option, press
OK
.
Then select the AFT
option and press
b. Next press
v
or
V
to adjust the fine tuning between -15 and +15. Finally press OK twice
to store.
d) Skip any unwanted programme numbers when they are selected with the PROG +/- buttons.
To do this:
Once you have entered the "Set Up" menu as it is explained on page 16 and after selecting the "Manual
Programme Preset" option, press OK. Next with the Programme option highlighted, press the PROG +/- button
to select the programme number you want to skip. When the programme you want to skip appears on the screen,
select the Skip option and press
b
. Next press
v
or
V
to select On. Finally press OK twice to confirm and store.
To cancel this function afterwards, select “Off” instead of “On” in the step above.
e) View and record scrambled channels (e.g. from a pay TV decoder) when using a decoder connected to Scart
3/ 3 directly or through a VCR.
S
This option is only available depending on the country you have selected in the “Country” menu.
To do this:
Once you have entered the "Set Up" menu as it is explained on page 16 and after selecting the "Manual Programme
Preset" option, press OK. Next select the Decoder option and press
b. Next press v or V to select On. Finally
press OK twice to confirm and store.
To cancel this function afterwards, select "Off" instead of "On" in the step above.
18
TV Functions
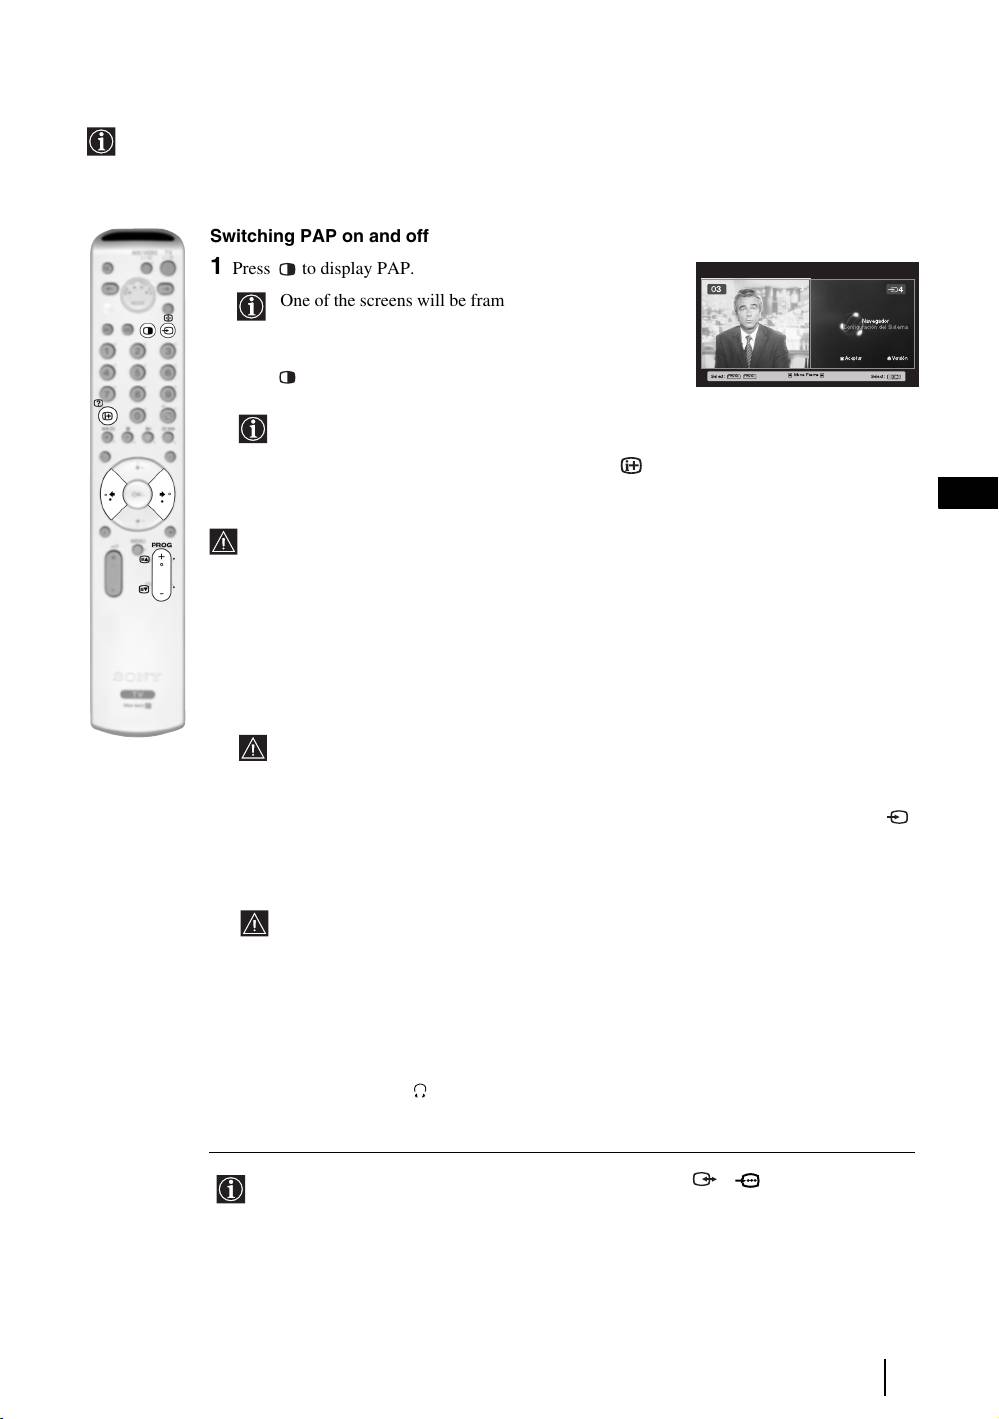
PAP (PICTURE AND PICTURE)
PAP divides the screen into two to watch two pictures in format 4:3 simultaneously.
Switching PAP on and off
1 Press to display PAP.
03
One of the screens will be framed to indicate that this is
Navegador
the active screen. It means that when you want to select
Configuración del Sistema
the PAP source, you will be doing it in the active screen.
Aceptar Versión
Select: Select:
PROG+ PROG-
Move Frame
2 Press again to remove PAP.
On the screen appears a banner guiding you how to operate
PAP. This banner will disappear after some seconds but it
always can be displayed again by pressing the button.
GB
Changing the active screen
This is only possible if Media Selector is set to TV.
To change the active screen (framed), press the B or b buttons.
Selecting PAP source
1 Selecting a TV channel:
Press the
B button to select the left screen as the active screen. Next press the number buttons
or PROG +/- to select a TV channel.
Video input signals can not be displayed on the left screen.
2 Selecting an input source:
Press the
b button to select the right screen as the active screen. Next press repeatedly the
button to watch the input signal of a connected equipment onto the TV right screen. For more
details on which input symbol you want to choose, please see section "Viewing pictures from
equipment connected to the TV" on page 23.
RF signal (TV broadcast channels) can not be displayed on the right screen.
Selecting the sound
The sound of the active screen (framed) always comes from the TV set loudspeakers.
Besides that, you can listen to the active screen as well as the non active screen via headphones.
To do this:
With the PAP switched on, refer to the section "The Sound Adjustment Menu", select "Headphones
Set Up" and set the option " PAP Sound" according your preference. For details see page 13.
In PAP (picture and picture) mode, the output from the Scart 2/ 2 is fixed to the right
picture.
TV Functions
19
Teletext
Teletext is an information service transmitted by most TV stations. The index page of the teletext service
(usually page 100) gives you information on how to use the service. To operate teletext, use the remote control
buttons as indicated below.
Teletext errors may occur if you use a channel (TV Broadcast) with a weak signal.
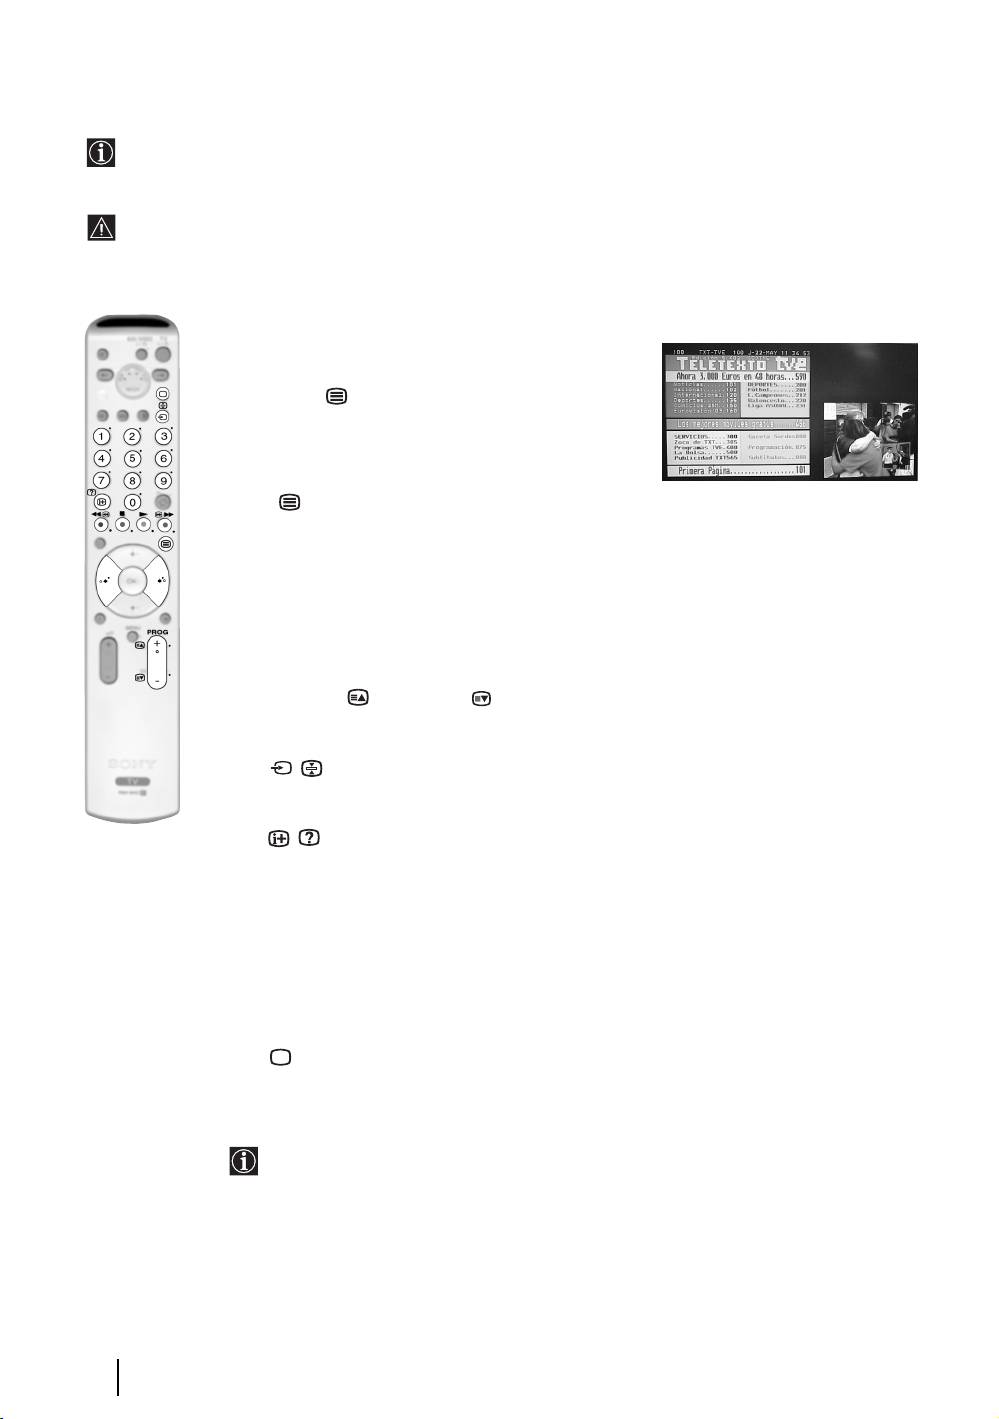
To switch on Teletext :
1 Select the broadcast channel which carries the teletext
service you wish to view.
2 Press the button one time to enter Picture and
Text (P&T) mode. The screen is divided into two with
the Text display on the left and the TV channel in the
right corner.
3 If you wish to view the Text in full screen mode, press
the button a second time.
To select a Teletext page:
Input 3 digits for the page number, using the numbered buttons.
• If you make a mistake, retype the correct page number.
• If the counter on the screen continues searching, it is because the page
is not available. If this is the case, input another page number.
To access the next or preceding page:
Press PROG + ( ) or PROG - ( ).
To freeze a teletext page:
Press / . Press it again to cancel the freeze.
To reveal concealed information (e.g: answer to a quiz):
Press / . Press it again to conceal the information.
To select a sub page:
A teletext page may consist of several sub pages. In this case, one or more arrows appear next
to the page number and an information box is displayed at the bottom of the screen showing the
number of sub pages contained on this page. As soon as sub pages are available, they start to
automatically run. If you want to stop the show and select your desired sub page, press
repeatedly
B or b.
To Switch Off Teletext:
Press .
Fastext
Fastext service lets you access Teletext pages with one button push.
When you are in Teletext mode and Fastext is broadcast, a colour coded menu appears at
the bottom of the teletext page. Press the appropriate coloured button (red, green, yellow
or blue) to access the page corresponding to your menu choice.
20
Teletext

NexTView*
*(depending on availability of service).
NexTView is an on-screen electronic programme guide, providing you with programme information for
different broadcasters.
When looking for information you can search by theme (sports, art, etc...) or date.
If wrong characters appear when viewing NexTView, use the menu system to enter the “Language” menu (see
page 16) and select the same language as the NexTView is broadcasted.
Displaying NexTView
1 Select a broadcast channel providing a NexTView service. In this case the indication
“NexTView” is displayed as soon as data is available.
2 To see NexTView service you have two different types of NexTView interface. These depend
on the % of available data:
a) “Programme List” interface:
Whilst you are watching TV, and after the indication “NexTView” (coloured white) is
GB
displayed on the screen, press the button on the remote control to watch the
“Programme List” interface (see fig. 1).
b) “Overview” interface:
Whilst you are watching TV, and after more than 50% of NexTView data is available
(100% data may not be available depending on the area) the indication “NexTView”
(coloured black) is displayed on the screen. Press the button on the remote control
to watch the “Overview” interface (see fig. 2).
3 To navigate through NexTView:
• Press
B or b to move left or right.
•Press
v or V to move downwards or upwards.
• Press OK to confirm a selection.
• If you have selected a programme, press OK to get more information on the
selected programme.
4 To switch NexTView off, press the button on the remote control.
“Programme List” interface (fig. 1): “Overview” interface (fig. 2):
Praesentiert von
www.tvmovie.de
Thu 12 Ju
Ihrer Programmzeitschr
General
1 Programmme list 2 3
Icons’ key:
NexTView
21
n
Praesentiert von
www.tvmovie.de
Thu 12 Ju
Ihrer Programmzeitschr
14:36
Thu 12
14:30
15:00
15:30 16:00
AttrText
Auf schlimmer undewig
AttrText
Baywatch
1
AttrText
Benny Hill
Perry Mason
AttrText
The Osbournes
AttrText
Segeln: Louis Vuitton Cup
AttrText
Twilight Zone
Perry Mason
RTL2
Tue 17 Jun 14:55
Krimiserie - Der Fall mit dem mittelmass
General
Date
Select:
categorie
2
3
n
14:36
Thu 12
14:30
15:00
15:30
16:00
AttrText
AttrText16
AttrText
AttrText16
AttrText
AttrText16
AttrText
AttrText16
AttrText
AttrText16
AttrText
AttrText16
Perry Mason
RTL2
Tue 17 Jun 14:55
Krimiserie - Der Fall mit dem mittelmass
Categori
e
1
Date
Select:
2
3
Date:
Categories:
Press the red button of the remote
Press the blue button of the remote to
control to display the date screen,
display the icons (see below the Icon’s key)
you can select the desired date by
for different themes. Next press v or V to
pressing v or V. Next press OK to
select the desired icon and finally press the
confirm.
OK button to confirm.
General:
Show
All the programme information is listed by time
and broadcast channels order.
Children
News
Arts
Movie
Music
Sports

