Sony CPD-E230: instruction
Class: Computer equipment, hardware, accessories
Type: Monitor
Manual for Sony CPD-E230
Table of contents
- Owner’s Record
- Table of Contents Setup 1 Connecting your monitor to your computer 2 Turning on the monitor and computer
- Adjustments Navigating the menu Adjusting the brightness and contrast
- On-Screen menu adjustments
- Troubleshooting On-screen messages
- If thin lines appear on the screen Specifications Self-diagnosis function
- Precautions
4-084-559-22 (1)
â
Trinitron Color
Computer Display
GB
Operating Instructions
FR
Mode d’emploi
DE
Bedienungsanleitung
ES
Manual de instrucciones
IT
Istruzioni per l’uso
RU
Инструкция по эксплуатации
SE
Bruksanvisning
NL
Gebruiksaanwijzing
CPD-E230
© 2001 Sony Corporation
Owner’s Record
NOTICE
This notice is applicable for USA/Canada only.
The model and serial numbers are located at the rear of the unit.
If shipped to USA/Canada, install only a UL LISTED/CSA
Record these numbers in the spaces provided below. Refer to them
LABELLED power supply cord meeting the following
whenever you call upon your dealer regarding this product.
specifications:
Model No.
Serial No.
SPECIFICATIONS
Plug Type Nema-Plug 5-15p
Cord Type SVT or SJT, minimum 3
× 18 AWG
WARNING
Length Maximum 15 feet
Rating Minimum 7 A, 125 V
To prevent fire or shock hazard, do not expose the
unit to rain or moisture.
NOTICE
Cette notice s’applique aux Etats-Unis et au Canada
Dangerously high voltages are present inside the
uniquement.
unit. Do not open the cabinet. Refer servicing to
Si cet appareil est export* aux Etats-Unis ou au Canada, utiliser
qualified personnel only.
le cordon d’alimentation portant la mention UL LISTED/CSA
FCC Notice
LABELLED et remplissant les conditions suivantes:
SPECIFICATIONS
This equipment has been tested and found to comply with the limits
for a Class B digital device, pursuant to Part 15 of the FCC Rules.
Type de fiche Fiche Nema 5-15 broches
These limits are designed to provide reasonable protection against
Cordon Type SVT ou SJT, minimum 3
× 18 AWG
harmful interference in a residential installation. This equipment
Longueur Maximum 15 pieds
generates, uses, and can radiate radio frequency energy and, if not
Tension Minimum 7 A, 125 V
installed and used in accordance with the instructions, may cause
harmful interference to radio communications. However, there is no
guarantee that interference will not occur in a particular installation.
If this equipment does cause harmful interference to radio or
television reception, which can be determined by turning the
equipment off and on, the user is encouraged to try to correct the
interference by one or more of the following measures:
As an
ENERGY STAR Partner, Sony
– Reorient or relocate the receiving antenna.
Corporation has determined that this
– Increase the separation between the equipment and receiver.
product meets the
ENERGY STAR
– Connect the equipment into an outlet on a circuit different from
guidelines for energy efficiency.
that to which the receiver is connected.
– Consult the dealer or an experienced radio/TV technician for
help.
You are cautioned that any changes or modifications not expressly
approved in this manual could void your authority to operate this
equipment.
This monitor complies with the
TCO’99 guidelines.
INFORMATION
This product complies with Swedish National Council for Metrology
If you have any questions about this product, you may call:
(MPR) standards issued in December 1990 (MPR II) for very low
Sony Customer Information Center
frequency (VLF) and extremely low frequency (ELF).
1-800-222-SONY (7669)
INFORMATION
or write to:
Ce produit est conforme aux normes du Swedish National Council
Sony Customer Information Center
for Metrology de décembre 1990 (MPR II) en ce qui concerne les
1 Sony Drive, Mail Drop #T1-11, Park Ridge, NJ 07656
fréquences très basses (VLF) et extrêmement basses (ELF).
INFORMACIÓN
Declaration of Conformity
Este producto cumple las normas del Consejo Nacional Sueco
para Metrología (MPR) emitidas en diciembre de 1990 (MPR II)
Trade Name: Sony
para frecuencias muy bajas (VLF) y frecuencias extremadamente
Model No.: CPD-E230
bajas (ELF).
Responsible Party: Sony Electronics Inc.
Address: 680 Kinderkamack Road, Oradell,
NJ 07649 USA
Telephone No.: 201-930-6972
This device complies with Part 15 of the FCC Rules. Operation is
subject to the following two conditions: (1) This device may not
cause harmful interference, and (2) this device must accept any
interference received, including interference that may cause
undesired operation.
2
â
•Trinitron
is a registered trademark of Sony Corporation.
Table of Contents
• Macintosh is a trademark licensed to Apple Computer, Inc., registered in
Setup . . . . . . . . . . . . . . . . . . . . . . . . . . . . . . . . . . . 3
the U.S.A. and other countries.
â
• Windows
and MS-DOS are registered trademarks of Microsoft
Adjustments . . . . . . . . . . . . . . . . . . . . . . . . . . . . . 4
Corporation in the United States and other countries.
Troubleshooting . . . . . . . . . . . . . . . . . . . . . . . . . . 6
• IBM PC/AT and VGA are registered trademarks of IBM Corporation of
the U.S.A.
Specifications . . . . . . . . . . . . . . . . . . . . . . . . . . . . 7
ä
• VESA and DDC
are trademarks of the Video Electronics Standard
Precautions . . . . . . . . . . . . . . . . . . . . . . . . . . . . . . 8
Association.
•
ENERGY STAR is a U.S. registered mark.
Appendix . . . . . . . . . . . . . . . . . . . . . . . . . . . . . . . . . i
• All other product names mentioned herein may be the trademarks or
Preset mode timing table . . . . . . . . . . . . . . . . . . . . . i
registered trademarks of their respective companies.
• Furthermore, “
ä” and “â” are not mentioned in each case in this manual.
TCO’99 Eco-document . . . . . . . . . . . . . Back Cover
Setup
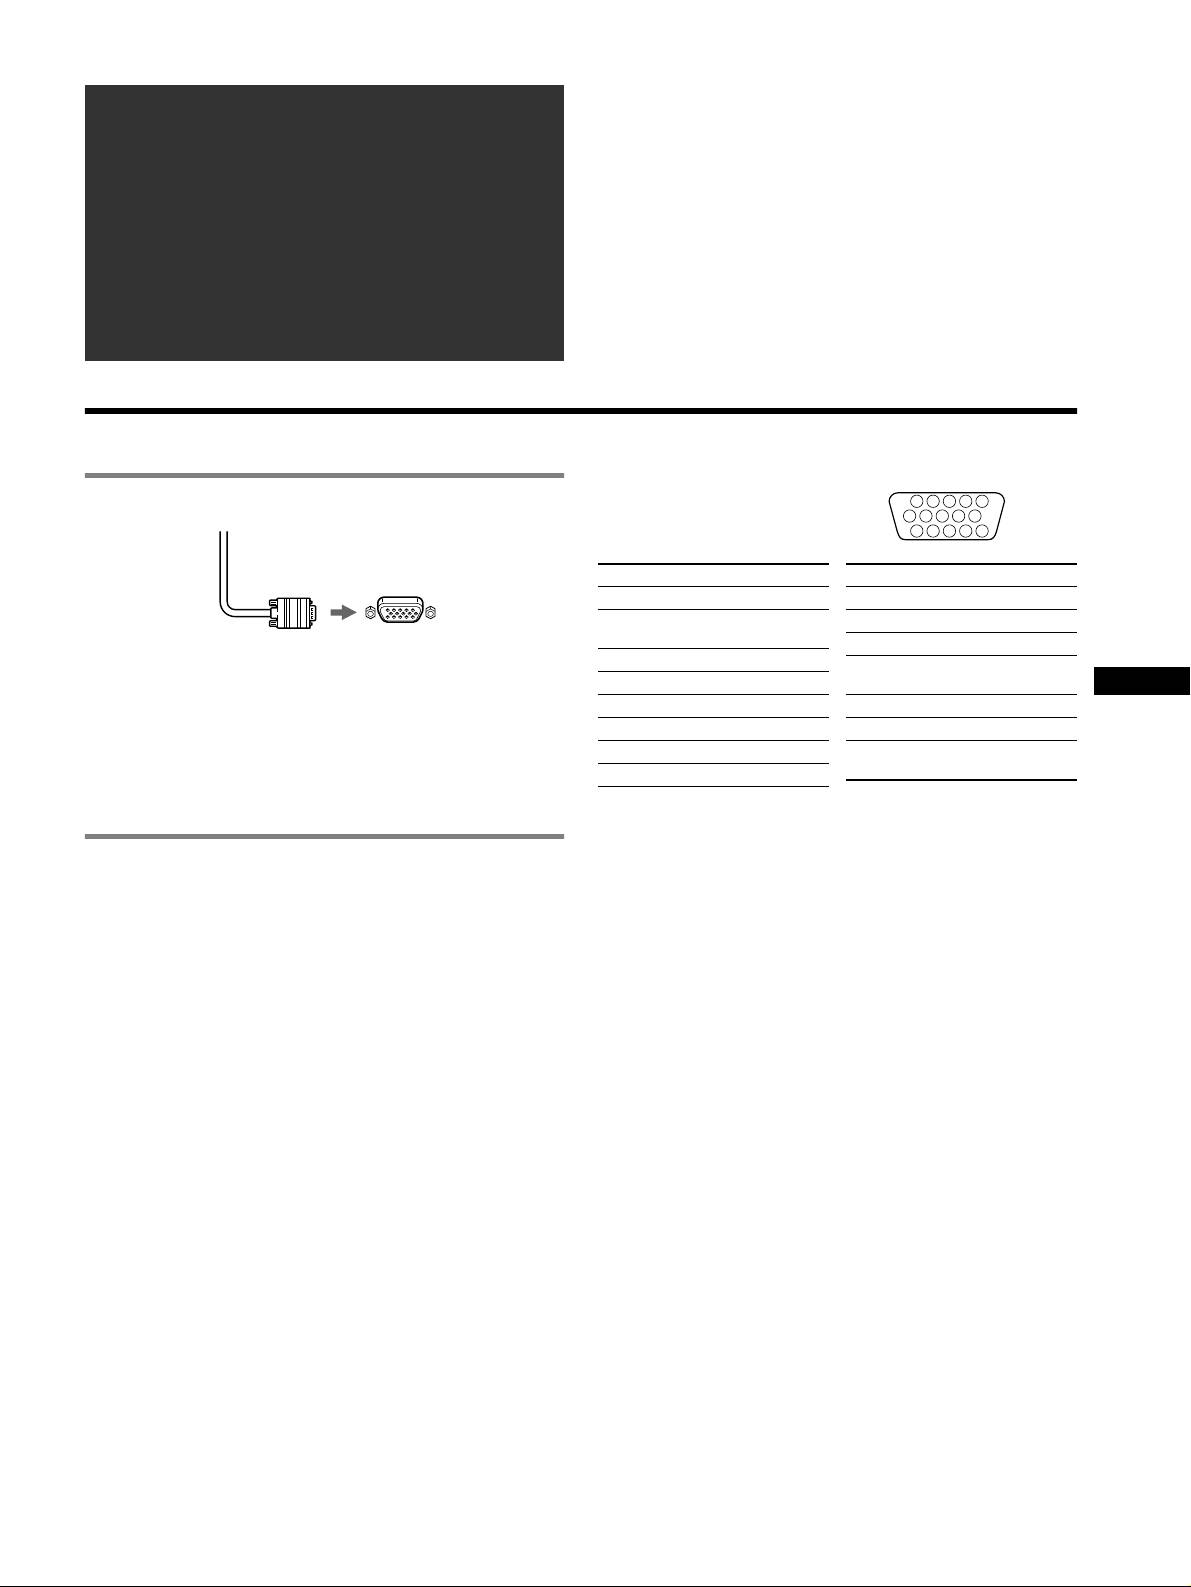
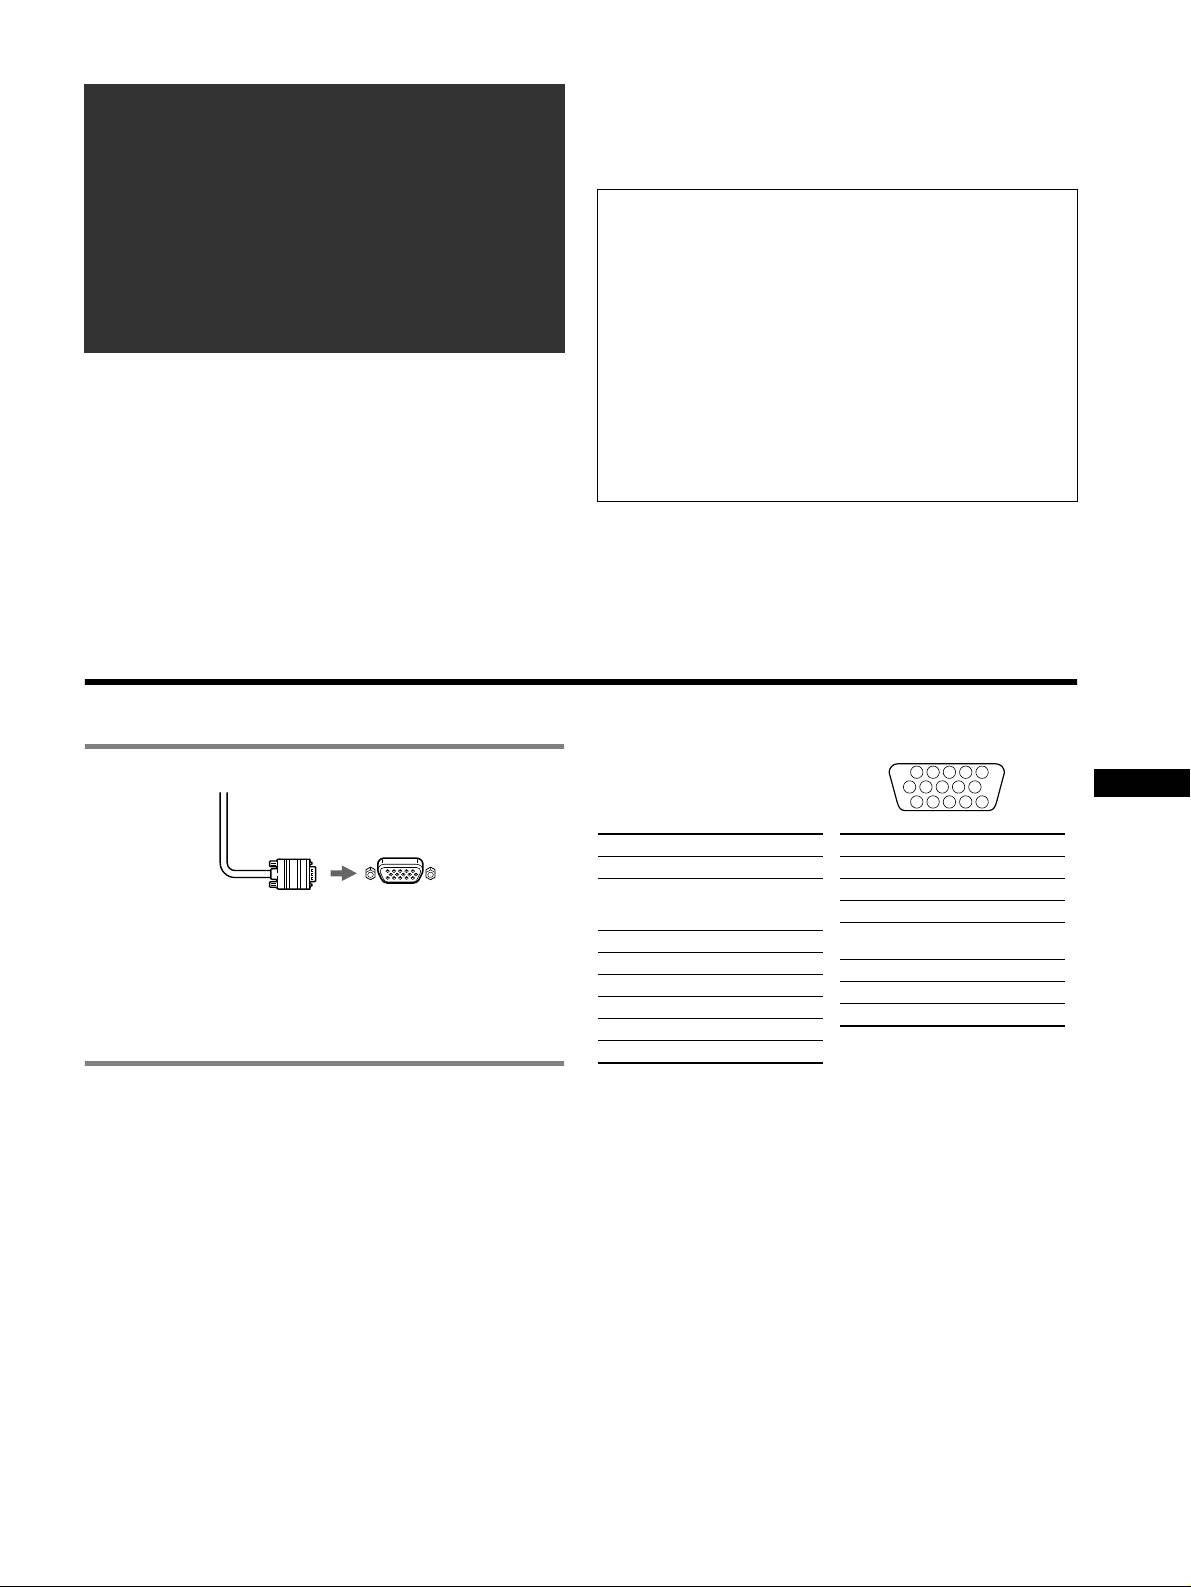
HD15 input connectors
1 Connecting your monitor to your computer
1
5432
678910
11 12 13 14 15
Pin No. Signal
Pin No. Signal
1Red
9 DDC HOST 5V*
Green (Sync on
10 Ground
2
Green)
Video signal cable
11 ID (Ground)
to HD15 of the
of the monitor
connecting computer
3Blue
Bi-Directional
12
4 ID (Ground)
Data (SDA)*
GB
5 DDC Ground*
13 H. Sync
Connecting to a Macintosh or compatible
6 Red Ground
14 V. Sync
computer
7 Green Ground
Data Clock
15
When connecting this monitor to a Macintosh computer, use the
(SCL)*
8 Blue Ground
Macintosh adapter if necessary. Connect the Macintosh adapter to
* DDC (Display Data Channel) is a standard of VESA.
the computer before connecting the cable.
2 Turning on the monitor and computer
1 Connect the power cord to the monitor and press the
1 (power) switch to turn on the monitor.
2 Turn on the computer.
No need for specific drivers
This monitor complies with the “DDC” Plug & Play standard and
automatically detects all the monitor’s information. No specific driver
needs to be installed to the computer.
The first time you turn on your PC after connecting the monitor, the setup
Wizard may appear on the screen. In this case, follow the on-screen
instructions. The Plug & Play monitor is automatically selected so that you
can use this monitor.
Notes
• Do not touch the pins of the video signal cable connector.
• Check the alignment of the HD15 connector to prevent bending the pins
of the video signal cable connector.
3
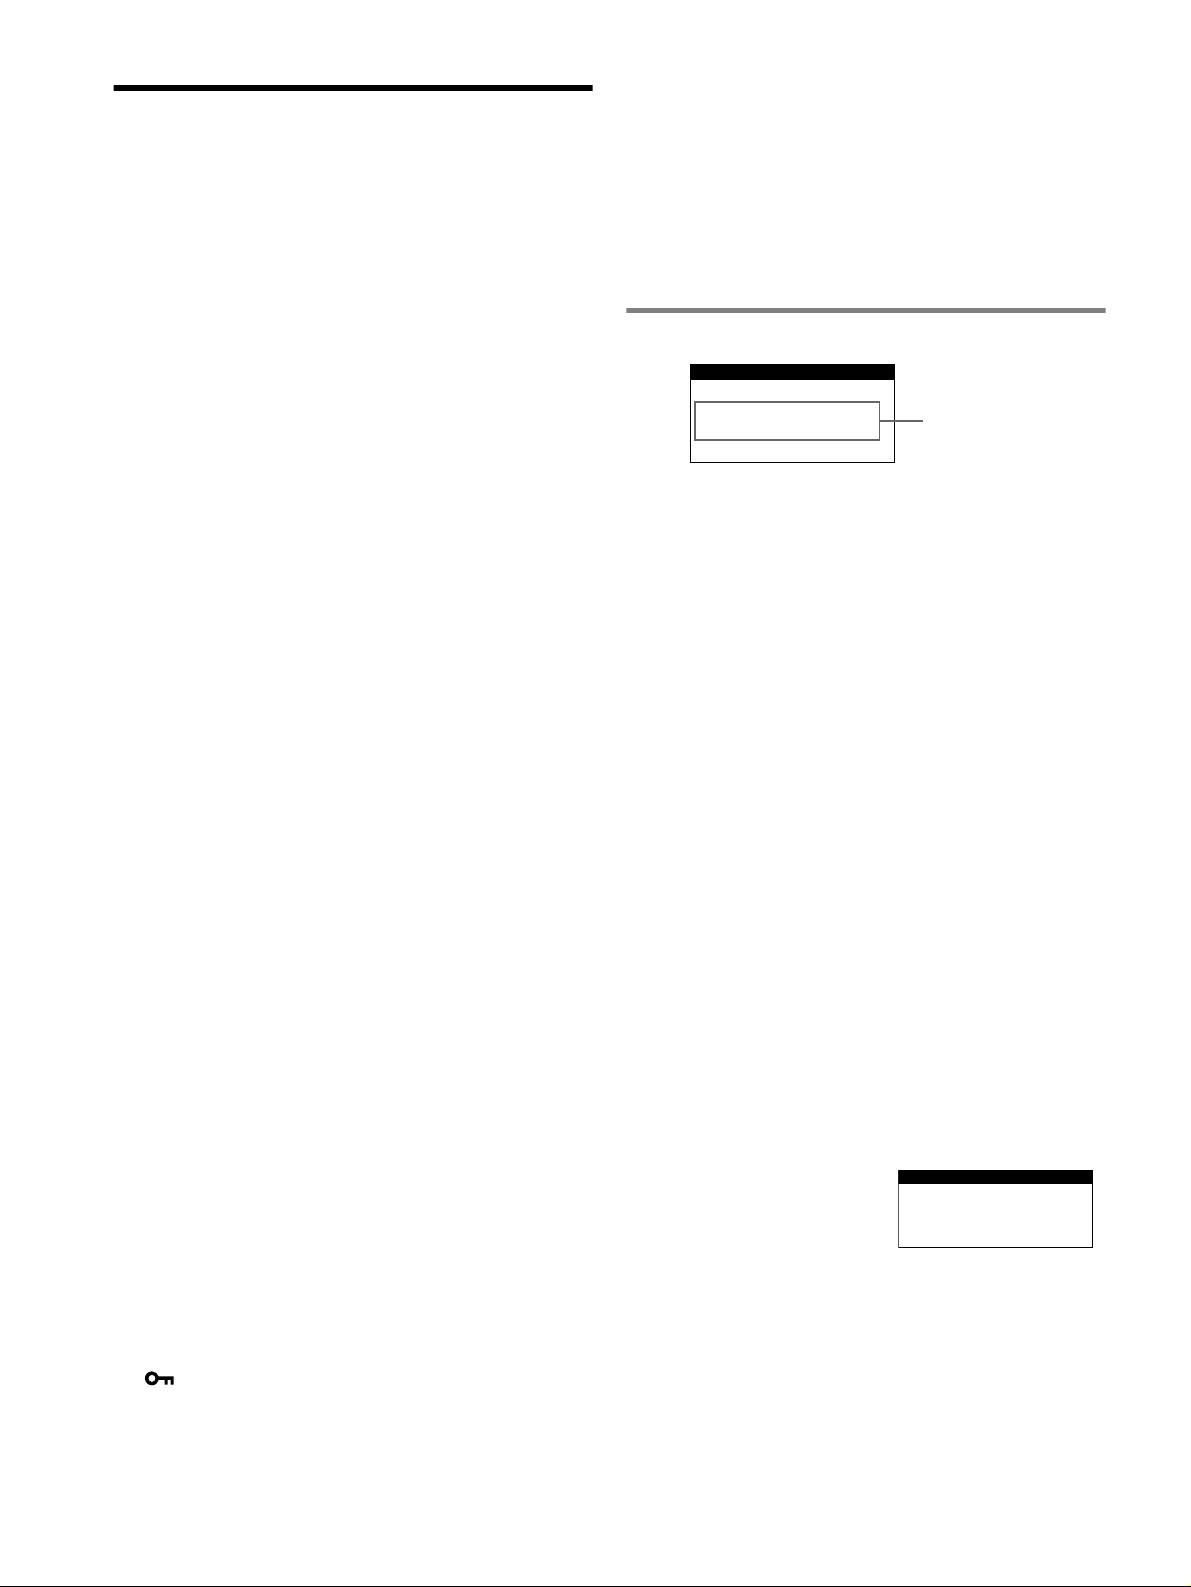
Adjustments
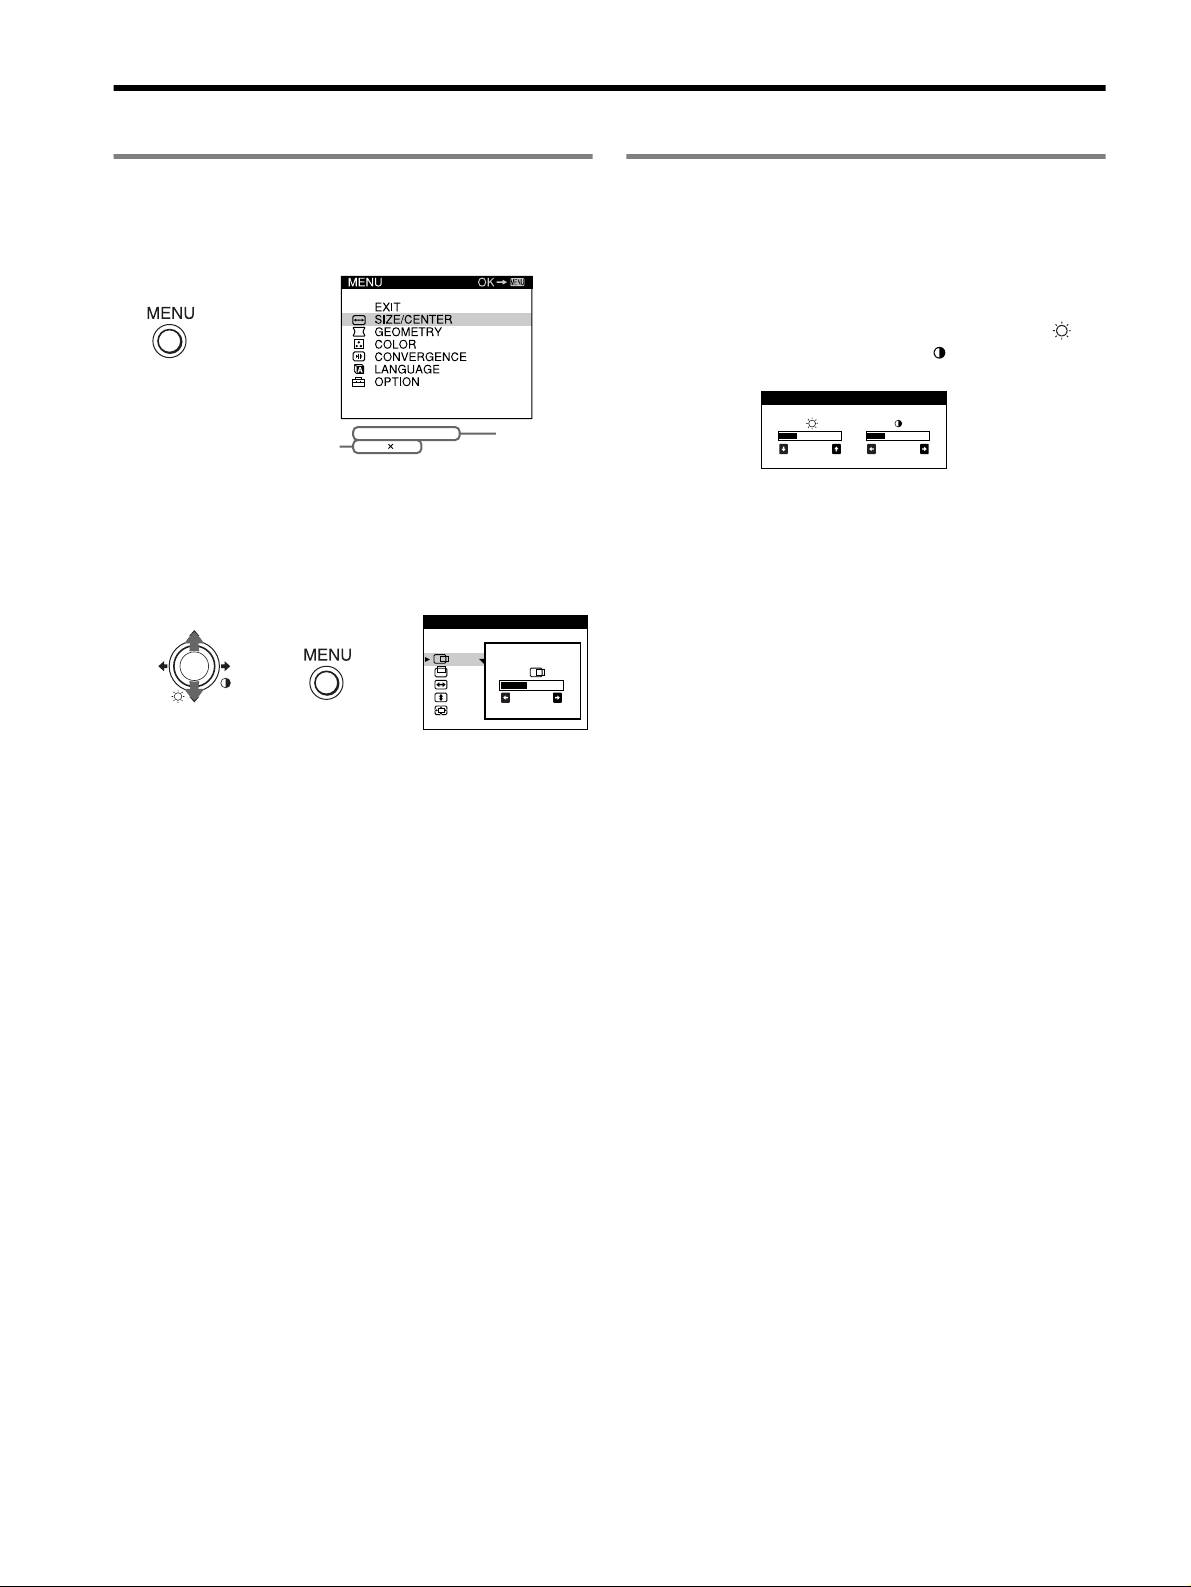
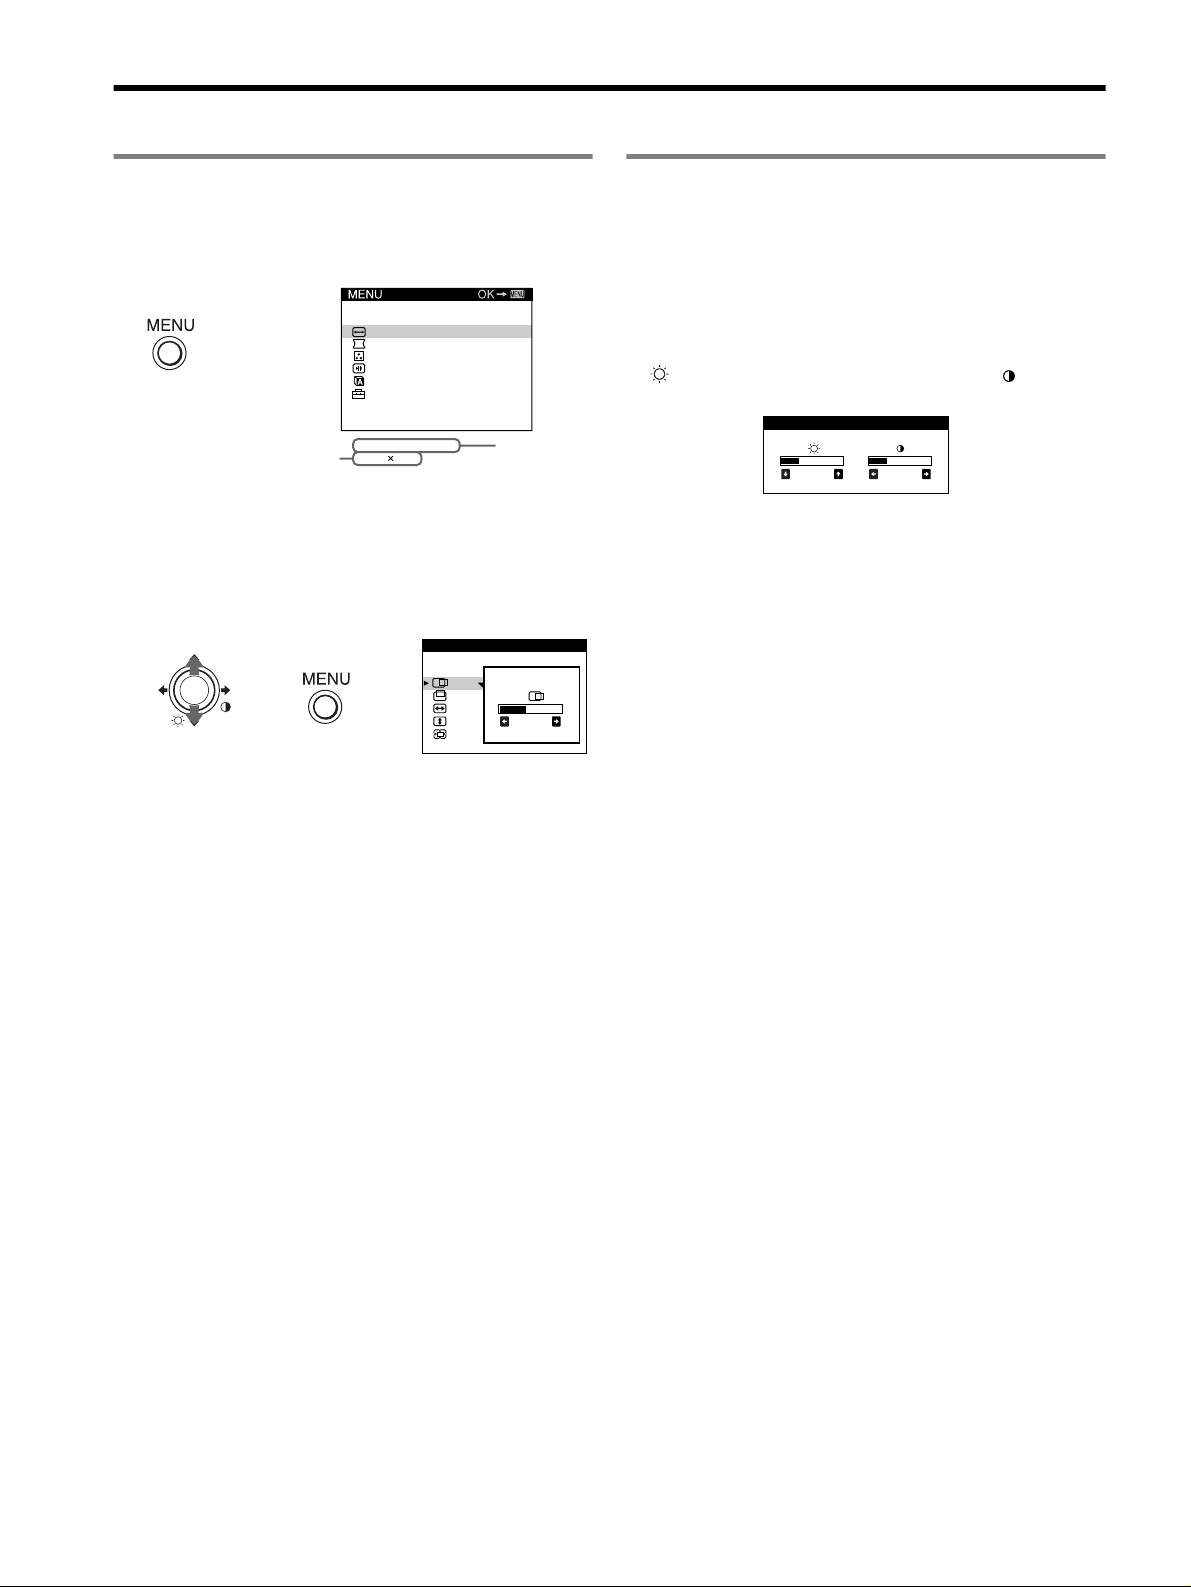
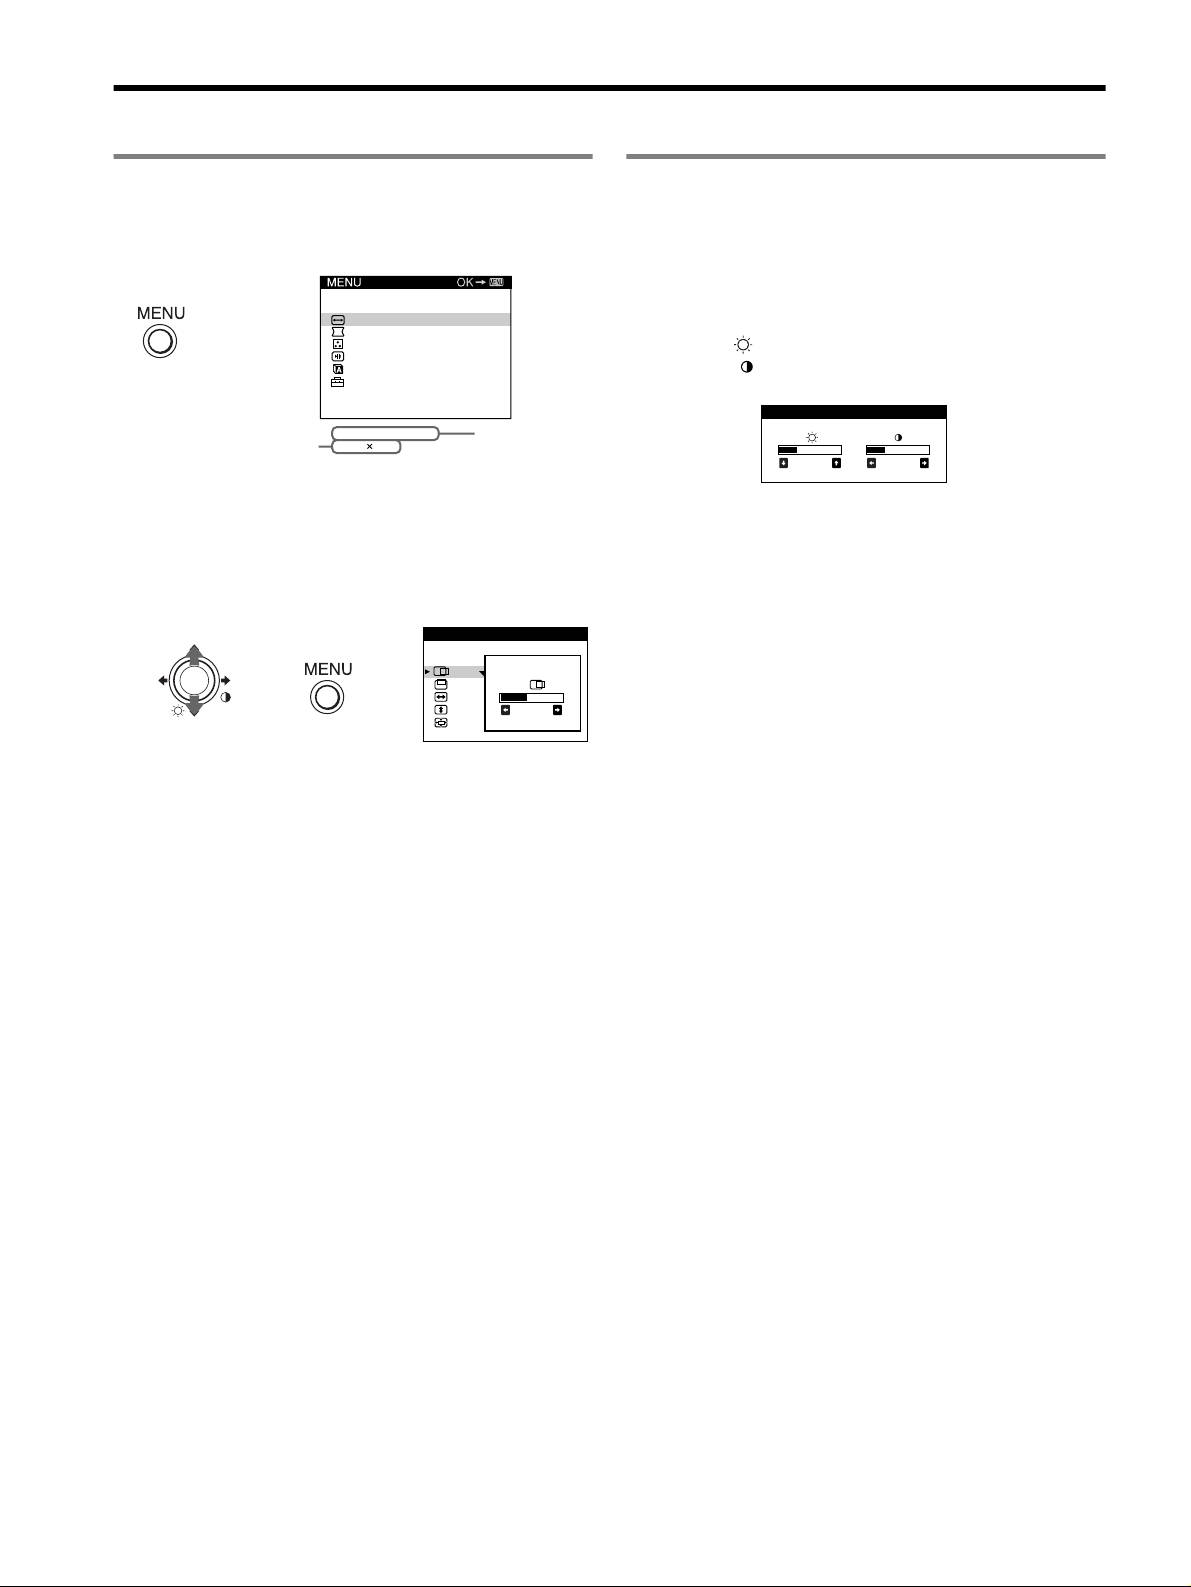
Navigating the menu
Adjusting the brightness and contrast
Brightness and contrast adjustments are made using a separate
1 Press the MENU/OK button to display the main menu.
BRIGHTNESS/CONTRAST menu. These adjustments are
effective for all input signals.
Main menu
1 Move the joystick in any direction to display the
BRIGHTNESS/CONTRAST menu.
,
2 Move the joystick m/M to adjust the brightness ( ),
and </, to adjust the contrast ( ).
BRI GHTNESS / CONTRAST
the resolution of the current
60.0kHz/ 75Hz
the horizontal
input signal (only if the signal
1024
768
and vertical
26 26
matches to one of the
frequencies
recommended VESA timing
of the current
modes).
input signal
2 Move the joystick m/M to highlight the main menu you
want to adjust and press the MENU/OK button.
Sub menu
SIZE/CENTER
,,
26
3 Move the joystick m/M to highlight the sub menu you
want to adjust. Then move the joystick </, to make
adjustments.
4
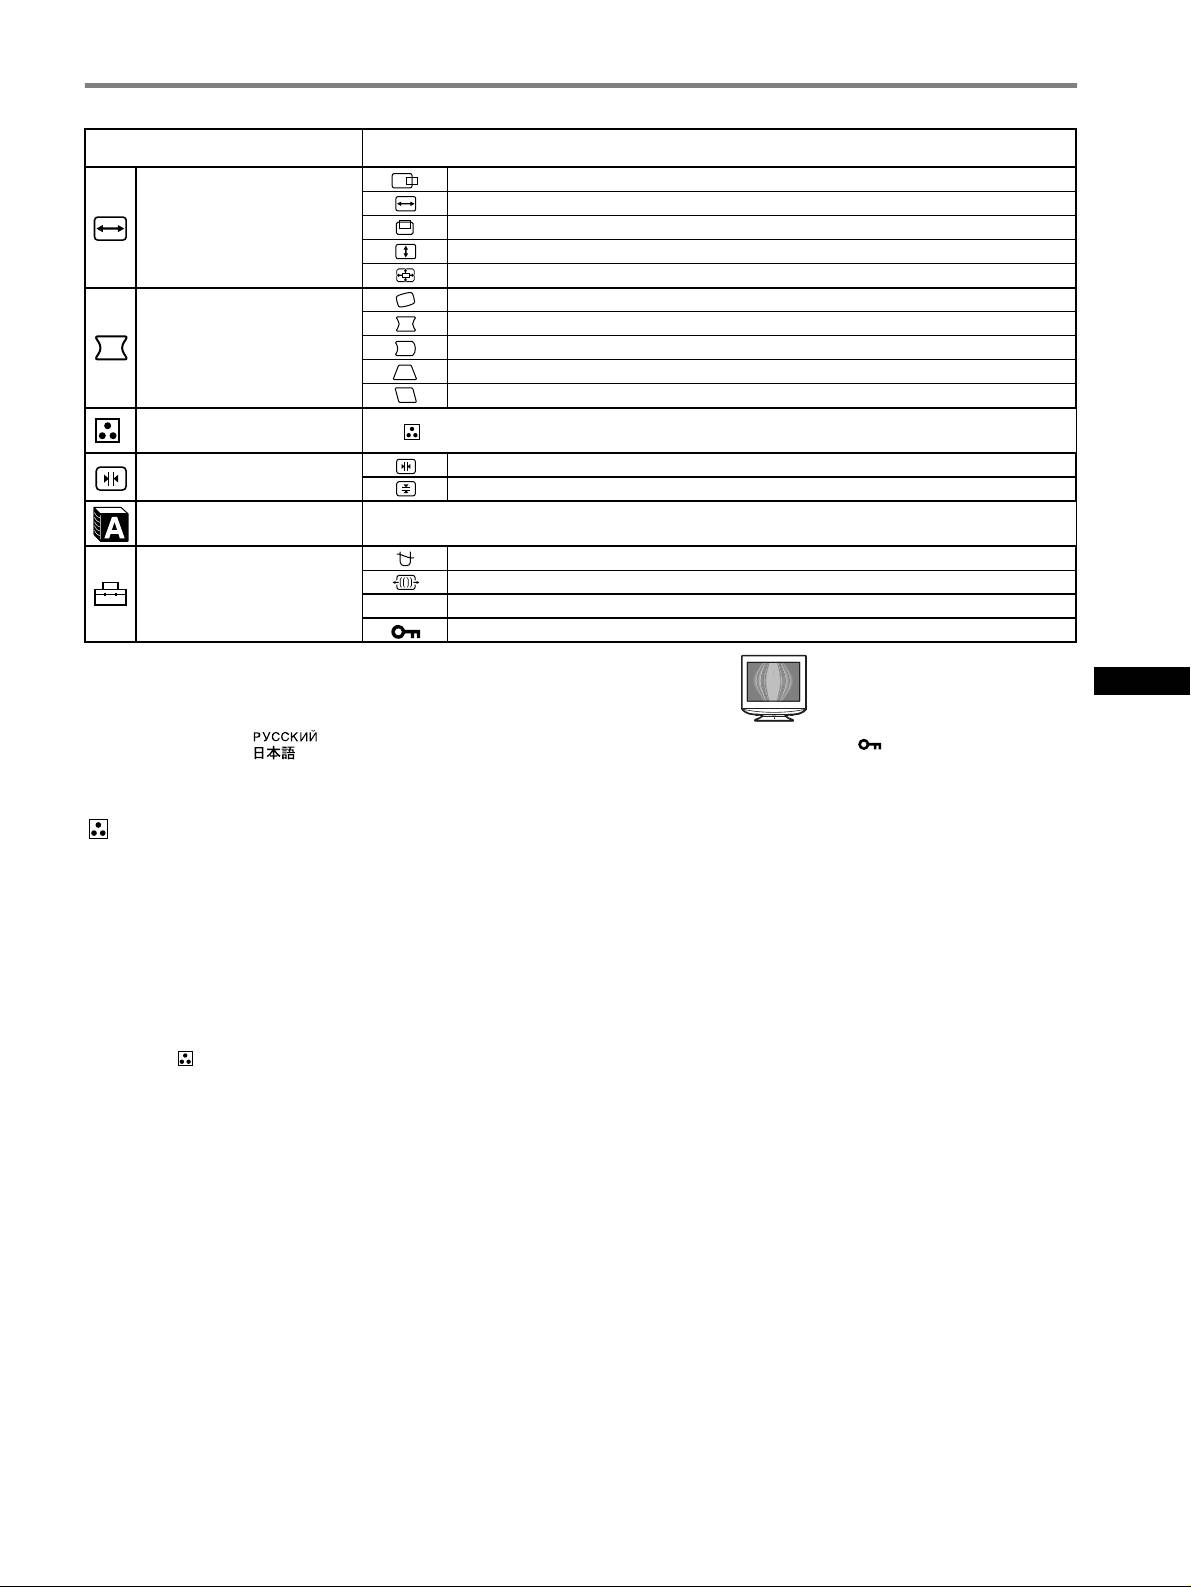
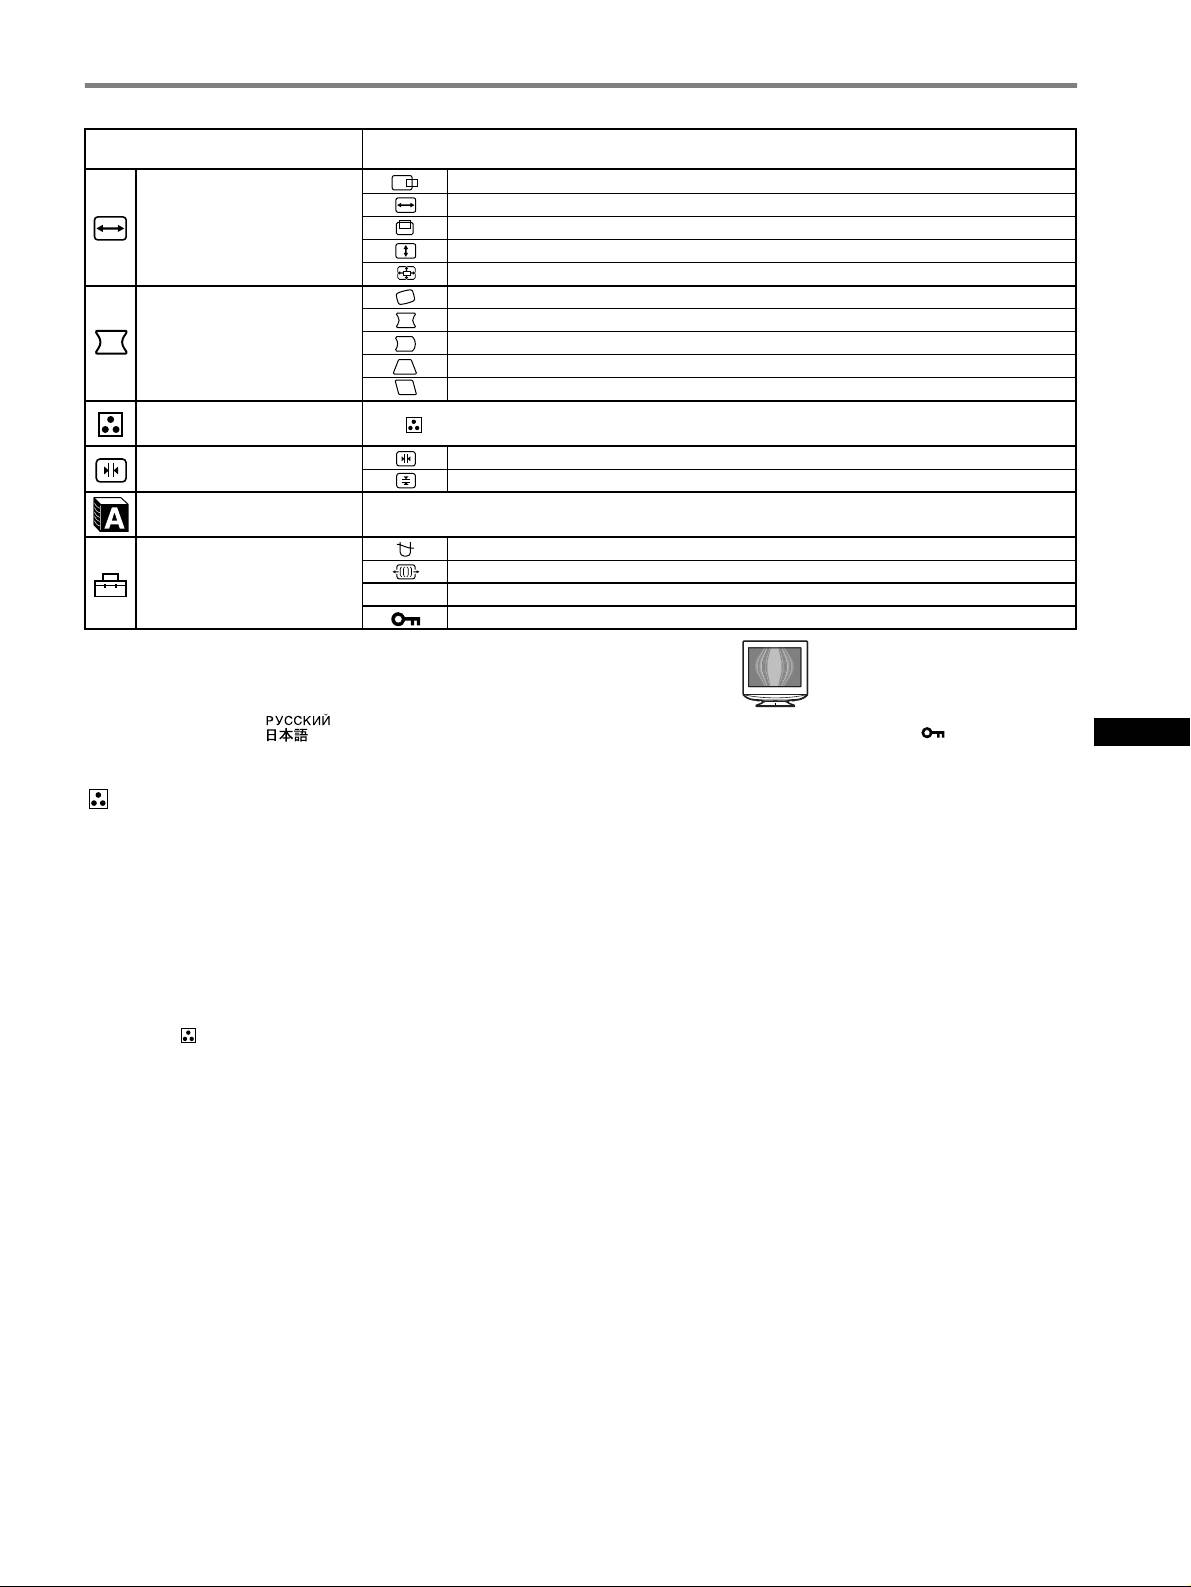
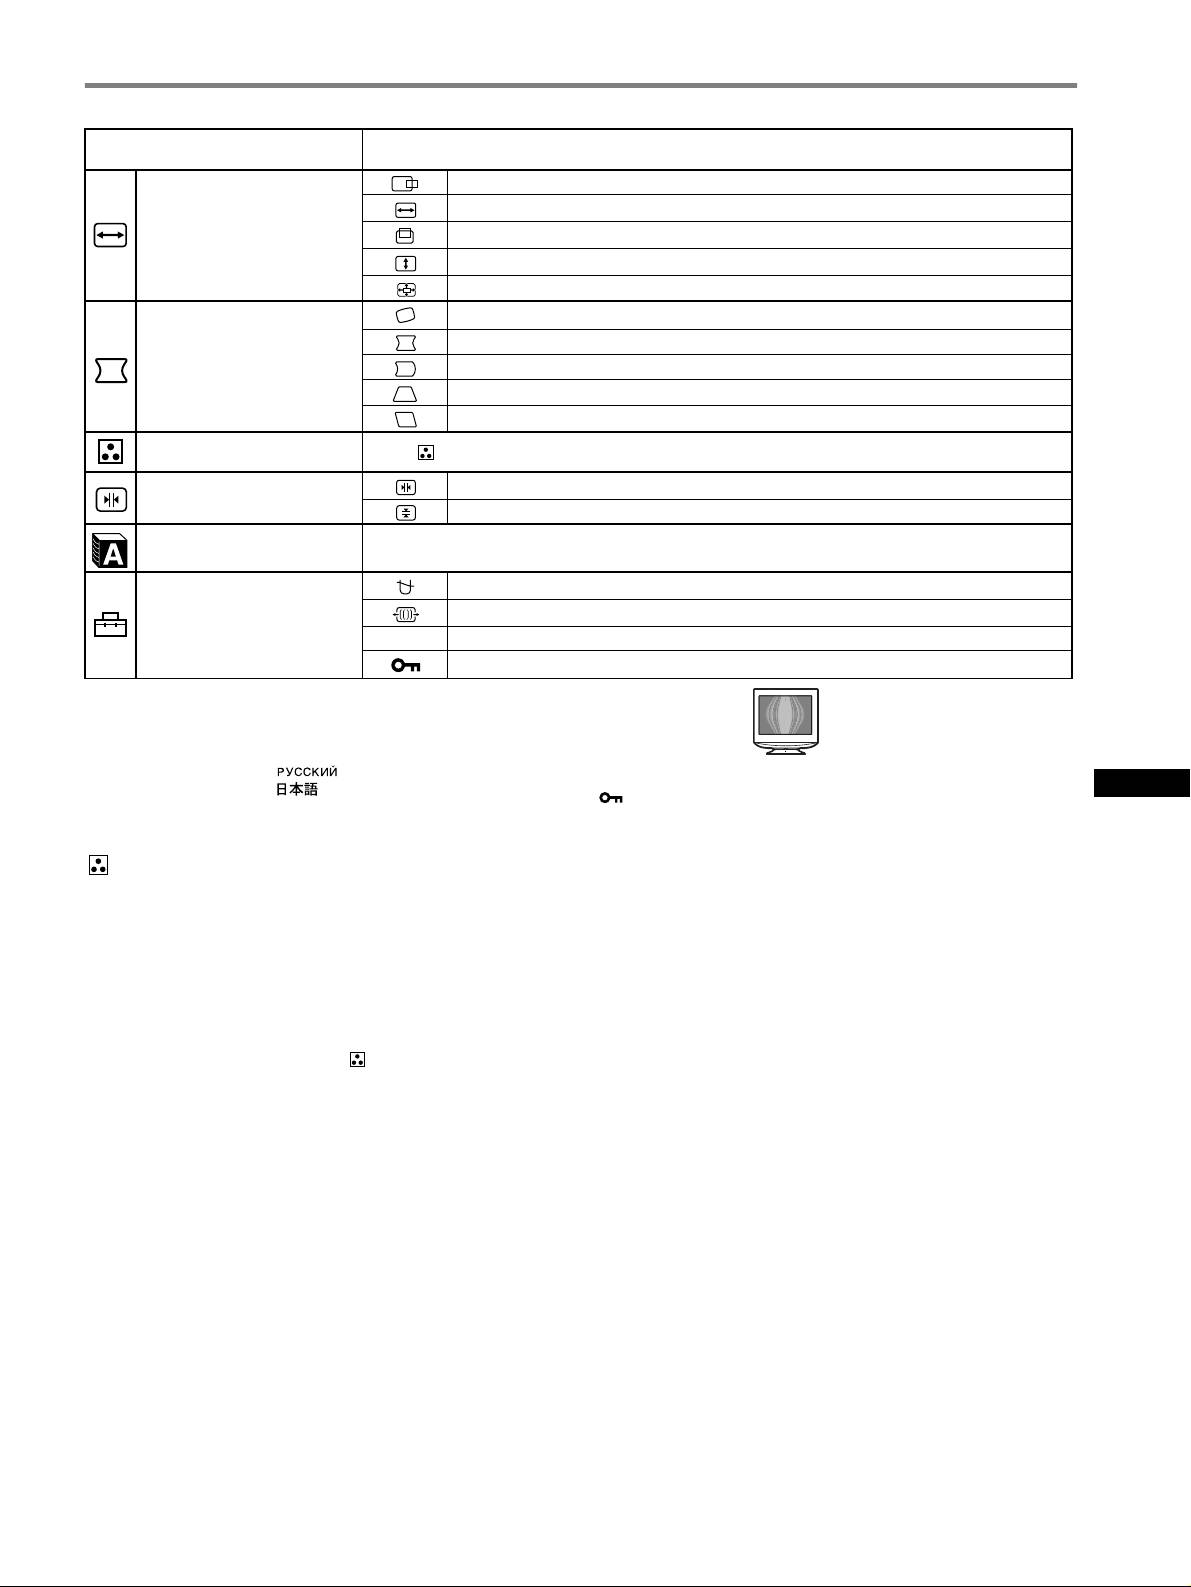
On-Screen menu adjustments
Main menu icons and adjustment
Sub menu icons and adjustment items
items
Horizontal position
Horizontal size
Adjusting the size or centering of
the picture
*
1
Vertical position
Ve r t i c al si z e
Enlarge/reduce
Rotating the picture
*
2
Expanding or contracting the picture sides*
1
Adjusting the shape of the picture
Shifting the picture sides to the left or right*
1
Adjusting the picture width at the top of the screen*
1
Shifting the picture to the left or right at the top of the screen*
1
Adjusting the color of the picture
*
2
See “ : To adjust the color of the picture”.
Horizontally shifts red or blue shadows
Adjusting the convergence
*
2
Vertically shifts red or blue shadows
Selecting language Selecting the on-screen menu language
*
3
DEGAUSS: demagnetizes the monitor.
MOIRE ADJUST: Minimises moire
*
4
Additional settings
0 See “To reset the adjustment”.
Protecting adjustment data (CONTROL LOCK)
*
5
1
4
*
This adjustment is effective for the current input signal.
*
Example of Moire
2
*
This adjustment is effective for all input signals.
3
GB
*
Language Menu
• ENGLISH • NEDERLANDS: Dutch
• FRANÇAIS: French • SVENSKA: Swedish
• DEUTSCH: German • : Russian
5
*
Only the 1 (power) switch, EXIT, and (CONTROL LOCK) menu
• ESPAÑOL: Spanish • : Japanese
• ITALIANO: Italian
will operate.
: To adjust the color of the picture
The COLOR settings allow you to adjust the picture’s color
temperature by changing the color level of the white color field.
Colors appear reddish if the temperature is low, and bluish if the
temperature is high. This adjustment is useful for matching the
monitor’s color to a printed picture’s colors.
x Adjustment items
You can select the preset color temperature from 5000K or 9300K.
The default setting is 9300K.
If necessary, you can make additional fine adjustments to the color
by selecting .
0: To reset the adjustment
The RESET option erases your customized settings. To restore
your monitor to the factory settings, refer to the following steps.
x Resetting the adjustment for current input signal
Move the joystick ,.
x Resetting the adjustment for all input signals
Hold the joystick , for 2 seconds.
Note
When “reset the adjustment for all input signal” is activated, the customized
language selection goes back to the default language of English.
5
x A hum is heard right after the power is turned on
• This is the sound of the auto-degauss cycle. When the power is
Troubleshooting
turned on, the monitor is automatically degaussed for five seconds.
x No picture
* If a second degauss cycle is needed, allow a minimum interval of
20 minutes for the best result. A humming noise may be heard, but this is
If the 1 (power) indicator is not lit
not a malfunction.
• Check that the power cord is properly connected.
• Check that the 1 (power) switch is in the “on” position.
On-screen messages
The 1 (power) indicator is orange
• Check that the video signal cable is properly connected and all plugs
are firmly seated in their sockets.
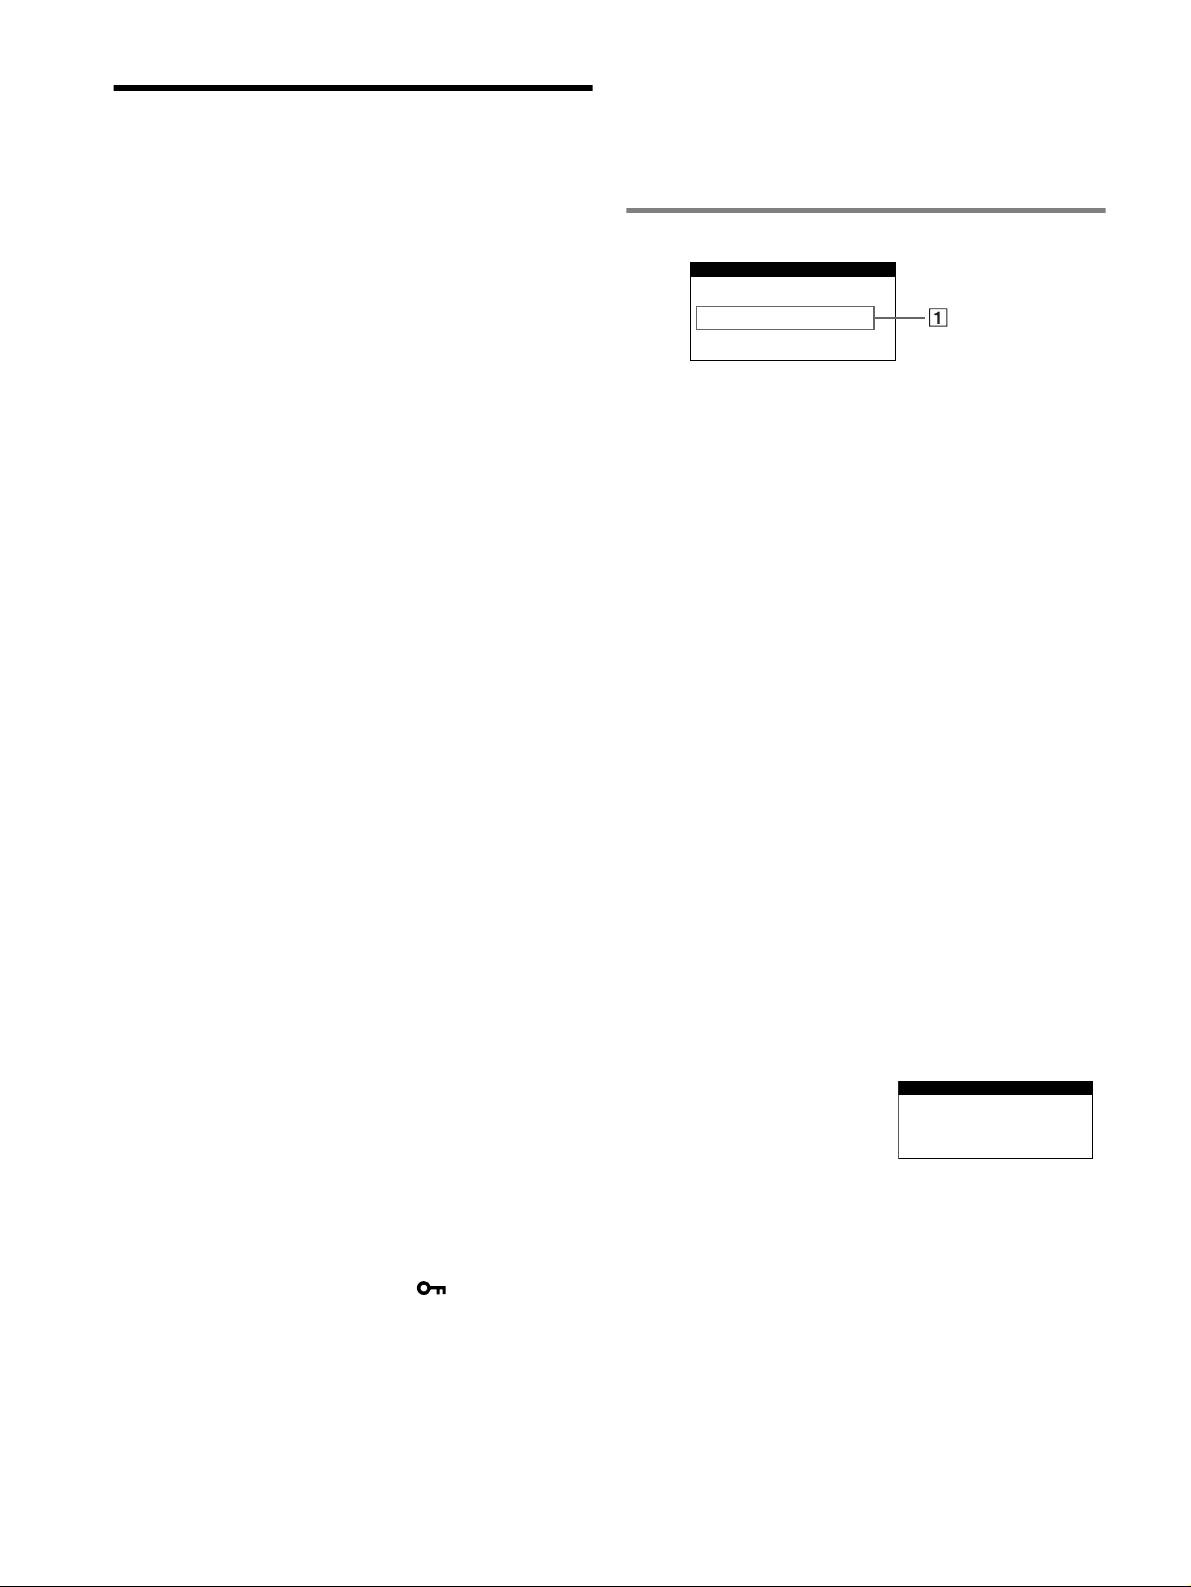
INFORMATION
• Check that the HD15 video input connector’s pins are not bent or
pushed in.
OUT OF SCAN RANGE
• Check that the computer’s power is “on”.
• The computer is in power saving mode. Try pressing any key on the
computer keyboard or moving the mouse.
• Check that the graphic board is completely seated in the proper bus
1 If “OUT OF SCAN RANGE” appears:
slot.
This indicates that the input signal is not supported by the monitor’s
If the 1 (power) indicator is green or flashing orange
specifications. Refer to the following remedies.
• Use the Self-diagnosis function.
• Check that the video frequency range is within that specified for
x Picture flickers, bounces, oscillates, or is scrambled
the monitor. If you replaced an old monitor with this monitor,
• Isolate and eliminate any potential sources of electric or magnetic
reconnect the old monitor and adjust the frequency range to the
fields such as other monitors, laser printers, electric fans, fluorescent
following.
lighting, or televisions.
Horizontal: 30 – 85 kHz
• Move the monitor away from power lines or place a magnetic shield
near the monitor.
Vertical: 48 – 170 Hz
• Try plugging the monitor into a different AC outlet, preferably on a
1 If “NO INPUT SIGNAL” appears:
different circuit.
• Try turning the monitor 90° to the left or right.
This indicates that no input signal is present. Refer to the following
• Check your graphics board manual for the proper monitor setting.
remedies.
• Confirm that the graphics mode and the frequency of the input signal
• Check that the video signal cable is properly connected and all
are supported by this monitor (see “Preset mode timing table” on
plugs are firmly seated in their sockets.
page i). Even if the frequency is within the proper range, some
• Check that the HD15 video input connector’s pins are not bent or
graphics board may have a sync pulse that is too narrow for the
pushed in.
monitor to sync correctly.
• Check that the computer’s power is “on.”
• Adjust the computer’s refresh rate (vertical frequency) to obtain the
• Check that the graphic board is completely seated in the proper
best possible picture.
bus slot.
x Picture is fuzzy
• Adjust the brightness and contrast.
1 If “MONITOR IS IN POWER SAVE MODE”
• Degauss the monitor.*
appears:
• Adjust for minimum moire.
This indicates that the computer is in power saving mode. This
x Picture is ghosting
message is displayed only when your computer is in a power saving
• Eliminate the use of video cable extensions and/or video switch
mode and you press any one of the buttons on the monitor. Refer to
boxes.
the following remedies.
• Check that all plugs are firmly seated in their sockets.
•
Try pressing any key on the computer keyboard or moving the
x Picture is not centered or sized properly
mouse.
• Adjust the size or centering. Note that with some input signals and/
• Check that the computer’s power is “on.”
or graphics board the periphery of the screen is not fully utilized.
• Check that the graphic board is completely seated in the proper
• Just after turning on the power switch, the size/center may take a
bus slot.
while to adjust properly.
x Edges of the image are curved
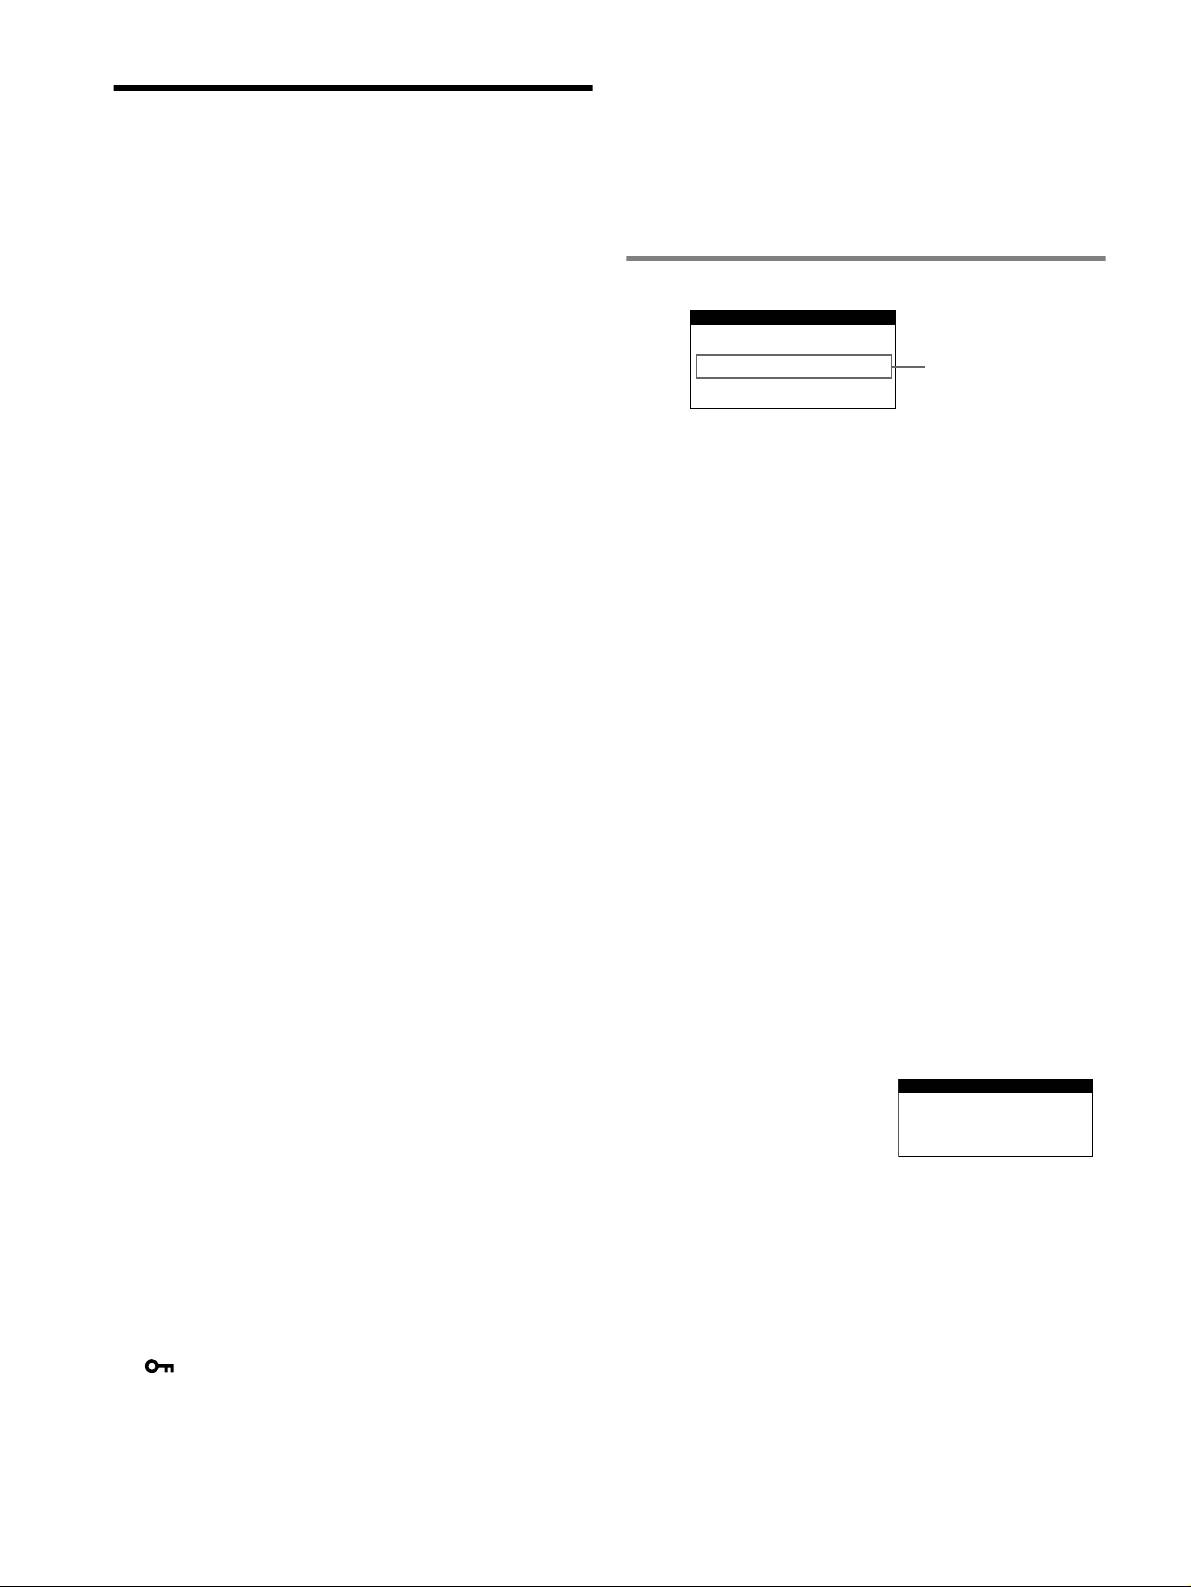
To display this monitor’s name, serial number, and
date of manufacture.
• Adjust the geometry.
While the monitor is receiving a
INFORMATION
x Wavy or elliptical pattern (moire) is visible
video signal, press and hold the
• Adjust for minimum moire.
MODEL:CPD-E230
MENU/OK button for more than
SER NO:1234567
• Change your desktop pattern.
MANUFACTURED : 200
1-52
five seconds to display this
x Color is not uniform
monitor’s information box.
• Degauss the monitor.* If you place equipment that generates a
magnetic field, such as a speaker, near the monitor, or if you change
the direction the monitor faces, color may lose uniformity.
x White does not look white
• Adjust the color temperature.
x Monitor buttons do not operate ( appears on the
screen)
• If the control lock is set to ON, set it to OFF.
x Letters and lines show red or blue shadows at the
edges
• Adjust the convergence.
6
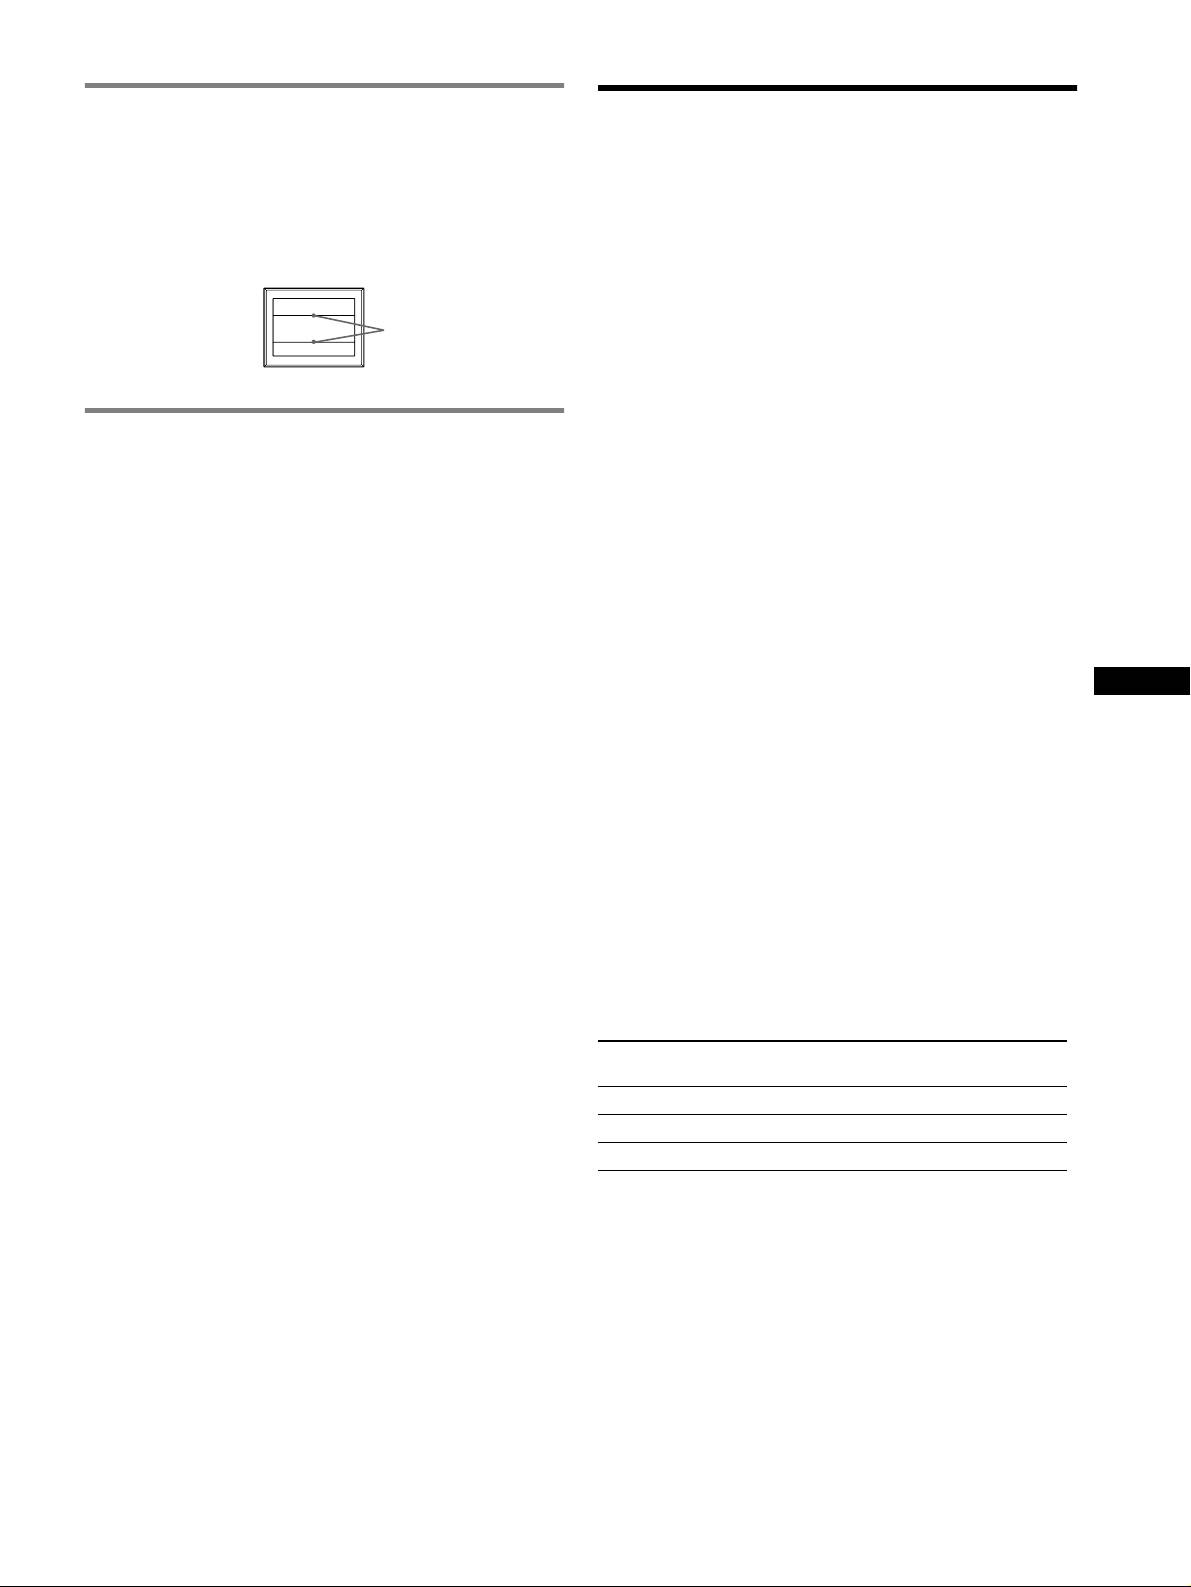
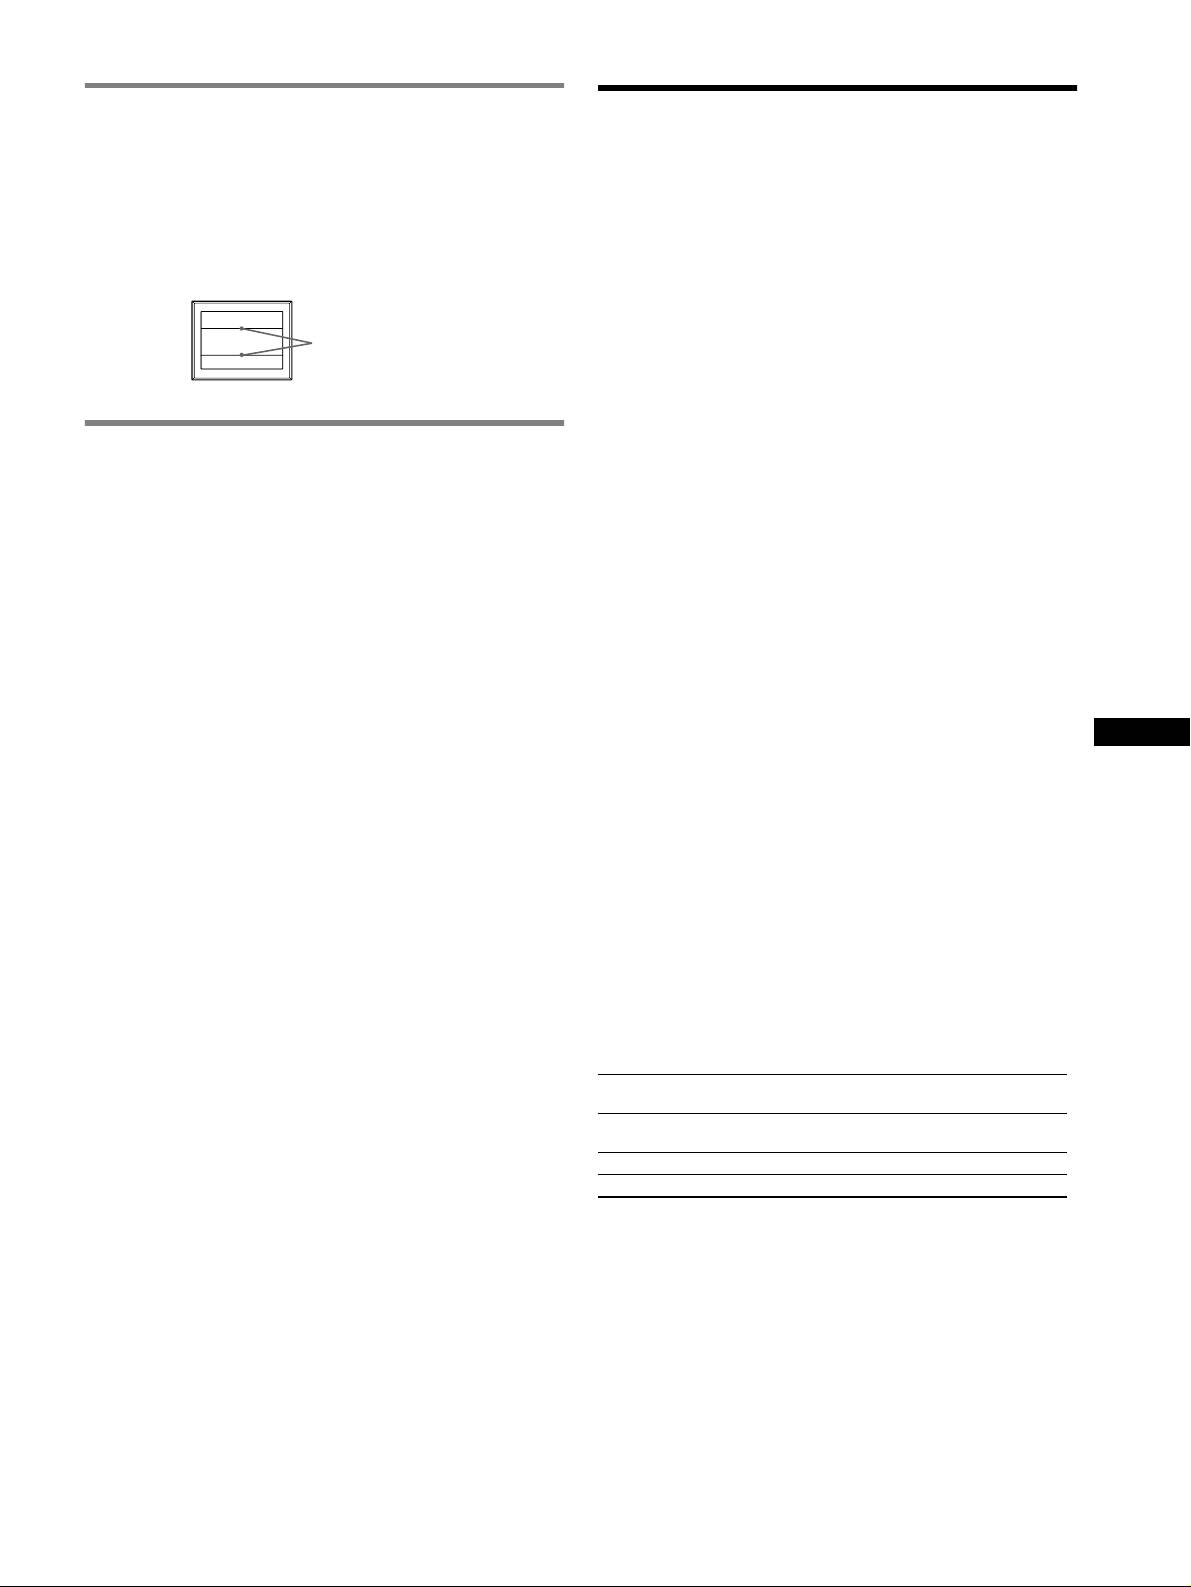
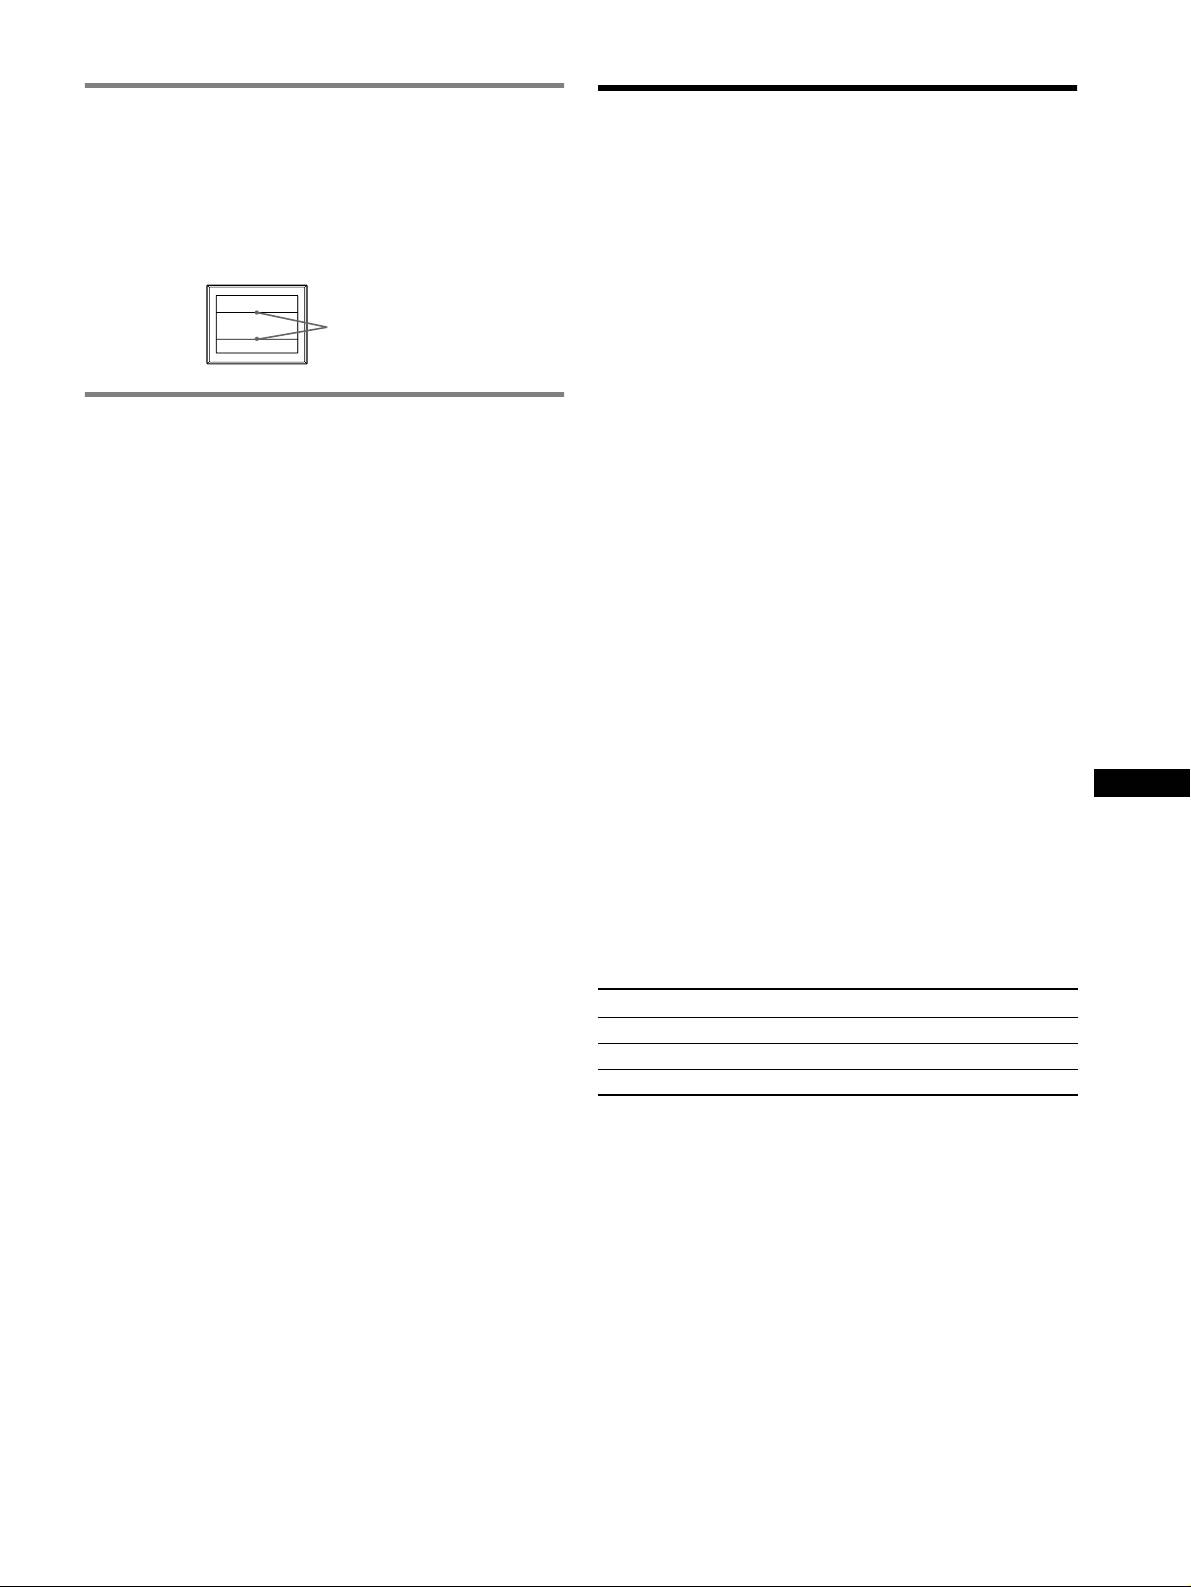
If thin lines appear on the screen
Specifications
(damper wires)
CRT 0.24 mm aperture grille pitch (center)
These lines do not indicate a malfunction; they are a normal
17 inches measured diagonally
effect of the Trinitron picture tube with this monitor. These are
90-degree deflection
shadows from the damper wires used to stabilize the aperture grille.
FD Trinitron
The aperture grille is the essential element that makes a Trinitron
Viewable image size
Approx. 327
× 243 mm (w/h)
picture tube unique by allowing more light to reach the screen,
7
5
(12
/8 × 9
/8 inches)
resulting in a brighter, more detailed picture.
Viewing image Approx. 406 mm (16.0 inches)
Resolution
Maximum Horizontal: 1600 dots
Vertical: 1200 lines
Damper
Recommended Horizontal: 1024 dots
wires
Vertical: 768 lines
Standard image area
Approx. 312
× 234 mm (w/h)
3
1
(12
/8 × 9
/4 inches)
Deflection frequency
Self-diagnosis function
Horizontal: 30 to 85 kHz
Vertical: 48 to 170 Hz
This monitor is equipped with a self-diagnosis function. If there is
AC input voltage/current
a problem with your monitor or computer(s), the screen will go
100 to 240 V, 50-60 Hz, Max. 1.7 A
blank and the 1 (power) indicator will either light up green or flash
Power consumption Approx.115 W
orange. If the 1 (power) indicator is lit in orange, the computer is
Operating temperature
in power saving mode. Try pressing any key on the keyboard or
10 ºC to 40 ºC
moving the mouse.
7
1
Dimensions
Approx. 402
×
418
×
421 mm (w/h/d)
(15
/8 × 16
/2 ×
5
16
/8 inches)
x If the 1 (power) indicator is green
Mass Approx. 19 kg (41.9 lb)
Plug and Play DDC2B/DDC2Bi
1 Disconnect the video input cable or turn off the
GTF
Supplied accessories
connected computer.
Power cord (1)
GB
2 Press the 1 (power) button twice to turn the monitor
Warranty card (1)
off and then on.
Notes on cleaning the screen’s surface (1)
This instruction manual
3 Move the joystick , for 2 seconds.
Preset and user modes
When the monitor receives an input signal, it automatically matches the
If all 4 color bars appear (white, red, green, blue), the monitor is
signal to one of the factory preset modes stored in the monitor’s memory to
working properly. Reconnect the video input cables and check the
provide a high quality picture
(see “Preset mode timing table” on page i).
condition of your computer(s).
For input signals that do not match one of the factory preset modes, the
If the color bars do not appear, there is a potential monitor failure.
digital Multiscan technology of this monitor ensures that a clear picture
Inform your authorized Sony dealer of the monitor’s condition.
appears on the screen for any timing in the monitor’s frequency range
(horizontal: 30 – 85 kHz, vertical: 48 – 170 Hz). If the picture is adjusted,
the adjustment data is stored as a user mode and automatically recalled
x If the 1 (power) indicator is flashing orange
whenever the same input signal is received.
Turn the monitor OFF and then ON.
Power saving function
This monitor meets the power-saving guidelines set by VESA, ENERGY
If the 1 (power) indicator lights up green, the monitor is working
STAR, and NUTEK. If no signal is received by the monitor from your
properly.
computer, the monitor will automatically reduce power consumption as
If the 1 (power) indicator is still flashing, there is a potential
shown below.
monitor failure. Count the number of seconds between orange
Power mode Power consumption 1 (power)
flashes of the 1 (power) indicator and inform your authorized Sony
indicator
dealer of the monitor’s condition. Be sure to note the model name
and serial number of your monitor. Also note the make and model
normal operation
≤ 115 W green
of your computer and graphics board.
active off*
≤ 3 W orange
power off 0 W (Approx.) off
* When your computer is in active off mode, MONITOR IS IN POWER
SAVE MODE appears on the screen if you press any button on the
monitor. After a few seconds, the monitor enters the power saving
mode again
Design and specifications are subject to change without notice.
7

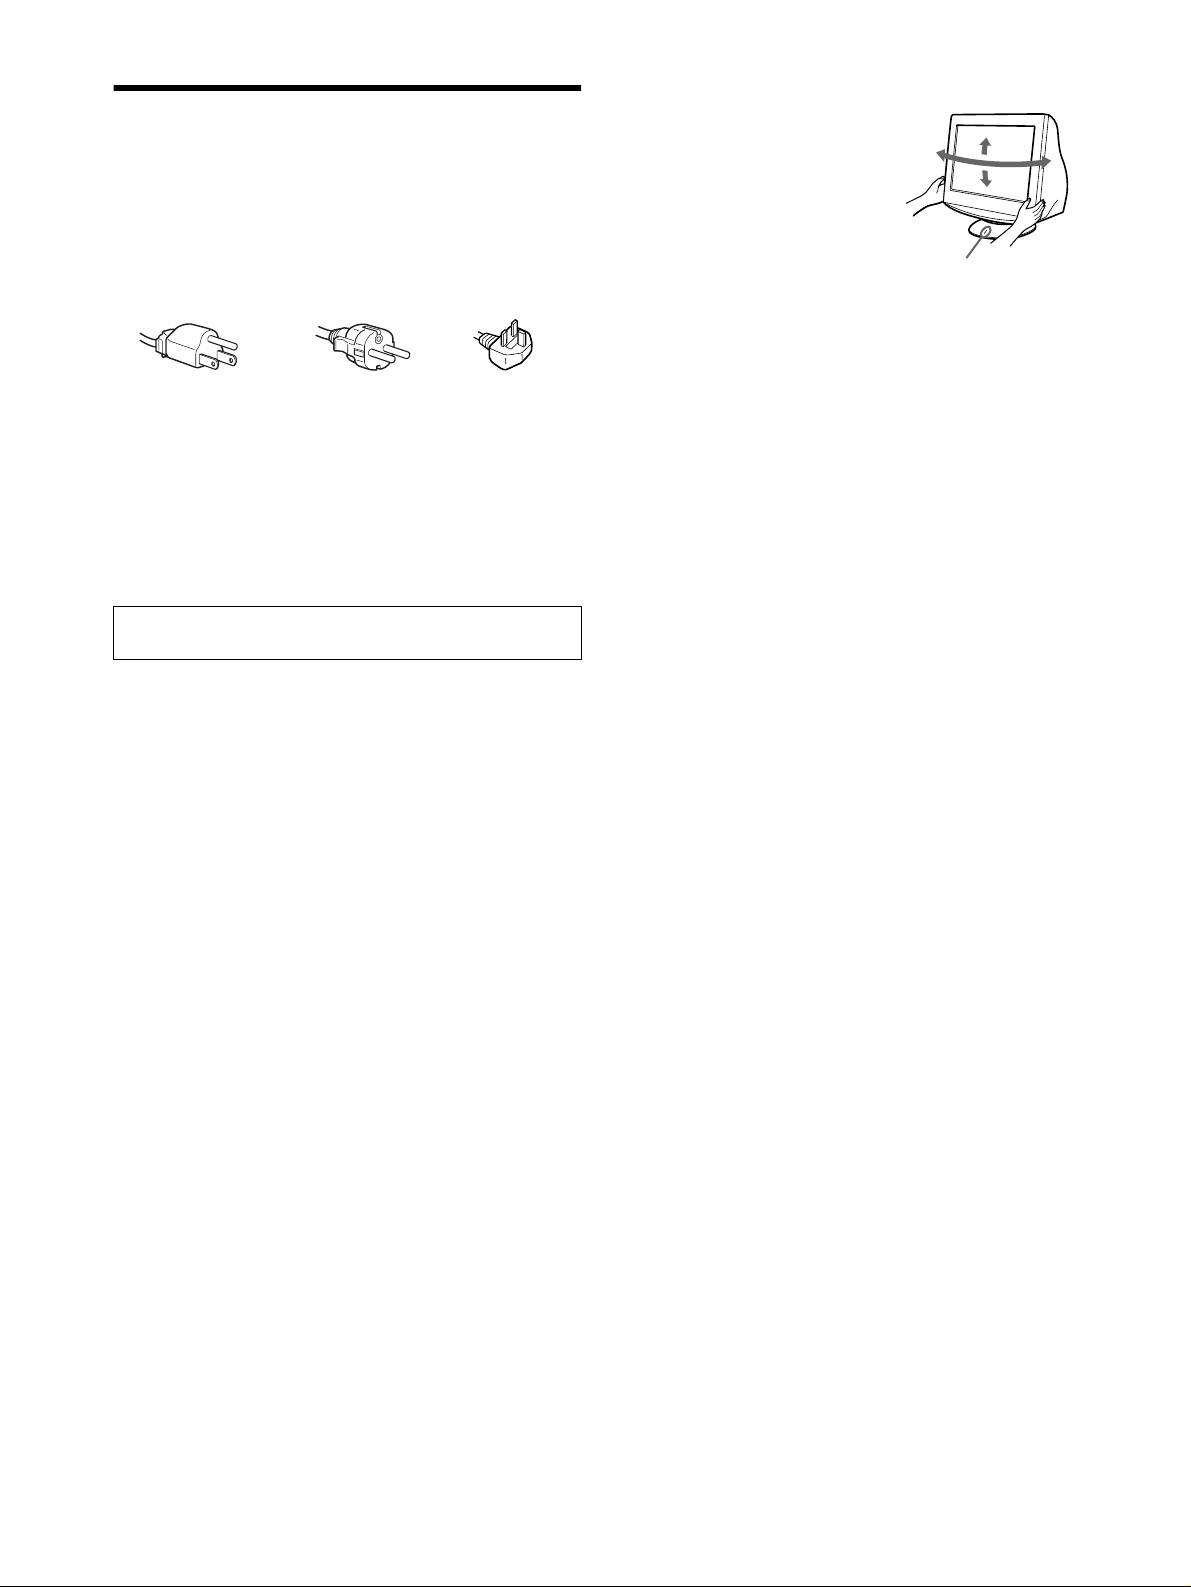
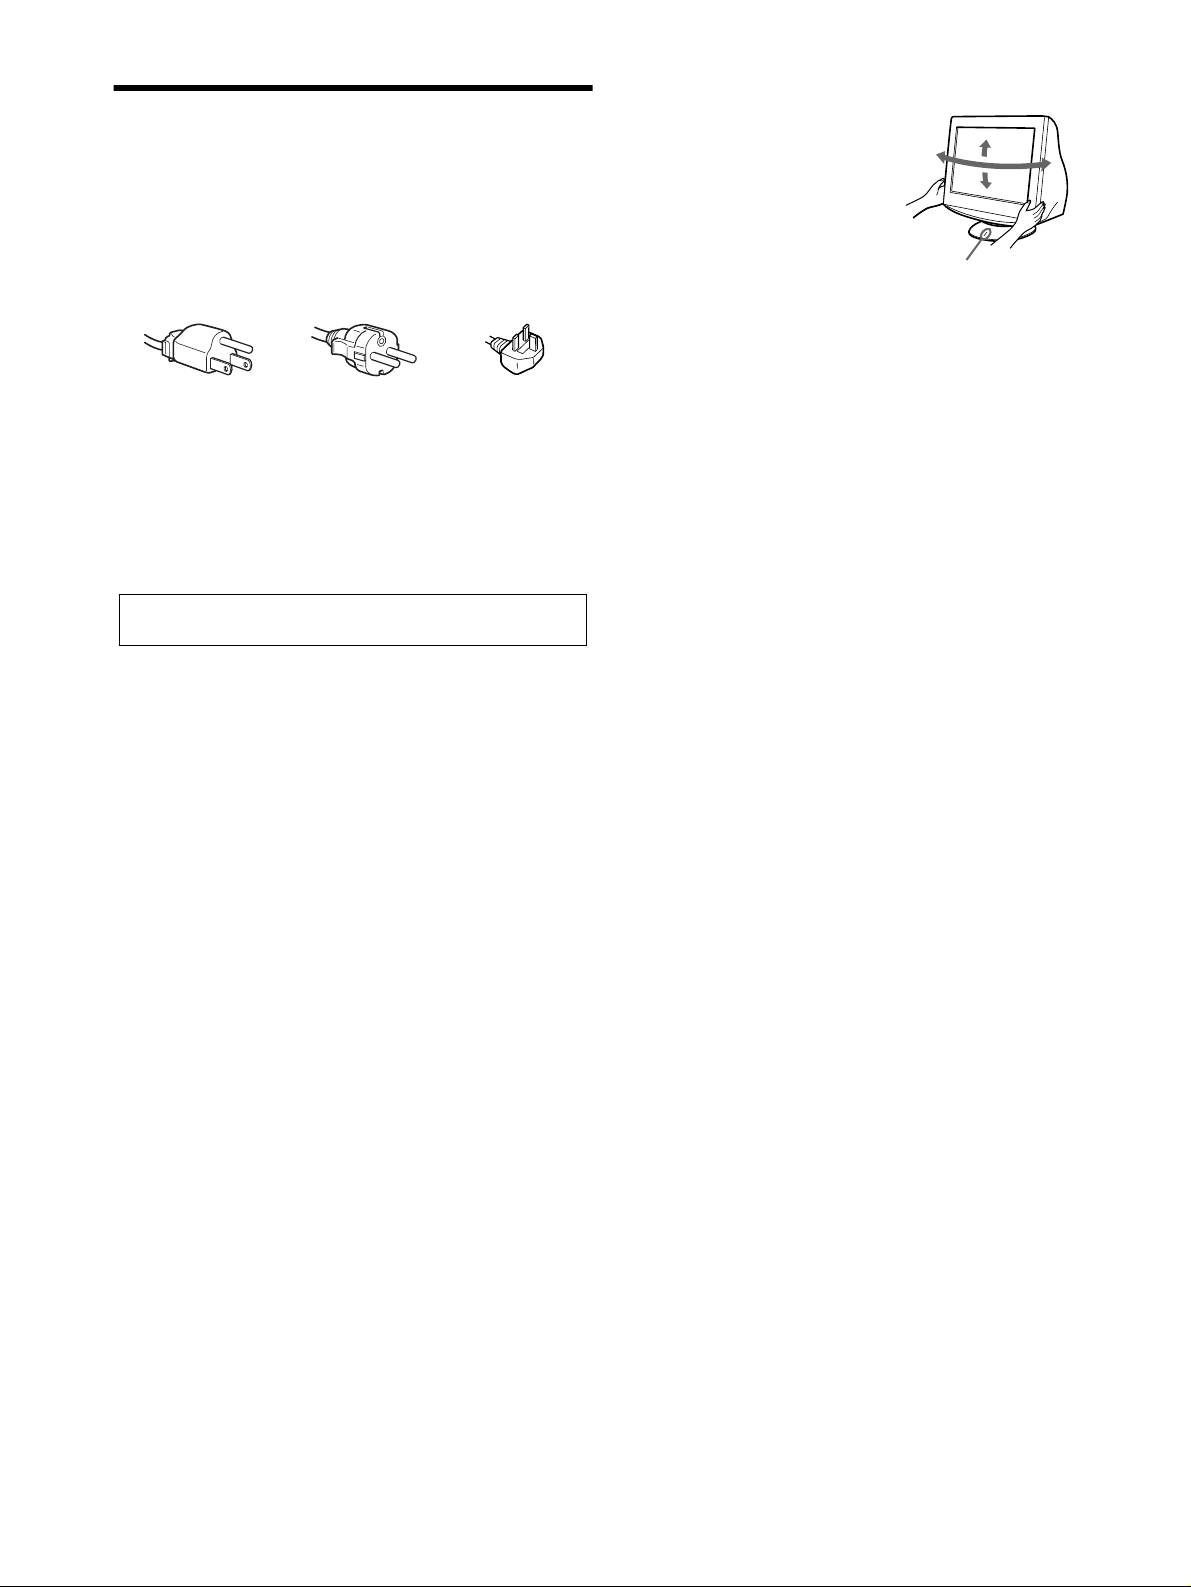
Use of the tilt-swivel
Precautions
This monitor can be adjusted
within the angles shown right. To
90°
15°
turn the monitor vertically or
90°
Warning on power connections
horizontally, hold it at the bottom
5°
• Use the supplied power cord. If you use a different power cord,
with both hands. Be careful not to
be sure that it is compatible with your local power supply.
pinch your fingers at the back of
For the customers in the UK
the monitor when you tilt the
If you use the monitor in the UK, be sure to use the supplied UK
monitor up vertically.
power cable.
Centering line
Example of plug types
for 100 to 120 V AC for 200 to 240 V AC for 240 V AC only
• Before disconnecting the power cord, wait at least 30 seconds
after turning off the power to allow the static electricity on the
screen’s surface to discharge.
• After the power is turned on, the screen is demagnetized
(degaussed) for about 5 seconds. This generates a strong
magnetic field around the screen which may affect data stored
on magnetic tapes and disks placed near the monitor. Be sure to
keep magnetic recording equipment, tapes, and disks away
from the monitor.
The equipment should be installed near an easily accessible
outlet.
Installation
Do not install the monitor in the following places:
• on surfaces (rugs, blankets, etc.) or near materials (curtains,
draperies, etc.) that may block the ventilation holes
• near heat sources such as radiators or air ducts, or in a place
subject to direct sunlight
• in a place subject to severe temperature changes
• in a place subject to mechanical vibration or shock
• on an unstable surface
• near equipment which generates magnetism, such as a
transformer or high voltage power lines
• near or on an electrically charged metal surface
• inside an enclosed rack
Maintenance
• Clean the screen with a soft cloth. If you use a glass cleaning
liquid, do not use any type of cleaner containing an anti-static
solution or similar additive as this may scratch the screen’s
coating.
• Do not rub, touch, or tap the surface of the screen with sharp or
abrasive items such as a ballpoint pen or screwdriver. This type
of contact may result in a scratched picture tube.
• Clean the cabinet, panel and controls with a soft cloth lightly
moistened with a mild detergent solution. Do not use any type
of abrasive pad, scouring powder or solvent, such as alcohol or
benzine.
Transportation
When you transport this monitor for repair or shipment, use the
original carton and packing materials.
8

â
• Trinitron
est une marque commerciale déposée de Sony Corporation.
Table des Matières
• Macintosh est une marque commerciale sous licence d’Apple Computer, Inc.,
Configuration. . . . . . . . . . . . . . . . . . . . . . . . . . . . . . . 3
déposée aux Etats-Unis et dans d’autres pays.
â
•Windows
et MS-DOS sont des marques déposées de Microsoft Corporation
Réglages. . . . . . . . . . . . . . . . . . . . . . . . . . . . . . . . . . . 4
aux Etats-Unis et dans d’autres pays.
Dépannage . . . . . . . . . . . . . . . . . . . . . . . . . . . . . . . . . 6
• IBM PC/AT et VGA sont des marques commerciales déposées d’IBM
Corporation aux Etats-Unis.
Spécifications . . . . . . . . . . . . . . . . . . . . . . . . . . . . . . 7
ä
• VESA et DDC
sont des marques commerciales de Video Electronics
Précautions . . . . . . . . . . . . . . . . . . . . . . . . . . . . . . . . 8
Standard Association.
•
ENERGY STAR est une marque déposée aux Etats-Unis.
Appendix . . . . . . . . . . . . . . . . . . . . . . . . . . . . . . . . . . . i
• Tous les autres noms de produits mentionnés dans le présent mode d’emploi
Preset mode timing table . . . . . . . . . . . . . . . . . . . . . . . i
peuvent être des marques commerciales ou des marques commerciales
déposées de leurs sociétés respectives.
TCO’99 Eco-document. . . . . . . . . . . . . .Couverture dos
• Les symboles “
ä” et “â” ne sont pas mentionnés systématiquement dans le
présent mode d’emploi.
Configuration
Connecteurs d’entrée HD15
1 Raccordez votre moniteur à votre
1
5432
678910
ordinateur
11 12 13 14 15
N° de broche Signal
N° de broche Signal
1 Rouge
9 DDC HOST 5V*
Ve rt
10 Masse
2
(Sync sur Vert)
11 ID (Masse)
3Bleu
Données
Câble de signal vidéo
vers le HD15 de
4 ID (Masse)
12
bi-directionnelles
du moniteur
l’ordinateur raccordé
5 DDC (Masse)*
(SDA)*
6 Masse Rouge
13 Sync H
14 Sync V
Raccordement à un Macintosh ou un ordinateur
7Masse Vert
8Masse Bleu
Horloge de
FR
compatible
15
données (SCL)*
Lorsque vous connectez ce moniteur à un ordinateur Macintosh,
utilisez l’adaptateur Macintosh, si nécessaire. Raccordez l’adaptateur
* DDC (Display Data Channel) est une norme de VESA.
Macintosh à l’ordinateur avant de brancher le câble.
2 Mettez le moniteur et l’ordinateur sous
tension
1 Raccordez le cordon d’alimentation au moniteur puis
appuyez sur l’interrupteur 1 (alimentation) afin de mettre
le moniteur sous tension.
2 Mettez l’ordinateur sous tension.
Vous n’avez pas besoin de pilotes spécifiques
Ce moniteur est conforme à la norme Plug & Play “DDC” et détecte
automatiquement l’ensemble des informations relatives au moniteur. Il n’est pas
nécessaire d’installer un pilote ou un gestionnaire supplémentaire sur
l’ordinateur.
Lorsque vous mettez votre ordinateur sous tension pour la première fois, après
l’avoir raccordé au moniteur, il est possible que l’Assistant d’ajout de nouveau
matériel apparaisse à l’écran. Dans ce cas, suivez les instructions affichées. Le
moniteur Plug & Play approprié est sélectionné automatiquement, vous
permettant ainsi de l’utiliser.
Remarques
• Ne touchez pas les broches du connecteur du câble de signal vidéo.
• Vérifiez l’alignement du connecteur HD15 pour ne pas tordre les broches du
connecteur du câble de signal vidéo.
3
Réglages
Navigation dans le menu
Réglage de la luminosité et du
contraste
1 Appuyez sur la touche MENU/OK pour afficher le menu
principal.
Vous pouvez modifier la luminosité et le contraste à l’aide du menu
LUMINOSITE/CONTRASTE. Ces réglages s’appliquent à tous les
signaux d’entrée.
1 Déplacez le joystick dans l’une des directions pour
SORTIR
afficher le menu LUMINOSITE/CONTRASTE.
TAILLE/CENTRE
,
GEOMETRIE
COULEUR
2 Déplacez le joystick vers m/M pour régler la luminosité
CONVERGENCE
() et vers </, pour régler le contraste ().
LANGUAGE
OPTION
60,0kHZ/ 75Hz
fréquences
1024 768
horizontale et
verticale du
signal d’entré
2 Déplacez le joystick vers m/M pour mettre en surbrillance
le menu principal que vous souhaitez régler, puis appuyez
sur la touche MENU/OK.
3 Déplacez le joystick m/M pour mettre en surbrillance le
sous-menu que vous souhaitez régler. Déplacez ensuite
le joystick </, pour procéder aux réglages.
4
e
Menu principal
L
U
MIN
OS
ITE
/
C
O
NT
R
A
S
TE
résolution du signal d’entrée en
cours (uniquement si le signal
correspond à l’un des modes
26 26
de synchronisation VESA
recommandés).
en cours
Sous-menu
T
A
I
LL
E
/
C
E
N
TR
E
,,
26
Réglages du menu d’écran
Icônes du menu principal et éléments
Icônes du sous-menu et éléments de réglage
de réglage
Position horizontale
Taille horizontale
Réglage de la taille ou du centrage
Position verticale
de l’image
*
1
Taille verticale
Agrandissement/Réduction
Rotation de l’image
*
2
Étirement ou contraction des côtés de l’image*
1
Réglage de la forme de l’image
Déplacement des bords de l’image vers la droite ou la gauche*
1
Réglage de la largeur de l’image en haut de l’écran*
1
Déplacement de l’image vers la droite ou la gauche en haut de l’écran*
1
Réglage de la couleur de l’image*
2
Vo i r “ : pour régler la couleur de l’image”.
Décalage horizontal des ombres rouges ou bleues
Réglage de la convergence
*
2
Décalage vertical des ombres rouges ou bleues
Sélection de la langue Sélection de la langue du menu d’écran
*
3
DEMAGNET : démagnétise le moniteur.
REGLAGE MOIRE : réduit le moirage
*
4
Réglages supplémentaires
0 Vo i r “Réinitialisation des réglages”.
Protection des données de réglage (VERROU MENU)
*
5
1
4
*
Ce réglage est effectif pour le signal d’entrée courant.
*
Exemple de moiré
2
*
Ce réglage est effectif pour tous les autres signaux d’entrée.
3
*
Menu de langues
• ENGLISH : Anglais • NEDERLANDS : Néerlandais
• FRANÇAIS • SVENSKA : Suédois
• DEUTSCH : Allemand • : Russe
5
• ESPAÑOL : Espagnol • : Japonais
*
Seul le commutateur (d’alimentation) 1, SORTIR et (VERROU MENU)
FR
• ITALIANO : Italien
fonctionnent.
: pour régler la couleur de l’image
Les paramètres COULEUR permettent de régler la température des
couleurs de l’image en changeant le niveau de couleur des champs de
couleur blanche. Les couleurs apparaissent rougeâtres lorsque la
température est basse et bleuâtres lorsqu’elle est élevée. Ce réglage
s’avère pratique pour faire correspondre les couleurs du moniteur aux
couleurs d’une image imprimée.
x Eléments de réglage
Vous pouvez sélectionner une température des couleurs prédéfinie, à
savoir 5000K ou 9300K. Le réglage par défaut est 9300K.
Si nécessaire, vous pouvez affiner le réglage de la couleur en
sélectionnant .
0: Réinitialisation des réglages
L’option REINITIALISATION permet d’effacer vos réglages
personnalisés. Pour rétablir les réglages effectués en usine, procédez
comme suit.
x Réinitialisation du réglage du signal d’entrée du
courant
Déplacez le joystick ,.
x Réinitialisation du réglage de tous les signaux
d’entrée
Tenez le joystick , pendant 2 secondes.
Remarque
Lorsque “réinitialisation des réglages pour tous les signaux d’entrée” est activée,
la sélection de la langue personnalisée revient automatiquement sur la langue par
défaut : l’anglais.
5
x Les bords des lettres et des lignes sont soulignés d’une
ombre rouge ou bleue
Dépannage
• Réglez la convergence.
x Aucune image
x Un bourdonnement est audible juste après la mise sous
Si l’indicateur 1 (alimentation) est éteint
tension
• Assurez-vous que le cordon d’alimentation est raccordé correctement.
• Il s’agit du son provoqué par le cycle de démagnétisation automatique.
• Vérifiez que l’interrupteur 1 (alimentation) est en position activée (on).
Lorsque le moniteur est mis sous tension, il est automatiquement
L’indicateur 1 (alimentation) est allumé en orange
démagnétisé pendant 5 secondes.
• Vérifiez que le câble de signal vidéo est correctement raccordé et que
* Si un deuxième cycle de démagnétisation est nécessaire, attendez au
toutes les prises sont complètement enfichées.
minimum 20 minutes pour un résultat optimal. Un bourdonnement peut être
• Vérifiez que les broches du connecteur d’entrée vidéo HD15 ne sont pas
audible, ceci est normal.
pliées ni enfoncées.
• Assurez-vous que l’ordinateur est sous tension.
Messages à l’écran
• L’ordinateur est en mode d’économie d’énergie. Essayez d’appuyer sur
une touche ou de déplacer la souris.
• Vérifiez que la carte graphique est bien insérée dans le connecteur de bus
INFORMATIONS
approprié.
Si l’indicateur 1 (alimentation) est vert ou orange clignotant
HORS PLAGE DE
1
• Utilisez la fonction d’auto-diagnostic.
BALAYAGE
x L’image scintille, sautille, oscille ou est brouillée
• Isolez et supprimez les sources potentielles de champs électriques ou
magnétiques tels que d’autres moniteurs, des imprimantes laser, des
1 Si “HORS PLAGE DE BALAYAGE” s’affiche:
éclairages fluorescents ou des téléviseurs.
indique que les spécifications du moniteur ne prennent pas le signal
•Éloignez le moniteur des lignes à haute tension ou placez un blindage
d’entrée en charge. Reportez-vous aux remèdes suivants.
magnétique à proximité du moniteur.
• Vérifiez si la plage de fréquence vidéo correspond aux spécifications
• Banchez le moniteur sur une autre prise secteur, de préférence raccordée
du moniteur. Si vous remplacez un ancien moniteur par ce moniteur,
à un autre circuit.
reconnectez l’ancien moniteur et ajustez la plage de fréquence
• Faites pivoter le moniteur de 90° vers la gauche ou la droite.
comme suit.
• Vérifiez le réglage adéquat pour le moniteur dans le mode d’emploi de
Horizontale : 30 – 85 kHz
votre carte graphique.
Verticale : 48 – 170 Hz
• Assurez-vous que le mode graphique et la fréquence du signal d’entrée
sont pris en charge par ce moniteur (voir le tableau de modes prédéfinis
1 Si “PAS ENTREE VIDEO” s’affiche:
(Preset mode timing table) page i). Même si la fréquence est comprise
indique qu’aucun signal n’est entré. Reportez-vous aux remèdes
dans la plage appropriée, il est possible que certaines cartes graphiques
suivants.
aient une impulsion de synchronisation trop étroite pour que le moniteur
• Vérifiez si le câble de signal vidéo est correctement raccordé et si
puisse se synchroniser correctement.
toutes les fiches sont bien insérées dans les prises.
• Ajustez le taux de régénération de l’ordinateur (fréquence verticale) de
• Vérifiez si les broches du connecteur d’entrée vidéo HD15 ne sont
façon à obtenir la meilleure image possible.
pas tordues ni enfoncées.
x L’image est floue
• Vérifiez si le commutateur d’alimentation de l’ordinateur est réglé
• Ajustez la luminosité et le contraste.
sur “on”.
• Démagnétisez le moniteur.*
• Vérifiez si la carte graphique est complètement enfoncée dans la
• Réduisez le moirage au maximum.
fente de bus appropriée.
x Des images fantômes apparaissent
• N’utilisez pas de prolongateurs de câble vidéo et/ou de boîtiers de
1 Si “MONITEUR EN MODE D’ECONOMIE
commutation vidéo.
D’ENERGIE” s’affiche:
• Vérifiez que toutes les fiches sont bien connectées dans leurs prises
indique que l’ordinateur est en mode d’économie d’énergie. Ce
respectives.
message est uniquement affiché lorsque votre ordinateur est en mode
x L’image n’est pas centrée ou est de taille incorrecte
d’économie d’énergie et que vous appuyez sur l’une des touches du
• Ajustez la taille ou le centrage. Veuillez noter que pour certains signaux
moniteur. Reportez-vous aux remèdes suivants.
d’entrée et/ou cartes graphiques, il est possible que l’image ne remplisse
•
Essayez d’appuyer sur une touche ou de déplacer la souris.
pas totalement la surface de l’écran.
• Vérifiez si le commutateur d’alimentation de l’ordinateur est réglé
• Juste après la commutation de l’interrupteur d’alimentation, le réglage
sur “on”.
correct de la taille et du centrage peut prendre un certain temps.
• Vérifiez si la carte graphique est complètement enfoncée dans la
fente de bus appropriée.
x Les bords de l’image sont incurvés
• Réglez la géométrie.
Affichage de l’identification du moniteur, du
x Un motif ondulatoire ou elliptique (moiré) est visible
numéro de série et de la date de fabrication.
• Réduisez le moirage au maximum.
Pendant que le moniteur reçoit un
INFORMATION+
S
• Changez le motif de votre bureau.
signal vidéo, maintenez la touche
MODEL:CPD-E230
x Les couleurs ne sont pas uniformes
MENU/OK enfoncée pendant au
SER NO: 1234567
moins cinq secondes afin d’afficher
MANUFACTURED : 2 0 0
1-52
• Démagnétisez le moniteur.* Si vous placez à côté du moniteur un
appareil qui génère un champ magnétique, comme un haut-parleur, ou si
les informations relatives au
vous changez l’orientation du moniteur, il est possible que les couleurs
moniteur.
perdent leur uniformité.
x Le blanc n’est pas blanc
• Réglez la température des couleurs.
x Les touches du moniteur ne fonctionnent pas
(apparaît à l’écran)
• Si la fonction de verrouillage des commandes est réglée sur ACTIF,
réglez-la sur INACTIF.
6
Si des lignes fines apparaissent à
Spécifications
l’écran
(fils d’amortissement)
Tube cathodique Ouverture de grille de 0,24 mm
Ces lingnes ne constituent aucunement un dysfonctionnement ;
(centrale)
elles résultent de l’utilisation du tube image Trinitron sur ce moniteur.
17 pouces mesurés en diagonale
Ces lignes sont en fait l’ombre des fils d’amortissement employés pour
Déflexion de 90 degrés.
stabiliser la grille d’ouverture. Cette grille est un composant essentiel
Trinitron FD
qui rend le tube d’image Trinitron unique en laissant passer une plus
Taille d’image affichée
grande quantité de lumière vers l’écran, permettant ainsi d’obtenir une
Environ 327
× 243 mm (l/h)
7
5
image plus lumineuse et plus détaillée.
(12
/8 × 9
/8 pouces)
Image affichéee Environ 406 mm (16,0 pouces)
Résolution
Maximum Horizontale : 1600 points
Fils d’amortissement
Verticale : 1200 lignes
Recommandée Horizontale : 1024 points
Verticale : 768 lignes
Zone d’image standard
Environ 312
× 234 mm (l/h)
3
1
(12
/8 × 9
/4 pouces)
Fonction d’auto-diagnostic
Fréquence de déflexion
Horizontale : 30 à 85 kHz
Ce moniteur est équipé d’une fonction d’auto-diagnostic. En cas de
Verticale : 48 à 170 Hz
problème avec le moniteur ou l’ordinateur/les ordinateurs, rien n’est
Tension/courant d’entrée
affiché à l’écran et 1’indicateur 1 (alimentation) s’allume en vert ou
100 à 240 V, 50 – 60 Hz, Max. 1,7 A
clignote en orange. Si l’indicateur 1 (alimentation) est allumé en
Consommation électrique
orange, l’ordinateur est en mode d’économie d’énergie. Essayez
Environ 115 W
d’appuyer sur une touche ou de déplacer la souris.
Température d’utilisation
10 ºC à 40 ºC
7
1
x Si l’indicateur 1 (alimentation) s’allume en vert
Dimensions Environ 402
× 418 × 421 mm (l/h/p) (15
/8 × 16
/2 ×
5
16
/8 pouces)
1 Débranchez le câble d’entrée vidéo ou mettez l’ordinateur
Masse Environ 19 kg (41,9 livres)
raccordé hors tension.
Plug and Play DDC2B/DDC2Bi
GTF
2 Appuyez deux fois sur la touche 1 (alimentation) pour
Accessoires fournis Cordon d’alimentation (1)
mettre le moniteur hors tension, puis sous tension.
Carte de garantie (1)
Remarques concernant l’entretien de la surface de
FR
3 Déplacez le joystick dans le sens , pendant 2 secondes.
l’écran (1)
Le présent mode d’emploi
Si les quatre barres de couleurs apparaissent (blanc, rouge, vert et bleu),
Modes préréglés et personnalisés
le moniteur fonctionne correctement. Reconnectez les câbles d’entrée
Lorsque le moniteur reçoit un signal d’entrée, il compare automatiquement le
vidéo et vérifiez l’état des ordinateurs.
signal à l’un des modes préréglés en usine mémorisés afin de fournir une image
Si les barres de couleur n’apparaissent pas, il est possible que le
de haute qualité (voir le tableau de modes prédéfinis (Preset mode timing table)
moniteur ne fonctionne pas normalement. Informez votre revendeur
page i). Pour les signaux d’entrée qui ne correspondent à aucun mode préréglé en
Sony agréé de l’état du moniteur.
usine, la technologie Multiscan numérique intégrée à ce moniteur permet
d’afficher une image claire à l’écran pour toutes les synchronisations de la plage
x Si l’indicateur 1 (alimentation) clignote en orange
de fréquence du moniteur (horizontale : 30 – 85 kHz, verticale : 48 – 170 Hz). Si
l’image est réglée, les données de réglage sont mémorisées comme un mode
Eteignez puis rallumez le moniteur.
utilisateur et sont rappelées automatiquement chaque fois que le même signal
d’entrée est reçu.
Si l’indicateur 1 (alimentation) est allumé en vert, le moniteur
Fonction d’économie d’énergie
fonctionne correctement.
Ce moniteur satisfait aux critères d’économie d’énergie VESA, ENERGY
Si l’indicateur 1 (alimentation) clignote toujours, il est possible que le
STAR et NUTEK.
moniteur ne fonctionne pas normalement. Comptez le nombre de
Si le moniteur ne reçoit aucun signal en provenance de l’ordinateur, il réduit
automatiquement sa consommation d’énergie de la façon suivante.
secondes entre les clignotements oranges de l’indicateur
1 (alimentation) et informez votre revendeur Sony agréé de l’état du
Mode
Consommation
indicateur
moniteur. Notez soigneusement le modèle et le numéro de série du
d’alimentation
électrique
1 (alimentation)
moniteur. Notez également la marque et le modèle de l’ordinateur et de
fonctionnement
≤ 115 W vert
la carte graphique.
normal
inactif*
≤ 3 W orange
hors tension 0 W (environ) désactivé
* Lorsque votre ordinateur est en mode inactif, l’indication MONITEUR EN
MODE D’ECONOMIE D’ENERGIE apparaît à l’écran si vous appuyez sur
une touche quelconque du moniteur. Après quelques secondes, le moniteur
repasse en mode d’économie d’énergie.
La conception et les spécifications sont sujettes à modifications sans préavis.
7
Utilisation du pied pivotant
Ce moniteur peut être réglé selon les
Précautions
angles d’inclinaison indiqués ci-
contre. Pour le faire pivoter sur un
90°
15°
90°
Avertissement relatif au raccordement secteur
plan vertical ou horizontal, saisissez-
5°
• Utilisez le cordon d’alimentation fourni. Si vous utilisez un cordon
le par le bas avec les deux mains.
d’alimentation différent, assurez-vous que ce dernier est
Prenez garde de ne pas vous pincer
compatible avec votre réseau d’alimentation électrique.
les doigts à l’arrière du moniteur
Pour les utilisateurs au Royaume-Uni
lorsque vous relevez celui-ci
Si vous utilisez le moniteur au Royaume-Uni, assurez-vous
verticalement.
Ligne de centrage
d’utiliser le cordon d’alimentation correct.
Exemple de types de prises
pour 100 à 120 V CA pour 200 à 240 V CA pour 240 V CA
uniquement
• Avant de débrancher le cordon d’alimentation, attendez au moins
30 secondes avant de couper l’alimentation afin de permettre le
déchargement de l’électricité statique de la surface de l’écran.
• Après avoir branché l’alimentation, l’écran est démagnétisé
pendant environ 5 secondes. Ceci génère un champ magnétique
puissant autour de l’écran, susceptible d’altérer les données
stockées sur les cassettes ou bandes placées à proximité du
moniteur. Assurez-vous de ne pas placer d’équipement
d’enregistrement magnétique, de bandes ou de disquettes à
proximité du moniteur.
La prise électrique doit être installée à proximité de l’appareil et
facile d’accès.
Installation
N’installez pas le moniteur dans les endroits suivantes :
• sur des surfaces textiles (tapis, couvertures, etc.) ni à proximité de
tissus (rideaux, draperies, etc.) qui risquent d’obstruer les orifices
de ventilation
• près de sources de chaleur telles que des radiateurs ou des conduits
d’air chaud ou à un emplacement exposé aux rayons directs du
soleil
• dans un endroit sujet à de fortes variations de température
• dans un endroit sujet à des vibrations mécaniques ou à des chocs
• sur une surface instable
• près d’un équipement générant un champ magnétique, tel qu’un
transformateur ou des lignes à haute tension
• près ou sur une surface métallique chargée d’électricité
• dans un rack fermé
Entretien
• Nettoyez l’écran en utilisant un chiffon doux et sec. Si vous utilisez
un nettoyant pour vitres, n’utilisez pas de produits contenant une
solution antistatique ou une solution similaire qui risque d’abîmer
le revêtement de l’écran.
• Ne frottez pas, ne touchez pas et ne tapotez pas la surface de l’écran
avec des objets pointus ou abrasifs, tels que la pointe d’un stylo ou
un tournevis. Dans le cas contraire, vous pourriez rayer le tube de
l’écran.
• Nettoyez le châssis, l’écran et les commandes à l’aide d’un chiffon
doux légèrement imbibé d’une solution détergente non agressive.
N’utilisez pas de tampon abrasif, de poudre à récurer ou de produit
solvant comme l’alcool ou la benzine.
Transport
Lorsque vous transportez ce moniteur, utilisez le carton et les
matériaux d’emballage d’origine.
8
Hinweis
Dieses Gerät erfüllt bezüglich tieffrequenter (very low frequency) und
Inhalt
tiefstfrequenter (extremely low frequency) Strahlung die Vorschriften
Anschließen des Monitors . . . . . . . . . . . . . . . . . . . . 3
des „Swedish National Council for Metrology (MPR)“ vom Dezember
1990 (MPR II).
Einstellen des Monitors . . . . . . . . . . . . . . . . . . . . . . 4
Störungsbehebung . . . . . . . . . . . . . . . . . . . . . . . . . . 6
Hinweise
Technische Daten . . . . . . . . . . . . . . . . . . . . . . . . . . . 7
• Aus ergonomischen Gründen wird empfohlen, die Grundfarbe
Blau nicht auf dunklem Untergrund zu verwenden (schlechte
Sicherheitsmaßnahmen . . . . . . . . . . . . . . . . . . . . . . 8
Erkennbarkeit, Augenbelastung bei zu geringem
Appendix . . . . . . . . . . . . . . . . . . . . . . . . . . . . . . . . . . . i
Zeichenkontrast).
Preset mode timing table . . . . . . . . . . . . . . . . . . . . . . . i
• Aus ergonomischen Gründen (flimmern) sollten nur
Darstellungen bei Vertikalfrequenzen ab 70 Hz (ohne
TCO’99 Eco-document. . . . . . . . Hintere Umschlagseite
Zeilensprung) verwendet werden.
• Die Konvergenz des Bildes kann sich auf Grund des
â
•Trinitron
ist ein eingetragenes Warenzeichen der Sony Corporation.
Magnetfeldes am Ort der Aufstellung aus der korrekten
• Macintosh ist ein Warenzeichen der Apple Computer, Inc., in den USA
Grundeinstellung verändern. Zur Korrektur empfiehlt es sich
und anderen Ländern.
deshalb, die Regler an der Frontseite für Konvergenz so
â
• Windows
und MS-DOS sind eingetragene Warenzeichen der Microsoft
einzustellen, daß die getrennt sichtbaren Farblinien für Rot,
Corporation in den USA und anderen Ländern.
Grün und Blau bei z.B. der Darstellung eines Buchstabens zur
• IBM PC/AT und VGA sind eingetragene Warenzeichen der IBM
Deckung (Konvergenz) gelangen.
Corporation in den USA.
Siehe hierzu auch die Erklärungen zu Konvergenz.
ä
• VESA und DDC
sind Warenzeichen der Video Electronics Standard
Association.
•
ENERGY STAR ist ein eingetragenes Warenzeichen in den USA.
• Alle anderen in diesem Handbuch erwähnten Produktnamen können
Warenzeichen oder eingetragene Warenzeichen der jeweiligen
Eigentümer sein.
• Im Handbuch sind die Warenzeichen und eingetragenen Warenzeichen
nicht überall ausdrücklich durch „
ä“ und „â“ gekennzeichnet.
Anschließen des Monitors
HD15-Eingänge
1 Anschließen des Monitors an den Computer
1
5432
678910
DE
11 12 13 14 15
•
Stift Nr. Signal
Stift Nr. Signal
1
Rot
9 DDC HOST 5V*
Grün
10 Masse
Videosignalkabel
an HD15 des
2
(Grünsignal mit
11 ID (Masse)
des Monitors
anzuschließenden
Synchronisation)
Computers
Bidirektionale
3Blau
12
Daten (SDA)*
Anschließen an einen Macintosh oder kompatiblen
4ID (Masse)
13 H. Sync
Computer
5DDC-Masse*
14 V. Sync
Wenn Sie diesen Monitor an einen Macintosh-Computer anschließen,
6 Masse Rot
15
Datentakt (SCL)*
verwenden Sie, wenn nötig, den Macintosh-Adapter. Schließen Sie den
7 Masse Grün
Macintosh-Adapter an den Computer an, bevor Sie das Kabel anschließen.
8 Masse Blau
* DDC (Display Data Channel) ist ein Standard der VESA.
2 Einschalten von Monitor und Computer
1 Verbinden Sie das Netzkabel mit dem Monitor, und
schalten Sie den Monitor am Netzschalter 1 ein.
2 Schalten Sie den Computer ein.
Keine speziellen Treiber erforderlich
Dieser Monitor entspricht dem Plug-and-Play-Standard „DDC“, so daß alle
Daten des Monitors automatisch erkannt werden. Daher muß kein spezifischer
Treiber auf dem Computer installiert werden.
Wenn Sie den Monitor an den PC anschließen und diesen dann zum ersten Mal
starten, wird möglicherweise der Hardware-Assistent auf dem Bildschirm
angezeigt. Gehen Sie in diesem Fall nach den Anweisungen auf dem Bildschirm
vor. Der Plug-and-Play-Monitor ist automatisch ausgewählt, so daß Sie ohne
weitere Vorbereitungen mit diesem Monitor arbeiten können.
Hinweise
• Berühren Sie nicht die Stifte am Stecker des Videosignalkabels.
• Achten Sie darauf, den Stecker des Videosignalkabels korrekt am HD15-
Anschluß auszurichten, damit die Stifte am Stecker des Videosignalkabels
nicht verbogen werden.
3
Einstellen des Monitors
Navigieren in den Menüs
Einstellen von Helligkeit und Kontrast
Helligkeit und Kontrast können Sie über ein spezielles Menü,
1 Rufen Sie mit der Taste MENU/OK das Menü auf.
HELLIGKEIT/KONTRAST, einstellen. Die Einstellungen gelten für alle
Eingangssignale.
Hauptmenü
1 Bewegen Sie den Joystick in beliebiger Richtung, um
das Menü HELLIGKEIT/KONTRAST aufzurufen.
ENDE
GRÖSSE/BILDLG
2 Bewegen Sie den Joystick zum Einstellen der
,
GEOMETRIE
FARBE
Helligkeit ( ) in Richtung m/M und zum Einstellen des
KONVERGENZ
LANGUAGE
Kontrasts ( ) in Richtung </,.
OPTION
HELL I GKE I T / KONTRAST
Auflösung des aktuellen
60.0kHz/ 75Hz
Horizontal- und
Eingangssignals (nur wenn
1024
768
Vertikal-
das Signal einem der
frequenz des
26 26
empfohlenen VESA-Timing-
aktuellen
Modi entspricht).
Eingangssignals
2 Bewegen Sie den Joystick in Richtung m/M, um das
Hauptmenü hervorzuheben, in dem Sie Einstellungen
vornehmen wollen, und drücken Sie dann die Taste
MENU/OK.
Untermenü
GRÖSSE/BILDLG
,,
26
3 Bewegen Sie den Joystick in Richtung m/M, um das
Untermenü hervorzuheben, in dem Sie Einstellungen
vornehmen wollen. Bewegen Sie den Joystick dann in
Richtung</,, um Einstellungen vorzunehmen.
4
Einstellungen über das Bildschirmmenü
Hauptmenüsymbole und
Untermenüsymbole und Einstelloptionen
Einstelloptionen
Horizontale Position
Horizontale Breite
Einstellen von Größe oder
Zentrierung des Bildes
1
Vertikale Position
*
Vertika le H öhe
Ve rg r ößern/Verkleinern
Drehen des Bildes
*
2
Wölben der Bildränder nach außen oder innen*
1
Einstellen der Form des Bildes
Verschieben der Bildränder nach links oder rechts*
1
Einstellen der Bildbreite im oberen Bildschirmbereich*
1
Verschieben des Bildes nach links oder rechts im oberen Bildschirmbereich*
1
Einstellen der Farben des
Bildes
*
2
Siehe „ : Einstellen der Farben des Bildes“.
Horizontales Verschieben roter oder blauer Schatten
Einstellen der Konvergenz
*
2
Vertikales Verschieben roter oder blauer Schatten
Auswählen der Sprache Auswählen der Sprache für die Bildschirmmenüs
*
3
ENTMAGNETISIEREN: Entmagnetisieren des Monitors.
MOIRE EINST: Minimieren des Moiré-Effekts
*
4
Weitere Einstellungen
0 Siehe „Zurücksetzen der Einstellungen“.
Schützen von Einstellungen (TASTENSPERRE)*
5
1
*
4
*
Diese Einstellung gilt für das aktuelle Eingangssignal.
Beispiel für Moire.
2
*
Diese Einstellung gilt für alle Eingangssignale.
3
*
Sprachmenü
• ENGLISH: Englisch • NEDERLANDS: Niederländisch
• FRANÇAIS: Französisch • SVENSKA: Schwedisch
• DEUTSCH • : Russisch
*
5
Jetzt können Sie nur noch den Netzschalter 1, die Option ENDE sowie
• ESPAÑOL: Spanisch • : Japanisch
DE
• ITALIANO: Italienisch
(TASTENSPERRE) benutzen.
: Einstellen der Farben des Bildes
Mit den Optionen im Menü FARBE können Sie die Farbtemperatur des
Bildes einstellen. Dabei ändert sich der Farbwert im weißen Farbfeld.
Farben erscheinen bei einer niedrigen Farbtemperatur rötlich, bei einer
hohen Farbtemperatur bläulich. Mit Hilfe dieser Funktion können Sie die
Farben auf dem Monitor an die Farben eines gedruckten Bildes anpassen.
x Optionen
Hier stehen zwei voreingestellte Farbtemperaturen zur Verfügung: 5000 K
und 9300 K. Die Standardeinstellung ist 9300 K.
Wenn nötig, können Sie über die Option weitere Feineinstellungen für
die Farbe vornehmen.
0
: Zurücksetzen der Einstellungen
Mit der Option ZURÜCKSETZEN werden die von Ihnen vorgenommenen
Einstellungen gelöscht. Wenn Sie den Monitor also auf die werkseitigen
Einstellungen zurücksetzen wollen, gehen Sie wie im folgenden erläutert
vor.
x Zurücksetzen der Einstellungen für das aktuelle
Eingangssignal
Bewegen Sie den Joystick in Richtung ,.
x Zurücksetzen der Einstellungen für alle
Eingangssignale
Halten Sie den Joystick 2 Sekunden lang in Richtung ,.
Hinweis
Wenn Sie die Einstellungen für alle Eingangssignale zurücksetzen, wird statt der
von Ihnen eingestellten Sprache wieder die Standardsprache Englisch
ausgewählt.
5
x Unmittelbar nach dem Einschalten ist ein
Summgeräusch zu hören
Störungsbehebung
• Dieses Geräusch wird vom automatischen Entmagnetisierungszyklus
verursacht. Wenn Sie das Gerät einschalten, wird der Monitor
x Es wird kein Bild angezeigt
automatisch etwa fünf Sekunden lang entmagnetisiert.
* Ist ein zweiter Entmagnetisierungszyklus erforderlich, warten Sie nach
Die Netzanzeige 1 leuchtet nicht
dem ersten Zyklus mindestens 20 Minuten. Auf diese Weise erzielen Sie
• Das Netzkabel muß korrekt angeschlossen sein.
die besten Ergebnisse. Dabei ist möglicherweise ein Summgeräusch zu
• Der Monitor muß am Netzschalter 1 eingeschaltet sein.
hören, aber dies ist keine Fehlfunktion.
Die Netzanzeige 1 leuchtet orange
•Überprüfen Sie, ob das Videosignalkabel korrekt angeschlossen ist und
alle Stecker fest in den Buchsen sitzen.
Bildschirmmeldungen
• Achten Sie darauf, daß am HD15-Videoeingangsanschluß keine Stifte
verbogen oder eingedrückt sind.
INFORMATION
•Überprüfen Sie, ob der Computer eingeschaltet ist.
• Der Computer befindet sich im Energiesparmodus. Drücken Sie eine
beliebige Taste auf der Computer-Tastatur, oder bewegen Sie die Maus.
NICHT IM ABTASTBEREICH
1
• Die Grafikkarte muß korrekt im richtigen Bus-Steckplatz sitzen.
Die Netzanzeige 1 leuchtet grün oder blinkt orange
• Verwenden Sie die Selbstdiagnosefunktion.
x Das Bild flimmert, springt, oszilliert oder ist gestört
1 Wenn „NICHT IM ABSTATBEREICH“ angezeigt
• Entfernen Sie alle möglichen Quellen elektrischer oder magnetischer
wird:
Felder wie andere Monitore, Laserdrucker, Ventilatoren,
Gibt an, daß das Eingangssignal nicht den technischen Daten des Monitors
Leuchtstoffröhren oder Fernsehgeräte aus der Nähe des Monitors.
entspricht. Führen Sie folgende Abhilfemaßnahmen aus.
• Halten Sie den Monitor von Stromleitungen fern, oder schützen Sie den
• Stellen Sie sicher, daß die Videofrequenz im für den Monitor
Monitor durch eine Magnetabschirmung.
angegebenen Bereich liegt. Wenn Sie einen älteren Monitor durch diesen
• Schließen Sie das Netzkabel des Monitors an eine andere Steckdose,
Monitor ersetzt haben, schließen Sie den alten Monitor wieder an und
möglichst an einem anderen Stromkreis, an.
stellen eine Frequenz im folgenden Bereich ein:
• Versuchen Sie, den Monitor um 90 Grad nach links oder rechts zu
Horizontal: 30 – 85 kHz
drehen.
Vertical: 48 – 170 Hz
• Schlagen Sie in der Anleitung zur Grafikkarte die korrekte
Monitoreinstellung nach.
1 Wenn „KEIN EINGANGSSIGNAL“ angezeigt
•Überprüfen Sie, ob der Grafikmodus und die Frequenz des
wird:
Eingangssignals von diesem Monitor unterstützt werden (siehe “Preset
mode timing table” auf Seite i). Auch wenn die Frequenz innerhalb des
Gibt an, daß kein Eingangssignal vorhanden ist. Führen Sie folgende
unterstützten Bereichs liegt, arbeiten einige Grafikkarten
Abhilfemaßnahmen aus.
möglicherweise mit einem Synchronisationsimpuls, der für eine korrekte
•Überprüfen Sie, ob das Videosignalkabel korrekt angeschlossen ist und
Synchronisation des Monitors zu kurz ist.
alle Stecker fest in den Buchsen sitzen.
• Stellen Sie die Auffrischungsrate am Computer (Vertikalfrequenz) auf
• Achten Sie darauf, daß am HD15-Videoeingangsanschluß keine Stifte
den Wert ein, mit dem Sie die besten Bilder erzielen.
verbogen oder eingedrückt sind.
x Das Bild ist verschwommen
•Überprüfen Sie, ob der Computer eingeschaltet ist.
• Stellen Sie Helligkeit und Kontrast ein.
• Die Grafikkarte muß korrekt im richtigen Bus-Steckplatz sitzen.
• Entmagnetisieren Sie den Monitor.*
1 Wenn „MONITOR IST IM
• Reduzieren Sie den Moiré-Effekt so weit wie möglich.
ENERGIESPARMODUS“ angezeigt wird:
x Doppelbilder sind zu sehen
Gibt an, daß sich der Computer im Energiesparmodus befindet. Diese
• Verwenden Sie keine Bildschirmverlängerungskabel und/oder
Meldung erscheint nur, wenn sich der Computer in einem der
Videoschaltboxen, wenn dieses Phänomen auftritt.
Energiesparmodi befindet und Sie eine der Tasten am Monitor drücken.
•Überprüfen Sie, ob alle Stecker fest in den jeweiligen Buchsen sitzen.
Führen Sie folgende Abhilfemaßnahmen aus.
x Das Bild ist nicht zentriert, oder die Bildgröße ist nicht
• Drücken Sie eine beliebige Taste auf der Computer-Tastatur, oder
korrekt
bewegen Sie die Maus.
• Stellen Sie die Bildgröße oder -zentrierung ein. Beachten Sie bitte, daß
•Überprüfen Sie, ob der Computer eingeschaltet ist.
bei einigen Eingangssignalen und/oder Grafikkarten das Bild den
• Die Grafikkarte muß korrekt im richtigen Bus-Steckplatz sitzen.
Bildschirm nicht ganz bis zum Rand ausfüllt.
• Unmittelbar nach dem Einschalten des Geräts am Netzschalter dauert es
Anzeigen des Namens, der Seriennummer und des
eine Weile, bis Bildgröße und -zentrierung richtig eingestellt sind.
Herstellungsdatums des Monitors.
x Die Bildränder sind gekrümmt
Während Videosignale am Monitor
INFORMATION
• Stellen Sie die Geometrie ein.
eingehen, halten Sie die Taste MENU/
MODEL:CPD-E230
OK mehr als fünf Sekunden lang
x Wellenförmige oder elliptische Moiré-Effekte sind
SER NO:1234567
gedrückt, um ein Feld mit
MANUFACTURED : 200
1-52
sichtbar
Informationen zum Monitor
• Reduzieren Sie den Moiré-Effekt so weit wie möglich.
anzuzeigen.
• Wählen Sie ein anderes Muster für Ihren Desktop.
x Die Farbe ist nicht gleichmäßig
• Entmagnetisieren Sie den Monitor.* Wenn Sie ein Gerät, das ein
Magnetfeld erzeugt (z. B. einen Lautsprecher), in der Nähe des Monitors
aufstellen oder wenn Sie die Richtung des Monitors ändern, sind die
Farben möglicherweise nicht mehr gleichmäßig.
x Weiß sieht nicht weiß aus
• Stellen Sie die Farbtemperatur ein.
x Die Bedienelemente am Monitor funktionieren nicht
( erscheint auf dem Bildschirm)
• Wenn die Tastatursperre auf EIN gesetzt ist, setzen Sie sie auf AUS.
x An den Rändern von Buchstaben und Linien sind rote
oder blaue Schatten zu sehen
• Stellen Sie die Konvergenz ein.
6
Wenn auf dem Bildschirm dünne
Technische Daten
Linien erscheinen
(Dämpfungsdrähte)
Kathodenstrahlröhre
Diese Linien sind keine Fehlfunktion. Sie sind bei einem Monitor mit
Streifenabstand 0,24 mm (Mitte)
Trinitron-Bildröhre normal. Es sind die Schatten der Dämpfungsdrähte, die
Bildschirmdiagonale 43 cm
die Streifenmaske stabilisieren. Die Streifenmaske ist ein wichtiges
Ablenkung 90 Grad
Merkmal der Trinitron-Bildröhre. Sie bewirkt, daß mehr Licht auf den
FD-Trinitron
Bildschirm gelangt, und ermöglicht eine höhere Farbintensität und
Effektive Bildgröße ca. 327
× 243 mm (B/H)
Detailgenauigkeit.
Anzeigegröße ca. 41 cm
Auflösung
Höchstwert Horizontal: 1600 Punkte
Vertikal: 1200 Zeilen
Dämpfungsdrähte
Empfohlen Horizontal: 1024 Punkte
Vertikal: 768 Zeilen
Standardanzeigegröße
ca. 312
× 234 mm (B/H)
Ablenkfrequenz Horizontal: 30 bis 85 kHz
Selbstdiagnosefunktion
Vertikal: 48 bis 170 Hz
Betriebsspannung 100 bis 240 V Wechselstrom,
Dieser Monitor verfügt über eine Selbstdiagnosefunktion. Wenn an dem
50 – 60 Hz, max. 1,7 A
Monitor oder am Computer (bzw. an den Computern) ein Problem auftritt,
Leistungsaufnahme ca. 115 W
erscheint ein leerer Bildschirm, und die Netzanzeige 1 leuchtet grün auf
Betriebstemperatur 10 ºC bis 40 ºC
oder blinkt orange. Wenn die Netzanzeige 1 orange leuchtet, befindet sich
Abmessungen ca. 402
× 418 × 421 mm (B/H/T)
der Computer im Energiesparmodus. Drücken Sie eine beliebige Taste auf
Gewicht ca. 19 kg
der Computer-Tastatur, oder bewegen Sie die Maus.
Plug and Play DDC2B/DDC2Bi
GTF
x Wenn die Netzanzeige 1 grün leuchtet
Mitgeliefertes Zubehör
Netzkabel (1)
1 Lösen Sie das Videoeingangskabel, oder schalten Sie
Garantiekarte (1)
den angeschlossenen Computer aus.
Hinweise zum Reinigen der Bildschirmoberfläche (1)
Diese Bedienungsanleitung
2 Schalten Sie den Monitor am Netzschalter 1 aus und
dann wieder ein.
Vordefinierte Modi und Benutzermodi
Wenn ein Eingangssignal in den Monitor eingespeist wird, vergleicht der
3 Halten Sie den Joystick 2 Sekunden lang in Richtung
Monitor dieses Signal mit den werkseitig vordefinierten Modi im Speicher des
,.
Monitors und wählt automatisch den Modus aus, bei dem sich eine möglichst
hohe Bildqualität erzielen läßt (siehe “Preset mode timing table” auf Seite i). Bei
Eingangssignalen, die keinem der werkseitig vordefinierten Modi entsprechen,
Wenn alle vier Farbbalken (weiß, rot, grün, blau) angezeigt werden,
sorgt der Monitor mit Hilfe seiner digitalen Multiscan-Technologie dafür, daß
DE
funktioniert der Monitor ordnungsgemäß. Schließen Sie die
bei einem beliebigen Timing innerhalb des für den Monitor gültigen
Videoeingangskabel wieder an, und überprüfen Sie den Zustand des/der
Frequenzbereichs (horizontal: 30 – 85 kHz, vertikal: 48 – 170 Hz) ein scharfes
Computer(s).
Bild angezeigt wird. Wenn Sie das Bild einstellen, werden die Einstellungen als
Wenn die Farbbalken nicht erscheinen, liegt möglicherweise ein Fehler am
Benutzermodus automatisch gespeichert und abgerufen, wann immer das
Monitor vor. Wenden Sie sich mit der Beschreibung des Problems an einen
betreffende Eingangssignal eingeht.
autorisierten Sony-Händler.
Die Energiesparfunktion
Dieser Monitor erfüllt die Energiesparrichtlinien der VESA, des ENERGY
x Wenn die Netzanzeige 1 orange blinkt
STAR-Programms und des NUTEK-Standards. Wenn vom angeschlossenen
Computer kein Signal am Monitor eingeht, wird der Stromverbrauch des
Schalten Sie den Monitor aus (OFF) und dann wieder ein
Monitors wie unten erläutert automatisch verringert.
(ON).
Betriebsmodus Leistungsaufnahme Netzanzeige 1
Wenn die Netzanzeige 1 jetzt grün leuchtet, funktioniert der Monitor
Normalbetrieb ≤ 115 W grün
ordnungsgemäß.
Wenn die Netzanzeige 1 immer noch blinkt, liegt möglicherweise ein
Deaktiviert*
≤ 3 W orange
Fehler am Monitor vor. Ermitteln Sie das Intervall, in dem die Netzanzeige
Ausgeschaltet 0 W (ca.) aus
1 orange blinkt (in Sekunden), und wenden Sie sich mit der Beschreibung
des Problems an einen autorisierten Sony-Händler. Notieren Sie sich
* Wenn der Computer in den Modus „Deaktiviert“ wechselt und Sie danach
unbedingt die Modellbezeichnung und die Seriennummer des Monitors.
eine der Tasten am Monitor drücken, erscheint auf dem Bildschirm die
Notieren Sie sich außerdem das Fabrikat und Modell Ihres Computers und
Meldung „MONITOR IST IM ENERGIESPARMODUS“. Nach einigen
der Grafikkarte.
Sekunden schaltet der Monitor erneut in den Energiesparmodus.
Änderungen, die dem technischen Fortschritt dienen, bleiben vorbehalten.
7
Der dreh- und neigbare Ständer
Mit dem Ständer können Sie den Monitor
Sicherheitsmaßnahmen
innerhalb der rechts abgebildeten Winkel
nach Bedarf einstellen. Wenn Sie den
90°
15°
90°
Warnhinweis zum Netzanschluß
Monitor drehen oder neigen, stützen Sie
5°
• Verwenden Sie ausschließlich das mitgelieferte Netzkabel. Wenn Sie ein
ihn bitte mit beiden Händen unten ab.
anderes Netzkabel verwenden, achten Sie darauf, daß es für die
Achten Sie darauf, die Finger nicht an der
Stromversorgung in Ihrem Land geeignet ist.
Rückseite des Monitors einzuklemmen,
Für Kunden in Großbritannien
wenn Sie den Monitor nach oben
Wenn Sie den Monitor in Großbritannien verwenden, benutzen Sie bitte
schwenken.
Zentrierlinie
das mitgelieferte Kabel mit dem für Großbritannien geeigneten Stecker.
Beispiele für Steckertypen
für 100 bis 120 V
für 200 bis 240 V
nur für 240 V
Wechselstrom
Wechselstrom
Wechselstrom
• Warten Sie nach dem Ausschalten des Geräts mindestens 30 Sekunden,
bevor Sie das Netzkabel lösen. In dieser Zeit kann sich die statische
Elektrizität auf der Oberfläche des Bildschirms entladen.
• Wenn Sie das Gerät einschalten, wird der Bildschirm etwa 5 Sekunden
lang entmagnetisiert. Dadurch entsteht um den Bildschirm ein starkes
magnetisches Feld, das Daten auf Magnetbändern, Disketten oder
anderen Datenträgern in der Nähe beschädigen kann. Legen Sie
magnetische Datenträger und Bänder/Disketten daher nicht zu nahe bei
diesem Monitor ab.
Die Netzsteckdose sollte sich in der Nähe des Geräts befinden und
leicht zugänglich sein.
Aufstellung
Stellen Sie den Monitor nicht an folgenden Standorten auf:
• Auf Oberflächen wie Teppichen oder Decken oder in der Nähe von
Materialien wie Gardinen und Wandbehängen, die die
Lüftungsöffnungen blockieren könnten.
• In der Nähe von Wärmequellen wie Heizkörpern oder
Warmluftauslässen oder an einem Ort, an dem der Monitor direktem
Sonnenlicht ausgesetzt ist.
• An einem Ort, an dem der Monitor starken Temperaturschwankungen
ausgesetzt ist.
• An einem Ort, an dem der Monitor mechanischen Vibrationen oder
Stößen ausgesetzt ist.
• Auf einer instabilen Oberfläche.
• In der Nähe anderer Geräte, die ein starkes Magnetfeld generieren, wie
zum Beispiel ein Transformator oder eine Hochspannungsleitung.
• In der Nähe von oder auf einer elektrisch geladenen Metallfläche.
• In einem geschlossenen Gestell.
Wartung
• Reinigen Sie den Bildschirm mit einem weichen Tuch. Wenn Sie ein
Glasreinigungsmittel verwenden, achten Sie darauf, daß es keine
Antistatik-Lösung oder ähnliche Zusätze enthält, da diese zu Kratzern
auf der Beschichtung des Bildschirms führen könnten.
• Berühren Sie die Bildschirmoberfläche nicht mit scharfen, rauhen oder
spitzen Gegenständen wie zum Beispiel Kugelschreibern oder
Schraubenziehern. Andernfalls könnte die Bildschirmoberfläche
zerkratzt werden.
• Reinigen Sie Gehäuse, Bedienfeld und Bedienelemente mit einem
weichen Tuch, das Sie leicht mit einer milden Reinigungslösung
angefeuchtet haben. Verwenden Sie keine Scheuermittel,
Scheuerschwämme oder Lösungsmittel wie Alkohol oder Benzin.
Transport
Wenn Sie den Monitor zur Reparatur oder bei einem Umzug transportieren
müssen, verpacken Sie ihn mit Hilfe der Originalverpackungsmaterialien
wieder im Originalkarton.
8
")