Sony CPD-120AS – page 2
Manual for Sony CPD-120AS
Table of contents
- Owner’s Record
- Table of Contents
- Introduction Plug and play
- Precautions Maintenance Transportation
- Warning on Power Connection
- Functions of Controls
- Functions of Controls
- Functions of Controls
- Getting Started Installation p Step 1: Connect the computer
- p CPD-120AS p CPD-220AS
- p Step 2: Connect the power cord p Step 3: Turn on the display and computer. p Step 4: If necessary...
- Using Your Display Preset and user modes
- Using the tilt-swivel
- Damper wire
- Adjustments Adjusting volume
- Adjusting the picture contrast
- Adjusting the picture brightness
- Adjusting the picture centering
- Adjusting the picture size
- Adjusting the picture rotation
- Adjusting the pincushion
- Setting the color temperature
- Resetting
- Available Features Selecting Graphic Picture Enhancement (GPE)
- Selecting Bass Boost
- Power Saving Function
- Specifications
- Troubleshooting
- Troubleshooting
- Troubleshooting

Adjusting the picture rotation
The adjustment data becomes the common setting for all input signals.
1. Press the d button.
The GEOMETRY OSD appears.
2. Press the . +/– buttons.
+ to rotate clockwise
– to rotate counterclockwise
To exit the OSD
Press the d button again.
✎ Tip
If you don’t touch any buttons, the OSD automatically disappears after 10 seconds.
When you want to adjust another item, press the button of the item. The OSD of the selected
item appears.
Adjustments
GB
21
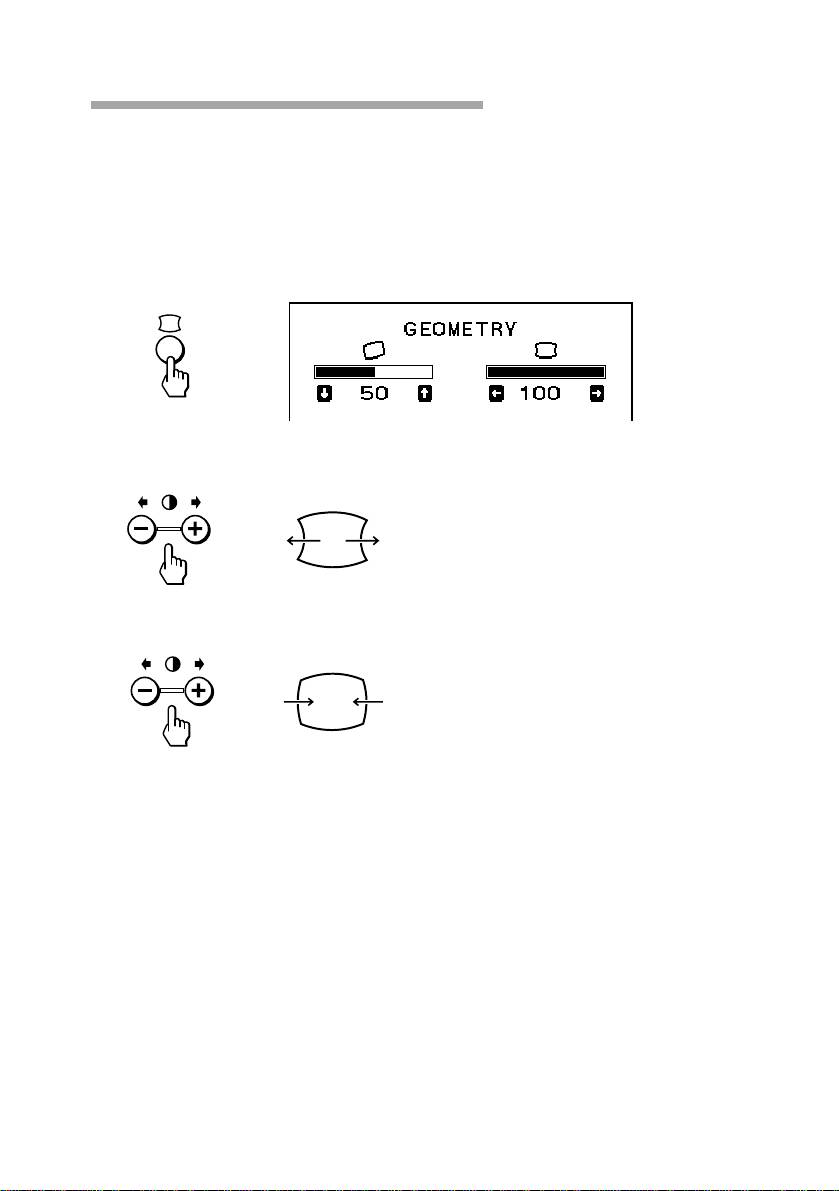
Adjusting the pincushion
The adjustment data becomes the individual setting for each input signal
received.
1. Press the d button.
The GEOMETRY OSD appears.
2. Press the > +/– buttons.
+ to expand the picture sides
– to diminish the picture sides
To exit the OSD
Press the d button again.
✎ Tip
If you don’t touch any buttons, the OSD automatically disappears after 10 seconds.
When you want to adjust another item, press the button of the item. The OSD of the selected
item appears.
GB
Adjustments
22
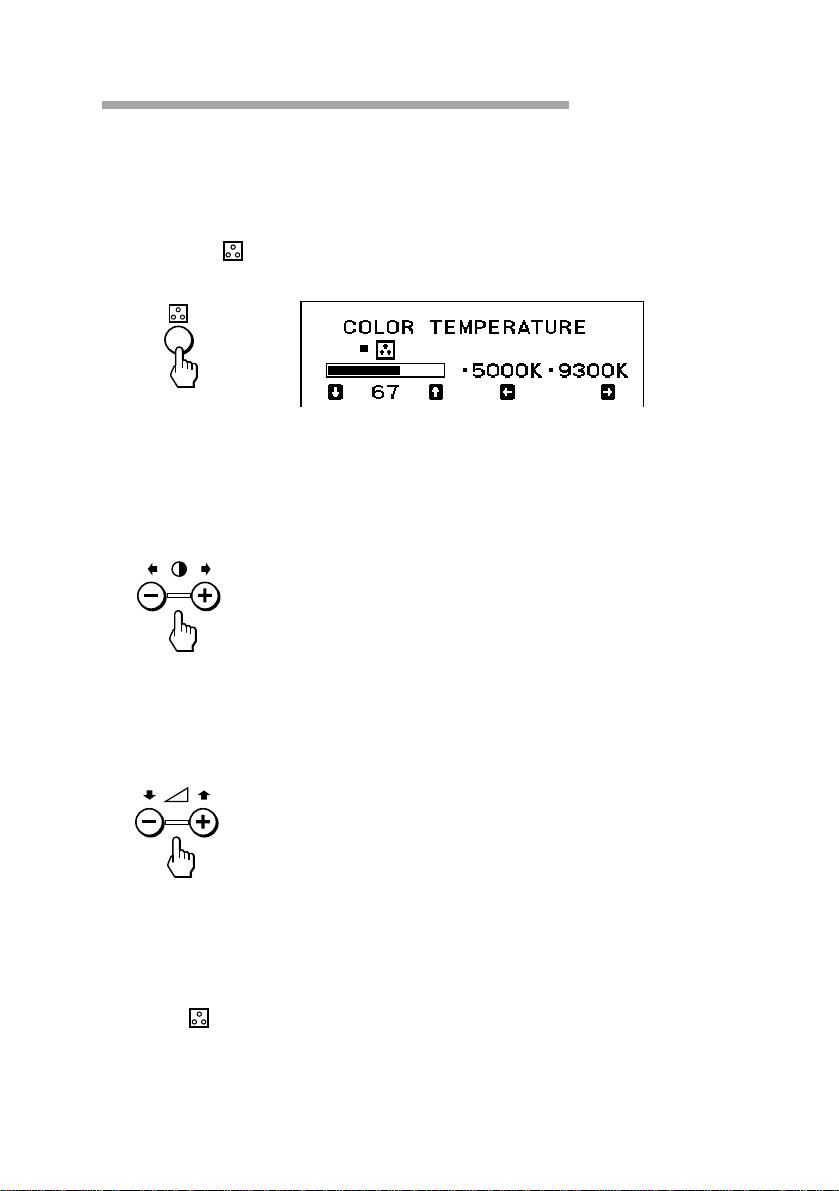
Setting the color temperature
The selected color temperature becomes the common setting for all input
signals.
1. Press the button.
The COLOR TEMPERATURE OSD appears.
2. Adjust with the . +/– and > +/– buttons.
To select 5000K or 9300K
Press > +/– buttons.
The selected color temperature is indicated.
+ to select 9300K
– to select 5000K
To obtain the desired color temperature between 5000K and
9300K
Press . +/– buttons.
+ for higher temperature
– for lower temperature
✎ Tip
The first press of . + or – button recalls the color temperature which was obtained at the
last adjustment.
To exit the OSD
Press the button again.
✎ Tip
If you don’t touch any buttons, the OSD automatically disappears after 10 seconds.
When you want to adjust another item, press the button of the item. The OSD of the selected
item appears.
Adjustments
GB
23

Resetting
p To recall the factory settings for individual
adjustment item
Press the button of the adjustment item you want to recall the factory
settings, and then press the ? button immediately before the OSD
disappears.
p To recall the factory settings for the current
mode
Press the ? button immediately when no OSD is shown.
p To recall the factory settings for all modes
Press and hold the ? button for 2 seconds.
All adjustments return to the factory settings.
GB
Adjustments
24
Available Features
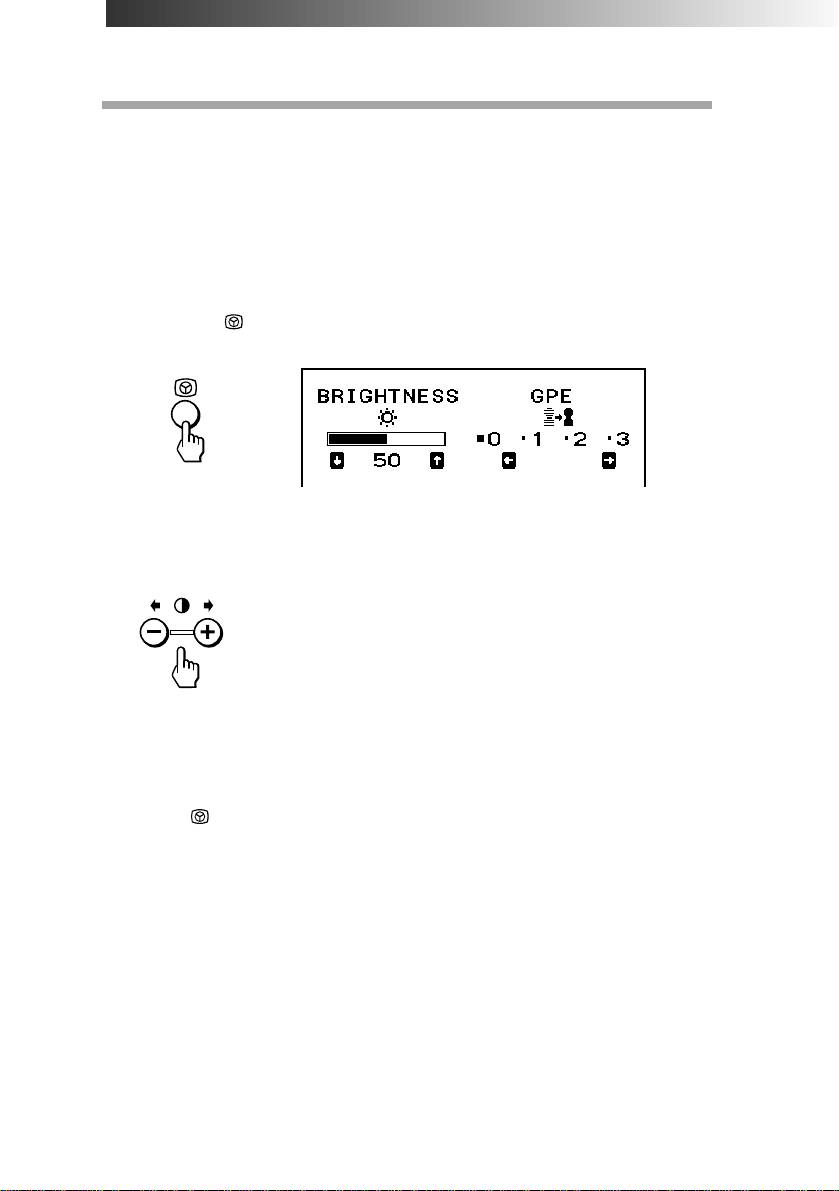
Selecting Graphic Picture Enhancement
(GPE)
There are 4 GPE modes from “0” through “3,” and the picture is more
vivid at a higher number. You can enjoy movies and games with striking
visuals by enhancing the picture sharpness.
Default setting is “0.”
1. Press the button.
The BRIGHTNESS/GPE OSD appears.
2. Press the > +/– buttons to select the GPE mode.
+ for higher number
– for lower number
You can adjust the brightness on the same OSD by pressing the
. +/– buttons.
To exit the OSD
Press the button again.
✎ Tip
If you don’t touch any buttons, the OSD automatically disappears after 10 seconds.
When you want to adjust another item, press the button of the item. The OSD of the selected
item appears.
✔Notes on GPE mode
For text oriented applications such as word processing and spreadsheets, set the GPE
mode to “0” (default setting).
GPE (Graphic Picture Enhancement) mode is reset to “0” when:
• you turn off the display
• the PC recovered from the power saving mode
• the resolution is changed
Available Features
GB
25
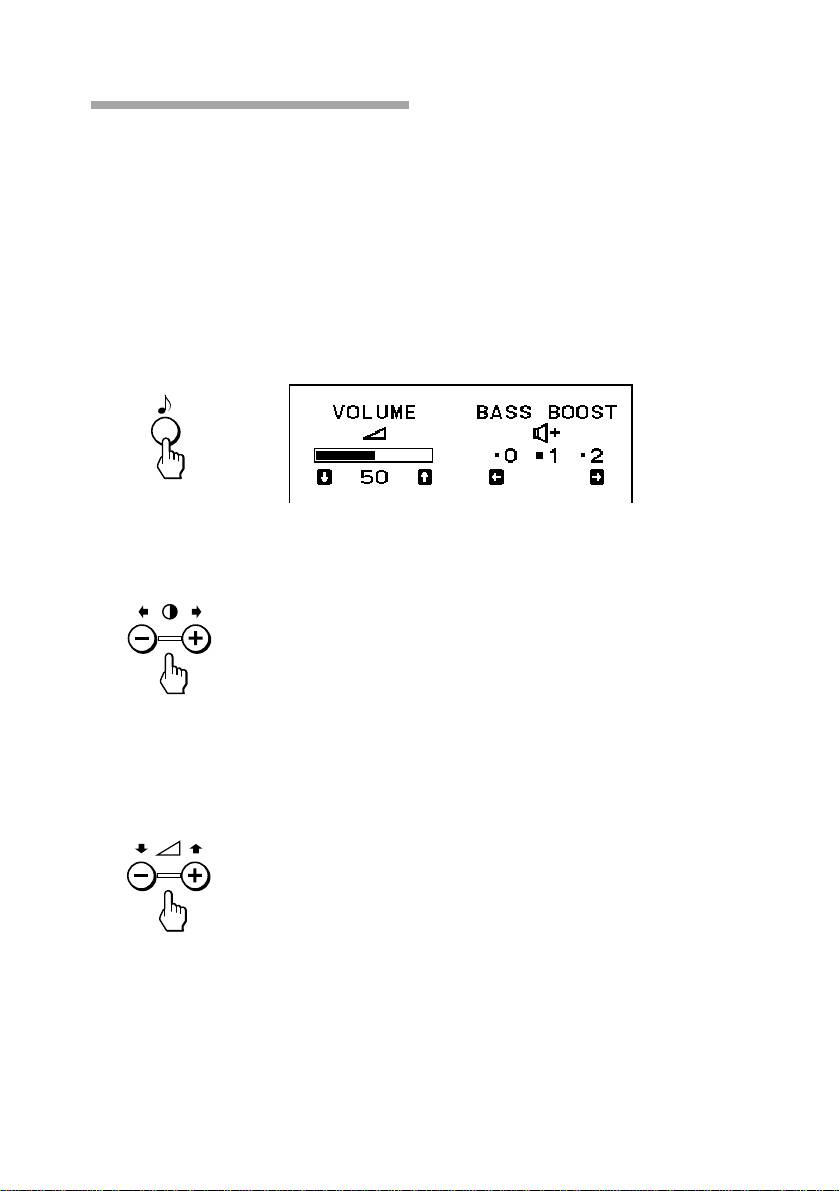
Selecting Bass Boost
There are 3 Bass Boost modes from “0” through “2,” and bass is boosted
more at a higher number. The factory setting is “1” (normal mode).
You can enjoy games and music programs with lively sound by selecting
“2.”
When you use the PC phone, select “0.” You will be able to hear the
caller’s voice more easily as the high-pitched tone is reduced.
1. Press the ≥ button.
The VOLUME/BASS BOOST OSD appears.
2. Press the > +/– buttons to select the BASS BOOST mode.
+ for higher number
– for lower number
After selecting the Bass Boost mode, you can adjust the volume on
the same OSD.
Press the . +/– buttons.
+ to increase volume
– to decrease volume
To exit the OSD
Press the ≥ button again.
✎ Tip
If you don’t touch any buttons, the OSD automatically disappears after 10 seconds.
When you want to adjust another item, press the button of the item. The OSD of the selected
item appears.
GB
Available Features
26

Power Saving Function
This display meets the power saving guidelines set by the International
ENERGY STAR Program. It is capable of reduced power consumption
when used with a computer equipped with Display Power Management
Signaling (DPMS). By sensing the absence of the sync signal coming
from the computer, it will reduce the power consumption as follows:
✔ CAUTION
The Power Saving function will automatically put the display into Active-off state if the
power switch is turned on without any video signal input. Once the horizontal and vertical
syncs are sensed, the display will automatically return to its Normal operation state.
State
Power
Required
u Power
Speaker
consumption
resumption time
indicator
1
Normal
CPD-120AS
—
Green
On
operation
130 W (max)
CPD-220AS
—
Green
On
150 W (max)
Off
2
Suspend (1st step
15 W (max)
Approx. 3 sec.
Green ˜
of power saving)
Orange
Off
3
Active-off (2nd
10 W (max)
Approx. 10 sec.
Orange
step of power
saving)
1)
Off
4
Power-off
Approx. 10 W
—
Off
✔ Note
1) To lower the power consumption to 0 W, disconnect the power cord.
Power Saving Function
GB
27

Specifications
Picture tube
CPD-120AS: 0.25 mm aperture grille pitch, 15 inches
measured diagonally (13.9” viewable),
90-degree deflection, AR coating
CPD-220AS: 0.25 mm aperture grille pitch, 17 inches
measured diagonally (16.0” viewable),
90-degree deflection, AR coating
Viewable image size
1
CPD-120AS: Approx. 284 × 212 mm (w/h) (11
/4 ×
3
8
/8 inches) 13.9” viewing image
7
CPD-220AS: Approx. 327 × 241 mm (w/h) (12
/8 ×
1
9
/2 inches) 16.0” viewing image
Max resolution Horizontal: Max. 1280 dots
Vertical: Max. 1024 lines
VESA standards 640 × 480 at 85 Hz
800 × 600 at 85 Hz
1024 × 768 at 85 Hz
1280 × 1024 at 60 Hz
Deflection frequency
Horizontal: 30 to 70 kHz
Vertical: 50 to 120 Hz
Speaker Left, right: 3.5 W x 2, Sub-woofer: 10 W
50 to 20 kHz
Microphones Uni-direction, electret condenser microphone
Microphones output
Miniplug
Audio input Stereo miniplug, input impedance 47 kΩ, input level
0.7 Vrms typical
Headphones output
Stereo minijack, 4 mW + 4 mW at 16 Ω
Microphones input
Minijack, plug-in-power
USB pass-through
Upsteam × 1, downstream × 1
Controls Contrast/Audio level/Picture enhancement/
Brightness/Bass Boost/(Audio level)/H.Size/V.Size/
Pincusion/Color tempeature/Audio muting
GB
Specifications
28

AC input voltage/current
100 to 240 V, 50 – 60 Hz, 1.5 – 0.5 A
Dimensions
CPD-120AS: Approx. 424 × 425 × 388 mm
3
3
3
(w/h/d) (16
/4 × 16
/4 × 15
/8 inches)
CPD-220AS: Approx. 481.5 × 483 × 427.5 mm
1
7
(w/h/d) (19 × 19
/8 × 16
/8 inches)
Mass CPD-120AS: Approx. 16.8 kg (37 lb 1 oz)
CPD-220AS: Approx. 22 kg (48 lb 8 oz)
Design and specifications are subject to change without notice.
Specifications
GB
29

Troubleshooting
This section may help you isolate a problem and as a result, eliminate the
need to contact technical support, allowing continued productivity.
No picture
If the u indicator is not lit
m Check that the power cord is properly connected.
m Check that the u switch is in the “ON” position.
If the u indicator is lit in orange, or alternately in orange and green
m Check that your computer power switch is in the “ON” position.
m The display may recover when you press any key on the keyboard of
the computer.
m Check that the video cable is properly connected.
m Ensure that no pins are bent or pushed in the HD15 connector of the
cable.
m Check that the video card in your computer is seated completely in a
proper bus slot.
m Check that the video sync signal is within that specified for the
display.
m This display has a self-diagnostics function. To activate the function,
turn off the computer and the display. Press and hold the u switch of
the display for about 8 seconds. If the display is operating correctly,
the screen will become white first and then the color bars will appear.
If the u indicator is flashing in orange
m Check that the video sync signal is specified for the display.
m There is a potential display failure. Contact Sony Technical Support.
No sound from speaker
If the ¤ indicator is lit
m Press the ¤ button to cancel muting.
m Check that the audio plug is properly connected.
m Adjust the volume with . +/– buttons.
m Check that the headphones are not connected.
m Check that the sound board of the computer is properly connected.
m Check that the volume control, muting, sound selector, etc. of the
sound board. (See the computer’s manual.)
Microphone mixing is not possible
m Check that the MIC plug is properly connected.
m Check that the sound board of the computer is properly connected.
m Check that the microphone control, sound selector, etc. of the sound
board. (See the computer’s manual.)
GB
Troubleshooting
30

Howling (feed-back) is heard
m Decrease the volume with . +/– buttons, or turn down the
microphone input volume of the sound board.
Picture is scrambled
m Check your graphics board manual for the proper display setting on
the display.
m Check this manual and confirm that the graphic mode and the
frequency at which you are trying to operate is supported. Even
within the proper range, some video boards may have a sync pulse
that is too narrow for the display to sync correctly.
Color is not uniform
m Trip the u switch once to activate the Auto-degauss cycle*.
Picture is flickering
m If the refresh rate is not appropriate, the picture may flicker. Set the
refresh rate of the non-interlace mode as high as possible on the
computer. For details on how to set the refresh rate, consult the dealer
of your computer or video board.
Screen image is not centered or sized properly
m Adjust picture centering, size, or geometry (rotation/ pincushion) on
the OSD (pages 19–22).
m Some video modes do not fill the screen to the edge of the display.
There is no single answer to solve the problem. There is a tendency for
this problem to occur on higher refresh timings.
Picture is fuzzy
m Adjust the contrast and brightness on the OSD (pages 17, 18). Some
brands of SVGA boards have an excessive video output level which
creates a fuzzy picture at maximum contrast.
m The GPE setting may not be proper for the picture. Selecting a lower
GPE number may improve the picture (page 25).
m Trip the u switch once to activate the Auto-degauss cycle*.
Picture bounces or has wavy oscillations
m Isolate and eliminate any potential sources of electric or magnetic
fields. Common causes for this symptom are electric fans, fluorescent
lighting, laser printers, etc.
m If you have another display close to this display, increase the distance
between them to reduce interference.
m Try plugging the display into a different AC outlet, preferably on a
different circuit.
Picture appears to be ghosting
m Eliminate the use of video extension cables and/or video switch boxes
if this symptom occurs. Excessive cable length or weak connections
can produce this symptom.
Continued to the next page ➔
Troubleshooting
GB
31

Fine horizontal lines (wires) are visible
m These wires stabilize the vertically striped Aperture Grille. The
Aperture Grille allows more light to pass through to the screen giving
the Trinitron CRT more color and brightness.
Wavy or elliptical (moire) pattern is visible
m Due to the relationship between resolution, display Aperture Grille
pitch and the pitch of some image patterns, certain screen
backgrounds, especially gray, sometimes show moire which looks like
wavy lines. This can only be eliminated by changing your desktop
pattern.
Hum is heard right after the power is turned on
m When the power is turned on, the Auto-degauss cycle* is activated.
While the Auto-degauss cycle is activated, a hum may be heard for
about 3 seconds. This is not a malfunction.
* The Auto-degauss function demagnetizes the metal frame of the CRT to obtain
a neutral field for uniform color reproduction. If a second degauss cycle is
needed, allow a minimum interval of 20 minutes for the best result.
• If the problem persists, call your authorized Sony dealer from a
location near you, or call Sony Technical Support.
• Note the model name and the serial number of your display. Also note
the make and name of your computer and video board.
GB
Troubleshooting
32

Table des matières
Introduction .................................................................................4
Plug & play .................................................................................................. 4
Précautions................................................................................... 5
Fonctions des commandes .......................................................... 7
Préambule ..................................................................................10
Installation ................................................................................................. 10
Utilisation de l’écran .................................................................13
Modes usine et modes utilisateur........................................................... 13
Utilisation du socle orientable ................................................................ 14
Fils d’amortissement ................................................................................ 15
GB
Réglages .....................................................................................16
F
Réglage de volume ................................................................................... 16
Réglage de contraste ................................................................................. 17
D
Réglage de luminosité .............................................................................. 18
ES
Réglage de centrage d’image .................................................................. 19
Réglage de taille d’image......................................................................... 20
I
Réglage de rotation d’image.................................................................... 21
RF
Réglage de distorsion d’image................................................................ 22
Réglage de température de couleur ....................................................... 23
Réinitialisation........................................................................................... 24
Fonctions disponibles................................................................25
Sélection du mode d’optimisation graphique (GPE)........................... 25
Sélection du mode d’accentuation des graves ...................................... 26
Fonction d’économie d’énergie ................................................ 27
Spécifications ............................................................................. 28
Dépannage.................................................................................30
F
3

Introduction
Nous sommes heureux que vous ayez acheté un écran Sony Multiscan
CPD-120AS/220AS!
Cet écran est le fruit des 25 années d’expérience acquises par Sony avec
sa technique Trinitron, ce qui constitue une garantie de performances et
de fiabilité.
La large plage de fréquences de balayage (30 – 70 kHz) et la technique de
multibalayage numérique permettent d’utiliser cet écran dans n’importe
quel format graphique, du format VGA standard au format VESA 1024 ×
768 à 85 Hz (VESA 1280 × 1024 à 60 Hz).
De plus, ses deux modes de couleur préréglés et son mode réglable par
l’utilisateur vous offrent une flexibilité sans égale dans le calibrage des
couleurs et vous permettent d’assurer une meilleure correspondance
entre les couleurs affichées et celles de l’impression.
Cet écran possède de nombreuses fonctions supplémentaires:
• Fonction d’optimisation graphique
Permet de créer des images pour des sources multimédias.
• Fonction d’accentuation des graves
Permet d’adapter la reproduction sonore à la source.
• Excellente reproduction sonore
grâce à un subwoofer de 10 W et à deux tweeters de 3,5 W.
Bref, le CPD-120AS/220AS vous offre des performances de haut niveau
et toute la qualité et le sérieux qui ont fait la réputation de Sony.
Plug & play
Cet écran est conforme aux normes DDC™1 et DDC2B du format VESA.
Si vous branchez sur votre écran un système hôte DDC1, l’écran se
synchronisera avec le V. CLK conformément aux normes VESA et
enverra les données EDID (Extended Display Identification Data) à la
ligne de données.
Si vous connectez un système DDC2B, l’écran passe automatiquement en
communication DDC2B.
DDC™ est une marque déposée de Video Electronics Standard Association.
F
4
Introduction

Précautions
Installation
• Evitez toute accumulation de chaleur en prévoyant une circulation
d’air adéquate. Ne placez pas l’écran sur des surfaces (tapis,
couvertures, etc.) ou à proximité de rideaux ou de tentures
susceptibles de bloquer les ouïes de ventilation.
• N’installez en aucun cas l’écran près de sources de chaleur telles que
des radiateurs ou des bouches d’aération ou dans des endroits
exposés à la lumière directe du soleil, à une poussière excessive, à des
vibrations mécaniques ou à des chocs.
• Ne placez jamais l’écran près d’équipements produisant des ondes
magnétiques, tels que des transformateurs ou des lignes à haute
tension.
Entretien
• Nettoyez le coffret, le tube-image et les commandes à l’aide d’un
chiffon doux légèrement imbibé d’un détergent non agressif.
N’utilisez ni tampon abrasif, ni poudre ou liquide à récurer ni alcool
ni benzène.
• Evitez de toucher le tube-image avec tout objet abrasif ou pointu, tel
que stylo à bille ou tournevis, en raison du risque d’endommagement
du tube-image.
Transport
• Ne jetez ni la boîte ni les matériaux d’emballage. Pour transporter
l’écran, utilisez toujours la boîte et les matériaux d’emballage afin que
l’écran soit parfaitement protégé.
• Lorsque vous portez l’écran, prenez garde à ne pas coincer vos doigts
entre l’écran et le socle.
Suite à la page suivante ➔
F
Précautions
5
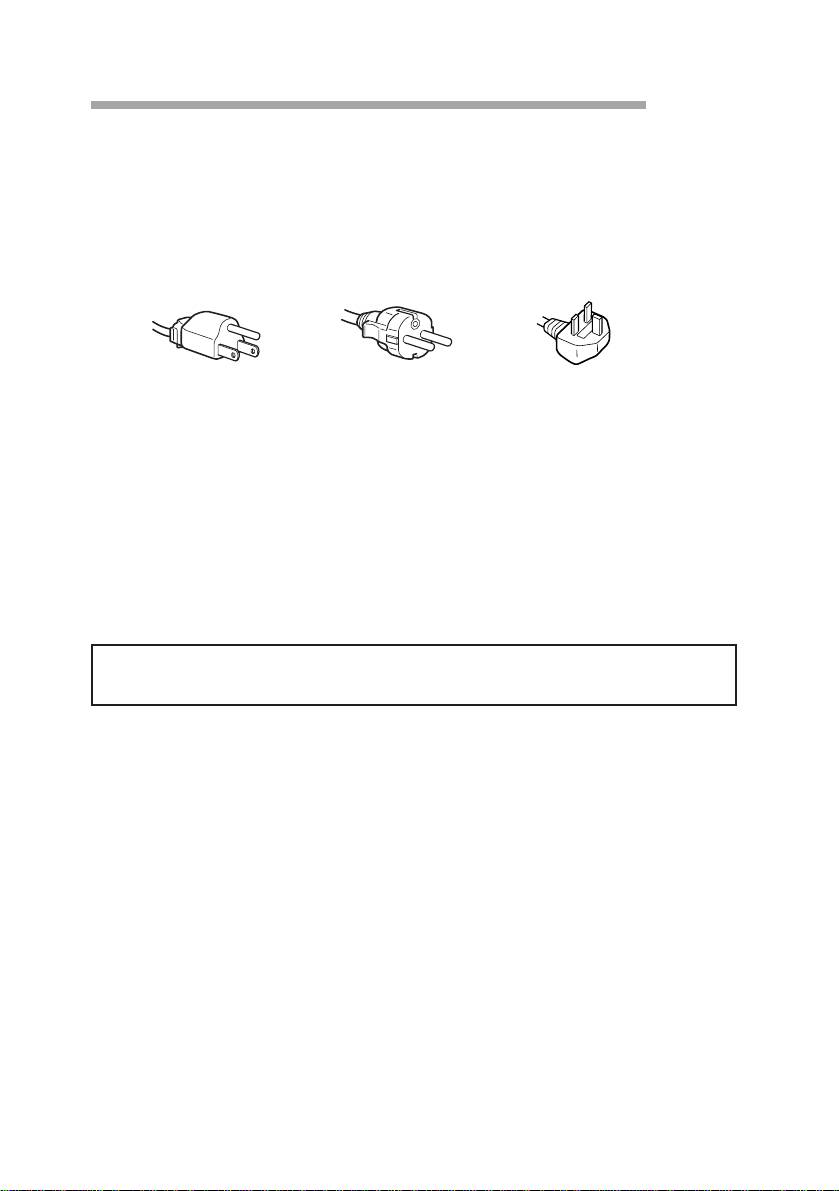
Mise en garde pour le branchement
électrique
• Utilisez le cordon d’alimentation fourni.
Au Royaume-Uni
Si vous utilisez l’écran au R.-U., veuillez utiliser le câble spécial fourni.
100 à 120 V CA 220 à 240 V CA 240 V CA uniquement
• Avant de débrancher le cordon d’alimentation, attendez au moins 30
secondes après avoir mis l’écran hors tension afin de permettre la
dissipation de l’électricité statique accumulée à la surface du tube.
• Une fois mis sous tension, l’écran est démagnétisé pendant environ 5
secondes, ce qui génère un puissant champ magnétique autour de
l’encadrement. Ce champ magnétique peut affecter les données
enregistrées sur des bandes magnétiques ou des disquettes posées à
proximité de l’écran. Nous vous recommandons donc d’éloigner tout
support magnétique de l’écran.
La prise doit se situer à proximité de l’écran et être aisément
accessible.
F
6
Précautions
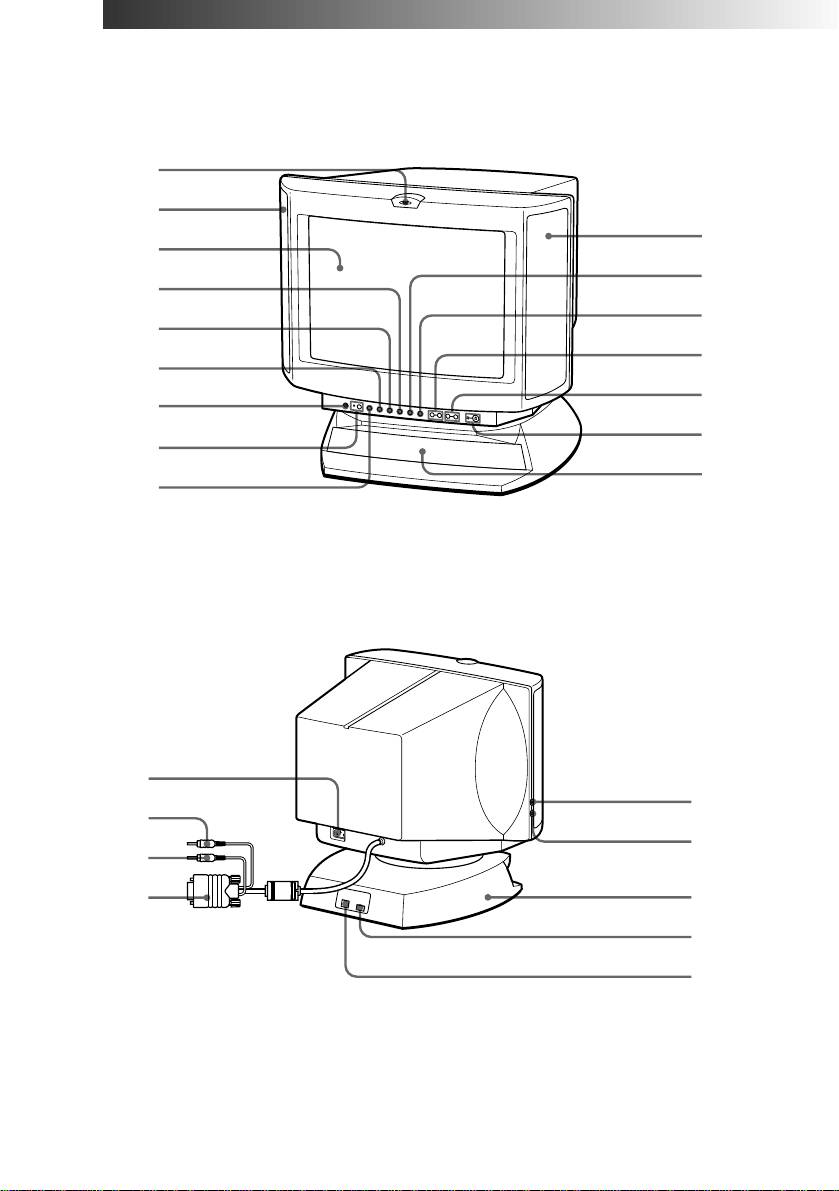
Fonctions des commandes
Avant
1
2
2
3
!º
4
!¡
5
!™
6
!£
7
!¢
8
!∞
9
Arrière
p CPD-120AS
!§
@™
!¶
@¡
!•
!ª
@£
@º
@¢
Suite à la page suivante ➔
F
Fonctions des commandes
7
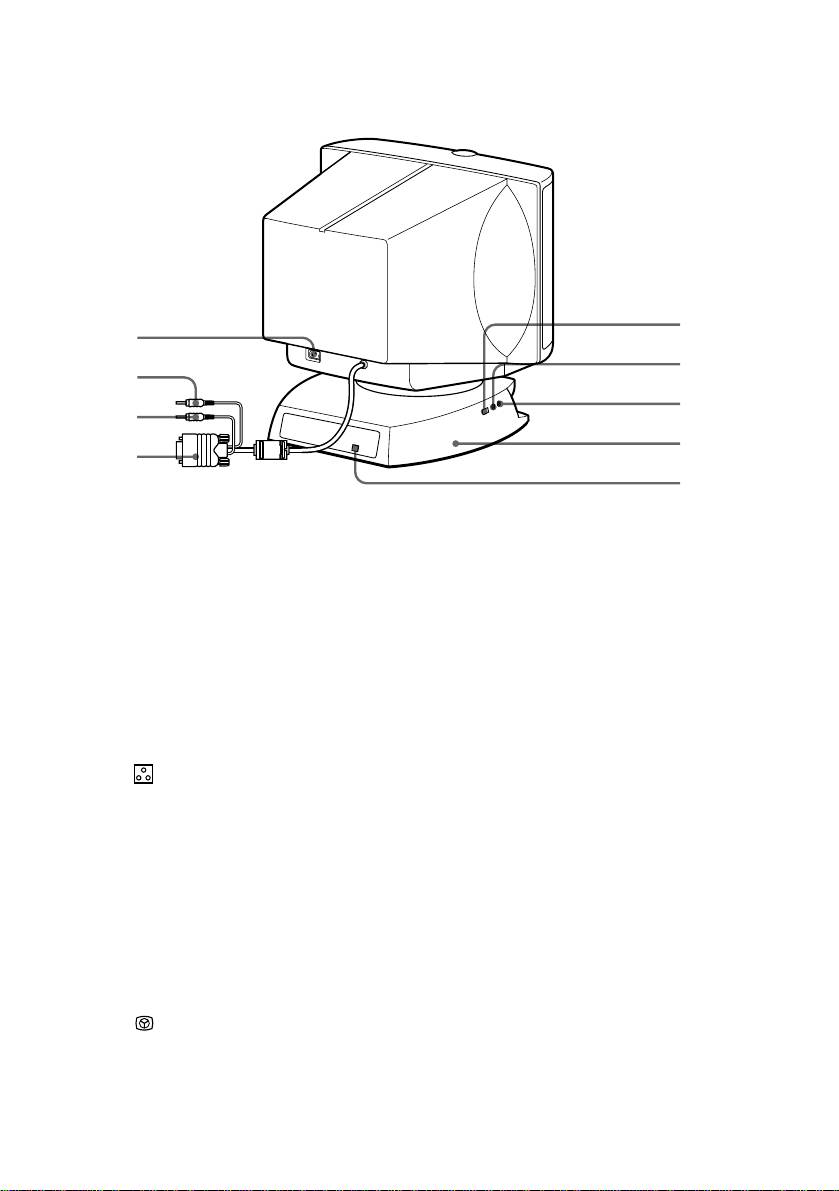
p CPD-220AS
@º
!§
@¡
!¶
@™
!•
@£
!ª
@¢
1
Micro
Le micro interne est automatiquement coupé
lorsque l’on branche un micro externe.
2
Haut-parleur principal
—
3
Tube-image
Affiche le menu lorsque vous procédez à des
réglages.
4
Å Bouton de taille
Permet de régler la taille de l’image (page 20).
d’image
5
d Bouton de
Permet de régler la distorsion et la rotation
géométrie d’image
d’image (pages 21, 22).
6
Bouton de
Permet de régler la température de couleur
température de couleur
(page 23).
7
? Bouton de
Permet de revenir aux réglages d’usine (page
réinitialisation
24).
8
¤ Bouton de mise en
Permet de couper le son (page 17).
sourdine et son témoin
lumineux
9
≥ Bouton de volume/
Permet de régler le volume des haut-parleurs
accentuation des
ou de sélectionner le mode d’accentuation des
graves
graves (page 26).
!º
S Bouton de centrage
Permet de régler le centrage d’image (page 19).
!¡
Bouton de
Permet de régler la luminosité ou de
luminosité/
sélectionner le mode d’optimisation graphique
optimisation graphique
(GPE) (page 25).
F
8
Fonctions des commandes

!™
. Boutons de
Permet de régler le volume (page 16).
volume –/+
Le réglage par défaut du volume est de 30 %.
!£
> Bouton de
Permet de régler le contraste (page 17).
contraste –/+
!¢
u Interrupteur
Permet de mettre l’écran sous/hors tension.
marche/arrêt et son
témoin lumineux
!∞
Subwoofer
—
!§
Prise d’alimentation
Destiné à recevoir le cordon d’alimentation
(page 12).
!¶
2 Fiche audio (vert)
A connecter à la sortie haut-parleur de
l’ordinateur (page 11).
!•
h Fiche micro (rouge)
A connecter à l’entrée micro de l’ordinateur
(page 11).
!ª
; Câble vidéo (bleu)
A connecter à la sortie vidéo de l’ordinateur
(page 11).
@º
Prise USB aval
Permet de connecter un équipement USB (page
11).
@¡
h Prise jack micro
Sert à connecter un micro (non fourni).
@™
2 Prise jack casque
Sert à connecter un casque (non fourni). Les
haut-parleurs sont automatiquement coupés
lorsque vous branchez un casque.
@£
Socle orientable
Permet de régler l’angle de vision (page 14).
@¢
Prise USB amont
A connecter aux ports USB de l’ordinateur si
vous branchez un équipement USB (universal
serial bus) sur votre écran (page 11).
F
Fonctions des commandes
9

Préambule
Avant d’utiliser votre écran, vérifiez si les éléments suivants figuraient
bien dans l’emballage:
• écran multimédia (1)
• cordon d’alimentation (1)
• mode d’emploi (1)
• Windows 95 Monitor Information Disk et son mode d’emploi (1)
✎ Conseil
Cet écran se synchronisera sur tout système IBM ou compatible équipé d’une carte graphique
1)
VGA
ou d’une carte plus performante. Bien que cet écran ait été conçu pour se synchroniser
sur d’autres plates-formes à des fréquences horizontales comprises entre 30 et 70 kHz, y
2)
compris les systèmes Macintosh
et Power Macintosh, un adaptateur de câble est alors
nécessaire. Nous vous prions de consulter le service technique de Sony, qui vous indiquera les
références de l’adaptateur dont vous avez besoin.
1) VGA est une marque déposée de IBM Corporation.
2) Macintosh est une marque dépose de Apple Computer Inc.
Installation
p Première étape: branchement de l’ordinateur
Ordinateur éteint, connectez le câble vidéo à la prise écran (VGA) de
votre ordinateur. Si votre ordinateur supporte la norme plug and play
DDC, ce branchement permettra à lui seul la communication DDC entre
l’écran et l’ordinateur.
De plus, le câble vidéo est combiné avec les câbles audio et micro. Si
votre ordinateur possède une carte son, connectez les fiches audio et
micro aux prises jacks adéquates sur votre ordinateur.
Si vous utilisez un équipement USB (universal serial bus), connectez
l’équipement USB à la prise jack USB aval et le PC à la prise jack USB
amont.
F
10
Préambule
