Sony SU-WTS1: Step 3: Attach the Mounting Arms to the TV
Step 3: Attach the Mounting Arms to the TV: Sony SU-WTS1
Table of contents
- For Users For dealers or authorized service personnel
- Step 1: Check the Parts
- 4 Step 2: Remove Stands from the TV
- Step 3: Attach the Mounting Arms to the TV
- 6 Step 4: Fasten Lower Mount Wall Brackets (Example for securing to a wood wall)
- Step 5: Secure Upper Mount Wall Brackets
- 8 Step 6: Mount the TV to the Mount Wall Brackets Step 7: Adjust Tension
- Proper Ventilation
5
GB
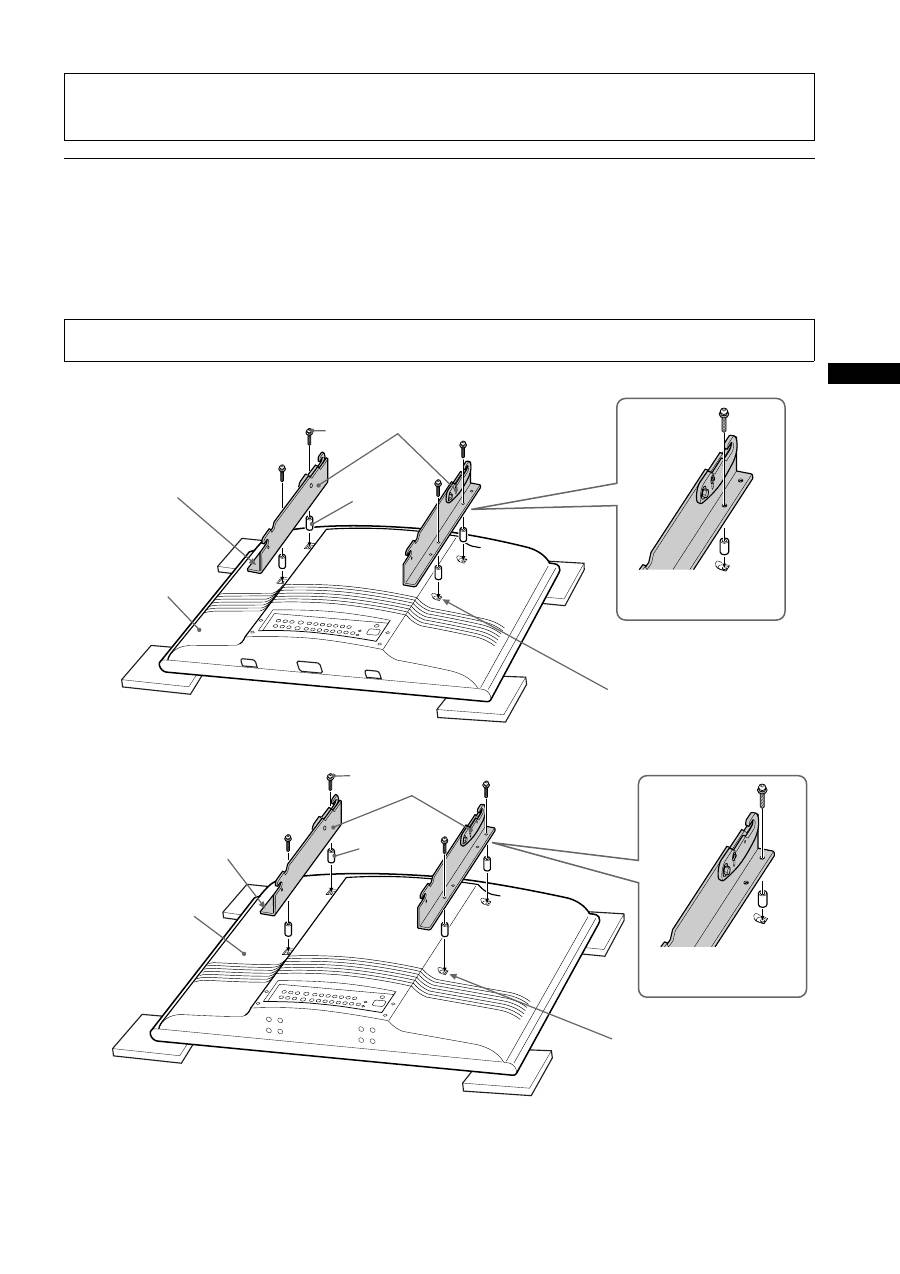
Step 3: Attach the Mounting Arms to the TV
Use the hardware chart in “Step1: Check the Parts” on page 3 of this manual to identify the appropriate hardware. Mounting points on the
mounting arms (
A
) differ depending on TV size. See “MOUNTING POINTS FOR PLASMA MODELS KZ-32TS1E / KZ-42TS1E” on
page 3 of this manual.
Invert the TV on a soft, flat surface and locate the mounting points on the back of the TV. Secure the left and right
mounting arms (
A
) to the TV with the screws (
G
,
I
), making sure that the upper hook screw, nut and reference arrow
are facing the outside edges of the TV.
KZ-32TS1E
KZ-42TS1E
Caution
Installation of units is to be carried out by dealers or authorized service personnel only. Install in appropriate location by checking the
wall structure and durability for safety and accident prevention.
Note
Do not overtighten the bracket mounting screws as damage to the TV internal mounting threads could occur.
Arrow must face out prior
to installation
Securing the mounting
arms.
A
G
E
Remove the screws attached at these
4 positions, then attach the mounting
arms to the TV. Keep the screws
supplied with the TV for use when not
using the Wall-Mount Bracket.
Rear of TV
Arrow must face out prior
to installation
Securing the mounting
arms.
Rear of TV
A
I
E
Remove the screws attached at
these 4 positions, then attach the
mounting arms to the TV. Keep
the screws supplied with the TV
for use when not using the Wall-
Mount Bracket.
