Sony VPL-HW55ES: a b Installing the Unit Step 2
a b Installing the Unit Step 2: Sony VPL-HW55ES
Table of contents
- About the Quick Reference Manual
- WARNING
- For the Customers in Brazil only
- Precautions On preventing internal heat build- up On repacking On watching 3D video images On LCD Projector On condensation
- Notes on Installation and Usage
- Unsuitable Conditions
- Safety precautions for installing the unit on a ceiling
- Preparing Step 1 Checking the Supplied Accessories Inserting the Batteries into the Remote Control Using the CD-ROM manual
- a b Installing the Unit Step 2
- c
- Connecting the Unit Step 3 Connecting to a VCR
- To connect to equipment with component video output connectors
- Connecting to a Computer
- Connecting to a 3D Sync Transmitter
- Selecting the Menu Language Step 4
- Projecting Step 5
- Selecting the Picture Viewing Mode
- Error Handling Warning Indicators
- 1 2 Maintenance Replacing the Lamp
- 3 6
- 7 14
- Cleaning the Air Filter
US
10
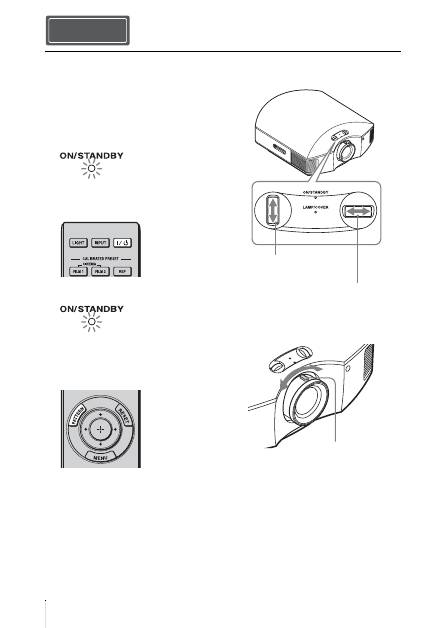
1
Position the unit so that the lens is
parallel to the screen.
2
After connecting the AC cord to the
projector, plug the AC cord into a wall
outlet.
3
Press the
?
/
1
(ON/STANDBY)
switch to turn on the projector.
4
Press the PATTERN button to display
a test signal for performing
adjustments.
a
Move both lens shift dials to
adjust the picture position.
b
Adjust the picture size using the
zoom lever.
Installing the Unit Step 2
Lights in red.
Top of the unit
Flashes in green for a
while (tens of seconds)
and then lights in green.
Top of the unit
To adjust the vertical
position
To adjust the horizontal
position
Zoom lever
Top 10 manuals
100.00
NZXT HALE90 1000W99.99
Samsung SM-R38099.97
AEG BSB 18C99.97
Dell 2700W99.97
Smeg KSEC70X99.96
Beurer HDE 4099.96
Pyramida KH 50 v.299.96
MSI CSM-H81M-P3299.96
AEG HR 562799.95
Melissa 640-048