Sony KF-50SX100K: Overview of Remote Control Buttons
Overview of Remote Control Buttons: Sony KF-50SX100K
5
GB
S
RM 903
PROGR
MENU
1
4
7
2
5
8
0
3
6
9
K
VIDEO
TV
VIDEO
TV
VTR 1 2 3 4 DVD
C H
Overview
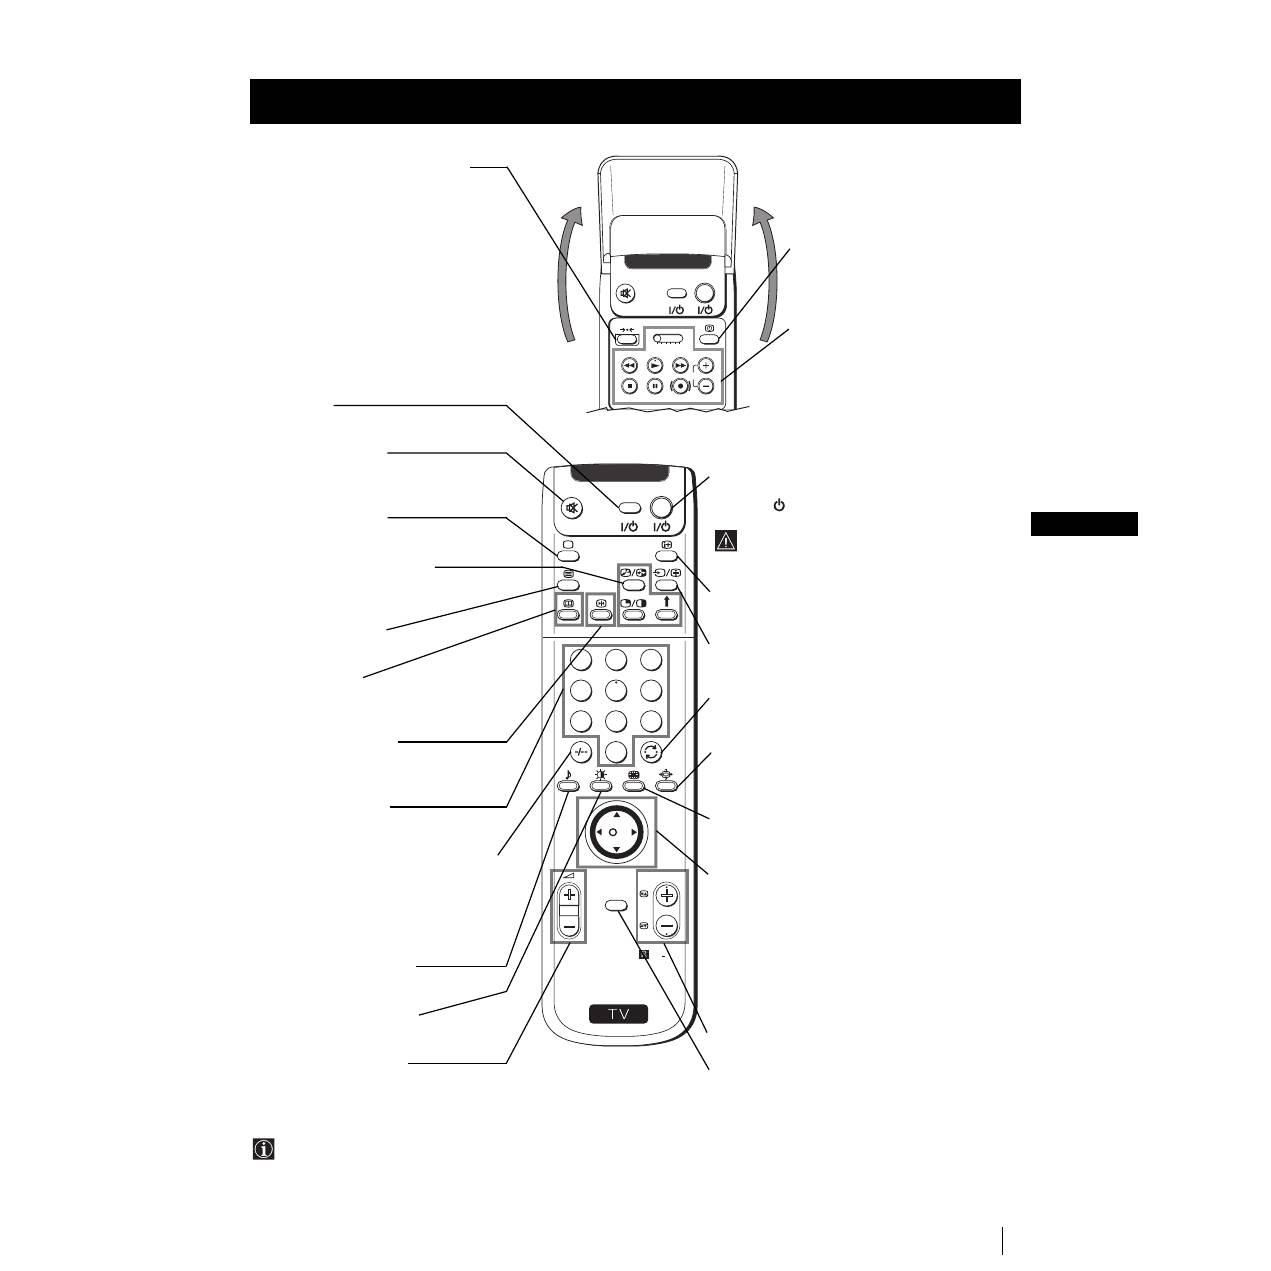
Overview of Remote Control Buttons
Resetting to factory set levels
Press not only to return picture and sound
settings to factory-set levels, but also to re-
install the set as the first time it was switched
on.
After the "Language/Country" menu
appeared on the screen, proceed in the same
way as described in the section "Switching on
the set and automatically Tuning" of this
instruction manual.
VCR on/off
Press to switch your VCR on or off.
Muting the Sound
Press to mute TV sound.
Press again to restore the sound.
Selecting TV mode
Press to switch off Teletext or video input.
PAP (Picture And Picture)
For more details, please refer to the section
"Using PAP (Picture And Picture)".
Selecting Teletext
Press to switch on Teletext.
Displaying EPG
Press to display the Electronic Programme
Guide (EPG). Press again to switch off EPG.
Freezing the picture
Press to freeze the picture. Press again to
return to the normal picture.
Selecting channels
Press to select channels.
For double-digit programme numbers, e.g.
23, press -/-- first, then the buttons 2 and 3.
If you enter an incorrect first digit, this
should be corrected by entering another digit
(0-9) and then selecting -/-- button again to
enter the programme number of your choice.
Selecting Sound mode
Press repeatedly to change the sound mode.
Selecting Picture mode
Press repeatedly to change the picture mode.
Adjusting TV Volume
Press to adjust the volume of the TV.
Displaying the time
Press to switch the time on or off
(available only when teletext is
broadcast).
VCR operation
For more details, please refer to the
section "Remote Control of other
Sony Equipment".
Besides TV functions, all coloured buttons as well as green
symbols are also used for Teletext operation. For more details,
please refer to the "Teletext" section of this instruction manual.
Overview
To Temporarily Switch Off
Press to temporarily switch off TV (the standby
indicator
on the set lights up in red). Press
again to switch on TV from standby mode.
After 15-30 minutes without a signal and
without any button being pressed, the set
switches automatically into standby mode.
Displaying On Screen Information
Press to display all on-screen indications.
Press again to cancel.
Selecting Input source
Press repeatedly until the desired input symbol of
the source appears on the screen.
Back to the channel last watched
Press to watch the last channel selected (watched for
at least 5 seconds).
Selecting Screen format
Press repeteadly to change the format of the screen
(for more details, please refer to the section
“Changing the Screen format”).
Displaying Multi PIP (Picture In Picture)
Press to display Multi PIP mode. Press again to
cancel.
Joystick for menu selection
• When MENU is switched on:
4
Scroll Up
$
Scroll Down
Z
Previous menu or selection
z
Next menu or selection
OK
Confirms your selection
• When MENU is switched off:
Z
Return to the last menu screen.
OK
Shows a channel overview
Selecting channels
Press to select the next or previous channel.
Displaying the menu system
Press to display the menu on the screen. Press again
to remove the menu display from the screen.
Оглавление
- Introduction
- Overview of TV Buttons
- Overview of Remote Control Buttons
- Inserting Batteries into the Remote Control
- Switching on the set and Automatically Tuning
- Changing the Screen Format
- On Screen display Menus Guide
- Adjusting the Picture
- Adjusting the Sound
- Using the Features Menu
- Manually Tuning the TV
- Labelling a channel
- Skipping Programme positions
- Using the "Further Programme Preset" function
- Inputting Your Personal ID
- Using the Demo Mode
- Adjusting the H Centre picture for an RGB source
- Labelling and Selecting the screen format of Input Sources
- Using Multi PIP (Picture In Picture)
- Teletext
- NexTView *
- Connecting Optional Equipment
- Using Optional Equipment
- Smartlink
- Optimum Viewing Area
- Replacing the Lamp
- Specifications
- Troubleshooting
- Úvod
- Kontrola přídavných doplňků Přehled tlačítek aparátu
- Přehled tlačítek dálkového ovladače
- Vložení baterií do dálkového ovladače
- Zapnutí aparátu a automatické naladění
- Změna formátu zobrazení
- Stručný návod k volbě Menu
- Seřízení obrazu
- Seřízení zvuku
- Použití menu “Spec. funkce”
- Ruční ladění televizoru
- Identifikace jednotlivých vysílacích stanic
- Vynechávání programových pozic
- Použití funkce “Rozšířené předvolby”
- Zavedení Vašeho osobního ID čísla
- Ukázka různých funkcí
- Seřízení vodorovného centrování obrazu pro videozdroj RGB
- Identifikace a volba formátu zobrazení vstupních signálů
- Multi Obrazy (Multi PIP)
- Teletext
- NexTView *
- Připojení přídavných zařízení
- Použití přídavných zařízení
- Smartlink
- Optimální úhel vidění
- Výměna žárovky
- Specifikace
- Řešení problémů
- Wprowadzenie
- Sprawdzanie dostarczonych akcesoriów
- Przegląd przycisków pilota do zdalnego sterowania
- Wkładanie baterii do pilota
- Włączanie telewizora i automatyczne programowanie
- Zmiana formatu ekranu
- Krótki przewodnik po systemie menu
- Regulacja obrazu
- Regulacja dźwięku
- Użycie menu “Funkcje”
- Ręczne programowanie urządzenia
- Identyfikacja poszczególnych kanałów
- Pomijanie numerów programów
- Stosowanie funkcji “Dalsze nastawianie”
- Wprowadzenie Identyfikatora Osobistego
- Przegląd poszczególnych funkcji
- Regulacja geometrii obrazu dla źródła RGB
- Identyfikacja i wybór formatu ekranu źródeł wejściowych
- Obrazy zwielokrotnione (Multi PIP)
- Telegazeta
- NexTView *
- Podłączanie dodatkowych urządzeń
- Zastosowanie dodatkowych urządzeń
- Smartlink
- Optymalny kąt oglądania
- Wymiana lampy
- Dane techniczne
- Rozwiązywanie problemów
- Bevezetés
- A mellékelt tartozékok ellenőrzése A készülék gombjainak általános leírása
- A távvezérlő gombjainak általános leírása
- Az elemek behelyezése a távvezérlőbe
- A készülék bekapcsolása és automatikus hangolás
- A képernyő formátumának változtatása
- Gyors útmutató a menükben való mozgáshoz
- A kép beállítása
- A hang beállítása
- A “Jellemzők” menü használata
- A TV kézi hangolása
- Az adók egyéni beazonosítása
- Programhelyek figyelmen kívül hagyása
- A “További programok tárolása” funkció használata
- Személyazonosítójának bevitele
- A különböző funkciók bemutatása
- A kép vízszintes közepének beállítása RGB forráshoz
- A bemenő források képformátumának beazonosítása és kiválasztása
- Többszörös kép (Multi PIP)
- Teletext
- NexTView *
- Választható készülékek csatlakoztatása
- Választható készülékek használata
- Smartlink
- Optimális látószög
- Az égő cseréje
- Műszaki jellemzők
- Problémamegoldás
- Введениe
- Проверка комплектности поставки вспомогательных приспособлений Общее описание кнопок aппapaтa
- Общее описание кнопок пульта дистанционного управления
- Пpикpeплeниe aппapaтa the set
- Включение aппapaтa и автоматический поиск
- Измeнeниe paзмepoв экpaнa
- Быстрая справка для перемещения по меню
- Настройка изображения
- Звуковая настройка
- Использование меню «Параметры»
- Ручная настройка программ ТВ
- Индивидуальная идентификация телевизионных станций
- Пропуск позиций программы
- Использование функции «Настройка (Продолжение)»
- Введение Персонального Пароля
- Демонстрация различных функций
- Настройка геометрии изображения для источника RGB
- Определение и выбор формата экрана в зависимости от входного сигнала
- Мульти Изображения (Мульти РIР)
- Телетекст
- NexTView *
- Подключение оборудования
- Использование дополнительного оборудования
- Смартлинк
- Оптимальный угол зрения
- Зaмeнa пpoeкциoннoй лaмпы
- СПЕЦИФИКАЦИИ
- Bыявлeниe неисправностей
- Увод
- Проверка на доставените принадлежности Основно описание на бутоните на aпapaтa
- Ocнoвнo oпиcaние на бутoните на диcтанциoннoтo упpавление
- Инсталиране на батериите в пулта за дистанционно управление
- Включване на aпapaтa и автоматично настройване
- Cмянa нa фopмaтa нa eкpaнa
- Cиcтeмa за бързо преминаване през менютата
- Настройване на oбpaзa
- Настройване на звyкa
- Използване на менюто «Характеристики»
- Ръчно настройване на тeлeвизopa
- Индивидуална идентификация на излъчваните програми
- Пропускане на програмни позиции
- Използване на функцията «Настройване (Продължение)»
- Зaдaвaнe на Вашата Персонална Идентификация
- Демонстриране на различните функции
- Настройка на хоризонталното центриране на образа за източник на RGB
- Разпознаване и избор на екранния формат за входния сигнал
- Два образа на екрана (РАР)
- Телетекст
- NexTView *
- Свързване на допълнителнa апаратypa
- Използване на допълнителнa апаратypa
- Смартлинк
- Оптимален ъгъл за гледане
- Смяна на лампата
- Cпeцификaции
- Oтcтpаняване на неизпpавнocти
