Sony DCR-PC115E – страница 7
Инструкция к Видеокамере Sony DCR-PC115E
Audio dubbing
Монтаж звукозаписи
Monitoring the new recorded
Контрольное прослушивание
sound
записанного звука
To play back the sound
Воспроизведение звука
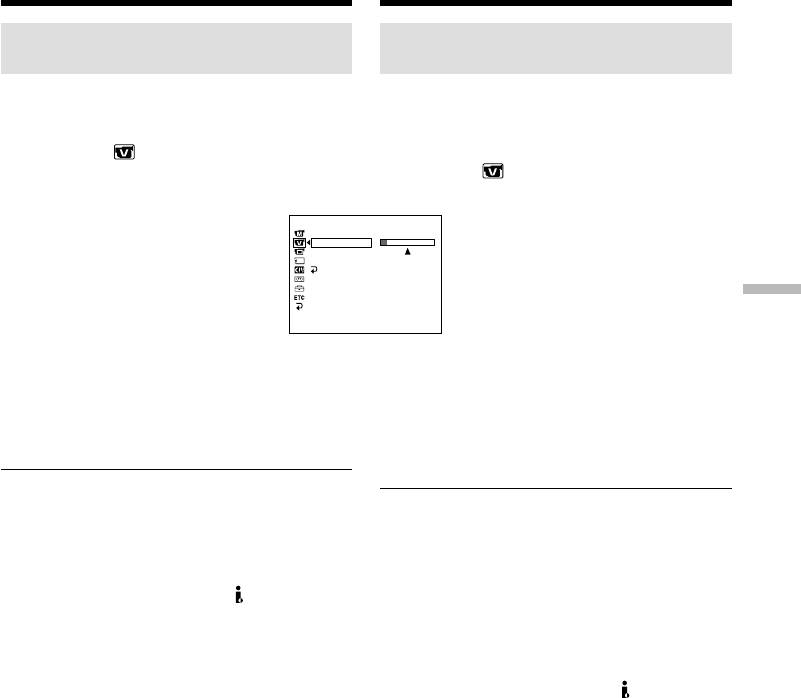
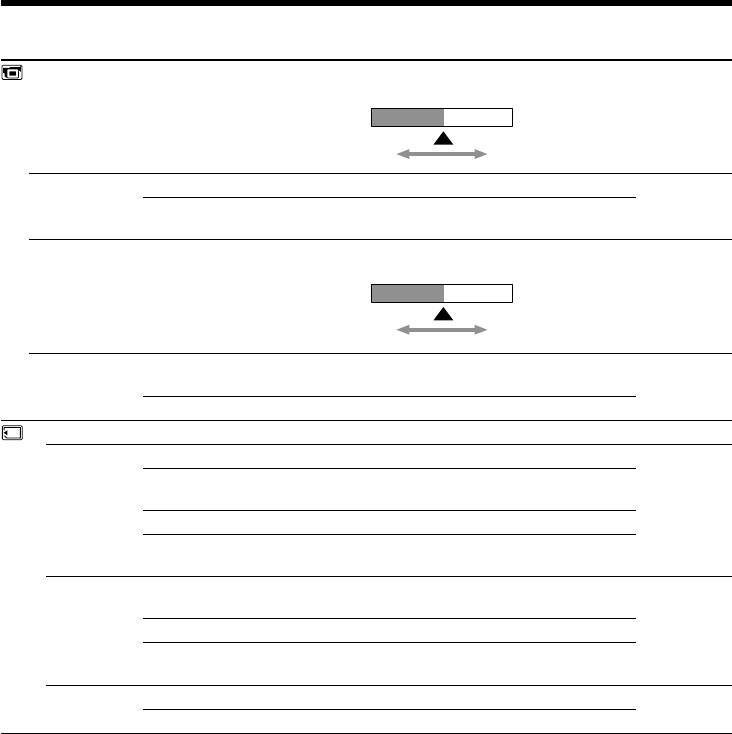
Adjust the balance between the original sound
Отрегулируйте баланс между исходным
(ST1) and the new sound (ST2) by selecting
звучанием ленты (ST1) и наложенным
AUDIO MIX in in the menu settings (p. 132).
звуковым сопровождением (ST2), выбрав
AUDIO MIX в в настройках меню (стр.
132).
VCR SET
HiFi SOUND
AUDIO MIX
A
/
V
c
DV OUT
ST1 ST2
NTSC PB
NRUTER
Editing Монтаж
[
MENU
]
:
END
Five minutes after when you disconnect the
Через 5 минут после отключения источника
power source or remove the battery pack, the
питания или удаления из видеокамеры
setting of AUDIO MIX returns to the original
батарейного блока, установка AUDIO MIX
sound (ST1) only. The default setting is original
автоматически вернется в режим исходного
sound only.
звучания (ST1), который устанавливается по
умолчанию.
Notes
•New sound cannot be recorded on a tape
Примечания
already recorded in the 16-bit mode (32 kHz,
•Новое звуковое сопровождение не может
44.1 kHz or 48 kHz).
быть наложено на ленту, записанную в 16-
•New sound cannot be recorded on a tape
разрядном режиме (32 кГц, 44,1 кГц или 48
already recorded in the LP mode.
кГц).
•You cannot add audio with the DV jack.
•Новое звуковое сопровождение не может
•You cannot add audio on the blank portion of
быть наложено на ленту, записанную в
the tape.
режиме LP (долгоиграющее
воспроизведение).
If an i.LINK cable (DV connecting cable)
•Наложение звукового сопровождения не
(optional) is connected to your camcorder
осуществляется через гнездо DV.
You cannot add a sound to a recorded tape.
•Наложение звукового сопровождения не
осуществляется на незаписанный участок
We recommend that you add new sound on a
ленты.
tape recorded with your camcorder
If you add new sound on a tape recorded with
Если к видеокамере подключен кабель
another camcorder (including other
i.LINK (соединительного кабеля DV)
DCR-PC115E/PC120E), the sound quality may
(приобретается дополнительно)
become worse.
Наложение звукового сопровождения на
записанную ленту не осуществляется.
Рекомендуется проводить аудиомонтаж
на той же самой видеокамере, на которой
была записана лента
Если наложение звукового сопровождения
производится на ленту, записанную на другой
видеокамере (даже на видеокамере типа
DCR-PC115E/PC120E), то качество
звукозаписи может ухудшиться.
121

Audio dubbing Монтаж звукозаписи
If you set the write-protect tab of the tape to
Если защитный лепесток ленты находится
lock
в положении защиты от записи
You cannot record on a tape. Slide the write-
Запись на эту ленту невозможна.
protect tab to release the write protection.
Передвиньте защитный лепесток, чтобы
убрать защиту от записи.
To add new sound more precisely
Press ZERO SET MEMORY on the Remote
Для более точного наложения звукового
Commander at the point where you want to stop
сопровождения
recording later in the playback mode.
Нажмите кнопку ZERO SET MEMORY на
Carry out from steps 3 to 5. Recording
пульте дистанционного управления перед
automatically stops at the point where ZERO SET
окончанием записи в режиме
MEMORY was pressed.
воспроизведения.
Затем выполните пункты от 3 до 5. Запись
автоматически остановится в том месте, где
была нажата кнопка ZERO SET MEMORY.
122
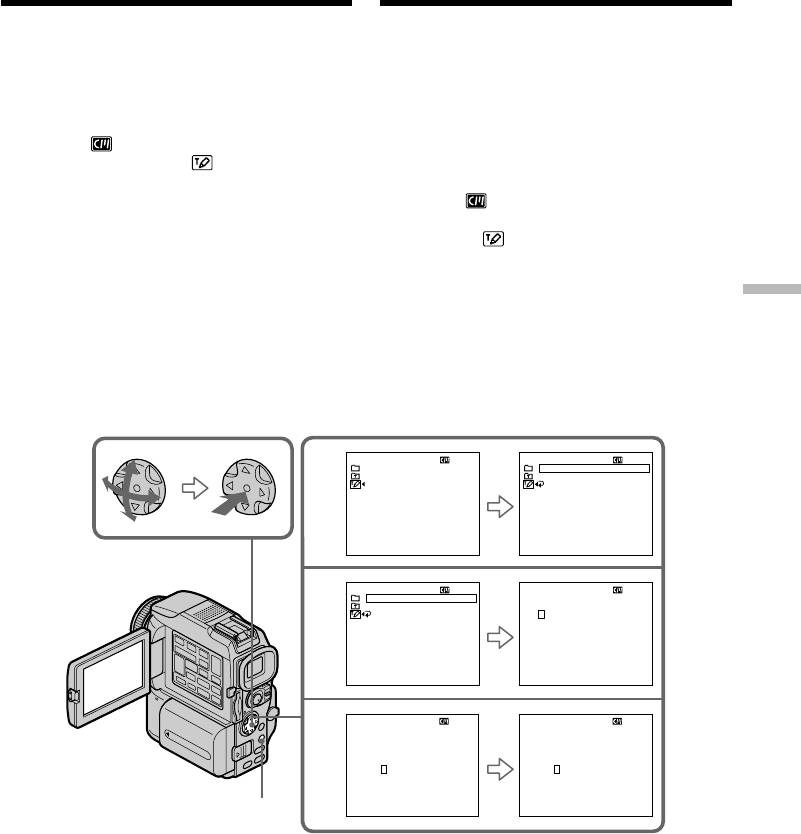
Superimposing a title
Наложение титров
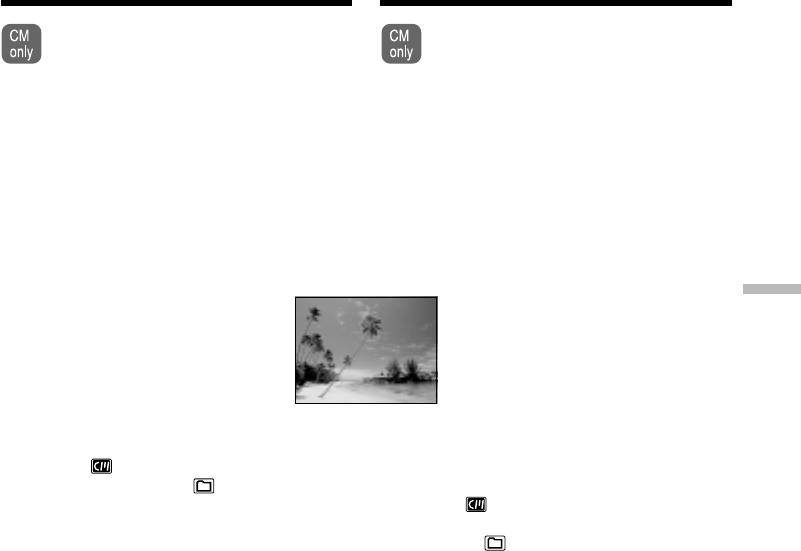
If you use a tape with cassette memory,
Операция наложение титров может
you can superimpose the title. When you
проводиться только при
play back the tape, the title is displayed
использовании лент с кассетной
for five seconds from the point where you
памятью. Каждый титр, наложенный
superimposed it.
на записанную ленту, отображается во
время воспроизведения записи в
You can select one of eight preset titles and two
течение 5 секунд, начиная с точки
custom titles (p. 127). You can also select the
наложения.
colour, size and position of titles.
Можно выбрать любой титр из восьми
предварительно установленных и двух
самостоятельно набранных титров (стр. 127),
а также изменять цвет, размер и
расположение титров в кадре.
Editing Монтаж
VACATION
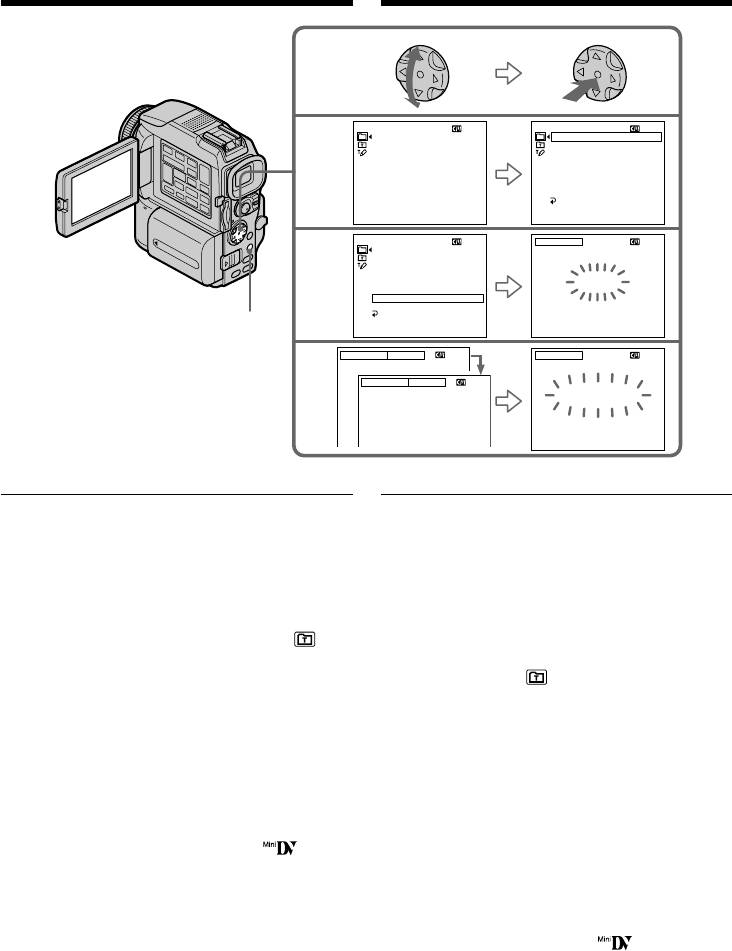
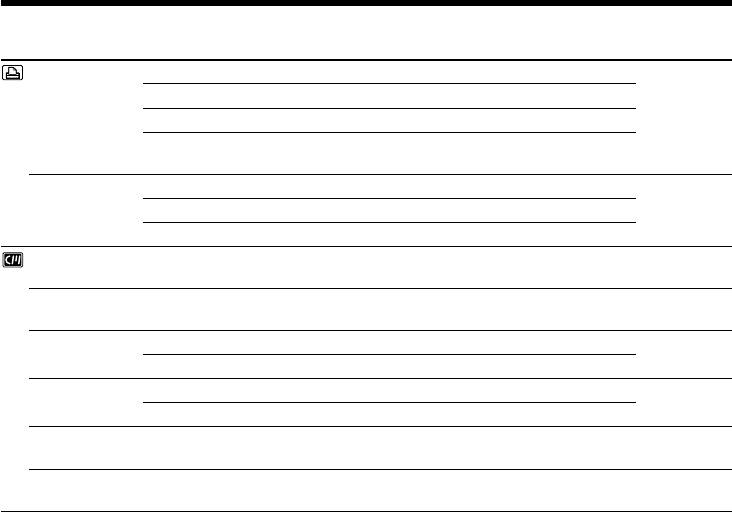
(1)Set the POWER switch to CAMERA or VCR.
(1)Установите переключатель POWER на
Press MENU, then select and decide upon
видеокамере в положение CAMERA или
TITLE in with the control button (p. 132).
VCR.
(2)Select and decide upon with the control
Нажмите кнопку MENU, затем выберите
button.
TITLE в с помощью управляющей
(3)Select and decide upon the desired title with
клавиши (стр. 132).
the control button. The title flashes.
(2)Выберите с помощью управляющей
(4)Change the colour, size, or position, if
клавиши.
necessary.
(3)Выберите титр с помощью управляющей
1 Select and decide upon the COLOUR, SIZE
клавиши, титр при этом начнет мигать.
or POSITION with the control button. The
(4)При желании измените цвет, размер,
item appears.
положение титра в кадре.
2 Select and decide upon the desired item
1 Выберите COLOUR, SIZE или POSITION
with the control button.
с помощью управляющей клавиши.
3 Repeat steps 1 and 2 until the title is laid
Появится выбранный пункт.
out as desired.
2 Выберите один из подпунктов с
(5)Press z on the control button again to
помощью управляющей клавиши.
complete the setting.
3 Повторяйте пункты 1 и 2 до тех пор,
In the recording, playback or playback pause
пока титр не примет нужный вид и не
mode:
займет правильное положение
The TITLE SAVE indicator appears on the
(5)Для завершения установки титра снова
screen for five seconds and the title is set.
нажмите z на управляющей клавише.
In the standby mode:
В режимах записи, воспроизведения и
The TITLE indicator appears. And when you
паузы воспроизведения:
press START/STOP to start recording, TITLE
На экране появится индикатор TITLE
SAVE appears on the screen for five seconds
SAVE и будет высвечиваться в течение 5
and the title is set.
секунд, пока титр не установится.
В режиме ожидания:
На экране появится индикатор TITLE. С
начала видеозаписи, после нажатия
кнопки START/STOP, на экране появится
индикатор TITLE SAVE, который будет
высвечиваться в течение 5 секунд, пока
титр не установится.
123
Superimposing a title
Наложение титров
PRESET T ITLE
PRESET T I TLE
HELLO
!
HELLO
!
2
HAPPY B IRTHDAY
HAPPY B IRTHDAY
HAPPY HOL IDAYS
HAPPY HOL IDAYS
CONGRATULAT IONS
!
CONGRATULAT IONS
!
OUR S
W
EET BABY
OUR S
W
EET BABY
W
EDDING
W
EDDING
VACATION
VACATION
THE END
THE END
RETURN
[
MENU
]:
END
[
MENU
]:
END
PRESET T ITLE
TITLE
HELLO
!
3
HAPPY B IRTHDAY
HAPPY HOL IDAYS
CONGRATULAT IONS
!
OUR S
W
EET BABY
VACATION
W
EDDING
VACATION
THE END
RETURN
MENU
[
MENU
]:
END
[
EXEC
]: :
SAVE
[
MENU
]
END
SIZE SMALL
TITLE
4
SIZE LARGE
VACATION
VACATION
[
EXEC
]: :
SAVE
[
MENU
]
END
If you set the write-protect tab of the tape to
Если защитный лепесток ленты находится
lock
в положении защиты от записи
You cannot superimpose or erase the title. Slide
Наложение и стирание титров невозможна.
the write-protect tab to release the write
Передвиньте защитный лепесток, чтобы
protection.
убрать защиту от записи.
To use the custom title
Применение самостоятельно набранных
If you want to use the custom title, select in
титров
step 2.
Для работы с самостоятельно набранными
титрами выберите в пункте 2.
If the tape has a blank portion
You cannot superimpose a title on the portion.
Если на ленте есть незаписанный участок
Наложение титров на этот участок
If the tape has a blank portion in the middle
невозможно.
of the recorded parts
The title may not be displayed correctly.
Если посреди записи есть незаписанный
участок
The titles superimposed with your camcorder
Отображение титра может быть
•They are displayed by only the DV format
неправильным.
video equipment with index titler function.
•The point you superimposed the title may be
Титры, смонтированные на этой
detected as an index signal when searching a
видеокамере
recording with other video equipment.
•Отображаются только на видеоаппаратуре
c цифровым форматом DV и при
наличии функции индексации титров.
•При просмотре записи с другой
видеоаппаратуры место наложения титра
определяется в виде индексного сигнала.
124

Superimposing a title
Наложение титров
If the tape has too many index signals
Если на ленте много индексных сигналов
You may not be able to superimpose a title
Наложение титра может не произойти из-за
because the memory is full. In this case, delete
переполнения памяти. В таком случае
data you do not need.
следует удалить ненужные данные.
Not to display titles
Как отключить отображение титров
Set TITLE DSPL to OFF in the menu settings
В настройках меню выберите OFF для TITLE
(p. 132).
DSPL (стр. 132).
Title setting
Установка титра
•The title colour changes as follows:
•Выбор цвета титра:
WHITE y YELLOW y VIOLET y RED y
WHITE (белый) y YELLOW (желтый) y
CYAN y GREEN y BLUE
VIOLET (фиолетовый) y RED (красный)
•The title size changes as follows:
y CYAN (голубой) y GREEN (зеленый)
SMALL y LARGE
y BLUE (синий)
Editing Монтаж
You cannot input 13 characters or more in
•Выбор размера титра:
LARGE size. If you input more than 12
SMALL (мелкий) y LARGE (крупный)
characters, the title size returns to SMALL even
Длина титра в формате LARGE ограничена
you select LARGE.
13 символами. При вводе лишнего 12-го
•If you select SMALL, you have nine choices for
символа титр автоматически сменит
the title position.
формат LARGE на формат SMALL, даже
If you select LARGE, you have eight choices for
если формат LARGE был предварительно
the title position.
для него задан.
•В формате SMALL титр можно расположить
One cassette can have up to about 20 titles, if
в кадре девятью различными способами.
one title consists of five characters
В формате LARGE титр можно расположить
However, if the cassette memory is full with date,
в кадре восемью различными способами.
photo and cassette label data, one cassette can
have only up to about 11 titles with five
На одной кассете может находиться до 20
characters each.
титров длиной 5 символов
Cassette memory capacity is as follows:
Однако, если кассетная память, выделенная
–6 date data
под информацию о датах, фотографиях и
–12 photo data
маркировке кассеты, будет полностью
–1 cassette label
заполнена, количество возможных 5-ти
символьных титров на кассете будет
If the “ FULL” mark appears
максимум только 11.
The cassette memory is full. Erase the title you do
Кассетная память позволяет содержать
not need.
информацию по:
– 6 датам
– 12 фотографиям
– маркировке одной кассеты
Если на экране появится метка “
FULL”
Кассетная память полностью заполнена.
Удалите ненужный титр.
125
Superimposing a title
Наложение титров
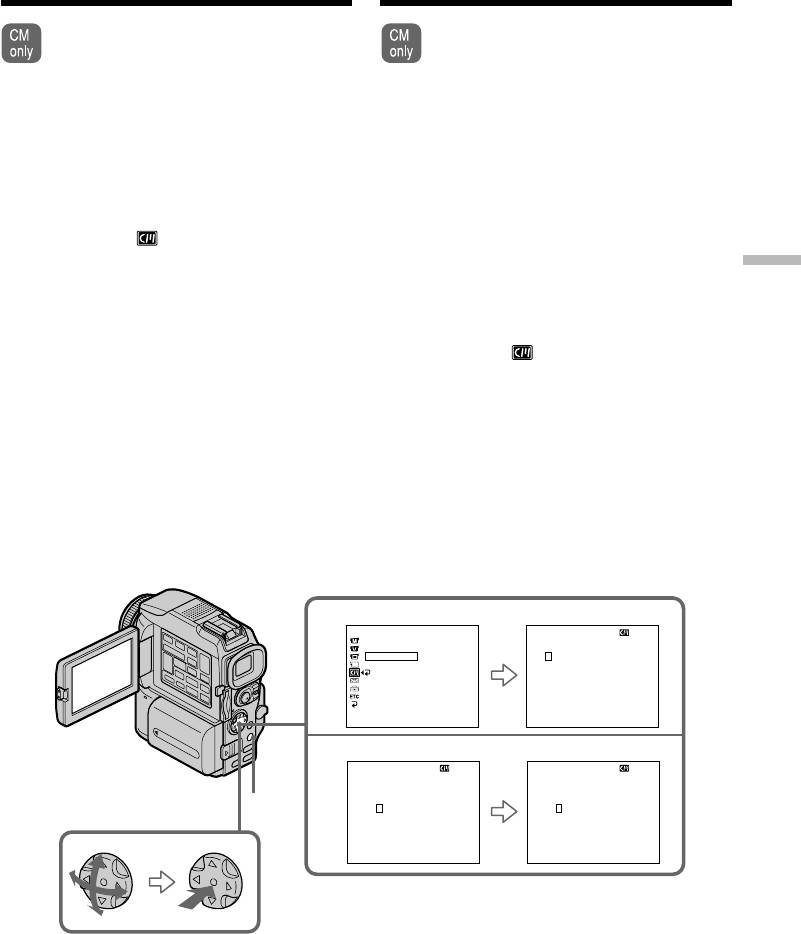
Erasing a title
Как стереть титр
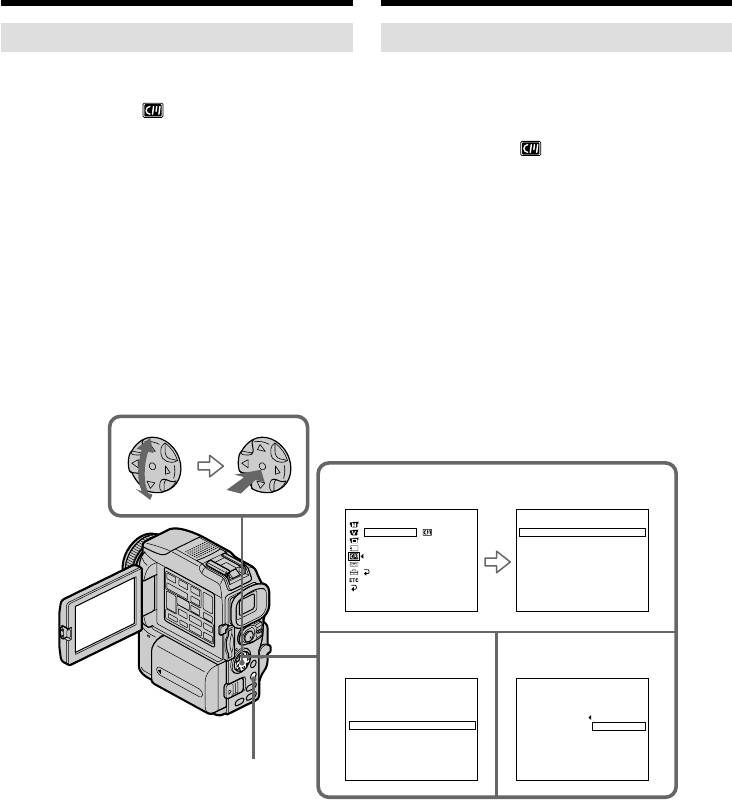
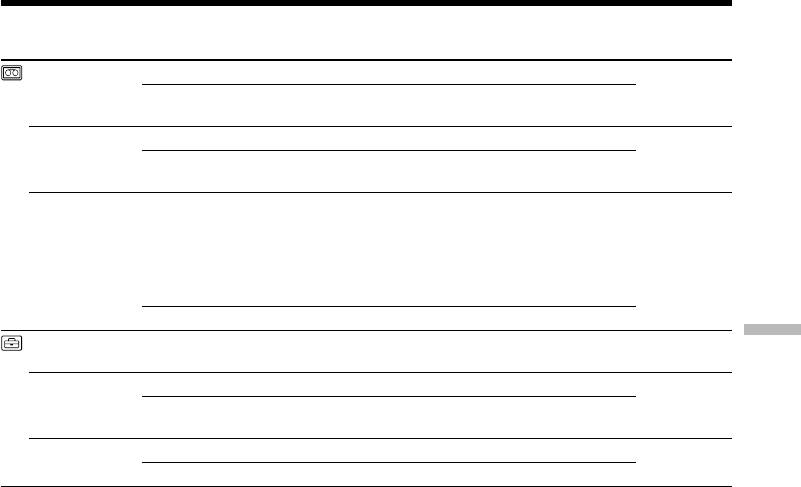
(1)Set the POWER switch to CAMERA or VCR.
(1)Установите переключатель POWER на
(2)Press MENU, then select and decide upon
видеокамере в положение CAMERA или
TITLEERASE in with the control button
VCR.
(p. 132).
(2)Нажмите кнопку MENU, затем выберите
(3)Select and decide upon the title you want to
TITLEERASE в с помощью
erase with the control button. ERASE OK ?
управляющей клавиши (стр. 132).
indicator appears.
(3)Выберите стираемый титр с помощью
(4)Make sure the title is the one you want to
управляющей клавиши. На экране
erase, and select and decide upon OK with the
появится индикатор ERASE OK ?.
control button. OK changes to EXECUTE.
(4)Убедитесь, что выбранный титр должен
(5)Select and decide upon EXECUTE with the
быть обязательно удален. Затем выберите
control button.
ОК с помощью управляющей клавиши.
ERASING flashes on the screen. When the
Индикатор OK изменится в EXECUTE.
title is erased, COMPLETE is displayed.
(5)Выберите и выполните EXECUTE с
помощью управляющей клавиши.
На экране замигает индикатор ERASING.
Когда выбранный титр будет стерт, на
экране отобразится индикатор
COMPLETE.
2
CM SET
TITLE ERASE
TITLE
TITLEERASE
1
HELLO
!
TITLE DSPL
2
CONGRATULATIONS
!
CM SEARCH
3
HAPPY NE
W
YEAR
!
TAPE T I TLE
4
PRESENT
ERASE ALL
5
GOOD
M
ORNING
RETURN
6
W
EDDING
[
MENU
]
:
END
[
MENU
]
:
END
34
TITLE ERASE
T I TLE ERASE
1
HELLO
!
4
PRESENT
2
CONGRATULATIONS
!
3
HAPPY NE
W
YEAR
!
ERASE O
K
?
RETURN
4
PRESENT
OK
5
GOOD
M
ORNING
6
W
EDDING
[
MENU
]
:
END
[
MENU
]
:
END
MENU
To cancel erasing a title
Как отменить удаление титра
Select and decide upon RETURN in step 5.
В пункте 5 выберите RETURN.
126
Making your own
Создание собственных
titles
титров
You can make up to two titles and store them in
Видеокамера позволяет самостоятельно
the memory of your camcorder. Each title can
набирать два титра, которые будут храниться
have up to 20 characters.
в ее памяти. Длина каждого титра может
достигать 20 символов.
(1)Set the POWER switch to CAMERA or VCR.
(2)Press MENU, then select and decide upon
(1)Установите переключатель POWER на
TITLE in with the control button (p. 132).
видеокамере в положение CAMERA или
(3)Select and decide upon with the control
VCR.
button.
(2)Нажмите кнопку MENU, затем выберите
(4)Select and decide upon CUSTOM1 SET or
TITLE в с помощью управляющей
CUSTOM2 SET with the control button.
клавиши (стр. 132).
(5)Select and decide upon the desired character
(3)Выберите с помощью управляющей
with the control button.
клавиши.
(6)Repeat steps 5 to complete making your own
(4)Выберите CUSTOM1 SET или CUSTOM2
title.
SET с помощью управляющей клавиши.
Editing Монтаж
(7)To finish making your own titles, select and
(5)Выберите нужную букву или символ с
decide upon [SET] with the control button.
помощью управляющей клавиши.
(6)Выполните пункт 5 столько раз, сколько
потребуется для набора титра.
(7)Для завершения набора перейдите с
помощью управляющей клавиши к [SET].
TITLE SET
TITLE SET
CUSTOM
1
TES
CUSTOM
1
TES
3
CUSTOM
2
TES
CUSTOM
2
TES
RETURN
[
MENU
]:
END
[
MENU
]:
END
TITLE SET
TITLE SET
CUSTOM
1
TES
____________________
4
CUSTOM
2
TES
RETURN
ABCDE
12345
FGHI J
67890
KLMNO
’ .,/–
PQRST
[
C
]
UV
W
XY
[
SET
]
Z
&?!
[
MENU
]:
END
[
MENU
]:
END
TITLE SET
TITLE SET
5
____________________
S
___________________
ABCDE
12345
ABCDE
12345
FGHI J
67890
FGHI J
67890
KLMNO
’ .,/–
KLMNO
’ .,/–
PQRST
[
C
]
PQRST
[
C
]
UV
W
XY
[
SET
]
UV
W
XY
[
SET
]
Z
&?!
Z
&?!
[
MENU
]:
END
[
MENU
]:
END
MENU
To change a title you have stored
Как изменить сохраненный титр
In step 4, select the original title you want to
В пункте 4 выберите один из двух титров,
change, and then press z on the control button.
который требуется изменить, затем нажмите
Select [C] to select the title to delete, then press z
z на управляющей клавише.
to delete the last character of your title. Enter the
Чтобы выбрать титр, предназначенный для
new title as desired.
удаления, перейдите к [C], затем нажмите z
на управляющей клавише . Последний
символ титра будет удален. Наберите новый
титр.
127

Making your own titles
Создание собственных титров
If you take five minutes or longer to enter
Если в видеокамеру вставлена кассета и
characters in the standby mode while a
производится ввод символов в режиме
cassette is in your camcorder
ожидания более чем 5 минут
The power automatically goes off. The characters
Питание видеокамеры отключится
you have entered remain stored in memory. Set
автоматически, но введенные символы
the POWER switch to OFF (CHG) once and then
останутся в памяти. Переведите
to CAMERA again, then proceed from step 1.
переключатель POWER из положения в
We recommend setting the POWER switch to
положение OFF (CHG) и снова в положение
VCR or removing the cassette so that your
CAMERA, затем начните с пункта 1.
camcorder does not automatically turn off while
Рекомендуется установить переключатель
you are entering title characters.
POWER в положение VCR или вынуть из
видеокамеры кассету, тогда видеокамера не
To erase the title
будет автоматически выключаться во время
Select [C]. The last character is erased.
набора титра.
To enter a space
Удаление титра
Select [ Z& ? ! ], then select the blank part.
Перейдите к [C]. Последний символ титра
будет удален.
Ввод пробела
Выберите набор символов [ Z& ? ! ], затем -
пустое место в таблице символов.
128
Labelling a cassette
Маркировка кассеты
If you use a tape with cassette memory,
Провести маркировку кассеты можно
you can label a cassette. The label can
только при наличии кассетной памяти.
consist of up to 10 characters and is stored
Метка, маркирующая кассету,
in cassette memory. When you insert the
содержит максимум 10 символов и
labelled cassette and turn the power on,
хранится в кассетной памяти. После
the label is displayed for about
установки помеченной кассеты и
five seconds.
включения питания видеокамеры
маркирующая метка будет
(1)Insert the cassette you want to label.
отображаться на экране в течение 5
(2)Set the POWER switch to CAMERA or VCR.
секунд.
(3)Press MENU, then select and decide upon
TAPE TITLE in with the control button
(1)Вставьте в видеокамеру непомеченную
(p. 132).
кассету.
Editing Монтаж
Tape title display appears.
(2)Установите переключатель POWER на
(4)Select and decide upon the desired character
видеокамере в положение CAMERA или
with the control button.
VCR.
(5)Repeat steps 4 until you complete the label.
(3)Нажмите кнопку MENU, затем выберите
(6)Select and decide upon [SET] with the control
TAPE TITLE в с помощью управляющей
button.
клавиши (стр. 132).
The label is stored in memory.
Появится меню титра ленты.
(4)Выберите нужную букву или символ с
помощью управляющей клавиши.
(5)Выполните пункт 4 шаг столько раз,
сколько потребуется для набора метки.
(6)Перейдите к [SET] с помощью
управляющей клавиши.
Маркирующая метка будет занесена в
память.
3
CM SET
TAPE T I TLE
TITLE
__________
T I TLEERASE
TAPE T I TLE
__________
ABCDE
12345
ERASE ALL
FGHI J
67890
RETURN
KLMNO
’ .,/–
PQRST
[
C
]
UV
W
XY
[
SET
]
Z
&?!
[
MENU
]
:
END
[
MENU
]
:
END
4
TAPE T I TLE
TAPE T I TLE
__________
M
_________
ABCDE
12345
ABCDE
12345
FGHI J
67890
FGHI J
67890
MENU
KLMNO
’ .,/–
KL
M
NO
’ .,/–
PQRST
[
C
•
]
PQRST
[
C
•
]
UV
W
XY
[
SET
]
UV
W
XY
[
SET
]
Z
&?!
Z
&?!
[
MENU
]
:
END
[
MENU
]
:
END
129

Labelling a cassette
Маркировка кассеты
To erase the label you have made
Удаление метки
Select and decide upon [C] with the control
В пункте 4 выберите [C] с помощью
button in step 4. The last character is erased.
управляющей клавиши. Последний символ
метки будет удален.
To change the label you have made
Insert the cassette to change the label, and
Изменение метки
operate in the same way to make a new label.
Вставьте в видеокамеру кассету, метку
которой нужно изменить, и выполните те же
операции, что и для создания новой метки.
If you set the write-protect tab of the tape to
lock
You cannot label a cassette. Slide the write-
Если защитный лепесток ленты находится
protect tab to release the write protection.
в положении защиты от записи
Маркировка кассеты невозможна.
If the tape has too many index signals
Передвиньте защитный лепесток, чтобы
You may not be able to label a cassette because
убрать защиту от записи.
the memory is full. In this case, delete data you
do not need.
Если на ленте много индексных сигналов
Маркировка кассеты невозможна из-за
If you have superimposed titles in the cassette
переполнения памяти. В таком случае
When the label is displayed, up to four titles also
следует удалить ненужные данные.
appear.
Если на ленте кассеты имеются
When the “-----” indicator has fewer than 10
наложенные титры
spaces
На экране вместе с меткой появятся титры
The cassette memory is full.
(не более 4-х).
The “-----” indicates the number of characters
you can select for the label.
Если индикатор “-----” содержит меньше 10
пробелов
To erase the character
Кассетная память полностью заполнена.
Press [C]. The last character is erased.
Индикатор “-----” показывает допустимое
число символов в метке.
To enter a space
Select [ Z& ? ! ], then select the blank part.
Удаление символа
Нажмите [C]. Последний символ будет
удален.
Ввод пробела
Выберите набор символов [ Z& ? ! ], затем -
пустое место в таблице символов.
130

Labelling a cassette
Маркировка кассеты
Erasing all the data in cassette
Полная очистка кассетной
memory
памяти
You can erase all the data in cassette memory at
При необходимости можно удалить сразу всю
once.
информацию, содержащуюся в кассетной
памяти.
(1)Set the POWER switch to CAMERA or VCR.
(2)Press MENU, then select and decide upon
(1)Установите переключатель POWER на
ERASE ALL in with the control button
видеокамере в положение CAMERA или
(p. 132).
VCR.
(3)Select and decide upon OK with the control
(2)Нажмите кнопку MENU, затем выберите
button. OK changes to EXECUTE.
ERASE ALL в с помощью управляющей
(4)Select and decide upon EXECUTE with the
клавиши пункт (стр. 132).
control button. ERASING flashes on the
(3)Выберите с помощью управляющей
screen. When all the data is erased,
клавиши команду OK, которая
Editing Монтаж
COMPLETE is displayed.
превратится в команду EXECUTE.
(4)Нажатием управляющей клавиши
To cancel deleting
выполните команду EXECUTE. На экране
Select and decide upon RETURN with the control
замигает индикатор ERASING. Когда вся
button in step 4.
информация, содержащаяся в кассетной
памяти, будет стерта, на экране
отобразится индикатор COMPLETE.
Отмена очистки
В пункте 4 выберите RETURN с помощью
управляющей клавиши.
131

— Customising Your Camcorder —
— Настройка видеокамеры —
Changing the menu
Изменение настроек
settings
меню
To change the mode settings in the menu
Чтобы изменить настройки режимов в меню
видеокамеры, выберите соответствующие
settings, select the menu items with the control
пункты меню с помощью управляющей
button. The default settings can be partially
клавиши. Частично можно изменить
changed. First, select the icon, then the menu
установки по умолчанию. Выберите сначала
item and then the mode.
пиктограмму, затем пункт меню и
соответствующий режим.
(1)Set the POWER switch to CAMERA, VCR or
(1)Установите переключатель POWER в
MEMORY, press MENU.
одно из следующих положений: CAMERA,
(2)Press v/V on the control button to select the
VCR, MEMORY. Нажмите кнопку MENU.
desired icon, then press z or B.
(2)Нажимая на v/V управляющей клавиши,
выберите нужную пиктограмму, затем
(3)Press v/V on the control button to select the
нажмите на z или B.
desired item, then press z or B.
(3)Нажимая на v/V управляющей клавиши,
(4)Press v/V on the control button to select the
выберите нужный пункт, затем нажмите
desired mode, then press z.
на z или B.
(5)If you want to change other items, select
(4)Нажимая на v/V управляющей клавиши,
выберите нужный режим, затем нажмите
RETURN and press z or b, then repeat steps
на z.
2 to 4.
(5)Если нужно внести изменения в другие
For details, see “Selecting the mode setting of
пункты, выберите RETURN, нажмите z
each item” (p. 133).
или b и после этого повторите пункты 2 – 4.
Более подробные сведения приведены в
разделе “Выбор настройки режимов по
каждому пункту” (стр. 141).
CAMERA
TAPE SET
TAPE SET
1
2
R
EC MODE
R
EC MODE SP
MANUAL SET
AUDIO MODE
AUDIO MODE
PROGRAM AE
REMA IN
REMA I N
MENU
PEFFECT
RETURN
DEFFECT
W
HT BAL
AUTO SHTR
[
MENU
]
:
END
[
MENU
]
:
END
[
MENU
]
:
END
VCR
or
/
MANUAL SET
или
PEFFECT
DEFFECT
TAPE SET
TAPE SET
3
REC MODE
REC MODE
AUDIO MODE
AUDIO MODE
REMA I N
AUTO
REMA I N
AUTO
[
MENU
]
:
END
RETURN
RETURN
ON
MEMORY
[
MENU
]
:
END
[
MENU
]
:
END
MANUAL SET
PROGRAM AE
W
HT BAL
or
/
или
[
MENU
]
:
END
TAPE SET
TAPE SET
4
REC MODE
REC MODE
AUDIO MO D
AUDIO MODE
REMA I N
AUTO
REMA I N
ON
RETURN
ON
RETURN
[
MENU
]
:
END
[
MENU
]
:
END
132
Changing the menu settings
Изменение настроек меню
To make the menu display disappear
Как закрыть меню
Press MENU.
Нажмите кнопку MENU.
This manual refers to selecting and
В данном руководстве выражение
deciding upon items by the above
“Выберите [(имя пункта)]”
procedure as “Select and decide
подразумевает операцию выбора
upon [(item name)].”
пункта меню с последующим
подтверждением.
Menu items are displayed as the following
icons:
Пункты меню выводятся на экран в виде
MANUAL SET
следующих пиктограмм:
CAMERA SET
MANUAL SET (Установка вручную)
VCR SET
CAMERA SET (Установка
LCD/VF SET
видеокамеры)
MEMORY SET
VCR SET (Установка
PRINT SET
видеомагнитофона)
Customising Your Camcorder Настройка видеокамеры
CM SET
LCD/VF SET (Установка ЖК-дисплея/
TAPE SET
видоискателя)
SETUP MENU
MEMORY SET (Установка памяти)
OTHERS
PRINT SET (Установка печати)
CM SET (Установка кассетной памяти)
TAPE SET (Установка ленты)
SETUP MENU (Меню установок)
OTHERS (Прочее)
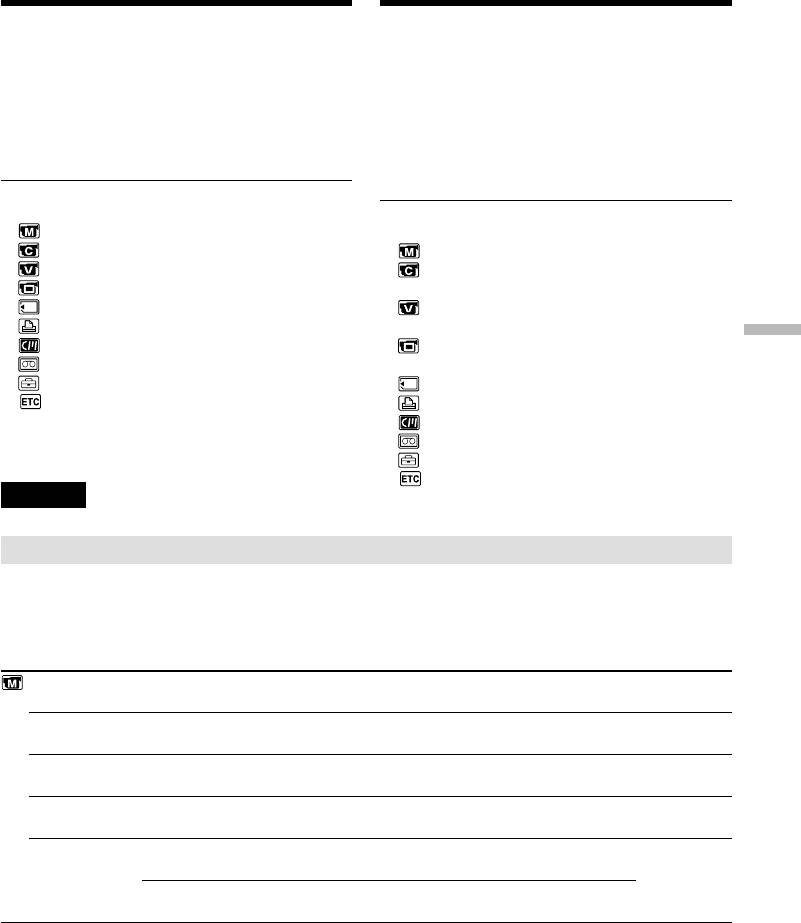
English
Selecting the mode setting of each item z is the default setting.
Menu items differ depending on the position of the POWER switch. The screen shows only the items
you can operate at the moment.
POWER
Icon/item
Mode
Meaning
switch
PROGRAM AE
——
To suit your specific shooting requirement (p. 68).
CAMERA
MEMORY
P EFFECT
——
To add special effects like those in films or on the TV
VCR
to images (p. 63, 78).
CAMERA
D EFFECT
——
To add special effects using the various digital
VCR
functions (p. 65, 79).
CAMERA
WHT BAL
——
To adjust the white balance (p. 57).
CAMERA
MEMORY
AUTO SHTR
z ON
To automatically activate the electronic shutter when
CAMERA
shooting in bright conditions.
OFF
Not to automatically activate the electronic shutter
even when shooting in bright conditions.
(Continued on the following page)
133

Changing the menu settings
POWER
Icon/item
Mode
Meaning
switch
D ZOOM
z OFF
To deactivate the digital zoom. Up to 10× zoom is
CAMERA
carried out.
20×
To activate the digital zoom. More than 10× to 20×
zoom is performed digitally (p. 34).
120×
To activate the digital zoom. More than 10× to 120×
zoom is performed digitally (p. 34).
16:9WIDE
z OFF
—
CAMERA
ON
To record a 16:9 wide picture (p. 59).
STEADYSHOT
z ON
To compensate for camera-shake.
CAMERA
OFF
To cancel the SteadyShot function. Natural pictures
are produced when shooting a stationary object with
a tripod.
N.S. LIGHT
z ON
To use the NightShot Light function (p. 39).
CAMERA
MEMORY
OFF
To cancel the NightShot Light function.
FRAME REC
z OFF
To deactivate Cut recording function.
CAMERA
ON
To activate Cut recording function (p. 76).
INT. REC
ON
To activate Interval recording function (p. 74).
CAMERA
z OFF
To deactivate Interval recording function.
SET
To set INTERVAL and REC TIME for Interval
recording function.
FLASH LVL
HIGH
Makes the flash level higher than normal.
CAMERA
MEMORY
z NORMAL
Normal setting.
LOW
Makes the flash level lower than normal.
HOLOGRAM F
z AUTO
The HOLOGRAM AF emits when focusing on
MEMORY
subjects is difficult in dark places (p. 164).
OFF
The HOLOGRAM AF does not emit.
Notes on the SteadyShot function
•The SteadyShot function will not correct excessive camera-shake.
•Attachment of a conversion lens (optional) may influence the SteadyShot function.
If you cancel the SteadyShot function
The SteadyShot off indicator appears. Your camcorder prevents excessive compensation for
camera-shake.
Note on FLASH LVL
You cannot adjust FLASH LVL if the external flash (optional) is not compatible with the flash level.
134
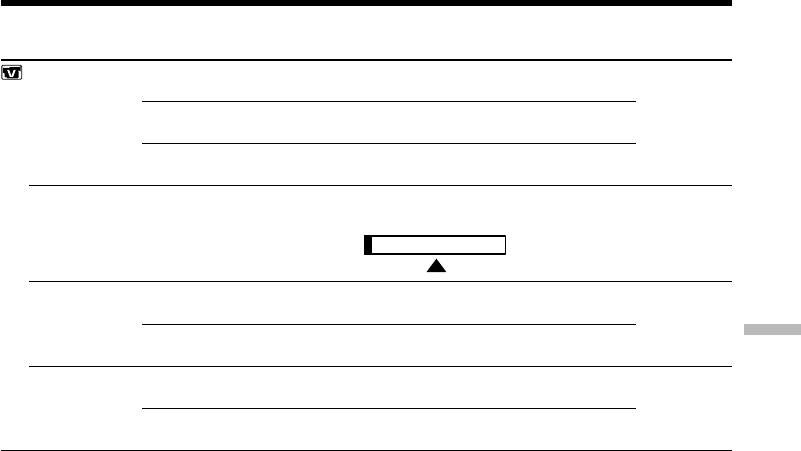
Changing the menu settings
POWER
Icon/item
Mode
Meaning
switch
HiFi SOUND
z STEREO
To play back a stereo tape or dual sound track tape
VCR
with main and sub sound (p. 238).
1
To play back a stereo tape with the left sound or a
dual sound tape with main sound.
2
To play back a stereo tape with the right sound or a
dual sound track tape with sub sound.
AUDIO MIX
——
To adjust the balance between the stereo 1 and stereo
VCR
2 (p. 121).
ST1 ST2
A/VtDV OUT
z OFF
To output digital images and sound in analog format
VCR
using your camcorder.
ON
To output analog images and sound in digital format
Customising Your Camcorder Настройка видеокамеры
using your camcorder (p. 109).
NTSC PB
z ON PAL TV
To play back a tape recorded in the NTSC colour
VCR
system on a PAL system TV
NTSC 4.43
To play back a tape recorder in the NTSC colour
system on a TV with the NTSC 4.43 mode
Note on NTSC PB
When you play back a tape on a Multi System TV, select the best mode while viewing the picture on
the TV.
(Continued on the following page)
135
Changing the menu settings
POWER
Icon/item
Mode
Meaning
switch
LCD BRIGHT
——
To adjust the brightness on the LCD screen with b/B
VCR
on the control button.
CAMERA
MEMORY
To darken To lighten
LCD B. L.
z BRT NORMAL
To set the brightness on the LCD screen normal.
VCR
CAMERA
BRIGHT
To brighten the LCD screen.
MEMORY
LCD COLOUR
——
To adjust the colour on the LCD screen, press
VCR
b/B on the control button.
CAMERA
MEMORY
To get low-
To get high-
intensity
intensity
VF B.L.
z BRT NORMAL
To set the brightness on the viewfinder screen to
VCR
normal.
CAMERA
MEMORY
BRIGHT
To brighten the viewfinder screen.
STILL SET
PIC MODE
z SINGLE
Not to record continuously.
MEMORY
NORMAL
To record from three to nine images continuously
(p. 160).
HIGH SPEED
To record up to 16 images continuously fast.
MULTI SCRN
To record nine images continuously, display the
images on a single page divided into nine boxes.
QUALITY
z SUPER FINE
To record still images in the finest image quality
VCR
mode (p. 153).
MEMORY
FINE
To record still images in the fine image quality mode.
STANDARD
To record still images in the standard image quality
mode.
IMAGESIZE
z 1360 × 1020
To record still images in 1360 × 1020 size (p. 155).
MEMORY
640 × 480
To record still images in 640 × 480 size.
Notes on LCD B.L. and VF B.L.
•When you select BRIGHT, battery life is reduced by about 10 percent during recording.
•When you use power sources other than the battery pack, BRIGHT is automatically selected.
Even if you adjust LCD BRIGHT, LCD B.L., LCD COLOUR and/or VF B.L.
The recorded picture will not be affected.
136

Changing the menu settings
POWER
Icon/item
Mode
Meaning
switch
MOVIE SET
IMAGESIZE
z 320 × 240
To record moving pictures in 320 × 240 size (p. 155).
VCR
MEMORY
160 × 112
To record moving pictures in 160 × 112 size.
REMAIN
z AUTO
To display the remaining capacity of the “Memory
VCR
Stick” in the following cases:
MEMORY
•For five seconds after inserting a “Memory Stick”
into your camcorder
•When the capacity of the “Memory Stick” is less
than 1 minute in MEMORY mode
•For five seconds after completing a moving picture
recording
ON
To always display the remaining capacity of the
“Memory Stick.”
PRINT MARK
ON
To write a print mark on the recorded still images
VCR
Customising Your Camcorder Настройка видеокамеры
you want to print out later (p. 213).
MEMORY
z OFF
To cancel print marks on still images.
PROTECT
ON
To protect selected images against accidental erasure
VCR
(p. 210).
MEMORY
z OFF
Not to protect images.
SLIDE SHOW
——
To play back images in a continuous loop (p. 208).
MEMORY
DELETE ALL
——
To delete all the unprotected images (p. 212).
MEMORY
FORMAT
z RETURN
To cancel formatting.
MEMORY
OK
To format an inserted “Memory Stick.”
1. Select FORMAT.
2. Select and decide upon OK with the control button.
3. After EXECUTE appears, press z on the control
button. FORMATTING flashes during formatting.
COMPLETE appears when formatting is finished.
PHOTO SAVE
——
To duplicate still images on tape onto “Memory
VCR
Stick” (p. 188).
Notes on formatting
•Supplied “Memory Stick”s have been formatted at factory. Formatting with this camcorder is not
required.
•Do not turn the POWER switch or press any button while the display shows FORMATTING.
•You cannot format the “Memory Stick” if the write-protect tab on the “Memory Stick” is set to LOCK.
•Format the “Memory Stick” when FORMAT ERROR is displayed.
Formatting erases all information on the “Memory Stick”
Check the contents of the “Memory Stick” before formatting.
• Formatting erases sample images on the “Memory Stick.”
• Formatting erases the protected image data on the “Memory Stick.”
(Continued on the following page)
137
Changing the menu settings
POWER
Icon/item
Mode
Meaning
switch
9PIC PRINT
z RETURN
To cancel prints of split screen.
MEMORY
SAME
To make prints of same split screen (p. 215).
MULTI
To make prints of different split screen.
MARKED
To make prints of images with print marks in
recording order.
DATE/TIME
z OFF
To make prints without the recording date and time.
MEMORY
DATE
To make prints with the recording date (p. 215).
DAY&TIME
To make prints with the recording date and time.
TITLE
——
To superimpose a title or make your own title
VCR
(p. 123, 127).
CAMERA
TITLEERASE
——
To erase the title you have superimposed (p. 126).
VCR
CAMERA
TITLE DSPL
z ON
To display the title you have superimposed.
VCR
OFF
Not to display the title.
CM SEARCH
z ON
To search using cassette memory (p. 84, 86, 88).
VCR
OFF
To search without using cassette memory.
TAPE TITLE
——
To label a cassette (p. 129).
VCR
CAMERA
ERASE ALL
——
To erase all the data in cassette memory (p. 131).
VCR
CAMERA
Note on PRINT SET
9PIC PRINT and DATE/TIME are displayed only when an external printer (optional) is connected to
the intelligent accessory shoe.
138
Changing the menu settings
POWER
Icon/item
Mode
Meaning
switch
REC MODE
z SP
To record in the SP (Standard Play) mode.
VCR
CAMERA
LP
To increase the recording time to 1.5 times the SP
mode.
AUDIO MODE
z 12BIT
To record in the 12-bit mode (two stereo sounds).
VCR
CAMERA
16BIT
To record in the 16-bit mode (one stereo sound with
high quality).
qREMAIN
z AUTO
To display the remaining tape bar:
VCR
•for about eight seconds after a cassette is inserted
CAMERA
and your camcorder calculates the remaining
amount of tape.
•for about eight seconds after N or DISPLAY is
pressed.
ON
To always display the remaining tape indicator.
CLOCK SET
——
To set the date or time (p. 24).
CAMERA
Customising Your Camcorder Настройка видеокамеры
MEMORY
LTR SIZE
z NORMAL
To display selected menu items in normal size.
VCR
CAMERA
2×
To display selected menu items at twice the normal
MEMORY
size.
DEMO MODE
z ON
To make the demonstration appear.
CAMERA
OFF
To cancel the demonstration mode.
Notes on the LP mode
•When you record a tape in the LP mode on your camcorder, we recommend playing the tape on your
camcorder. When you play back the tape on other camcorders or VCRs, noise may occur in pictures
or sound.
•When you record in the LP mode, we recommend using a Sony Excellence/Master cassette so that
you can get the most out of your camcorder.
•You cannot make audio dubbing on a tape recorded in the LP mode. Use the SP mode for the tape to
be audio dubbed.
•When you record in the SP and LP modes on one tape or you record some scenes in the LP mode, the
playback picture may be distorted or the time code may not be written properly between scenes.
Notes on AUDIO MODE
•You cannot dub audio sound on a tape recorded in the 16-bit mode.
•When playing back a tape recorded in the 16-bit mode, you cannot adjust the balance in AUDIO MIX.
Notes on DEMO MODE
•You cannot select DEMO MODE when a cassette is inserted in your camcorder.
•When NIGHTSHOT is set to ON, the “NIGHTSHOT” indicator appears on the screen and you cannot
select DEMO MODE in the menu settings.
•DEMO MODE is set to STBY (Standby) as the default setting and the demonstration starts about 10
minutes after you have set the POWER switch to CAMERA without a cassette inserted.
To cancel the demonstration, insert a cassette, set the POWER switch to other than CAMERA, or set
DEMO MODE to OFF. To set to STBY (Standby) again, leave the DEMO MODE at ON in the menu
settings, turn the POWER switch OFF (CHG), and return the POWER switch to CAMERA.
(Continued on the following page)
139

Changing the menu settings
POWER
Icon/item
Mode
Meaning
switch
DATA CODE
z DATE/CAM
To display date, time and various settings during
VCR
playback (p. 45).
MEMORY
DATE
To display date and time during playback.
AREA SET
——
Temporarily change the area where you are using
CAMERA
your camcorder.
MEMORY
SUMMERTIME
z OFF
Not during summer time.
CAMERA
MEMORY
ON
During summer time.
BEEP
z MELODY
To output the melody when you start/stop recording
VCR
or when an unusual condition occurs on your
CAMERA
camcorder.
MEMORY
NORMAL
To output the beep instead of the melody.
OFF
To cancel all sound including shutter sound.
COMMANDER
z ON
To activate the Remote Commander supplied with
VCR
your camcorder.
CAMERA
MEMORY
OFF
To deactivate the Remote Commander to avoid
remote control misoperation caused by other VCR’s
remote control.
DISPLAY
z LCD
To show the display on the LCD screen and in the
VCR
viewfinder.
CAMERA
MEMORY
V-OUT/LCD
To show the display on the TV screen, LCD screen
and in the viewfinder.
REC LAMP
z ON
To light up the camera recording lamp at the front of
CAMERA
your camcorder.
MEMORY
OFF
To turn the camera recording lamp off so that the
person is not aware of the recording.
VIDEO EDIT
z RETURN
To cancel video editing.
VCR
TAPE
To make programme and perform video editing
(p. 94).
MEMORY
To make programme and perform MPEG editing
(p. 184).
Note
If you press DISPLAY with DISPLAY set to V-OUT/LCD in the menu settings, the picture from a TV
or VCR will not appear on the LCD screen even when your camcorder is connected to outputs on the
TV or VCR.
When recording a close subject
When REC LAMP is set to ON, the red camera recording lamp on the front of the camcorder may
reflect on the subject if it is close. In this case, we recommend you set REC LAMP to OFF.
In more than five minutes after removing the power source
The PROGRAM AE, WHT BAL, FLASH LVL, HiFi SOUND, AUDIO MIX and COMMANDER items
are returned to their default settings.
The other menu items are held in memory even when the battery is removed.
140

