Sony DCR-PC115E – страница 11
Инструкция к Видеокамере Sony DCR-PC115E
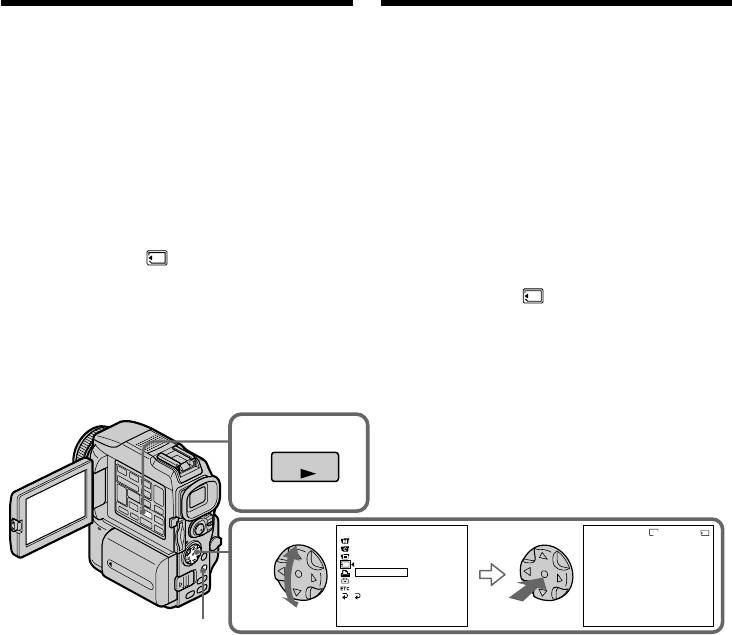
Просмотр изображений на
Viewing images using computer
компьютере
Viewing images
Просмотр изображений
For Windows users
Для пользователей Windows
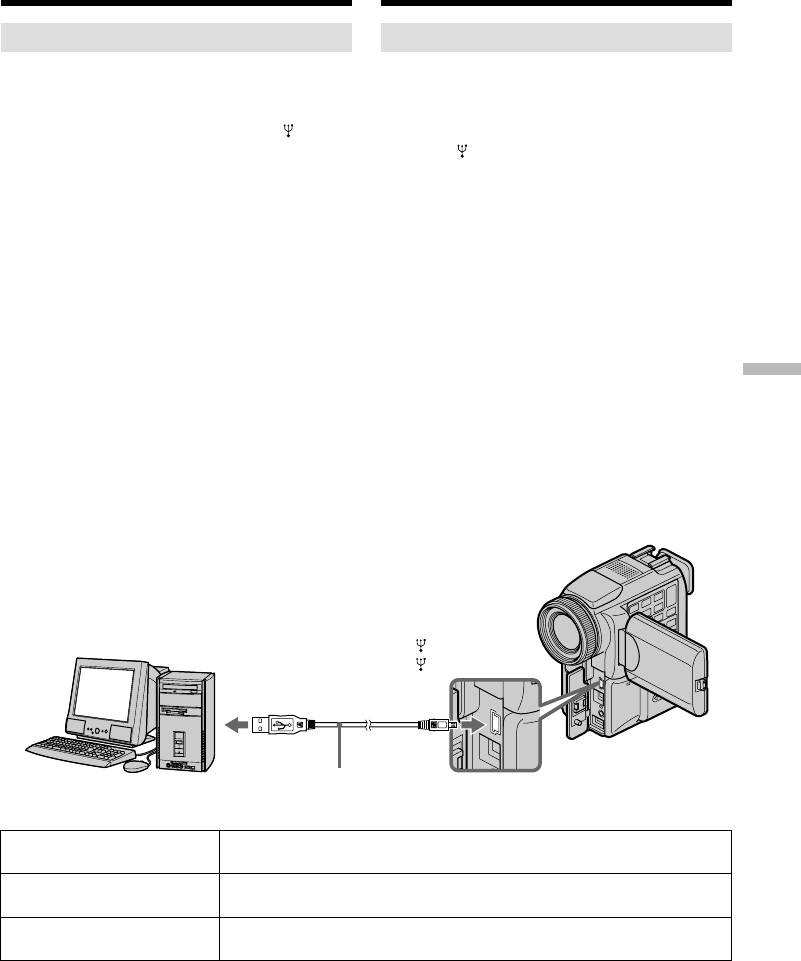
(1)Turn on the power of your computer and
(1)Включите компьютер и дождитесь
allow Windows to load.
загрузки Windows.
(2)Connect one end of USB cable to the (USB)
(2)Подсоедините один конец кабеля USB к
jack on the camcorder and the other end to the
гнезду (USB) на видеокамере, а другой
USB connector on your computer.
конец - к разъему USB на компьютере.
(3)Insert a “Memory Stick” into your camcorder,
(3)Вставьте “Memory Stick” в видеокамеру и
and connect the AC power adaptor to your
подключите к ней адаптер питания
camcorder and then to a wall socket.
переменного тока, а затем к
(4)Set the POWER switch to MEMORY.
электрической сети.
USB MODE appears on the screen of the
(4)Установите переключатель POWER в
camcorder.
положение MEMORY.
(5)Open “My Computer” on Windows and
На экране видеокамеры появится
double click the newly recognised drive
индикация USB MODE.
(Example: “Removable Disk (E:)”).
(5)Откройте в Windows окно “My Computer” и
The folders inside the “Memory Stick” are
дважды щелкните вновь распознанный
displayed.
диск (например: “Removable Disk (E:)”).
“Memory Stick
(6)Select and double-click the desired image file
Отобразятся папки “Memory Stick”.
from the folder.
(6)Выберите из папки и дважды щелкните
For the detailed folder and file name, see
файл нужного изображения.
”Image file storage destinations and image
Подробное описание имен папок и файлов
files” (p. 203).
содержится в разделе “Файлы
” operations
изображений и места их хранения” (стр.
203).
Работа с “Memory Stick”
(USB) jack/
Гнездо USB
USB connector/
Разъем USB
USB cable/
Push into the end/
Кабель USB
Вставьте до упора
Desired file type/ Double-click in this order/
Нужный тип файла Порядок двойных щелчков
Still image/ “Dcim” folder t “100msdcf” folder t Image file/
Неподвижное изображение
Папка “Dcim” t Папка “100msdcf” t Файл изображения
Moving picture*/ “Mssony” folder t “Moml0001” folder t Image file*/
Движущееся изображение*
Папка “Mssony” t Папка “Moml0001” t Файл изображения*
* Copying a file to the hard disk of your
* Рекомендуется перед просмотром
computer before viewing it is recommended. If
скопировать файл на жесткий диск
you play back the file directly from the
компьютера. При воспроизведении файла
“Memory Stick,” the image and sound may
непосредственно с “Memory Stick”
break off.
изображение и звук могут прерываться.
201

Просмотр изображений на
Viewing images using computer
компьютере
For Windows 2000 Professional/
Для пользователей Windows
Me users
2000 Professional/Me
To unplug the USB cable or eject the “Memory
При отсоединении кабеля USB или
Stick”, follow the procedure below.
извлечении “Memory Stick” следуйте
нижеописанной процедуре.
(1)Move the cursor to the “Unplug or Eject
Hardware” icon on the Task Tray and click to
(1)Переместите курсор на значок “Unplug or
cancel the applicable drive.
Eject Hardware” на панели задач и
(2)A message to remove the device from the
щелкните, отменив желаемый диск.
system appears, then unplug the USB cable or
(2)Появится сообщение об удалении
eject the “Memory Stick.”
устройства из системы. Отсоедините
кабель USB или выньте “Memory Stick”.
For Macintosh users
Для пользователей Macintosh
To unplug the USB cable or eject the “Memory
Stick”, follow the procedure below.
При отсоединении кабеля USB или
извлечении “Memory Stick” следуйте
(1)Quit application programmes opened.
нижеописанной процедуре.
Make sure that the access lamp of the hard
disk is not lit.
(1)Закройте открытые программы
(2)Drag and drop the “Memory Stick” icon to the
приложений.
Trash or select Eject under the Special menu.
Убедитесь в том, что индикатор доступа к
(3)Unplug the USB cable or eject the “Memory
жесткому диску не горит.
Stick.”
(2)Перетащите мышью значок “Memory Stick”
в “Корзину” или выберите команду Eject в
меню Special.
For Mac OS X users
(3)Отсоедините кабель USB или выньте
Unplug the USB cable or eject the “Memory
устройство “Memory Stick”.
Stick” after shutting down your computer.
Для пользователей Mac OS X
Notes on using your computer
Отсоедините кабель USB или выньте
“Memory Stick”
“Memory Stick” после выключения
компьютера.
•“Memory Stick” operations on your camcorder
cannot be assured if a “Memory Stick”
formatted on your computer is used on your
Примечания по использованию
camcorder, or if the “Memory Stick” in your
компьютера
camcorder was formatted from your computer
when the USB cable was connected.
“Memory Stick”
•Do not optimise the “Memory Stick” on a
•Работа “Memory Stick” с видеокамерой не
Windows machine. This will shorten the
гарантируется, если “Memory Stick” было
“Memory Stick” life.
отформатировано на компьютере или если
•Do not compress the data on the “Memory
“Memory Stick” было отформатировано на
Stick.” Compressed files cannot be played back
видеокамере с помощью компьютера,
on your camcorder.
подключенного через кабель USB.
•Не выполняйте оптимизацию “Memory Stick”
на компьютере под управлением Windows.
Это сокращает срок службы “Memory Stick”.
•Не сжимайте данные на “Memory Stick”.
Сжатые файлы не воспроизводятся на
видеокамере.
202
Просмотр изображений на
Viewing images using computer
компьютере
Software
Программное обеспечение
•Depending on your application software, the
•В зависимости от прикладного
file size may increase when you open a still
программного обеспечения, размер файла
image file.
при открытии неподвижного изображения
•When you load an image modified using a
может увеличиться.
retouch software from your computer to the
•В случае загрузки из компьютера на
camcorder or when you directly modify the
видеокамеру изображения, измененного
image on the camcorder, the image format will
путем ретуширования, или при
differ so a file error indicator may appear and
непосредственном изменении изображения
you may be unable to open the file.
на видеокамере его формат изменится,
поэтому может появиться индикатор
Communications with your computer
ошибки файла и, возможно, файл не
Communications between your camcorder and
удастся открыть.
your computer may not recover after recovering
from Suspend, Resume, or Sleep.
Связь с компьютером
После выхода компьютера из режимов
Suspend, Resume или Sleep, связь между
видеокамерой и компьютером может не
восстановиться.
“Memory Stick
Image file storage destinations
Файлы изображений и места их
and image files
хранения
Image files recorded with your camcorder are
Записанные с помощью видеокамеры файлы
” operations
grouped in folders by recording mode.
изображений сгруппированы в папки по
The meanings of the file names are as follows.
режиму записи. Ниже пояснены значения
ssss stands for any number within the range
имен файлов. ssss обозначает любое
from 0001 to 9999.
число в диапазоне от 0001 до 9999.
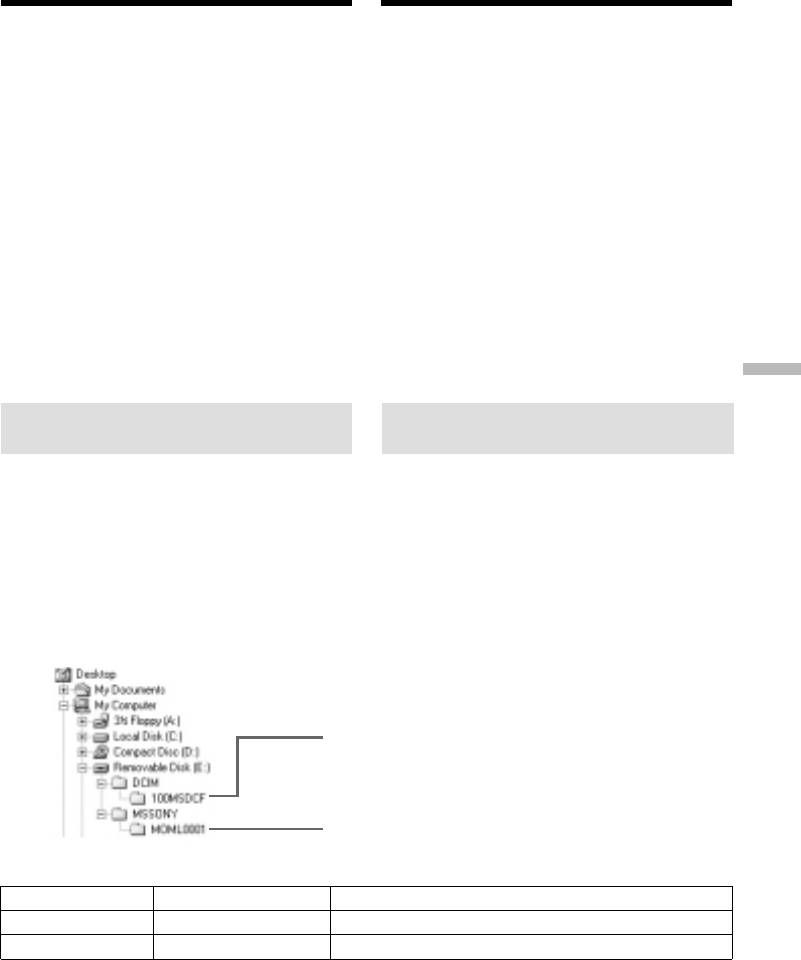
For Windows Me users
Для пользователей Windows Me
Работа с “Memory Stick”
(The drive recognising the camera is
(Диск, соответствующий видеокамере
[E:].)
– [E:])
Folder containing still image data/
Папка, содержащая данные
неподвижных изображений
Folder containing moving picture data/
Папка, содержащая данные
движущихся изображений
Folder/Папка File/Файл Meaning/Значение
100msdcf DSC0ssss.JPG Still image file/Файл неподвижного изображения
Moml0001 MOV0ssss.MPG Moving picture file/Файл движущегося изображения
203
Copying the image
Копирование
recorded on “Memory
изображений с “Memory
Stick”s to tapes
Stick” на ленту
You can copy images recorded on “Memory
Изображения, записанные на “Memory Stick”,
Stick” and record them to a tape.
можно копировать на ленту.
Before operation
Перед началом работы
•Insert a tape for recording into your camcorder.
•Установите ленту для записи в
•Insert a “Memory Stick” into your camcorder.
видеокамеру.
•Вставьте “Memory Stick” в видеокамеру.
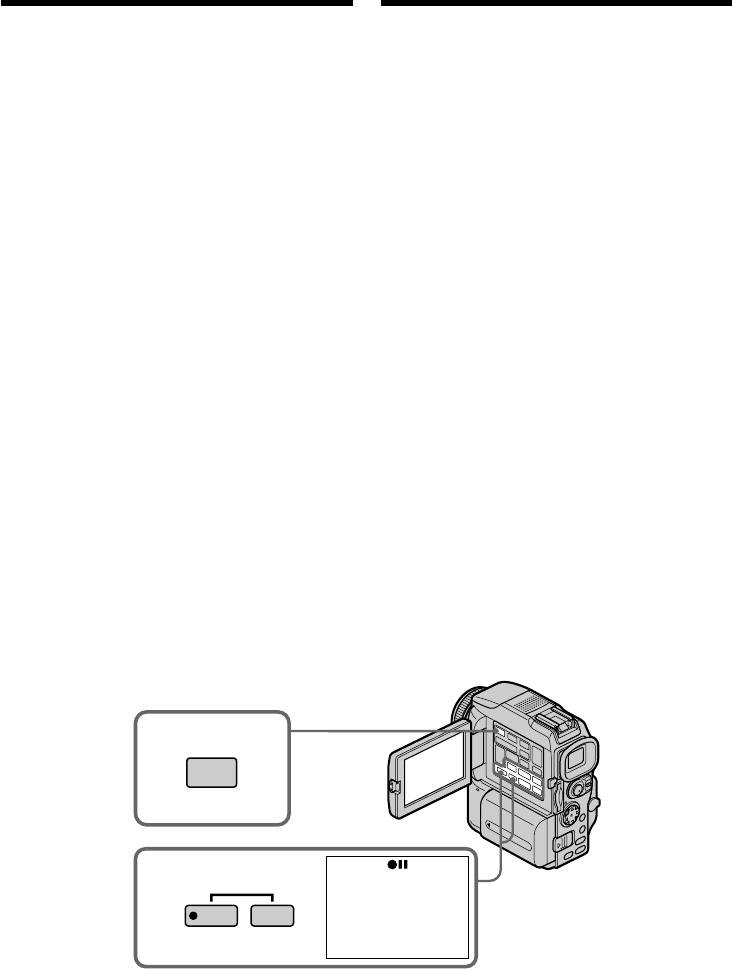
(1)Set the POWER switch to VCR.
(2)Using the video control buttons, search a
(1)Установите переключатель POWER в
point where you want to record the desired
положение VCR.
images. Set the tape to playback pause.
(2)С помощью кнопок управления видео
(3)Press z REC and the button on its right
найдите позицию, в которой требуется
simultaneously on your camcorder. The tape
записать нужные изображения.
is set to the recording pause mode.
Установите ленту в режим паузы
(4)Press MEMORY PLAY. The last recorded
воспроизведения.
image is displayed.
(3)Нажмите на видеокамере одновременно
(5)Press MEMORY +/– to select the desired
кнопку z REC и кнопку справа от нее.
image. To see the previous image, press
Лента установлена в режим паузы записи.
MEMORY –. To see the next, press MEMORY
(4)Нажмите кнопку MEMORY PLAY.
+.
Отобразится последнее записанное
(6)Press X to start recording and press X again
изображение.
to stop.
(5)Для выбора нужного изображения
z appears on the screen during recording.
используются кнопки MEMORY +/–. Для
(7)If you have more to copy, repeat steps 5 and 6.
просмотра предыдущего изображения
нажмите кнопку MEMORY –. Для
просмотра следующего изображения
нажмите кнопку MEMORY +.
(6)Для запуска на запись нажмите кнопку X,
для остановки - нажмите X еще раз.
Во время записи на экране отображается
z.
(7)Если требуется скопировать
дополнительные изображения, повторите
пункты 5 и 6.
4
PLAY
3
REC
To stop copying in the middle
Остановка в процессе копирования
Press x.
Нажмите кнопку x.
204

Copying the image recorded on
Копирование изображений с
“Memory Stick”s to tapes
“Memory Stick” на ленту
During copying
Во время копирования
You cannot operate the following buttons:
Во время копирования следующие кнопки не
–MEMORY PLAY
функционируют:
–MEMORY INDEX
– MEMORY PLAY
–MEMORY DELETE
– MEMORY INDEX
–MEMORY +/–
– MEMORY DELETE
–MEMORY MIX
– MEMORY +/–
– MEMORY MIX
Note on the index screen
You cannot record the index screen.
Примечание об индексном экране
Индексный экран не записывается.
If you press EDITSEARCH during pause mode
Memory playback stops.
Если нажата кнопка EDITSEARCH в
режиме паузы
Image data modified with your computers or
В этом случае воспроизведение изображений
shot with other equipment
из памяти останавливается.
You may not be able to copy them with your
camcorder.
Данные изображения, измененные на
персональном компьютере или снятые с
“Memory Stick
If you press DISPLAY in during recording or in
помощью другого оборудования
recording standby mode
Копирование таких изображений на
You can see memory playback and the file name
видеокамере может оказаться невозможным.
indicators in addition to the indicators pertinent
to tapes, such as the time code indicator.
Если нажата кнопка DISPLAY в режиме
” operations
ожидания или записи
Это дает возможность просмотреть
индикаторы воспроизведения памяти и имен
файлов, а также такие относящиеся к ленте
индикаторы, как код времени.
Работа с “Memory Stick”
205
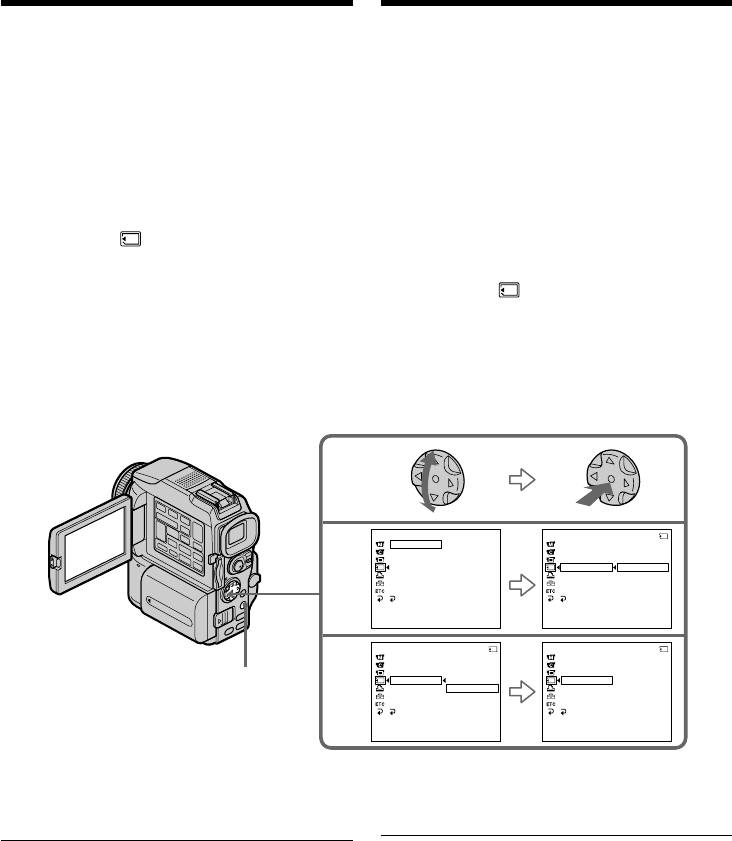
Enlarging still images
Увеличение неподвижных
recorded on “Memory
изображений, записанных на “Memory
Stick”s – Memory PB ZOOM
Stick” — Функция PB ZOOM памяти
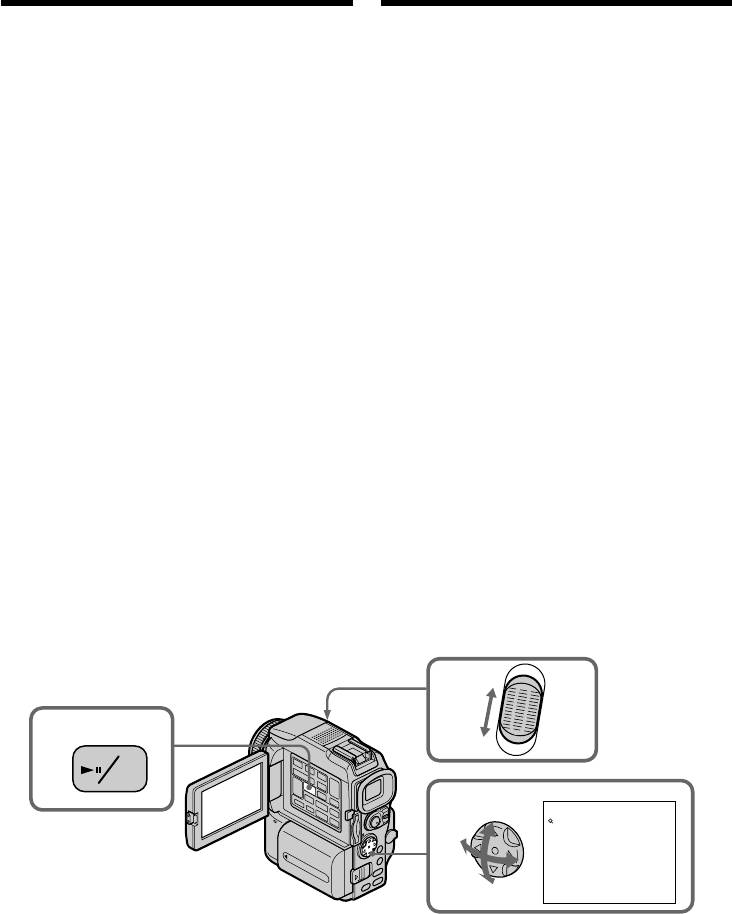
You can enlarge still images recorded on a
Неподвижные изображения, записанные на
“Memory Stick.” You can select and view the
“Memory Stick”, можно увеличить. Для
desired part from the enlarged still image. Also
просмотра можно выбирать нужную часть
you can copy the desired part of the enlarged still
увеличенного неподвижного изображения.
image to tapes or “Memory Stick”s.
Также можно копировать выбранную часть
увеличенного изображения на ленту или
Before operation
“Memory Stick”.
Insert a “Memory Stick” into your camcorder.
Перед началом работы
(1)Set the POWER switch to MEMORY or VCR.
Вставьте “Memory Stick” в видеокамеру.
Make sure that the LOCK switch is set to the
right (unlock) position.
(1)Установите переключатель POWER в
(2)In the memory playback mode, press PB
положение MEMORY или VCR. Убедитесь
ZOOM on your camcorder.
в том, что переключатель LOCK
The centre of the image is enlarged to twice its
установлен в правое (открытое)
size.
положение.
(3)Press the control button to move the image.
(2)В режиме воспроизведения памяти
The image moves in the same direction as the
нажмите на видеокамере кнопку PB
control button.
ZOOM.
(4)Adjust the zoom ratio by the power zoom
Центральная область изображения
lever.
увеличится в два раза.
You can enlarge the image from 1.1 times up
(3)Изображение можно переместить с
to five times its size.
помощью контрольной клавиши.
W : Decreases the zoom ratio.
Направление перемещения изображения
T : Increases the zoom ratio.
задается контрольной клавишей.
(4)Отрегулируйте степень увеличения с
помощью рычажка вариообъектива с
приводом.
Допустимый диапазон увеличения
изображения - от 1,1 до 5.
W: Снижение степени увеличения.
T : Повышение степени увеличения.
W
4
2
T
MPEG
PB
ZOOM
PB ZOOM
3
× 5.0
To cancel the PB ZOOM function
Отмена функции PB ZOOM
Press PB ZOOM.
Нажмите кнопку PB ZOOM.
206

Enlarging still images recorded
Увеличение неподвижных
on “Memory Stick”s
изображений, записанных на “Memory
– Memory PB ZOOM
Stick” — Функция PB ZOOM памяти
In the PB ZOOM mode
В режиме PB ZOOM
The digital effect function does not work.
Функция цифрового эффекта не работает.
The PB ZOOM function is cancelled when the
Функция PB ZOOM отменяется при
following buttons are pressed:
нажатии на следующие кнопки:
– MENU
– MENU
– MEMORY PLAY
– MEMORY PLAY
– MEMORY INDEX
– MEMORY INDEX
– MEMORY +/–
– MEMORY +/–
Moving pictures recorded on “Memory Stick”s
Движущиеся изображения, записанные на
The PB ZOOM function does not work.
“Memory Stick”
Для этих изображений функция PB ZOOM не
To record an image processed by PB ZOOM on
работает.
“Memory Stick”s
Press the PHOTO button to record the image
Запись на “Memory Stick” изображения,
processed by PB ZOOM. (The image size
обработанного функцией PB ZOOM
becomes 640 × 480)
Для записи изображения, обработанного
функцией PB ZOOM, нажмите кнопку PHOTO.
“Memory Stick
(Размер изображения становится 640 × 480)
” operations
Работа с “Memory Stick”
207
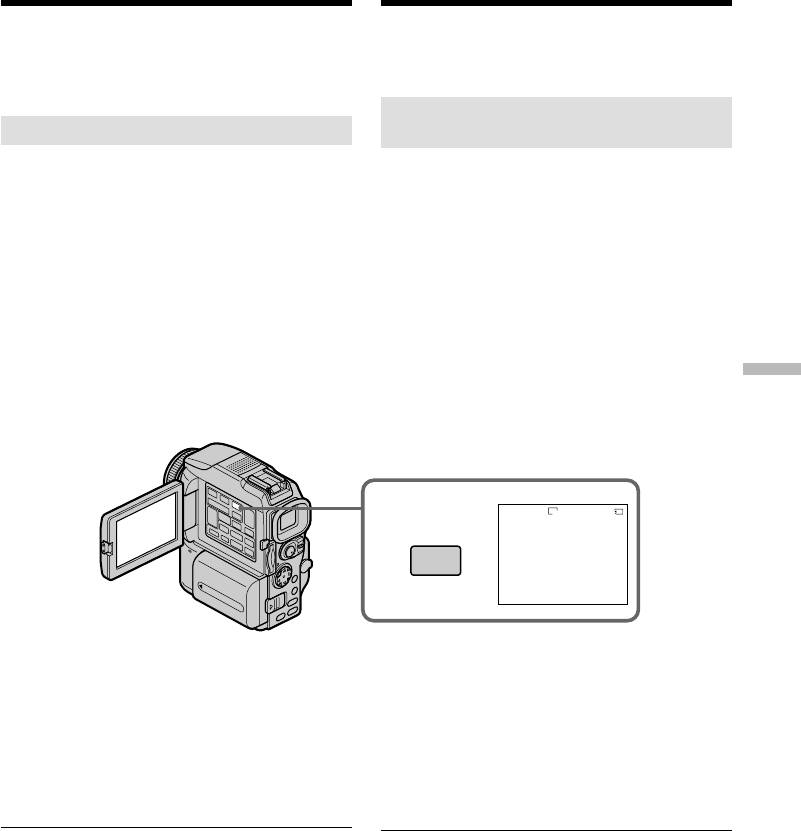
Playing back images
Воспроизведение
in a continuous loop
изображений по замкнутому
– SLIDE SHOW
циклу — Функция SLIDE SHOW
You can automatically play back images in
Существует возможность автоматического
sequence. This function is useful especially when
последовательного воспроизведения
checking recorded images or during a
изображений. Эта функция особенно удобна
presentation.
при проверке записанных изображений или
во время презентации.
Before operation
Insert a “Memory Stick” into your camcorder.
Перед началом работы
Вставьте “Memory Stick” в видеокамеру.
(1)Set the POWER switch to MEMORY. Make
sure that the LOCK switch is set to the right
(1)Установите переключатель POWER в
(unlock) position.
положение MEMORY. Убедитесь в том,
(2)Press MENU, then select and decide upon
что переключатель LOCK установлен в
SLIDE SHOW in with the control button
правое (открытое) положение.
(p. 132).
(2)Нажмите кнопку MENU, затем выберите
(3)Press MEMORY PLAY. Your camcorder plays
SLIDE SHOW в с помощью
back the images recorded on a “Memory
управляющей клавиши (стр. 132).
Stick” in sequence.
(3)Нажмите кнопку MEMORY PLAY.
Видеокамера начнет последовательное
воспроизведение изображений,
записанных на “Memory Stick”.
3
PLAY
MEMORY SET
SLIDE SHO
W
640
1/100
STILL SET
100-0001
MOV I E SET
2
PRINT MARK
PROTECT
SLIDE SHO
W
READY
DELETE ALL
FORMAT
RETURN
[
MENU
]
:
END
[
MPLAY
]:
START
[
MENU
]:
END
MENU
To stop the slide show
Остановка показа слайдов
Press MENU.
Нажмите кнопку MENU.
To pause during a slide show
Пауза во время показа слайдов
Press MEMORY PLAY.
Нажмите кнопку MEMORY PLAY.
To start the slide show from a
Начало показа слайдов с
particular image
определенного изображения
Select the desired image using MEMORY +/–
Перед пунктом 2 выберите нужное
buttons before step 2.
изображение с помощью кнопок MEMORY +/–
.
208

Воспроизведение изображений по
Playing back images in a
замкнутому циклу — Функция
continuous loop – SLIDE SHOW
SLIDE SHOW
To view the recorded images on TV
Просмотр записанных изображений на
Connect your camcorder to a TV with the A/V
экране телевизора
connecting cable supplied with your camcorder
Перед началом воспроизведения
before operation.
подсоедините видеокамеру к телевизору с
помощью соединительного кабеля аудио/
If you change the “Memory Stick” during
видео, который прилагается к видеокамере.
operation
The slide show does not operate. If you change
Замена “Memory Stick” во время просмотра
the “Memory Stick,” be sure to follow the steps
В этом случае показ слайдов не работает. В
again from the beginning.
случае замены “Memory Stick” следует
повторить все действия с начала.
“Memory Stick
” operations
Работа с “Memory Stick”
209
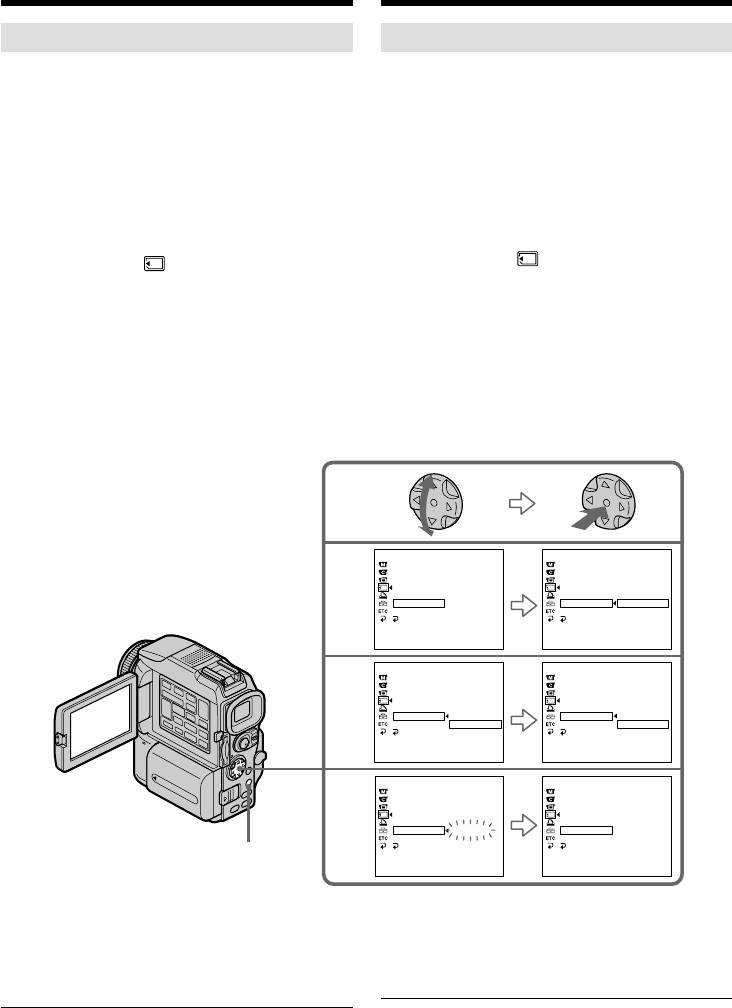
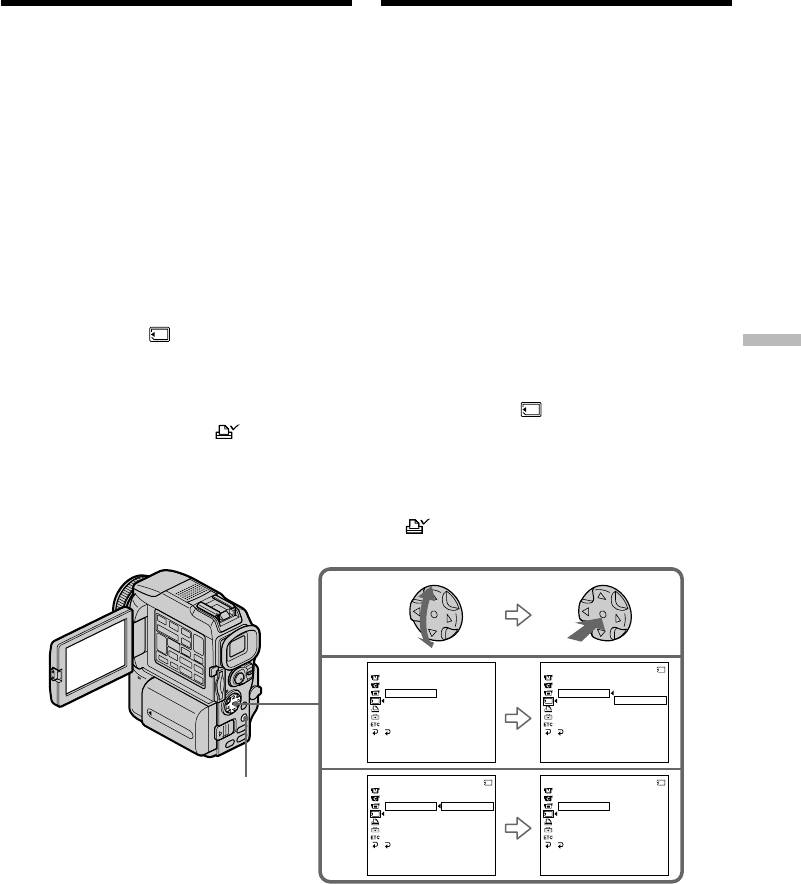
Preventing accidental
Предотвращение
erasure
случайного стирания
– Image protection
— Защита изображения
To prevent accidental erasure of important
Можно защитить выбранные важные
images, you can protect selected images.
изображения, предотвратив их случайное
стирание.
Before operation
Insert a “Memory Stick” into your camcorder.
Перед началом работы
Вставьте “Memory Stick” в видеокамеру.
(1)Set the POWER switch to MEMORY or VCR.
(1)Установите переключатель POWER в
Make sure that the LOCK switch is set to the
положение MEMORY или VCR. Убедитесь
right (unlock) position.
в том, что переключатель LOCK
(2)Play back the image you want to protect.
установлен в правое (откртое) положение.
(3)Press MENU, then select and decide upon
(2)Воспроизведите защищаемое
PROTECT in with the control button
изображение.
(p. 132).
(3)Нажмите кнопку MENU, затем выберите
(4)Select and decide upon ON with the control
PROTECT в с помощью управляющей
button.
клавиши (стр. 132).
(5)Press MENU to make the menu display
(4)Выберите ON с помощью управляющей
disappear. The “-” mark is displayed beside
клавиши.
the data file name of the selected image.
(5)Нажмите кнопку MENU - меню исчезнет с
экрана. На экране появится метка “-”
рядом с именем файла данных выбранного
изображения.
MEMORY SET
MEMORY SET
10/12
STILL SET
STILL SET
3
MOV I E SE T
MOV I E SE T
PRINT MARK
PRINT MARK
PROTECT
PROTECT
OFF
SLIDE SHO
W
SLIDE SHO
W
DELETE ALL
DELETE ALL
FORMAT
FORMAT
RETURN
RETURN
[
MENU
]
:
END
[
MENU
]
:
END
MEMORY SET
10/12
MEMORY SET
10/12
STILL SET
STILL SET
4
MOV I E SE T
MOV I E SE T
PRINT MARK
PRINT MARK
MENU
PROTECT
ON
PROTECT
ON
SLIDE SHO
W
OFF
SLIDE SHO
W
DELETE ALL
DELETE ALL
FORMAT
FORMAT
RETURN
RETURN
[
MENU
]
:
END
[
MENU
]
:
END
To cancel image protection
Отмена защиты изображения
Select and decide upon OFF with the control
В пункте 4 выберите OFF с помощью
button in step 4.
управляющей клавиши.
Примечание
Note
Форматирование стирает всю информацию
Formatting erases all information on the
на “Memory Stick”, включая данные
“Memory Stick,” including the protected image
защищенного изображения. Проверьте
data. Check the contents of the “Memory Stick”
содержание “Memory Stick” перед
before formatting.
форматированием.
If the write-protect tab on the “Memory Stick”
Лепесток защиты “Memory Stick” от записи
is set to LOCK
установлен в положение LOCK
You cannot carry out image protection.
В этом случае нельзя выполнить защиту
изображения.
210
Удаление
Deleting images
изображений
You can delete images stored in a “Memory
Изображения, записанные на “Memory Stick”,
Stick.” You can delete all images or selected
можно удалить. Можно удалять все или
images.
только выбранные изображения.
Удаление выбранных
Deleting selected images
изображений
Before operation
Перед началом работы
Insert a “Memory Stick” into your camcorder.
Вставьте “Memory Stick” в видеокамеру.
(1)Set the POWER switch to MEMORY or VCR.
(1)Установите переключатель POWER в
Make sure that the LOCK switch is set to the
положение MEMORY или VCR. Убедитесь
right (unlock) position.
в том, что переключатель LOCK
(2)Playback the image to delete.
установлен в правое (открытое)
(3)Press MEMORY DELETE. “DELETE?”
положениие.
appears on the screen.
(2)Воспроизведите удаляемое изображение.
(4)Press MEMORY DELETE again. The selected
(3)Нажмите кнопку MEMORY DELETE. На
image is deleted.
дисплее появится вопрос “DELETE?”.
(4)Нажмите кнопку MEMORY DELETE еще
“Memory Stick
раз. Выбранное изображение будет
удалено.
” operations
3
DELETE
640
89/100
100-0010
DELETE?
DELETE
[
DELETE
]
:
DEL
[
–
]
:
CANCEL
Работа с “Memory Stick”
To cancel deleting an image
Отмена удаления изображения
Press MEMORY – in step 4.
В пнкте 4 нажмите кнопку MEMORY –.
To delete an image displayed on the
Удаление изображения,
index screen
отображаемого на индексном экране
Press MEMORY +/– to move the B indicator to
С помощью кнопок MEMORY +/– переместите
the desired image you want to delete and follow
индикатор B к удаляемому изображению и
steps 3 and 4.
выполните пункты 3 и 4.
Notes
Примечания
•To delete a protected image, first cancel image
•Для удаления защищенного изображения
protection.
сначала отмените его защиту.
•Once you delete an image, you cannot restore
•Восстановление удаленного изображения
it. Check the images to delete carefully before
невозможно. Внимательно проверяйте
deleting them.
изображения перед удалением.
If the write-protect tab on the “Memory Stick”
Лепесток защиты “Memory Stick” от записи
is set to LOCK
установлен в положение LOCK
You cannot delete images.
В этом случае удаление изображений
невозможно.
211
Deleting images
Удаление изображений
Deleting all the images
Удаление всех изображений
You can delete all the unprotected images in a
Можно удалить все незащищенные
“Memory Stick.”
изображения на “Memory Stick”.
Перед началом работы
Before operation
Вставьте “Memory Stick” в видеокамеру.
Insert a “Memory Stick” into your camcorder.
(1)Установите переключатель POWER в
(1)Set the POWER switch to MEMORY. Make
положение MEMORY. Убедитесь в том,
sure that the LOCK switch is set to the right
что переключатель LOCK установлен в
(unlock) position.
правое (открытое) положение.
(2)Press MENU, then select and decide upon
(2)Нажмите кнопку MENU, затем выберите
DELETE ALL в с помощью
DELETE ALL in with the control button
управляющей клавиши (стр. 132).
(p. 132).
(3)Выберите OK с помощью управляющей
(3)Select and decide upon OK with the control
клавиши. Индикация OK изменится на
button. OK changes to EXECUTE.
EXECUTE.
(4)Select and decide upon EXECUTE with the
(4)Выберите EXECUTE с помощью
control button. DELETING flashes on the
управляющей клавиши. На экране должен
screen. When all the unprotected images are
мигать индикатор DELETING. После
deleted, COMPLETE is displayed.
удаления всех незащищенных
изображений появится индикация
COMPLETE.
MEMORY SET
MEMORY SET
STILL SET
STILL SET
MOV I E SE T
MOV I E SE T
2
PRINT MARK
PRINT MARK
PROTECT
PROTECT
SLIDE SHO
W
SLIDE SHO
W
DELETE ALL
READY
DELETE ALL RETURN
FORMAT
FORMAT OK
RETURN
RETURN
[
MENU
]
:
END
[
MENU
]
:
END
MEMORY SET
MEMORY SET
STILL SET
STILL SET
MOV I E SE T
MOV I E SE T
3
PRINT MARK
PRINT MARK
PROTECT
PROTECT
SLIDE SHO
W
SLIDE SHO
W
DELETE ALL RETURN
DELETE ALL RETURN
FORMAT OK
FORMAT EXECUTE
RETURN
RETURN
[
MENU
]
:
END
[
MENU
]
:
END
MEMORY SET
MEMORY SET
STILL SET
STILL SET
MOV I E SE T
MOV I E SE T
4
PRINT MARK
PRINT MARK
PROTECT
PROTECT
SLIDE SHO
W
SLIDE SHO
W
DELETE ALL DELETING
DELETE ALL COMPLETE
FORMAT
FORMAT
RETURN
RETURN
MENU
[
MENU
]
:
END
[
MENU
]
:
END
To cancel deleting all the images in
Отмена удаления всех изображений
the “Memory Stick”
на “Memory Stick”
Select and decide upon RETURN with the control
В пункте 3 выберите RETURN с помощью
button in step 3.
управляющей клавиши.
Во время отображения индикации
While DELETING appears
DELETING
Do not turn the POWER switch or press any
Не изменяйте положение переключателя
buttons.
212
POWER и не нажимайте какие-либо кнопки.
Writing a print mark
Запись меток печати
– PRINT MARK
— функция PRINT MARK
You can specify the recorded still image to print
С помощью меток можно указать записанные
out by putting marks. This function is useful for
неподвижные изображения для печати. Эта
printing out still images later.
функция полезна для последующей
Your camcorder conforms with the DPOF
распечатки неподвижных изображений.
(Digital Print Order Format) standard for
Видеокамера соответствует стандарту DPOF
specifying the still images to print out.
(формат правила цифровой печати), что
позволяет указать неподвижные
Before operation
изображения для распечатки.
Insert a “Memory Stick” into your camcorder.
Перед началом работы
(1)Set the POWER switch to MEMORY or VCR.
Вставьте “Memory Stick” в видеокамеру.
Make sure that the LOCK switch is set to the
right (unlock) position.
(1)Установите переключатель POWER в
(2)Playback the still image you want to write a
положение MEMORY или VCR. Убедитесь
print mark on.
в том, что переключатель LOCK
(3)Press MENU, then select and decide upon
установлен в правое (открытое)
PRINT MARK in with the control button
положение.
(p. 132).
(2)Воспроизведите неподвижное изображение,
“Memory Stick
(4)Select and decide upon ON with the control
которое нужно отметить для печати.
button.
(3)Нажмите кнопку MENU, затем выберите
(5)Press MENU to make the menu display
PRINT MARK в с помощью
disappear. The print mark is displayed
управляющей клавиши (стр. 132).
beside the data file name of the image.
(4)Выберите ON с помощью управляющей
” operations
клавиши.
(5)Нажмите кнопку MENU - меню исчезнет с
экрана. На экране появится метка печати
рядом с именем файла данных
изображения.
Работа с “Memory Stick”
MEMORY SET
MEMORY SET
10/12
STILL SET
STILL SET
3
MOV I E SE T
MOV I E SE T
PRINT MARK
FFO
PRINT MARK
NO
PROTECT
PROTECT
FFO
SLIDE SHO
W
SLIDE SHO
W
DELETE ALL
DELETE ALL
FORMAT
FORMAT
RETURN
RETURN
[
MENU
]
:
END
[
MENU
]
:
END
MEMORY SET
10/12
MEMORY SET
10/12
MENU
STILL SET
STILL SET
MOV I E SE T
MOV I E SE T
4
PRINT MARK
ON
PRINT MARK
ON
PROTECT
OFF
PROTECT
SLIDE SHO
W
SLIDE SHO
W
DELETE ALL
DELETE ALL
FORMAT
FORMAT
RETURN
RETURN
[
MENU
]
:
END
[
MENU
]
:
END
To cancel writing print marks
Отмена записи меток печати
Select and decide upon OFF with the control
В пункте 4 выберите OFF с помощью
button in step 4.
управляющей клавиши.
213

Writing a print mark
Запись меток печати
– PRINT MARK
— функция PRINT MARK
If the write-protect tab on the “Memory Stick”
Лепесток защиты “Memory Stick” от записи
is set to LOCK
установлен в положение LOCK
You cannot write print marks on still images.
В этом случае запись меток печати для
неподвижных изображений невозможна.
Moving pictures
You cannot write print marks on moving
Движущиеся изображения
pictures.
Невозможна запись меток печати для
движущихся изображений.
While the file name is flashing
You cannot write a print mark on the still image.
Во время мигания имени файла
В этот момент запись меток печати для
неподвижных изображений невозможна.
214
Using the optional
Использование
printer
дополнительного принтера
You can use the optional printer on your
Для печати изображений с видеокамеры на
camcorder to print images on the print paper.
бумаге можно использовать дополнительно
For details, refer to the operating instructions of
приобретаемый принтер. Подробности можно
the printer.
найти в инструкции по эксплуатации
There are various ways of printing still images.
принтера.
The following, however, describes how to print
Печатать неподвижные изображения можно
by selecting in the menu on your camcorder.
различными способами. Ниже описана
процедура печати с использованием пункта
Before operation
в меню видеокамеры.
•Insert a recorded “Memory Stick” into your
camcorder.
Перед началом работы
•Connect the optional printer to your camcorder
•Вставьте в видеокамеру устройство
as illustrated.
“Memory Stick” с записью.
•Подсоедините принтер к видеокамере, как
показано на рисунке.
“Memory Stick
9PIC PRINT DATE/TIME
Printer/
PRI NT SET
PRI NT SET
DATE
” operations
Printer
9PIC PRINT
RETURN
9PIC PRINT
Принтер
DATE
/
TIME
SAME
DATE
/
TIME
OFF
RETURN
MULT I
RETURN
DATE
MARKED
DAY&T IME
[
MENU
]
:
END
[
MENU
]
:
END
Работа с “Memory Stick”
MENU
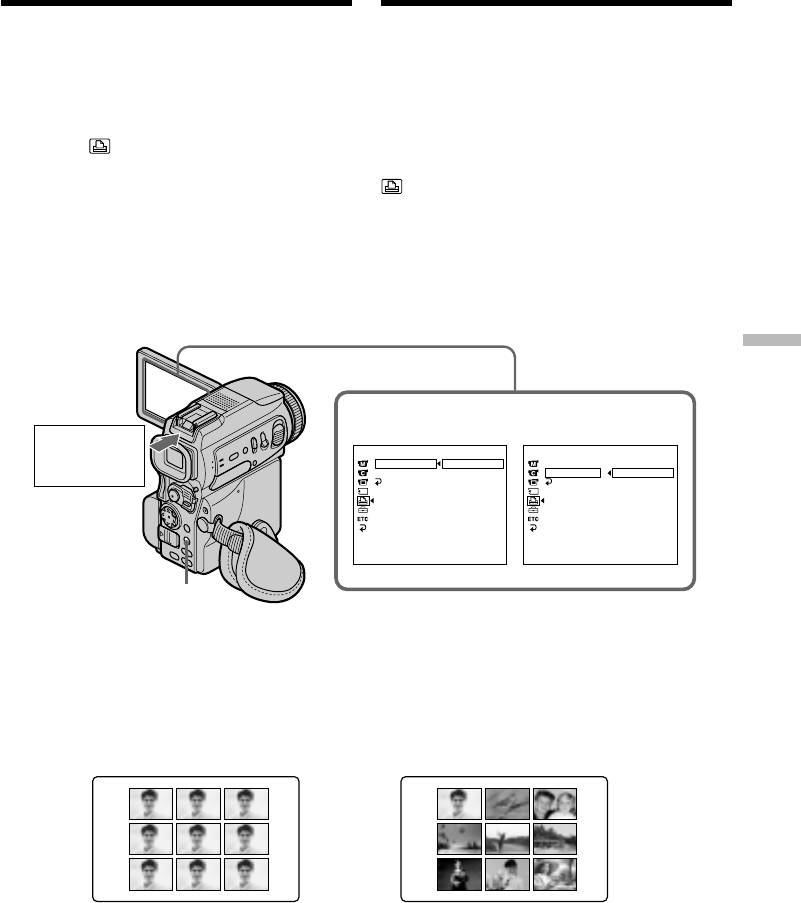
You can print nine still images on the 9-split print
Можно печатать по 9 неподвижных
paper. Select the desired mode in the menu
изображений на листах, разделенных на 9
settings.
участков. Выберите нужный режим в
настройках меню.
MULTI PICS or *MARKED PICS/
SAME PICS
Режимы MULTI PICS или *MARKED PICS
* Nine still images with print marks are printed
* Совместная печать 9 неподвижных
together.
изображений с метками для печати.
215
Using the optional printer
You can make prints with the recording date
and/or recording time. Select the desired mode
in the menu settings.
DATE DAY & TIME
Images recorded in multi screen mode
You cannot print images recorded in multi screen
mode on sticker type print paper.
Moving pictures recorded on “Memory Stick”
You cannot print moving pictures.
When “Memory Stick” has no files
“ NO STILL IMAGE FILE” appears on the
screen.
When there are no files with a PRINT MARK
“ NO PRINT MARK” appears on the screen.
216
412
:
00
Использование дополнительного
принтера
На распечатках можно указать дату и/или
время записи. Выберите нужный режим в
настройках меню.
4
7
2001
Изображения, записанные в
многоэкранном режиме
Изображения, записанные в многоэкранном
режиме, нельзя распечатать на этикетках.
Движущиеся изображения, записанные на
“Memory Stick”
Печать движущихся изображений
невозможна.
Если “Memory Stick” не содержит файлов
На экране появляется индикация “ NO
STILL IMAGE FILE”.
Если нет файлов с меткой PRINT MARK
На экране появляется индикация “ NO
PRINT MARK”.
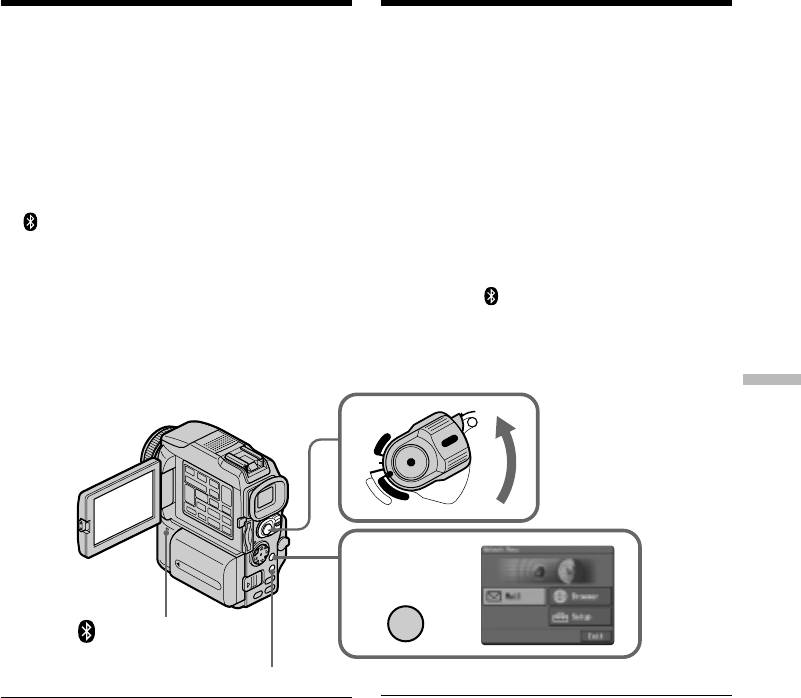
— Using the Network function —
— Использование функции доступа к сети —
Accessing the network
Доступ к сети
– DCR-PC120E only
– Только для модели DCR-PC120E
You can access the Internet using a Bluetooth
Доступ к сети производится с помощью
equipped device (optional) that is complied to
совместимого с видеокамерой устройства (не
the camcorder. Once the access is made, you can
прилагается), работающего по технологии
view a Web page, send/receive your e-mail, etc.
Bluetooth.
После осуществления доступа можно
This section described only how to open the
просматривать страницы веб, отправлять/
Network Menu.
получать электронную почту или подготовить
альбом для веб и других страниц.
(1)Set the POWER switch to MEMORY.
В этом разделе описывается только то, как
(2)Press NETWORK.
следует открывать меню сети (Network Menu).
(Bluetooth) lamp flashes and Network
Menu appears.
(1)Установите переключатель POWER в
положение MEMORY.
For the details, refer to the Network Function
(2)Нажмите NETWORK.
Operating Instructions supplied with your
Загорится лампа Bluetooth и появится
camcorder.
сетевое меню.
Детальное описание находится в инструкции
по эксплуатации сети, которая прилагается к
видеокамере.
Using the Network function Использование функции доступа к сети
POWER
1
LOCK
R
C
(CHG)
OFF
V
C
A
M
M
E
E
M
R
O
R
A
Y
2
NETWORK
(Bluetooth) lamp/
Лампа Bluetooth
BROWSER MENU
On trademarks
Торговые знаки
•The BLUETOOTH trademarks are owned by
• Торговые знаки BLUETOOTH принадлежат
их владельцу и используются Sony
their proprietor and used by Sony Corporation
Corporation по лицензии.
under license.
• Все упоминаемые названия продуктов
•All other product names mentioned herein may
могут быть охраняемыми товарными
be the trademarks or registered trademarks of
знаками соответствующих компаний.
their respective companies. Furthermore, “™”
Далее в данном руководстве не всегда
and “®” are not mentioned in each case in this
приводятся ссылки на товарные знаки, “”
manual.
и “”.
Note
Примечание
Make sure that your camcorder is in the standby
Убедитесь в том, что видеокамера находится
mode with the POWER switch set to MEMORY.
в режиме ожидания, при этом переключатель
POWER установлен в положение MEMORY.
During using the network function
При использовании функции подключения
You cannot use the optional printer.
к сети
Нельзя использовать дополнительный
принтер.
217

— Troubleshooting —
English
Types of trouble and their solutions
If you run into any problem using your camcorder, use the following table to troubleshoot the
problem. If the problem persists, disconnect the power source and contact your Sony dealer or local
authorised Sony service facility. If “C:ss:ss” appears on the screen, the self-diagnosis display
function has worked. See page 224.
In the recording mode
Symptom Cause and/or Corrective Actions
START/STOP does not operate.
• The POWER switch is not set to CAMERA.
c Set it to CAMERA (p. 29).
• The tape has run out.
c Rewind the tape or insert a new one (p. 27, 47).
• The write-protect tab is set to expose the red mark.
c Use a new tape or slide the tab (p. 28).
• The tape is stuck to the drum (moisture condensation).
c Remove the cassette and leave your camcorder for at least
one hour to acclimatise (p. 244).
The power goes off.
• While being operated in CAMERA mode, your camcorder has
been in the standby mode for more than five minutes.
c Set the POWER switch to OFF (CHG) and then to CAMERA.
• The battery pack is dead or nearly dead.
c Install a charged battery pack.
The image on the viewfinder screen
• Viewfinder is not extended to the end.
is not clear.
c Pull out the viewfinder (p. 33).
• The viewfinder lens is not adjusted.
c Adjust the viewfinder lens (p. 33).
The SteadyShot function does not
• STEADYSHOT is set to OFF in the menu settings.
work.
c Set it to ON (p. 132).
The autofocusing function does not
• The setting is the manual focus mode.
work.
c Set FOCUS to the auto focus mode (p. 72).
• Shooting conditions are not suitable for autofocus.
c Adjust to focus manually (p. 72).
The picture does not appear in the
• The LCD panel is open.
viewfinder.
c Close the LCD panel (p. 31).
A vertical band appears when you
• The contrast between the subject and background is too high.
shoot a subject such as lights or a
Your camcorder is not a malfunction.
candle flame against a dark
background.
A vertical band appears when you
• Your camcorder is not a malfunction.
shoot a very bright subject.
Some tiny white spots appear on the
• Slow shutter, low lux of PROGRAM AE or Super NightShot
screen.
mode is activated. This is not a malfunction.
An unknown picture is displayed on
• If 10 minutes elapse after you set the POWER switch to
the screen.
CAMERA or DEMO MODE is set to ON in the menu settings
without a cassette inserted, your camcorder automatically
starts the demonstration.
c Insert a cassette and the demonstration stops.
You can also cancel DEMO MODE (p. 139).
218

Types of trouble and their solutions
Symptom Cause and/or Corrective Actions
The picture is recorded in incorrect or
• NIGHTSHOT is set to ON.
unnatural colours.
c Set it to OFF (p. 39).
The picture appears too bright, and
• NIGHTSHOT is set to ON in a bright place.
the subject does not appear on the
c Set it to OFF (p. 39).
screen.
• The backlight function is active.
c Set it off (p. 38).
The click of the shutter does not
• BEEP is set to OFF in the menu settings.
sound.
c Set it to MELODY or NORMAL (p. 132).
Black bands appear when you
• Set the STEADYSHOT in the menu settings to OFF (p. 132).
record TV or computer screen.
An external flash (optional) does not
• The power of the external flash is off or the power source is not
work.
installed.
c Turn on the external flash or install the power source.
• Two or more external flashes (optional) are attached.
c Only one external flash (optional) can be attached.
In the playback mode
Symptom Cause and/or Corrective Actions
The tape does not move when a
• The POWER switch is not set to VCR.
Troubleshooting Поиск и устранение неисправностей
video control button is pressed.
c Set it to VCR (p. 44).
The playback button does not work.
• The tape has run out.
c Rewind the tape (p. 44).
There are horizontal lines on the
• The video head may be dirty.
picture or the playback picture is not
c Clean the heads using the cleaning cassette (optional)
clear or does not appear.
(p. 245).
No sound or only a low sound is
• The stereo tape is played back with HiFi SOUND set to 2 in the
heard when playing back a tape.
menu settings.
c Set it to STEREO (p. 132).
• The volume is turned to minimum.
c Turn up the volume (p. 44).
• AUDIO MIX is set to ST2 in the menu settings.
c Adjust AUDIO MIX (p. 132).
Displaying the recorded date, date
• The tape has no cassette memory.
search function does not work.
c Use a tape with cassette memory (p. 86).
• CM SEARCH is set to OFF in the menu settings.
c Set it to ON (p. 132).
• The tape has a blank portion in the recorded portion (p. 87).
The title search function does not
• The tape has no cassette memory.
work.
c Use a tape with cassette memory (p. 84).
• CM SEARCH is set to OFF in the menu settings.
c Set it to ON (p. 132).
• There is no title in the tape.
c Superimpose the titles (p. 123).
• The tape has a blank portion in the recorded portion (p. 85).
The new sound added to the
• AUDIO MIX is set to ST1 side in the menu settings.
recorded tape is not heard.
c Adjust AUDIO MIX (p. 132).
The title is not displayed.
• TITLE DSPL is set to OFF in the menu settings.
c Set it to ON (p. 132).
(continued on the following page)
219

Types of trouble and their solutions
In the recording and playback modes
Symptom Cause and/or Corrective Actions
The power does not turn on.
• The battery pack is not installed, or is dead or nearly dead.
c Install a charged battery pack (p. 18, 19).
• The AC power adaptor is not connected to a wall socket.
c Connect the AC power adaptor to a wall socket (p. 23).
The end search function does not
• The tape was ejected after recording when using a tape without
work.
cassette memory (p. 42).
• You have not recorded on the new cassette yet (p. 42).
The end search function does not
• The tape has a blank portion in the beginning or middle (p. 43).
work correctly.
The battery pack is quickly
• The operating temperature is too low.
discharged.
• The battery pack is not fully charged.
c Charge the battery pack fully again (p. 19).
• The battery pack is completely dead, and cannot be recharged.
c Replace with a new battery pack (p. 18).
The battery remaining indicator does
• You have used the battery pack in an extremely hot or cold
not indicate the correct time.
environment for a long time.
• The battery pack is completely dead, and cannot be recharged.
c Replace with a new battery pack (p. 18).
• The battery is not fully charged.
c Install a charged battery pack (p. 18, 19).
• A deviation has occurred in the remaining battery time.
c Charge the battery pack fully again so that the indication on
the battery remaining indicator is correct (p. 19).
The power goes off although the
• A deviation has occurred in the remaining battery time.
battery remaining indicator indicates
c Charge the battery pack fully again so that the indication on
that the battery pack has enough
the battery remaining indicator is correct (p. 19).
power to operate.
The cassette cannot be removed from
• The power source is disconnected.
the holder.
c Connect it firmly (p. 18, 23).
• The battery is dead.
c Use a charged battery pack (p. 18, 19).
The % and Z indicators flash and no
• Moisture condensation has occurred.
functions except for cassette ejection
c Remove the cassette and leave your camcorder for at least
work.
one hour to acclimatise (p. 244).
indicator does not appear when
• The gold-plated connector of the tape is dirty or dusty.
using a tape with cassette memory.
c Clean the gold-plated connector (p. 238).
Remaining tape indicator is not
• The q REMAIN is set to AUTO in the menu settings.
displayed.
c Set it to ON to always display the remaining tape indicator
(p. 132).
220

