Sony CPD-E100E: Technical Features Troubleshooting
Technical Features Troubleshooting: Sony CPD-E100E
C:\WIN95-E\DESKTOP\CPD E100\386765911CPDE100EAEP\01GB03BAS-AEP.fm
masterpage:Right
Technical Features
Troubleshooting
Before contacting technical support, refer to this section.
Preset and user modes
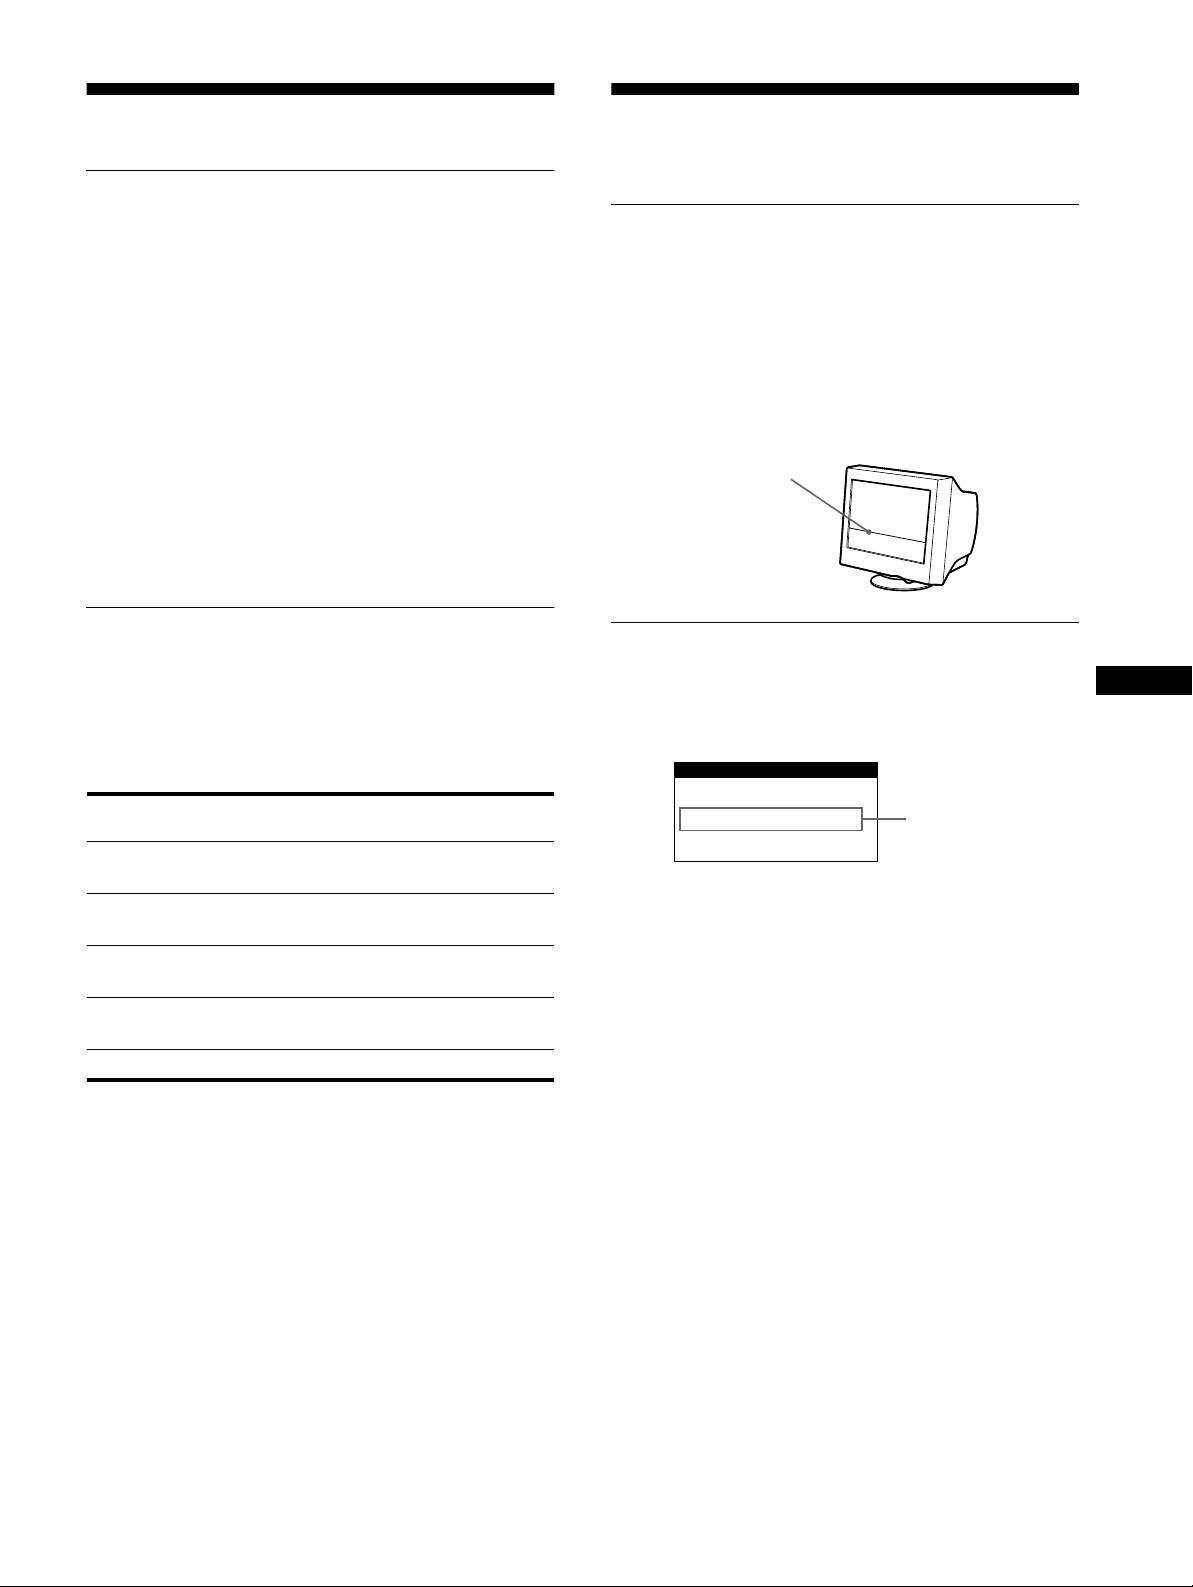
If thin line appears on your screen
When the monitor receives an input signal, it automatically
matches the signal to one of the factory preset modes stored in the
(damper wire)
monitor’s memory to provide a high quality picture at the center of
the screen.
(See Appendix for a list of the factory preset modes.)
The line you are experiencing on your screen is normal for the
For input signals that do not match one of the factory preset modes,
Trinitron monitor and is not a malfunction. This is shadow from
the digital Multiscan technology of this monitor ensures that a
the damper wire used to stabilize the aperture grille and is most
clear picture appears on the screen for any timing in the monitor’s
noticeable when the screen’s background is light (usually white).
frequency range (horizontal: 30 – 70 kHz, vertical: 48 – 120 Hz).
The aperture grille is the essential element that makes a Trinitron
If the picture is adjusted, the adjustment data is stored as a user
picture tube unique by allowing more light to reach the screen,
mode and automatically recalled whenever the same input signal
resulting in a brighter, more detailed picture.
is received.
Damper wire
Note for Windows users
For Windows users, check your video board manual or the utility
program which comes with your graphic board and select the
highest available refresh rate to maximize monitor performance.
Power saving function
On-screen messages
This monitor meets the power-saving guidelines set by VESA,
If there is something wrong with the input signal, one of the
GB
E
NERGY
S
TAR, and NUTEK. If the monitor is connected to a
following messages appears on the screen. To solve the problem,
computer or video graphics board that is DPMS (Display Power
see “Trouble symptoms and remedies” on page 14.
Management Signaling) compliant, the monitor will automatically
reduce power consumption in three stages as shown below
.
Power mode Power consumption 1 (power)
indicator
normal
≤ 95 W green
operation
The input signal condition
1 standby ≤ 15 W green and orange
OUT OF SCAN RANGE
alternate
indicates that the input signal is not supported by the monitor’s
2 suspend
≤ 15 W green and orange
specifications.
(sleep)*
alternate
NO INPUT SIGNAL
3 active off**
≤ 5 W orange
indicates that no signal is being input to the monitor.
(deep sleep)*
power off 0 W off
* “Sleep” and “deep sleep” are power saving modes defined by the
Environmental Protection Agency.
** When your computer enters the “active off” mode, the input signal is
cut and NO INPUT SIGNAL appears on the screen. After 20 seconds,
the monitor enters the power saving mode.
13
3-867-659-
CPD-E100E
11
(1)
INFORMATION
OUT OF SCAN RANGE
Input signal
condition

C:\WIN95-E\DESKTOP\CPD E100\386765911CPDE100EAEP\01GB03BAS-AEP.fm
masterpage:Left
Trouble symptoms and remedies
If the problem is caused by the connected computer or other equipment, please refer to the connected equipment’s instruction manual.
Use the self-diagnosis function (page 16) if the following recommendations do not resolve the problem.
Symptom Check these items
No picture
If the 1 (power) indicator is not lit • Check that the power cord is properly connected.
• Check that the 1 (power) switch is in the “on” position.
If the NO INPUT SIGNAL message
• Check that the video signal cable is properly connected and all plugs are firmly seated in
appears on the screen, or if the 1
their sockets (page 6).
(power) indicator is either orange or
• Check that the HD15 video input connector’s pins are not bent or pushed in.
alternating between green and
x
Problems caused by the connected computer or other equipment
orange
• The computer is in power saving mode. Try pressing any key on the computer keyboard.
• Check that the computer’s power is “on.”
• Check that the graphic board is completely seated in the proper bus slot.
If the OUT OF SCAN RANGE
x
Problems caused by the connected computer or other equipment
message appears on the screen
• Check that the video frequency range is within that specified for the monitor. If you
replaced an old monitor with this monitor, reconnect the old monitor and adjust the
frequency range to the following.
Horizontal: 30 – 70 kHz
Vertical: 48 – 120 Hz
If no message is displayed and the 1
• Use the Self-diagnosis function (page 16).
(power) indicator is green or flashing
orange
If using Windows 95/98 • If you replaced an old monitor with this monitor, reconnect the old monitor and do the
following. Install the Windows Monitor Information Disk (page 7) and select this monitor
(“CPD-E100E”) from among the Sony monitors in the Windows 95/98 monitor selection
screen.
If using a Macintosh system • Check that the Macintosh adapter (not supplied) and the video signal cable are properly
connected (page 6).
Picture flickers, bounces,
• Isolate and eliminate any potential sources of electric or magnetic fields such as other
oscillates, or is scrambled
monitors, laser printers, electric fans, fluorescent lighting, or televisions.
• Move the monitor away from power lines or place a magnetic shield near the monitor.
• Try plugging the monitor into a different AC outlet, preferably on a different circuit.
• Try turning the monitor 90° to the left or right.
x
Problems caused by the connected computer or other equipment
• Check your graphics board manual for the proper monitor setting.
• Confirm that the graphics mode (VESA, Macintosh 16" Color, etc.) and the frequency of
the input signal are supported by this monitor (Appendix). Even if the frequency is within
the proper range, some video boards may have a sync pulse that is too narrow for the
monitor to sync correctly.
• Adjust the computer’s refresh rate (vertical frequency) to obtain the best possible picture.
Picture is fuzzy
• Adjust the brightness and contrast (page 9).
• Degauss the monitor* (page 12).
• Select CANCEL MOIRE and adjust the moire cancellation effect (page 12).
14
3-867-659-
CPD-E100E
11
(1)
C:\WIN95-E\DESKTOP\CPD E100\386765911CPDE100EAEP\01GB03BAS-AEP.fm
masterpage:Right
Symptom Check these items
Picture is ghosting • Eliminate the use of video cable extensions and/or video switch boxes.
• Check that all plugs are firmly seated in their sockets.
Picture is not centered or sized
• Adjust the size or centering (page 10). Note that some video modes do not fill the screen
properly
to the edges.
Edges of the image are curved • Select PIN/PIN BALANCE, KEY/KEYBALANCE, or ROTATION, and adjust the
picture’s shape and rotation (page 10, 11).
Wavy or elliptical pattern (moire)
• Select CANCEL MOIRE and adjust the moire cancellation effect (page 12).
is visible
xProblems caused by the connected computer or other equipment
• Change your desktop pattern.
Color is not uniform • Degauss the monitor* (page 12). If you place equipment that generates a magnetic field,
such as a speaker, near the monitor, or if you change the direction the monitor faces, color
may lose uniformity.
White does not look white • Adjust the color temperature (page 11).
A hum is heard right after the
• This is the sound of the auto-degauss cycle. When the power is turned on, the monitor is
power is turned on
automatically degaussed for five seconds.
* If a second degauss cycle is needed, allow a minimum interval of 20 minutes for the best result. A humming noise may be heard, but this is not a
malfunction.
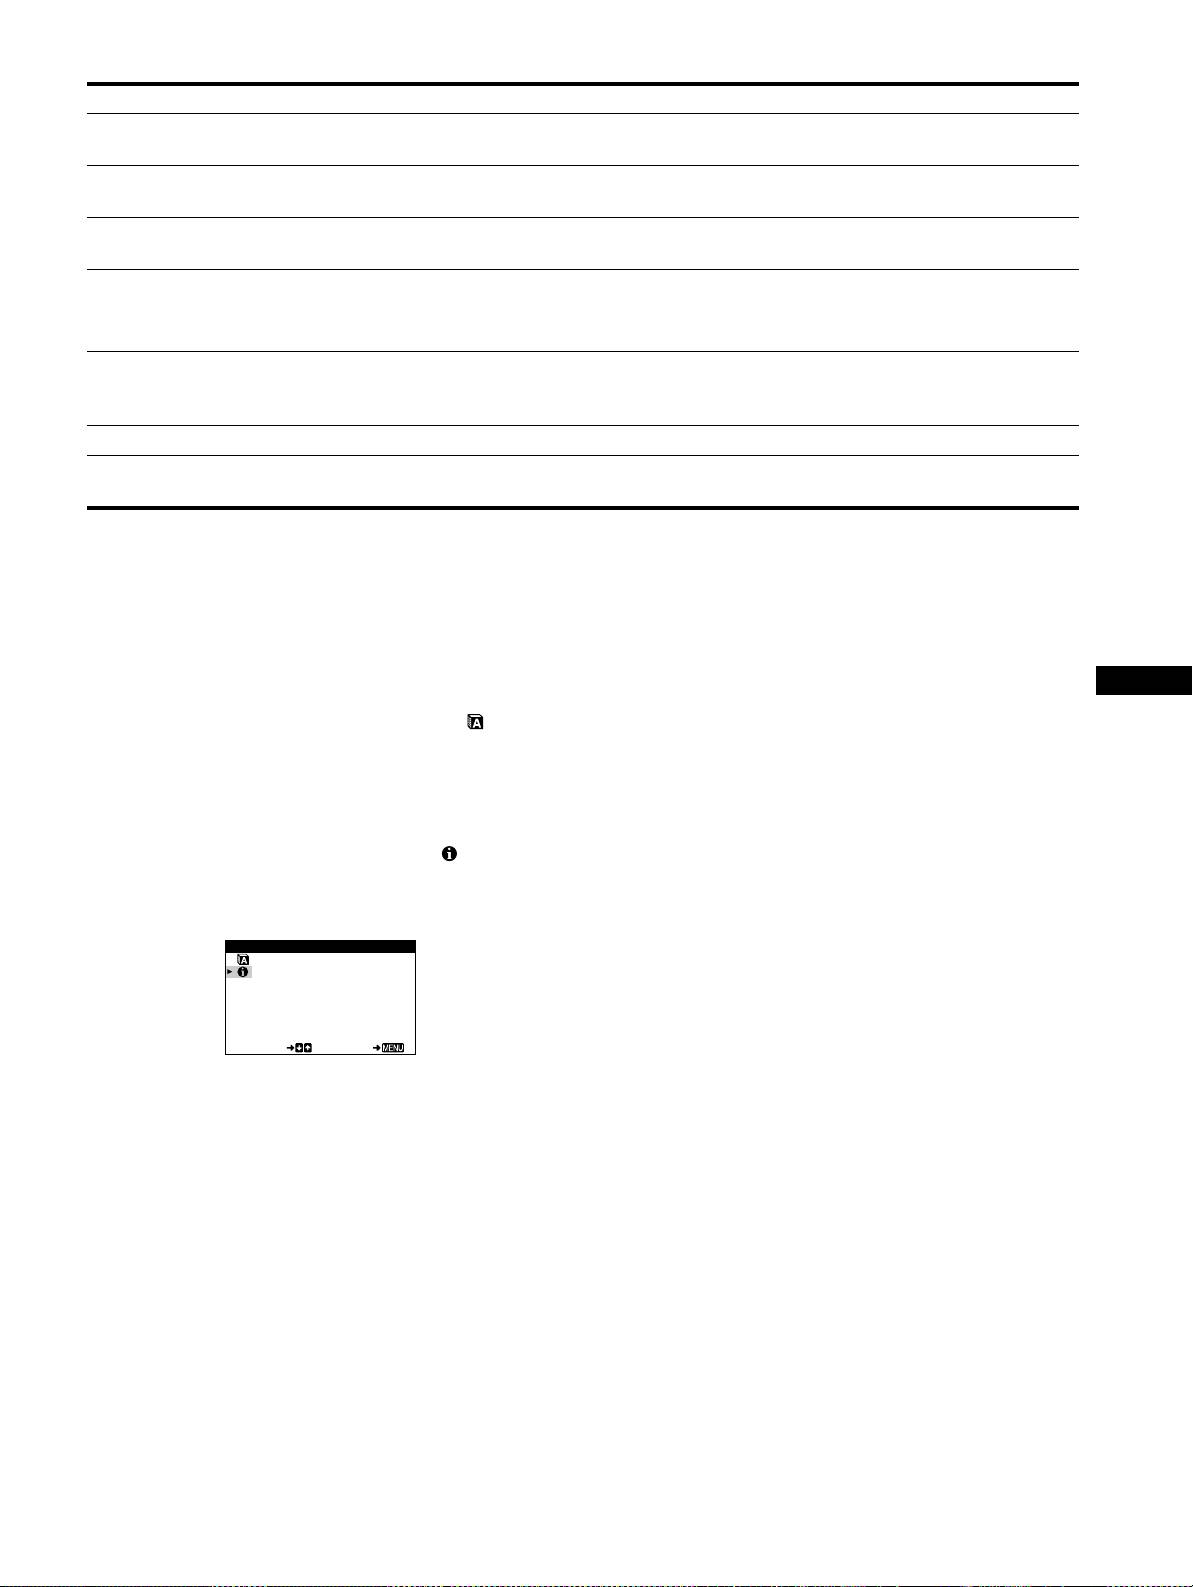
Displaying this monitor’s name, serial number,
If the problem persists, call your authorized Sony dealer and give
and date of manufacture (INFORMATION)
the following information.
• Model name: CPD-E100E
• Serial number
1
Press the center of the control button.
• Name and specifications of your computer and graphics board.
The main MENU appears on the screen.
GB
2
Move the control button m/M to highlight
LANGUAGE/INFORMATION and press the center of
the control button again.
The LANGUAGE/INFORMATION menu appears on the
screen.
3
Move the control button m/M to select
(INFORMATION).
This monitor’s information box appears on the screen.
Example
LANGUAGE / INFORMAT ION
MODEL :CPD- E100E
SERIAL:12345678
MANUFACTURED: 1999 - 52
SELECT EXI T
15
3-867-659-
CPD-E100E
11
(1)
Оглавление
- Table of Contents
- Setup
- Customizing Your Monitor
- Technical Features Troubleshooting
- Specifications
- Table des Matières
- Installation
- Personnalisation de votre
- Caractéristiques Dépannage techniques
- Spécifications
- Inhalt
- Anschließen des Geräts
- Einstellen des Monitors
- Technische Merkmale Störungsbehebung
- Technische Daten
- Índice
- Instalación
- Personalización del
- Características técnicas Solución de problemas
- Especificaciones
- Indice
- Installazione
- Personalizzazione del
- Caratteristiche Guida alla soluzione dei problemi
- Caratteristiche tecniche
- Содержание
- Подготовка к работе
- Подстройка монитора
- Технические особенности Устранение неисправностей
- Технические
- Appendix
