Sony KP-44PX2: Adjusting Colour Registration (Convergence)
Adjusting Colour Registration (Convergence): Sony KP-44PX2
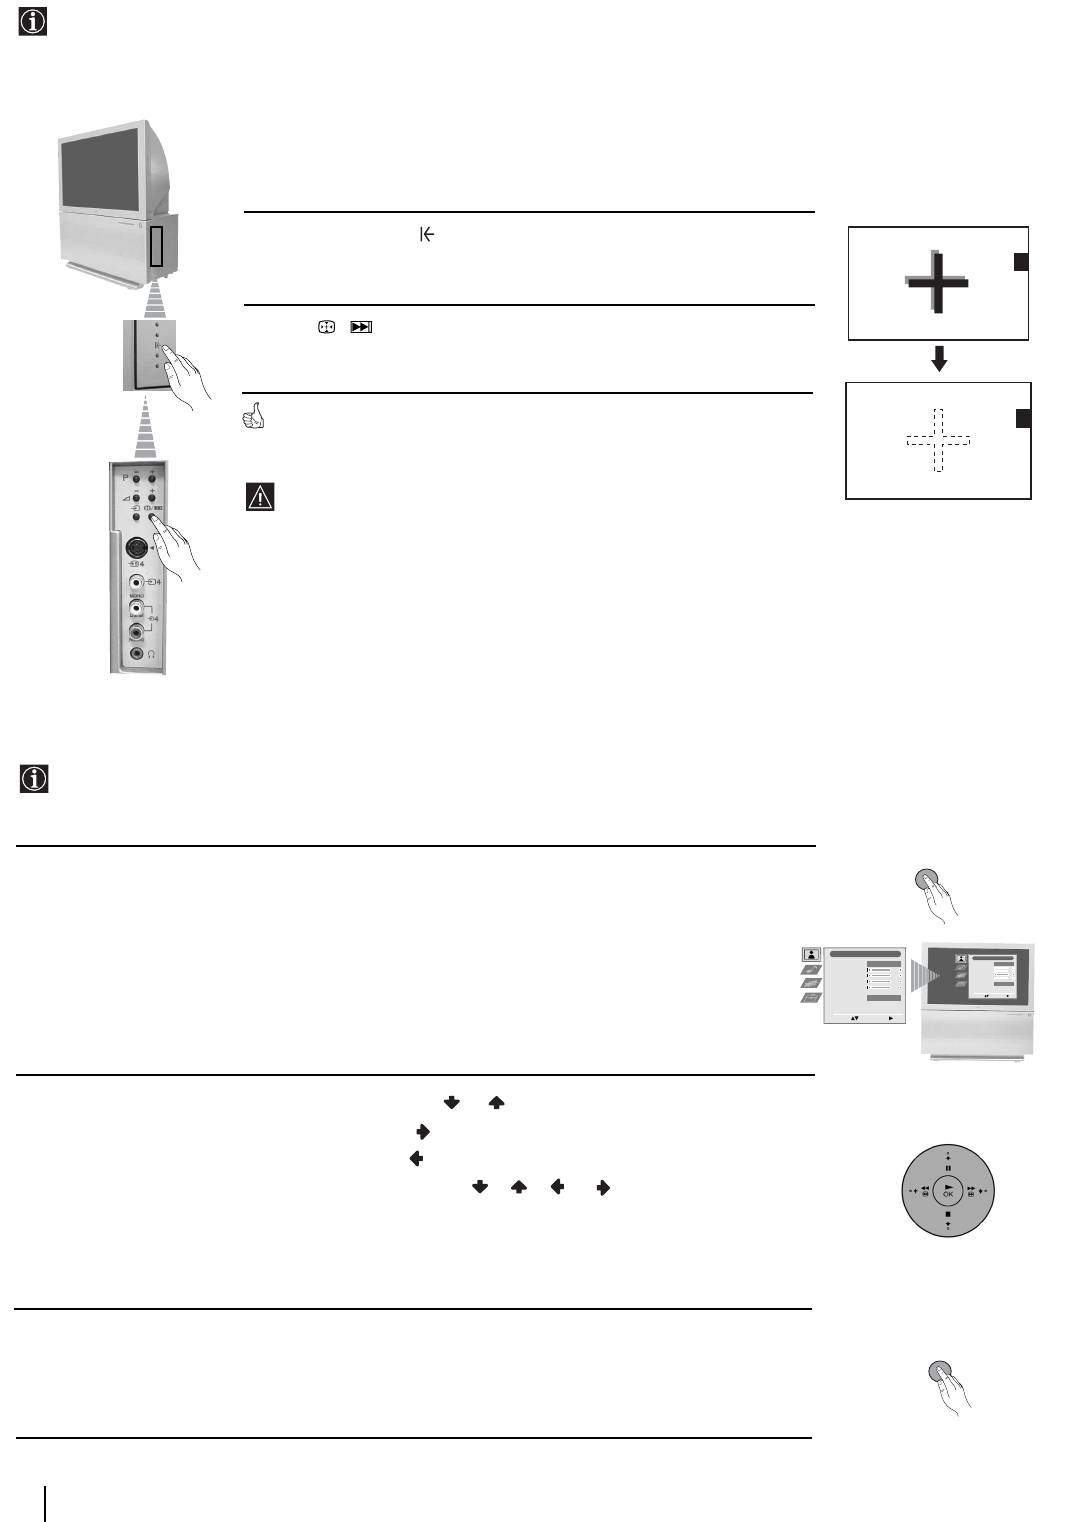
Adjusting Colour Registration (Convergence)
Due to the earth’s magnetism, the picture might become undefined and you could see different colours on the outlines of
the images.
In that case, proceed as follows.
Auto converge the Red, Green, and
Blue Lines
1 Press on the mark , on the right side of the projection TV.
2 Press / button.
The Auto Convergence function works for about 10 seconds. When the white
cross disappears from the screen, your projection TV is ready for use.
The Auto Convergence function does not work when:
• no signal is input.
• the input signal is weak.
• the screen is exposed to spotlights or direct sunlight.
• you watch the teletext broadcast.
• you watch NexTView.
Introducing and Using the Menu system
Your projection TV uses an on-screen menu system to guide you through the operations. Use the following buttons on the
Remote Control to operate the menu system:
MENU
1 Press the MENU button to switch the first level menu on.
Picture Adjustment
Picture Adjustment
Picture Mode
Personal
Picture Mode
Contrast
Personal
Contrast
Brightness
Brightness
Colour
Colour
Sharpness
Reset
Sharpness
Noise Reduction
AUTO
Reset
Noise Reduction
AUTO
Select: Enter Menu:
Select: Enter Menu:
2 • To highlight the desired menu or option, press or .
• To enter the selected menu or option, press .
• To return to the last menu or option, press .
• To alter the settings of your selected option, press //or.
• To confirm and store your selection, press OK.
3 Press the MENU button to remove the menu from the screen.
MENU
10
First Time Operation - Menu System
Оглавление
- Introduction
- Safety Information
- Overview of Remote Control Buttons
- Overview of Projection TV Buttons
- Connecting the Aerial and VCR
- Switching On the Projection TV and Automatically Tuning
- Adjusting Colour Registration (Convergence)
- On Screen display Menus Guide
- Menu Guide
- Teletext
- NexTView*
- Connecting Optional Equipment
- Using Optional Equipment
- SmartLink
- Remote Control Configuration for VCR/DVD
- Optimum Viewing Area
- Specifications
- Troubleshooting
- Увод
- Техника на безопасност
- Основно описание на бутоните на дистанционното управление
- Основно описание на бутоните на проекционен телевизор
- Свързване на антената и видеото
- Включване и автоматично настройване на телевизора
- Настройване на наслагването на цветовете (конвергенция)
- Cиcтeмa за бързо преминаване през менютата
- Водач на менютата
- Телетекст
- NexTView*
- Свързване на допълнителни апарати
- Боравене с допълнителни апарати
- SmartLink (Смартлинк)
- Конфигуриране на пулта за дистанционно управление на DVD или Видео апарата
- Оптимален ъгъл за гледане
- Характеристики
- Отстраняване на неизправности
- Úvod
- Všeobecný přehled tlačítek dálkového ovladače
- Všeobecný přehled tlačítek TV promítače
- Připojení antény a videa
- Zapnutí a automatické naladění TV promítače
- Seřízení prolínání barev (Konvergence)
- Stručný návod k volbě Menu
- Průvodce po menu
- Teletext
- NexTView*
- Připojení přídavných zařízení
- Použití přídavných zařízení
- SmartLink
- Instalace dálkového ovládání pro DVD nebo video
- Optimální úhel vidění
- Technické údaje
- Řešení problémů
- Bevezetés
- Biztonsági előírások
- A távvezérlő gombjainak áttekintése
- A projektoros TV gombjainak általános leírása
- Az antenna és a videomagnó csatlakoztatása
- A projektoros TV bekapcsolása és automatikus hangolás
- A színátfedések beállítása (Konvergencia)
- Gyors útmutató a menükben való mozgáshoz
- Útmutató a menükhöz
- Teletext
- NexTView*
- Választható készülékek csatlakoztatása
- Választható készülékek használata
- SmartLink
- A távvezérlő beállítása DVD-hez vagy videomagnóhoz
- Optimális látószög
- Műszaki jellemzők
- Problémamegoldás
- Wprowadzenie
- Informacje dotyczące bezpieczeństwa
- Ogólny przegląd przycisków pilota
- Ogólny przegląd przycisków telewizora
- Podłączanie anteny i magnetowidu
- Włączanie telewizora i automatyczne programowanie
- Regulacja dopasowania barw (Zbieżność)
- Krótki przewodnik po systemie menu
- Telegazeta
- NexTView*
- Podłączanie dodatkowych urządzeń
- Zastosowanie dodatkowych urządzeń
- SmartLink
- Konfigurowanie pilota do nastawiania DVD lub magnetowidu
- Optymalny kąt oglądania
- Dane techniczne
- Rozwiązywanie problemów
- Введение
- Общие правила техники безопасности
- Назначение кнопок на пульте дистанционного управления
- Общее описание кнопок проекциoннoгo телевизора
- Подключение антенны и видеомагнитофона
- Включение и автоматическая настройка проекциoннoгo телевизора
- Настройка совмещения цветов (Cведения)
- Быстрая справка для перемещения по меню
- Схема меню
- Телетекст
- NexTView*
- Подключение дополнительных устройств
- Использование дополнительных устройств
- Смартлинк
- Настройка пульта дистанционного управления для DVD или видеомагнитофона
- Оптимальный угол зрения
- Спецификации
- Устранение неполадок
