Sony STR-DE435: Unpacking Hookup Overview
Unpacking Hookup Overview: Sony STR-DE435
Getting Started
Unpacking Hookup Overview
Check that you received the following items with the
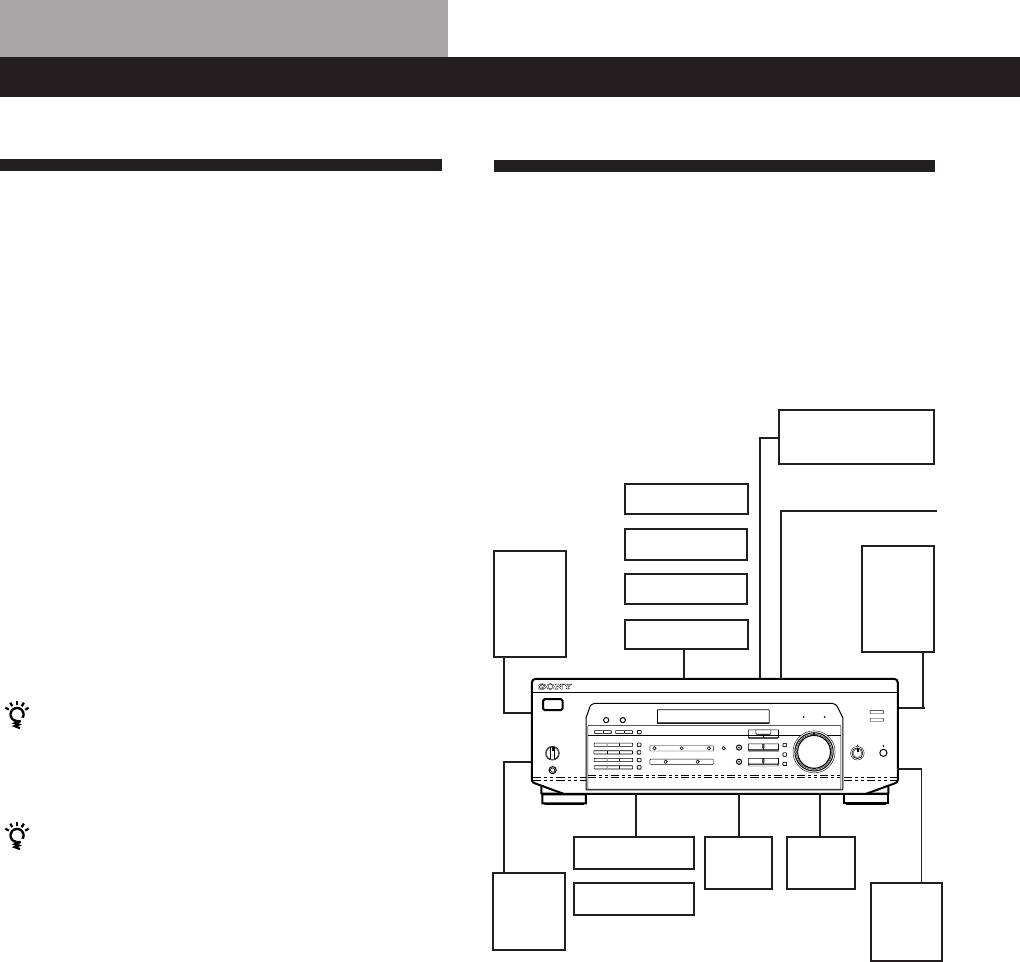
The receiver allows you to connect and control the
receiver:
following audio/video components. Follow the
• FM wire aerial (1)
hookup procedures for the components that you want
• AM loop aerial (1)
to connect to the receiver on the pages specified. To
• Remote commander (remote) (1)
learn the locations and names of each jack, see “Rear
• Operating instruction for remote commander (1)
Panel Descriptions” on page 31.
• Size AA (R6) batteries (2)
DVD player/AC-3
Video Component
decoder
Hookups (6)
Speaker
Aerial Hookups (5)
Inserting batteries into the remote
TV monitor
System
AM/FM aerial
Insert two size AA (R6) batteries in accordance with
Hookups (7)
TV tuner
the + and – markings on the battery compartment.
When using the remote, point it at the remote sensor g
Front
Front
LD player
speaker
speaker
on the receiver.
(L)
(R)
For details, refer to the operating instructions supplied
VCR
with your remote.
When to replace batteries
Under normal use, the batteries should last for about 6
months. When the remote no longer operates the
receiver, replace both batteries with new ones.
You cannot operate the following buttons on the
RM-PP402 remote
CD player
Centre
Active
speaker
woofer
• VIDEO2
Rear
• VIDEO3
MD/TAPE deck
Rear
speaker
speaker
• DVD
(L)
Audio Component
(R)
• PHONO
Hookups (5)
• SOUND FIELD A.F.D.
Before you get started
Notes
• Do not leave the remote in an extremely hot or humid
• Turn off the power to all components before making
place.
any connections.
• Do not use a new battery with an old one.
• Do not connect the mains lead until all of the
• Do not expose the remote sensor to direct sunlight or
connections are completed.
lighting apparatuses. Doing so may cause a malfunction.
• Be sure to make connections firmly to avoid hum
• If you don’t use the remote for an extended period of time,
and noise.
remove the batteries to avoid possible damage from
battery leakage and corrosion.
• When connecting an audio/video cable, be sure to
match the color-coded pins to the appropriate jacks
on the components: Yellow (video) to Yellow; White
(left, audio) to White; and Red (right, audio) to Red.
GB
4
Оглавление
- WARNING Precautions
- About This Manual
- Unpacking Hookup Overview
- Aerial Hookups
- Video Component Hookups
- Speaker System Hookups
- AC Hookups Before You Use Your Receiver
- Dolby Surround Setup
- Front Panel Parts Description
- Receiving Broadcasts
- Presetting Radio Stations
- Storing FM Stations Using the Radio Data System Automatically in Alphabetical (RDS) Order (“Auto-betical”)
- Enjoying Surround Sound
- Selecting a Sound Field
- Customizing Sound Fields
- Indexing Preset Stations and Recording Programme Sources
- Using the Sleep Timer
- Troubleshooting
- Specifications
- Glossary
- Receiving Broadcasts Presetting Radio Selecting a
- ВНИМАНИЕ! Меры
- Пояснения к настоящей
- Распаковка Общая схема соединений
- Подключение антенн
- Подключение видеоаппаратуры
- Подключение
- Подключение к сети
- Hacтpoйka cиcтembi Dolby
- Описание органов управления передней панели
- Прием радиопередач
- Ввод радиостанций в
- Автоматический ввод в Пользование системой память станций диапазона FM трансляции текстовых в алфавитном порядке данных (RDS) (“автоалфавитная настройка”)
- Использование объемного
- Выбор режима звука
- Установка звуковых полей
- Можно ввести название до Запись 8 знаков для
- Использование таймера
- Устранение неполадок
- Технические
- Глоссарий
- Прием Ввод Выбор радиопередач радиостанций в подключенной
- OSTRZEŻENIE Środki ostrożności
- Rozpakowanie elementów Ogólny opis montażu zestawu
- Podłączenie Anten
- Montaż Komponentów Wizualnych
- Montaż Systemu
- Montaż Obiegu Zasilania
- Konfiguracja systemu Dolby
- Opis Elementów Płyty Czołowej
- Odbiór Audycji Radiowych
- Kodowanie Radiowych Stacji Nadawczych pod
- Automatyczne i alfabetyczne Korzystanie z Serwisu zapisywanie radiowych stacji Radiowego Systemu Danych nadawczych w pamięci (RDS) sprzętu (funkcja “Auto-
- Korzystanie z Systemu
- Wybór Pola Akustucznego
- Przystosowanie Pól
- Indeksacja Zapisanych w Wykonywanie nagrań Pamięci Sprzętu Radiowych
- Korzystanie z timera
- Usuwanie usterek
- Dane Techniczne
- Słowniczek
- Odbiór Audycji Zapisywanie Wybór


