Sony STR-DE435: Front Panel Parts Description
Front Panel Parts Description: Sony STR-DE435
Location of Parts and Basic Amplifier Operations
Front Panel Parts Description
This chapter gives you the information on the location
and function of the buttons and controls on the front
panel and explains basic amplifier operations.
1
823 !º
9
7
4
56
GB
12
!
¡
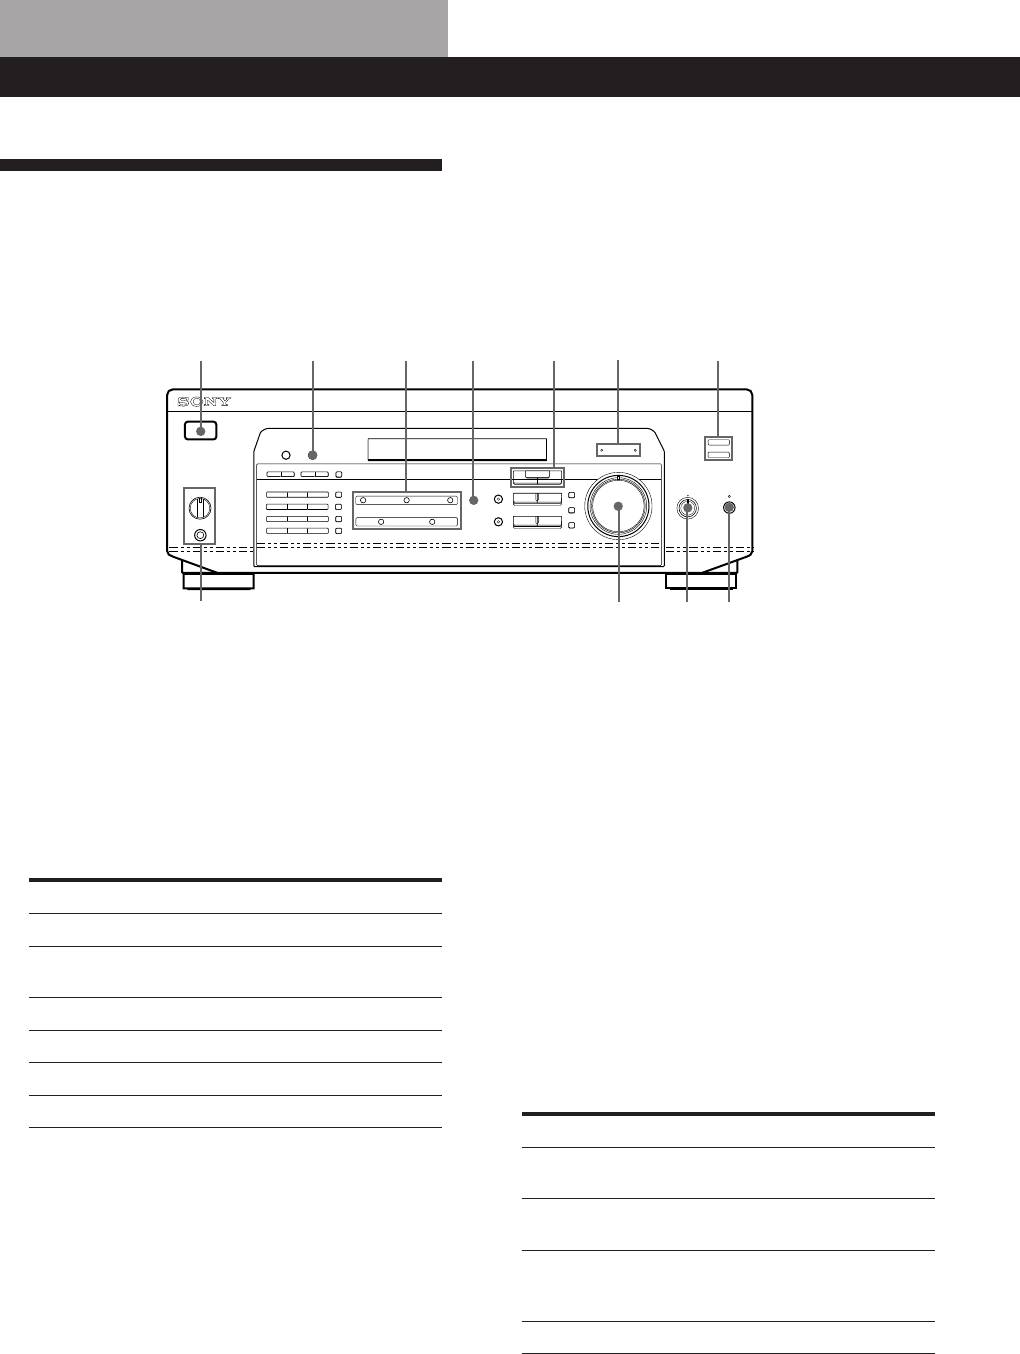
1 1/u switch
3 5.1 CH/DVD button
Press to turn the receiver on and off.
Press to select the component connected to the 5.1
CH/DVD jacks. The 5.1 CH/DVD indicator lights
Note
up when the component is selected.
Before you turn on the receiver, make sure that you have
turned the MASTER VOLUME control to the leftmost
4 MASTER VOLUME control
position to avoid damaging your speakers.
After turning on the component you selected, rotate
to adjust the volume.
2 Function buttons
Press to select the component you want to use.
5 MUTING button
To listen to or watch
Press
Press to mute the sound. The MUTING indicator
Video tapes
VIDEO
lights up when the sound is muted.
TV programmes or
TV/LD
6 BALANCE control
Laser discs
Rotate to adjust the balance of the front speakers.
MiniDiscs or audio tapes
MD/TAPE
Compact discs (CD)
CD
7 SPEAKERS selector
Set according to the front speakers you want to
Radio programmes
TUNER
drive.
DVD player/AC-3 decoder
5.1 CH/DVD
To select
Set to
Speakers connected to the SPEAKERS
A
After selecting the component, turn on the
FRONT A terminals
component you selected and play the program
source.
Speakers connected to the SPEAKERS
B
FRONT B terminals
Speakers connected to both the SPEAKERS
A + B*
FRONT A and B terminals (parallel
connection)
No front speaker output
OFF
Do not set to A+B when a sound field is turned on.
*
Be sure to connect the front speakers with nominal
impedance of 8 ohms or higher if you want to select both
sets of front speakers.
Location of Parts and Basic Amplifier Operations
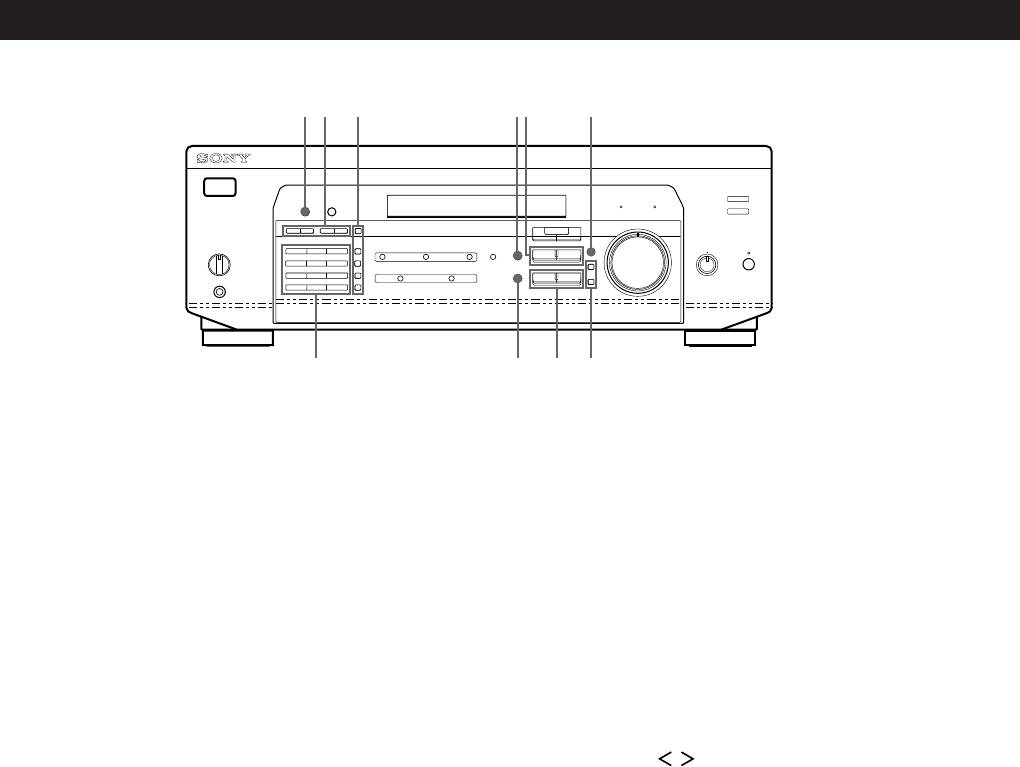
PHONES jack
9 Use the following buttons to enjoy surround sound.
Connects headphones.
For details, see “Enjoying Surround Sound”
starting from page 21.
Note
To use the headphones, set the SPEAKERS selector to OFF
SOUND FIELD ON/OFF button
to output sound to the headphones.
Press to turn the sound field on or off.
8 DISPLAY button
SOUND FIELD MODE +/– button
Press repeatedly to change the information on the
Press to select a sound field from the group you
display window as follows:
selected.
When a component other than tuner is selected
0 TONE button
Press to turn the tone effect on or off. The TONE
v
indicator lights up while the tone effect is turned
Index name of the component*
on.
v
Note that if you have adjusted the tone using the
Selected component
MENU </> and +/– buttons, the adjusted tone will
v
be produced whenever you turn on the tone effect.
Sound field applied to the component
BASS BOOST button
Press to increase the bass of the front speakers. The
BASS BOOST indicator lights up when the function
When the tuner is selected
is turned on.
v
Index name of the preset station* or
!¡ TONE indicator
programme station name**
Lights up while the tone effect is turned on.
v
Frequency
BASS BOOST indicator
v
Lights up while the bass boost is turned on.
Programme type indication**
v
When you want to enjoy high quality sound
Radio text**
Do the procedure below to bypass the sound control
circuits.
v
Current time**
1 Set SOUND FIELD ON/OFF to off.
v
2 Set TONE to off.
Sound field applied to the band or the preset
station
3 Set BASS BOOST to off.
The result will be a two-channel stereo sound output
Index name appears only when you have assigned one to the
*
from the front speakers that is highly faithful to the
component or the preset station (see page 25).
programme source.
These indications appear only during RDS reception (see page
**
18).
(continued)
GB
13
Location of Parts and Basic Amplifier Operations
GB
14
@
¡
!™ !£ !ª!∞ !¶
!¢ @º !§ !•
!™ The following buttons operate the built-in tuner.
!¢ The following buttons operate the built-in tuner.
For details, see “Receiving Broadcasts” starting
For details, see “Receiving Broadcasts” starting
from page 16. Note that these buttons are operable
from page 16. Note that these buttons are operable
only when the tuner is selected.
only when the tuner is selected.
PRESET/PTY SELECT +/– buttons
Numeric buttons (1 to 0)
Press to scan the stations by programme type or to
Inputs the numeric value.
scan all preset stations.
SHIFT button
TUNING +/– buttons
Selects a memory page for preset stations.
Press to scan all the available radio stations.
DIRECT button
!£ The following buttons operate the built-in tuner.
Press to enter a station's frequency directly.
For details, see “Receiving Broadcasts” starting
from page 16. Note that the PTY button is operable
!∞ MENU buttons (
/ )
only when the tuner is selected.
After pressing the SUR, NAME, BASS/TREBLE or
SET UP button, use these buttons to make specific
RDS PTY button
settings (see pages 11, 23 and 25).
Press to start or to scan stations by programme
type.
!§ +/– buttons
After pressing MENU buttons, use these buttons to
RDS EON button
make specific settings (see pages 11, 23 and 25).
Press to automatically switch to a station currently
broadcasting traffic announcements, news, or
information programme. The RDS EON button
does not function during AM reception.
FM/AM button
Selects the FM or AM band.
FM MODE button
If “STEREO” flashes in the display and the FM
stereo reception is poor, press this button. You will
not have the stereo effect but the sound is
improved.
MEMORY button
Press to perform Auto-betical Select (see page 18) or
to memorize a preset station.

Location of Parts and Basic Amplifier Operations
!¶ SET UP button
Press this button repeatedly to select any of the
following two indications. The selected indication
appears in the display and you will be able to make
various settings using the cursor buttons.
When you've
You can
displayed
CTR MODE
Select any one of the four centre
modes (page 10)
REAR GAIN
Increase the range of rear speakers by
5 dB (page 11)
!• Press the following buttons to name preset stations
or programme sources. For details, see “Indexing
Preset Stations and Programme Sources” on page
25.
NAME button
Press to enter a name for preset stations and
programme sources (except 5.1 CH/DVD).
ENTER button
Press to store the names.
!ª SUR button
Press this button to adjust sound parameters (see
page 23).
@º BASS/TREBLE button
Press this button to adjust the tone (see page 23).
@¡ DIMMER button
Press this button to set the display at any of four
levels of brightness.
GB
15
Оглавление
- WARNING Precautions
- About This Manual
- Unpacking Hookup Overview
- Aerial Hookups
- Video Component Hookups
- Speaker System Hookups
- AC Hookups Before You Use Your Receiver
- Dolby Surround Setup
- Front Panel Parts Description
- Receiving Broadcasts
- Presetting Radio Stations
- Storing FM Stations Using the Radio Data System Automatically in Alphabetical (RDS) Order (“Auto-betical”)
- Enjoying Surround Sound
- Selecting a Sound Field
- Customizing Sound Fields
- Indexing Preset Stations and Recording Programme Sources
- Using the Sleep Timer
- Troubleshooting
- Specifications
- Glossary
- Receiving Broadcasts Presetting Radio Selecting a
- ВНИМАНИЕ! Меры
- Пояснения к настоящей
- Распаковка Общая схема соединений
- Подключение антенн
- Подключение видеоаппаратуры
- Подключение
- Подключение к сети
- Hacтpoйka cиcтembi Dolby
- Описание органов управления передней панели
- Прием радиопередач
- Ввод радиостанций в
- Автоматический ввод в Пользование системой память станций диапазона FM трансляции текстовых в алфавитном порядке данных (RDS) (“автоалфавитная настройка”)
- Использование объемного
- Выбор режима звука
- Установка звуковых полей
- Можно ввести название до Запись 8 знаков для
- Использование таймера
- Устранение неполадок
- Технические
- Глоссарий
- Прием Ввод Выбор радиопередач радиостанций в подключенной
- OSTRZEŻENIE Środki ostrożności
- Rozpakowanie elementów Ogólny opis montażu zestawu
- Podłączenie Anten
- Montaż Komponentów Wizualnych
- Montaż Systemu
- Montaż Obiegu Zasilania
- Konfiguracja systemu Dolby
- Opis Elementów Płyty Czołowej
- Odbiór Audycji Radiowych
- Kodowanie Radiowych Stacji Nadawczych pod
- Automatyczne i alfabetyczne Korzystanie z Serwisu zapisywanie radiowych stacji Radiowego Systemu Danych nadawczych w pamięci (RDS) sprzętu (funkcja “Auto-
- Korzystanie z Systemu
- Wybór Pola Akustucznego
- Przystosowanie Pól
- Indeksacja Zapisanych w Wykonywanie nagrań Pamięci Sprzętu Radiowych
- Korzystanie z timera
- Usuwanie usterek
- Dane Techniczne
- Słowniczek
- Odbiór Audycji Zapisywanie Wybór


