Sony CDX-M600R – страница 2
Инструкция к Автомагнитоле Sony CDX-M600R

Presetting different settings for
Presetting the RDS
each preset station
stations with the AF and
1 Select an FM band, and tune in the
desired station (page 16).
TA data
2 Press (AF/TA) repeatedly to select either
When you preset RDS stations, the unit stores
“AF on,” “TA on” or “AF TA on” (for both
each station’s data as well as its frequency, so
AF and TA functions).
you don’t have to turn on the AF or TA
function every time you tune in the preset
Tip
station. You can select a different setting (AF,
If you select the mode using the buttons on the
TA, or both) for individual preset stations, or
unit, press (AF) and/or (TA) to select “AF on” and/
the same setting for all preset stations.
or “TA on.”
Presetting the same setting for all
3 Press the desired number button of the
preset stations
unit until “MEM” appears.
Repeat from step 1 to preset other stations.
1 Select an FM band (page 16).
Tip
2 Press (AF/TA) repeatedly to select either
If you want to change the preset AF and/or TA
“AF on,” “TA on” or “AF TA on” (for both
setting after you tune in the preset station, you
AF and TA functions).
can do so by turning the AF or TA function on or
off.
Note that selecting “AF TA off” stores not
only RDS stations, but also non-RDS
stations.
Tip
If you select the mode using the buttons on the
unit, press (AF) and/or (TA) to select “AF on” and/
or “TA on.” Note that selecting “AF off” or “TA
off” stores not only RDS stations, but also
non-RDS stations.
3 Press (MENU), then press M or m
repeatedly until “BTM” appears.
4 Press , until “BTM” flashes.
5 Press (ENTER).
21

1 Press (DSPL/PTY) during FM reception
Locating a station by
until “PTY” appears.
programme type
You can locate the station you want by
selecting one of the programme types shown
below.
The current programme type name appears
if the station is transmitting the PTY data.
Programme types Display
“- - - - -” appears if the received station is
News News
not an RDS station, or if the RDS data has
Current Affairs Affairs
not been received.
Information Info
Sports Sport
2 Press M or m repeatedly until the desired
programme type appears.
Education Educate
The programme types appear in the order
Drama Drama
shown in the table. Note that you cannot
Culture Culture
select “None” (Not specified) for searching.
Science Science
Varied Varied
Popular Music Pop M
Rock Music Rock M
Easy Listening Easy M
Light Classical Light M
3 Press (ENTER).
The unit starts searching for a station
Classical Classics
broadcasting the selected programme type.
Other Music Type Other M
Weather Weather
Finance Finance
Children’s Programmes Children
Social Affairs Social A
Religion Religion
Phone In Phone IN
Travel Travel
Leisure Leisure
Jazz Music Jazz
Country Music Country
National Music Nation M
Oldies Music Oldies
Folk Music Folk M
Documentary Document
Not specified None
Note
You cannot use this function in some countries
where no PTY (Programme Type selection) data is
available.
22
With Optional Equipment
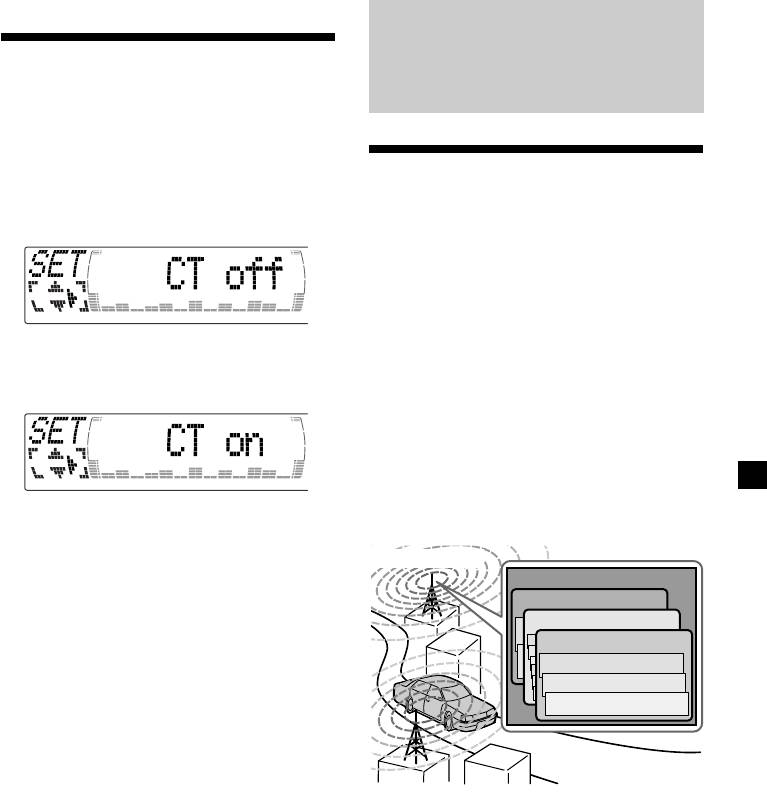
Setting the clock
DAB
automatically
The CT (Clock Time) data from the RDS
transmission sets the clock automatically.
Overview of DAB
1 During radio reception, press (MENU),
then press M or m repeatedly until “CT”
DAB (Digital Audio Broadcasting) is a new
appears.
multimedia broadcasting system that transmits
audio programmes with a quality comparable
to that of CDs. This is made possible by the use
of a microcomputer in the DAB tuner which
uses the radio signals sent from multiple
aerials and multi-path signals (reflected radio
waves) to boost the strength of the main signal.
This makes DAB almost immune to radio
2 Press , repeatedly until “CT on”
interference even in a moving object such as a
appears.
car.
The clock is set.
Each DAB station bundles radio programmes
(services) into an ensemble which it then
broadcasts. Each service contains one or more
components. All ensembles, services, and
components are identified by name, so you can
access any of them without having to know
their frequencies.
3 Press (ENTER) to return to the normal
display.
DAB programme
Ensemble
To cancel the CT function
Service
Select “CT off” in step 2.
Service
Service
Notes
Component
• The CT function may not work even though an
RDS station is being received.
Component
• There might be a difference between the time
Component
set by the CT function and the actual time.
Notes
• The DAB system is actually in a testing phase.
This means some services have not been
sufficiently defined or are presently being tested.
At present, such services are not supported by
the optional DAB tuner unit XT-100DAB.
• DAB programmes are broadcast in Band-III (174
to 240 MHz) and L-Band (1,452 to 1,492 MHz),
with each band divided into channels (41 in
Band-III and 23 in L-Band). One ensemble is
broadcast per channel by each DAB station.
• When you change the mode from FM3 to DAB,
all the AF TA modes stay active.
• When you change any of the AF TA modes in
DAB, that mode stays active in FM1.
23
Receiving the memorised services
Basic operations of DAB
Following procedure is available after
presetting the service. For details on presetting
Searching for the Ensemble and
the services, refer to “Presetting DAB services
automatically,” (page 25) and “Presetting DAB
Service
services manually” (page 25).
— Automatic Tuning
1 Press (SOURCE) repeatedly to select the
1 Press (SOURCE) repeatedly to select the
tuner.
tuner.
2 Press (MODE) repeatedly to select
2 Press (MODE) repeatedly to select
“DAB.”
“DAB.”
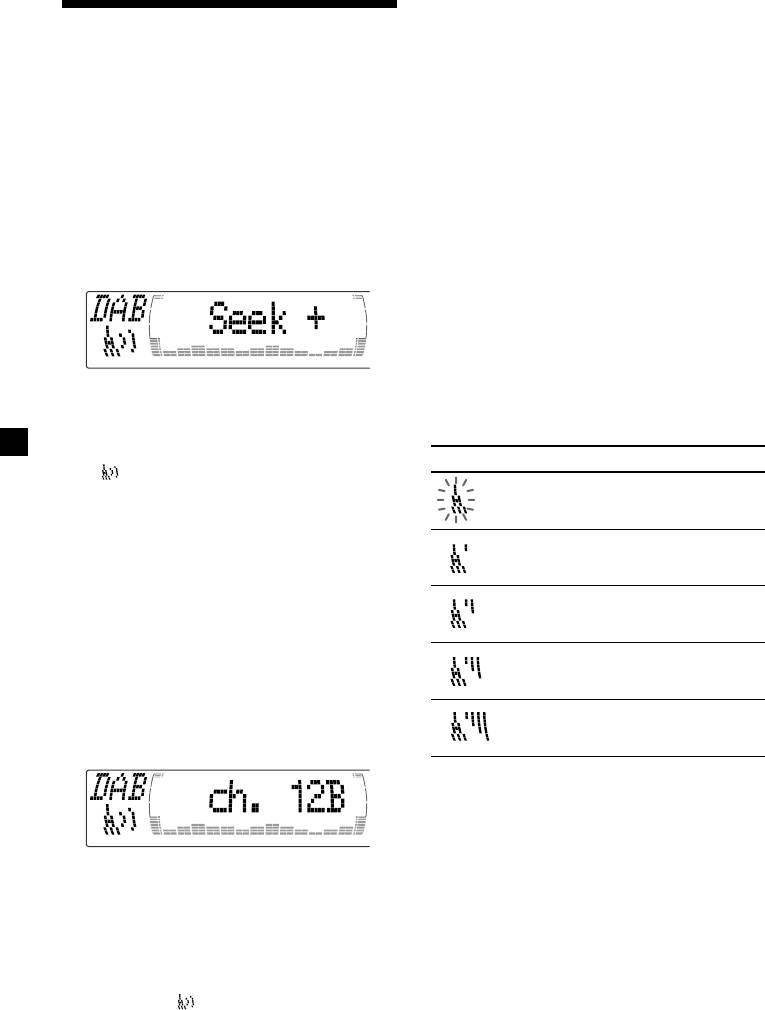
3 Press and hold < or , until “Seek +” or
“Seek –” appears.
3 Press M or m repeatedly to select the
preset service.
Tip
There is another way to receive the preset service.
Press the number buttons ((1) to (6)) of the unit
on which the desired service is stored.
4 Press < or , to search the desired
The receiving mode of the DAB tuner is
service.
displayed according to the chart below:
Note
Indication Level Receive mode
The “
” indication flashes while the unit is
searching for the Ensemble.
(flash) 0 cannot receive
Selecting the Ensemble
— Manual Tuning
1 poor reception
If you know the channel number of Ensemble,
follow the procedure below to tune in.
2 so-so
1 Press (SOURCE) repeatedly to select the
tuner.
3 moderate
2 Press (MODE) repeatedly to select
“DAB.”
4 good reception
3 Press M or m until “Ch. XXX” appears.
4 Press M or m repeatedly until the desired
channel number appears.
Tips
• More than one channel may broadcast the same
Ensemble.
• If you select the Ensemble service but cannot
receive it, the “
” indication flashes.
24
Presetting DAB services
Presetting DAB services
automatically — BTM
manually
— Manual Preset Memory
The BTM (Best Tuning Memory) function picks
You can also preset DAB services manually or
out DAB ensembles and automatically assigns
delete a service which is already preset. Note
the services within the ensembles to preset
that up to 40 services (preset either by the BTM
service numbers. The unit can preset up to 40
function or manually) can be preset to the
services. If services have been previously set,
unit’s memory.
the BTM function operates under the following
conditions:
1 While listening to a DAB programme,
•If you activate the BTM function while
press (MENU).
listening to a preset service, the unit will
store detected services (by overwriting) only
to preset numbers higher than that of the
2 Press M or m repeatedly until
current present service.
“PresetEdit” appears, then press
•If you activate the function while listening to
(ENTER).
a service that is not preset, the unit will
replace the contents of all preset numbers.
3 Select the service and the preset number
•In both cases above, if the unit detects a
you want to preset.
service that is identical to one already preset,
the previously stored service remains
1 Press < or , to select the service.
unchanged and the newly detected service is
not preset.
2 Press M or m to select the preset
number.
1 While listening to a DAB programme,
press (MENU).
2 Press M or m repeatedly until “BTM”
appears.
3 Press (ENTER).
3 Press (ENTER).
A beep sounds when the service is stored.
4 Press M or m to select “Over Wrt.”
After activating the BTM function, the unit
Each time you press m, the edit command
tunes the service assigned in the preset
changes as follows:
memory 1 automatically.
B Over Wrt B Insert* B Delete
Note
If the unit can only tune in a few services, the BTM
function may not assign services to all the preset
* “Insert” does not appear if the maximum
service numbers.
number of services (40) is already preset in
memory.
To preset other services, repeat steps 3 and
4.
5 Press (ENTER).
25

Replacing the services in preset
Tip
To check the name of the current component,
memories
ensemble or service, press (LIST) repeatedly until
Press M or m to select “Over Wrt” in step 4,
the respective list appears in the display. The name
then press (ENTER).
of the currently selected item flashes.
Adding the services in preset
Changing the display item
memories
When you press (LIST) once, the list selected
last time appears.
Press M or m to select “Insert” in step 4, then
Each time you press (LIST), the list changes as
press (ENTER).
follows:
Erasing the services in preset
V
memories
ENS (Ensemble list)
Press M or m to select “Delete” in step 4, then
V
press (ENTER).
SRV (Service list)
V
Tip
CMP (Component list)
There is another way to preset the service.
V
After receiving the service, press the number
PRS (Preset list)
buttons ((1) to (6)) of the unit until a beep
V
sounds.
DAB (Cancel)
Automatic updating of the
Listening to a DAB
ensemble list
When you perform the BTM function for the
programme
first time, all the ensembles available in your
area are automatically stored. When you
Follow the procedure below to tune in a DAB
perform the BTM function again, the contents
programme manually.
of these lists are updated in accordance with
You can also store DAB services in the unit’s
the conditions described on page 25.
memory for instant tuning (see “Presetting
An ensemble is added to the respective list
DAB services automatically (BTM)” on page
when it is received during Automatic Tuning
25).
or Manual Tuning but is unlisted.
An unlisted ensemble is also deleted from the
1 While listening to a DAB programme,
respective list when:
press (LIST) repeatedly until the
•you select an ensemble from the list, but it
Ensemble List appears.
cannot be received.
•you perform Automatic Tuning or Manual
Tuning to receive a listed ensemble, service,
2 Press M or m until the desired ensemble
or the component, but it cannot be received.
appears, then press (ENTER).
3 Press (LIST) repeatedly to until the
Service List appears.
4 Press M or m repeatedly until the desired
service appears, then press (ENTER).
5 Press (LIST) repeatedly until the
Component List appears.
6 Press M or m until the desired component
appears, then press (ENTER).
26
Settings on the audio
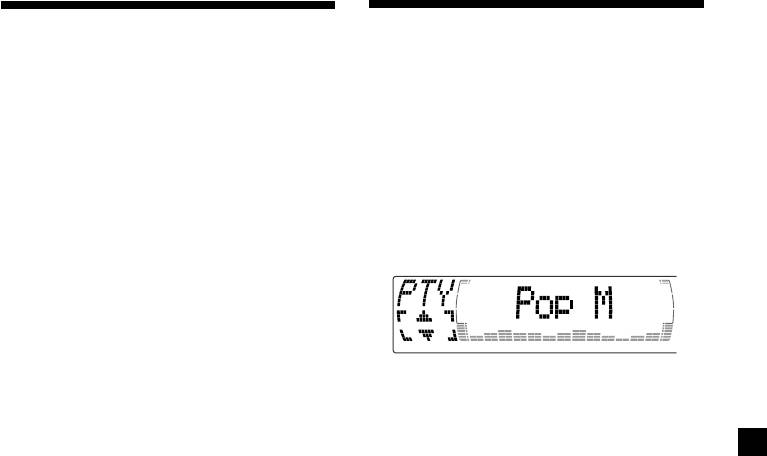
Locating a DAB service by
reception
programme type (PTY)
DAB can contain multi-channel audio. You can
You can use the PTY (Programme type
select main or sub-channel for reception. Also,
selection) function to tune in the programme
if you turn on the DRC (Dynamic Range
you want.
Control) function, the dynamic range on the
service which supports DRC can automatically
1 While listening to a DAB programme,
be extended.
press (DSPL/PTY).
The following items can be set:
•Main/Sub — to selects chennel between
“Main”(main-cannel) and “Sub”(sub-cannel).
2 Press M or m repeatedly to select the
•DRC — to turn on or off the function.
programme type.
1 While listening to a DAB programme,
press (MENU).
2 Press M or m repeatedly until “DRC” or
The programme types appear in the order
“Main (or Sub)” appears.
shown on the page 22.
3 Press < or , to select the desired
3 Press (ENTER).
setting (Example: “on” or “off” ).
4 Press (ENTER).
Note
“Main (or Sub)” appears in the menu only when
the unit is receiving a multi-channel programme.
27
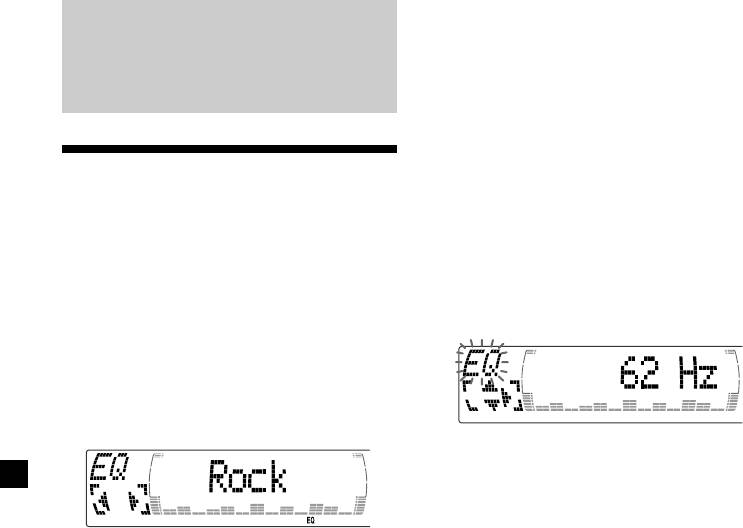
Adjusting the equalizer curve
1 Press (MENU).
DSP (CDX-M700R only)
2 Press M or m repeatedly until “EQ Tune”
appears.
Setting the equalizer
3 Press (ENTER).
You can select an equalizer curve for five
music types (Rock, Vocal, Groove, Techno, and
4 Press < or , to select the desired
Custom).
equalizer curve.
You can store and adjust the equalizer settings
Rock y Vocal y Groove y Techno y
Custom y off
for frequency and level.
Selecting the equalizer curve
5 Press (ENTER).
1 Press (SOURCE) to select a source (tuner,
CD, or MD).
2 Press (SOUND) repeatedly until “EQ”
appears.
6 Press < or , to select the desired
frequency.
62 Hz y 157 Hz y 396 Hz y 1.0 kHz y
2.5 kHz y 6.3 kHz y 16.0 kHz
7 Press M or m to select the desired level.
3 Press < or , to select the desired
The volume is adjustable by 1 dB steps
equalizer curve.
from –12 dB to +12 dB.
Rock y Vocal y Groove y Techno y
To restore the factory-set equalizer curve,
Custom y off
press (ENTER) for two seconds.
To cancel the equalizing effect, select “off.”
8 Press (MENU) twice.
After three seconds, the display returns to
When the effect setting is complete, the
the normal playback mode.
normal playback mode appears.
28
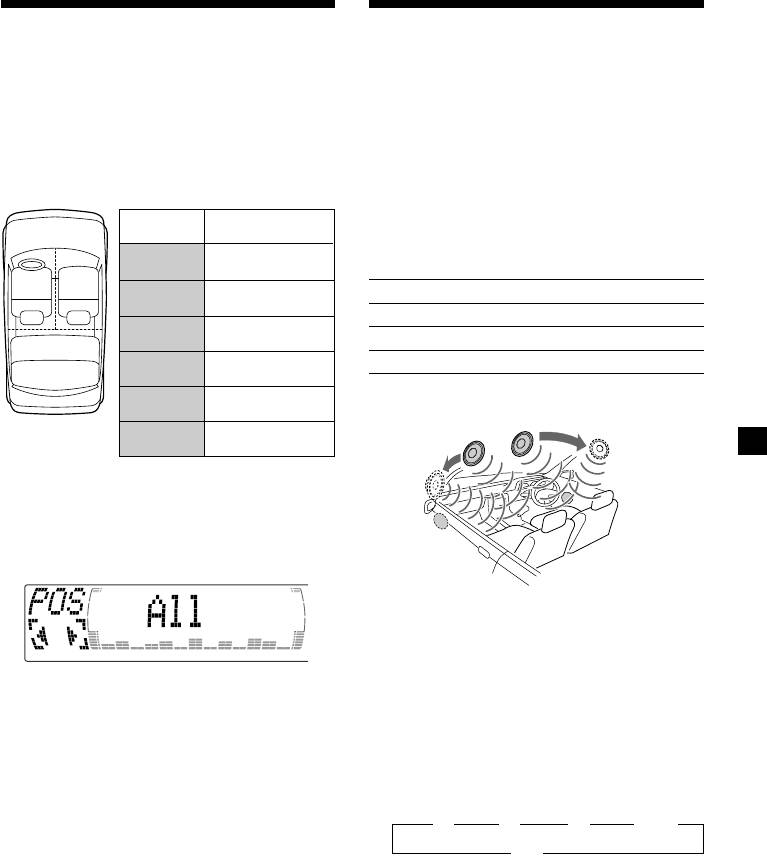
Selecting the listening
Selecting a soundstage
position
menu
— Dynamic Soundstage Organizer (DSO)
You can set a delayed time for the sound to
reach the listeners from the speakers.
If your speakers are installed into the lower
In this way, the unit can simulate a natural
part of the doors, the sound will come from
sound field so that you feel as if you are in the
below and may not be clear.
centre of the sound field no matter where you
The DSO (Dynamic Soundstage Organizer)
sit in the car.
function creates a more ambient sound as if
there were speakers in the dashboard (virtual
Display
Centre of sound
speakers).
window
field
POS
Normal setting
Soundstage menu
All
(1 + 2 + 3)
1
2
POS
Front part
Memory presets Meaning
Front
(1 + 2)
DSO1 – 3 Virtual speakers (Standard)
POS
Right front (2)
Front-R
DSO Wide Virtual speakers (Wide)
3
POS
DSO off Cancel
Left front (1)
Front-L
POS
Rear part (3)
Image of virtual speakers
Rear
1
*
POS
1
2
*
*
Cancel
off
2
*
3
1 Press (SOURCE) to select a source (tuner,
*
CD, or MD).
3
*
2 Press (SOUND) momentarily until “POS”
appears.
*
1
Standard
*
2
Wide
*
3
Acutual speakers position (lower part of the
front doors).
Selecting the DSO
3 Press < or , to select the desired
listening position.
1 Press (SOURCE) to select a source (tuner,
All y Front y Front-R y Front-L y Rear y
CD, or MD).
off
The listening positions appear in the order
2 Press (DSO) repeatedly to select the
shown above.
desired DSO mode.
B 1 B 2 B 3 B Wide
To cancel the POS mode, select “off.”
off
bb
b
bb
After three seconds, the display returns to
the normal playback mode.
To cancel the DSO mode, select “off.”
After three seconds, the display returns to
the normal playback mode.
29

Adjusting the cut-off frequency
Adjusting the balance
and the output volume level for
the front/rear speakers
(BAL)
To match the characteristics of the installed
speaker system, you can adjust the output
You can adjust the sound balance from the left
volume level and select the cut-off frequency
and right speakers.
of the speakers.
Cut-off frequency
1 Press (SOURCE) to select a source (tuner,
CD, or MD).
Level
2 Press (SOUND) repeatedly until “BAL”
appears.
Frequency (Hz)
1 Press (MENU).
3 Press < or , to adjust the balance.
After three seconds, the display returns to
the normal playback mode.
2 Press M or m repeatedly to select “Front
HPF” or “Rear HPF”
3 Press (ENTER).
Adjusting the front and
rear fader
1 Press (SOURCE) to select a source (tuner,
CD, or MD).
4 Press < or , to select the cut-off
frequency.
2 Press (SOUND) repeatedly to select the
off y 78 Hz y 99 Hz y 125 Hz y 157 Hz y
“F” for the front speakers or “R” for the
198 Hz
rear speakers.
5 Press M or m to adjust the volume level.
The volume is adjustable by 1 dB steps
from –12 dB to +12 dB.
Tip
When you lower the volume all the way down,
3 Press < or , to adjust the volume of
“ATT” appears and the cut-off frequency is
front/rear speakers.
disabled.
After three seconds, the display returns to
the normal playback mode.
6 Press (MENU) twice.
When the effect setting is complete, the
normal playback mode appears.
30
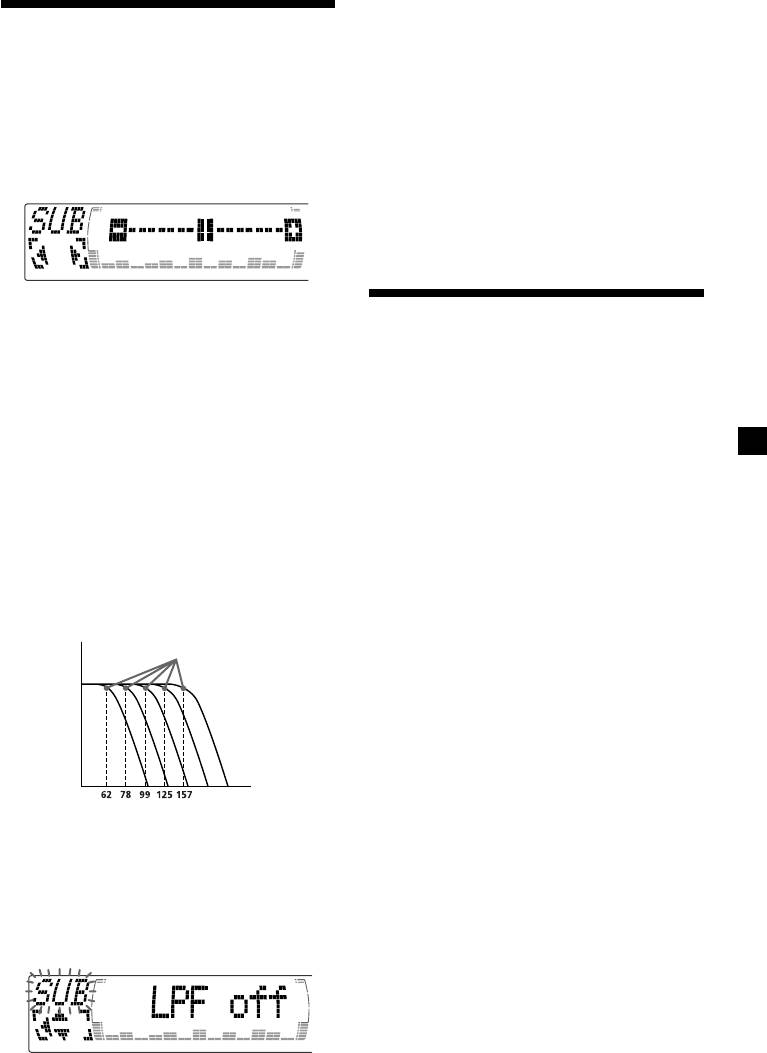
4 Press < or , to select the desired cut-
Adjusting the volume of
off frequency.
The cut-off frequency in the display
the subwoofer(s)
changes as follows:
62 y 78 y 99 y 125 y 157 y off
1 Press (SOURCE) to select a source (tuner,
CD, or MD).
5 Press M or m to adjust the volume.
2 Press (SOUND) repeatedly until “SUB”
6 Press (MENU) twice.
appears.
After the frequency setting is complete, the
display returns to the normal playback
mode.
3 Press < or , to adjust the volume.
Listening to each
After three seconds, the display returns to
the normal playback mode.
programme source in its
Tip
registered DSO
When you press (VOL) repeatedly to adjust the
— Source Sound Memory (SSM)
volume all the way down, “Sub ATT” appears and
the cutout frequency of the subwoofer is disabled.
Each time you return to the same source, you
can hear the same DSO menu and equalizer
Adjusting the frequency of the
curve registered for that source, even after
subwoofer(s)
changing the programme source or turning the
unit off and then on again.
To match the characteristics of the connected
subwoofer(s), you can cut out the unwanted
high and middle frequency signals entering
the subwoofer(s). By setting the cut-off
frequency (see the diagram below), the
subwoofer(s) will output only low frequency
signals so you can get a clearer sound image.
Cut-off frequency
Level
Frequency (Hz)
1 Press (MENU).
2 Press (MENU) repeatedly until “SUB LPF”
appears.
3 Press (ENTER).
31
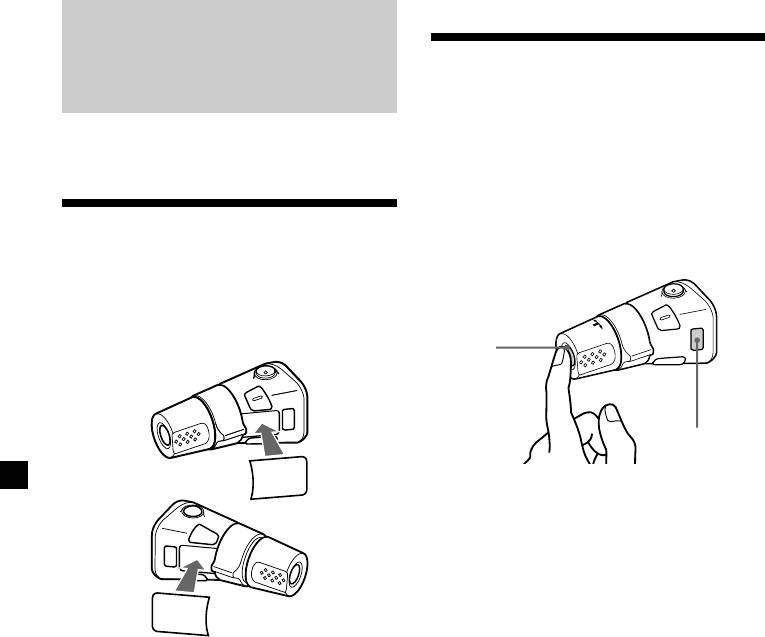
Using the rotary
Other Functions
commander
The rotary commander works by pressing
You can also control the unit with a rotary
buttons and/or rotating controls.
commander (optional).
You can also control an optional CD/MD unit
with the rotary commander.
By pressing buttons
Labelling the rotary
(the SOURCE and MODE buttons)
commander
Depending on how you mount the rotary
commander, attach the appropriate label as
shown in the illustration below.
(SOURCE)
(MODE)
SOUND
MODE
DSPL
Each time you press (SOURCE), the
source changes as follows:
Tuner t CD t MD*
* If the corresponding optional equipment is
DSPL
not connected, this item will not appear.
MODE
SOUND
Pressing (MODE) changes the operation
in the following ways:
• Tuner: FM1 t FM2 t FM3 t MW t LW
• CD unit: CD1 t CD2 t …
• MD unit*: MD1 t MD2 t …
* If the corresponding optional equipment is
not connected, the item will not appear.
32
By rotating the control
Other operations
(the SEEK/AMS control)
Rotate the VOL control to
adjust the volume.
Press (ATT) to
attenuate the
sound.
OFF
Press (OFF) to
turn off the unit.
Press (SOUND) to
Rotate the control momentarily and
adjust sound menu.
release it to:
•Locate a specific track on a disc. Rotate
and hold the control until you locate the
specific point in a track, then release it to
start playback.
Press (DSPL) to display
•Tune in stations automatically. Rotate and
the memorised names.
hold the control to find a specific station.
Tip
If your car has no ACC (accessory) position on the
By pushing in and rotating the
ignition key switch, be sure to press (OFF) for two
control (the PRESET/DISC control)
seconds to turn off the clock indication after
turning off the engine.
Push in and rotate the control to:
•Receive the stations memorised on the
number buttons.
•Change the disc.
33

Changing the operative direction
The operative direction of controls is factory-
Adjusting the sound
set as shown below.
characteristics (CDX-M600R only)
To increase
You can adjust the bass, treble, balance, and
fader.
You can store the bass and treble levels
independently for each source.
1 Select the item you want to adjust by
To decrease
pressing (SOUND) repeatedly.
Each time you press (SOUND), the item
If you need to mount the rotary commander
changes as follows:
on the right hand side of the steering column,
BAS (bass) t TRE (treble) t BAL (left-right)
you can reverse the operative direction.
t FAD (front-rear)
2 Adjust the selected item by pressing <
or ,.
When adjusting with the rotary
commander, press (SOUND) and rotate the
VOL control.
Note
Adjust within three seconds after selecting the
item.
Press (SOUND) for two seconds while
pushing the VOL control.
Tip
Attenuating the sound
You can also change the operative direction of
these controls with the unit (see “Changing the
sound and display settings” on page 35).
Press (ATT) on card remote commander
or the rotary commander.
“ATT on” appears momentarily.
To restore the previous volume level, press
(ATT) again.
Tip
When the interface cable of a car telephone is
connected to the ATT lead, the unit decreases the
volume automatically when a telephone call comes
in (Telephone ATT function).
34

1 Press (MENU).
Changing the sound and
2 Press M or m repeatedly until the desired
display settings
item appears.
Each time you press m, the item changes as
The following items can be set:
follows:
Set (setting)
Example
•Clock (page 9)
Clock t CT t Beep t RM t English/
Spanish/Portuguese/Swedish t D.Info t SA
•CT (Clock Time) (page 23)
1
t Dimmer t Contrast t M.Dspl t A.Scrl*
•Beep — to turn the beeps on or off.
2
2
2
t EQ tune*
t Front HPF*
t Rear HPF*
t
•RM (Rotary Commander) — to change the
2
SUB LPF*
operative direction of the controls of the
1
*
When no CD or MD is playing, this item will
rotary commander.
not appear.
— Select “norm” to use the rotary
2
*
CDX-M700R only
commamder as the factory-set position.
— Select “rev” when you mount the rotary
Note
commander on the right side of the
The displayed item will differ depending on
steering column.
the source.
•English/Spanish/Portuguese/Swedish — to
Tip
change the display language to English,
You can easily switch among categories (“Set,“
Spanish, Portuguese or Swedish.
“Snd,“ “P/M“ (Play Mode) and “Dis“) by
Dis (Display)
pressing M or m for two seconds.
•Dimmer — to change the brightness of the
display.
3 Press , to select the desired setting
— Select “Auto” to dim the display only
(Example: on or off) or press < or ,
when you turn the lights on.
repeatedly to select the frequency
— Select “on” to dim the display.
(Example: off, 78 Hz or 125 Hz).
— Select “off” to deactivate Dimmer.
For the “Contrast” setting, pressing ,
•Contrast — to adjust the contrast if the
makes the contrast higher, and pressing <
indications in the display are not
makes the contrast lower.
recognisable because of the unit’s installed
position.
4 Press (ENTER).
•D.Info (Dual Information) — to display the
After the mode setting is completed, the
clock and the play mode at the same time (on)
display returns to normal play mode.
or to display the information alternately (off).
•M.Dspl (Motion Display) — to turn the
motion display on or off.
1
•A.Scrl (Auto Scroll)*
(page 11)
Snd (Sound)
2
•EQ Tune*
(Equalizer tuning) — to adjust the
frquency and volume level of equalizer
curve.
2
•Front HPF*
(High pass filter for the front
pre-output) — to select the cut-off frequency
of the front pre-output.
2
•Rear HPF*
(High pass filter for the rear pre-
output) — to select the cut-off frequency of
the rear pre-output.
•SUB LPF (Low pass filter for the subwoofer
2
output)*
— to select the roll off frequency of
the subwoofer output.
35
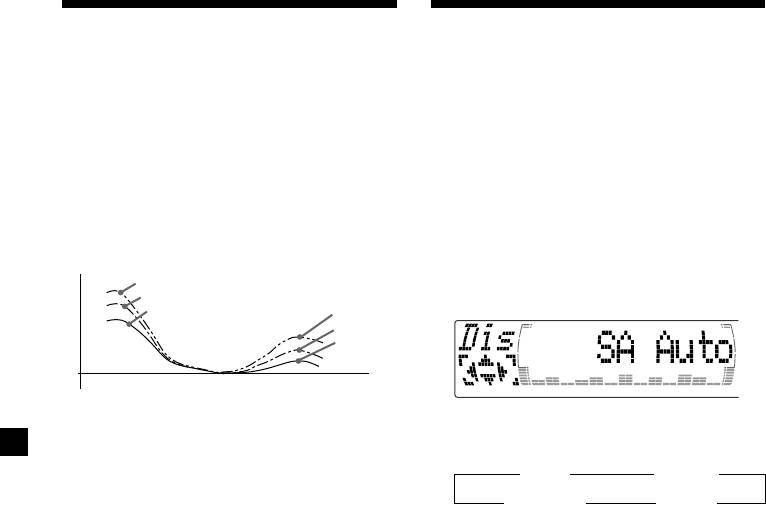
Boosting the bass sound
Selecting the spectrum
— D-bass (CDX-M600R only)
analyser
You can enjoy a clear and powerful bass
The sound signal level is displayed on a
sound.
spectrum analyser. You can select a display
The D-bass function boosts the low and high
pattern from 1 to 6, or the automatic display
frequency signal with a sharper curve than
mode.
conventional bass boost.
You can hear the bass line more clearly even
1 Press (SOURCE) to select a source (tuner,
while the vocal volume remains the same. You
CD, or MD).
can emphasize and adjust the bass sound
easily with the D-BASS button.
2 Press (MENU).
D-BASS 3
D-BASS 2
Level
3 Press M or m repeatedly until “SA” appears.
D-BASS 1
D-BASS 3
D-BASS 2
D-BASS 1
0dB
Frequency (Hz)
Adjusting the bass curve
4 Press < or , repeatedly to select the
desired setting.
Press (D-BASS) repeatedly to select the
B SA 1 bB … SA 6 b
desired bass curve.
As the D-BASS number increases so does
B SA Auto* bB SA off b
the effect.
* All of these display patterns appear one by
D-BASS 1 t D-BASS 2 t D-BASS 3 t D-BASS off
one automatically.
Note
5 Press (ENTER).
The bass sound may distort at same volume. If the
bass sound distorts, select less effective bass curve.
36
Additional
Adjusting the sound and
Information
frequency of the equalizer
preamplifier
(CDX-M600R only)
This unit can also control an optional equalizer
Maintenance
preamplifier.
This lets you add some effects to the sound
field of the currently selected source.
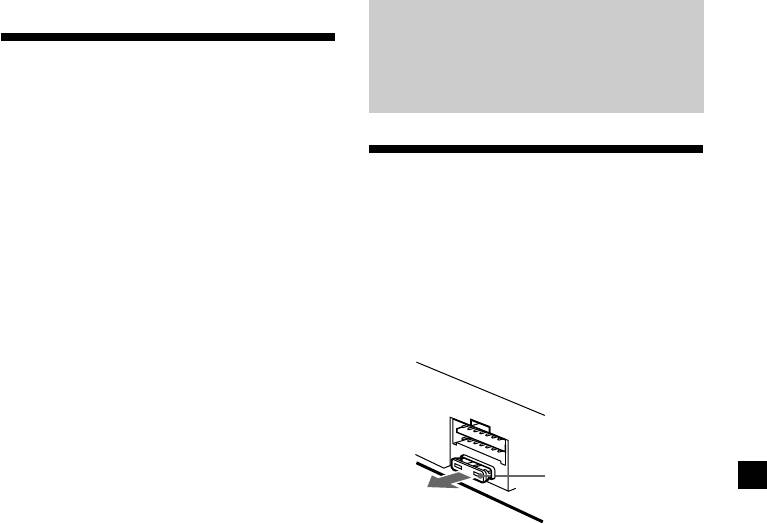
Fuse replacement
When replacing the fuse, be sure to use one
For details, refer to the instructions manual
matching the amperage rating stated on the
supplied with the equalizer preamplifier.
original fuse. If the fuse blows, check the
power connection and replace the fuse. If the
fuse blows again after replacement, there may
be an internal malfunction. In such a case,
consult your nearest Sony dealer.
Fuse (10 A)
Warning
Never use a fuse with an amperage rating
exceeding the one supplied with the unit as
this could damage the unit.
37
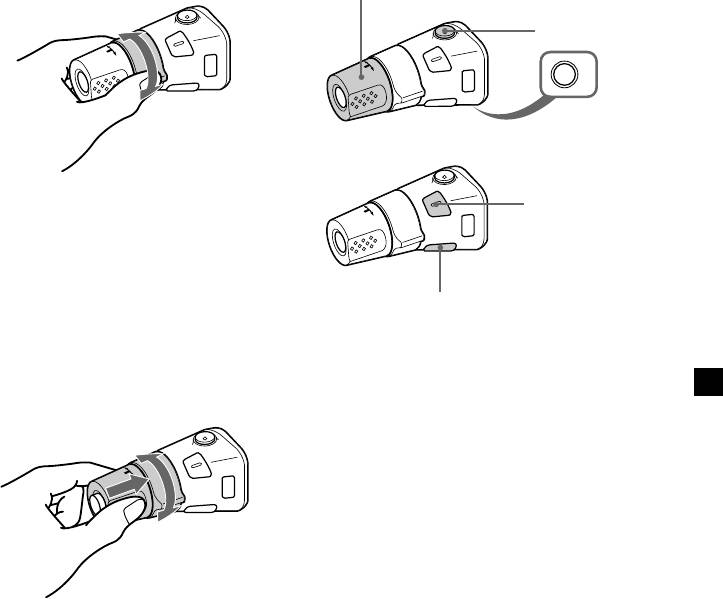
Replacing the lithium battery
When the battery becomes weak, the range of
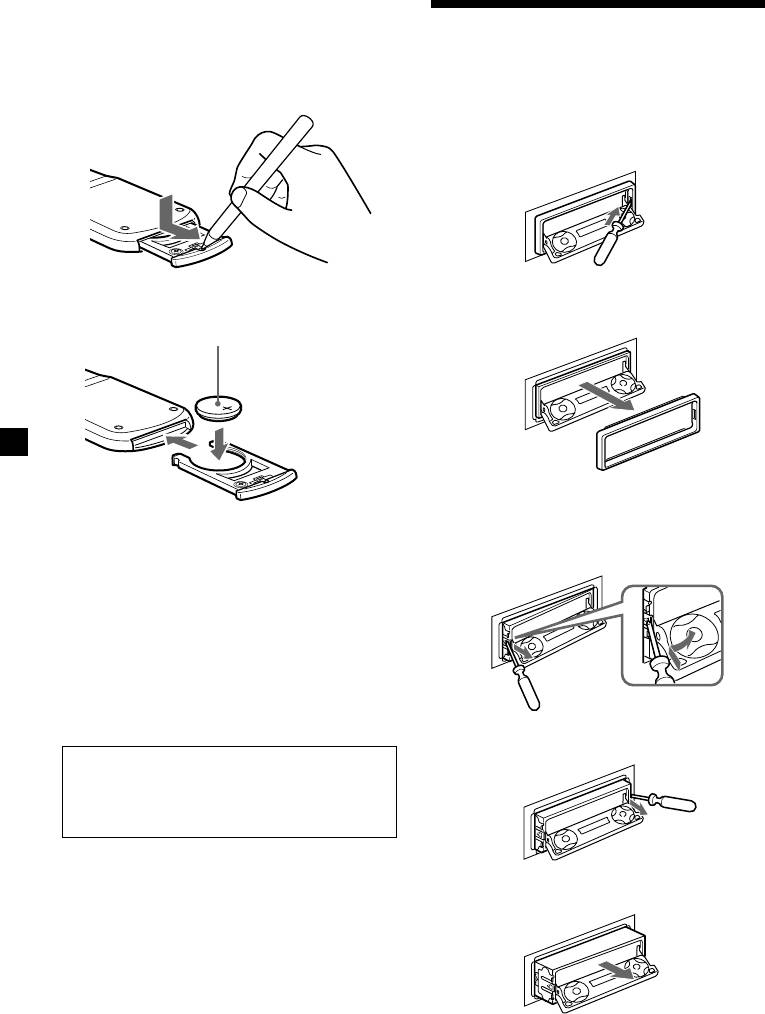
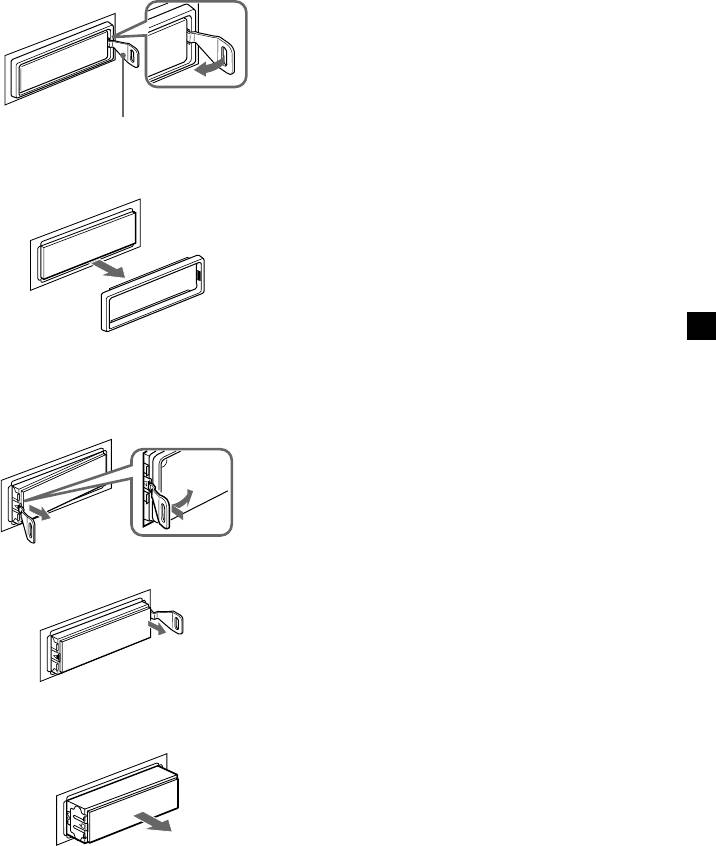
Dismounting the unit
the card remote commander becomes shorter.
Replace the battery with a new CR2025 lithium
With the front panel open
battery.
1 Press (OPEN) of the unit, then press the
clip inside the front cover with a thin
screwdriver, and gently pry the front
cover free.
x
2 Repeat step 1 on the left side.
The front cover is removed.
+ side up
3 Use a thin screwdriver to push in the clip
on the left side of the unit, then pull out
Notes on lithium battery
the left side of the unit until the catch
•Keep the lithium battery out of the reach of
clears the mounting.
children. Should the battery be swallowed,
immediately consult a doctor.
•Wipe the battery with a dry cloth to assure a
good contact.
•Be sure to observe the correct polarity when
installing the battery.
•Do not hold the battery with metallic
tweezers, otherwise a short-circuit may
occur.
4 Repeat step 3 on the right side.
WARNING
Battery may explode if mistreated.
Do not recharge, disassemble, or dispose of
in fire.
5 Slide the unit out of the mounting.
38
If the front panel does not open
because of a blown fuse
1 Press the clip inside the front cover with
a release key (supplied), and pry the
front cover free.
Release key (supplied)
2 Repeat step 1 on the left side.
The front cover is removed.
3 Use a release key to push in the clip on
the left side of the unit, then pull out the
left side of the unit until the catch clears
the mounting.
4 Repeat step 3 on the right side.
5 Slide the unit out of the mounting.
39

Specifications
MD player section
General
1
Signal-to-noise ratio 90 dB
Outputs Audio outputs*
Frequency response 10 – 20,000 Hz
Power aerial relay control
Wow and flutter Below measurable limit
lead
Power amplifier control
lead
Tuner section
Inputs Telephone ATT control lead
FM
Illumination control lead
Tuning range 87.5 – 108.0 MHz
Tone controls (CDX-M600R only)
Aerial terminal External aerial connector
Bass ±9 dB at 100 Hz
Intermediate frequency 10.7 MHz/450 kHz
Treble ±9 dB at 10 kHz
Usable sensitivity 8 dBf
Power requirements 12 V DC car battery
Selectivity 75 dB at 400 kHz
(negative ground)
Signal-to-noise ratio 66 dB (stereo),
Dimensions Approx. 178 × 50 × 182 mm
72 dB (mono)
(w/h/d)
Harmonic distortion at 1 kHz
Mounting dimensions Approx. 182 × 53 × 163 mm
0.6 % (stereo),
(w/h/d)
0.3 % (mono)
Mass Approx. 1.5 kg
Separation 35 dB at 1 kHz
Supplied accessories Card remote commander
Frequency response 30 – 15,000 Hz
RM-X95 (CDX-M700R only)
RM-X96 (CDX-M600R only)
MW/LW
Parts for installation and
Tuning range MW: 531 – 1,602 kHz
connections (1 set)
LW: 153 – 279 kHz
Optional accessories Rotary commander
Aerial terminal External aerial connector
RM-X4S
Intermediate frequency 10.7 MHz/450 kHz
BUS cable (supplied with an
Sensitivity MW: 30 µV
RCA pin cord)
LW: 40 µV
RC-61 (1 m), RC-62 (2 m)
Compact disc single
adaptor CSA-8
Power amplifier section
Optional equipment CD changer (10 discs)
Outputs Speaker outputs
CDX-828, CDX-737
Speaker impedance 4 – 8 ohms
MD changer (6 discs)
Maximum power output 50 W × 4 (at 4 ohms)
MDX-65
Other CD/MD units with
the Sony-BUS system
Source selector
XA-C30
DAB tuner unit
XT-100DAB
Digital equalizer
2
preamplifier*
XDP-210EQ, XDP-4000X
1
*
Equipped with front, rear and sub outputs:
CDX-M700R only
Equipped with front and rear outputs:
CDX-M600R only
2
*
CDX-M600R only
Design and specifications are subject to change
without notice.
40

