Sony KV-36FS70K: Operation
Operation: Sony KV-36FS70K
7
+
–
+
–
PROGR
CONTROL
Operation
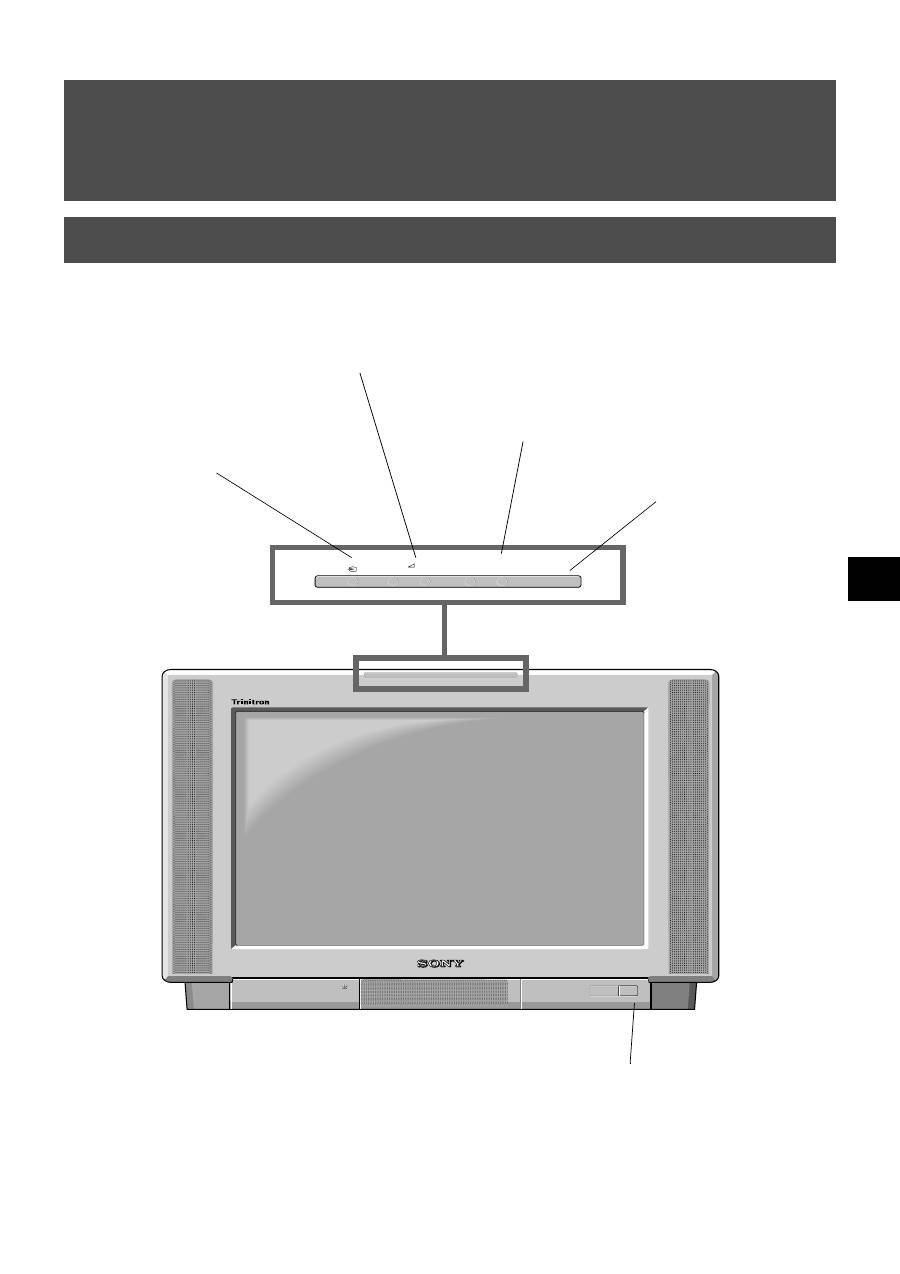
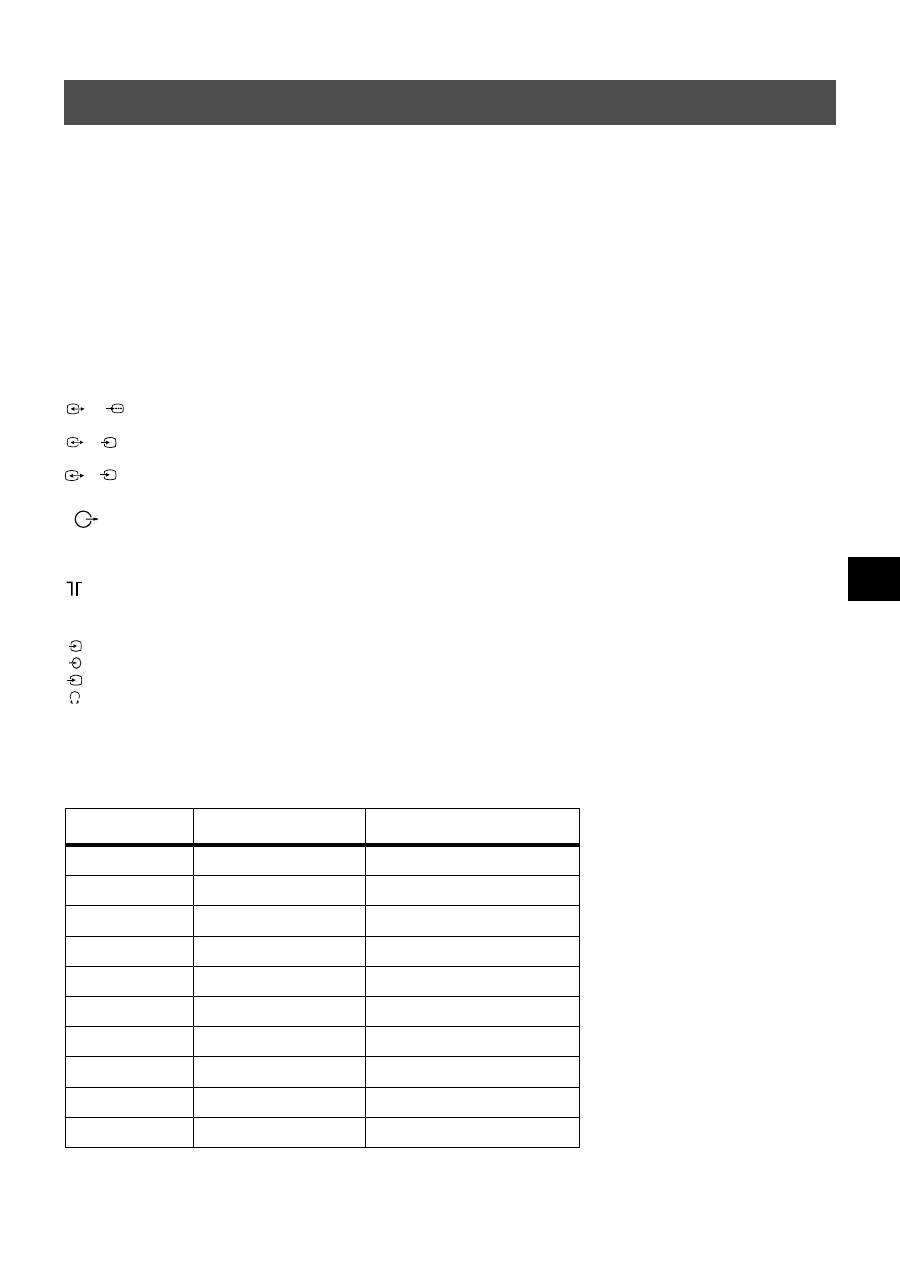
Overview of the TV set buttons
Volume control buttons.
Press to increase (+) /
decrease (-) volume.
Video input button.
Press to select
the input
signals from VCR etc.
CONTROL button
Press to activate and
illuminate the control panel.
On/Off switch.
Press to switch TV on and off.
Programme Up (+) or
Down (-) buttons.
Press to select TV
channels.
8
Operation
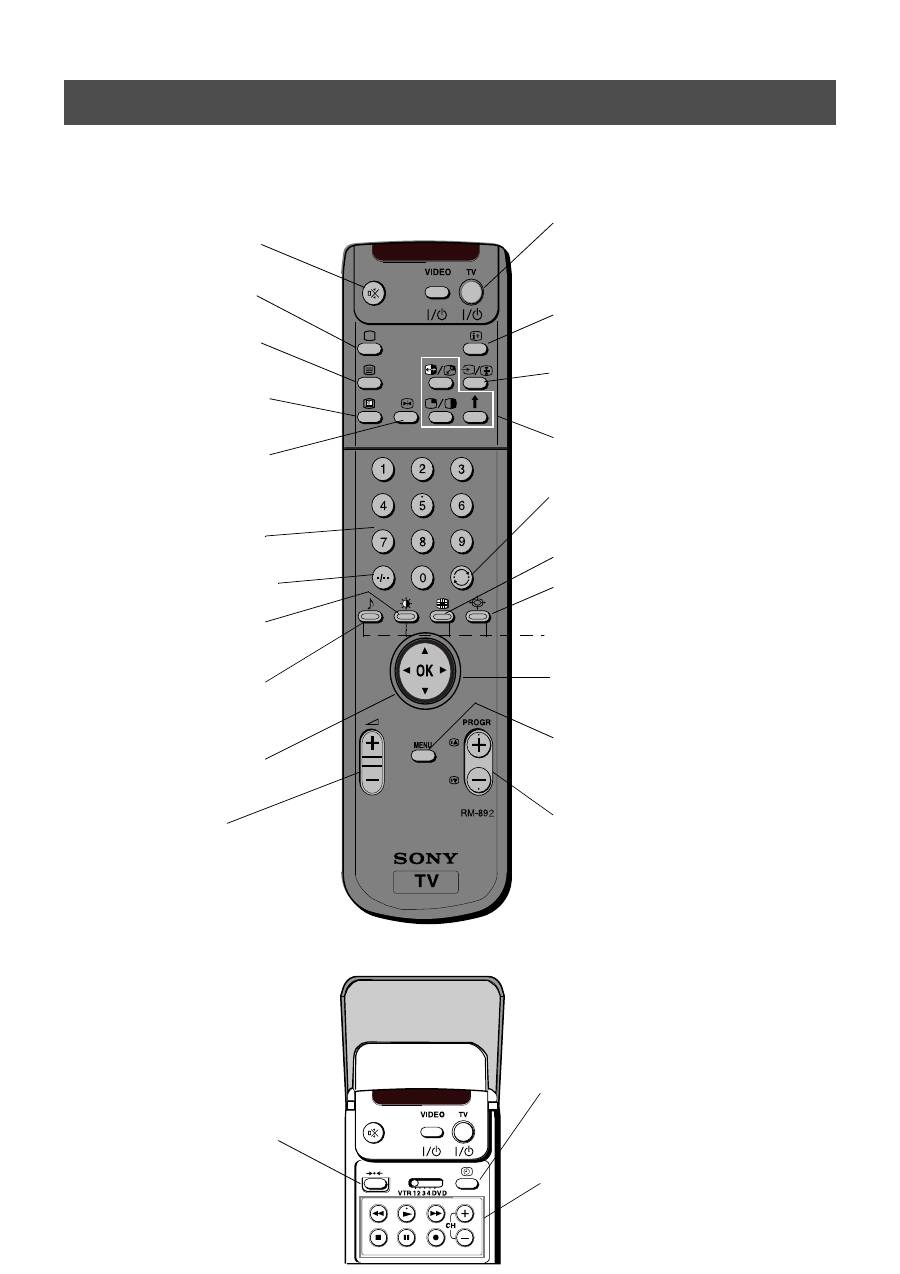
Overview of the remote control buttons
To temporarily switch off TV
Press to temporarily switch off TV. Press again to switch on
from standby mode. To save energy, we recommend
switching off completely when TV is not in use. NOTE:
After 15-30 minutes without a TV signal and without any
button being pressed, the TV switches automatically into
standby mode.
To reveal on screen information
Press to reveal all on-screen indications. Press again to
cancel. In Teletext mode, press to reveal the index page
(normally page 100).
To select input signal or freeze teletext
Press to select inputs from the TV sockets (see Using
Optional Equipment section). In Teletext mode, press to
freeze the displayed page. Press once again to cancel.
Please refer to the ‘Operating PAP’ section of this
instruction manual for details.
To return to previous channel
Press to return to the previous channel you were watching.
Note: This can be done only after watching the present
channel for 5 seconds.
Press to switch Multi PIP mode on and off
.
To change screen format
Press to change the size of the screen.
Fastext keys
See Teletext section of manual for details.
To select menu items
Use the OK button and arrow keys to select the options
available in the menu system of this TV.
To display the menu
Press if you wish to use the TV menu system. Press again to
remove the menu from the TV screen.
To select channels
Press to select channels.
To mute sound
Press to mute TV sound. Press again to restore the
sound.
To return to TV mode
Press to return to the normal operation from teletext
mode or standby mode.
To select Teletext
Press to switch Teletext on and off.
To select Electronic Programme Guide
(EPG)
Press to switch EPG on and off.
To freeze the picture
Press if you wish to make a note of some
information on the TV screen eg a telephone
number. Press again to return to normal TV mode.
To select channels
Press the numbered buttons to select channels.
For double digit programme numbers, e.g.23, press
-/-- first, then the buttons 2 and 3.
To display picture menu
Press to change the picture settings. Press the OK
button to remove the display.
To display sound menu
Press to change the sound settings. Press the OK
button to remove the display.
To display the Channel Table
Press the OK button. Press
v
or
V
to select the
desired channel then press
B
to confirm.
To adjust TV volume
Press to adjust the volume of the TV.
To reset to factory set levels.
Open the remote control lid and press to return
picture and sound settings to factory-set levels.
After the ‘Installation; menu has appeared on
the TV screen, refer to the ‘Selecting Language
and Country’ section of the instruction manual
to change your choice of language and country
if desired.
To display the time.
Open the remote control lid and press to display the
time on screen. Press again to cancel.
To operate video equipment
Open the remote control lid and press these buttons to
operate your video equipment (please refer to your
VCR manual).
9
Operation
NexTView is an on-screen electronic programme guide, providing you with programme information for different
broadcasters.
NexTView*
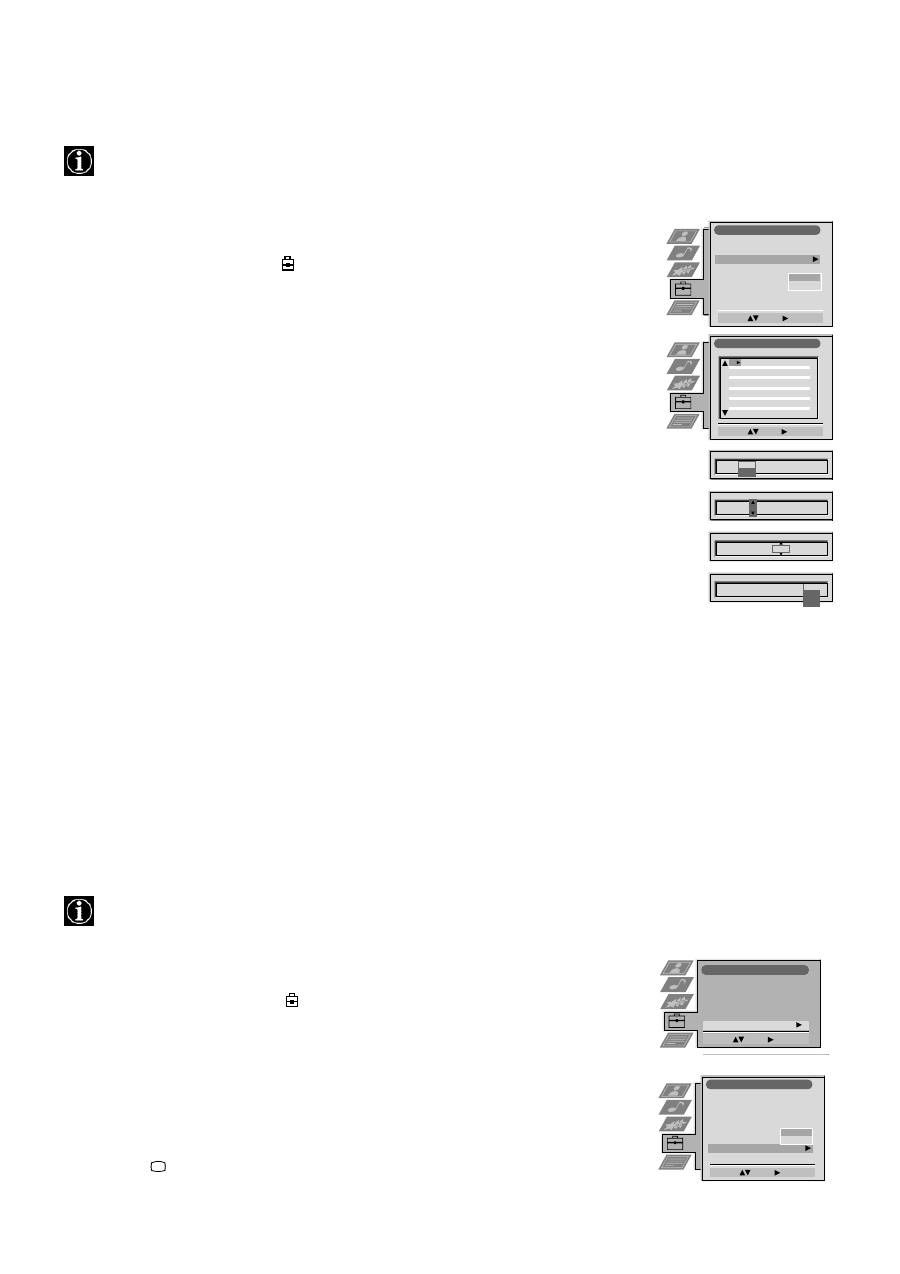
Selecting your NexTView provider
Your TV set automatically selects the best NexTView provider for you. This provider is available about 30 minutes after the
channel tuning. You can however change this selection of provider if you wish.
1. Press the MENU button on the remote control to display the menu on the TV screen.
2. Press the
v
or
V
buttons to select the the
symbol on the menu screen then press
B
to enter the ‘Set Up’ menu.
3. Press
v
or
V
to highlight ‘Select NexTView’ then press
B
to confirm. A list is displayed containing all available
NexTView providers.
4. Press
v
or
V
to select the desired NexTView provider then press the OK button to store.
5. Press the MENU button to remove the menu from the TV screen.
7
Tue
07 Tue
12:38
8
Wed
10
Fri
11
Sat
12
Sun
13
Mon
9
Thu
12
SWISS
Star Wars
Super RTL
Fantasy film, USA, 1996
Werner - Beinhart
Pro 7
Flui grüsst den Rest der Welt
Kabel 1
Once upon a time in the West
Euronews
International News
RTL Plus
10:35 - 12:45
10:20 - 12:00
10:45 - 10:50
11:00 - 11:20
11:45 - 12:50
TXT
TPS / RINGIER
Tue 07. 04 .98
Displaying NexTView
1. Press the
button repeatedly on the remote control to switch NexTView on and off.
* In some cases, you may also need to press the
b
button to display the Sony electronic programme guide.
2. Press the
v
,
V
,
b
or
B
buttons to move the cursor around the screen.
3. Press the OK button to confirm a selection.
a. If you press the OK button in the date, time or icon (themes) columns, you change the programme list according to the
selection.
b. If you press the OK button in the programme list, you directly display the channel if the broadcast is currently running,
or, you display the ‘Long Info’ menu if the broadcast is running at some future time.
Index
full selection list
personal selection
news broadcasts
movies
sports
entertainment
children
return to last menu
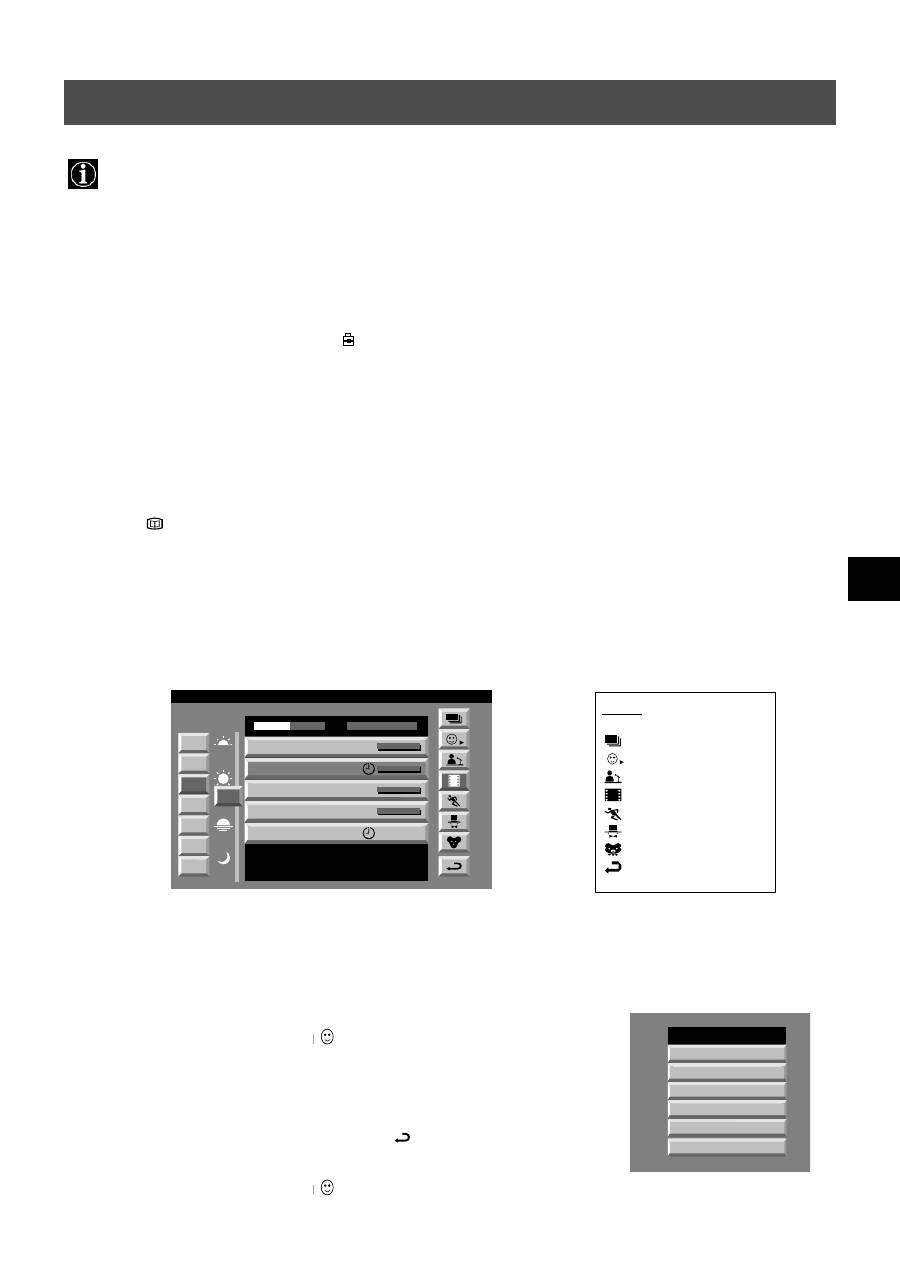
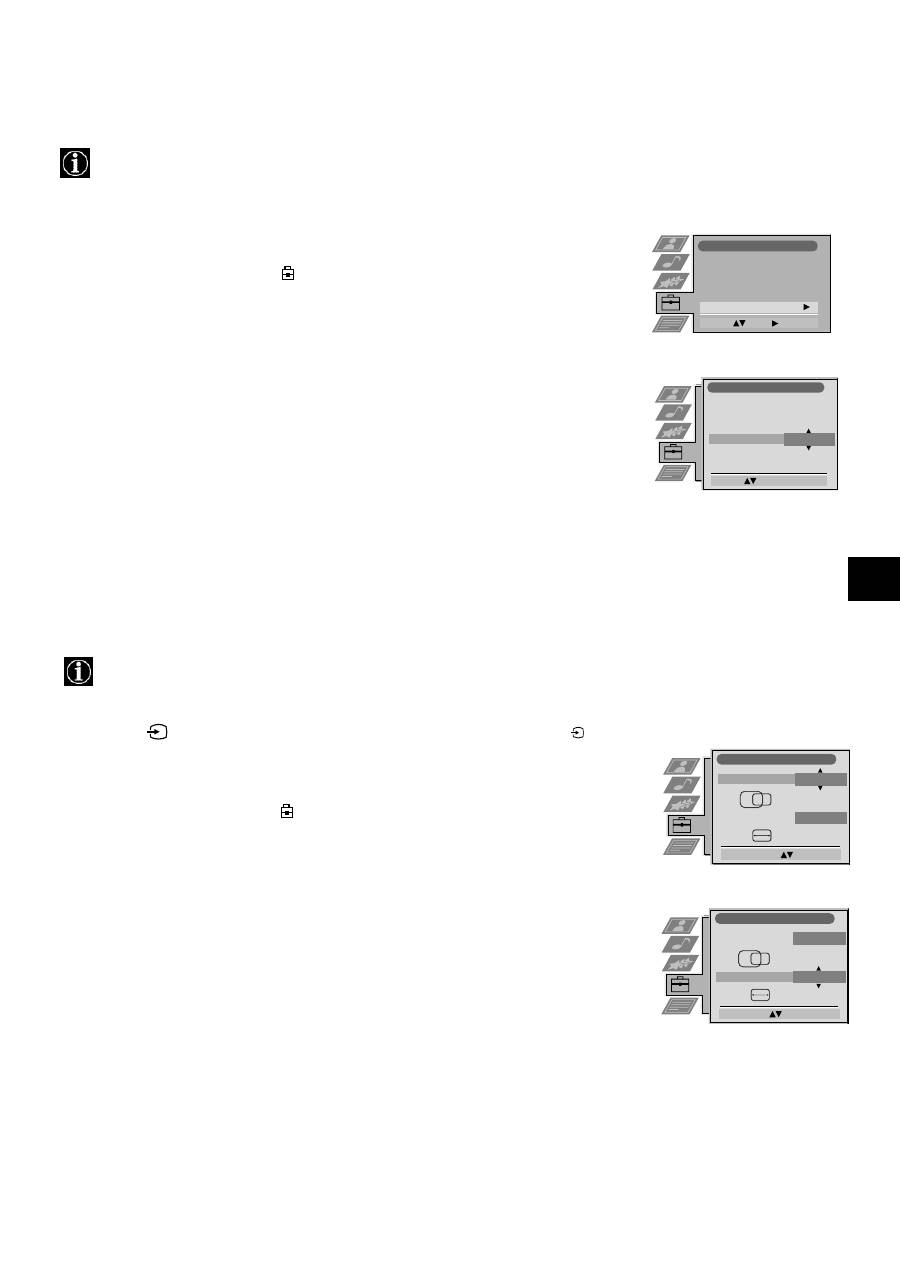
Using the ‘Individual Setting’ menu
You can make a personal list of the types of programmes you wish to view on the
programme guide.
1. Press the
v
or
V
buttons to select the
icon then press
B
to display the
‘Individual Setting’ menu.
2. Press
v
or
V
to select your chosen item on the screen then press the OK button to
confirm your choice.
3. Repeat step 2 for all the items you wish to have in your list.
4. When you have finished the list, press
B
to select
on the menu screen.
5. Press the OK button to return to the previous menu.
6. Press the
v
or
V
buttons to select the
icon then press the OK button again to
activate your ‘Individual Setting’ filter.
Movie
Individual Setting
Comedy
Adult
News
Interview
Entertainment
* depending on availability of service
10
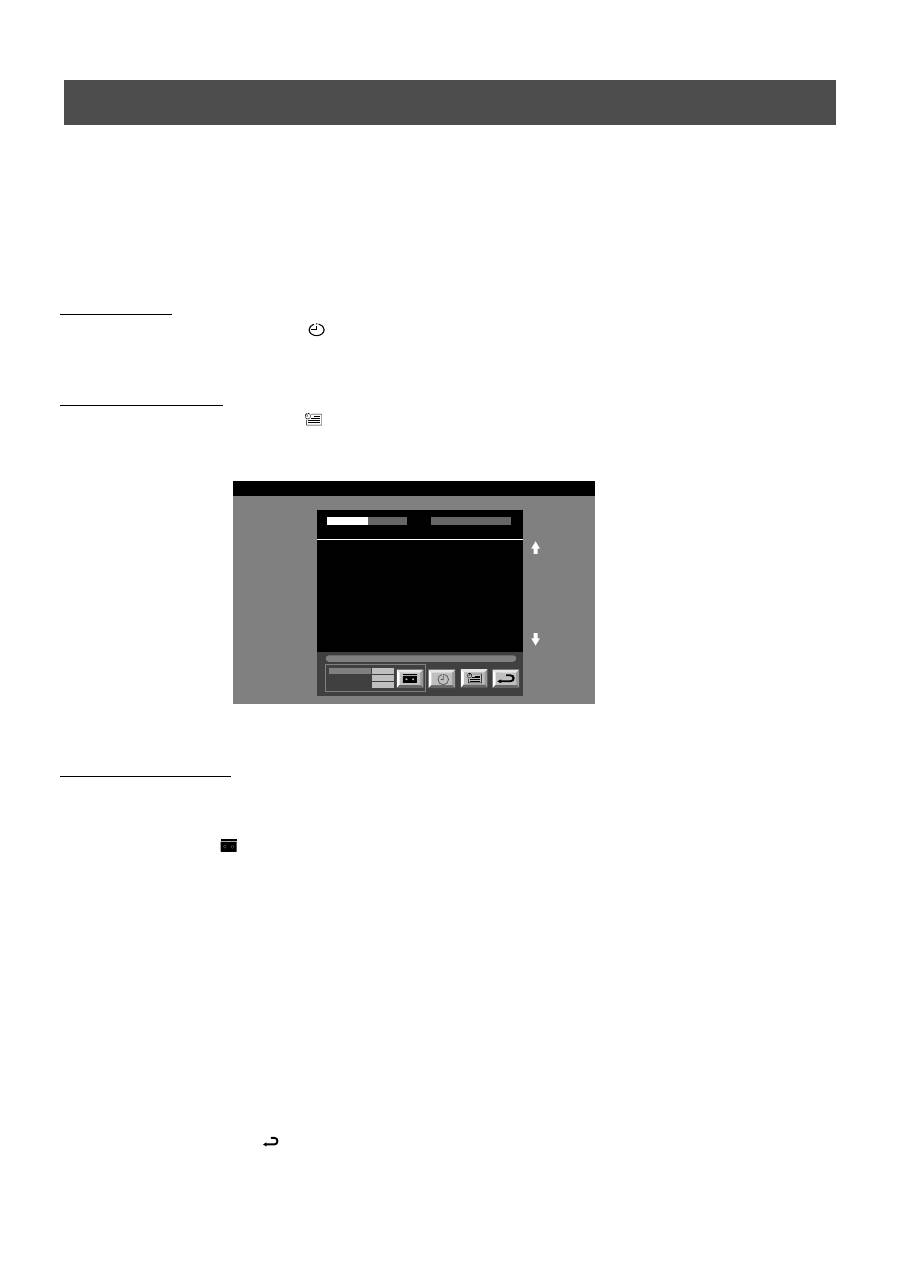
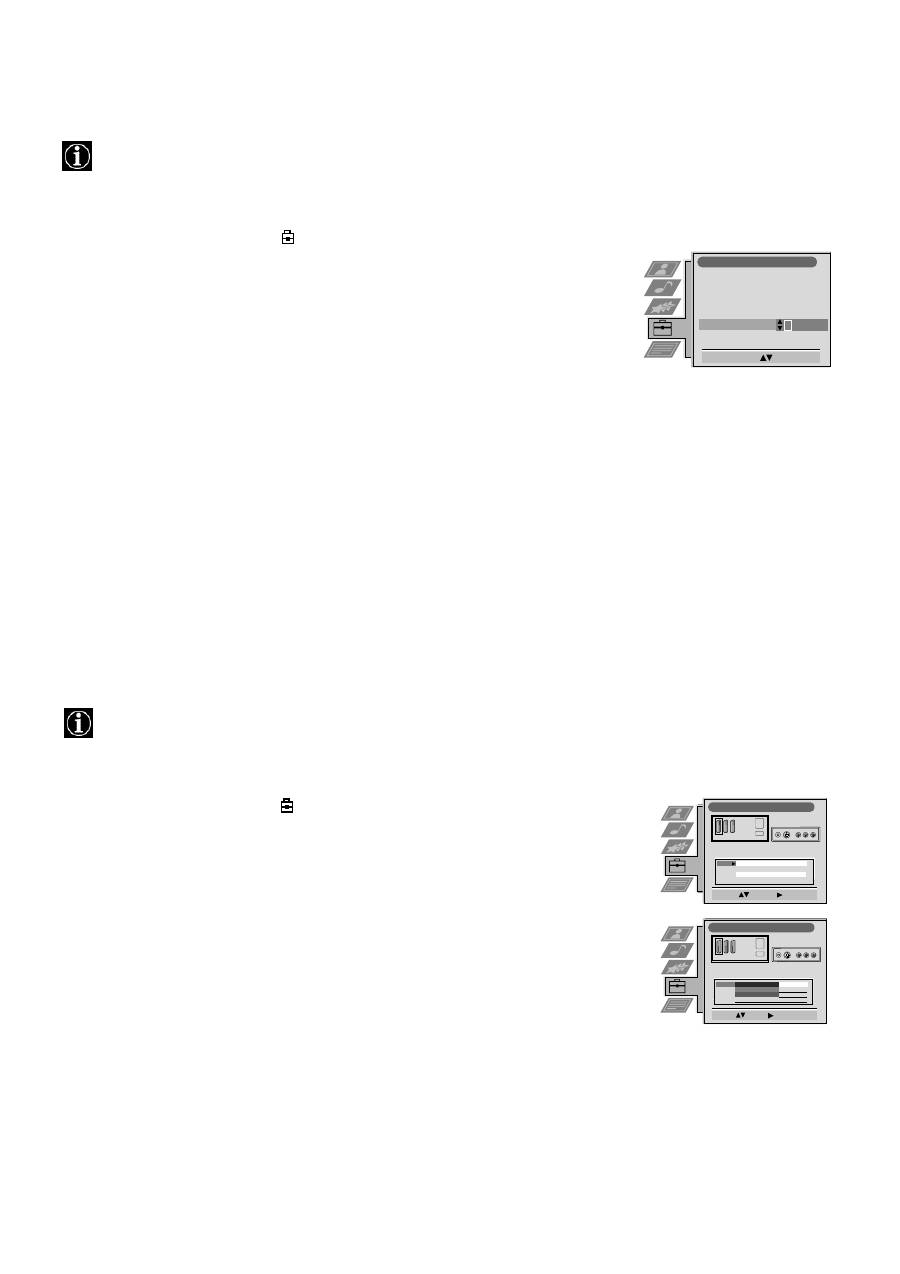
Using the ‘Long Info’ menu
With this ‘Long Info’ menu screen, you can set timers or record selected programmes.
1. Press
v
or
V
to select a future programme in the programme list column.
2. Press the OK button to display the ‘Long Info’ menu on the TV screen.
To set the timer
Press the
b
or
B
buttons to highlight the
icon then press the OK button repeatedly to ‘set the timer’ or ‘cancel the timer’. If
you choose to set the timer, the programme is marked with a clock symbol and a message appears on the screen shortly before
the programme is due to start asking whether you wish to still view this programme.
To view the timer table
Press the
b
or
B
buttons to highlight the
icon then press the OK button repeatedly to switch on/off the timer table. This table
shows the programmes on which you have already set a timer. (You can set a timer on up to 5 programmes).
Operation
NexTView
07 Tue
12:38
Address Mapping
The position of the addresses in the
OSDA is shown in the following diagram.
The position values of the DPW are set
to '0'.
If other values are set, the complete
combination will be scrolled.
Example:
if the DPWC is set to '63', the char-
Speed
Timer Prog
VPS/PDC
SP
VCR1
On
This channel has been set for a timer
First nextTView/EPG-Providers in Europe
SWISS
TXT
TPS / RINGIER
nexTView
Tue 07. 04 .98
To record programmes*
* (only with Smartlink VCRs)
1. Connect your Smartlink VCR.
2. Press
b
or
B
to select
then press the OK button to download the information to your VCR.
3. To set up the VCR:
VPS/PDC
Press
b
to select VPS/PDC then press the OK button repeatedly to select ‘On’ or ‘Off’. With this setting on you have the
guaranteed recording of the whole broadcast should there be a change in the TV programme. This only works if the selected
channel broadcasts a VPS/PDC signal
Speed
Press
V
to select ‘Speed’ then press the OK button repeatedly to select between ‘SP’ for standardplay or ‘LP’ for
longplay. With longplay you can record twice as much on a videotape. The picture quality however may suffer.
VCR Setup
Press
V
to select ‘VCR Setup’ then press the OK button repeatedly to select which VCR you wish to programme, namely
‘VCR1’ or ‘VCR2’.
4. Finally, press
B
to select the
icon then press the OK button to remove the menu from the TV screen.
11
Operation
Most TV channels broadcast information via Teletext. The index page of the teletext service (usually page 100) gives you
information on how to use the service. Please use a TV channel with a strong signal, otherwise there may be Teletext errors.
Teletext
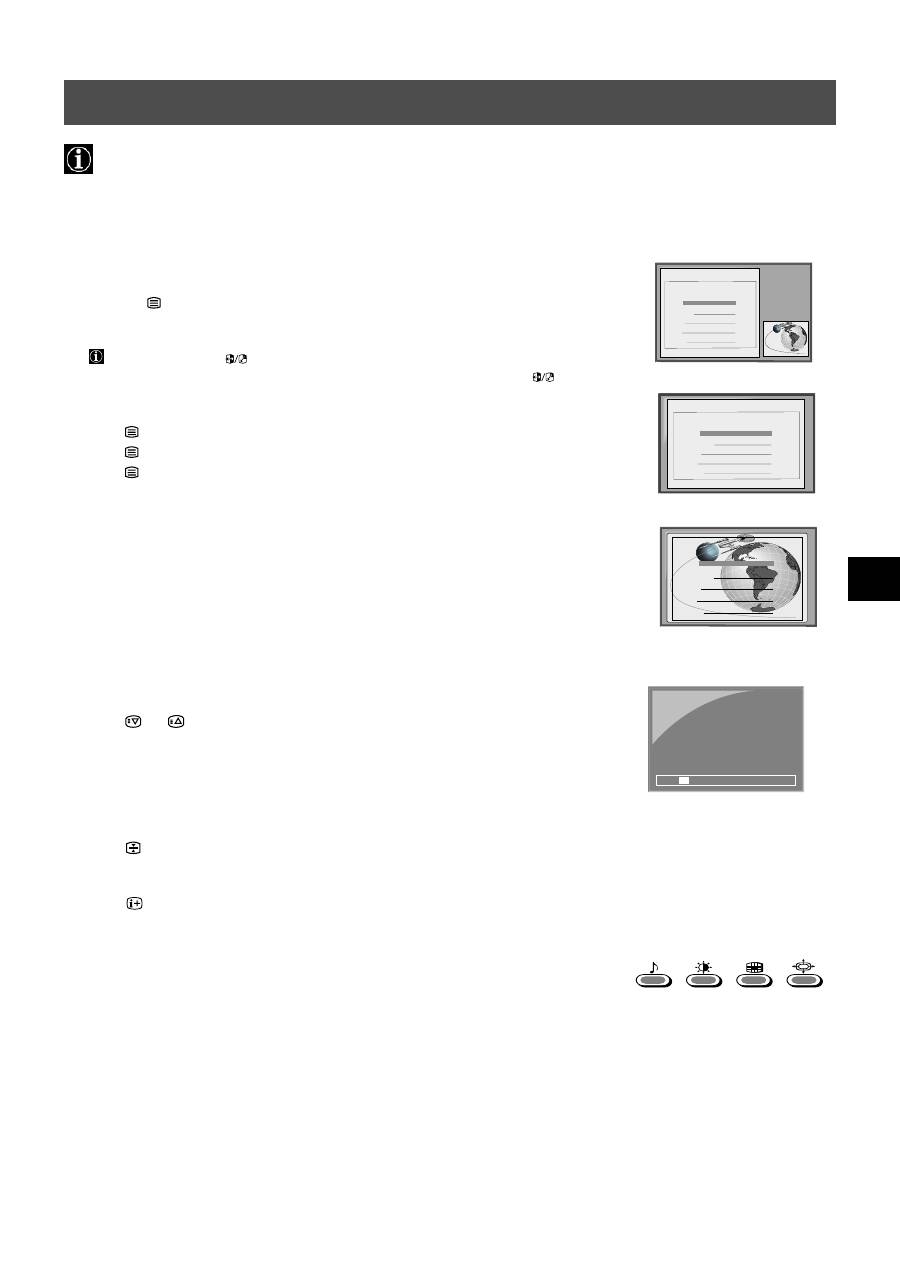
Switching Teletext on and off
1. Select the TV channel which carries the teletext service you want to view.
2. Press the
button once for Picture and Teletext (P&T). The screen is divided in two,
with the TV channel in the right corner and the Teletext display on the left.
P&T mode: Press
then press PROGR+/- to change the channel of the TV
screen. Press
b
or
B
to change the size of the TV screen then press
again
to resume normal teletext reception.
3. Press
twice to get Teletext only.
4. Press
three times for Mix mode.
5. Press
a fourth time to switch off Teletext.
Selecting a Teletext page
Input three digits for the page number using the numbered buttons on the control. If you make
a mistake, type in any three digits then re-enter the correct page number.
Using Other Teletext Functions
Selecting the next or preceding page
Press the
or
buttons on the remote control to select the previous or next page.
Selecting a sub page
A teletext page may consist of several sub pages. In this case an information line is displayed,
showing the number of subpages. Select the sub page by pressing
v
or
V
.
To freeze a Teletext page
Press the
button to freeze the page. Press again to cancel the freeze.
Revealing the index page
Press the
button to reveal the index page (normally page 100).
Using colour buttons to access pages (Fastext)
(only available if the TV station broadcasts Fastext signals)
When the colour coded menu appears at the bottom of a page, press a coloured button on the
remote control (green, red, yellow or blue) to access the corresponding page.
Using the feature ‘Page Catching’
1. Press the numbered buttons on the remote control to select a teletext page which has
several page numbers on it (eg the index page).
2. Press the OK button.
3. Press
v
or
V
to select the desired page number then press the OK button. The requested
page is displayed after some seconds.
Index
TELETEXT
TELETEXT
Programme
News
Sport
Weather
25
153
101
98
Index
TELETEXT
Programme
News
Sport
Weather
25
153
101
98
Index
TELETEXT
Programme
News
Sport
Weather
25
153
101
98
m
m
216-02
01
03
04
05
06
07
08
02
12
Operation
Teletext is an information service transmitted by most TV stations.
Teletext
Using the Teletext menu
1. With Teletext switched on, press the MENU button on the remote control to display the
menu on the TV screen.
2. Press
v
or
V
to select your chosen item on the screen then press
B
to display the relevant
sub menu.
3. To remove the Teletext menu from the screen, press the MENU button.
Top/Bottom/Full
The Top/Bottom/Full sub menu allows you to enlarge different sections of the Teletext page.
Press
v
to enlarge the upper half of the screen, press
V
to enlarge the lower half. Press the
OK button to restore the page to normal size. Press
b
to return to the Teletext menu screen.
Text Clear
*available in Teletext only and Mix modes (see ‘Switching Teletext on and off’).
Text Clear is a function that displays a TV channel whilst looking for a Teletext page.
1.
Press the
button twice on the remote control to select full screen text.
2.
Press the MENU button to display the ‘Teletext’ menu.
3.
Press
v
or
V
to highlight ‘Text Clear’ and press
B
to select.
4.
The current TV channel is displayed. Once the text page has been found a blue
symbol appears in the top left corner of the screen.
5.
Press the
button on the remote control to view the page.
Reveal
Some teletext pages contain hidden information (eg for a quiz), which you can reveal. After
having selected the function, the hidden information appears on screen. After having selected
the function, press
B
. The hidden information appears on screen.
Time Page*
*depending on availability of service
You can call up a time-coded page such as an alarm page at a time specified by you. After
you have displayed the Time Page sub menu:
Press the numbered buttons on the remote control to enter the three digits of the desired page.
Press the numbered buttons again to enter the four digits of the desired time.
Press the OK button to store the desired time. The time is displayed in the top left corner of
the screen. At the requested time the page is displayed.
Page Overview
*only available if TOP-Text is transmitted by the TV station
In this menu the TOP-Text pages are divided into two columns, the first column showing
‘blocks’ of pages and the second showing ‘groups’ of pages.
1.
Press
b
or
B
to select the first or second column.
2.
Press
v
or
V
to select the relevant ‘group’ or ‘block’ of pages.
3.
Press the OK button to display the chosen pages.
Top:
Bottom:
Full: OK
Time Page
PAGE
TIME
Select:
Enter:
– – –
- - : - -
Teletext
Top / Bottom / Full
Text Clear
Reveal
Time Page
Page Overview
Select:
Enter Menu:
13
Operation
The TV consists of a menu system which is based on a series of user friendly on-screen displays and menus. These displays will
help you get the most from your TV, helping you to change picture and sound settings, to alter the size of the TV picture and to
rearrange the TV channels etc.
Adjusting the picture and sound
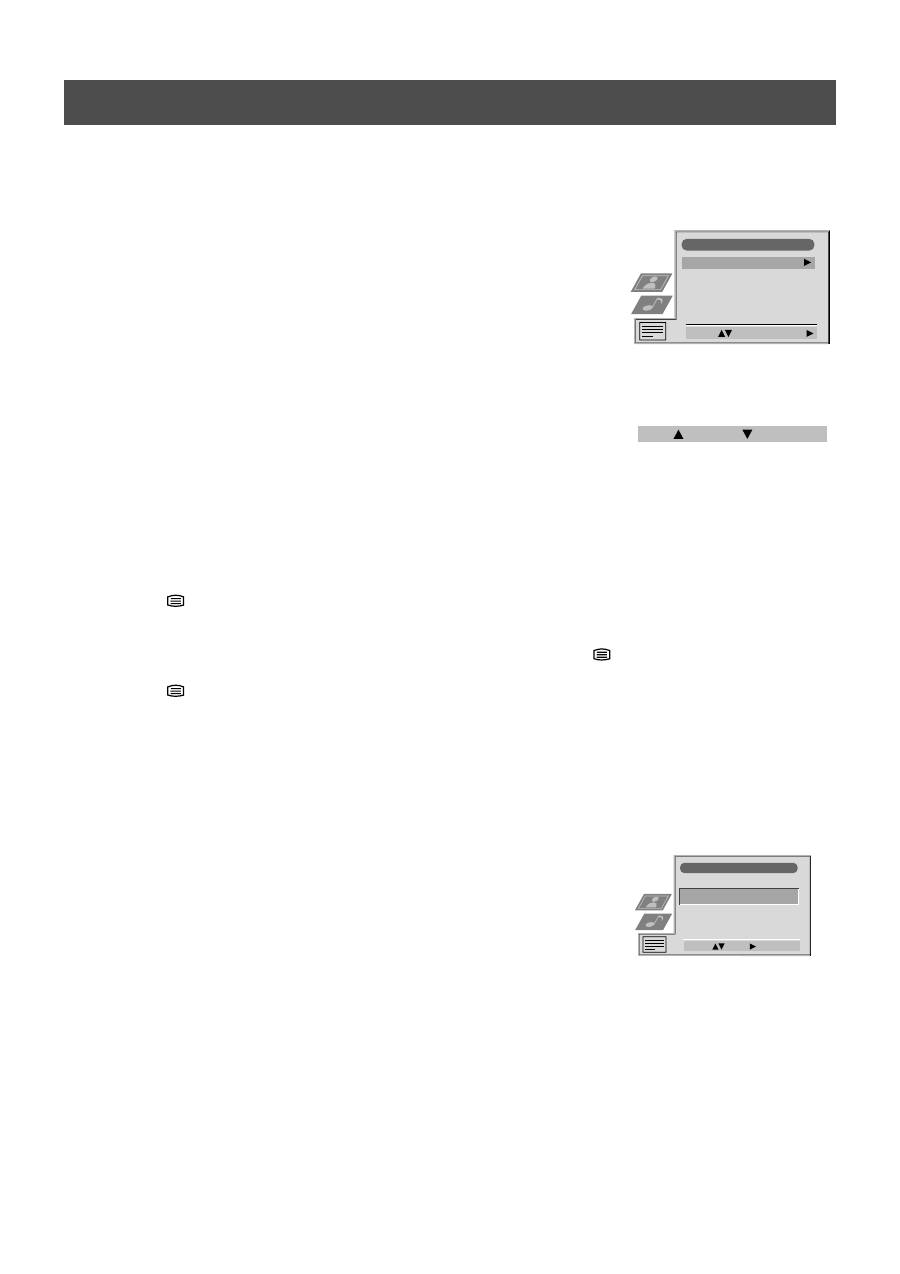
The picture and sound are preset at the factory. You can however adjust them to suit your own taste.
Using the TV menu system
1. Press the MENU button on the remote control to display the menu on the TV screen.
2. Press the
v
or
V
buttons to select
for picture settings or
for sound settings
then press
B
to enter either the ‘Picture Adjustment’ menu or the ‘Audio
Adjustment’ menu.
3. Press the
v
or
V
buttons to select the item on the screen you wish to adjust then
press
B
to confirm. For a description of the menu items and their effects, see the
table below.
4. Press the
v
,
V
,
B
or
b
buttons to adjust your selected item.
5. As soon as you have adjusted the item, press the OK button to store the new setting.
6. Repeat steps 3-5 if you wish to adjust any of the other items.
7. Press the MENU button to remove the menu from the TV screen.
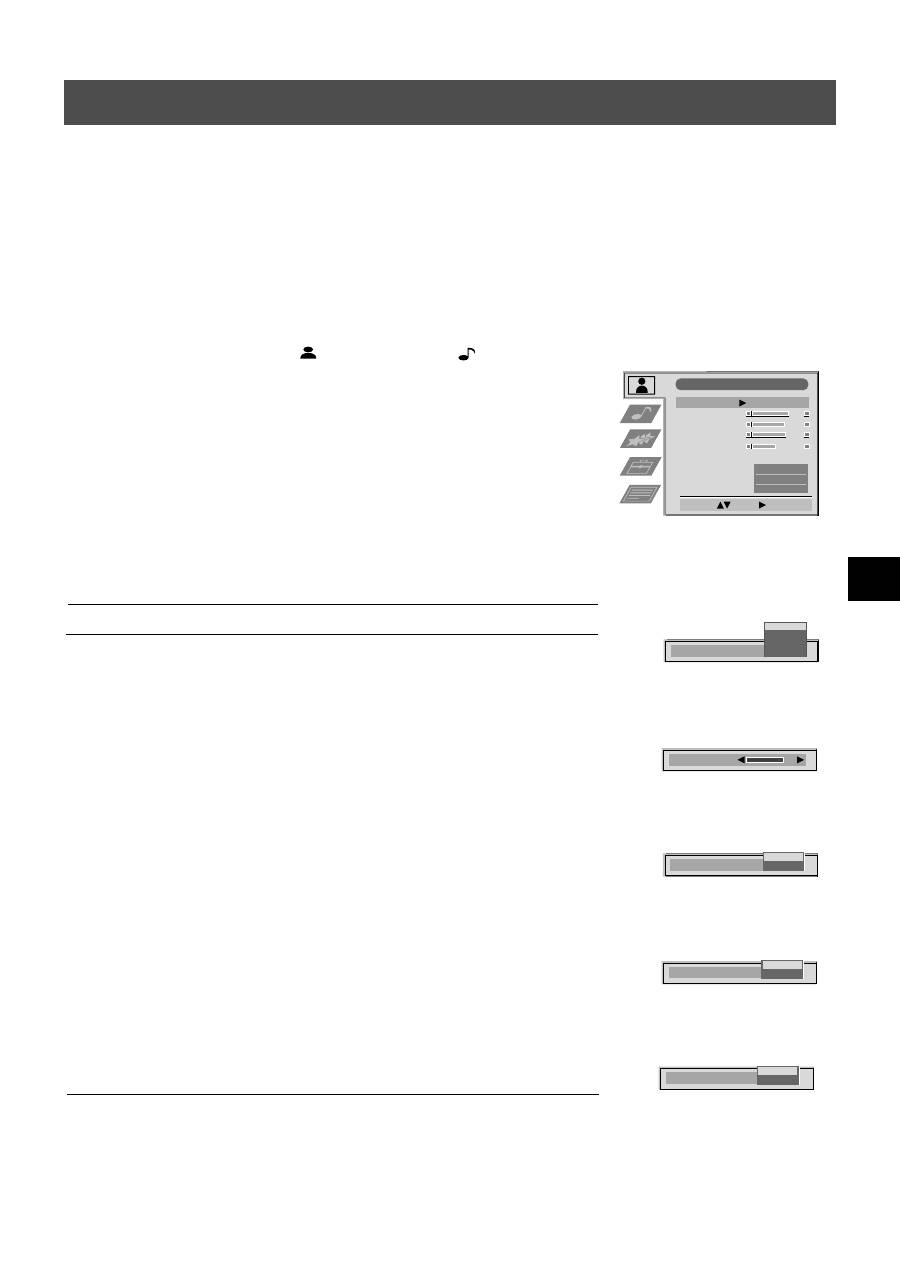
Picture Control
Item
Effect/Operation
Picture Mode
V
Live
(for live broadcasts)
Personal (for individual settings)
Movie
(for movie broadcasts)
v
Game
(for computer games)
Contrast
Less
b B
More
Brightness*
Darker
b B
Brighter
Colour*
Less
b B
More
Hue**
Reddish
b B
Greenish
Sharpness*
Softer
b B
Sharper
Reset
Resets picture to the factory preset levels
AI (Artificial Intelligence)
V
Off : Normal
v
On : Automatic optimisation of contrast level
according to the TV signal.
Noise Detection
V
Off : Normal
v
On : Reduces picture noise in case of a weak
broadcasting signal
Digital Mode
V
DRC 50 : improves picture resolution and is optimal
for viewing scrolling characters
v
DRC 100 :improves picture resolution creating
flicker-free pictures
*
Only if ‘Personal’ is selected in Picture Mode.
**
Only available for NTSC colour signal (eg US video tapes)
AI
On
Off
Contrast
Picture Adjustment
Select :
Enter:
Picture Mode
Contrast
Brightness
Colour
Sharpness
Reset
AI
Noise Detection
Digital Mode
Personal
On
On
Normal
Noise Detection
On
Off
Picture Mode
Live
Personal
Movie
Game
Digital Mode
DRC 50
DRC 100
14
Using the TV menu system:
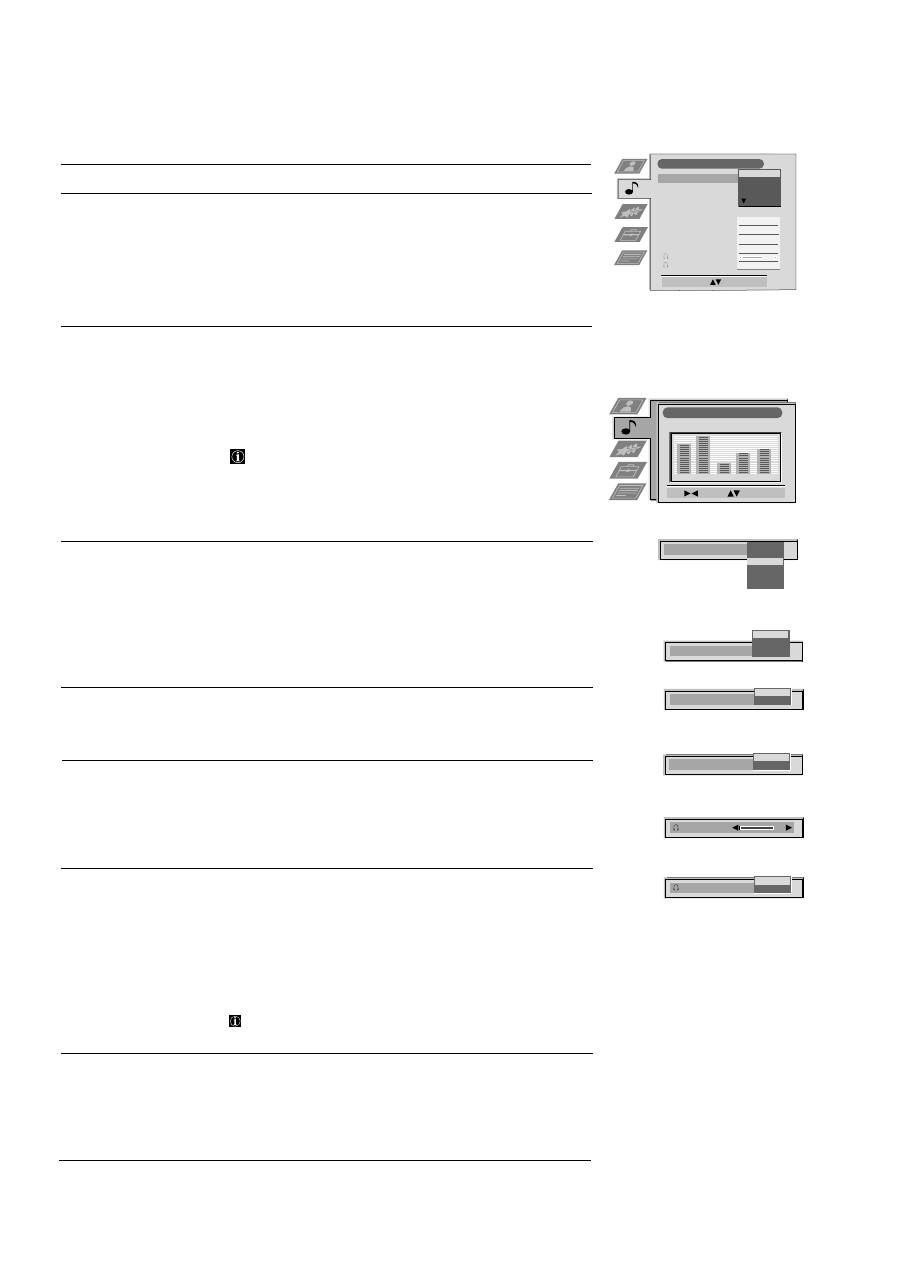
Audio Adjustment
Equaliser Mode
Equaliser
Adjustment
Surround Mode
SRS Mode
Auto Vol. Control
Dual Sound 00
Volume
Dual Sound 00
Stereo
Off
SRS
Stereo
Personal
Vocal
Jazz
Rock
Pop
Select Mode :
SRS 1
Confirm: OK
Equaliser Adjustment
Sel:
Adjust:
Confirm:OK
Personal
+
0
–
120
150
1,5K
5 K
10 K
Auto Vol. Control
Off
On
Dual Sound
Mono
Stereo
Volume
Dual Sound
A
B
Surround Mode
SRS Mode
SRS 1
SRS 2
SRS 3
Off
SRS
Hall
Church
Disco
Stadium
Sound Control
Item
Effect/Operation
Equaliser Mode
V
Personal
Vocal
Jazz
Rock
Pop
v
Flat (fixed setting, cannot be adjusted)
Equaliser adjustment
You can adjust the mode selected in Equaliser mode by
cutting and boosting the 5 selected frequency bands.
Press
b
or
B
to select the frequency band then
V
or
v
to
adjust the frequency. Finally, press the OK button to store
the new adjustment.
If you want to store the new setting, you need to set
the Equaliser mode to ‘Personal’. Personal mode
permanently stores the setting, all other modes
(Vocal, Jazz, Rock, Pop) store only until the next
mode change.
Surround Mode
V
Off
Dolby Sur
SRS
Hall
Church
Disco
v
Stadium
SRS Mode*
V
SRS 1
(*only if ‘Surround Mode’
SRS 2
is set to ‘SRS’)
v
SRS 3
Auto Vol. Control
V
On : volume level of the channels will stay the same
independent of the broadcast signal (eg in the case of
advertisements)
v
Off : volume level changes according to the broadcast
signal.
Dual Sound
For a bilingual broadcast:
V
A for channel 1
v
B for channel 2
For a stereo broadcast:
V
Mono
v
Stereo
When NICAM stereo is being broadcast, the
indication NiCAM appears briefly on the screen.
Headphones
i
Volume
Less
b
B
More
i
Dual Sound
For a bilingual broadcast:
V
A for channel 1
v
B for channel 2
15
Using the TV menu system:
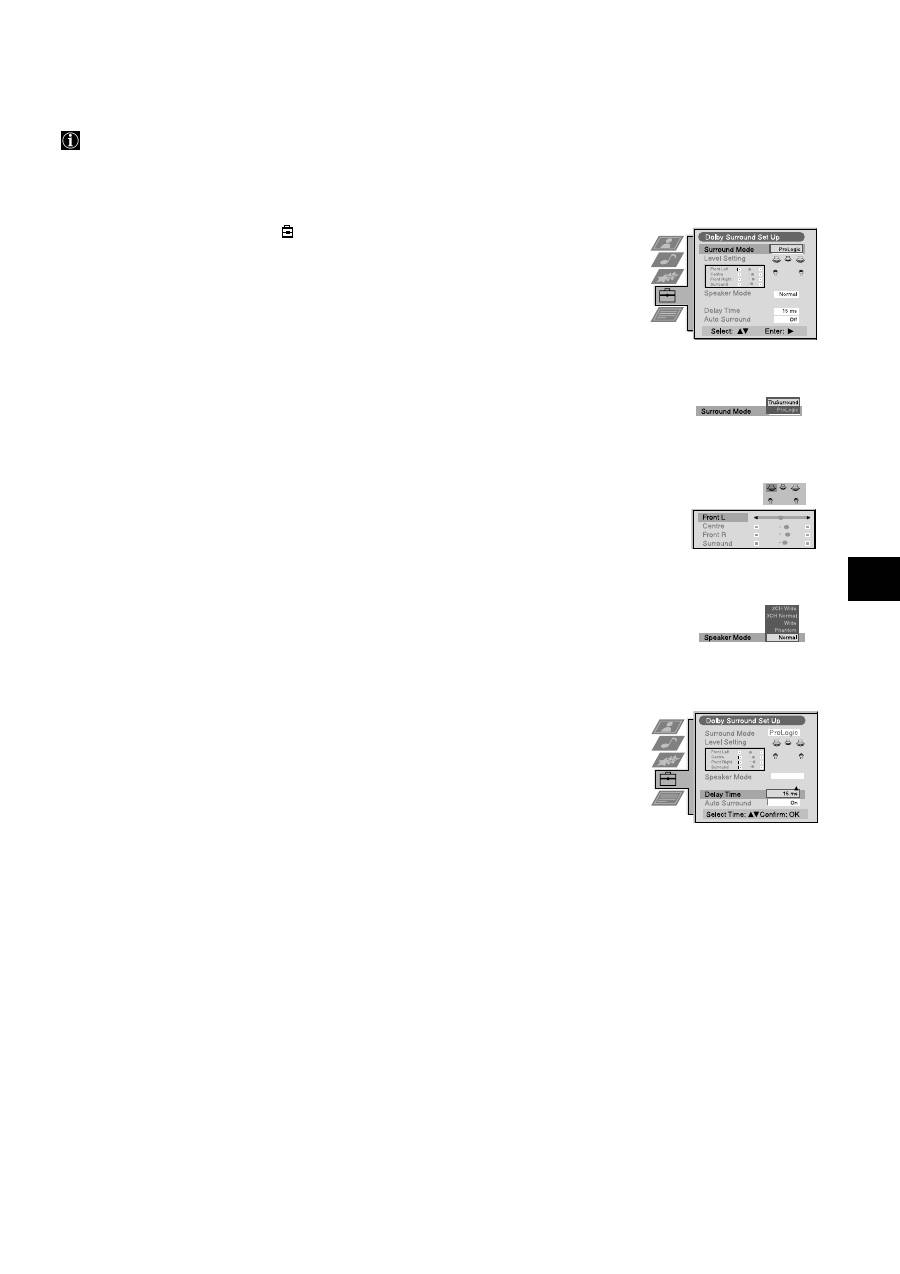
Setting up Dolby Surround
Before listening to Dolby Surround encoded programmes you need to adapt the Dolby settings to suit your individual
requirements. This setting up is normally only necessary when installing your TV set or when changing the speaker positions.
1. Press the MENU button on the remote control to display the menu on the TV screen.
2. Press the
V
button to select the
symbol on the menu screen then press
B
to enter the
‘Set Up’ menu.
3. Press the
V
button to select ‘Dolby Surround Set Up’ then press
B
to enter the ‘Dolby
Surround Set Up’ menu.
4. Press the
v
or
V
buttons to select ‘Surround Mode’ then press
B
to enter the ‘Surround
Mode’ sub menu. Press the
v
or
V
buttons to select’Pro Logic’ if you are using the
surround speakers or ‘TruSurround’ if you are not using surround speakers. Press the OK
button to confirm.
5. Press the
v
or
V
buttons to select ‘Level Setting’ then press
B
to hear a test tone which will
sequentially switch through all speakers. From your sitting position all volume levels
should be the same. If this is the case, press the OK button to store the settings. If this is not
the case:
(a)Press the
v
or
V
buttons to select ‘Front L.’, ‘Centre’, ’Front R.’ or ‘Surround’ speakers.
(b) Press
b
or
B
to adjust the volume level then press the OK button to store.
(c) Press
V
to select another speaker.
(d) Repeat steps (a) and (b) for all the speakers you wish to adjust.
(e) Press the OK button to store the new settings.
6. To select ‘Speaker Mode’ ensure ‘Surround Mode’ is set to ‘Pro Logic’ then press the
v
or
V
buttons to select ‘Speaker Mode’. Press
B
to enter the ‘Speaker Mode’ sub menu. Press
the
v
or
V
buttons to select one of the following speaker modes then press the OK button
to store:
‘Normal’
all speakers are activated
‘Phantom’
centre speaker is switched off
‘Wide’
wider bandwidth from centre speaker
‘3CH Normal’
surround speakers are switched off
‘3CH Wide’
surround speakers are switched off, centre speaker carries full
frequency response.
7. To select ‘Delay Time’ ensure ‘Surround Mode’ is set to ‘Pro Logic’ then press the
v
or
V
buttons to select ‘Delay Time’. Press
B
to enter the ‘Delay Time’ sub menu. Press the
v
or
V
buttons to select the desired delay time for the surround speakers. You have the choice
between 15ms for big rooms, 20ms or 25ms for standard rooms and 30ms for small rooms.
Once you have set the time, press the OK button to store.
8. Press the
v
or
V
buttons to select ‘Auto Surround’ then press
B
to enter the ‘Auto
Surround’ sub menu. Press the
v
or
V
buttons to select ‘On’ or ‘Off’ then press the OK
button to store.
9. Press the MENU button to remove the menu from the TV screen.
.
.
Normal

16
Using the TV menu system:
Using the Features menu
1. Press the MENU button on the remote control to display the menu on the TV screen.
2. Press the
v
or
V
buttons to select
for the ‘Features’ menu then press
B
to enter the ‘Features’
menu.
3. Press the
v
or
V
buttons to select the desired menu item then press
B
to confirm. For a description
of the menu items and their effects, see the table below.
4. Press the
v
,
V
,
B
or
b
buttons to select the desired setting.
5. Press the OK button to confirm your choice of setting.
6. Repeat steps 3-5 if you wish to select any of the other items.
7. Press the MENU button to remove the menu from the TV screen.
Item
Effect/Operation
Auto Format*
V
Off:
Size of picture does not automatically adjust.
*only for aerial signal
Normal: Size of picture automatically adjusts according to
information from the broadcaster.
v
Full:
The TV can automatically adjust the picture size to eliminate any
dark areas on the TV picture (as shown below):
Format Correction*
V
Off :
4:3/14:9 is selected
(*only if Auto Format is
v
On :
Smart mode is selected automatically for 4:3/14:9 broadcasts
set to ‘Normal’ or ‘Full’)
Sleep Timer
You can select a time after which the TV switches itself into
standby mode.
V
Off
.
v
90 min
Parental Lock
V
Off : Normal
v
On : Press the buttons on the remote control to switch the TV out of
standby mode. The buttons on the TV do not work.
AV2 Output
V
TV audio/video signal from the aerial
AV1 audio/video signal from scart 1
AV2 audio/video signal from scart 2
AV3 audio/video signal from scart 3
v
AV4 audio/video signal from connectors on front of TV
Changing the screen size
This feature allows you to change the size of the TV picture.
Press the
button on the remote control repeatedly or use the
v
or
V
buttons to select one of the
following formats then press the OK button to confirm your selection:
Smart
imitation of wide screen effect for 4:3 broadcasts.
4:3
conventional 4:3 picture size, full picture information.
14:9
compromise between 4:3 and 16:9 picture size.
Zoom
widescreen format for letterbox movies
Wide
for 16:9 broadcasts.
In Smart, Zoom and 14:9 modes parts of the top and bottom of the screen are cut off. Press
v
or
V
to
adjust the position of the image on screen (eg to read subtitles) then press the OK button to confirm.
Format Correction
Off
On
Parental Look
Off
On
10 min
Sleep Timer
AV 2 Output
TV
AV 1
AV 2
AV 3
AV 4
Auto Format
Off
Normal
Full
Features
Auto Format
Format Correction
Sleep Timer
Parental Lock
AV 2 Output
Off
Off
TV
Select:
Enter:
Off
On
17
Using the TV menu system:
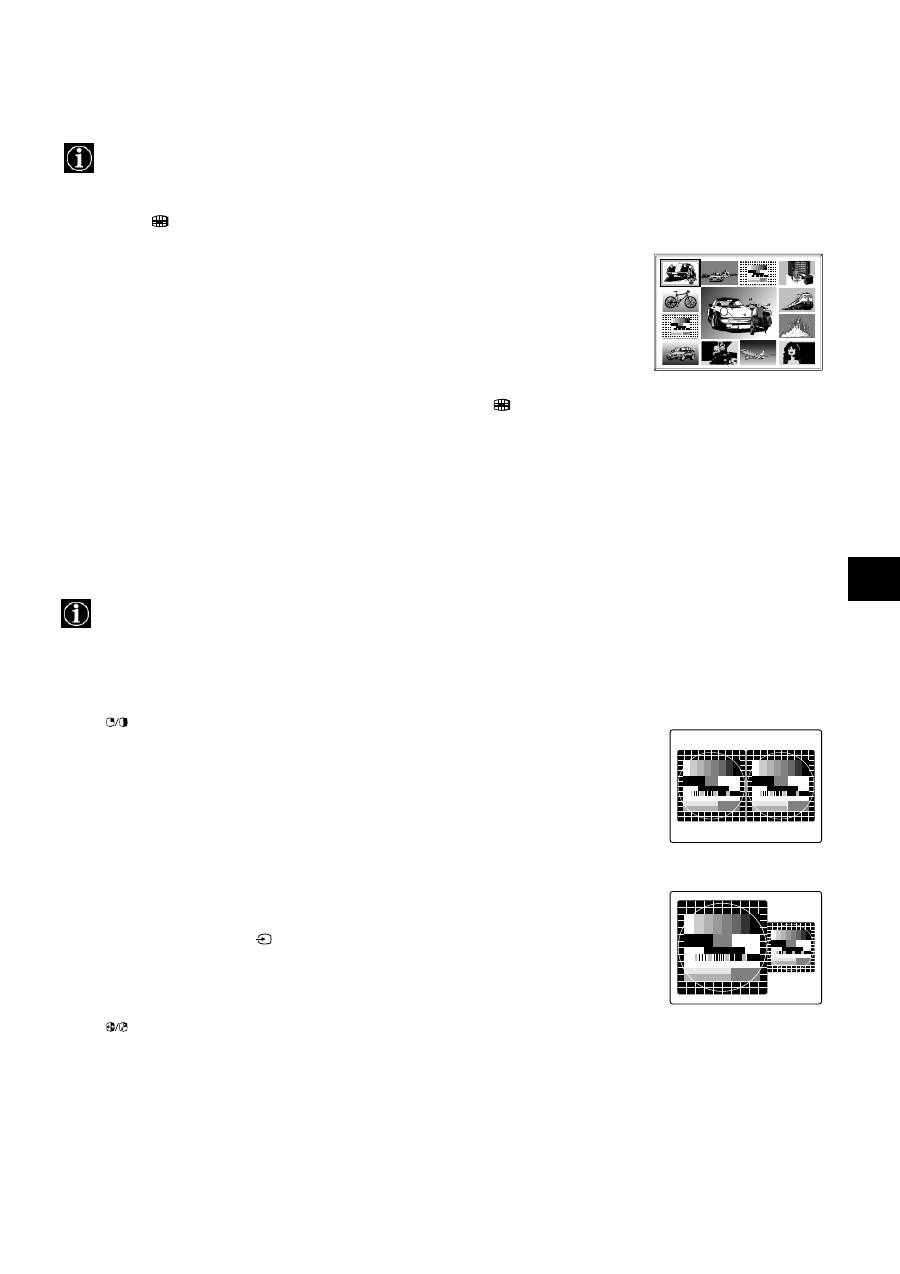
Using Multi PIP
Multi PIP (picture in picture) mode displays a succession of 12 still pictures and a 13th that is live. You can manually
select which channel you wish to watch, either full-screen or in the PIP mode.
Operating PAP (Picture and Picture)
This PAP feature divides the screen into two for watching two channels simultaneously (with a video source on one if you
want). The sound of the left screen comes through the TV loudspeakers, the sound of the right screen is selectable via
headphones.
1. Press the
button on the remote control to select Multi PIP mode. 13 programme
positons appear on the screen with the current channel in the centre.
2. Press the PROGR+/- buttons repeatedly to select the next or preceding 12 programme
positions.
3. Press the
v
,
V
,
b
or
B
buttons to move within the 13 displayed channels.
4. Press the OK button to select the framed channel. This channel now moves to the centre.
5. Press the OK button again to display the selected channel or press
to remove Multi PIP
mode from the TV screen.
Switching PAP on and off
Press
once to display the screens and twice to switch PAP off.
Selecting sound for the headphones
With PAP switched on, refer to the ‘Adjusting the picture and sound’ section of this manual and
set ‘
i
Dual Sound‘ to ‘PAP’.
Selecting a PAP source
Press
M
. The symbol
M
appears in the right screen. Select the desired source using the numbered
buttons (for a TV channel) or
(for a video source).
Swapping screens
Press
to swap the two screens.
Zooming the screens
Press the
b
or
B
buttons to change the size of the two screens.
03
05
01
06
11
09
08
02
10
07
13
12
04
18
Using the TV menu system:
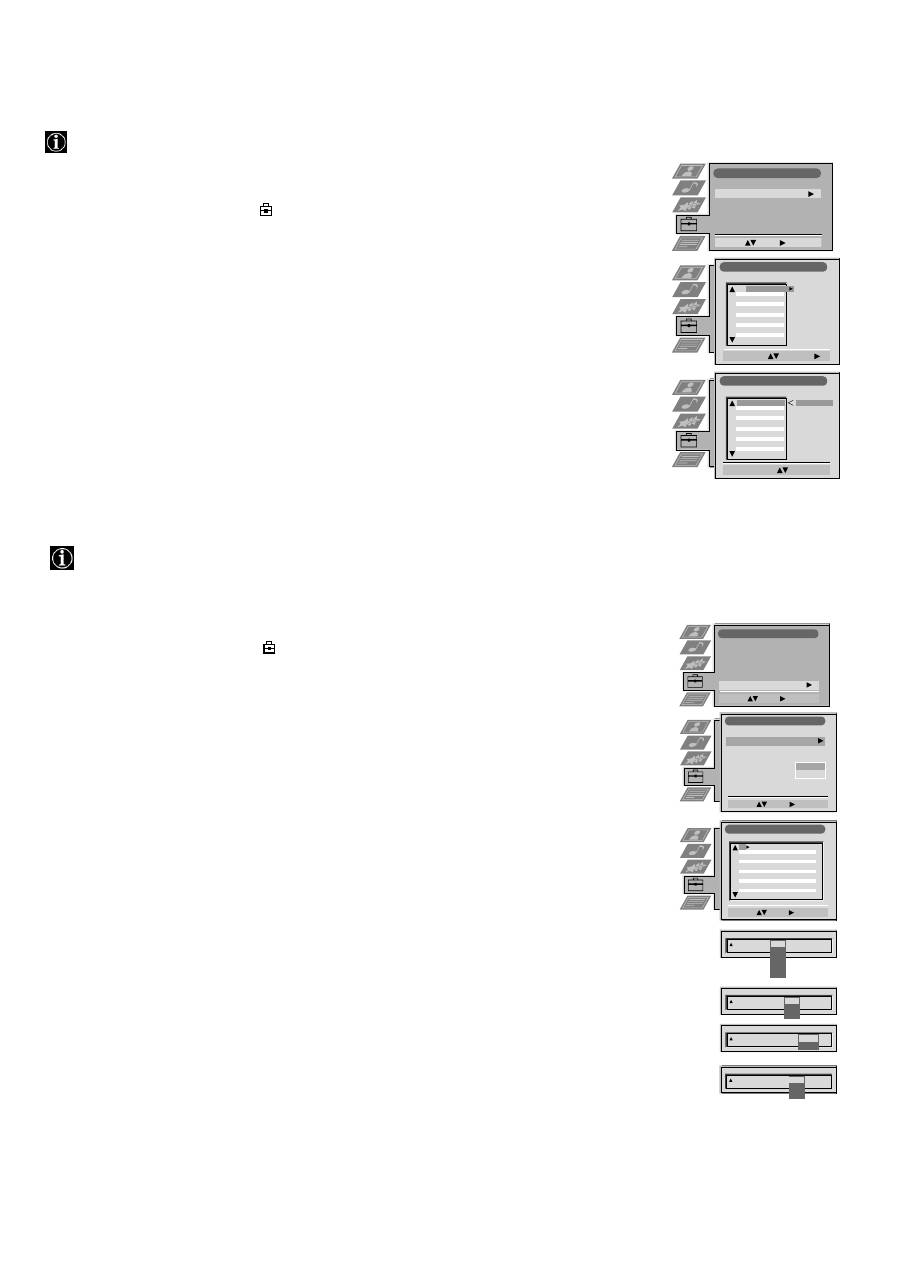
Re-arranging the TV channels
After tuning the TV, you can use this feature to change the order of the channels on the TV.
1. Press the MENU button on the remote control to display the menu on the TV screen.
2. Press the
V
button to select the
symbol on the menu screen then press
B
to enter the ‘Set Up’
menu.
3. Press the
V
button to select ‘Programme Sorting’ then press
B
to enter the ‘Programme Sorting’
menu.
4. Press the
v
or
V
buttons to select the channel you want to move then press
B
to confirm.
5. Press the
v
or
V
buttons to select the new programme position (eg PROG 4) for your selected
channel then press the OK button to confirm. The selected channel now moves to its new
programme position and the other channels move accordingly.
6. Repeat steps 4 and 5 if you wish to sort the other channels.
7. Press the MENU button to remove the menu from the TV screen.
Programme Sorting
Select Prog:
Confirm:
Set Up
Auto Tuning
Programme Sorting
Select NexTView
Dolby Surround Set Up
AV Preset
Manual Set Up
Select:
Enter:
PROG CH
LABEL
Programme Sorting
Select Position:
Move: OK
C03
TV 5
PROG CH
LABEL
1
2
3
4
5
6
7
8
9
10
11
C03
C05
C07
C08
C09
C11
C12
C13
C14
C15
C16
TV 5
PRO 7
EU-SP
SWF
RTL
SAT
MDR
DDI
DSF
RTL 2
KAB 1
C03
C05
C07
C08
C09
C11
C12
C13
C14
C15
C16
TV 5
PRO 7
EU-SP
SWF
RTL
SAT
MDR
DDI
DSF
RTL 2
KAB 1
1
2
3
4
5
6
7
8
9
10
11
Manually tuning the TV
You have already tuned the TV automatically using the instructions at the start of this manual. You can however carry
out this operation manually, adding channels to the TV one at a time.
1. Press the MENU button on the remote control to display the menu on the TV screen.
2. Press the
V
button to select the
symbol on the menu screen then press
B
to enter the ‘Set Up’
menu.
3. Press the
V
button to select ‘Manual Set Up’ on the menu screen then press
B
to enter the ‘Manual
Set Up’ menu.
4. Press the
V
button to select ‘Manual Programme Preset’ on the menu screen then press
B
to enter
the ‘Manual Programme Preset’ menu.
5. Press the
v
or
V
buttons to select a programme number for your channel (eg PROGR 1 for BBC1)
then press
B
to highlight the ‘SKIP’ column.
6. Press
v
to select ‘OFF’ then press
B
to highlight the ‘SYS’ column.
7. Press the
v
or
V
buttons to select the TV broadcast system (B/G for western european countries, I
for Great Britain, D/K for eastern european countries or L for France) or ‘EXT’ for a video input
source (AV1, AV2, ...) then press
B
to confirm.
8. Press the
v
or
V
buttons to select ‘C’ for terrestrial channels, ‘S’ for cable channels, or ‘F’ for
direct frequency inputs then press
B
to confirm.
9. Select the first number digit of ‘CH’ (channel) then the second number digit of ‘CH’ with the
number buttons on the remote control or
Press the
V
button to search for the next available channel.
10. If you do not wish to store this channel on the programme number you selected, press the
v
or
V
buttons to continue searching for the desired channel.
11. If this is the channel you wish to store, press the OK button.
12. Repeat steps 5-11 if you wish to store more channels then press the MENU button to remove the
menu from the TV screen.
PROG
SYS
Off
SKIP
LABEL
1
I
Manual Set Up
Select:
Enter:
Language/Country
Manual Programme Preset
Further Programme Preset
RGB Set Up
Picture Rotation
Personal ID
Demo
O
- - - - - - -
Set Up
Auto Tuning
Programme Sorting
Select Next View
Dolby Surround Set Up
AV Preset
Manual Set Up
Select:
Enter:
Manual Programme Preset
Select:
Enter:
PROG
CH
SYS
SKIP
LABEL
Off
Off
Off
Off
Off
Off
Off
Off
Off
Off
Off
1
2
3
4
5
6
7
8
9
10
11
PROG
CH
SYS
Off
SKIP
LABEL
1
B/G
L
I
D/K
EXT
CH
C
S
F
PROG
SYS
Off
SKIP
LABEL
1
I
CH
03
SEARCH
PROG
CH
SYS
Off
SKIP
LABEL
0
EXT
AV1
AV2
AV3
AV1
ARD
BBC
C03
C05
C07
C08
C09
C11
C12
C13
C14
B/G
B/G
C09
C10
B/G
B/G
TV 5
PRO 7
EU-SP
SWF
RTL
SAT
MDR
DDI
DSF
B/G
B/G
B/G
B/G
B/G
B/G
B/G
19
Using the TV menu system:
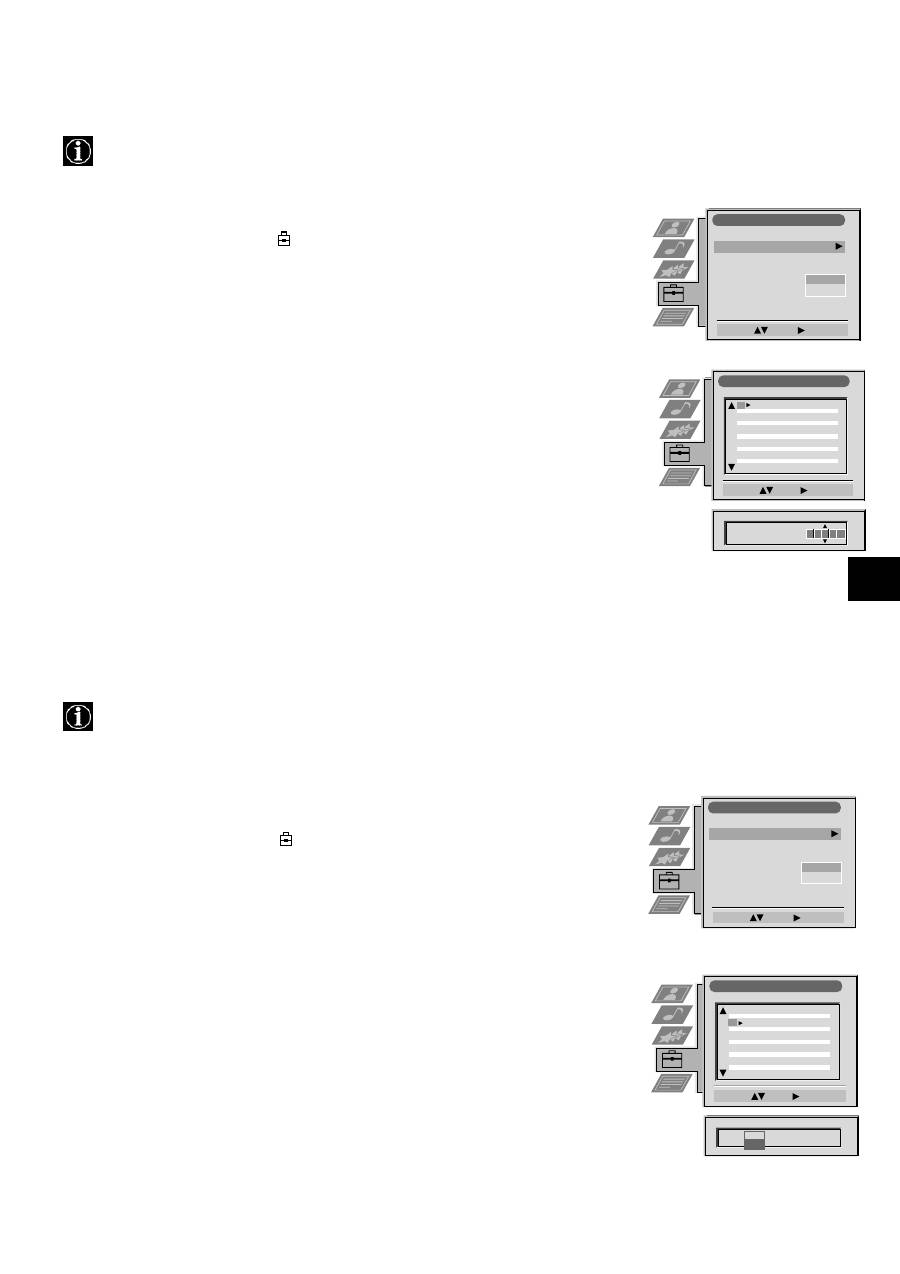
Naming a channel
Names for channels are usually taken automatically from Teletext if available. You can however name a channel or an
input video source using up to five characters (letters or numbers).
Skipping programme positions
This function enables you to skip unused programme positions when selecting them with the PROGR+/- buttons.
However, by using the number buttons you can still select the skipped programme position.
1. Press the MENU button on the remote control to display the menu on the TV screen.
2. Press the
V
button to select the
symbol on the menu screen then press
B
to enter the ‘Set
Up’ menu.
3. Press the
V
button to select ‘Manual Set Up’ then press
B
to enter the ‘Manual Set Up’
menu.
4. Press the
V
button to select ‘Manual Programme Preset’ then press
B
to enter the ‘Manual
Programme Preset’ menu.
5. Press the
v
or
V
buttons to select the channel you wish to name.
6. Press the
B
button repeatedly until the first element of the ‘LABEL’ column is highlighted.
7. Press the
v
or
V
buttons to select a letter or number (select ‘-’ for a blank) then press
B
to
confirm. Select the other four characters in the same way.
8. After selecting all the characters, press the OK button.
9. Repeat steps 5 to 8 if you wish to label other channels.
10. Press the MENU button to remove the menu from the TV screen.
1. Press the MENU button on the remote control to display the menu on the TV screen.
2. Press the
V
button to select the
symbol on the menu screen then press
B
to enter the
‘Set Up’ menu.
3. Press the
V
button to select ‘Manual Set Up’ then press
B
to enter the ‘Manual Set Up’
menu.
4. Press the
V
button to select ‘Manual Programme Preset’ then press
B
to enter the ‘Manual
Programme Preset’ menu.
5. Press the
v
or
V
buttons to select the programme position then press
B
to highlight the
‘SKIP’ column.
6. Press the
v
or
V
buttons to select ‘Off’ or ‘On’ (if you wish to skip this programme
position) then press the OK button to store.
7. Repeat steps 5 and 6 if you wish to skip or unskip further programme positions.
8. Press the MENU button to remove the menu from the TV screen.
Manual Programme Preset
Select:
Enter:
PROG
CH
SYS
SKIP
LABEL
PROG
CH
SYS
SKIP
LABEL
53
I
F189
- - -
Off
On
C09
C10
BBC1
BBC
I
I
Off
Off
Off
Off
Off
Off
Off
Off
Off
Off
Off
51
52
53
54
55
56
57
58
59
60
61
Manual Programme Preset
Select:
Enter:
PROG
CH
SYS
SKIP
LABEL
C09
C10
ARD
BBC
B/G
B/G
Off
Off
Off
Off
Off
Off
Off
Off
Off
Off
Off
1
2
3
4
5
6
7
8
9
10
11
PROG
CH
SYS
Off
SKIP
LABEL
6
I
C07
T E
Manual Set Up
Select:
Enter:
Language/Country
Manual Programme Preset
Further Programme Preset
RGB Set Up
Picture Rotation
Personal ID
Demo
O
- - - - - - -
Manual Set Up
Select:
Enter:
Language/Country
Manual Programme Preset
Further Programme Preset
RGB Set Up
Picture Rotation
Personal ID
Demo
O
- - - - - - -
Manual Set Up
Select:
Enter:
Language/Country
Manual Programme Preset
Further Programme Preset
RGB Set Up
Picture Rotation
Personal ID
Demo
O
- - - - - - -
20
Using the TV menu system:
Using the Further Programme Preset feature
With this feature you can a) adjust the attenuation of each channel, b) individually adjust the volume level of each channel,
c) manually fine-tune the TV to obtain a better picture reception if the picture is distorted or d) preset the AV output for
the programme positions of channels with scrambled signals (eg from a pay TV decoder). In this way a connected VCR
records the unscrambled signal.
Manual Set Up
Select:
Enter:
Language/Country
Manual Programme Preset
Further Programme Preset
RGB Set Up
Picture Rotation
Personal ID
Demo
O
- - - - - - -
Further Programme Preset
Select:
Enter:
PROG
AFT
VOL
DECODER
On
On
On
0
0
0
1
2
3
4
5
6
7
8
9
10
11
PROG
AFT
VOL
ATT
DECODER
1
Off
On
PROG
AFT
VOL
DECODER
1
0
PROG
AFT
VOL
DECODER
1
-5
PROG
AFT
VOL
DECODER
1
-5
On
On
Off
AV1
AV2
ATT
Off
Off
Off
Off
Off
Off
Off
Off
Off
Off
Off
0
0
0
0
0
0
0
0
Off
Off
Off
Off
Off
Off
Off
Off
Off
Off
Off
On
On
On
On
On
On
On
On
1. Press the MENU button on the remote control to display the menu on the TV screen.
2. Press the
V
button to select the
symbol on the menu screen then press
B
to enter the ‘Set
Up’ menu
3. Press the
V
button to select ‘Manual Set Up’ then press
B
to enter the ‘Manual Set Up’ menu.
4. Press the
V
button to select ‘Further Programme Preset’ then press
B
to enter the ‘Further
Programme Preset’ menu.
5. Press the
v
or
V
buttons to select the relevant programme number then press the
B
button
repeatedly to select a) ATT b) VOL c) AFT or d) DECODER. The selected item changes
colour.
6. a)
ATT - RF Attenuator
Press the
v
or
V
buttons to switch attenuator ‘on’ or ‘off’. Press the OK button to confirm the
selection. Repeat steps 5 and 6a if you wish to adjust the attenuation of the other channels.
b)
VOL - Volume Offset
Press the
v
or
V
buttons to adjust the volume level (range -7 to +7) of the channel. Store by
pressing the OK button. Repeat steps 5 and 6b if you wish to adjust the volume level of the
other channels.
c)
AFT - Automatic Fine Tuning
Press the
v
or
V
buttons to fine tune the channel frequency over a range of -15 to +15. Press
the OK button to confirm. Repeat steps 5 and 6c if you wish to fine tune other channels.
d)
DECODER
Press the
v
or
V
buttons to select AV1 or AV2 for the programme position then press the OK
button to confirm. You can now attach a decoder to the AV1 or the AV2 socket on the back
of the TV and the picture from that decoder will appear on this programme number. Repeat
steps 5 and 6d to preset the AV output for other programme positions.
7. Press the MENU button to remove the menu from the TV screen.
Selecting the ‘Demo’ feature
This function provides an overview of some of the features available on the TV.
1. Press the MENU button on the remote control to display the menu on the TV screen.
2. Press the
V
button to select the
symbol on the menu screen then press
B
to enter the
‘Set Up’ menu
3. Press the
V
button to select ‘Manual Set Up’ then press
B
to enter the ‘Manual Set Up’
menu.
4. Press the
V
button to select ‘Demo’ then press
B
to start the demonstration (which lasts for
approximately 5 minutes).
5. Press the
button to remove the demonstration from the TV screen.
Set Up
Auto Tuning
Programme Sorting
Select Next View
Dolby Surround Set Up
AV Preset
Manual Set Up
Select:
Enter:
Manual Set Up
Select:
Enter:
Language/Country
Manual Programme Preset
Further Programme Preset
RGB Set Up
Picture Rotation
Personal ID
Demo
O
- - - - - - -
21
Using the TV menu system:
Adjusting the picture geometry for an RGB source
When connecting an RGB source such as a Sony playstation you may need to readjust the geometry of the picture.
RGB Set Up
Adjust Size:
Confirm: OK
H Centre
O
H Size
O
RGB Set Up
Adjust Position:
Confirm: OK
H Centre
O
H Size
O
1. Press the
button on the remote control to select the connected RGB source
.
2. Press the MENU button to display the menu on the TV screen.
3. Press the
V
button to select the
symbol on the menu screen then press
B
to enter the ‘Set
Up’ menu
4. Press the
V
button to select ‘Manual Set Up’ on the menu screen then press
B
to enter the
‘Manual Set Up’ menu
5. Press the
V
button to select ‘RGB Set Up’ on the menu screen then press
B
to enter the
‘RGB Set Up’ sub menu.
6. Press
B
to select H Centre then press
v
or
V
to adjust the centre of the picture over a range
of -10 to +10. Store the new range by pressing the OK button.
7. Press
B
to select H Size then press
v
or
V
to adjust the horizontal coordinates over a range
of -10 to +10. Store the new range by pressing the OK button.
8. Press the MENU button to remove the menu from the TV screen.
1
Adjusting the picture rotation
Because of the earth’s magnetism the picture might slant. In this case you can readjust the picture.
1. Press the MENU button on the remote control to display the menu on the TV screen.
2. Press the
V
button to select the
symbol on the menu screen then press
B
to enter the
‘Set Up’ menu
3. Press the
V
button to select ‘Manual Set Up’ then press
B
to enter the ‘Manual Set Up’
menu.
4. Press the
V
button to select ‘Picture Rotation’ then press
B
to enter the ‘Picture Rotation’
sub menu.
5. Press the
v
or
V
buttons to rotate the picture over a range of -5 to +5 then press the OK
button to store.
6. Press the MENU button to remove the menu from the TV screen.
Manual Set Up
Rotate:
Confirm: OK
Language/Country
Manual Programme Preset
Further Programme Preset
RGB Set Up
Picture Rotation
Personal ID
Demo
O
Set Up
Auto Tuning
Programme Sorting
Select Next View
Dolby Surround Set Up
AV Preset
Manual Set Up
Select:
Enter:
22
Using the TV menu system:
Inputting your personal ID
With this feature, you can allocate a safety code to your TV which will enable you to be traced if the TV is stolen and
recovered. The safety code however can only be input once - please make a note of it!
1. Press the MENU button on the remote control to display the menu on the TV screen.
2. Press the
V
button to select the
symbol on the menu screen then press
B
to enter the
‘Set Up’ menu
3. Press the
V
button to select ‘Manual Set Up’ on the menu screen then press
B
to enter the
‘Manual Set Up’ menu.
4. Press the
V
button to select ‘Personal ID’ on the menu screen then press
B
to enter the
‘Personal ID’ sub menu.
5. Press the
v
or
V
buttons to select the first of a total of 11 characters (letter, number, + or
a blank) then press
B
to go to the next character.
6. Repeat step 5 to input all the characters for the code.
7. Press the OK button to store. A status box appears on screen requesting you to re-enter
your code.
8. Press the OK button to store the code or press
b
to cancel.
9. Press the MENU button to remove the menu from the TV screen.
Presetting and naming input signals
Using this feature, you can automatically format and label input sources.
1. Press the MENU button on the remote control to display the menu on the TV screen.
2. Press the
V
button to select the
symbol on the menu screen then press
B
to enter the ‘Set
Up’ menu
3. Press the
V
button to select ‘AV Preset’ on the menu screen then press
B
to enter the ‘AV
Preset’ menu.
4. Press the
v
or
V
buttons to select the desired AV input (AV1, 2, 3 or 4)..
5. Press the
B
button to select ‘Auto Format’ then press the
v
or
V
buttons to select ‘Off’,
‘Normal’ or ‘Full’.
6. Press the
B
button to select ‘Label’.
7. Press the
v
or
V
buttons to select the first character of the name then press the
B
button to
move to the next character.
8. Repeat step 7 to select the other 4 characters then store by pressing the OK button.
9. Repeat steps 4-8 for the other AV input sources then press the MENU button to remove the
menu from the TV screen.
Manual Set Up
Select A-Z, 0-9:
Confirm: OK
Language/Country
Manual Programme Preset
Further Programme Preset
RGB Set Up
Picture Rotation
Personal ID
Demo
- - - - - -
AV Preset
Select :
Enter:
Input Auto Format Label
AV 1
AV 2
AV 3
AV 4
Full
Off
Normal
Normal
AV 1
AV 2
AV 3
AV 4
AV Preset
Select :
Confirm: OK
Input Auto Format Label
AV 1
AV 2
AV 3
AV 4
Next :
AV 1
AV 2
AV 3
AV 4
Off
Normal
Full
Full
23
D E F
G
R/D/D/D
L/G/S/I
R/D
D/D
L/G
S/I
1
2
DVD
VHS
R/D/D/D
L/G/S/I
R/D
D/D
L/G
S/I
C
-
-
-
s
s
1
1
2
S
2
3
S 3
C
-
-
-
s
s
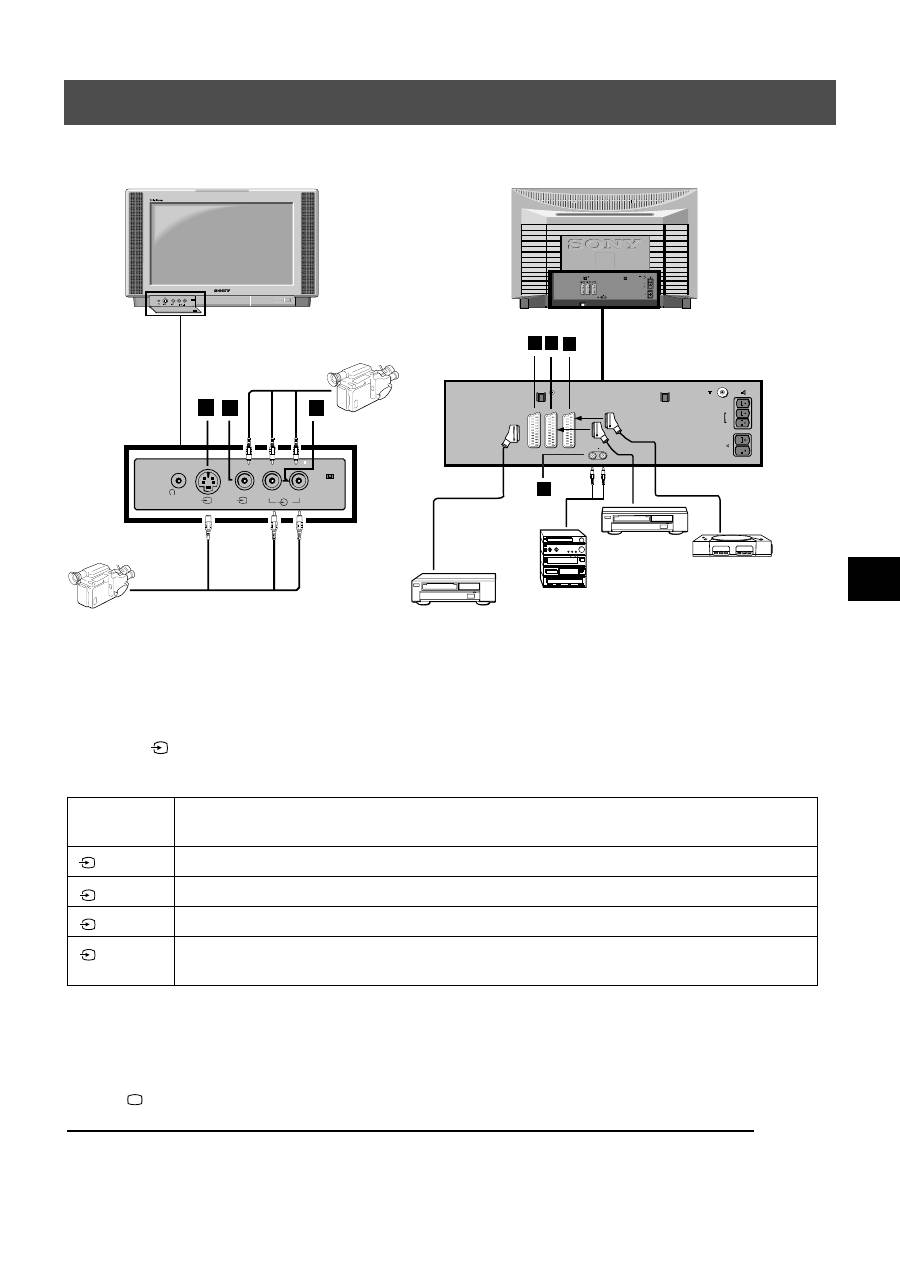
Additional Equipment
Using the illustrations below, you can connect a wide range of audio and video equipment to your TV.
Connecting additional equipment to the TV
In order to get the input signal of a connected equipment on to the TV screen, you need to select the symbol of the connector, to
which you have connected the device.
1. Using the illustrations above, connect your equipment to the appropriate TV socket.
2. Press the
button repeatedly on the remote control until the correct input symbol for your equipment appears on the TV
screen (see table below):
* automatic detection of the signal according to the connected equipment
3. Switch on the connected equipment.
4. Press
to return to the normal TV screen.
Note: To avoid picture distortion, do not connect equipment to the
A
and
B
sockets at the same time.
Symbol on
the TV screen
Input signals from connector
•
Audio/video input signal through scart connector
D
or* RGB through scart connector
D
•
Audio/video input signal through scart connector
E
or* S-video through scart connector
E
•
Audio/video input signal through scart connector
F
or* S-video through scart connector
F
•
S-video input signal through the 4-pin DIN connector
A
or* video input signal through phono jack
B
and audio input signal through phono jacks
C
1
2
3
4
A
B
C
L/G/S/I R/D/D/D
MONO
s
4
4
4
L/G/S/I
R/D/D/D
S
4
4
4

24
Optional Equipment
*
If the picture or sound is distorted, move the VCR away from the TV set.
*
When connecting a monaural VCR, connect only the white jack to both the TV set and the VCR.
*
For information on how to select the output signal of the scart 2
/
, see page 16.
*
When connecting external hi-fi equipment, you can adjust the volume level by adjusting the headphones setting in the
sound menu - please refer to the ‘Adjusting picture and sound’ section of this manual.
Additional information when connecting equipment
2
s
2
Smartlink is a direct link between your TV and VCR.
For Smartlink you need:
*
A VCR which supports Smartlink, NexTView Link, Easy Link or Megalogic.
*
A fully-wired 21-pin scart cable to connect your VCR to scart 2
/
connector.
The features of Smartlink are:
*
Tuning information such as the channel overview are downloaded from the TV set to the VCR.
*
With NexTView you can programme your VCR easily.
*
Direct TV recording : while watching TV you need to press just one button on the VCR to record this programme.
For more information on Smartlink please refer to your VCR instruction manual.
Smartlink
2
s
2
Using the buttons underneath the cover of the remote control you can control other Sony equipment.
1. Open the cover of the remote control.
2. Set the selector VTR 1234 DVD according to the equipment you want to control:
VTR1 Beta VCR
VTR2 8mm VCR
VTR3 VHS VCR
VTR4 Digital Video (DCR-VX 1000/9000E,VHR-1000)
DVD Digital Video Disk
3. Use the buttons on the remote control to operate the equipment.
*
If your equipment has a COMMAND MODE selector, set this selector to the same position as the VTR 1234 DVD
selector on the TV remote control.
*
If the equipment does not have a certain function, the corresponding button on the remote control does not work.
Remote control of other Sony equipment
25
Additional Information
Specifications
TV system
B/G/H, D/K, I, L
Colour system
PAL, SECAM
NTSC 3.58, 4.43 (only Video In)
Channel coverage
See the ‘Channel Display Table’ below.
Picture tube
FD Trinitron WIDE
Approx 91cm (36 inches), 102° deflection
Rear Terminals
/
21-pin Euro connector (CENELEC standard) including audio/
video input, RGB input, TV audio/video output.
/
21-pin Euro connector (CENELEC standard) including audio/
video input, S-video input, Monitor audio/video output.
/
21-pin Euro connector (CENELEC standard) including audio/
video input, S-video input, Monitor audio/video output.
L/G/S/I
RCA connectors, variable output for audio signals
R/D/D/D
External speaker terminals : 2-pin DIN (5)
RF In
Front Terminals
Video input -phono jacks
Audio inputs - phono jacks
S video input - 4 pin DIN
Headphones jack - minijack stereo
1
1
2
s
2
3
s
3
4
4
s
4
Sound output
Left and Right speaker: 2x30W (music power)
2x15W (RMS)
Centre speaker:
1x20W (music power)
1x10W (RMS)
Surround speakers:
2x10W (music power)
2x5W (RMS)
Power consumption
170W
Dimensions (wxhxd)
Approx. 972 x 613.5 x 591 mm
Weight
Approx. 90.0kg
Accessories supplied
RM-892 remote control (1)
IEC designated size AA batteries (2)
Surround speaker (2)
Surround speaker lead (2)
Other features
Flat display Trinitron tube, noise detection, DRC 50Hz
picture, DRC 100Hz picture, PAP, PAT, graphic equaliser,
personal ID, sleep timer, NexTView, Dolby Surround, Digital
Comb Filter, second tuner.
Design and specifications are subject to change
without notice.
Channel Display Table
Receivable Channels
Channel Displays
B/G/H
E2..12, 21..69
C02..C12, C21..69
CABLE TV (1)
S1..S41
S01..S41
CABLE TV (2)
S01..S05
S42..S46
M1..M10
S01..S10
U1..U10
S11..S20
ITALIA
A..H, H1, H2
C13..C20
D/K
R01..R12, R21..R69
C01..C12, C21..C69
S01..S05
S42..S46
L
F2..F10, F21..F69
C01..C12, C21..C69
I
B21..B69
C21..C69
26
Additional Information
Here are some simple solutions to problems which may affect the picture and sound.
•
If you continue to have problems, have your TV serviced by qualified personnel.
•
NEVER open the casing yourself.
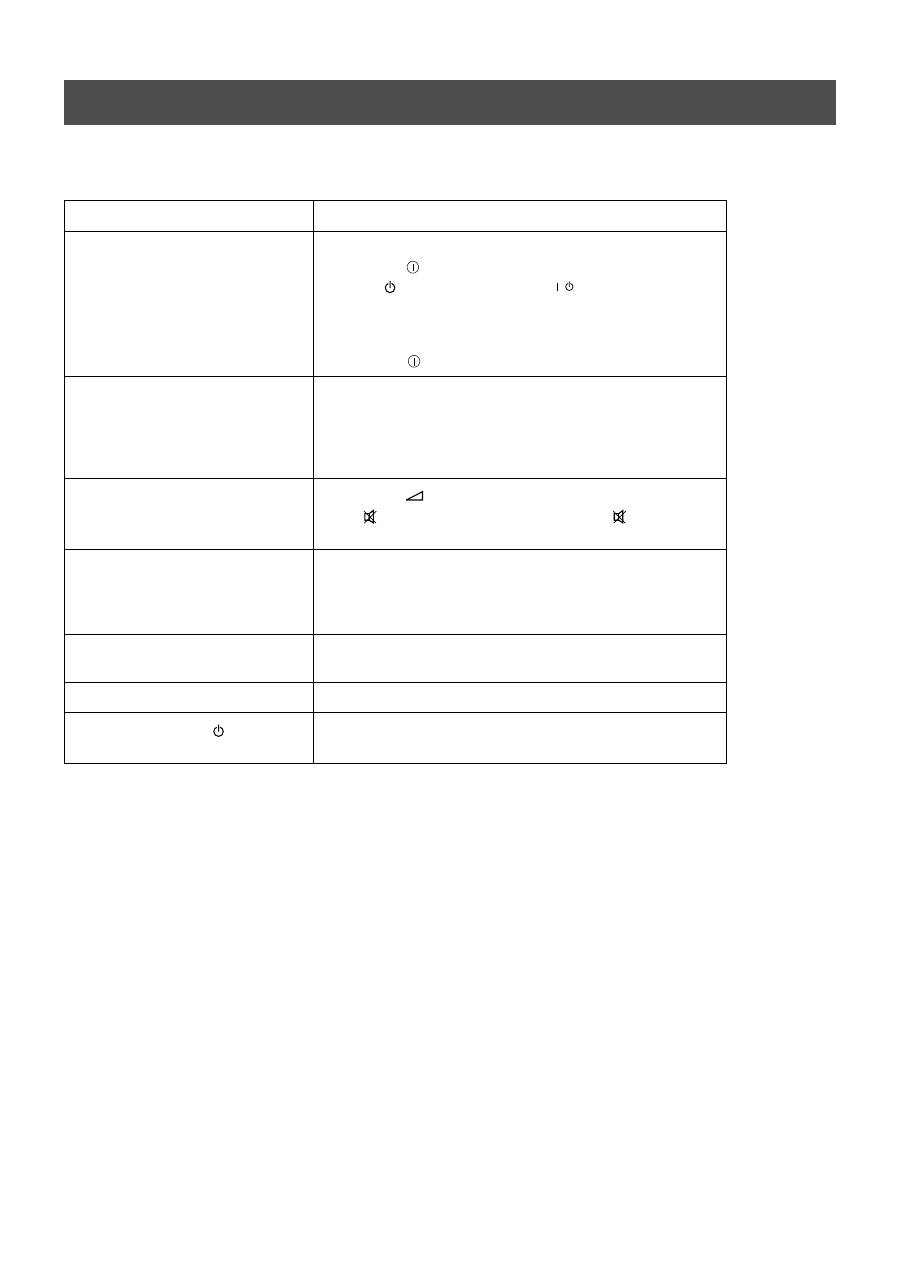
Troubleshooting
Problem
Suggested remedy
No picture (screen is dark), no sound
•
Plug the TV in.
•
Press the
button on the front of the TV.
•
If the
indicator is on press the
button or a numbered
button on the remote control.
•
Check the aerial connection.
•
Turn the TV off for 3 or 4 seconds and then turn it on again
using the
button on the front of the TV.
Poor or no picture (screen is dark), but
good sound.
•
Using the MENU system, select the Picture
Adjustment display. Adjust the brightness, picture and colour
balance levels.
•
From the Picture Adjustment display select RESET to return
to the factory settings.
Good picture, no sound
•
Press the
button on the remote control.
•
If
is displayed on the screen, press the
button on the
remote control.
No colour on colour programmes
•
Using the MENU system, select the Picture Adjustment
display and adjust the colour setting.
•
From the Picture Adjustment display select RESET to return
to the factory settings.
distorted picture when changing
programmes or selecting Teletext
•
Turn off any equipment connected to the scart connectors on
the rear of the TV.
Remote control does not function
•
Replace the batteries.
The standby indicator
on the TV
flashes
•
Contact your nearest Sony service centre.
/

27
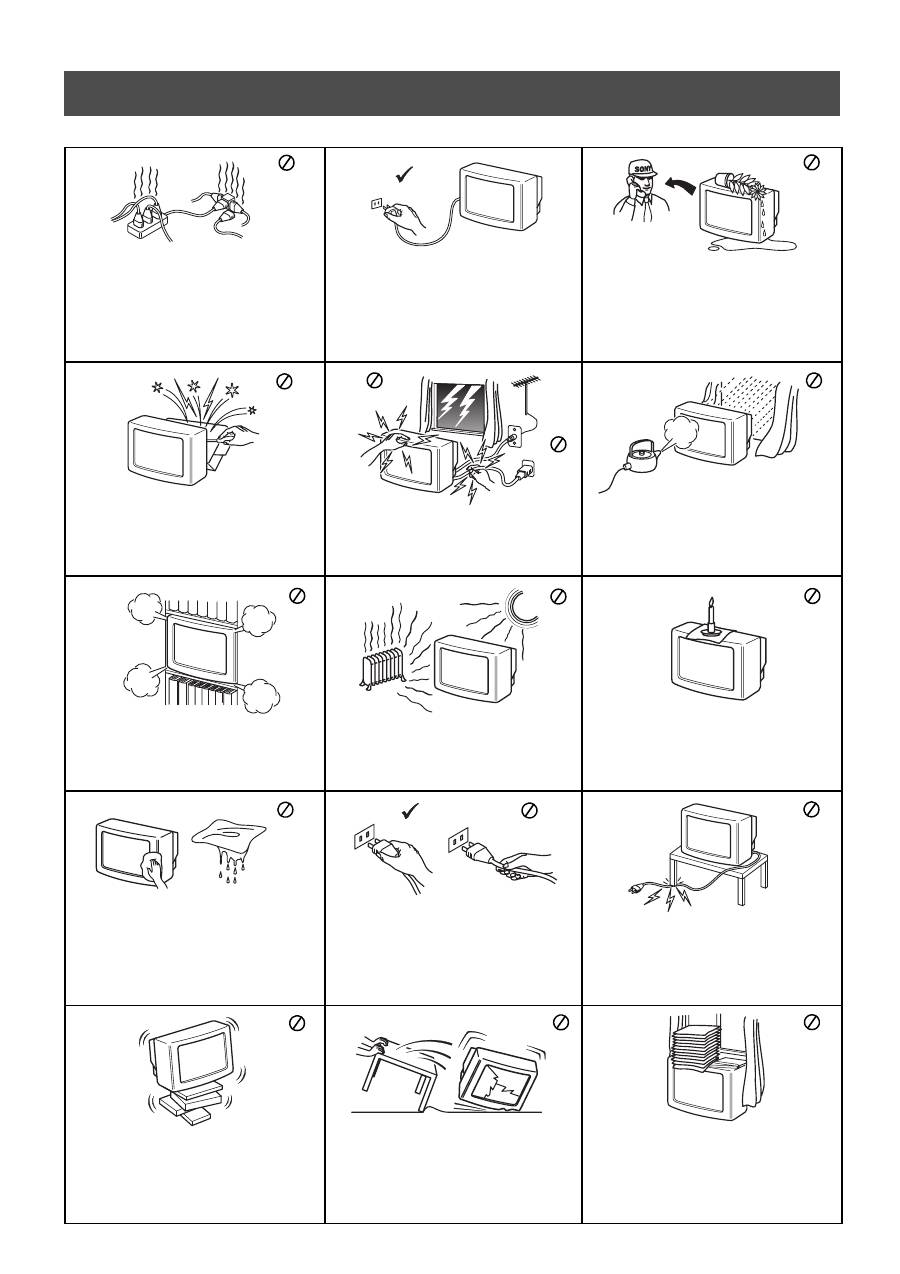
Informacje dotyczące bezpieczeństwa
Bezpieczeństwo
Telewizor jest przystosowany do zasilania tylko
napi
ę
ciem przemiennym 220 – 240 V. Nie w
łą
cza
ć
zbyt du
ż
ej liczby urz
ą
dze
ń
do jednego gniazdka
sieciowego grozi to po
ż
arem lub pora
ż
eniem
pr
ą
dem.
Ze wzgl
ę
du na bezpiecze
ń
stwo i ochron
ę
ś
rodowiska naturalnego zaleca si
ę
, aby telewizor,
który nie jest u
ż
ywany, nie pozostawa
ł
w trybie
czuwania, lecz by
ł
wy
łą
czany z sieci.
Nigdy nie wpycha
ć
do telewizora
ż
adnych
przedmiotów. Grozi to po
ż
arem lub pora
ż
eniem
pr
ą
dem. Nigdy nie wylewa
ć
na telewizor
ż
adnych
p
ł
ynów. Je
ś
li do wn
ę
trza telewizora dostanie si
ę
jaki
ś
p
ł
yn lub przedmiot, nie u
ż
ywa
ć
urz
ą
dzenia,
zanim zostanie ono skontrolowane przez
odpowiednio wykwalifikowan
ą
osob
ę
.
Nie otwiera
ć
obudowy ani nie zdejmowa
ć
pokrywy
z ty
ł
u telewizora. Naprawy powierza
ć
tylko
wykwalifikowanym osobom.
Aby unikn
ąć
ryzyka po
ż
aru lub pora
ż
enia pr
ą
dem,
nie wystawia
ć
telewizora na deszcz i chroni
ć
go
przed wilgoci
ą
.
Dla w
ł
asnego bezpiecze
ń
stwa, w czasie burzy nie
dotyka
ć
ż
adnych elementów telewizora, jego
przewodu zasilaj
ą
cego ani przewodu antenowego.
Nie zakrywa
ć
otworów wentylacyjnych na
telewizorze. Dla zapewnienia w
ł
a
ś
ciwej wentylacji,
pozostawi
ć
wokó
ł
telewizora przynajmniej
1
0 cm
wolnego miejsca.
Nigdy nie stawia
ć
telewizora w miejscach
gor
ą
cych, wilgotnych lub nadmiernie zapylonych.
Nie instalowa
ć
telewizora w miejscach, w których
b
ę
dzie on nara
ż
ony na wibracje mechaniczne.
Aby unikn
ąć
po
ż
aru, przechowywa
ć
ł
atwopalne
przedmioty z dala od telewizora i nie zbli
ż
a
ć
si
ę
do
niego z otwartym ogniem (na przyk
ł
ad
ś
wiec
ą
).
Do czyszczenia telewizora u
ż
ywa
ć
mi
ę
kkiej, lekko
zwil
ż
onej
ś
ciereczki. Nie czy
ś
ci
ć
telewizora
benzyn
ą
, rozcie
ń
czalnikiem ani innymi
ś
rodkami
chemicznymi. Nie rysowa
ć
ekranu telewizora. Dla
bezpiecze
ń
stwa, przed czyszczeniem telewizora
wy
łą
czy
ć
go z sieci.
Przy wy
łą
czaniu przewodu zasilaj
ą
cego z gniazdka
sieciowego chwyta
ć
wtyczk
ę
. Nie ci
ą
gn
ąć
samego
przewodu.
Dba
ć
, aby nie stawia
ć
na przewodzie zasilaj
ą
cym
ci
ęż
kich przedmiotów, poniewa
ż
mog
ą
one
uszkodzi
ć
przewód.
Zalecamy nawini
ę
cie nadmiaru przewodu na
zaczepy znajduj
ą
ce si
ę
z ty
ł
u telewizora.
Ustawi
ć
telewizor na bezpiecznej, stabilnej
podstawie. Nie pozwala
ć
, aby wspina
ł
y si
ę
na niego
dzieci. Nie k
ł
a
ść
telewizora na boku ani ekranem
do góry.
Przed przenoszeniem telewizora wy
łą
czy
ć
go z
sieci. Unika
ć
nierównych powierzchni, szybkiego
marszu i u
ż
ywania nadmiernej si
ł
y. Je
ś
li telewizor
zosta
ł
upuszczony lub uszkodzony, natychmiast
zleci
ć
jego kontrol
ę
odpowiednio
wykwalifikowanej osobie z serwisu.
Nie zakrywa
ć
otworów wentylacyjnych na
telewizorze takimi przedmiotami jak zas
ł
ony czy
gazety.
1
Spis Treści
Spis Treści
Instalowanie
1. Sprawdzanie załączonych akcesoriów
2. Wkładanie baterii do pilota
3. Podłączanie telewizora
4. Włączanie telewizora
5. Używanie przycisku sterującego
6. Programowanie telewizora
7. Znajdywanie kanału wideo
2
2
3
5
5
6
6
Obsługa
Przegląd przycisków telewizora
Przegląd przycisków pilota
NexTView
Telegazeta
Posługiwanie się systemem menu telewizora
Regulacja obrazu
Regulacja dźwięku
Ustawienie 'Dolby Surround'
Używanie menu Funkcje
Zmienianie wielkości obrazu
Posługiwanie się trybem Multi PIP
Działanie trybu PAP (Obraz i obraz)
Zamiana pozycji programów
Ręczne programowanie telewizora
Nadawanie nazw programom
Pomijanie pozycji programów
Posługiwanie się menu "Dalsze nastawianie"
Włączanie trybu "Demo"
Regulacja obrotu obrazu
Regulacja geometrii obrazu dla sygnałów RGB
Wprowadzanie identyfikatora osobistego
Ustawianie i nadawanie nazw urządzeniom zewnętrznym
7
8
9
11
13
13
14
15
16
16
17
17
18
18
19
19
20
20
21
21
22
22
Dodatkowy osprzęt
Podłączanie urządzeń dodatkowych
Informacje dodatkowe dotyczące podłączania urządzeń
Smartlink
Zdalne sterowanie innym sprzętem Sony
23
24
24
24
Informacje dodatkowe
Dane techniczne
Tabela programów
Problemy i ich usuwanie
25
25
26
Оглавление
- Follow steps 1-7 to install the TV and view TV programmes. Installation
- Operation
- Wykonaj czynności 1-7, aby dokonaćinstalacji telewizora i zacząć oglądać programy. Instalowanie
- Obsługa
- Instalace
- Obsluha
- Kövesse az 1-7. lépéseket a TV-készüléküzembe helyezéséhez és a TV-programokmegtekintéséhez. Üzembe helyezés
- Használat
- Използване
- Установка
