Sony KDL-46X3500: Set-up menu
Set-up menu: Sony KDL-46X3500
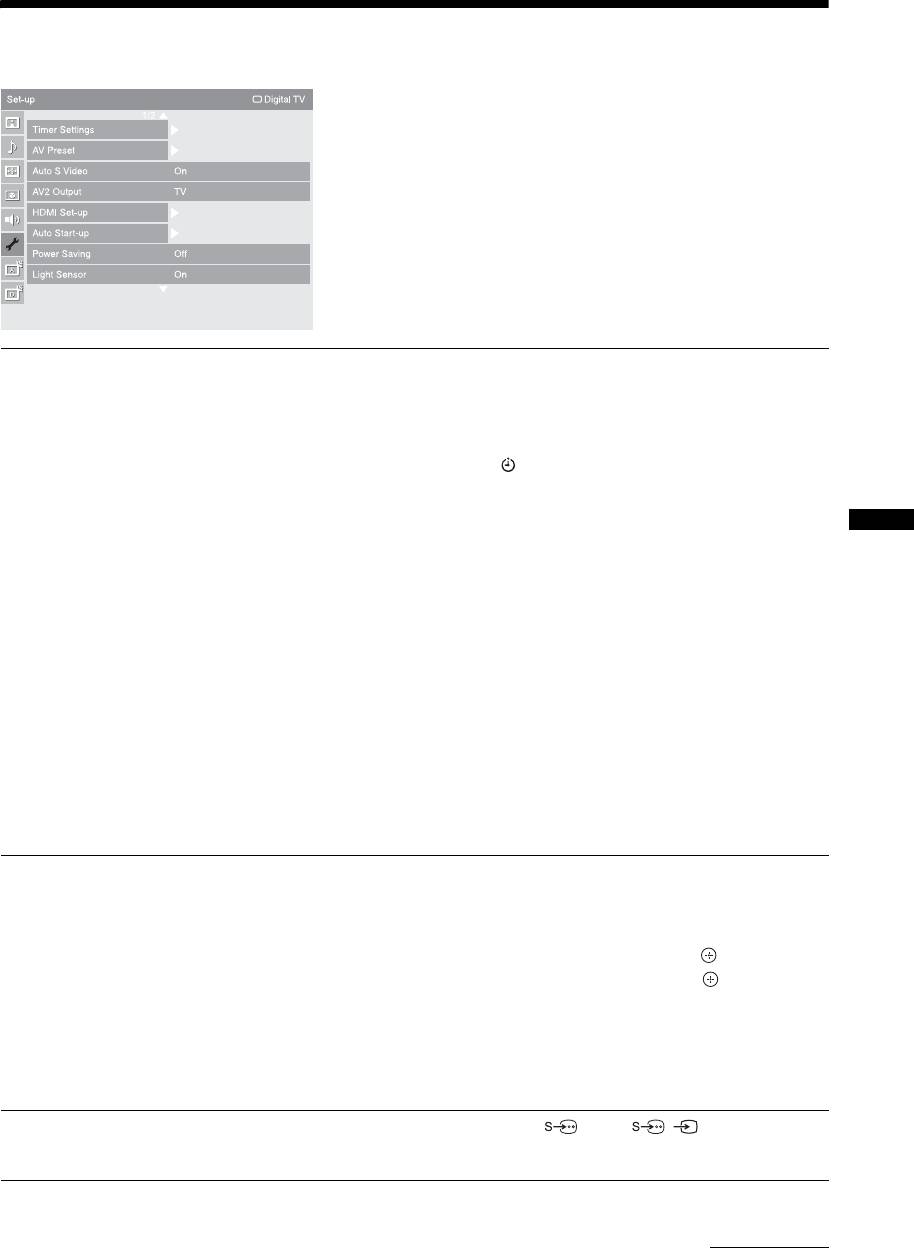
Set-up menu
You can select the options listed below on the “Set-
up” menu. To select options in “Settings”, refer to
“Navigating through menus” (page 27).
Timer Settings
Sets the timer to turn on/off the TV.
Sleep Timer
Sets a period of time after which the TV automatically switches itself into standby
mode.
When “Sleep Timer” is activated, the (Timer) indicator on the TV front panel
lights up in orange.
z
• If you turn off the TV and turn it on again, “Sleep Timer” is reset to “Off”.
• A notification message appears on the screen one minute before the TV switches to standby
Using Menu Functions
mode.
On Timer
Sets the timer to turn on the TV from standby mode.
“Day”: Selects the day on which you want to activate the “On Timer”.
“Time”: Sets the time to turn on the TV.
“Duration”: Selects the time period after which the TV automatically switches to
standby mode again.
“Volume Set-up”: Sets the volume for when the timer turns on the TV.
Clock Set
Allows you to adjust the clock manually. When the TV is receiving digital channels,
the clock cannot be adjusted manually since it is set to the time code of the broadcast
signal.
AV Preset
Assigns a name to any equipment connected to the side and rear sockets. The name
will be displayed briefly on the screen when the equipment is selected. You can skip
input signals from connected equipment that you do not want displayed on the
screen.
1 Press
F/f to select the desired input source, then press .
2 Press
F/f to select the desired option below, then press .
Equipment labels: Uses one of the preset labels to assign a name to connected
equipment.
“Edit:”: Creates your own label. Follow steps 2 to 4 of “Programme Labels”
(page 40).
“Skip”: Skips an unnecessary input source.
Auto S Video
Selects the input signal from S video sockets 7 when / 7 sockets are both
connected.
Continued
GB
37
AV2 Output
Sets a signal to be output through the socket labelled / 2 on the rear of the TV.
If you connect a VCR or other recording equipment to the / 2 socket, you can
then record from the equipment connected to other sockets of the TV.
“TV”: Outputs a broadcast.
“AV1”: Outputs signals from equipment connected to the / 1 socket.
“AV7”: Outputs signals from equipment connected to the
/ 7 socket.
“Auto”: Outputs whatever is being viewed on the screen (except signals from the
/ 3, / 4, HDMI IN 5, HDMI IN 6, HDMI IN 8 and PC IN /
sockets).
HDMI Set-up
This is used to set the HDMI control compatible equipment connected to the HDMI
sockets. Note that the link setting must also be made on the side of the HDMI control
compatible equipment that is connected.
HDMI Control
Sets whether or not to link the operations of the HDMI control compatible equipment
and the TV. When set to “On”, the following menu items can be performed.
Auto Devices Off
When this is set to “On”, any connected HDMI control compatible equipment will
be turned off with the TV.
Auto TV On
When this is set to “On”, and if the connected HDMI control compatible equipment
is turned on, the TV automatically turns on, and then displays the HDMI input from
the connected equipment.
HDMI Device List
Displays the connected HDMI control compatible equipment.
~
You cannot use “HDMI Control” if the TV operations are linked to the operations of an audio
system that is compatible with HDMI control.
Auto Start-up
Starts the initial set-up to select the language and country/region, and tune in all
available digital and analogue channels.
Usually, you do not need to do this operation because the language and country/
region will have been selected and channels already tuned when the TV was first
installed (page 6).
However, this option allows you to repeat the process (e.g. to retune the TV after
moving house, or to search for new channels that have been launched by
broadcasters).
Power Saving
Selects the power saving mode to reduce the power consumption of the TV.
When “Picture Off” is selected, the picture is switched off and the (Picture Off)
indicator on the TV front panel lights up in green. The sound remains unchanged.
Light Sensor
“On”: Automatically optimises the picture settings according to the ambient light in
the room.
“Off”: Turns off the “Light Sensor” feature.
~
Be sure not to put anything over the sensor, as its function may be affected. See page 14 for
further information on the sensor.
Logo Illumination
Lights up and turns off the Sony logo on the front of the TV.
PC Power Management
Switches the TV to standby mode if no signal is received for 30 seconds in the PC
input.
GB
38

Language
Selects the language in which the menus are displayed.
Product Information
Displays your TV’s product information.
All Reset
Resets all settings to the factory settings and then displays the “Auto Start-up”
screen.
~
• Be sure not to turn the TV off during this period (it takes about 30 seconds) or press any
buttons.
• All settings, including Digital Favourite list, country/region, language, auto tuned channels,
etc. will be reset.
Using Menu Functions
GB
39
Оглавление
- Table of Contents
- 1: Checking the 2: Attaching the stand accessories (except for KDL-
- 3: Connecting an aerial/ 4: Preventing the TV cable/VCR from toppling over
- 5: Bundling the cables 6: Performing the initial set-up
- Detaching the Table- Top Stand from the TV
- Safety information
- Precautions
- Overview of the remote
- Overview of the TV buttons and indicators
- Watching TV
- Using the Digital Electronic Programme Guide (EPG) *
- Using the Digital Favourite list *
- Connecting optional equipment
- Viewing pictures from
- Using the remote
- Using USB photo viewer Using HDMI control
- Navigating through
- Picture menu
- Sound menu
- Screen menu (except for PC input)
- Screen menu (for PC input)
- Video Settings menu
- Audio Settings menu
- Set-up menu
- Analogue Set-up menu
- Digital Set-up menu
- Specifications
- Cleaning Troubleshooting
- Spis treści
- 1: Sprawdzanie 2: Zamocowanie wyposażenia stojaka (oprócz KDL-
- 3: Podłączanie anteny/ 4: Zabezpieczenie sieci kablowej/ odbiornika TV przed magnetowidu przewróceniem
- 5: Zebranie kabli w 6: Wykonanie wiązkę początkowej konfiguracji
- Odłączanie
- Informacje
- Środki ostrożności
- Przegląd pilota
- Przegląd przycisków i wskaźników odbiornika TV
- Odbiór audycji
- Używanie Cyfrowego elektronicznego informatora programowego (EPG) *
- Używanie cyfrowej listy Ulubionych *
- Podłączanie dodatkowego sprzętu
- Oglądanie obrazów
- Używanie pilota
- Używanie
- Używanie sterowania HDMI
- Nawigacja w menu
- Menu Obrazu
- Menu Dźwięku
- Menu Ustawień ekranu (oprócz wejścia PC)
- Menu Ustawień ekranu (dla wejścia PC)
- Menu Ustawień wideo
- Menu Ustawień audio
- Menu Ustawień
- Menu Ustawień analogowych
- Menu Ustawień cyfrowych
- Dane techniczne
- Czyszczenie Rozwiązywanie
- Содержание
- 1: Проверка 2: Прикрепление принадлежностей подставки (за
- 3: Подсоединение 4: Защита телевизора антенны/кабеля
- 5: Укладка кабелей 6: Выполнение начальной установки
- Отсоединение
- Сведения по
- Меры
- Обзор пульта ДУ
- Обзор кнопок и индикаторов на телевизоре
- Просмотр
- Использование Цифрового электронного руководства по программам (EPG) *
- Использование цифрового списка Избранное *
- Подключение дополнительного оборудования
- Просмотр
- Использование
- Использование USB-
- Использование
- Навигация по пунктам
- Меню Изображение
- Меню Звук
- Меню Управление экраном (за исключением входа с ПК)
- Меню Управление экраном (для входа с ПК)
- Меню Установки Видео
- Меню Установки звука
- Меню Настройка
- Меню Настр. аналоговых каналов
- Меню Цифровая конфигурация
- Технические характеристики
- Чистка Поиск и устранение
