Sony KDL-46X3500: 5: Bundling the cables 6: Performing the initial set-up
5: Bundling the cables 6: Performing the initial set-up: Sony KDL-46X3500
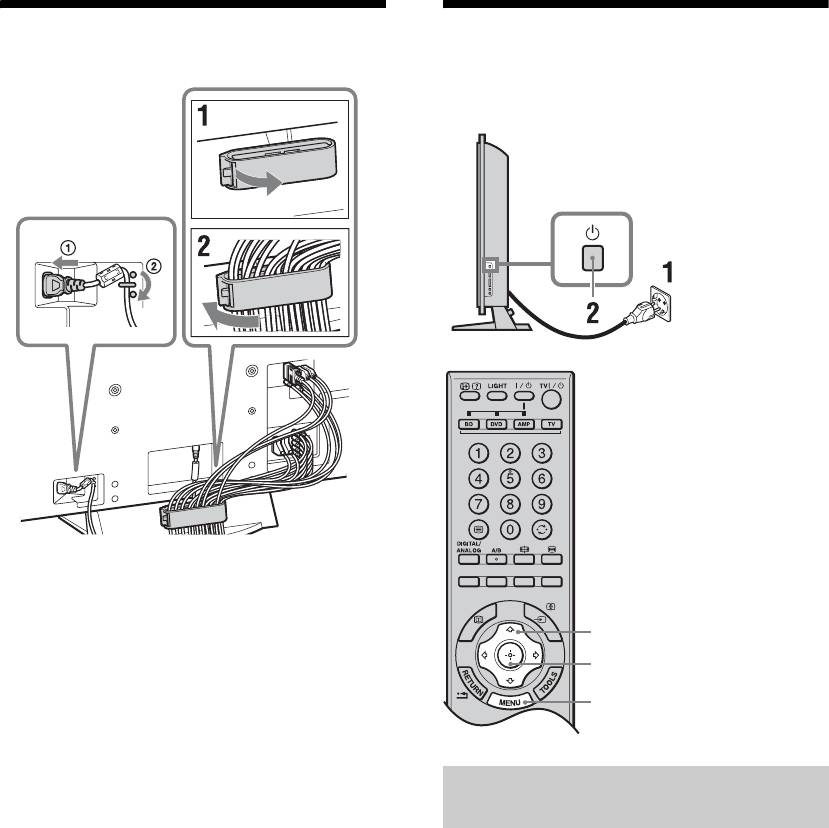
5: Bundling the cables
6: Performing the initial
set-up
~
The hook of the cable holder can be opened from either sides
depending on attaching position.
3, 4, 6, 7
3, 4, 6, 7
9
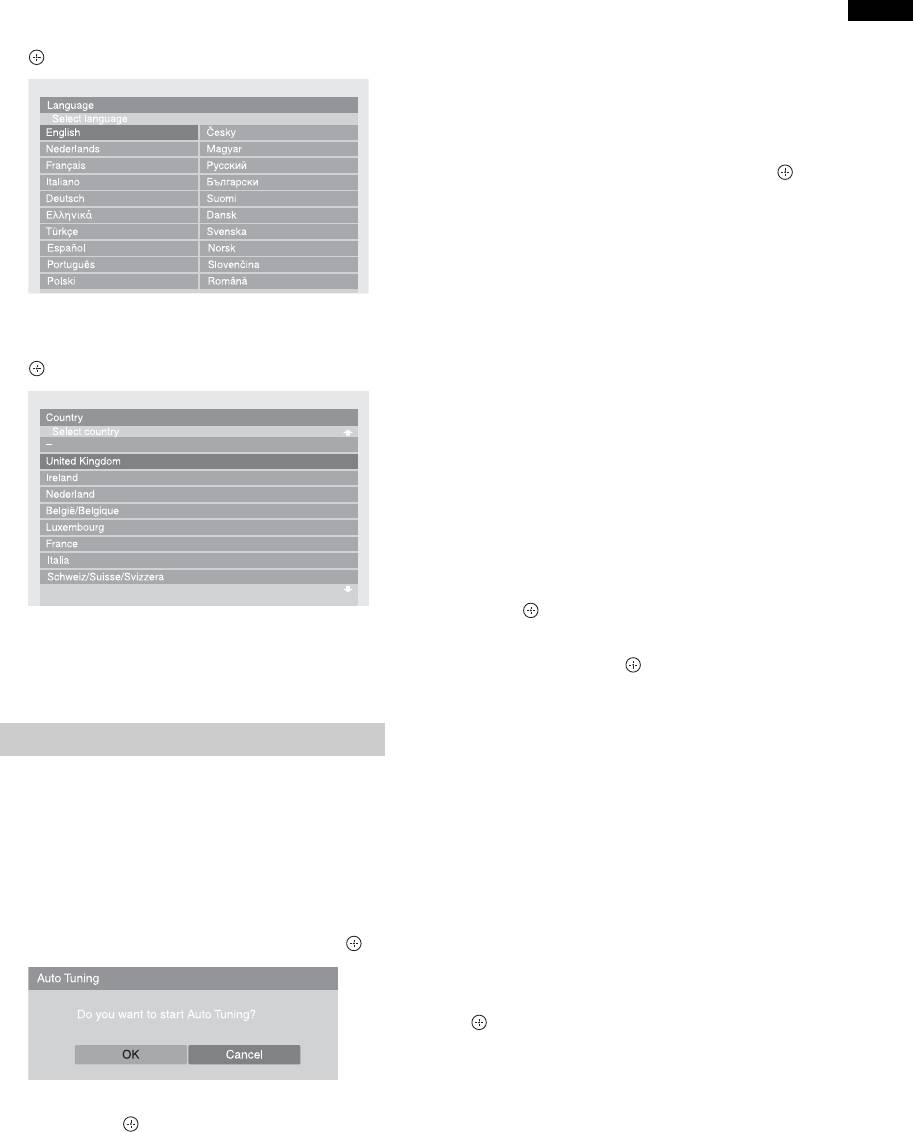
Selecting the language and country/
region
1 Connect the TV to your mains socket
(220–240 V AC, 50 Hz).
2 Press 1 on the right side of the TV.
When you turn on the TV for the first time, the
Language menu appears on the screen.
GB
6
The TV starts searching for all available digital
3 Press F/f/G/g to select the language
channels, followed by all available analogue
displayed on the menu screens, then press
Start-up Guide
channels. This may take some time, so do not
.
press any buttons on the TV or remote while
proceeding.
If a message appears for you to confirm the aerial
connection
No digital or analogue channels were found.
Check all the aerial connections and press to
start auto tuning again.
8 When the Programme Sorting menu
appears on the screen, follow the steps of
“Programme Sorting” on page 40.
If you do not wish to change the order in which the
analogue channels are stored on the TV, go to next
4 Press F/f to select the country/region in
step.
which you will operate the TV, then press
9 Press MENU to exit.
.
The TV has now tuned in all the available
channels.
~
When a digital broadcast channel cannot be received, or
when selecting a country/region in which there are no digital
broadcasts in step 4 (page 7), the time must be set after
performing step 9.
To tune the TV for digital cable connection
1 Press F/f to select “Scan Type”, then
press .
If the country/region which you want to use on the
TV does not appear in the list, select “–” instead
2 Press F/f to select “Quick Scan” or “Full
of a country/region.
Scan”, then press .
“Quick Scan”: Channels are tuned according to
the cable provider’s information within the
broadcast signal. The recommended setting for
Auto tuning the TV
“Frequency”, “Network ID” and “Symbol Rate” is
“Auto” unless your cable provider has supplied
5 Before you start auto tuning the TV, insert
actual values to use. “Quick Scan” is
a pre-recorded tape into the VCR
recommended for fast tuning when this is
connected to the TV (page 5) and start play
supported by your cable provider.
back.
“Full Scan”: All available channels are tuned and
The video channel will be located and stored on
stored. This procedure may take some time. This
the TV during auto tuning.
option is recommended when “Quick Scan” is not
If no VCR is connected to the TV, skip this step.
supported by your cable provider.
For further information about supported cable
6 Press G/g to select “OK”, then press .
providers, refer to the support web site:
http://support.sony-europe.com/TV/DVBC/
3 Press G/g/f to select “Start”, then press
.
The TV starts searching for channels. Do not press
any buttons on the TV or remote.
~
7 Press F/f to select “Antenna” or “Cable”,
Some cable providers do not support “Quick Scan”. If no
then press .
channels are detected using “Quick Scan”, perform “Full
If you select “Cable”, the screen for selecting the
Scan”.
scan type appears. See “To tune the TV for digital
cable connection” on page 7.
GB
7
Оглавление
- Table of Contents
- 1: Checking the 2: Attaching the stand accessories (except for KDL-
- 3: Connecting an aerial/ 4: Preventing the TV cable/VCR from toppling over
- 5: Bundling the cables 6: Performing the initial set-up
- Detaching the Table- Top Stand from the TV
- Safety information
- Precautions
- Overview of the remote
- Overview of the TV buttons and indicators
- Watching TV
- Using the Digital Electronic Programme Guide (EPG) *
- Using the Digital Favourite list *
- Connecting optional equipment
- Viewing pictures from
- Using the remote
- Using USB photo viewer Using HDMI control
- Navigating through
- Picture menu
- Sound menu
- Screen menu (except for PC input)
- Screen menu (for PC input)
- Video Settings menu
- Audio Settings menu
- Set-up menu
- Analogue Set-up menu
- Digital Set-up menu
- Specifications
- Cleaning Troubleshooting
- Spis treści
- 1: Sprawdzanie 2: Zamocowanie wyposażenia stojaka (oprócz KDL-
- 3: Podłączanie anteny/ 4: Zabezpieczenie sieci kablowej/ odbiornika TV przed magnetowidu przewróceniem
- 5: Zebranie kabli w 6: Wykonanie wiązkę początkowej konfiguracji
- Odłączanie
- Informacje
- Środki ostrożności
- Przegląd pilota
- Przegląd przycisków i wskaźników odbiornika TV
- Odbiór audycji
- Używanie Cyfrowego elektronicznego informatora programowego (EPG) *
- Używanie cyfrowej listy Ulubionych *
- Podłączanie dodatkowego sprzętu
- Oglądanie obrazów
- Używanie pilota
- Używanie
- Używanie sterowania HDMI
- Nawigacja w menu
- Menu Obrazu
- Menu Dźwięku
- Menu Ustawień ekranu (oprócz wejścia PC)
- Menu Ustawień ekranu (dla wejścia PC)
- Menu Ustawień wideo
- Menu Ustawień audio
- Menu Ustawień
- Menu Ustawień analogowych
- Menu Ustawień cyfrowych
- Dane techniczne
- Czyszczenie Rozwiązywanie
- Содержание
- 1: Проверка 2: Прикрепление принадлежностей подставки (за
- 3: Подсоединение 4: Защита телевизора антенны/кабеля
- 5: Укладка кабелей 6: Выполнение начальной установки
- Отсоединение
- Сведения по
- Меры
- Обзор пульта ДУ
- Обзор кнопок и индикаторов на телевизоре
- Просмотр
- Использование Цифрового электронного руководства по программам (EPG) *
- Использование цифрового списка Избранное *
- Подключение дополнительного оборудования
- Просмотр
- Использование
- Использование USB-
- Использование
- Навигация по пунктам
- Меню Изображение
- Меню Звук
- Меню Управление экраном (за исключением входа с ПК)
- Меню Управление экраном (для входа с ПК)
- Меню Установки Видео
- Меню Установки звука
- Меню Настройка
- Меню Настр. аналоговых каналов
- Меню Цифровая конфигурация
- Технические характеристики
- Чистка Поиск и устранение
