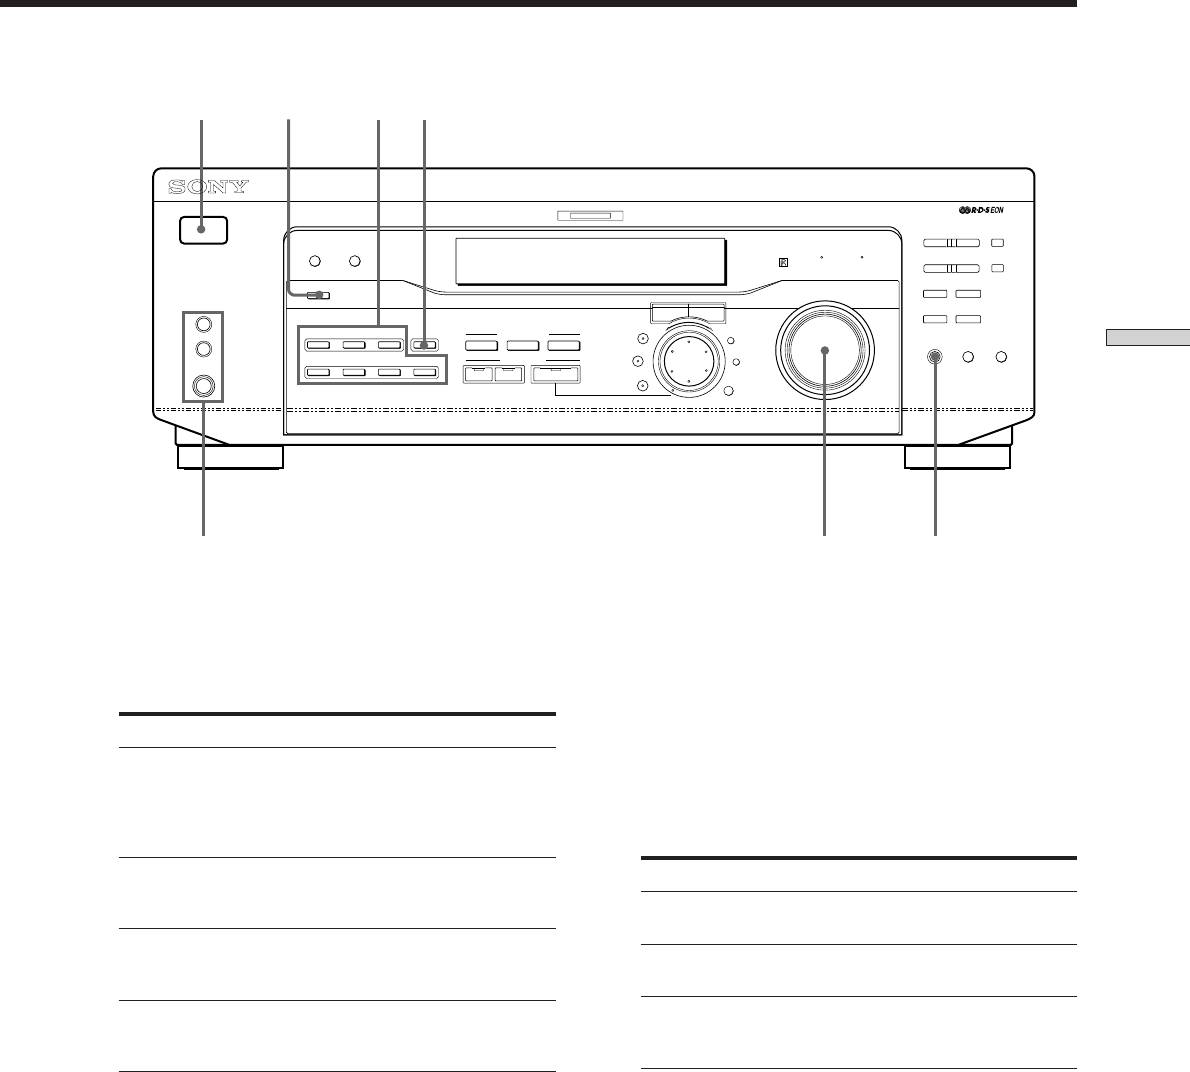
Sony STR-SE501: Location of
Location of: Sony STR-SE501

Location of
Front Panel Parts
Descriptions
Parts and Basic
Operations
This chapter provides information
about the locations and functions of
the buttons and controls on the front
panel. It also explains basic
operations.
1 ?/1 switch
Press to turn the receiver on and off.
2 Function buttons
Press one of the buttons to select the component you
want to use.
To select Press
VCR VIDEO
TV or satellite tuner TV/SAT
DVD or LD player DVD/LD
MD or Tape deck MD/TAPE
CD player CD
Built in tuner TUNER
An audio component AUX
After selecting the component, turn on the component
you selected and play the program source.
• After selecting VCR, DVD player, or LD player, turn on the
TV and set the TV’s video input to match the component
you selected.
GB
22
1
3
2 4
MULTI CHANNEL DECODING
? / 1
PRESET/
– PTY SELECT +
SHIFT
DIMMER
DISPLAY
BASS BOOST TONE
– TUNING +
MEMORY
FM/AM
FM MODE
INPUT MODE
MASTER VOLUME
SPEAKERS
R ON r OFF
A
I
i
RDS EON RDS PTY
B
VIDEO
DVD/LD TV/SAT
5.1CH INPUT
CINEMA STUDIO
–
+
LEVEL
A B C
SET UP
MUTING
BASS
BOOST
TONE
Location of Parts and Basic Amplifier Operations
MD/TAPE CD TUNER AUX
SOUND FIELD
SUR
NAME
PHONES
A. F. D.
2CH MODE
BASS/
TREBLE
ENTER
7
65
3 INPUT MODE button
5 MASTER VOLUME control
Press to select the input mode for your digital
After turning on the component you selected, rotate to
components (DVD/LD and TV/SAT).
adjust the volume.
Each press switches the input mode of the currently
selected component.
6 MUTING button
Press to mute the sound. The indicator lights up when
Select To
the sound is muted.
AUTO Give priority to digital signals
when there are both digital and
7 SPEAKERS selector (STR-DE545 and STR-SE501 only)
analog connections. If there are
no digital signals, analog is
Press according to the front speakers you want to
selected
drive.
DIGITAL (OPTICAL) Specify the digital audio signals
Press To select
input to the DIGITAL OPTICAL
input jacks
A The speakers connected to the FRONT
SPEAKERS A terminals
DIGITAL (COAXIAL) Specify the digital audio signals
input to the DIGITAL COAXIAL
B The speakers connected to the FRONT
input jacks (DVD/LD only)
SPEAKERS B terminals
ANALOG Specify the analog audio signals
A+B* The speakers connected to both the FRONT
input to the AUDIO IN (L and R)
SPEAKERS A and B terminals (parallel
jacks
connection)
* Be sure to connect the front speakers with nominal impedance of
8 ohms or higher if you want to select both sets of front speakers.
4 5.1CH INPUT button
Press to enjoy the audio source connected to the 5.1CH
STR-DE445 only
INPUT jacks with the video from the selected
Press SPEAKERS button to ON.
component.
PHONES jack
• When the 5.1CH INPUT is selected, the tone, bass booster,
Connects headphones.
and sound field effects do not function.
• To change the video input displayed when 5.1CH INPUT is
• To use the headphones, press the SPEAKERS button to OFF
selected, press SET UP (ws) and then press cursor buttons
to output sound to the headphones.
(w;) repeatedly to select “5.1 V. IN” (see page 47 for
• When listening to the headphones, set the sound field to
details).
2CH to get the correct soundstage.
GB
23
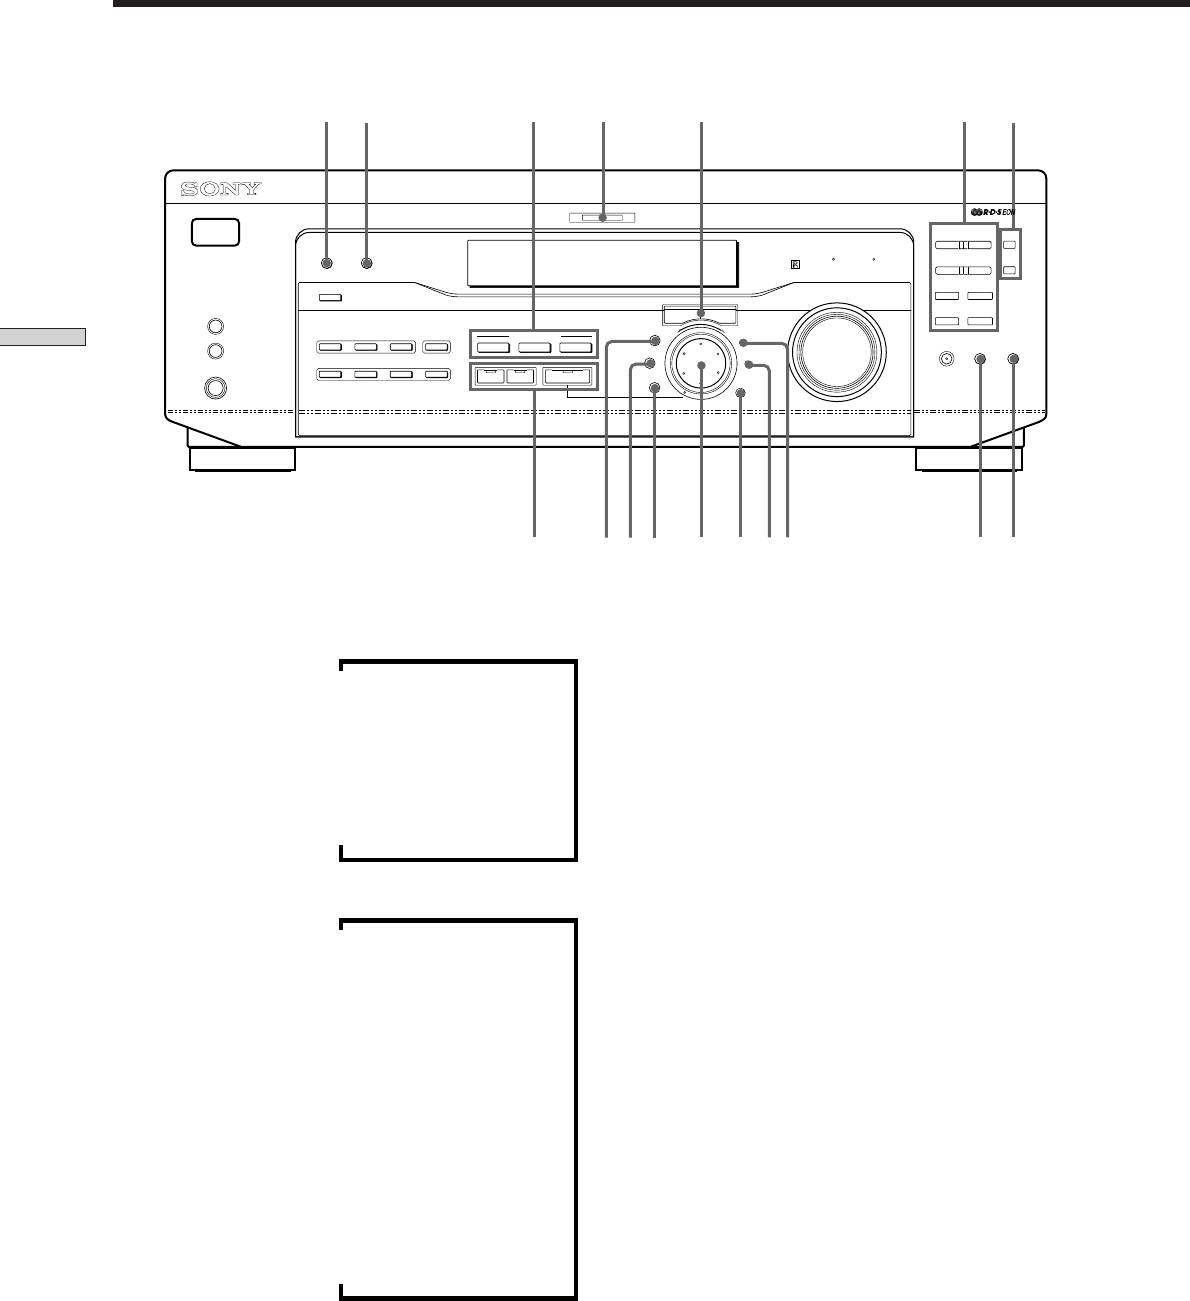
Front Panel Parts Description
8 qa w;qs
qh qg9
MULTI CHANNEL DECODING
? / 1
PRESET/
– PTY SELECT +
SHIFT
DIMMER
DISPLAY
BASS BOOST TONE
– TUNING +
MEMORY
FM/AM
FM MODE
INPUT MODE
MASTER VOLUME
SPEAKERS
R ON r OFF
A
I
i
RDS EON RDS PTY
VIDEO
DVD/LD TV/SAT
5.1CH INPUT
CINEMA STUDIO
–
+
B
LEVEL
MUTING
BASS
A B C
SET UP
BOOST
TONE
Location of Parts and Basic Amplifier Operations
MD/TAPE CD TUNER AUX
SOUND FIELD
SUR
NAME
PHONES
A. F. D.
2CH MODE
BASS/
TREBLE
ENTER
q;
qkql wswdwfwaqj
qd qf
8 DISPLAY button
* Index name appears only when you have assigned one to the
Press repeatedly to change the information on the
component or preset station (see page 45). Index name does not
display window as follows:
appear when only blank spaces have been entered, or it is the
same as the function button.
v
** These indications appear only during RDS reception (see page
Index name of the component
41).
v
FUNCTION button indication
9 DIMMER button
Press repeatedly to adjust the brightness of the display.
v
Sound field applied to the program source
0 Use the SOUND FIELD buttons to enjoy surround
sound. For details, see “Enjoying Surround Sound”
starting from page 27.
When the tuner is selected
A.F.D. button / indicator
v
Index name of the preset station* or program
Press to set the receiver to automatically detect the
station name**
type of audio signal being input and perform proper
v
decoding (if necessary).
Frequency
2CH button / indicator
v
Press to output sound from only the front (left and
Program type indication**
right) speakers.
v
Radio text**
MODE button / indicator
v
Press to activate the sound field selection mode (page
Current time
28).
v
qa MULTI CHANNEL DECODING indicator
Sound field applied to the band or the preset
This indicator lights up when the unit is decoding
station
signals recorded in a multi channel format.
GB
24

qs Use the CINEMA STUDIO buttons to enjoy the
TUNING +/– buttons
CINEMA STUDIO sound effects.
Scan all the available radio stations.
A/B/C buttons
FM/AM button
Press to activate the CINEMA STUDIO A, B or C
Selects the FM or AM band.
sound field (page 29).
FM MODE button
qd BASS BOOST button
If “STEREO” flashes in the display and the FM stereo
Press to increase the bass of the front speakers. The
reception is poor, press this button. You will not have
BASS BOOST indicator lights up when the function is
the stereo effect but the sound is improved.
turned on.
Location of Parts and Basic Amplifier Operations
RDS EON button
qf TONE button
Press to set the receiver to automatically switch to
Press to turn the tone effect on or off. The TONE
stations broadcasting traffic announcements, news, or
indicator lights up when the tone is turned on.
information program. The RDS EON button does not
When you adjust the tone using the BASS/TREBLE
function during AM reception.
parameters (page 35), the settings are stored automati-
cally and can be reproduced whenever you turn on the
RDS PTY button
tone.
Press to scan stations by program type. The RDS PTY
button does not function during AM reception.
z When you want to listen to an analog source without any
digital processing
qj LEVEL button
Do the following to bypass the sound field, tone, and bass
Press to activate the speaker level parameters (page
booster circuits.
34). The indicator on the button lights up and you can
1 Press 2CH.
adjust the various speaker level parameters (front
2 Press BASS BOOST to turn off the BASS BOOST indicator.
balance, rear balance, etc.).
3 Press TONE to turn off the TONE indicator.
Press again to turn off the indicator.
The result will be a sound that is highly faithful to the program
source.
qk SUR button
Press to activate the surround parameters (page 33).
qg The following buttons operate the built-in tuner. For
The indicator on the button lights up and you can
details, see “Receiving Broadcasts” starting from page
adjust the various surround parameters (effect level,
37.
wall type, etc.).
Press again to turn off the indicator.
SHIFT button
Selects a memory page for preset stations.
ql BASS/TREBLE button
Press to adjust the tone (page 35).
MEMORY button
Press to memorize a preset station.
w; Cursor buttons (
/ )
Press to select various speaker level, surround, and
qh The following buttons operate the built-in tuner. For
bass/treble parameters (etc.).
details, see “Receiving Broadcasts” starting from page
37.
PRESET/PTY SELECT +/– buttons
Scan all preset stations.
Select program types during PTY operations.
GB
25

Front Panel Parts Description
wa Jog dial
Turn to adjust the selected speaker level, surround,
and bass/treble parameters (etc.).
ws SET UP button
Press to activate the setup mode, then use the cursor
buttons (w;) to select any of the following indications.
You can then make various settings using the jog dial
(wa).
When you select You can
Location of Parts and Basic Amplifier Operations
Speaker type Specify the type of speakers.
(page 16)
Speaker setup Specify the front, center, rear
speaker sizes, the rear speaker
position, and whether or not you
are using a sub woofer. (page 16)
Speaker Distance Specify the front, center, and rear
speaker distances. (page 18)
5.1CH video input Specify the video input to be
used with the audio signals from
the 5.1CH INPUT jacks. (page 47)
wd NAME button
Press to activate the name function and enter names
for preset stations and program sources (page 45).
wf ENTER button
Press to enter individual characters for the preset
station and program source names.
GB
26


