Sony DAV-SC8: Step 1: Speaker System Hookup
Step 1: Speaker System Hookup: Sony DAV-SC8
Step 1: Speaker System Hookup
Connect the supplied speaker system using the supplied speaker cords by matching the colours of the
jacks to those of the cords. Do not connect any speakers other than those supplied with this system.
To obtain the best possible surround sound, specify the speaker parameters (distance, level, etc.) on
page 21.
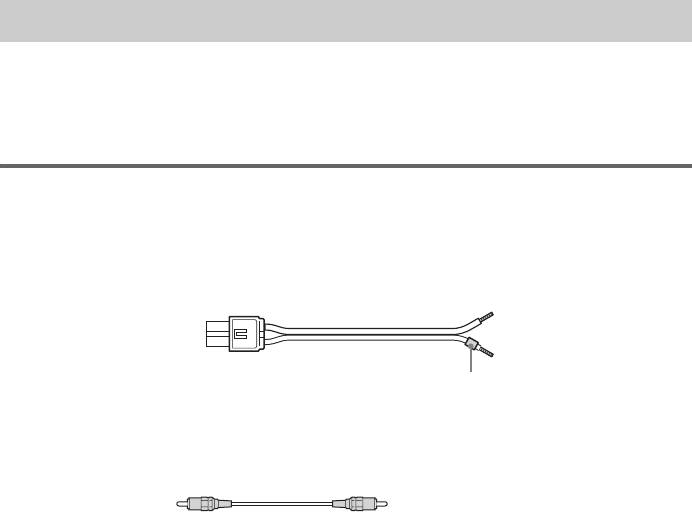
Required cords
Speaker cords
The connector and the colour tube of the speaker cords are the same colour as the label of the jacks to
be connected.
(–)
(–)
(+)
(+)
colour tube
Subwoofer cord
Connect the cord to the SUB WOOFER AUDIO OUT jack on the rear panel of the system.
GB
12
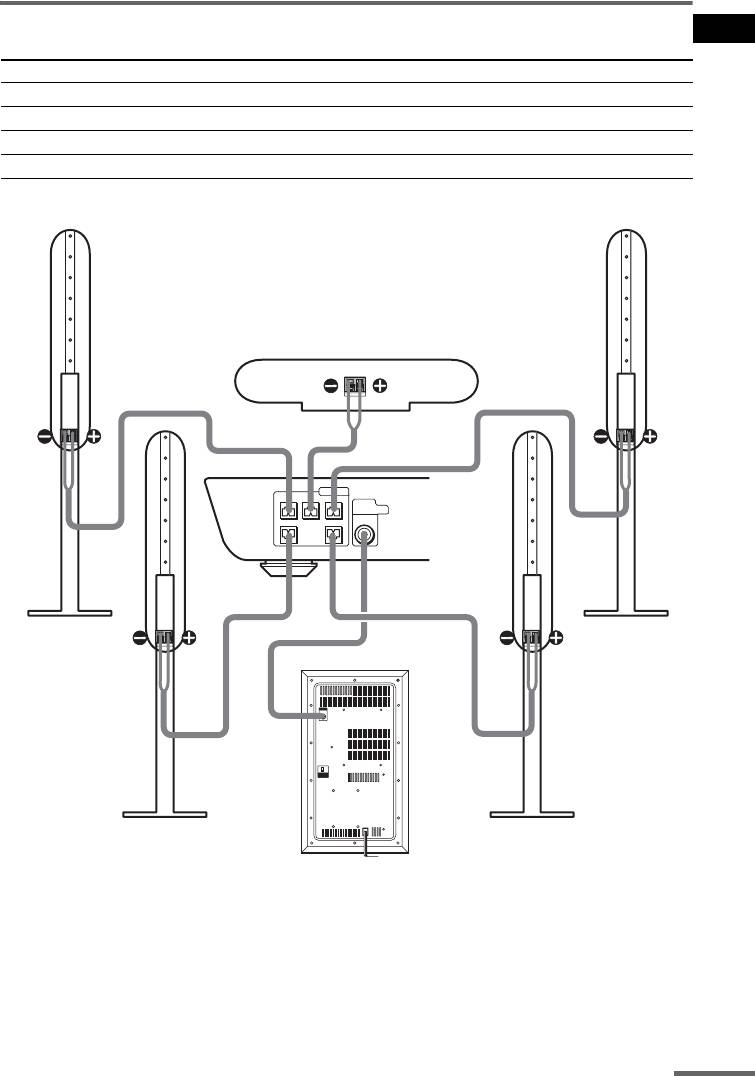
Terminals for connecting the speakers
Getting Started
Connect the To the
Front speakers SPEAKER FRONT L (white) and R (red) jacks
Surround speakers SPEAKER SURR L (blue) and R (grey) jacks
Centre speaker SPEAKER CENTER (green) jack
Subwoofer SUB WOOFER AUDIO OUT jack
Front speaker (R)
Front speaker (L)
Centre speaker
SPEAKER
CENTER FRONT LFRONT R
SUB
WOOFER
AUDIO
SURR LSURR R
OUT
LINE
IN
OFF
AUTO
SAVE
POWER
Surround speaker (R)
Surround speaker (L)
Subwoofer
Note on placing speakers
Use caution when placing the subwoofer or a speaker stand (not supplied) that is attached with the
front/surround speakers on a specially treated (waxed, oiled, polished, etc.) floor, as staining or
discoloration may result.
continued
GB
13
Note
Do not catch the speaker cable insulation in the SPEAKER jack.
Tip
Connect the speaker cable after bending the speaker wire at the end of the insulation. This prevents the speaker cable
from being caught in the SPEAKER jack.
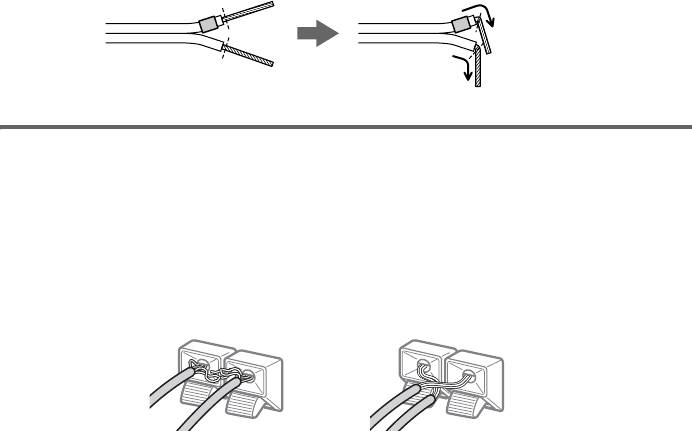
To avoid short-circuiting the speakers
Short-circuiting of the speakers may damage the system. To prevent this, be sure to follow these
precautions when connecting the speakers. Make sure the bare wire of each speaker cord does not touch
another speaker jack or the bare wire of another speaker cord.
Examples of poor conditions of the speaker cord
Stripped speaker cord is
Stripped cords are touching
touching another speaker
each other due to excessive
terminal.
removal of insulation.
After connecting all the components, speakers, and mains lead, output a test tone to check that all the
speakers are connected correctly. For details on outputting a test tone, see page 68.
If no sound is heard from a speaker while outputting a test tone, or a test tone is output from a speaker
other than the one currently displayed in the front panel display, the speaker may be short-circuited. If
this happens, check the speaker connection again.
Note
Be sure to match the speaker cord to the appropriate terminal on the components: 3 to 3, and # to #. If the cords
are reversed, the sound will lack bass and may be distorted.
GB
14
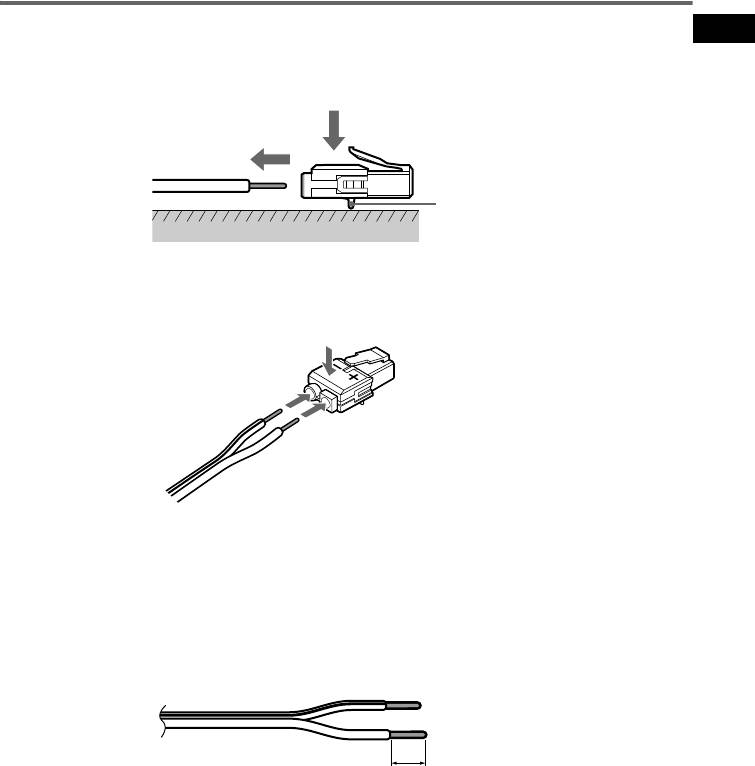
To change the speaker cables
Getting Started
If you want to use a different speaker cable, you can detach the plug for attachment to another cable.
Detaching
Catcher
With the catcher facing down, press and hold the plug down against a flat surface and remove the cords
from plug.
Attaching
While pressing the plug down against a flat surface, insert the new speaker cords.
Note that the cord marked with a line should be attached to the minus (-) side of the plug.
Note
Be careful not to damage the surface you use (desk, etc.) when attaching/detaching the speaker cords.
Tips
• You can use any commercially sold speaker cable of gauge cord AWG #18 - AWG #24.
• Before attaching a new cable, strip off 10 mm ( 13/32 in.) of its insulation and twist the bare wires of both cords.
10 mm
GB
15
Оглавление
- Welcome!
- Precautions
- Table of Contents
- About this Manual
- Notes about Discs
- Guide to the Control Menu Display
- Inserting Batteries into
- Step 1: Speaker System Hookup
- Step 2: Aerial Hookups
- Step 3: TV and Video Component Hookups
- Step 4: Connecting the Mains Leads
- Speaker Setup
- 5 Load a disc.
- Resuming Playback from Using the DVD’s Menu the Point Where You Stopped the Disc
- Playing VIDEO CDs with
- Playing an MP3 Audio Track
- 4 Select (TRACK) using X/x
- 5 Select a file using X/x and press
- 1 Press M while displaying a JPEG
- 2 Press c. Creating Your Own
- 6 Press H to start Program Play.
- Playing Repeatedly
- Searching for a Particular
- Searching for a Title/
- 1 Press DVD DISPLAY.
- 5 Press ENTER.
- 1 Press DVD DISPLAY during playback.
- 2 Press X/x to select (AUDIO),
- Enjoying Surround Sound
- Using the Sound Effect
- 3 Press ENTER or c.
- 3 Press X/x to select the language. Displaying Subtitles
- 3 Press X/x to select (CUSTOM
- 5 Enter your 4-digit password by using
- 3 Press X/x to select “PARENTAL
- 5 Press X/x to select “STANDARD,” then
- 1 Insert the disc and press H.
- Controlling TV with the
- Using the Video or Other
- 5 Press ENTER. Enjoying the Radio
- 1 Press FUNCTION repeatedly until FM
- 5 Press ENTER.
- Using the Radio Data Using the Sleep Timer System (RDS)
- To change the brightness Returning to the default of the front panel display settings
- 2 Press X/x to select the setup item from
- Setting the Display or
- Settings for the Display
- Custom Settings
- Settings for the Speakers
- 1 Press DVD SETUP in stop mode.
- 1 Press AMP MENU repeatedly until the
- Troubleshooting
- Specifications
- Glossary
- Index to Parts and Controls
- Language code list
- DVD Setup Menu List
- Index
- От фирмы- изготовителя!
- Содержание
- О данном руководстве На данной системе можно воспроизводить
- Примечания
- Руководство по дисплею меню управления
- Установка батареек в
- Пункт 1: Подключение системы громкоговорителей
- Пункт 2: Подключение антенн
- Пункт 3: Подключение телевизора и видеоаппаратуры
- Пункт 4: Подключение провода электропитания
- Настройка АС
- 4 Нажмите кнопку POWER на
- Возобновление
- Использование меню
- Воспроизведение VIDEO
- Воспроизведение
- 4 Выберите (PA3ДEЛ) с
- Воспроизведение файлов изображений JPEG
- 1 Нажмите кнопку M во время
- Создание собственной программы
- 2 Нажмите кнопку c. 5 Чтобы запрограммировать другие
- Воспроизведение в
- Неоднократное
- 3 Выберите параметр повторного
- Поиск определенного
- Поиск главы/раздела/
- 3 Нажмите кнопку X/x для выбора
- 3 Нажмите кнопку ENTER или c.
- Просмотр информации о
- 1 Во время воспроизведения нажмите
- 2 Нажмите кнопку X/x для выбора
- 4 Нажмите кнопку ENTER.
- Прослушивание
- Использование
- Смена ракурсов
- 3 Нажмите кнопку X/x, чтобы выбрать
- 1 Вставьте диск, который требуется
- 5 Введите 4-значный пароль, 1 Вставьте диск, для которого
- 3 Нажмите кнопку X/x, чтобы выбрать
- 5 Нажмите кнопку X/x, чтобы выбрать
- 1 Вставьте диск и нажмите кнопку H.
- Управление
- Использование видео- Прослушивание или других устройств радиоприемника
- 3 Нажмите кнопку MEMORY.
- 1 Несколько раз нажмите кнопку
- 4 Создайте индексное название с
- Использование таймера Для изменения яркости отключения дисплея передней панели
- Восстановление
- Использование дисплея установок
- 4 Выберите установку, используя
- Установки для дисплея
- Пользовательские
- Установки для громкоговорителей
- 1 В режиме остановки нажмите
- 1 Несколько раз нажмите кнопку AMP
- Поиск и устранение
- Технические
- Глоссарий
- Указатель деталей и органов управления
- Перечень кодов языков
- Список меню настройки DVD
- Указатель

